


The Zoidberg Project, Part 10: Mold Finishing and Foam Latex
This week, Frank finishes up the mold for the Zoidberg sculpture by affixing bolts and T-nuts to the two halves and creating core-inserts for the costume animatronics. We're just about ready for the test casting of the mask, so Frank gives a brief history on foam latex to explain why it's such a tricky and fascinating makeup material.
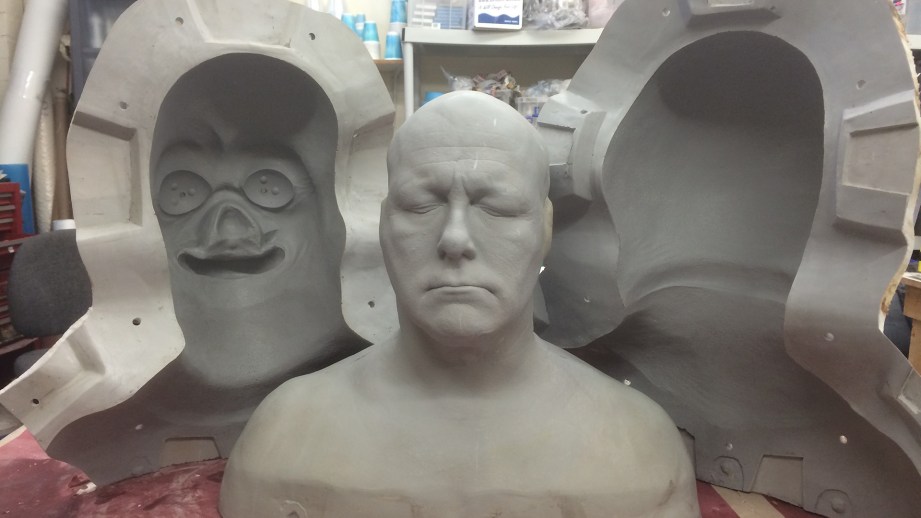
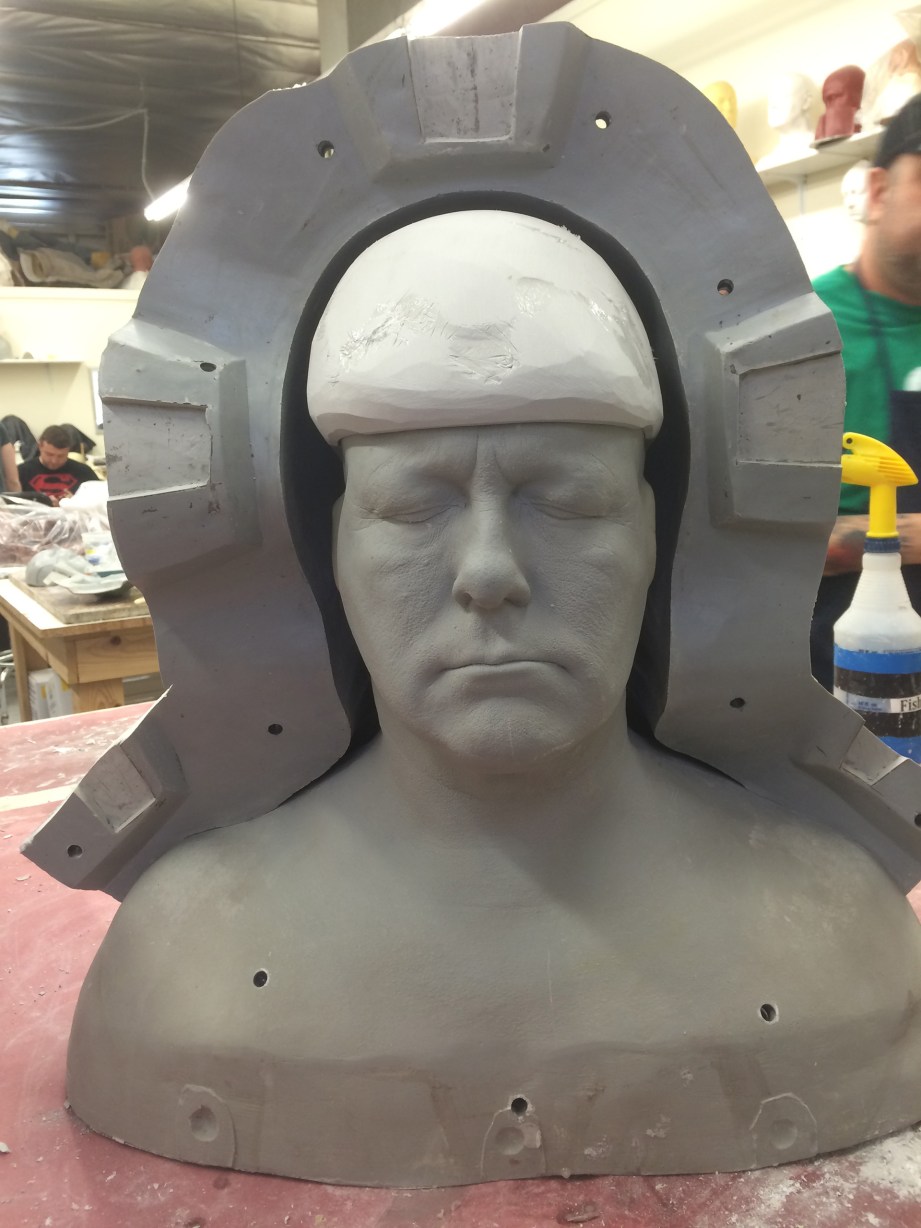
The primary mold for the Zoidberg sculpture is complete, but there are still a few things to do to make this mold functional for casting masks. The first thing I need to do is to drill the bolt holes and add T-nuts to the flange of the mold (the flat parts around the outside that connect the two halves together). Because of the rigidity of the flange, I don’t need to put a gajillion bolts in it to keep the mold stable. I start by drilling in a few typical places: near the bottom at the end of the flange, in the middle (corner of the neck) and up at the top of the head (one on either side of the large registration key).
When I’m placing my bolt holes, I need to pay attention to how close/far away from the sculpture they are. I like getting them as close to the sculpture as possible to keep the mold tight, but keeping in mind the outside of the mold–meaning that if I put the hole too close to the sculpture, I won’t be able to get a bolt through the flange. This usually ends up being about an inch or inch and a half from the sculpture. Sometimes, my process leaves a bunch of extra land on the flange, but I like having that extra land for when I’m prying the molds open. If the flange is too short, you can barely get a pry bar or screwdriver in between them to get any leverage for prying. It’s all about finding happy mediums.
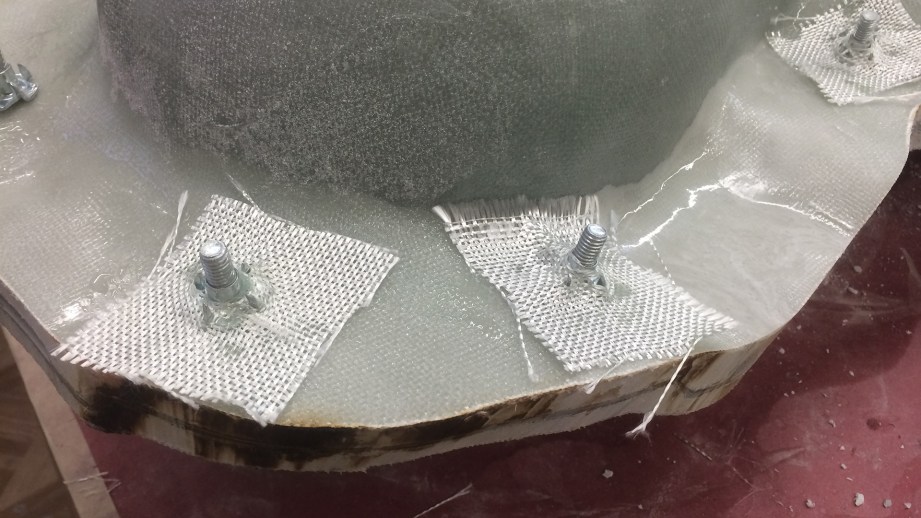
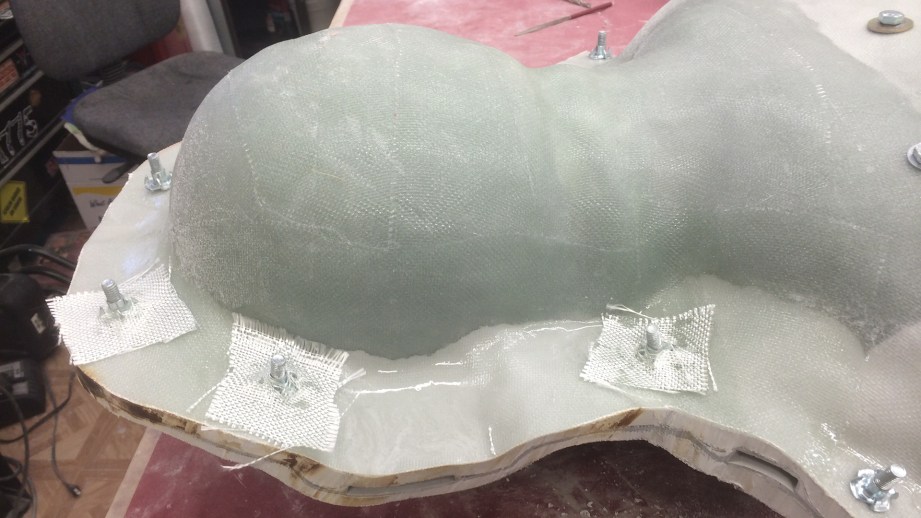
To make the mold easier to open and close, I love using T-Nuts. These are little nuts with a flat flange and teeth on them. This makes it so I can glass them onto the outside of the mold and then they won’t spin. Since I don’t have to fumble with the nuts when bolting and un-bolting the mold, I have the t-nuts permanently attached on the back side. To do this, first I brush a little wax onto the bolt (just to ease the removal) and tighten the T-nut onto it. I cut small squares of the glass cloth and mix up a small amount of freefrom air dough. By spreading the weave a tiny bit in the center of the square, I can push it over the T-nut and laminate it onto the flange with a little Epoxamite 102. Then I’ll take a tiny bit of dough and put it around the T-nut and laminate one more square of glass to sandwich it all together. Once this is set up, I’ll trim any glass that might be hanging over the edge, and back the bolts out and sand off any glass or resin that is still sticking up where the bolt used to be.
On both the head and the tentacle molds, I need to make another core-insert to accommodate where the animatronics will eventually be housed. The size of this core insert is determined by how thick the sculpture is, so I have to figure out how much space I have. I took the extra time to only scrape half the clay off the core, so I could see a cross section of the sculpture thickness. It doesn’t always work out this way, sometimes the clay will stick to the negative part of the mold, and then I can’t use this trick. I just happened to luck out. When I look at the cross section of the clay thickness I see that I have plenty of room in the top of the head, and I think I can core about 3/8″ out of there and not have any risk of seeing a lump in the top of the head when I put in the core-insert.
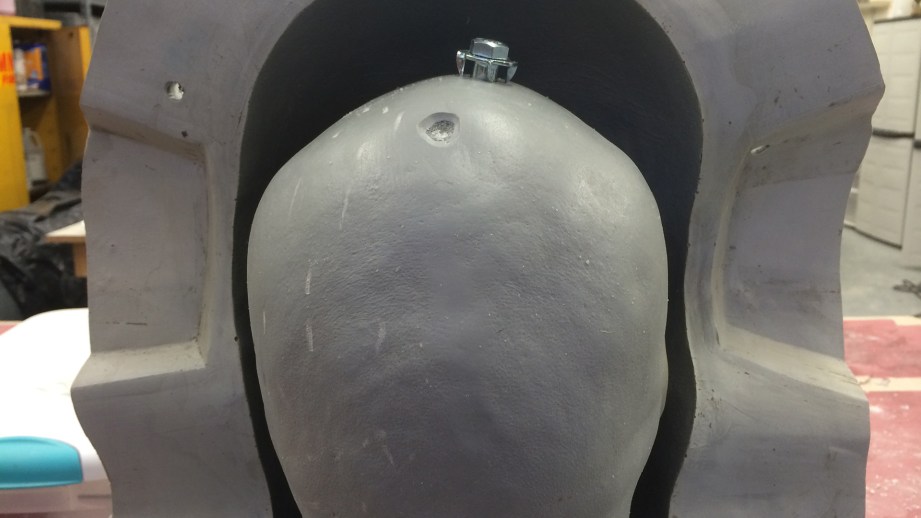
Using the clay cutter I’ve previously made with multiple thicknesses, I use the appropriate side to cut a bunch of slabs of water clay (em210) and press them into the negative. This is all covered with some plastic wrap to ease in the cleanup. On the top of the core, I also want to make some registration points for this insert. I have a few sizes of round router bits that I use as a key cutter, and use those to buzz in three contact points in the top of the head. I then drill a hole where the bolt that holds the core in will go. I wax up the top of the head core, add a bolt and then spin on a T-nut, but this time facing the other way. With a little bit of glass cloth and some epoxamite, I thread it in between the teeth of the T-nut and tap it down. This will make the contact point and bolted section stronger and resistant to pulling out of the insert a bit. By confirming with the picture of clay half removed from the core, and a picture of the core just set inside the negative, I can visually estimate how much volume I think it’s going to be, and mix up that much freefrom air. Some of this will get pressed onto the top of the head, and some will get pressed onto the plastic wrap, then the whole thing closed and bolted up. The next morning, I can crack it open, clean the water clay off, and pop this new core-insert off the head, and sand the edges smooth and even on a belt sander.
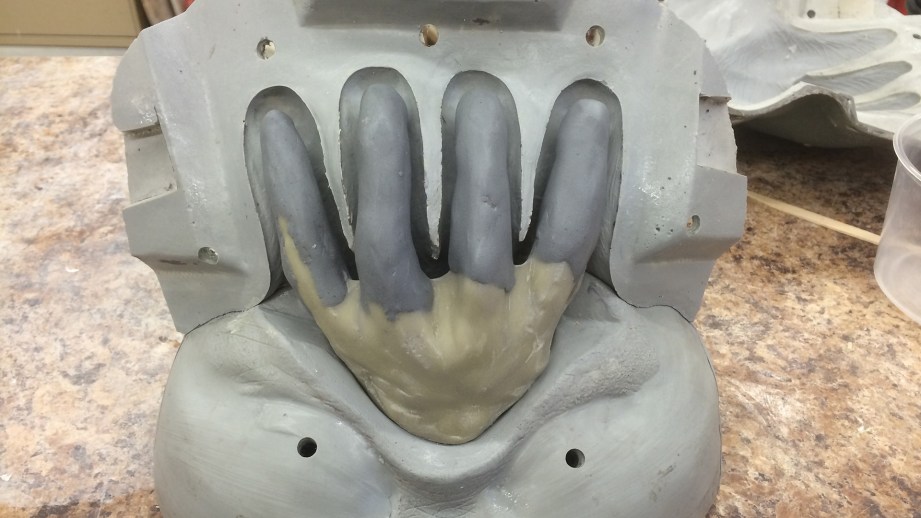
Now I need to do a similar process for the tentacles. First I hit the whole thing with Ease Release 200 to make sure the resin that I will inject won’t stick to the mold, then I take some soft Sculptex clay and roll it out to about 3/16″and lay this into each half of the negatives. This will represent the thickness of foam latex I will eventually get. On the positive section of the mold, I drill a hole in the center and put a bolt and T-nut on there. I also drill two small ¼-inch holes on either side to serve as injection points for the resin. Once this is all bolted back up and turned upside down, I grab a large syringe and inject some Smooth Cast 380 into one hole, and plug the other one with a small wad of clay as soon as it starts flowing out. If I leave the syringe in there it will maintain a bit of back pressure and the resin level will not drop. Once this is set up in about two hours, I can crack it open and clean everything out. This core is a little misshapen for my taste, so to just round out the “fingers” I Drexel down the sharp points and then use a little pro-poxy to beef up the forms and smooth it all out. Boom, now the core-inserts are done!!
Now comes the foam run! My friend Roland Blancaflor is the best foam runner in the industry and has some mystical formulas and additives and methods to his madness, which I don’t even know. So I’ll just explain the basics of foam latex, which worked just fine for me until I met Roland and saw his amazing work.
First, a brief history of foam latex. In the 1930’s, makeup artist George Bau was making props from foam latex for Paramount. In 1937, Perc Westmore brought him into the Warner Bros makeup department, and he used it on films like “Hunchback of Notre Dame” and “The Wizard of Oz,” among others. 1955 was the first year that Dick Smith (The Godfather, The Exorcist) used foam latex in production, which was taught to him by George Bau. in 1974, Bau gave his formula to Charles Schram, and in 1985 he sold it to Tom Burman. Tom burman employed Gil Moscow who broke off and make GM foam, which was sold off a few years ago to Namies Beauty (who now owns Burman Industries). In 1978, Tom McLaughlin started working for Jim Henson on The Dark Crystal, and eventually compounded his own foam system too. This was later taken over by Alcone. Then in the early 2000’s Monster Makers hired Tom to re-compound the foam, and it has been since reformulated again and is Monster Makers’ own brand. There’s a long history to the many uses and formulas of foam latex, and my point is that it’s not the same material that has been used in Hollywood since the 30s–each variation has a life and legacy of its own.
Foam Latex is typically four components that need to be accurately measured out and added at different times in the run schedule. First is the latex base, mixed with a foaming agent and curing agent in a Sunbeam, Kitchen Aid or Hobart mixer (depending on the volume that you are mixing). The first part of the mixing schedule is a fast speed, meant to whip the latex into a froth. Then the next steps are slower speeds–refining stages meant to break the large and inconsistent bubbles down into smaller and more consistent sizes. Finally, the last stage is a slow speed where you add in a gelling agent that will cause the foamed latex to congeal.
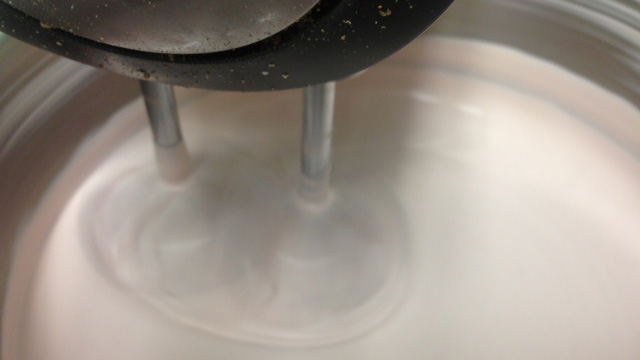
The amount of this additive and variations on the time of the first few stages will help predict the amount of time you have to get the foam injected into your mold. There are also other additives available to add to your concoction. Some are flow increasers that help the mixture flow into small details, some are stabilizers to help the foam cure up if it’s too cold or hot or there are other inconsistencies. And there are softeners you can add too. Once this is all mixed and injected into the mold, it needs to be baked. This epoxy that I used is not rated for high temperatures, so it needs to be baked at under 140 degrees. There are other epoxies that have upwards of 300 degree ratings, but I don’t need that for foam latex. 140 is plenty to bake the foam.
All of this is a skill that (like everything else) needs to be practiced and worked at. There are a million variables and things that can go wrong. This is why I now just take my molds to Roland. It’s just easier that way, and I don’t need to have an oven or whip up stinky latex in my shop.
Once it’s baked out, the mold is opened, and the skin can be taken off the cores. This first skin will just be a test skin. This is similar to what I sent Adam last year for his Admiral Ackbar mask before Comic-Con. I’ll use this to test paint, and evaluate thicknesses for the animatronics. Once it’s determined that the thickness is good enough, I’ll have Roland run another set and get the seams trimmed and patched up with smaller batches of foam latex and heat-gunned to bake the patched sections.
Today, there are a few brands of foam latex available, Monster Makers, Alcone, And GM. Pretty much any of these will work just fine with a little bit of practice and tinkering of additives and run times to suit your climate and elevation. Each of the brands comes with some info sheets with suggested run schedules and measurements. These are a good starting point, and with a bit of trial-and-error, you will find a schedule that works for you. Roland also has a pre-made prosthetic line that he sells to the general public. I have a few sculptures that I have done for him that are available to buy. Check his website or Facebook for info and pictures!
Thanks to Iwata-Medea and Smooth-On for providing materials and sponsoring this project.


4 thoughts on “The Zoidberg Project, Part 10: Mold Finishing and Foam Latex”
Leave a Reply

One Day Builds
Adam Savage’s One Day Builds: Life-Size Velocirapt…
Adam embarks on one of his most ambitious builds yet: fulfil…

Show And Tell
Adam Savage’s King George Costume!
Adam recently completed a build of the royal St. Edwards cro…

All Eyes On Perserverance – This is Only a Test 58…
We get excited for the Perserverance rover Mars landing happening later today in this week's episode. Jeremy finally watches In and Of Itself, we get hyped for The Last of Us casting, and try to deciper the new Chevy Bolt announcements. Plus, Kishore gets a Pelaton and we wrack our brains around reverse engineering the source code to GTA …

One Day Builds
Mandalorian Blaster Prop Replica Kit Assembly!
Adam and Norm assemble a beautifully machined replica prop k…
House of MCU – This is Only a Test 586 – 2/11/21
The gang gets together to recap their favorite bits from this past weekend's Superb Owl, including the new camera tech used for the broadcast and the best chicken wing recipes. Kishore shares tips for streamlining your streaming services, and Will guests this week to dive into the mind-bending implications of the latest WandaVision episod…

One Day Builds
Adam Savage’s One Day Builds: Royal Crown of Engla…
One of the ways Adam has been getting through lockdown has b…

Making
Adam Savage Tests the AIR Active Filtration Helmet…
Adam unboxes and performs a quick test of this novel new hel…

Making
Weta Workshop’s 3D-Printed Giant Eyeballs!
When Adam visited Weta Workshop early last year, he stopped …

One Day Builds
Adam Savage’s One Day Builds: Wire Storage Solutio…
Adam tackles a shop shelf build that he's been putting off f…

Show And Tell
Mechanical Dragonfly Automata Kit Build and Review
Time for a model kit build! This steampunk-inspired mechanic…
Love Frank Ippolito’s work, I wish he would upload more youtube clips on his page! His tutorial stuff is great, looking forward to (hopefully) meeting him at IMATS in Brisbane 😀
have ya signed up for my seminars at the Pro Makeup and Beauty Show (not imats) in Brisbane? id love to do more videos, i just am so slammed with work that i don’t have any free time to get to it! but i promise that i have some fun ideas in the works for when i do have time!
No I haven’t just yet but in the process of looking into it to see if i can as im currently in Sydney and at uni studying to get my diploma in TV/Movie and special fx. I’m hoping that I can get the time off and the money together to go up for the weekend and attend the shows! Completely understandable about time, looking forward to seeing future projects though ^.^ thanks for the reply!
Thanks so much Frank! I’ve always wanted to learn more about foam latex, and information regarding it can be pretty scarce on the internet. I can’t wait for the next part!