How To Make A Replica Hybrid Mercury IV Pressure Suit
How costumer Elizabeth Galeria fabricated this replica spacesuit to meet Adam's specific requirements and cosplaying needs.
(Editor’s note: One of Adam’s favorite costumes is his Mercury program spacesuit, which we’ve previously featured here on Tested. It’s one of the costumes he wore at this year’s Comic-Con. Elizabeth Galeria of The Magic Wardrobe, who made the costume in collaboration with Adam, reached out to us to share the process of designing and patterning this suit to meet Adam’s specific needs and requests. This is the first in a series of articles in which Elizabeth and her partner explain their fabrication process fort his project. Feel free to ask Elizabeth–Tested user “antylyz”–questions directly in the comments section below.)

An accurate replica of any costume or prop is only as good as the source images and what budget a “detail enthusiast” is willing to spend to get what’s envisioned. When Adam approached me to make him a Mercury suit, his celebrity factored into my quote. I really wanted to do this project having been a fan of MythBusters for many years.
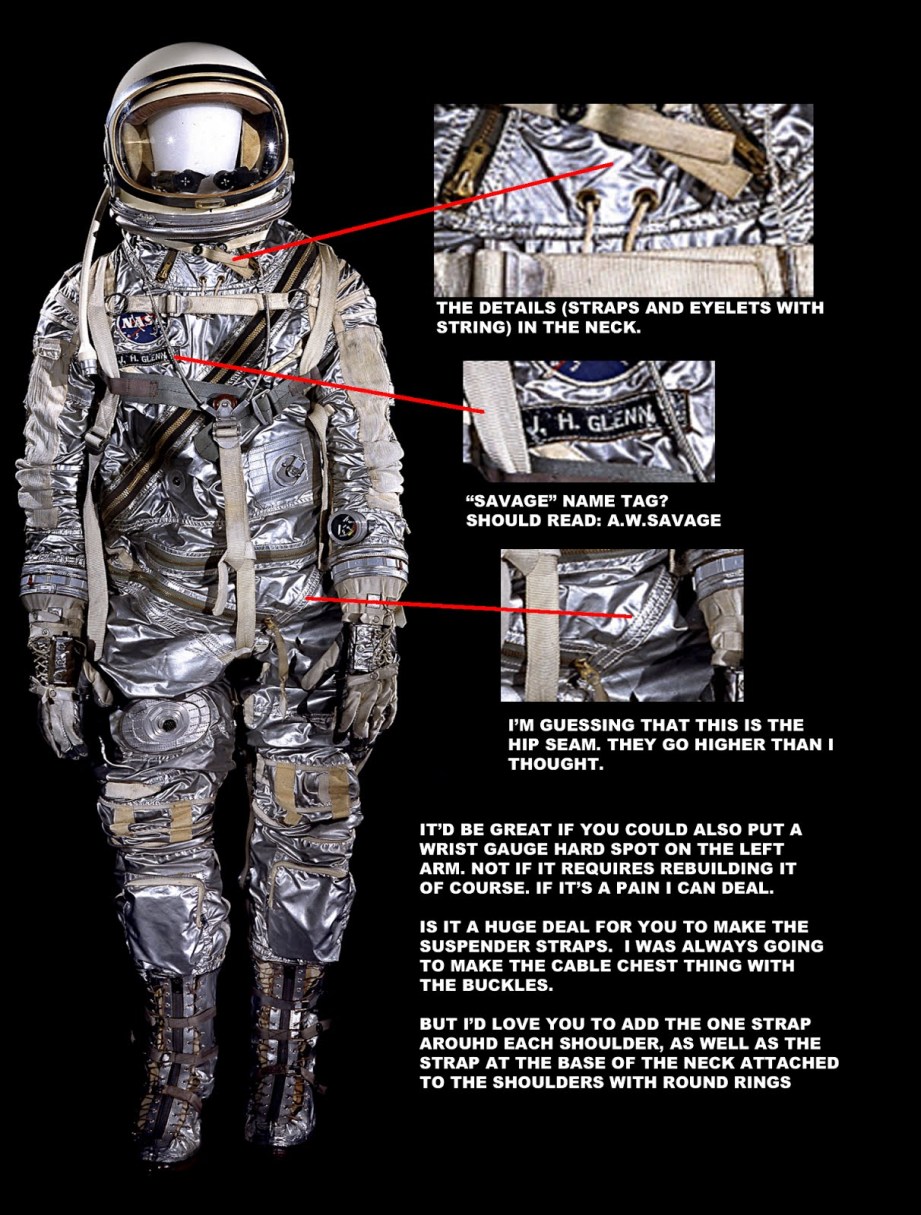
Adam had no shortage of images to show me so quoting him was pretty easy. It’s not often you get 100+ high-res images of the actual suits from the Smithsonian so I was able to count stitches-per-inch as is often the case needed for detail enthusiasts.
Adam was very specific that all he wanted was someone to do the “soft parts” and he would provide all the “hard parts,” which made the project easy. Adam was also very specific about what details he liked about the various iterations of suits used by NASA in the Mercury space program, and he focused on the following image in particular.
The biggest challenge in almost any replica costume or prop is finding the same or similar fabrics and materials used to make the original. Adam was very specific in describing the fabric he thought the original suit was made of. It’s something he has described in his videos about the suit.
1. Finding a Suitable Fabric
I tried to find something like the original source material, but I focused on finding something I knew would be affordable, “move well” when worn and accommodate alterations or modifications to requirements specifications changing as needed. Serious detail enthusiasts often have change order requests as projects evolve when their budget is flexible. Many clients go to extremes when it comes to getting what they want. They often spare no expense when they start seeing “in-progress” pictures and their vision and expectations are validated. But more on that later.
I always first send pictures of the fabrics selected to a client. Several fabrics were dismissed by Adam immediately, but that was expected. It’s a good way to gauge a buyer’s expectations and eye for detail. The hardest part of the job is finding the perfect fabrics and materials that we both like and will work well for costuming.
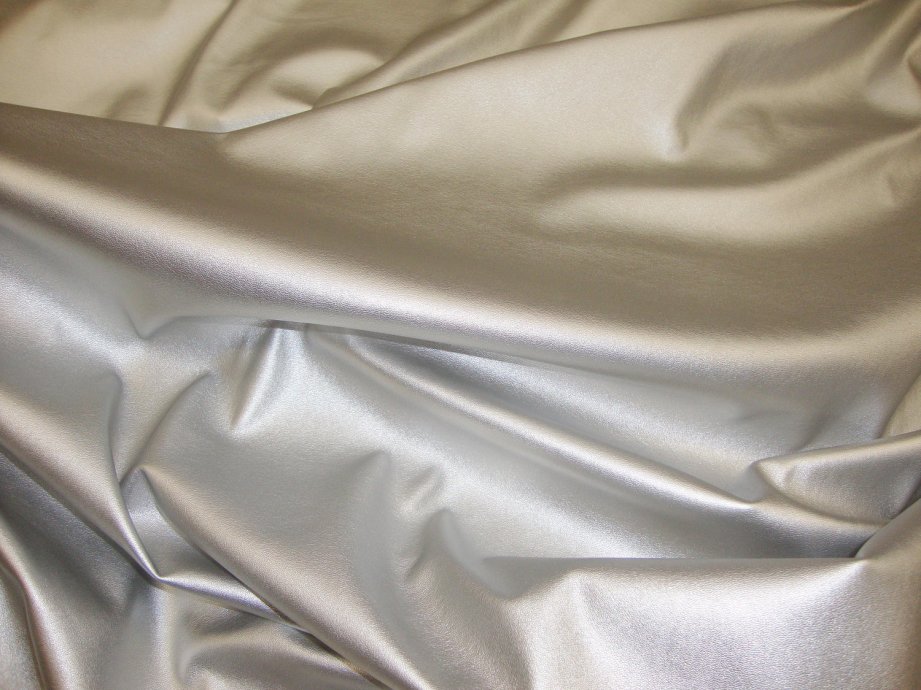
Adam didn’t initially choose the fabric finally selected by pictures alone. I knew I had to get fabric swatches, which aren’t always possible. Vendors either don’t sell swatches or you have to buy a minimum amount of yardage to even look at it. Frankly, there’s often no substitute for touching, feeling “the hand” of the fabric, how it moves and drapes in person. But I was able to get Adam the two final choices in person to inspect and approve.
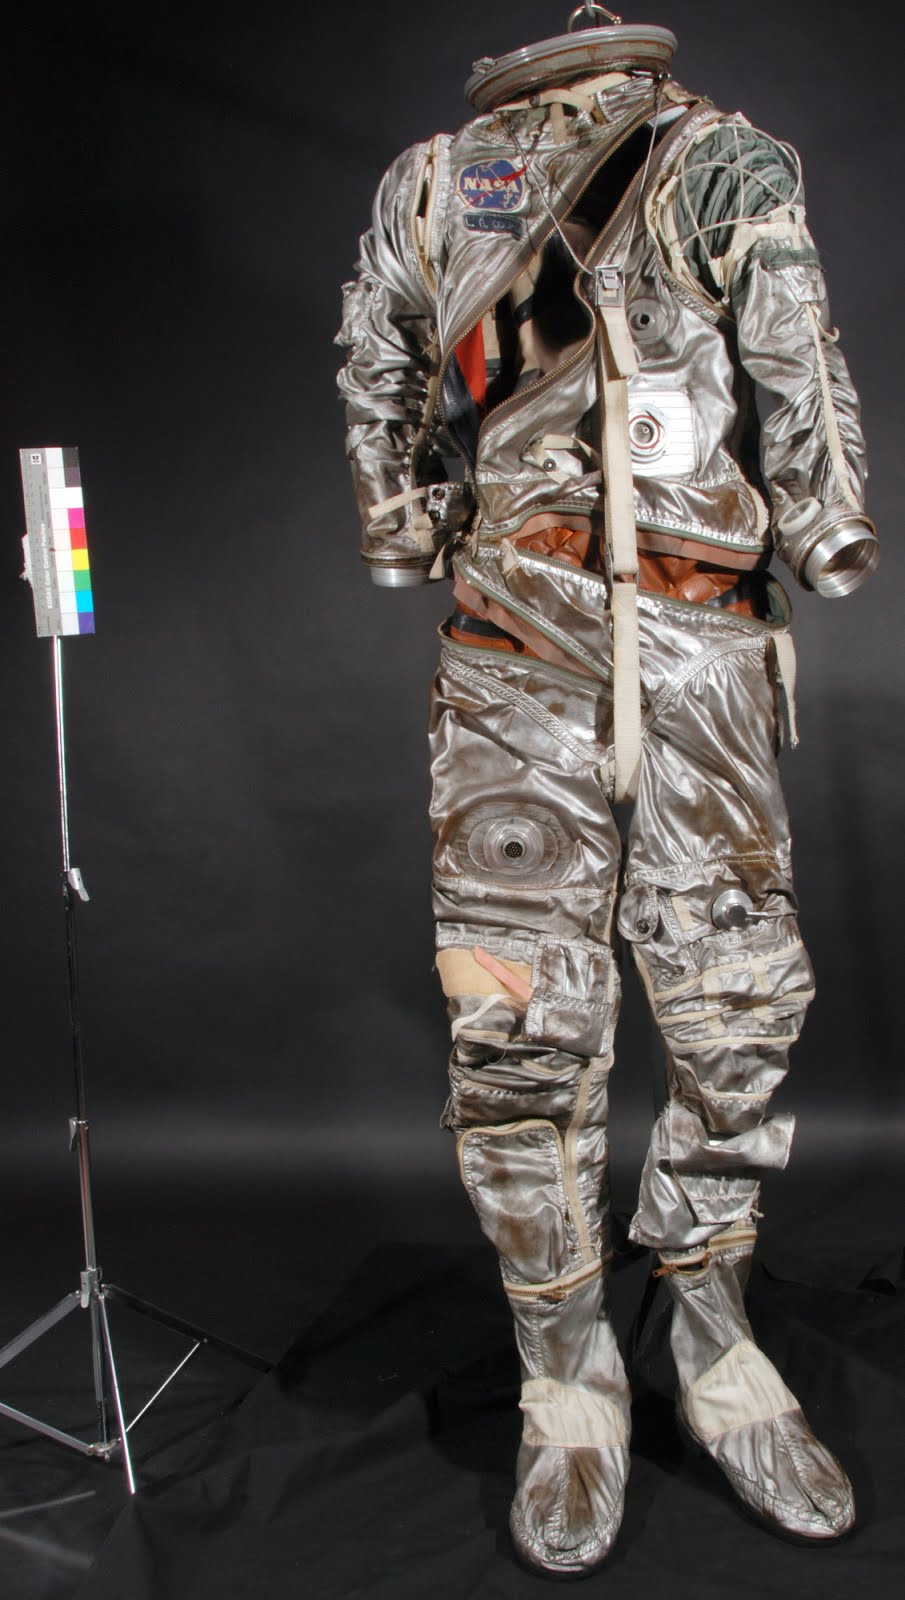
I almost always buy two or more fabric choices in enough quantity to have a back-up plan if something goes wrong. Sometimes, your first choice vendor sells everything in inventory just before you need it. For instance during the helmet build, Douglas and Sturgess in Richmond, CA ran out of the silicone Adam recommended and I had to drive to the San Francisco location to get it as we needed it the next day. (I’ll be covering the helmet build in a future article.) Projects can go sideways quick if you don’t have a back-up plan for some aspects of a project.
None of the local fabric stores had anything like I needed, including Britex Fabrics in San Francisco, which almost always has what I need but it’s usually my last resort. Adam even went to Britex himself when I told him there were no local sources for the fabric. I’ve found that many detail enthusiasts will go to any length to get perfect fabric, especially if it is screen-used. I will go to any length myself for the perfect fabric, including exceeding forecasted budget, making it if possible and having representatives go to the fabric marts in L.A., Chicago and N.Y.C. in fabric quests. Not kidding. One could produce a show like Adam Richmond’s Man vs. Food in quests for the best or widest range of quality fabrics sources. There are just an innumerable resources available.
As it turned out, Adam didn’t select the fabric I liked best out of the two final fabric swatches. I must admit I was initially frustrated and waited a few days before taking a persuasive stand on why I preferred his second choice. I anticipated this stand could be Adam’s first disappointment in his purchase. I didn’t realize until later after several instances of indecision and decisions needed that Adam is very flexible, highly communicative and reasonable about everything. Not many clients say up front that there’s no hurry. No deadline. I knew this project would turn out very well right then and it became a labor of love because I could really take my time and do some of my best work on a project I would enjoy. Circumstances like this just don’t come along that often. My experience usually is the higher the client expectations the more demanding the client relative to how much is spent.
I explained to Adam that the silver stretch clothing vinyl fabric I liked was better than his first choice because it would hide needle holes better if I had to make alterations or design changes and would “move” better than his first choice because it stretched slightly in two directions: side to side not up and down–or worse not at all.
I knew Adam would be wearing his suit when not displayed and it would have to endure some potentially rough treatment, alterations and potentially adverse conditions, such as in putting it on in haste. A suit like this requires help putting on. We got lucky and found not only a viable fabric in L.A., but a source that had a huge supply, so I bought enough to accommodate mistakes and new orders.
2. Measurements Needed and Desired, Muslin Prototype for Testing
With the fabric figured out, the next step was to make measurements. Let’s face it, no matter how much you spend on a costume or who makes it, it has to fit perfectly or you will not find as much value in the costume as you desire.
Most costume vendors sell standard sizes or a single one-size-fits-many. Our costumes are totally custom and hand-made to fit the intended client. I could make this suit fit anyone big and small and it would look correct. We ask for around 50 measurements on a costume like this. A designer/seamstress needs to consider what’s going to be worn underneath the costume as well.
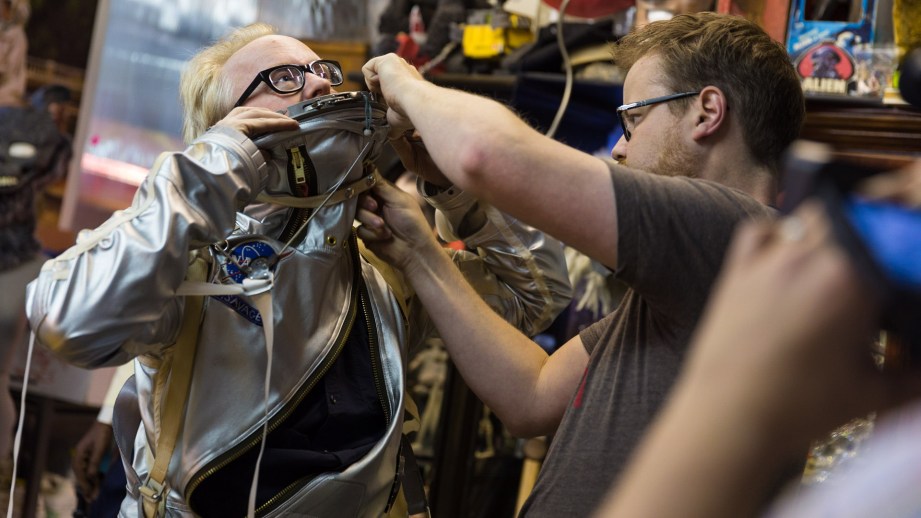
Frankly, when I see Adam’s Mercury costume pictures and the videos of him putting it on, I reflect on the choices made during fabrication. You must ask your client if the costume is going to be worn with clothing underneath, if so then with how many layers, and will the costume eventually be displayed on a mannequin and under what conditions. Some clients don’t bother to consider temperature for props or direct sunlight on fabrics. All of this matters.
Another important variable is how long the costume is going to be worn each day and where, because even with breathable fabrics you are going to get warm, even hot and sweat when you factor in helmet, gloves and boots, no air-conditioning and outside temperatures. What are your options for changing under garments or even changing a new shirt for the one you sweat through. For example, some clients will buy multiple shirts for our Han Solo costume.
I knew Adam was going to wear clothing underneath the suit, but I didn’t expect him to wear a shirt and medium to heavy jacket with pants as in one video of him getting dressed in the suit. This is not an easy suit to put on to begin with and I winced a few times imagining zippers, seams and stitches tearing as he put it on. Fortunately, I anticipated hard-wearing and it appears the suit is holding up very well as expected. Adam gets how the suit is constructed and should be put on which helps my work hold up.
One unintended option for the suit I thought about including was a NASA lining fabric designed to wick away perspiration. I used it for the cowl but I never completed the full suit lining as I hoped because I wanted to wait and see what kind of holes Adam would be making for all of his biometrics and accessories (and alterations desired). Eventually, I hope Adam will let me sew-in the inner suit NASA lining which will make the suit cooler to wear. I’d also suggest he wear a t-shirt and boxers but I heard somewhere he has ordered a special pair of long johns for the suit.
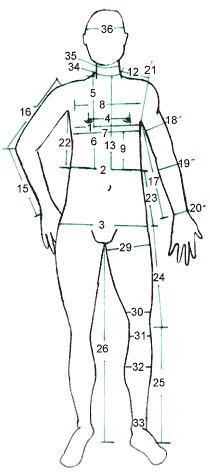
After Adam completed our measurements form, I had the opportunity to ask additional questions needed to get the right fit. Often, clients don’t understand certain important measurements, such as “girth” for a costume like this. That’s when I need the opportunity to help clients get it right. Always get help with measurements; never try to do it by yourself. Our work is only as good as the measurements we get!
The next step is the “muslin prototype” made from the pattern pieces which I sometimes make using an inexpensive similar type fabric and send the client for trying on. This is to make certain all the measurements given and specifications desired translate into a well-fitting prototype. I usually ask for front, side and back view pictures of the client wearing costume items to see for myself but Adam assured me it fit perfectly like a glove so I didn’t second guess him as this isn’t his first time through the sizing and fitting process. He returned the prototype made of the NASA fabric and I was ready for the next step: cutting the fabric.
3. Patterning and In-Progress Pictures
First to be cut were the sleeves. There are as many versions and designs of the Mercury IV suit sleeves as there are suits, boots and gloves versions. For Adam, the project called for a “hybrid” approach to the design that combined elements of a few of the suits. I don’t usually send clients pictures of my patterns but volunteered to do so with Adam because I felt that he could appreciate the in-progress work more than most.
Our hybrid sleeve pattern (version 1) is pictured here:
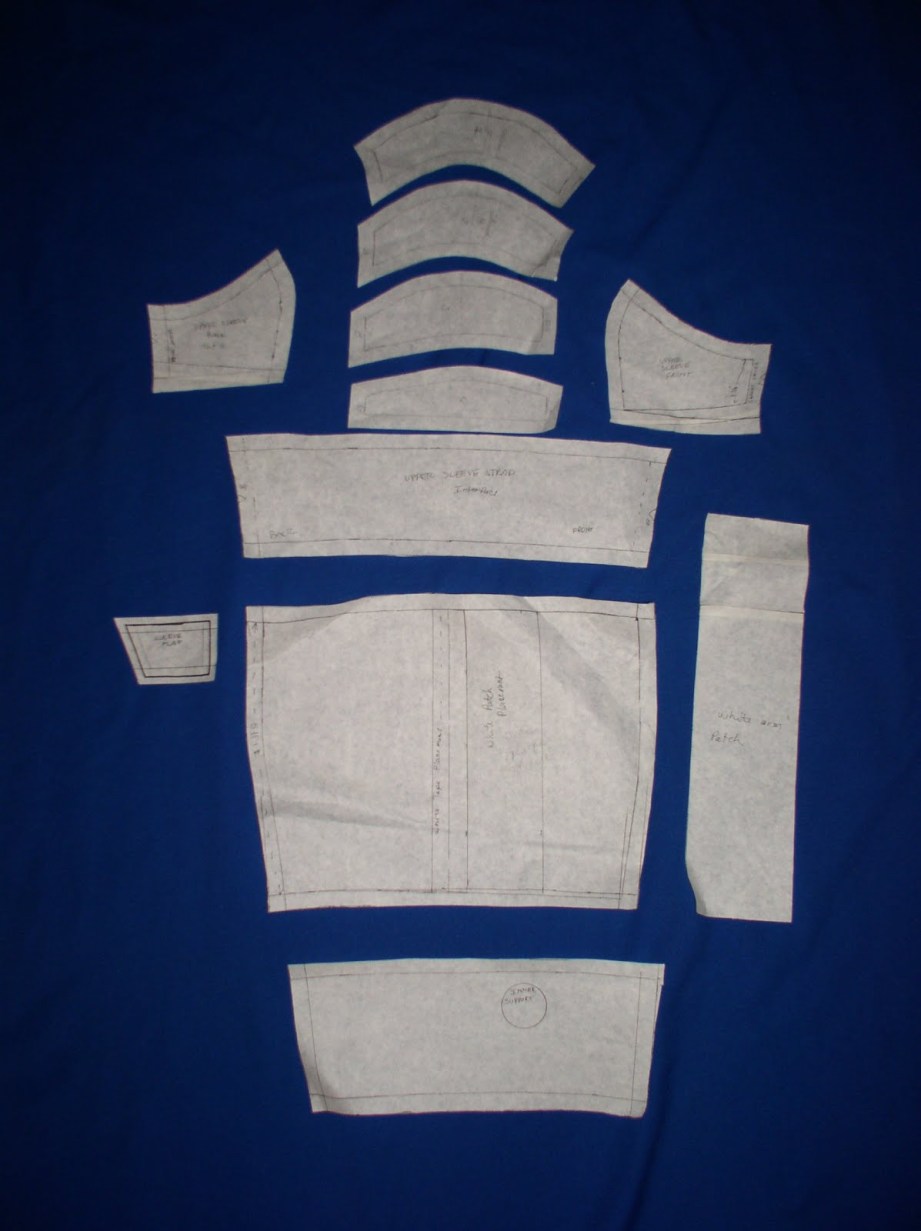
I usually start with the shape of the sleeve as a whole. Is it a basic sleeve shape or something funky? Then I break it down into the individual pattern pieces on the master sleeve, making sure the ratio of the upper sleeve works with main part of the sleeve. I consider whether interfacing is needed and what type looking at the original source material and whether a piece looks really firm or soft and comfortable without any firmness. And also whether pieces are cut larger and gathered to fit and the order in which I sew them. There’s a lot of starting and stopping with this type of sleeve with very few continuous lines of stitching.
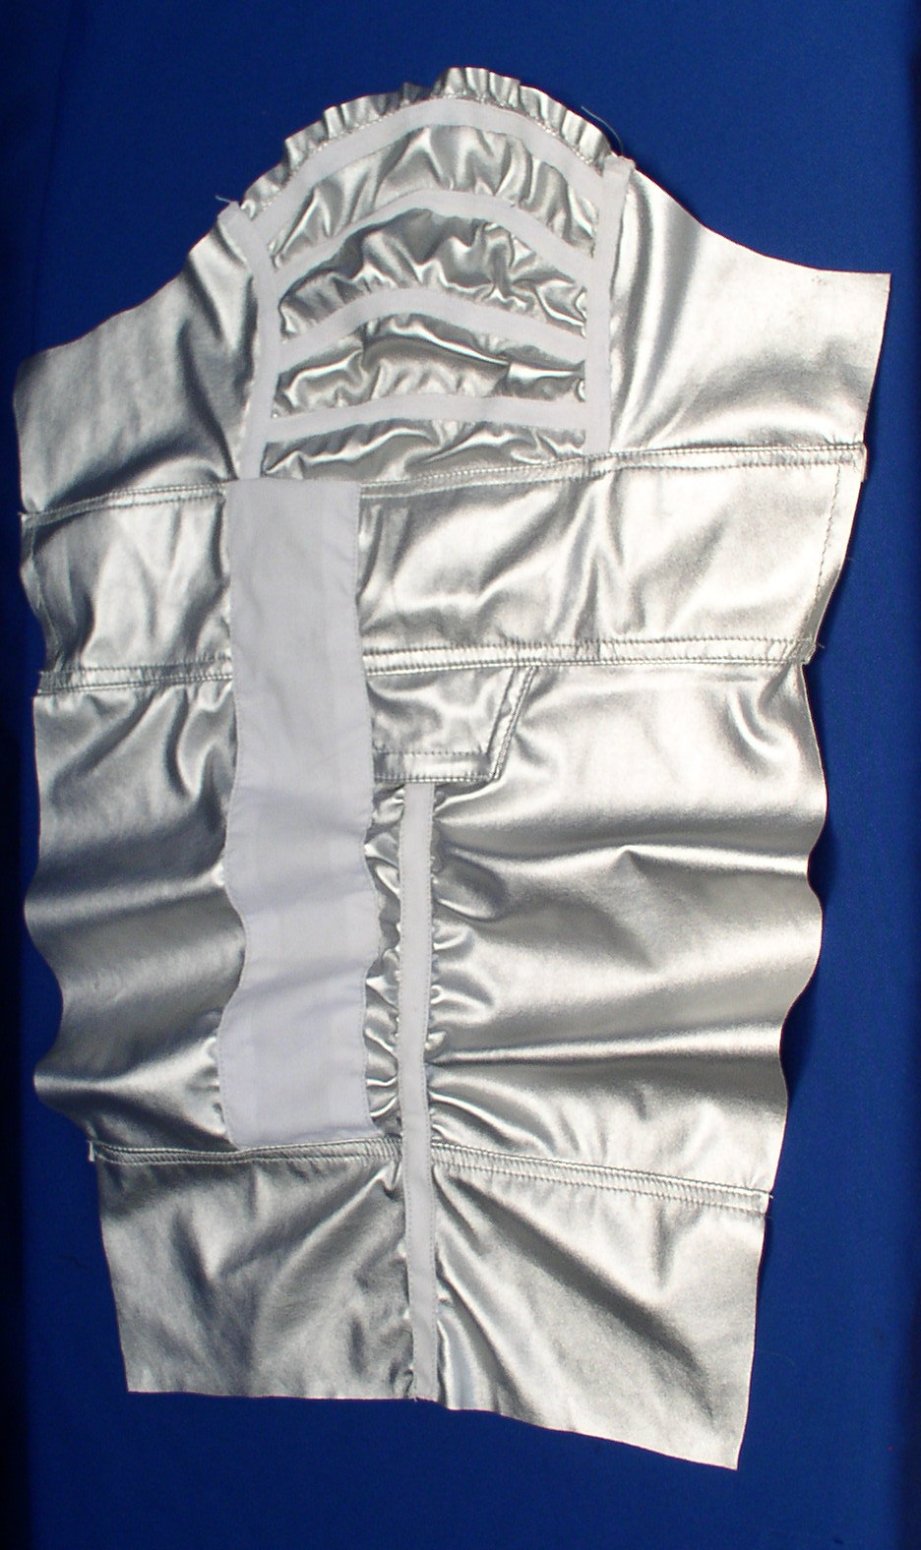
Generally, before this process begins I consider using a pre-printed manufactured pattern piece that’s close to what I’m looking for in overall shape because I’m not re-inventing the wheel–a sleeve is a sleeve–and I just alter the heck out of it. I did that in this case–it’s a worthwhile tip from a seasoned guerrilla seamstress. For the torso and even the legs I used the same basic pattern process as I used for the sleeves. I was lucky and I could get almost all the basic pattern designs from one manufactured pattern.
The body of the leg was pretty much a no-brainer. I just had to make sure that the ratio of piece-to-piece worked. That’s why I draw everything on a master pattern first, so I can actually visualize what it’s going to look like before I finish. The most difficult part of the leg is the top of the leg and the shape that the angle of the brief area of the suit. Are they going to fit? Will it work?
And, of course, while doing all this you have to make certain it will fit the person it’s intended for (plus size or tiny, male or female). The first pattern has to fit the intended measurements. After creating a proof of concept prototype, I usually feel very confident in increasing or decreasing sizes to fit children and adults from the first patterns.
I spent more time on the zipper lines around the body and across the torso than on any other part of the suit. I also made-to-measure my own zippers. In fact, when I couldn’t find the correct zippers in black, I told Adam that I was having difficulty and he suggested perfect army green zippers that were used for making sleeping bags. I bought all of them for future projects because the price was right and the inventory not being re-stocked.
Next was figuring out the design on the sleeves with all the parts and pieces and flaps and patches and stripes. There’s no one long seam to sew, you sew part way up one way, then you have to add another piece on, then you have to go back to the stitch line you were sewing before and then of course not forget about the other piece you have to add in…it’s like a Chinese puzzle box with instructions written in Farsi.
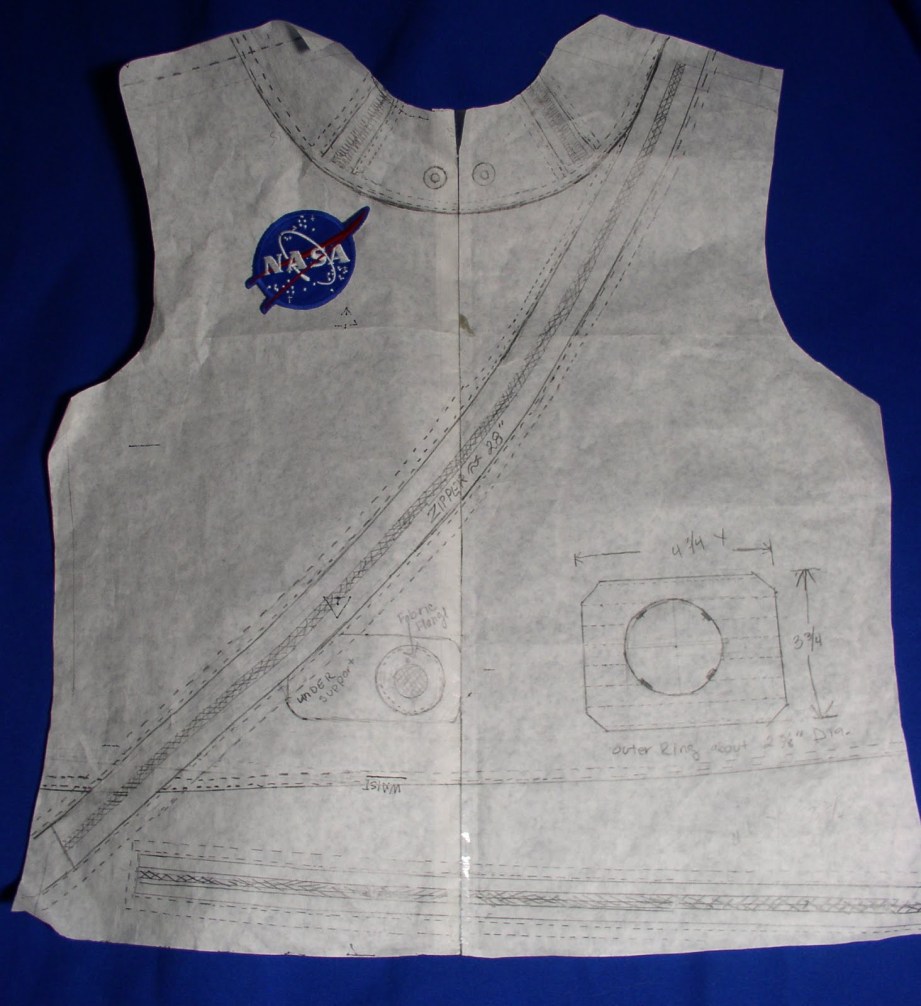
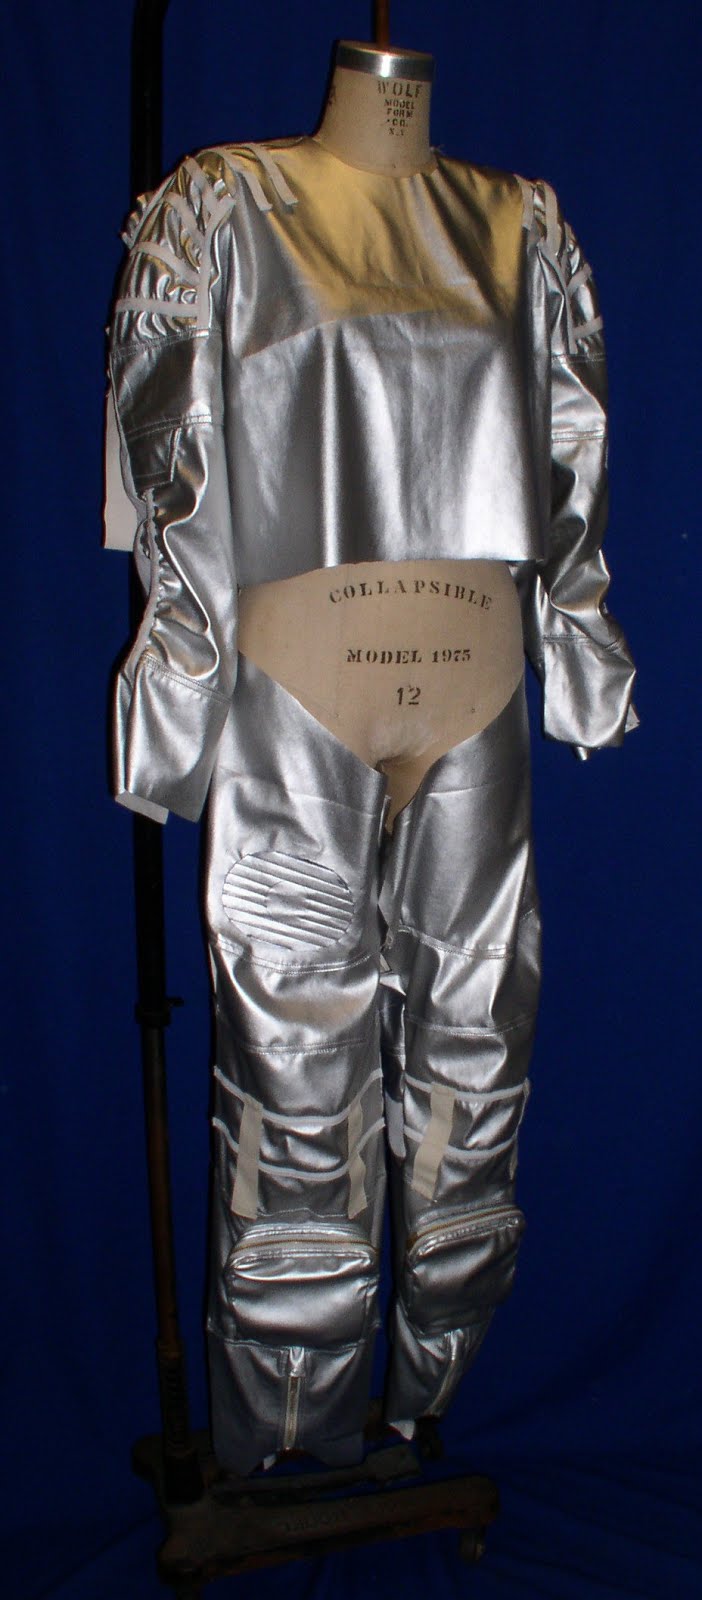
Now for the torso pattern pieces. First, it’s a flat front pattern, no darts, the same with the back and the upper back yoke. Once I’m happy the dimensions fit I then make sure that all the extra design work works on the pattern piece so there’s a lot of drawing and erasing making sure there are certain patches and they all have to fit just right like a checkerboard.
This is also the same point in time I make sure that the details from the front line up with the details on the back, shoulder, armseye (arm hole opening) for total torso fits the sleeve and that everything lines up from the torso to the legs. The torso sort of works like a wagon wheel with the neck, arms and legs acting like spokes of a wheel. If stuff doesn’t line up I have to start over.
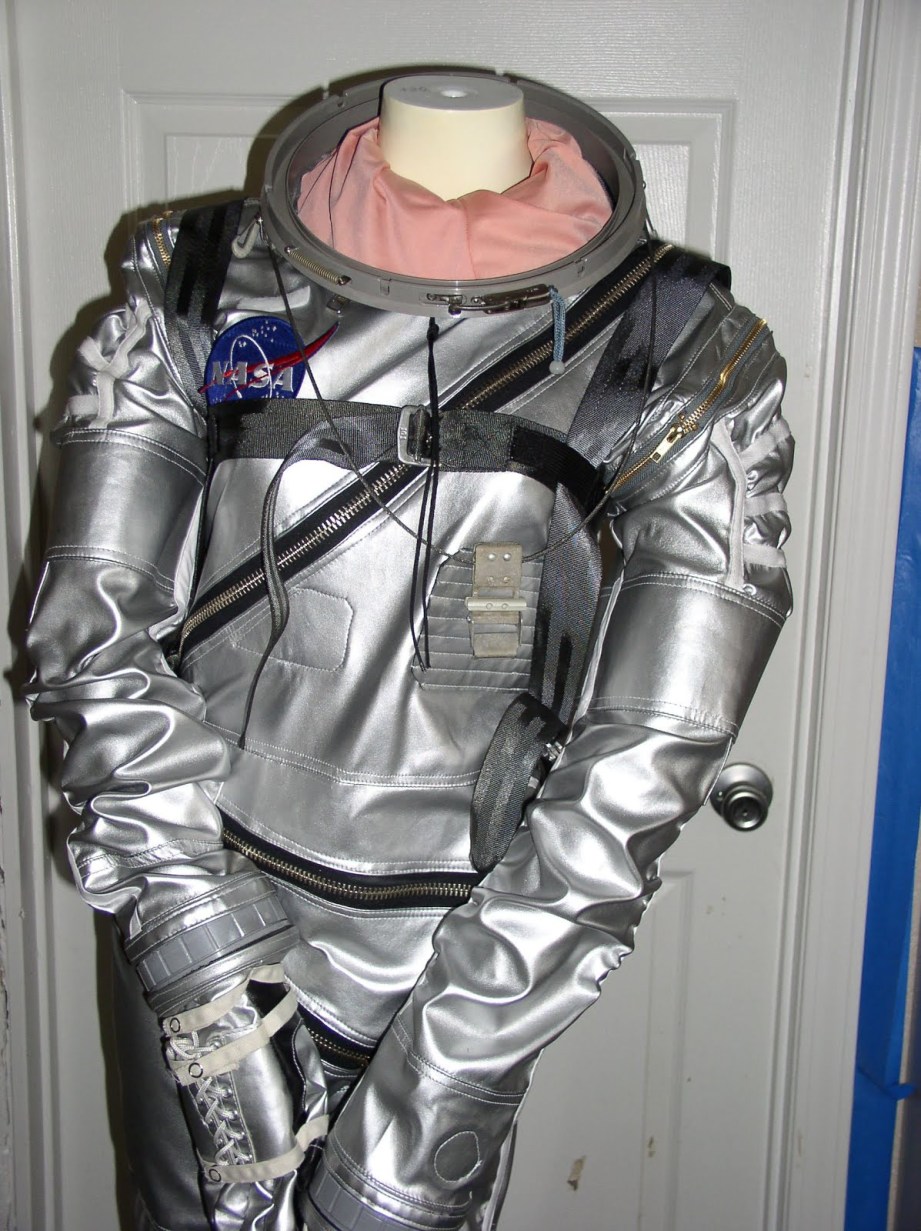
Finally, there’s the cowl that attaches the neck ring with the helmet and the body of the suit. When we first started this project we weren’t aware that Adam had specific a neck ring in mind, but he did give me circumference measurements for the openings of the rings for both neck and wrists. Coming up with a working pattern required making sure the neck opening of the suit had the correct circumference and trying to keep it as close to a round shape as possible. That way, by the time the zippers were put in, they didn’t overlap the zipper on the left shoulder.
This is one of those times when you just have to eyeball the pattern pieces and the many parts that all have to fit together. So often when you work on one piece you have to tweak them down the line to make them fit with what you just tweaked. It wasn’t until I was actually putting the suit together that I came up with the working design of how to attach the suit to the neck ring. Fortunately, the same solution worked for the wrist rings that Adam provided.
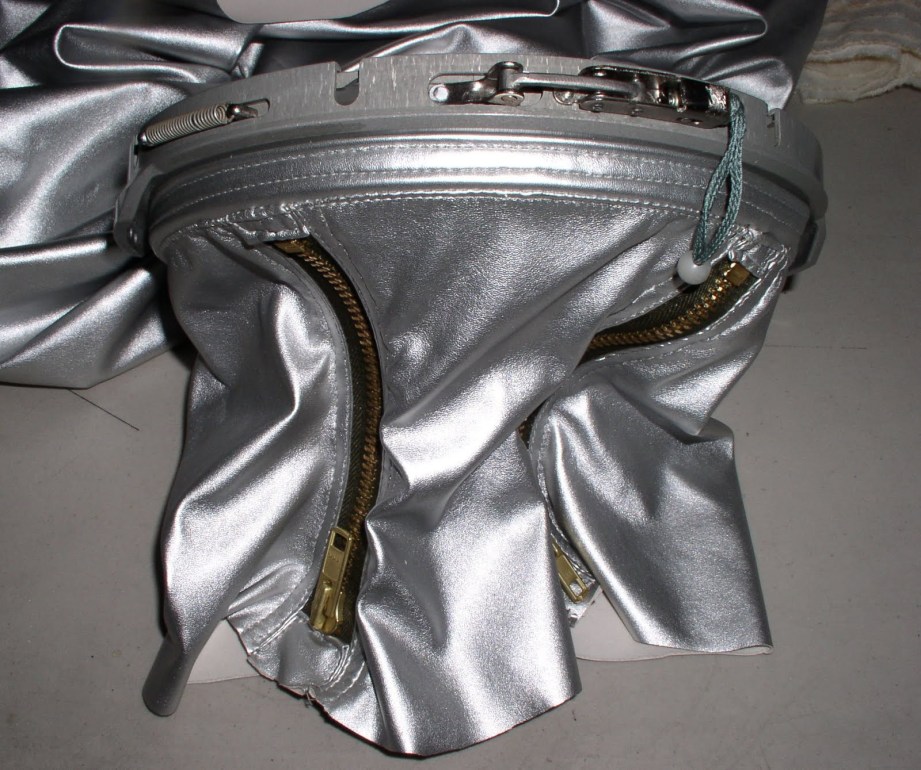
Adam initially wanted to attach the neck rings and wrist rings himself but I persuaded him to send them to me for me to do it. It was a good decision and a perfect example of how well we worked together. Everything I asked for he cooperated on. Often that’s not the case with clients as they don’t want to disclose details of their solutions or proprietary designs on parts they or someone else is doing. Adam’s approach is open-source, which is what these articles are all about. How you approach your problem-solving is more interesting than just the result.
I was blown away by the neck ring and initially thought Adam machined it like the wrist rings. The neck ring actually comes from a MIG high altitude helmet and they aren’t easy to find unless you buy a MIG helmet. I found an almost unlimited source of neck rings I am happy to share and promised one to Adam when the helmets are done and shipped.
We now have two solutions for joining the helmet with the cowl. One with the MIG neck ring like Adam’s and one without the neck ring. Adam’s solution is by far the cleanest and easiest to put on and take off. The following is what Adam’s helmet looks like without the MIG neck ring on another version of the suit (black version 1) for another client, intended for use on an upcoming album cover.
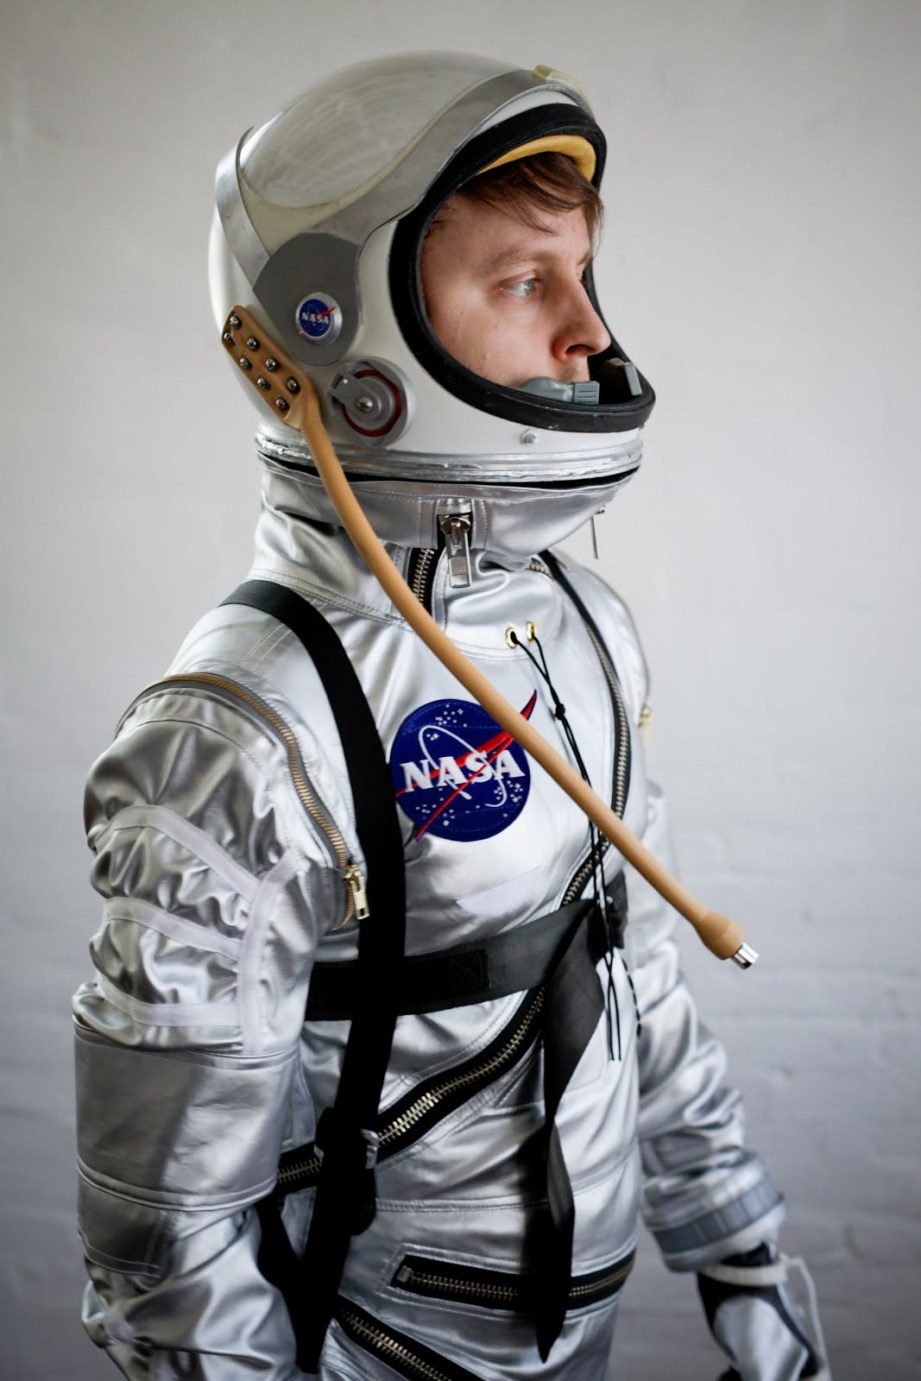
The faux neck ring you see above simply attaches with Velcro, while the details of the tabs are concealed by the MIG neck ring on Adam’s version.
Next is the brief area for joining the legs to the torso. These are very sexy briefs for an astronaut as they are high-cut ladies style French leg openings that any European man would be proud to wear to the beach but might find some resistance in some places stateside. This is one of the more difficult pieces both to pattern and to add the detail of the zippers. First you have the zipper that starts on the left leg front and unzips completely around with a very specific curve and you have the main torso zipper that has gone down the front of the torso and ends up on the brief area backside. Zippers are not meant to go around curved places so to make sure everything works well it’s pinning and repinning, readjusting, tweaking and tweaking again. With each suit I get faster, but there’s a lot of time spent getting it right here.
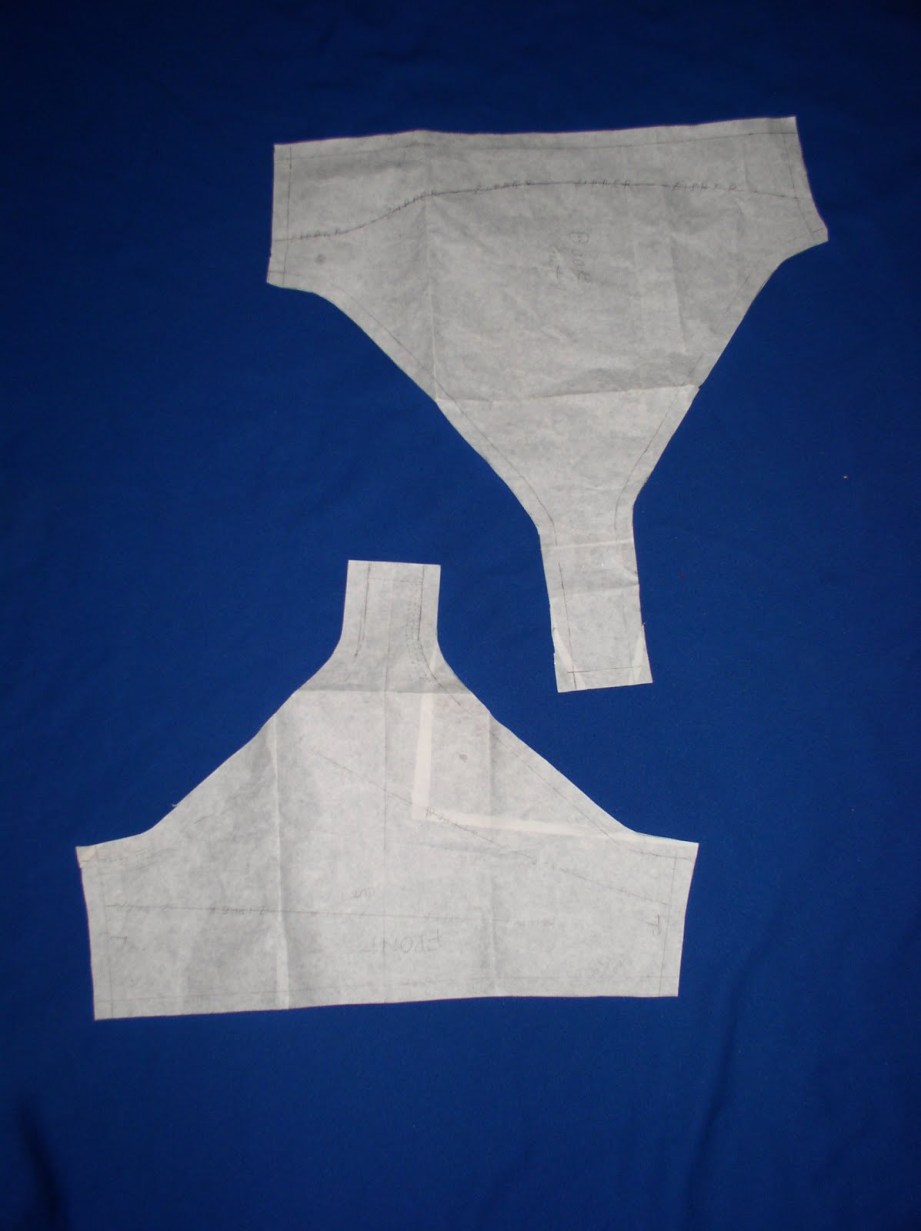
The kind of reproduction work I do rides between the lines of designer and techie. On one hand, I’m trying to make it look right but I’m always wondering if can I actually make it work with the pattern pieces I’ve made. I’m riding the razor edge at the client’s expense and risk to our credibility.
Here are some more in-progress photos sent over to Adam for comment and questions:
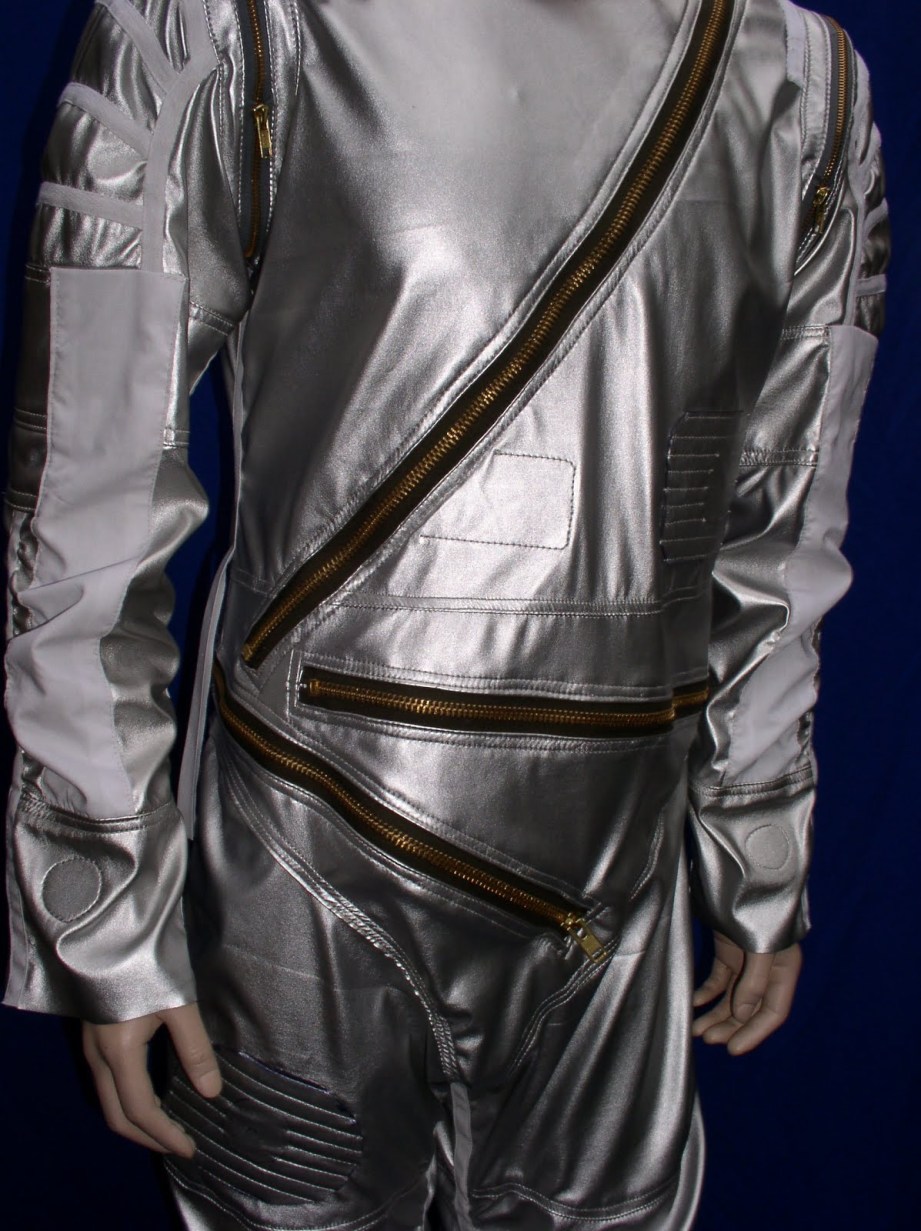
Mistakes happen, too. Notice in the image above that there’s a circle on the left sleeve for one of the biometrics. It was inadvertently stitched to the right sleeve instead of the left sleeve like on my pattern. Adam would have eventually noticed it if I said nothing so the solution was simply adding another support patch where it belongs and leave the mistake alone as few would notice. That was very gracious of Adam not making me redo the sleeve.
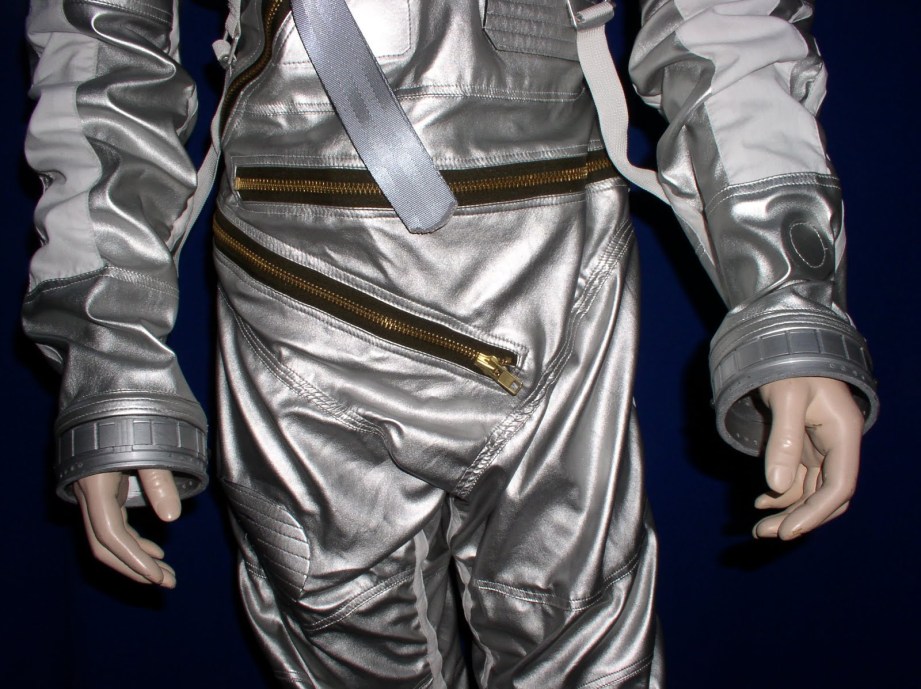
Another mistake might be the color of the cowl. It’s been pointed out that it should be more orange-y and I agree it maybe a little pale:
4. The Hard Parts
Next, all the straps, carriers and sliders. As I mentioned I didn’t give much thought to the “hard parts” including sliders as Adam said he would provide them. When I needed them to do the straps we had to buy them. Adam and I went back and forth suggesting various sources until we settled on two vendors. I picked what I wanted and he bought and shipped them to me. Prior to deciding on these sliders though I found some authentic aircraft strapping and hardware that I thought might work with some modifications. I recommended them initially but changed my mind. It would have been a mistake. Adam bought the items anyway but we never used them. Not everything goes as planned and Adam absorbed the cost anyway. It was one of the very few mistakes and bad recommendation.
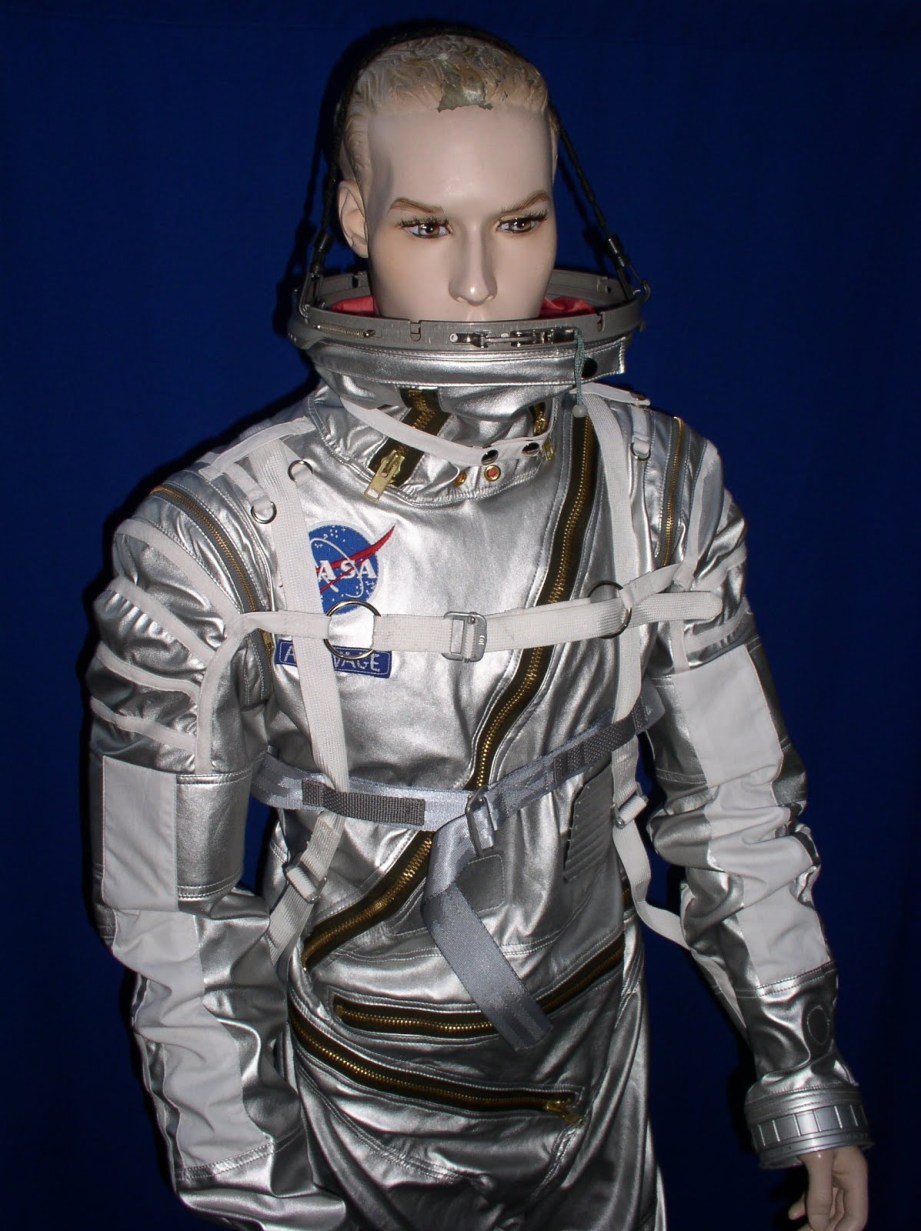
We also made a mistake buying the NASA patches initially but eventually found the correct design, but I had to whiten the border as perfect reproduction patches don’t seem to exist. If you look at the suits pictured in this article, you can see the difference between the patch with the blue border and the one with the white.
As for all the straps, there are four major straps, all optional, but the suit looks better when all are used. Strap #1 is 1″ white (Adam dipped them in a coffee mixture to discolor) webbing for the upper chest strap that connects to sleeves with O-rings and slider. Then the next chest strap fitting as high as you can take it and holds tight to the body with a slider. The strap is 1.5″ to 2″ wide nylon webbing. The second chest strap has four carriers, two in front, two in back and the 1″ wide straps that start at the hip and cross in back, loop through the back carriers over the shoulders where there are two carriers and then straight down the side where they connect to short strap with a slider.
And here it is, all pieced together:
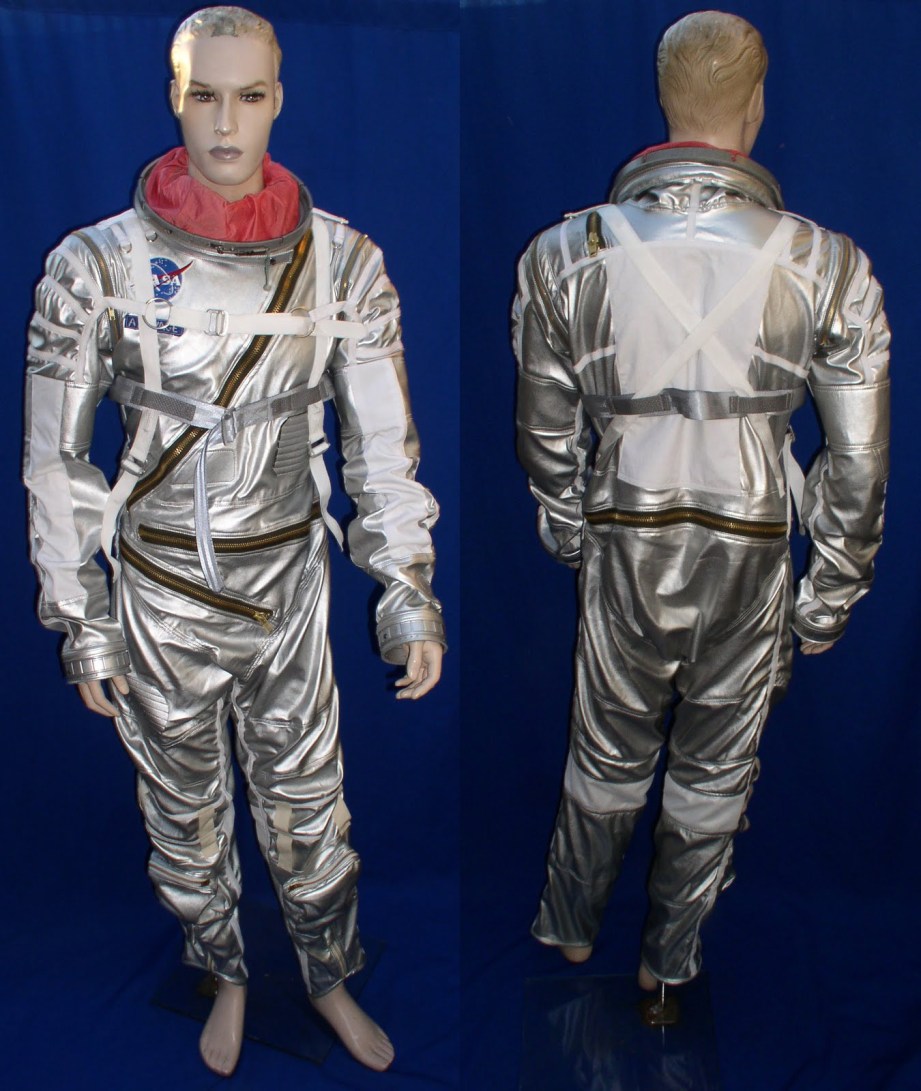
By now you have seen many pictures of the suit Adam has worn on Tested and at Comic-Con. Thank you for interest and I’m looking forward to questions and sharing more details! Stay tuned as we continue this series with a look at creating a replica Mercury program spacesuit helmet.
Photos courtesy Elizabeth Galeria
Elizabeth Galeria – a.k.a. antylyz – majored in theatre arts in college. Her favorite work is custom costumes. She has designed or worked on almost every costume era from prehistoric to space aliens.
While working as a show dresser in Reno, NV, she worked with exotic dancers and mastered the fine art of rip-away costumes. Her fashion design work includes many different styles and eras of costumes, clothing, lingerie, corsets and headwear for all walks of life including several female impersonators such as Holotta Tymes of Tyme of Your Life Productions. Her background includes seasons at the local Renaissance Faire, The San Francisco Opera, and many small theatre groups in the Bay Area. In 1993, she worked for the Redwood City Community Theatre and designed costumes for their production of Jesus Christ Superstar, which earned a nomination from the San Francisco Bay Area Theatre Guild.
She’s done a lot of work over the years for some impressive clients, including Bette Midler for The San Francisco Opera in Walt Disney’s Hocus Pocus. She also worked on costumes for MC Hammer and crew for his Comeback Tour. Fourteen years ago, she credits her partner with the vision of this company and it’s growth. Mark and Elizabeth have since created several other websites to specialize in certain markets.
Find Elizabeth and Mark’s work at The Magic Wardrobe and Etsy
13 thoughts on “How To Make A Replica Hybrid Mercury IV Pressure Suit”
Leave a Reply

One Day Builds
Adam Savage’s One Day Builds: Life-Size Velocirapt…
Adam embarks on one of his most ambitious builds yet: fulfil…

Show And Tell
Adam Savage’s King George Costume!
Adam recently completed a build of the royal St. Edwards cro…
All Eyes On Perserverance – This is Only a Test 58…
We get excited for the Perserverance rover Mars landing happening later today in this week's episode. Jeremy finally watches In and Of Itself, we get hyped for The Last of Us casting, and try to deciper the new Chevy Bolt announcements. Plus, Kishore gets a Pelaton and we wrack our brains around reverse engineering the source code to GTA …

One Day Builds
Mandalorian Blaster Prop Replica Kit Assembly!
Adam and Norm assemble a beautifully machined replica prop k…
House of MCU – This is Only a Test 586 – 2/11/21
The gang gets together to recap their favorite bits from this past weekend's Superb Owl, including the new camera tech used for the broadcast and the best chicken wing recipes. Kishore shares tips for streamlining your streaming services, and Will guests this week to dive into the mind-bending implications of the latest WandaVision episod…

One Day Builds
Adam Savage’s One Day Builds: Royal Crown of Engla…
One of the ways Adam has been getting through lockdown has b…

Making
Adam Savage Tests the AIR Active Filtration Helmet…
Adam unboxes and performs a quick test of this novel new hel…

Making
Weta Workshop’s 3D-Printed Giant Eyeballs!
When Adam visited Weta Workshop early last year, he stopped …

One Day Builds
Adam Savage’s One Day Builds: Wire Storage Solutio…
Adam tackles a shop shelf build that he's been putting off f…

Show And Tell
Mechanical Dragonfly Automata Kit Build and Review
Time for a model kit build! This steampunk-inspired mechanic…


Such a beautiful costume, Elizabeth! Thanks for the insight into the process, a lot of candor in client dealings here, but when that client is Adam and after a couple of years of visiting his cave weekly nothing less can be expected 🙂
I haven’t read much of this wonderful gem yet. However thanks for sharing this with us and for taking the time it took to write this up.
Very very cool, thank you so much for the detailed write up. I have a new perspective in regards costume making. The talent and skill required is a benchmark that has to be very hard to attain especially for that layer of detail.
btw if anyone is looking for an authentic Navy high altitude helmet…
http://www.ebay.com/itm/U-S-NAVY-B-F-GOODRICH-MK-II-HIGH-ALTITUDE-FULL-PRESSURE-PILOT-FLIGHT-HELMET-/191283399479?pt=Motors_Aviation_Parts_Gear&hash=item2c89610b37&vxp=mtr
This is a great write up. All the “How To’s” and “Make Blogs” have been spot on here.
AWESOME article. I love this kind of stuff, even though I would never attempt to do clothing myself.
That is incredible. Man, Tested has been on point lately. Not that Tested hasn’t been good (it definitely has) but just lately they’re really stepped it up.
I had to register, as a watch nerd, in appreciation of the Speedmaster love. Granted, it’s not a manual-wind Pro like what would have been used but it’s more-than close enough for a costume. Actually, a number of different watches were worn for the Mercury missions and the Speedmaster was certified later but they were worn on two Mercury flights. Great work!
FYI, the link to the measurements form requires a login.
That was wonderful, Elizabeth. I look forward to reading the next installment in this series.. 👍
This was great to read, it’s really pleasant to see the process of someone with such devotion and mastery.
I’m looking to buy a mercury helmet. Do you have more to sell?
Lantz Yes, please contact me and we can discuss details. Thank you for your interest. I believe there’s a private way to communicate on tested so I don’t have to publish my private email address on the forum.
Your design work is really well done: well thought out and worked through in detail.
I have some questions on the pattern creation and was hoping you would be available to ask .
I am really blown away by your work and by the write -up. Your directness and willingness to bring us in to the process is refreshing.
Thank you for sharing so much.