


Building Fallout 4 T-60 Power Armor, Part 1
Digital Designs--AKA, the "easy" part.
In this post, I’ll be outlining the process of extracting the 3D models for the Power Armor from Fallout 4’s game data and turning them into the blueprint for the rest of the build. Modern games like Fallout 4 have incredibly detailed models in game and are a great base to start from and require very little digital cleanup and remodeling, so when doing props or cosplays from games I try to start from the source.
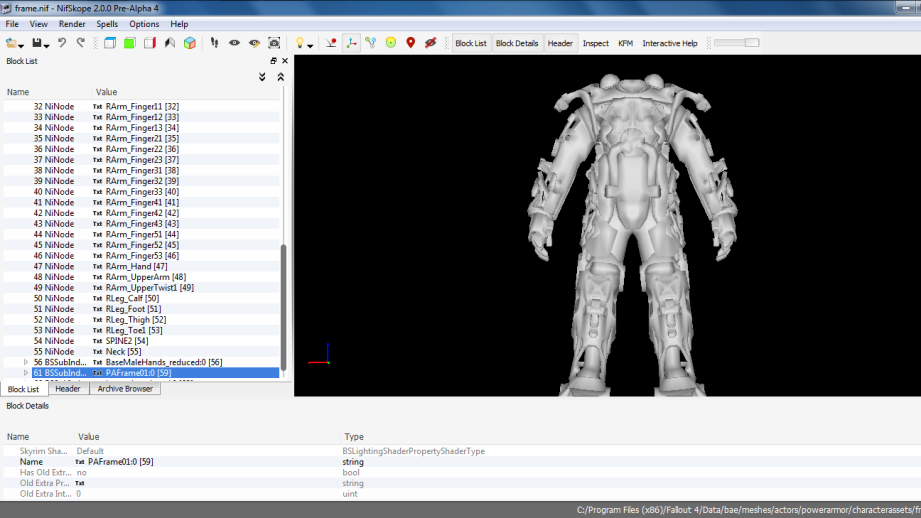
The process to extract content from the game can be pretty tricky. The exact process for every game will be different, and some games are so locked down that you have to rip the data directly from the video card while it’s being rendered. It pays to do a lot of research because there is almost always some tool that some person or group has developed to assist extracting the content.
Bethesda Games run on their own proprietary game engine, and the fan community has created a handful of tools you can use to extract the game content. The main programs we use for this are the Bethesda Archive Extractor to extract models and textures from the game’s content archive, and NifSkope which will load the extracted content and convert it into a format we can use. Locating the right assets can often be much easier said than done as there are literally thousands upon thousands of model and texture assets in modern games. After we extract them using BAE and NifSkope converts the models into a useable format, we load those into our 3D modeling suite. Now we can begin the real work!
I often get asked “what 3D modeling program should I use?” There’s no right or wrong answer to this question, so ultimately it comes down to what you are most familiar with, and what exactly you’re trying to create. Generally speaking, if you are wanting mechanical parts or something that moves, then a CAD suite is best suited for the job. If you’re wanting an organic shape, like the Xenomorph skull, then a digital sculpting suite like Zbrush or Sculptris is probably better. We’ll be doing a lot of simple operations, and personally I use Blender for things like this because it’s free, it’s open source, and I’m familiar enough with the interface to be able to do simple tasks quickly. Try not to limit yourself to a single program or toolchain, and use the right tool for the job even when it comes to modeling and CAD software.
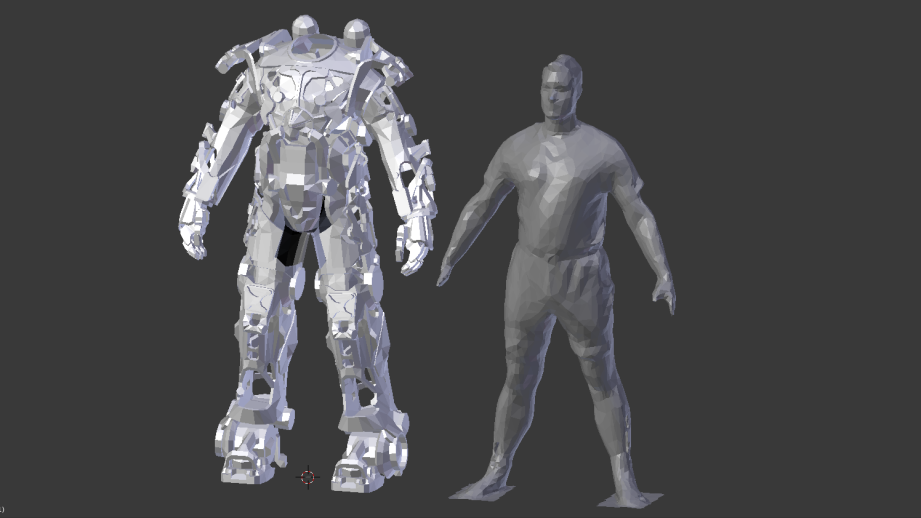
3D models from video games aren’t designed to exist in the real world, and don’t have any scale reference.
Back to the build–it’s time to start figuring out how we’ll be constructing it. You want to avoid the temptation to start 3D printing or CNC routing right away, as something this large and complex requires you to carefully consider not only how to produce the parts and but how you’ll actually be wearing them. 3D models in video games have two major disadvantages. The models are rarely designed to be able to exist in the real world, so you will have objects that intersect and exist inside of each other in ways that are impossible. And they also don’t have any scale reference to them, so you don’t know how big or small to make them without the final product coming out tiny or gigantic.
Solving the problem of intersecting solids is tricky. Often you can join parts together or subtract them from each other so that you can print sections and attach them together once they’re printed. In some cases you may have to fill in gaps in the model’s geometry, or if the models are particularly bad, redesign them entirely. Thankfully the T-60 models are really well designed and most of the models require very little digital cleanup or remodeling work. Some parts are hollow or “non-manifold” but we’ll go over fixing that later.
Solving the issue of scale requires some creativity. For things like weapons, I typically use the width or length of my palm to scale the gun so my hand will fit the grip, thus scaling the whole weapon to be realistically human sized. Way back in 2011 when I was building my Gravity Gun, that’s how I scaled my game reference (and wound up being incredibly close to both Volpin’s and NECA’s versions!). But for full body shapes like armor you either have to do a lot of guess work, or work off of a reference – which is really easy if you setup a basic 3D scanning rig.
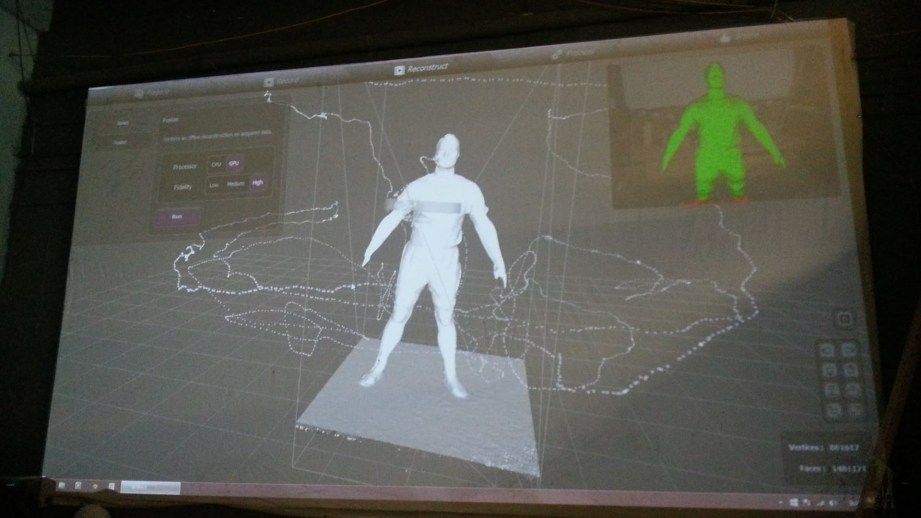
This is Elliott, my friend and assistant on this project. Using an Xbox Kinect we got off Ebay and a piece of software called Scannect, I was able to pull a rough 3D scan of of his body which I could import into Blender and be our life sized reference to scale the whole power armor. Scans from a Kinect won’t give you millimeter accurate details like scanning via photogrammetry, but they are more than suitable for a real world human reference. Once we worked out fitting him into the armor digitally and deciding exactly how big to scale it, we could then start working on the models to make them production ready.
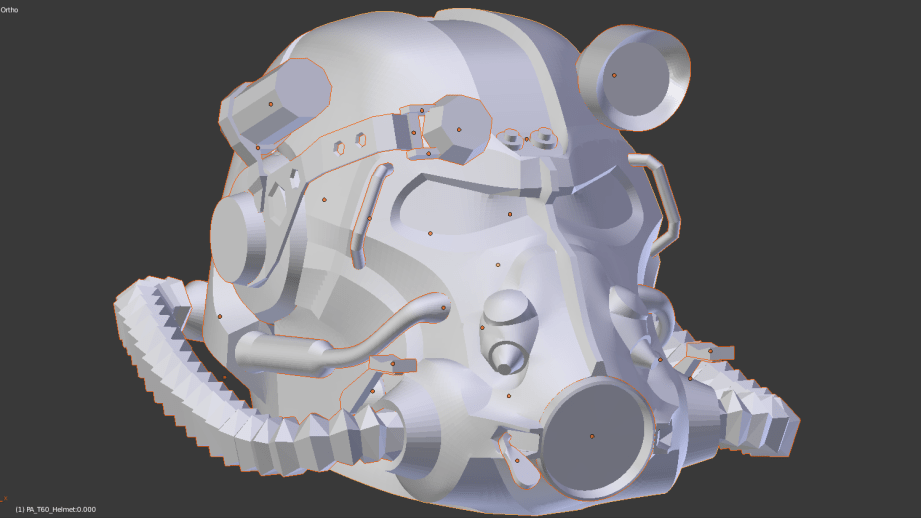
As mentioned in the previous post, we are utilizing three main production methods for the armor – 3D printing, CNC routing, and Pepakura. The models straight from the game are typically suitable straight to Pepakura, and I’ll go over that in detail in a later article. 3D printed and CNC routed parts work from effectively the same models, so prepping for that is the same process. We will need to increase the quality or detail of the models before they are print ready, since trying to print them as-is will make them appear “low poly” and have lots of sharp, polygonal edges. For some things, like the ever popular Bulbasaur planter on Thingiverse, the low poly look works in favor of the finished print. But since we want the armor to appear as realistic as possible, we need soft curves and hard edges where appropriate.
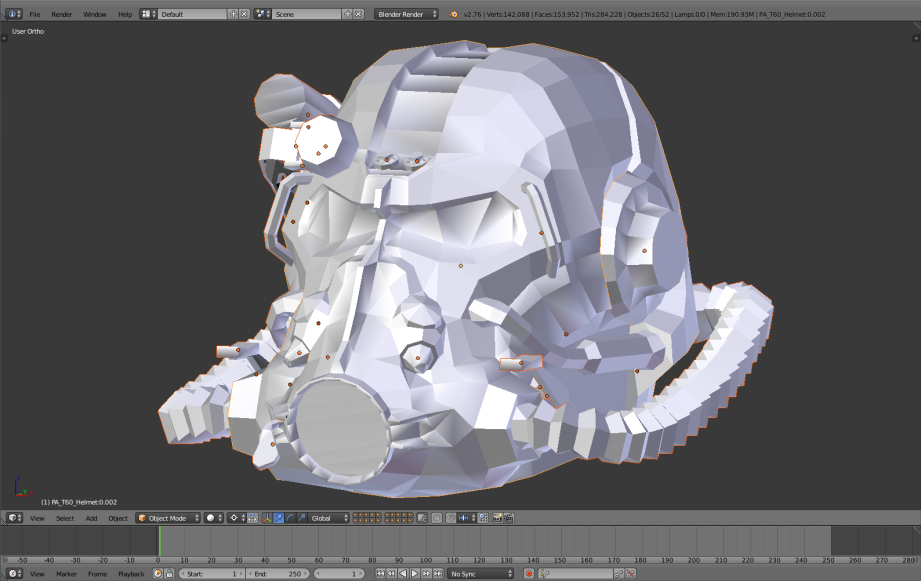
In most modeling suites this is easy, and Blender is no exception. For any given section of armor, we define sharp edges where they need to be defined, and then perform what’s called a subdivision on the model. This increases the number of polygons and smooths everything out, except for where we defined the hard edges which stay crisp and intact. Defining the sharp edges is crucial, without doing so you end up with a rounded blob that vaguely resembles our part. The result is a high poly and high detail model suitable for printing or CNC.
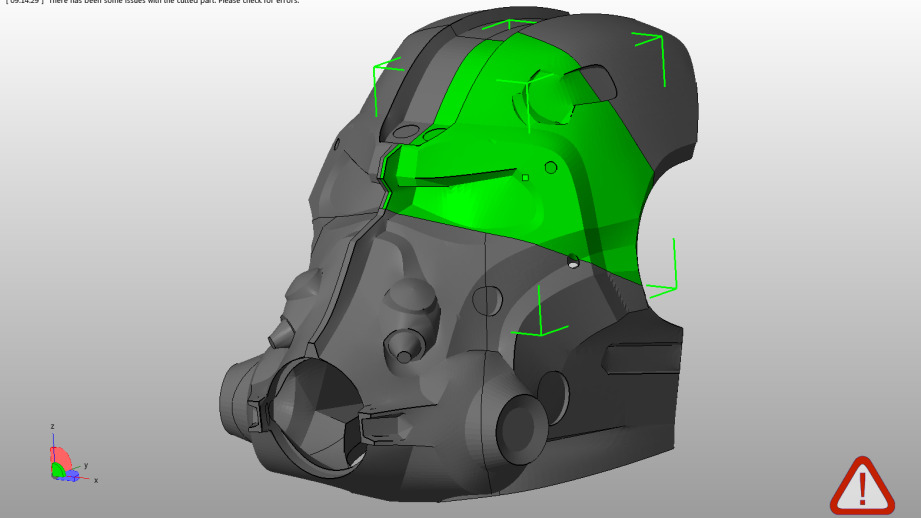
Most video game models are non-manifold, a term 3D printing enthusiasts will be familiar with. This means that the model is hollow and not “water tight” with gaps or missing sections that make it difficult for a printer to determine how the object needs to be fabricated. For models that suffer from this, we can try to patch them up within Blender, or in a free tool like Netfabb. Or we can add a “shell” to the part to give it some thickness. This was done primarily for the helmet, where printing it as a giant solid piece would be a massive waste of printing time and material.
Now that we have our high detail models that are ready to print, we need to chop them up into sections that will actually fit on the printers. There’s a bit of an art form to figuring out how and why to cut certain sections. Most axioms of 3D printing will apply here, like trying to create as few overhangs as possible, making sure the part that touches the build platform will be large enough to grab onto your print bed, and always being mindful of your printer’s printing volume and not creating sections that are too big to fit in your machine. I try to strike a balance between sections that will not be difficult for the printer to create, and not unnecessarily splitting the model into many small sections. This is an instance where a well tuned machine (and well tuned support material settings) can make the difference between an easy printing job and a huge headache.
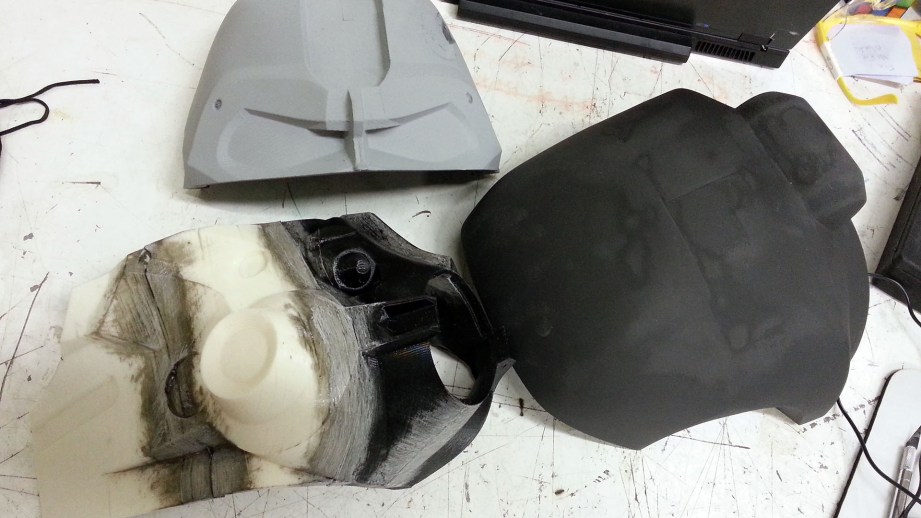
The helmet was cut into 12 separate pieces for the main body using Netfabb’s cut feature, and all of the bits and details were printed on their own to make cleaning them up and detailing a lot easier. Up next we will go over assembling and cleaning up our prints to make them into the high quality masters for the rest of the project. See you in a couple weeks!


9 thoughts on “Building Fallout 4 T-60 Power Armor, Part 1”
Leave a Reply

One Day Builds
Adam Savage’s One Day Builds: Life-Size Velocirapt…
Adam embarks on one of his most ambitious builds yet: fulfil…

Show And Tell
Adam Savage’s King George Costume!
Adam recently completed a build of the royal St. Edwards cro…

All Eyes On Perserverance – This is Only a Test 58…
We get excited for the Perserverance rover Mars landing happening later today in this week's episode. Jeremy finally watches In and Of Itself, we get hyped for The Last of Us casting, and try to deciper the new Chevy Bolt announcements. Plus, Kishore gets a Pelaton and we wrack our brains around reverse engineering the source code to GTA …

One Day Builds
Mandalorian Blaster Prop Replica Kit Assembly!
Adam and Norm assemble a beautifully machined replica prop k…
House of MCU – This is Only a Test 586 – 2/11/21
The gang gets together to recap their favorite bits from this past weekend's Superb Owl, including the new camera tech used for the broadcast and the best chicken wing recipes. Kishore shares tips for streamlining your streaming services, and Will guests this week to dive into the mind-bending implications of the latest WandaVision episod…

One Day Builds
Adam Savage’s One Day Builds: Royal Crown of Engla…
One of the ways Adam has been getting through lockdown has b…

Making
Adam Savage Tests the AIR Active Filtration Helmet…
Adam unboxes and performs a quick test of this novel new hel…

Making
Weta Workshop’s 3D-Printed Giant Eyeballs!
When Adam visited Weta Workshop early last year, he stopped …

One Day Builds
Adam Savage’s One Day Builds: Wire Storage Solutio…
Adam tackles a shop shelf build that he's been putting off f…

Show And Tell
Mechanical Dragonfly Automata Kit Build and Review
Time for a model kit build! This steampunk-inspired mechanic…
Any chance we could get the low poly model in Premium to unfold for pepakura ? 🙂
Nice job! Great article and info on extracting game files.
Is there a guide on how to smooth the shells like you did? I pulled a few models from video games and I’ve always had to make the smooth curves manually.
This is part 1. I’m sure it will be in upcoming parts. In the mean time, you can check this out using Blender. https://www.youtube.com/watch?v=XnOnxviL8pA&list=PLHaXkrdB47lcAvakFKZwLH6DFwOPO0_db
I’m waiting for an obscenely tall delta printer I have no right to defend the existence of to my wife to be delivered from poland to get my ash statues going again and now you remind me there is a future morrowind as well. -,_-
the article mentions that the name of the technique for interpolating a smoothed high poly surface from a low poly surface is subdivision. doesn’t that term turn up tutorials galore?
Thanks for the starting points and
You have to put in ‘edge loops’ which define how sharp an edge will be once smoothed. Left to right – original cube, same cube smoothed with no edge loops, same cube with tight edge loops on left and loose edge loops on right. It’s a bit of an art.
And both Countspatula & Michelle are both artists. Me on the other hand, I’m only printing out my 4th ever 3d item as I type this, and it’s something I pulled from Thingyverse. I have yet to crack open any sort of 3d design program to actually create something from scratch! lol
8]