


How To Get Started with Programmable RGB LED Strip Lighting
Today, we're going to explore the uses of LED strip lighting—a great, simple component that can add a lot of visual impact to any project. LED's provide bright, colorful and (in some cases) customizable light, and by buying them in strip form you save yourself a lot of time and effort at the soldering bench.
For more Tested.com content become a premium member, subscribe to our YouTube channel and check out our weekly podcast with Adam Savage!
One of the greatest things about the Maker scene is that there’s just so much of it—it encompasses everything from rocketry to hydroponics. And as a maker, just getting started can be the hardest part: deciding what to work on next, or if you’re new to the scene, what to work on first. So I’m starting up a new series of articles that I hope will help you get your bearings on what’s possible. But I’m going to refrain from calling out specific projects to work on; not only would my list probably be unhelpful (there’s only so many ways to write “build a fighting robot“), it sort of defeats the point of the whole endeavor, which is to express yourself through creating something suitable to your own abilities and interests. Instead, I’m going to look at some cool components that could be a major part of lots of different projects. Hopefully you’ll be inspired.
Today, we’re going to explore the uses of LED strip lighting—a great, simple component that can add a lot of visual impact to any project. LED’s provide bright, colorful and (in some cases) customizable light, and by buying them in strip form you save yourself a lot of time and effort at the soldering bench.
In order to examine the world of flexible lighting, I chose to put together a quick project of my own. I have some problems with the lighting in my living room—particularly when watching movies. With all the overhead lights and lamps turned off, the room gets pitch black, aside from the screen. With any room lights on, glare appears on the TV. So for a simple lighting project, I decided to mount a strip of lights to the back of the screen, to provide a gentle glow for the wall behind it.

Step one was to buy some lights. There are a whole lot of varieties of LED strip lighting on the market right now, but for the most part they fall into three categories, as follows:
Single Color, Non-Addressable: This is your basic “dumb” LED strip lighting. They come in plenty of colors, and are great for providing bright, colorful lighting in fixed location. These are commonly mounted under cabinets or tables to provide a nice recessed glow, or as a source of indirect lighting for home theater setups or display cases. They’re relatively inexpensive, and you can buy them in plenty of colors and intensities.
RGB, Non-Addressable: RGB strips are able to display any RGB color, and can change dynamically. They’re a good alternative for lighting projects where you want to be able to create different moods. They’re more expensive than single-color strips, and require some sort of microcontroller. If you’re so inclined, pre-made kits are available which include everything you need.
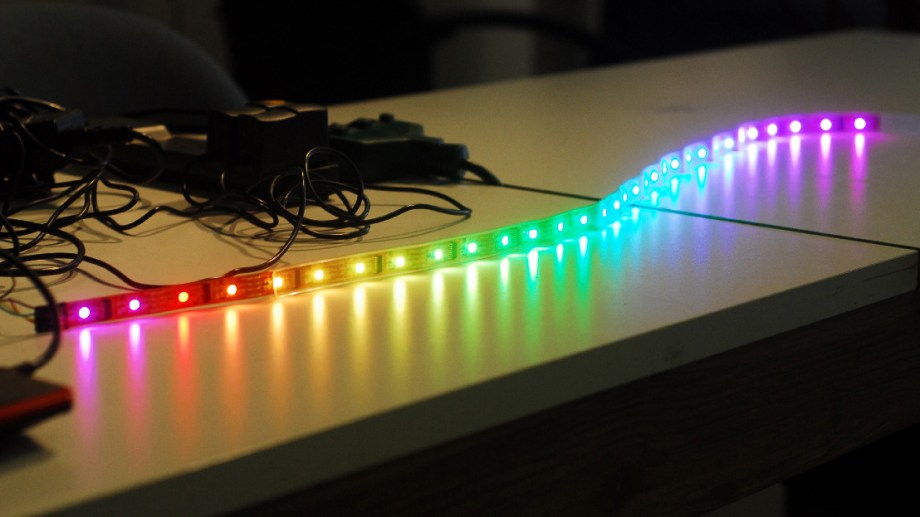
RGB, Addressable: The most customizable, most controllable, and just generally most awesome LED strips. Addressable LED strips are color-changing, like the previous category, but go a step further and include a tiny chip in between each and every LED, allowing you to control them all individually. They’re the most expensive, and to get the most out of one you will definitely need a microcontroller. They can be used for the most sophisticated lighting projects, or can even act as an art object all on their own. Additionally, they’re perfect for projects that rely on persistence of vision to create images in the air.
For my project, I decided to go with the RGB addressable strip. “Hold on,” you might be saying, “didn’t you just say that single color strips were good for home theater installations?” Yes, I did, but it’s also important to keep in mind how truly sweet those addressable RGB strips are. I mean, you really should watch the video. I decided on the spot that my TV backlight project is going to have a fiesta mode.
In addition to the lighting itself, I needed a power source. LED strips are powered by direct current sources, and their voltage needs differ from strip to strip—you’ve got to pay close attention to the spec when you buy it, and make sure you’ve got a power source that can provide just the right amount. I decided to go with the addressable strip from Adafruit, which is a very reasonable $29.95 per meter, as well as the power supply I would need to run it. There’s a chance I could have found better prices on individual components by shopping around more, but because I live in Hawaii shipping prices can be a pain, and it’s helpful to get everything from a single retailer.
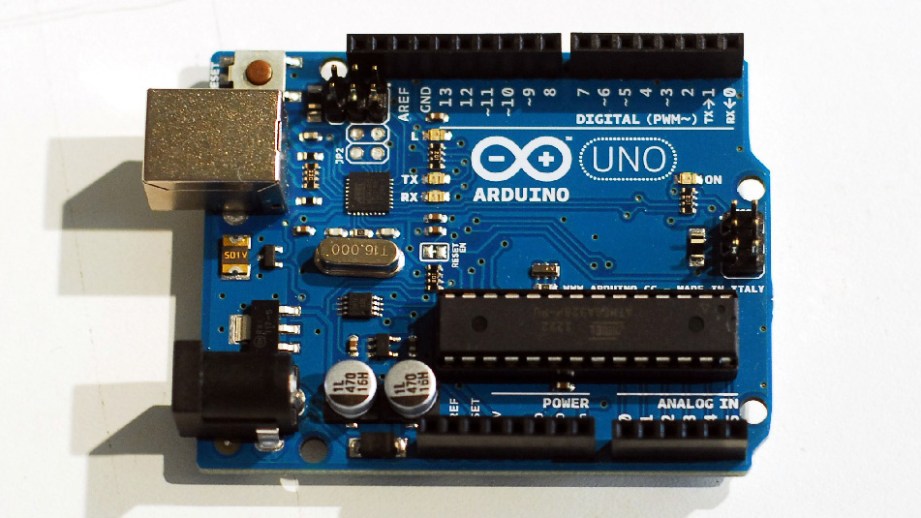
Finally, there’s the issue of control. You’re not going to get the LEDs to change color by asking them nicely—you need a microcontroller. There are a number of solutions, but the most widely used is Arduino. So I went ahead and tossed an Arduino Uno R3 and its power supply into the cart.
A few days later I got the parts in the mail, and started the process of building my TV backlight. There’s not much to a backlight, of course, but anything involving addressable LEDs takes at least three steps:
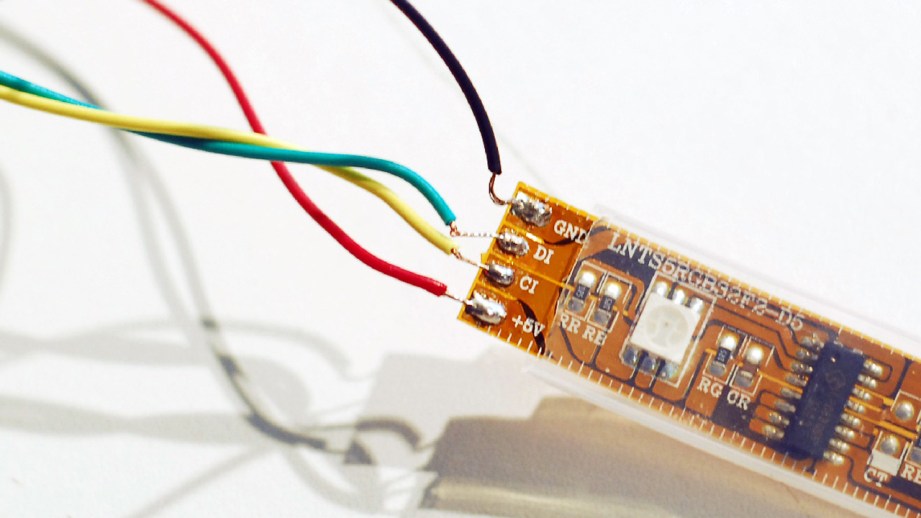
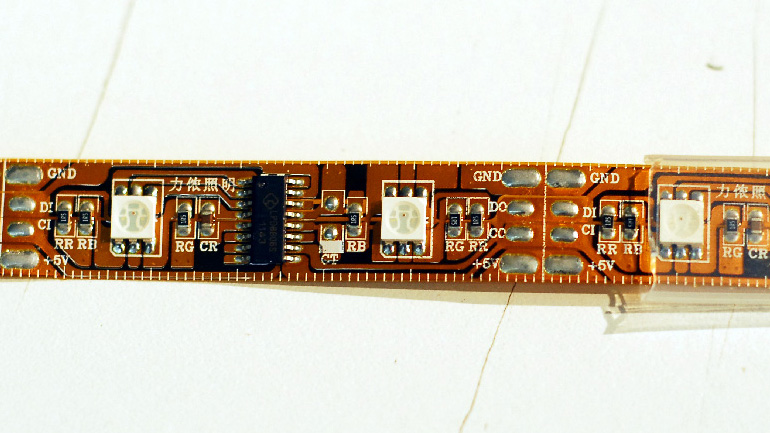
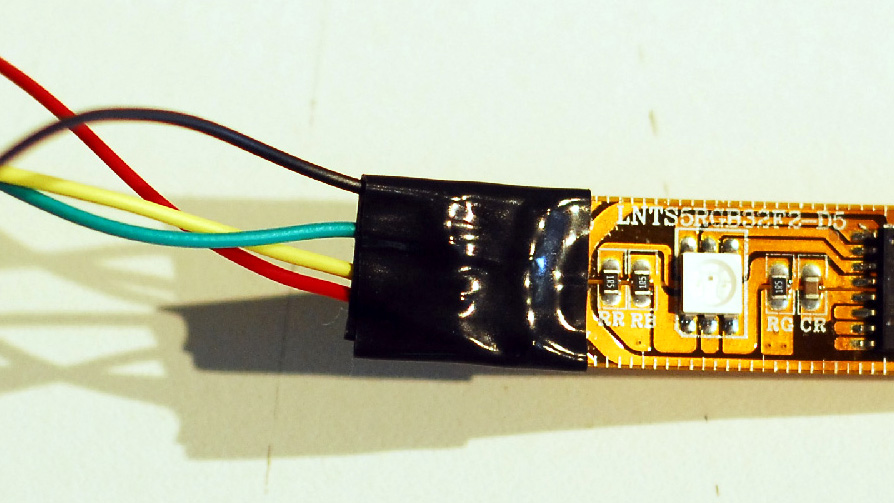
First, you have to solder leads to the strip of lights. When you buy LED ribbon, unless you get a whole 5 meter roll at once, you get a piece that’s been cut off of a longer quantity, so they tend to come without leads attached. It’s pretty simple soldering, you just have to make sure that you’re attaching wires to the correct side of the ribbon. Both ends will have a set of four contacts, but on one end the middle two contacts are labeled “DI” and “CI”, and on the other end they are “DO” and “CO”. You want the side with “I”s—they’re short for “In.” The connections are a little vulnerable at this point, so I suggest strengthening and insulating them with a little heat shrink tubing or electrical tape.
Second, you connect the LED strip to the Arduino and the power source. This involves connecting the “DI” and “CI” (data in and clock in) wires to two of the digital pins on the Arduino, and the other two to the power supply and the power supply and Arduino’s common ground. For a more in-depth guide to wiring an addressable LED strip, check out Adafruit’s excellent tutorial.
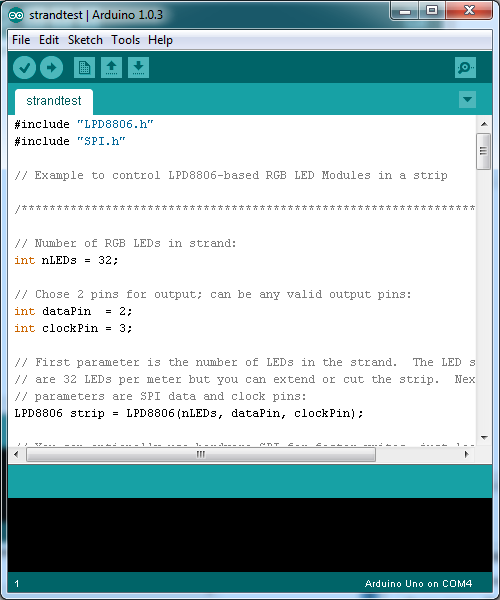
Finally, you need to use your computer to send a program to the Arduino for it to execute using the LEDs. For this you need the Arduino IDE (which includes the Arduino USB driver), as well as a library that allows you to control the chips on the LED strip. For the particular strip I bought, that library is available here.
I’m not going to go too deeply into how Arduino works or how to use it, because that’s a topic I’ll cover in a future guide. For now, I’ll just mention that you program the Arduino by writing a very simple program in C that defines which LEDs should light up at what time. It’s still programming, so be warned if that makes you squeamish, but controlling the LEDs is about as simple as C programming gets, and you could easily learn everything you need for the task in a few hours.
For my project, I added two push buttons to the Arduino, and wrote a simple program where one button cycles through three modes (steady light, slow “throbbing”, and fiesta mode) and the second button cycles through several different color options. To mount the backlight to the TV, I bought some standard 3M two-sided mounting tape and applied it to the Arduino and the LED strip. I stuck the whole thing to the back of the TV and voila, pleasant mood lighting for any genre of movie and/or fiesta.


22 thoughts on “How To Get Started with Programmable RGB LED Strip Lighting”
Leave a Reply

One Day Builds
Adam Savage’s One Day Builds: Life-Size Velocirapt…
Adam embarks on one of his most ambitious builds yet: fulfil…

Show And Tell
Adam Savage’s King George Costume!
Adam recently completed a build of the royal St. Edwards cro…

All Eyes On Perserverance – This is Only a Test 58…
We get excited for the Perserverance rover Mars landing happening later today in this week's episode. Jeremy finally watches In and Of Itself, we get hyped for The Last of Us casting, and try to deciper the new Chevy Bolt announcements. Plus, Kishore gets a Pelaton and we wrack our brains around reverse engineering the source code to GTA …

One Day Builds
Mandalorian Blaster Prop Replica Kit Assembly!
Adam and Norm assemble a beautifully machined replica prop k…
House of MCU – This is Only a Test 586 – 2/11/21
The gang gets together to recap their favorite bits from this past weekend's Superb Owl, including the new camera tech used for the broadcast and the best chicken wing recipes. Kishore shares tips for streamlining your streaming services, and Will guests this week to dive into the mind-bending implications of the latest WandaVision episod…

One Day Builds
Adam Savage’s One Day Builds: Royal Crown of Engla…
One of the ways Adam has been getting through lockdown has b…

Making
Adam Savage Tests the AIR Active Filtration Helmet…
Adam unboxes and performs a quick test of this novel new hel…

Making
Weta Workshop’s 3D-Printed Giant Eyeballs!
When Adam visited Weta Workshop early last year, he stopped …

One Day Builds
Adam Savage’s One Day Builds: Wire Storage Solutio…
Adam tackles a shop shelf build that he's been putting off f…

Show And Tell
Mechanical Dragonfly Automata Kit Build and Review
Time for a model kit build! This steampunk-inspired mechanic…
Those RGB addressable ones look pretty awesome, I am getting the itch to tinker.
I had four reels of these lights wrapped around my Christmas tree. Lots of fun to program.
pics of the final install!
What great timing for this article. Amazon just delivered my first strip of LED lights today. I also got a dimmer switch, because I want to use them to light my desk area which is under my loft bed and doesn’t get much light.
Now my only problem is where to place them. They are kinda bright so I don’t want them directly in my face. Anyway, i’ll figure it out.
If anyone is interested I modified Adafruit’s LPD8806 Arduino Library to work with ATtiny 85. Technically the library should work with the entire ATtiny series, but I have only tested w/ the 85.
I ended up creating my own circuit for a back-lighting system for my wife’s Harry Potter wand collection case. Here’s the link to my GitHub repo . I’ll post pictures and help out if anyone wants.
The best thing about strip lights is “we can install LEDs with variety of colors “. It adds a cool and fashionable look in decoration.
you can come to the site http://www.ledlightshub.com for more LED lights if you like.
Great writeup! I would only comment that the linked kit for getting started is WAYYYYY!!! overpriced. You can pick up the same if not better set here (waterproof) from Amazon. I have purchased several from this company and they have worked very well with great customer service – Link to Amazon
Hi , as an old retired gent i was wondering if this controller would do the following.
I want to install led strips lights from my car driveway into the garage to come on sequentially like a ‘batman’ does with aeroplanes.
I need the light to come on one (and stay on) after the other in say 1 sec intervals until the whole strip is lit up for say 5 sec and reset to start over again.
Any ideas for a semi senile former electronic engineer?
The kit you linked to uses the 5050 LEDs but they are not individually addressable. Completely different as every LED on the strip from Amazon will be the same color at any given time. The addressable strip allows you to control individual LEDs but I don’t think they were needed for this project as it is back lighting and I don’t see the need for addressing the LEDs here.
This is LPD8806 digital strip in 32pixel/m, but now, there are high density 60pixel/m lpd8806 led strip in the market,really interesting.
I’d like to see how you added the function buttons and maybe an idea of the programming that you used to get the different modes.
Led Strip Lights – led light strip is a generic term used to describe the many
different types of led lights that come in strips.
Can someone help me how to get this same set up but instead of plugging into a wall, have an external battery power source so I can take this portable?
I want to know if this controller can support[url=http://www.szledcolor.com]ws2813 led strip[/url]
Awesome tutorial, this is really going to help me out with starting a project of my own. Great job explaining your steps and the hardware you used. I’ll need it while just getting into this stuff. Thank you!
What is the code for this project?
Fantastic! Ordered it, came in yesterday, and just got it working tonight after work. Wow, wow, wow!
Plan to use it on front of our lead electric car in our upcoming Christmas parade here in Kauai for KauaiEV.org. We’re trying to make the point that EVs are here, they’re fun to drive, and they kick ass. And oh, yea, they help with global warming.
Thank you for pioneering this, writing this code, and sharing it. Can’t say thank you enough.
Hello, I have a project I’m working on. I was hoping to get you insight. Would you mind taking a look?
I think APA107/NS107S RGB&White addressable LED is more compatible with Arduino
Thanks for sharing this precious information with us. this help me a lot in my project.
Best view i have ever seen !