


The Zoidberg Project, Part 7: Sculpting the Details
As Frank gets closer to finishing the final form of Zoidberg, he talks about the importance of getting the shapes right and how he approaching applying the finer details. Some really helpful tips for clay sculpting in this update to the Zoidberg Project!
A lot of sculptors I know agree that the major shapes and forms of a sculpt are more important than the smaller details. You have to get the macro design right before you work on the micro. I think about sculptors like Henry Alvarez who did a ton of the sculptures for Rob Bottin back in the day. If you look at Henry’s sculpt of the Darkness makeup from the movie Legend, there is practically no texture or fine detail. It’s all about the forms. But like with other aspects of art, poor finishing can ruin a sculpture.
The good news is that I have the form of Zoidberg pretty well-figured out. I landed at more of a smooth and cartoony interpretation of the character than some of the more intricate or monster-y designs that I dug up as reference and inspiration. I’m still trying to incorporate some natural human and animal anatomy–always thinking about that bone, cartilage, or muscle structures might be going on underneath the “skin” of the sculpt.
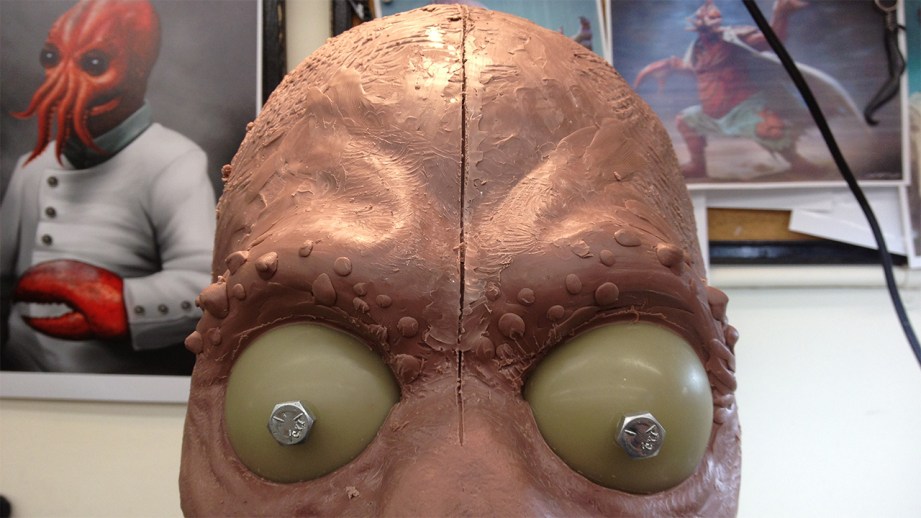
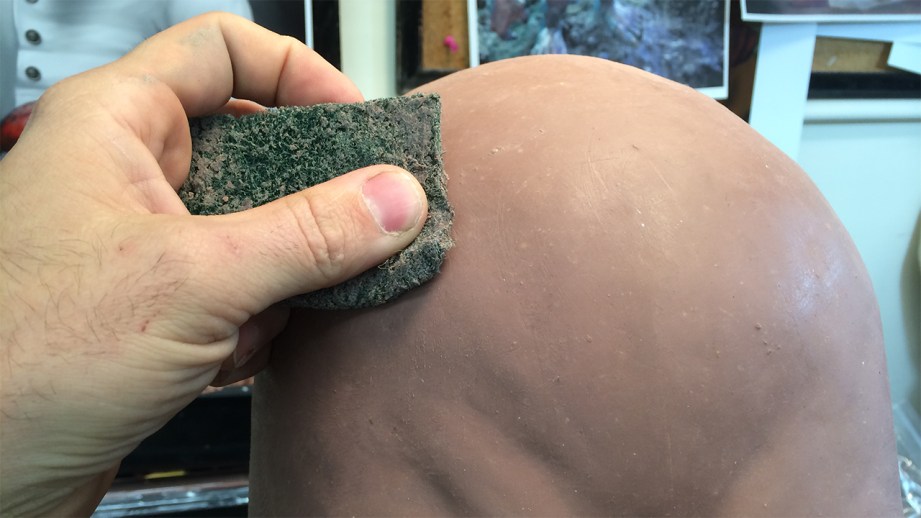
In some of my photos from past updates, you can see a line carved down the middle of his face–this helps to keep things symmetrical. It’s sometimes difficult to notice if I’m sculpting one side lower or heavier than the other, and I tend to favor my left side (the sculpture’s right side) because I’m predominantly left-handed. I’ve spent a lot of time trying to sculpt and paint ambidextrously, but I still favor my left. Once I get the forms raked out and uniform between those sides, I want to start smoothing out the surface. This happens in a few steps. First I’ll start with larger rakes and move to smaller rakes, eventually moving down to a scotchbrite pad.Then maybe I’ll apply a little bit of naphtha with the scotchbrite pad to get it very smoothed out, or at least good enough for the next step.
In terms of sculpting, I often get asked about what solvents to use with clay. I spoke about WED clay when I was making the arm sculptures, and the solvent for that clay is water (since it’s a water based clay). When I use Chavant, Kleen Klay, or Roma (which are oil-based clays), I will use 99% alcohol as the solvent. And with Monster Clay, which is technically an oil-based clay, but much more like a wax, I use naphtha.
Solvents should be used sparingly, though. When I was starting out, I had the tendency to slurry up all of my sculptures and just scrub everything down. But as I became more aware of my sculpting technique, I use the solvents much less, or only to achieve certain finishes. Sometimes you have to just let the clay do what the clay is going to do.
One other thing you can do with the solvent is make a jar of a slurried clay for detail finishing. Sometimes I’ll use turpenoid or lacquer thinner, and use this slurry to stipple in some detail at the end. This can help fill in lines that look too much like tool marks, or just give a fine bumpy texture as opposed to a slick polished finish. You can also use a small syringe to add raised texture with this slurry. It can end up looking like goosebumps, or whatever else you might honk up. Not all fishing texture has to be a removal of clay, having some texture that is additive is a great way to break things up.
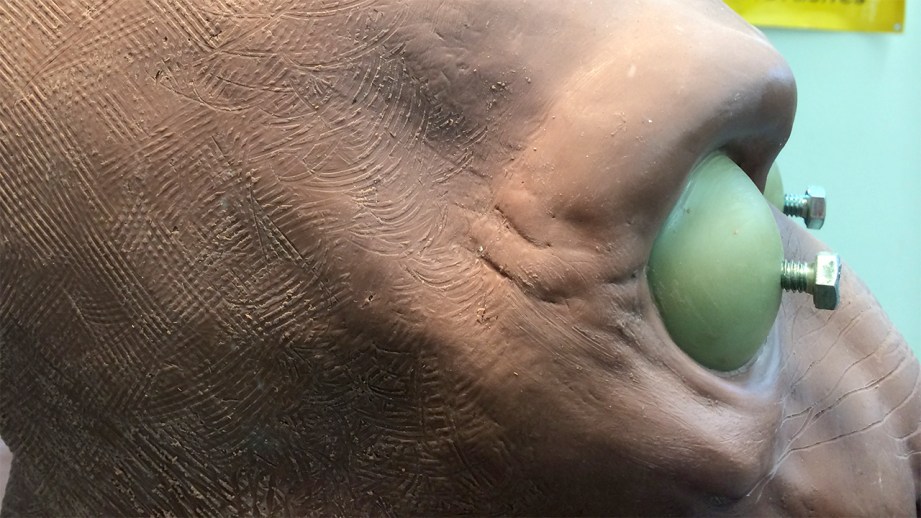
When I get close to the end of sculpting I end up finessing small areas and forms a lot. This involves making sure that transitions and angles of things are correct–in Zoidberg’s case, finding the balance of how much his eye bags should be present. In earlier versions, they are heavier and bonnier, but I think Zoidberg would be a little chunky, so I filled in some of the forms and smoothed them out. I think this eye bag shape is important because it’s definitely visible in the cartoon. Carrying over little things like that are important to translating the character to a three-dimensional form. Hinting at his bean-shaped head was an important balancing act, too. I don’t want to do a literal translation of the character’s cartoon silhouette, so, I just implied some of the shapes.
Adding things like crows-feet around the eyes or the lip texture add some lifelike qualities. I definitely don’t want it to be all smooth shapes.
Some of the conceptual designs that I am looking at for reference have a ton of barnacle texture and bumps–things I don’t want to have on our version of Zoidberg. I sometimes see sculptors load up the texture and detail in their work, and sometimes it ends up being kitchen-sink detail. Overloading the sculpt with texture isn’t my style. Same can go for paint–I’ll have to find a good natural feel to the colors. And with the paint job in mind, I need to be thinking about what will read through the paint and what will be accented or toned down with color. I want the sculpture to stand alone without color, so working under a strong overhead light helps me see what kinds of shadows appear and how the light affects the shapes. That way, when I get to the coloring portion, I don’t have to fudge what I’ve done already. The forms and colors can compliment each other.
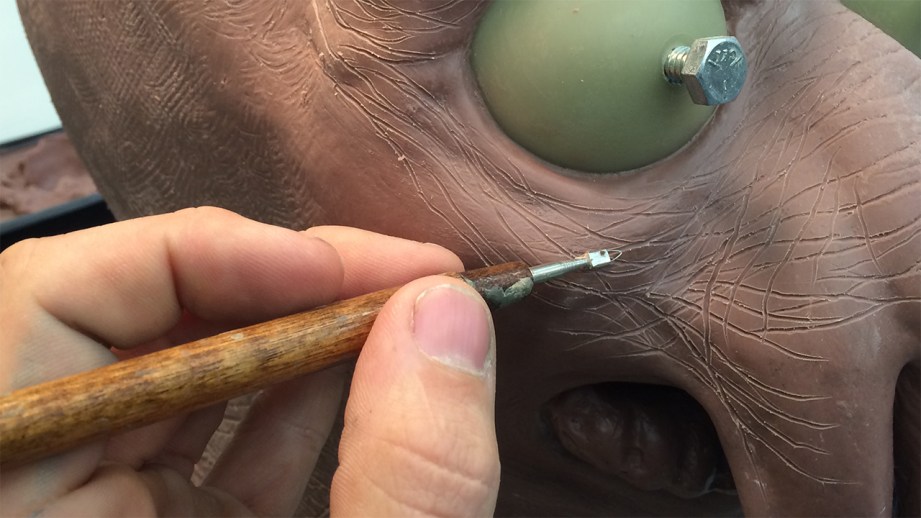
The next thing I have to do is lay in some wrinkles. A mistake I often see with new sculptors is that they just scratch the hell out of their clay in all kinds of directions, and all over. You have to think about the placement and direction of the wrinkles. You have to think about which direction is the skin going to be crinkling and where would a line form, or not form. I also want to be aware of how the foam latex cast is going to want to move and wrinkle on its own. By sculpting wrinkles and forms in certain places, I can control how the final foam mask will bend or crease. Thinking ahead!
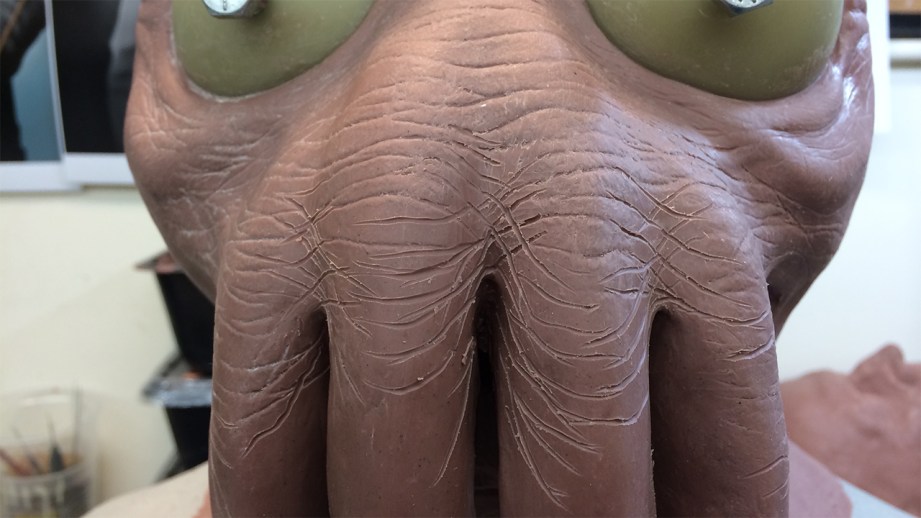

Wrinkles often intersect, and if you think of them as stretched out X or Y shapes it will help your sculpt some achieve more realism. Also, I don’t always see wrinkles travel very far without being broken up. Meaning they start and stop often, and it only appears to be one long line when looked at from afar.
I don’t think I will add pore texture, because it don’t think decapods have pores, but I will integrate some raised texture with that clay slurry mentioned earlier. I can also intermittently soften the forms or wrinkles with a little rubber nub tool. This thing can be found in most office supply catalogs as a money or paper counter, and is super helpful when finishing out sculptures. It has little bumps all over it that can help simulate pores or negative bumps shapes, or can just be used as a fine soft rake.
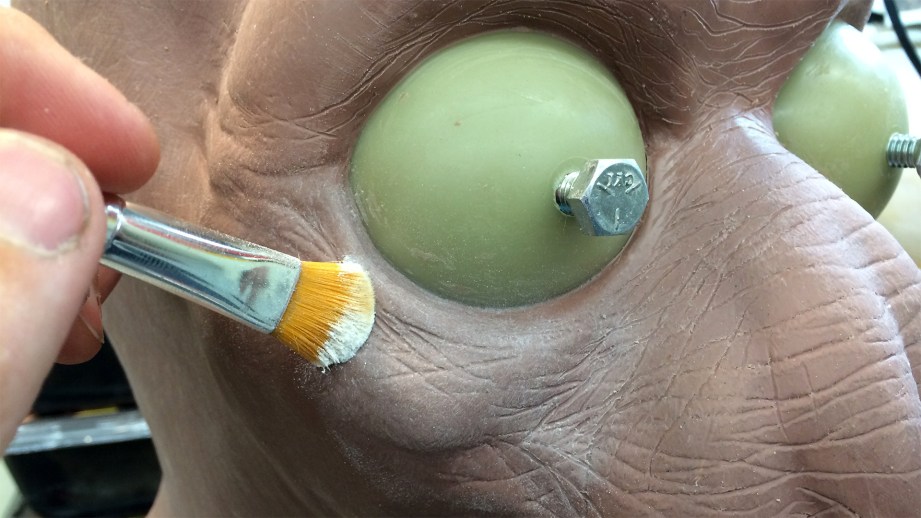
When I’m nearing the finish point, I will take some baby powder and a brush and polish the whole sculpt down. This softens some of the sharp lines and textures without washing it away with a solvent. Getting to that point is easier said than done. Sometimes I can zen-out while cruising to finish a sculpture, and sometimes it’s like pulling teeth to sit still for hours and just finessing one fine detail.
Thanks to Iwata-Medea and Smooth-On for providing materials and sponsoring this project.


6 thoughts on “The Zoidberg Project, Part 7: Sculpting the Details”
Leave a Reply

One Day Builds
Adam Savage’s One Day Builds: Life-Size Velocirapt…
Adam embarks on one of his most ambitious builds yet: fulfil…

Show And Tell
Adam Savage’s King George Costume!
Adam recently completed a build of the royal St. Edwards cro…

All Eyes On Perserverance – This is Only a Test 58…
We get excited for the Perserverance rover Mars landing happening later today in this week's episode. Jeremy finally watches In and Of Itself, we get hyped for The Last of Us casting, and try to deciper the new Chevy Bolt announcements. Plus, Kishore gets a Pelaton and we wrack our brains around reverse engineering the source code to GTA …

One Day Builds
Mandalorian Blaster Prop Replica Kit Assembly!
Adam and Norm assemble a beautifully machined replica prop k…
House of MCU – This is Only a Test 586 – 2/11/21
The gang gets together to recap their favorite bits from this past weekend's Superb Owl, including the new camera tech used for the broadcast and the best chicken wing recipes. Kishore shares tips for streamlining your streaming services, and Will guests this week to dive into the mind-bending implications of the latest WandaVision episod…

One Day Builds
Adam Savage’s One Day Builds: Royal Crown of Engla…
One of the ways Adam has been getting through lockdown has b…

Making
Adam Savage Tests the AIR Active Filtration Helmet…
Adam unboxes and performs a quick test of this novel new hel…

Making
Weta Workshop’s 3D-Printed Giant Eyeballs!
When Adam visited Weta Workshop early last year, he stopped …

One Day Builds
Adam Savage’s One Day Builds: Wire Storage Solutio…
Adam tackles a shop shelf build that he's been putting off f…

Show And Tell
Mechanical Dragonfly Automata Kit Build and Review
Time for a model kit build! This steampunk-inspired mechanic…
Yay for the most recent Installment of this wonderful project
Thanks for another great read, Its looking great
Seriously thank you so much for sharing this project, its amazing, cant wait to have a go at all this myself
This is *really* shaping up nicely, looks great even in raw clay.
Thanks for showing us how you are getting all the surface details on this scuplt, Frank.
It’s turning out great! 🙂
Absolutely gorgeous. Thank you for taking the time to share.
good stuff Frank! the wrinkle work really impressed me that and how you balance overall shape with detail. keep it up!!