


Maker Profile: Jeremy Williams’ LED Pixel Art Game Frame
We chat with Jeremy about the making of the Game Frame and his love for pixel art.
For those of you who’ve been following this project since last summer, today is an awesome day: Jeremy Williams just launched his Game Frame Kickstarter. Jeremy–a friend of Tested who you may have heard on our podcast–first showed us his Game Frame prototype when it brought it to our office last year for video demo. It was just a fun personal project–Jeremy loves 8-bit pixel art and wanted to find a way to display it on his walls. And that’s what’s so great about this project; he wanted something that didn’t exist, so he made it. And taught himself more about Arduino programming and LED electronics along the way. There was no plan to make more than just the one; Jeremy’s in the making-shit-that’s-cool business, not the empire business. It was the feedback from you guys in that first Show and Tell that inspired Jeremy to keep iterating on his prototype and design a Game Frame that would be cheaper to build and easier to use. And based on our conversations with Jeremy since last summer, it was task much easier said than done.
I asked Jeremy to share the story of the new Game Frame and explain some of the technical challenges he had to tackle to make this project a reality.
Let’s start with the beginning. In conceptualizing the game frame, what were your goals and how did it inform the technologies and design you chose for it?
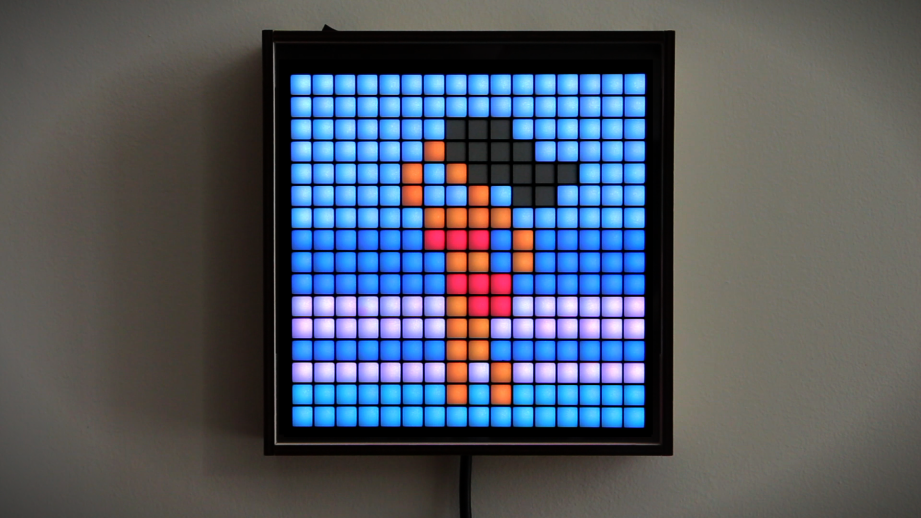
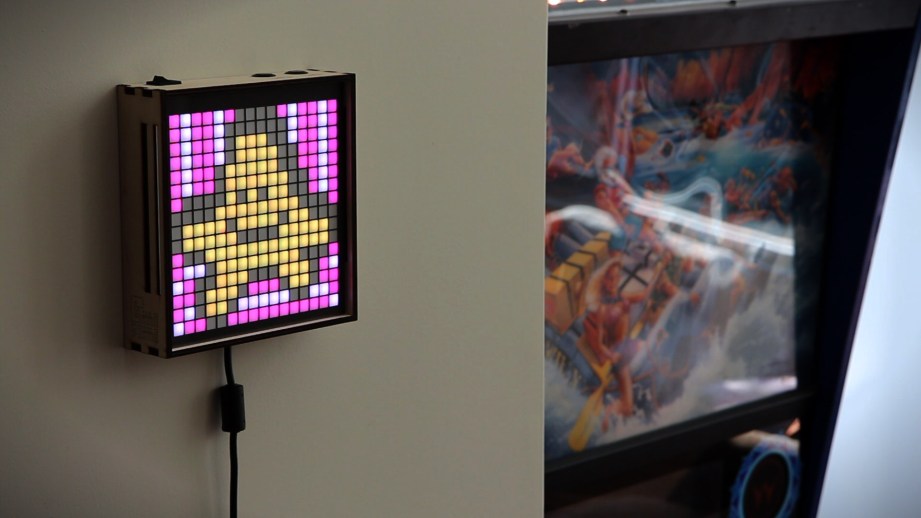
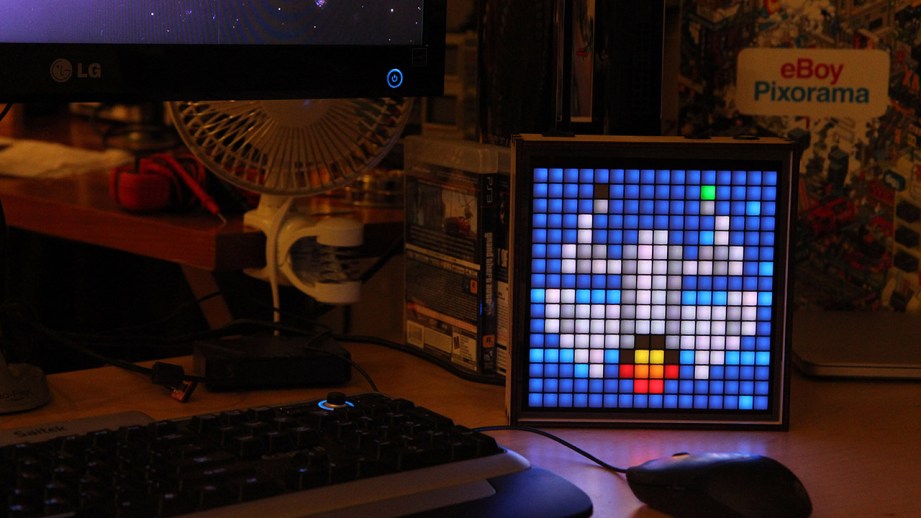
It’s called pixel art, so why not frame it? There are really two factors, at least for me: nostalgia and artistic merit. The earliest game sprites are powerful purely as memory triggers. Just seeing them is enough to make me smile about the “good ‘ol days,” when arcades were rotting our youth, MTV played videos, and email was something you sent on a BBS. A roll of quarters at age 10, in 1984, was worth its weight in gold — but I’d rather have the quarters. I played the hell out of Defender, Joust, Frogger, Burgertime, Tron. I can still hear the sound of an arcade. That’s just part of growing up in that generation. So I thought it would be cool to blow up some of that early art just to remind me of my youth.
But there’s also the pure artistry of it all. I’ve noticed that whenever computers are involved, people’s artistic radar gets scrambled. From video games, to the demo scene, to Pixar, computer assisted mediums just haven’t gotten their due recognition. With pixel art it’s especially frustrating because it’s so accessible. The problem with more modern computer-assisted crafts is most people can’t grok the creative process, but with pixel art you can. It’s painting with squares, and the best examples of this are an expression of sheer cleverness and minimalism. Maybe people don’t generally think of old game art as something that has inherent value outside of the game, but I do. I can watch the four frames of the Joust buzzard walk cycle any day, and always be inspired.
As for Game Frame tech, it turns out that if you want to frame early arcade sprites you need at least 16×16 resolution. That will get you comfortably to about year 1984, plus lots of NES content. Since I already had experience making an Arduino/microSD project, that was the most comfortable path, and the limitations of the Arduino chip map nicely to that number of pixels.
What were the technical or design hurdles to getting the specific look you wanted, and figuring out the electronics for the system?
“Pixel art is painting with squares, and the best examples of this are an expression of sheer cleverness and minimalism.”
Oh, man. For starters, the original prototype used LED strips that I cut and soldered into a grid. This took about four hours, and was obviously not acceptable for mass production. The Game Frame only became a serious possibility when I sourced a newly fabricated 16×16 LED grid from China. It made assembly practical, and the frame was based around its dimensions.
The original prototype ran on Raspberry Pi because code existed to display bitmaps on LED grids. Using Arduino meant writing that code myself, but I’m not a ninja coder. Thankfully code did already exist for displaying BMP files on LCD, and also separately for driving LED strips (thanks Adafruit!). I just had to connect the two techniques, and teach the code about the grid structure. By sheer luck, these particular LEDs buffer colors in nearly the same format as BMP files (a-ha!), so it really wasn’t that bad.
Early on, I couldn’t find the right diffusion material for the screen. Most plastics I tried were either too opaque or too transparent. It wasn’t until I took an LED down to San Francisco’s art mecca, Flax, that someone directed me toward various weights of vellum. That ended up being perfect.
The first prototype we saw a year ago looked great and ran on a Raspberry Pi. In designing the current version for Kickstarter, what refinements did you want to make and how did you get there?
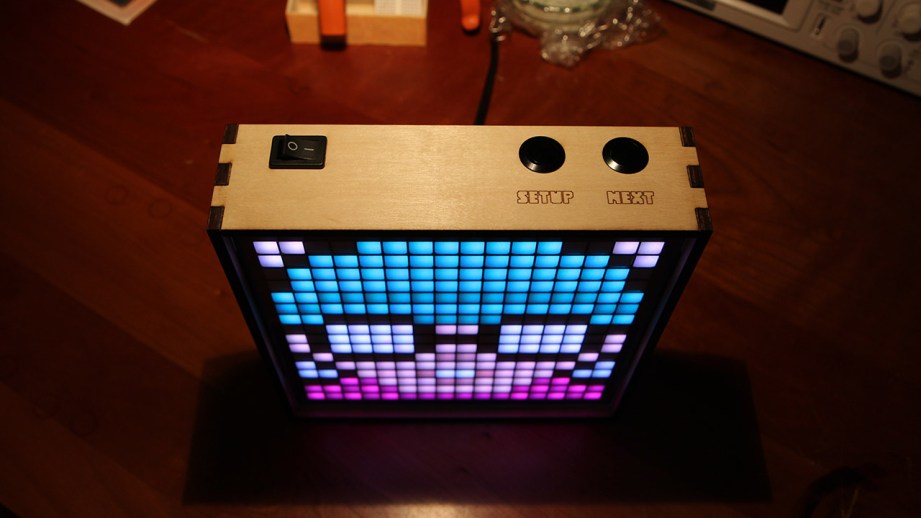
The transition from Raspberry Pi to Arduino was a big one, and it’s such an improvement. Now it boots instantly, maximizes system resources, and doesn’t need to be on stinking Wi-Fi. I hated that about the prototype. Now you just put your graphics on a microSD card, and away you go.
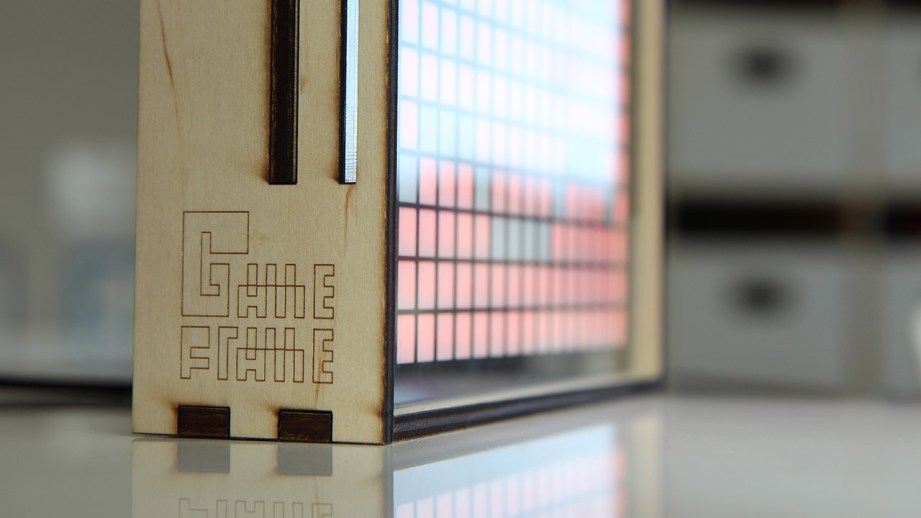
The original frame was really flimsy. It was cut from acrylic, sagged when hung up, and literally held the LEDs in place with a sheet of cardboard. It had screws all around the edges; really embarrassing. The new frame is 5mm wood, super sturdy, and is much more pleasing to handle.
“The biggest frame challenge was producing the thick interior mesh that isolates each LED light to its own pixel.”
The biggest frame challenge — easily — was producing the thick interior mesh that isolates each LED light to its own pixel. Early versions used 30 pieces of crisscrossed paper, but these were time-consuming to assemble and prone to heat problems. I tried laser cutting special model airplane Styrofoam, but it couldn’t handle the thin width of the walls between all 256 shafts. I got quotes from several CNC, laser cutting, and injection molding companies, and the ones that said it was even possible were cost prohibitive. I was about to ditch the project when I found one of those great partners that turns everything around. His innovative process produces a perfect, thin, opaque mesh from a single piece of plastic. Thank goodness for ingenuity.
Let’s talk about the art. How does the Game Frame process art, and what kind of animations can it show? Would it be possible to string several Game Frames together?
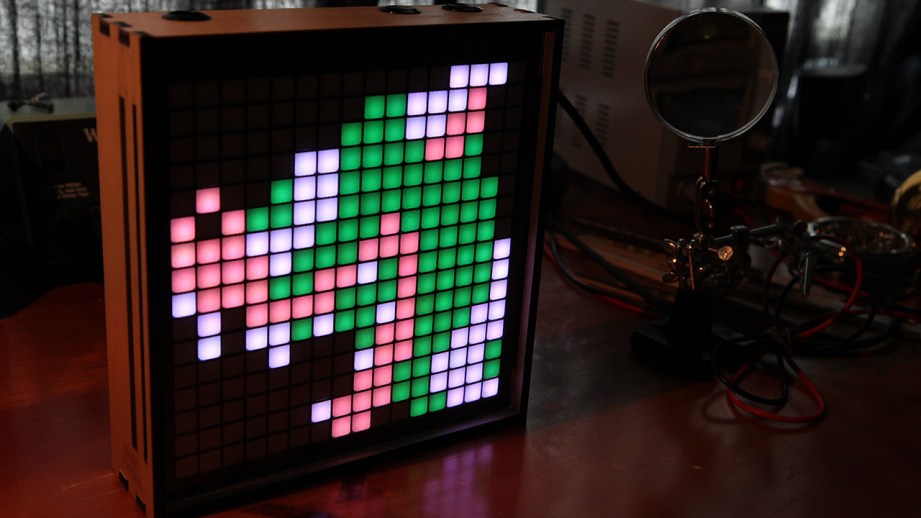
Game Frame loves 24-bit BMP files. It eats those for breakfast, lunch, and dinner. I know, it would be awesome if it supported PNG, animated GIF, or played Matroska files. That would be super sweet, but we’re talking about a 16 Mhz Arduino here. (Sorry, I’m being preemptively defensive.) The fact is, BMP is the most efficient format for this purpose, and allows for the best animation frame rates.
If you just want to show a single image, you just name your graphic 0.bmp and drop it into a folder with a name of your choosing. You’re done. If you want to create an animation, just add more files (e.g. 1.bmp, 2.bmp, etc.); thousands of frames if you want. It will loop through them until it’s time to transition to the next folder. However, the real fun comes when you add a special text file. This unlocks a bunch of animation controls that I hope people really dig into, like frame rate and moving your images across the screen. One of my favorite techniques is to make a film strip style graphic, with each frame of animation above one another in a tall, high resolution file. Then, you display it with instructions to scroll 16 pixels every frame, essentially projecting each “animation cell” like a movie projector does film. Since the SD card doesn’t have to seek for new files, you can achieve the best frame rates with this method (around 24 fps). You can literally convert video to 16×16 and show it this way.
Stringing multiple Game Frames together is enticing. Due to memory constraints, one motherboard can’t really drive more than its own pixels, and pushing enough power for multiples would be dicey at best. Out of the box, you could certainly setup the order of animations on SD and then turn on multiple Game Frames simultaneously. That would get you most of the way there, though they might fall out of sync over time. If this was a problem, you could add code to send/receive trigger signals from the expansion pins I exposed on the PCB, and use that to get perfect sync.
How can someone design their own 8-bit style art to put on the Game Frame?
Easy. Just buy a 6502 chip from eBay, learn assembly language… no, wait. Fire up an image editor and make a 16×16 image. Click around, save it out. Done. There are actually some great tools expressly made for pixel painting, including a good one I use on the iPad called Pixaki. It supports layers and outputs them as a Photoshop PSD file. There’s also the excellent “The Grix” app by my brothers at eBoy.
“Creating pixel art at this resolution is like writing a haiku. Anyone can do it in a matter of minutes, but it really makes you appreciate the good stuff.”
Creating pixel art at this resolution is like writing a haiku. Anyone can do it in a matter of minutes, but it really makes you appreciate the good stuff.
After the Kickstarter, what are your plans for the Game Frame design? Is it something that you hope users will modify and hack to iterate on the idea?
For starters, I just can’t wait to see what animations people make. I’ll have to setup a forum for that, where people can share tips and artwork. Beyond that, I’ll release the source code. It’s an interesting platform, and I’d love to see hackers transform it. There are expansion pins on the back that people can use to connect game controllers or other i/o devices. There’s even an Arduino NES controller library, so you could hook up a gamepad in about an hour with the right tools. Maybe someone will make games, an email notifier, twitter reader, or just code some abstract graphic patterns. This is all theoretical, and who knows if the Kickstarter will even succeed — let alone get into the right hacker hands — but I’m hopeful. Should someone modify the source code, it’s pretty easy for anyone else to update their Game Frame firmware as long as they have a USB FTDI adapter.
The Game Frame reward is only available for backers in the US. Any hope for people living elsewhere to get one?
This is a big point of frustration for me too! Unfortunately, distributing electronics outside the US requires both CE and RoHS certification, which is crazy expensive. Like, cancel-the-whole-project expensive. I will continue to research options, but I can’t ship Internationally until I can make it work financially. In the meantime, I suppose there’s nothing stopping someone else from shipping them overseas.
Update: Jeremy has now opened up a reward level for international backers and shipping!
Photos courtesy Jeremy Williams


40 thoughts on “Maker Profile: Jeremy Williams’ LED Pixel Art Game Frame”
Leave a Reply

One Day Builds
Adam Savage’s One Day Builds: Life-Size Velocirapt…
Adam embarks on one of his most ambitious builds yet: fulfil…

Show And Tell
Adam Savage’s King George Costume!
Adam recently completed a build of the royal St. Edwards cro…

All Eyes On Perserverance – This is Only a Test 58…
We get excited for the Perserverance rover Mars landing happening later today in this week's episode. Jeremy finally watches In and Of Itself, we get hyped for The Last of Us casting, and try to deciper the new Chevy Bolt announcements. Plus, Kishore gets a Pelaton and we wrack our brains around reverse engineering the source code to GTA …

One Day Builds
Mandalorian Blaster Prop Replica Kit Assembly!
Adam and Norm assemble a beautifully machined replica prop k…
House of MCU – This is Only a Test 586 – 2/11/21
The gang gets together to recap their favorite bits from this past weekend's Superb Owl, including the new camera tech used for the broadcast and the best chicken wing recipes. Kishore shares tips for streamlining your streaming services, and Will guests this week to dive into the mind-bending implications of the latest WandaVision episod…

One Day Builds
Adam Savage’s One Day Builds: Royal Crown of Engla…
One of the ways Adam has been getting through lockdown has b…

Making
Adam Savage Tests the AIR Active Filtration Helmet…
Adam unboxes and performs a quick test of this novel new hel…

Making
Weta Workshop’s 3D-Printed Giant Eyeballs!
When Adam visited Weta Workshop early last year, he stopped …

One Day Builds
Adam Savage’s One Day Builds: Wire Storage Solutio…
Adam tackles a shop shelf build that he's been putting off f…

Show And Tell
Mechanical Dragonfly Automata Kit Build and Review
Time for a model kit build! This steampunk-inspired mechanic…
Side note: i have volunteered my services to Jeremy to help assemble Game Frames for backers, if the Kickstarter is successful. Maybe that’s something you guys would like to see as a livestream?
as an intl. prospective buyer, can I collect one from you guys if/when you’re covering GDC?
Most certainly, it doesn’t need to be superprofessional, just a camera and some mics.
Yes 🙂
Yes. I also hope you bring Jeremy on This is Only a Test and discuss the Kickstarter experience in depth 🙂
Edit: He’s on route to be funded before the end of the work-day :p
YES! super psyched for this thing! NO! U.S. only :(, oh well hopefully one day we’ll be able to get it everywhere one day. Definitely would throw down a larger than normal shipping fee to get this to Australia.
well looks like this is funded…10k in a few hours, hope Jeremy is ready to make a lot of these
I’d actually like to hear more about the FCC approval process. What pushes something over the edge of needing certification when compared to sending out the raw components. Curious to know some of the rules and regulations are and what dealing with all that would be like.
I’m willing to bet that’s something that doesn’t cross a lot of DIY Makers who might want to a larger scale production run on something they’ve come up with.
I’ve been waiting for the Kickstarter to launch ever since Jeremy said it was going to be on Kickstarter.
I was debating getting the dark version and putting it all together myself but I thought about it and I barely have time to make things as it is. I’ve a Sega New Astro City candy cab that I started working on two years ago and it’s still not finished. Haven’t touched it in over a year.
So, $210 package it is, then. BACKED.
Really excited this is actually becoming a reality. Please do a stream, but don’t limit it to premium members only. I’d love to see a how-to video of Jeremy explaining how to load art and animation into it as well.
Live for only a couple hours and it’s just $218 from becoming funded… I think Jeremy may have under-estimated the demand for such an awesome little piece of technology. He better come up with some stretch goals real quick!
Bah, because I don’t have my passwords for my personal stuff at work… Had to wait until I got home and missed out on that early bird. Oh well, all for supporting Jeremy. Have wanted one of these since he first showed it on the site. So excited to have one
No shipping to Europe? http://www.reactiongifs.com/wp-content/uploads/2013/09/sad.gif
I really want one of these. Does anyone know where to get good images/animations that fit this? I swear I saw a link to a forum or something like that somewhere connected with this whole thing but I can’t find it anymore.
Also, I’m not sure how Kickstarter works. I wasn’t able to contribute because it reached the goal before I had the chance. Does that mean I can’t get one now or will they go on sale later? I would really like one of these and I’m not up on how Kickstarter works and how I can get one of these even though I didn’t contribute to the goal.
You should be able to still get one. There’s multiple tiers. The “Early Adopter” tier is sold out, but you can still get a completed one for $230. You can also purchase the components to put it together yourself starting at $60.
Oh cool! Thanks duder! I didn’t know exactly how Kickstarter worked and was concerned that it was a final deal once the goal was met. I really like the frame but I think I can make my own pretty easily. Not a bad price for one either, it looks like an awesome conversation piece.
No International shipping!!! Bugger, looks cool.
I’ve been looking forward to this for Months!! No International shipping to Canada!! ARG! Please Jeremy, think of something! 🙁
Holy bagels, man. What a day! Those of you saying I may have underestimated interest, you get a cookie. I’m still confident things will wind down to an acceptable level, but wow. I had no idea.
International shipments. Blame The Man, man! Stupid industry certifications. CE testing can run $10k, and that kind of cost is just out of the reach for this project. And that’s just for Europe. Every other country has their own standards. It’s nuts. So many barriers, even though Game Frame doesn’t have any radios (“radiators” they call them). Anyway, I am STILL looking into options, and remain open to any suggestions, especially from experts in this field. It’s a daunting area for small run electronics manufacturers like me, full of big price tags and legal liability.
Live stream? Whatever you want. The Tested community is the reason Game Frame is on Kickstarter at all, so I’m at your beck and call. Thank you all.
Super excited this has finally started. Can’t wait to get mine and do some coding.
don’t nail me to this, but I think if you would provide it as a self-assembly kit, you don’t need a CE certification.
Hopefully these are not all sold out before I scrounge up the funds for a completed version…
Put me down as another potential international backer, if something could be worked out. Happy to do some assembly if necessary (might help with shipping), and happy to source my own power unit too.
Am I the only one who hates the laser cut wood effect? Doesn’t matter anyway as I can’t kickstart it from the UK
This looks fantastic but wow… $230 for a completed one? Oi. My poor, poor wallet can’t make that happen.
That’s super disappointing about the US-only restriction. It looks great though, great work Jeremy Williams.
Is it just the board the requires certification? if so could we (ppl outside the US) buy the kit minus the board and replace it with an arduino?
More than twice funded in 24 hours? 🙂
Afraid it’s not just an Arduino. I designed a custom PCB that uses an Arduino Uno (ATMEGA328) for the CPU and connects it to an SD reader, buttons, and the LED headers.
Self-assembly. I’ve considered this, but it’s scary for QA & support concerns. There are two paper layers in the frame that could be easily damaged in transit or during assembly. I don’t know, I’ll have to think about it.
did you see my comment about GDC at the top? thanks.
From what I have seen in some basic searching, the 16×16 LED panel is $99 itself. So if your taking the DIY route it would seem just getting the $150 package would be the better deal.
That is unless you’re really only interested in the board.
I would have backed this, but since there is no international shipping, there is no point. 🙁
(Wish I could get one though)
No international shipping! Sad face!
Amazing looking final product though. If international shipping opens up I’ll order one in a heartbeat.
Sorry, the Kickstarter will conclude in early March, but I don’t receive funds for another two weeks, and that doesn’t leave enough time to have anything produced by GDC.
So sad I cannot order this, being from outside the US and all 🙁
Congrats on the kickstarter guys! Im super excited about this. If we add a couple bucks can we get an authentic “assembled by” Game Frame?
Backed! It’s pricey, I missed the early adopter package, but as a loong time Max PC, PC Gamer and Tested reader/listener, how could I skip this one? Also, it’s just so flippin’ cool. My kids (and I) are gonna love this in the house.
no extra bucks needed. it’s my pleasure to help and i’m sure we can run a fun livestream, as long as Jeremy approves of my assembly abilities.
Chipped in $10 and would have gone A LOT higher but the lack of International options for the Peoples’ Republic of Canada limited my options.
Yes International Shipping! Backed! Egg-Psy-Ted.