


Designing a Custom Arcade Cabinet in Sketchup
In preparation for our MAME cocktail cabinet build, Wes adapted blueprints found online to accommodate our four-player design. Here's how the designs for our cabinet were drafted in SketchUp.
As soon as Norm and I decided to build an arcade cabinet, we ran into a problem: We didn’t actually know how to build an arcade cabinet. We knew what we wanted, at least in general–a four-player MAME cocktail cabinet that could support fighting games and beat ’em ups and pretty much anything else we could throw at it. How hard could it be to find exactly what we wanted online, then replicate it at home? Turns out: Pretty hard.
ArcadeDepot, one of the most popular sources for arcade kits, was knocked out of commission by Hurricane Sandy. The other pre-built kits we looked at didn’t offer customization. That left user-built arcade cabinets to work off of. The Arcade Controls forums and wiki are great resources, with one unfortunate downside: Many of the projects linked on the site now lead to 10-year-old dead webpages, and most members only upload photos of their homemade arcade cabinets, sans dimensions or detailed blueprints. That left us with one good option: the detailed Pac-Man cocktail plans and assembly instructions created by Kyle Lindstrom.
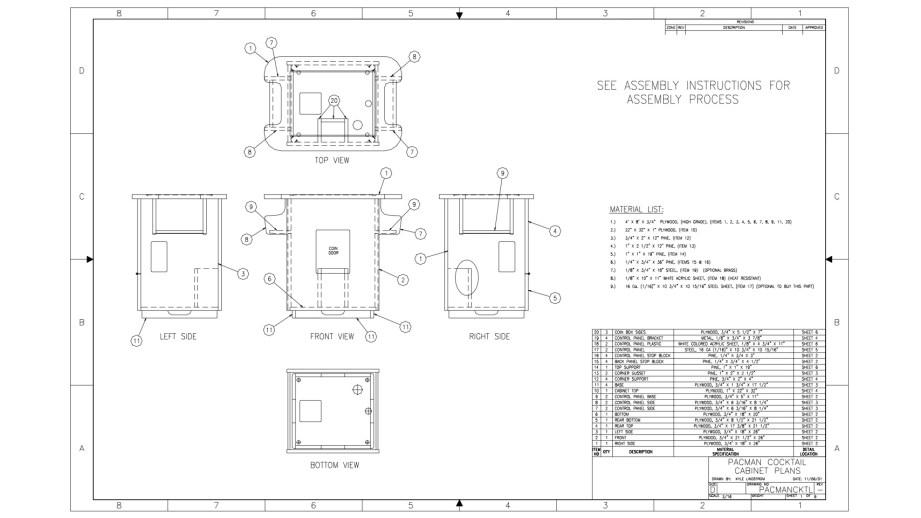
Most cocktail cabinets are heavily based on the original Pac-Man cocktail, with a few tweaks here and an added control panel there to support two extra players. To make those tweaks, I decided to recreate the Pac-Man cocktail cabinet in SketchUp. Once I had a 3D model of each part, it would (hopefully) be easy to piece them together, add another control panel, and change some dimensions while making sure everything still fit together.
After recreating the cocktail cabinet in 3D, the next phase of our build could begin: Creating a cardboard mockup, to make sure the dimensions of our modified design would give us enough control panel room. The cardboard build would also give us a good visualization of how the planned 19-inch arcade monitor would look in a slightly enlarged cabinet.
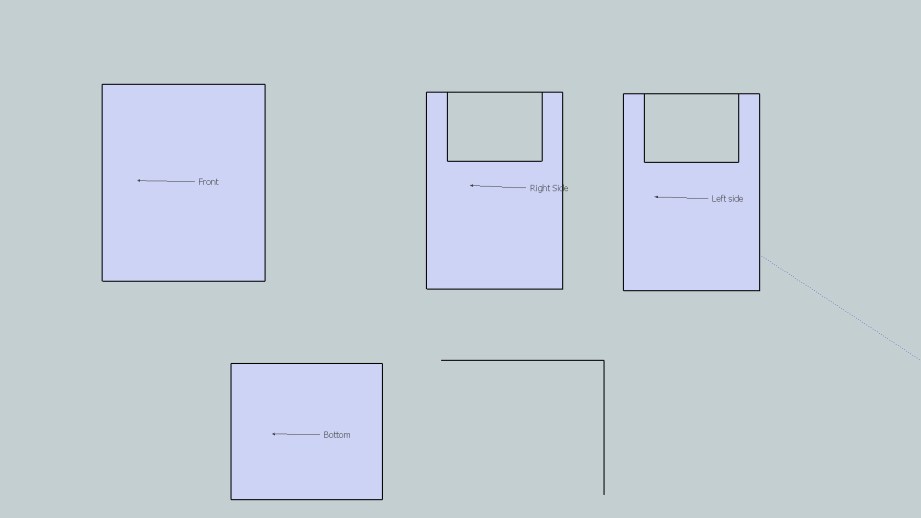
SketchUp is a free download, and offers templates upon startup to work in millimeters, inches, feet, and so on. I started with inches, and spent a few minutes fiddling with the 3D camera before settling on a top-down perspective. Then I started drawing each Pac-Man cabinet part in 2D.
Drawing the Parts
At first, the modeling was slower going than I expected. It’s been about eight years since I last used 3D design software, and I don’t remember much from my high school classes on AutoCAD drafting and 3D Studio Max animation. Even if I did, SketchUp has its own UI to learn. I first tried to draw rectangles and then modify their X/Y coordinates to fit Lindstrom’s dimensions. That didn’t work–once an object is drawn in SketchUp, individual dimensions can’t be modified.
For example, I was working with a rectangle. Because one line/side of the rectangle was attached to two other sides, SketchUp wouldn’t let me change its length. Doing so would require one of those other sides to move, changing the shape of the object. That would’ve been fine with me, since I would’ve changed length, then height. But it wasn’t an option.
SketchUp offers a scaling tool to change the dimensions of whole objects, but that didn’t quite do what I wanted, either. So I settled for the simplest option: Drawing one line, then typing in its exact length, doing the same for the second axis, and then drawing the next two lines to match. Thankfully SketchUp is good about offering snapping guides for straight lines. It didn’t take long to draw all of the rectangular parts. I labeled them along the way to keep track of what was what.
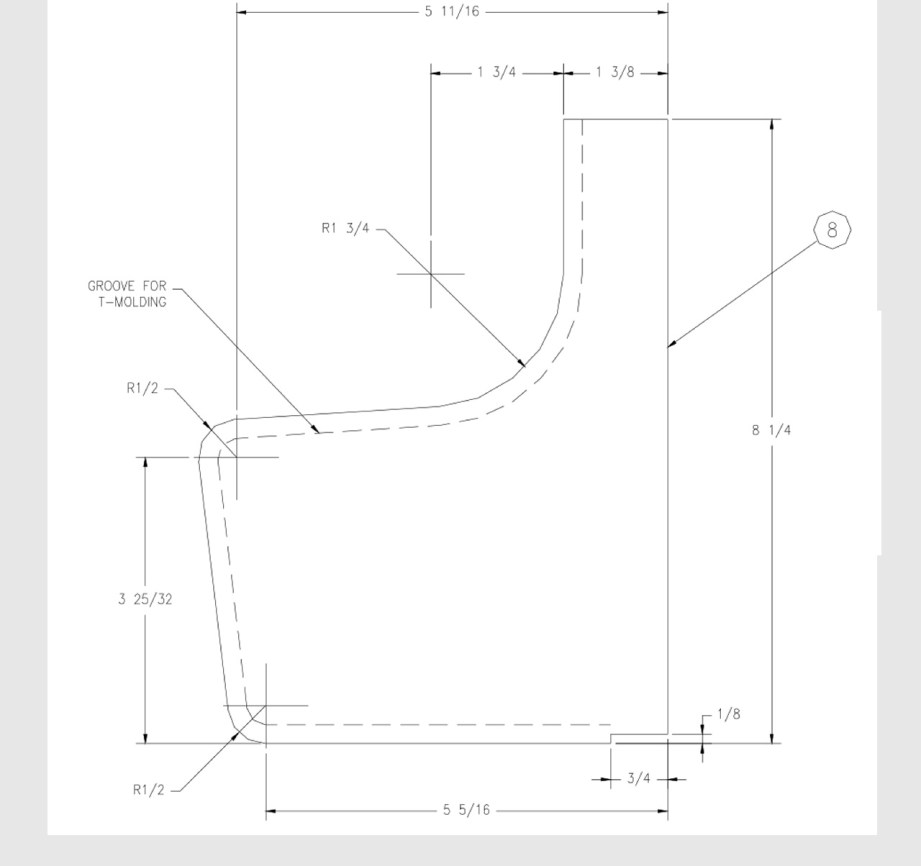
Drawing the top of the cabinet and the curved sides for the control panels was trickier. Those had curves. Instead of trying to perfectly reproduce the curves of the real parts, I decided to eyeball it using SketchUp’s radius tool. We won’t be printing out my 3D models and using them as patterns–the whole point of modeling is simply to give us a base we can work on and modify.
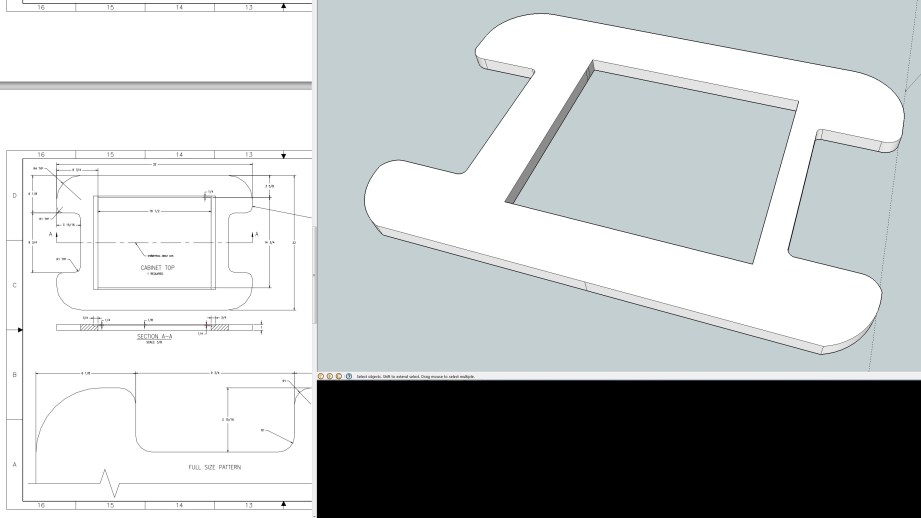
One side of my cabinet top ended up a little wonky, but that’s okay. I only drew one side of the top and mirrored it, when I could’ve drawn the top quarter and done both a horizontal and vertical mirror. But I found mirroring less intuitive in SketchUp than I remembered it from Autodesk software. I had to copy the part, paste a new piece, then flip it along an axis to mirror it, and getting the lines to connect and register a new solid object took a few minutes.
With all of the pieces drawn, it was time to extrude. Again I hit a small snag with SketchUp’s interface: I found the extrude tool, but didn’t know how to specify a distance to stretch my pieces into the Z axis. Instead, I moved the mouse very slowly, watching the numbers in the bottom right corner, where SketchUp displays dimensions, and let go once I hit 3/4-inch. That was the thickness of almost every part in the arcade build. Once everything was nice and 3D, I decided to copy all of my parts and use duplicates to assemble a model. That way, if I wanted to look at a part again, I wouldn’t have to pull it out of the assembly and mess around with the camera.
Digital Assembly
After a few complications, assembling the model turned out to be much easier than I expected. The first embarrassing roadblock I ran into was simply rotating pieces to the orientation I wanted them. Try as I might, I could never get an easy 90 degree rotation along one axis with SketchUp’s rotate tool, which I needed to do to line up the cabinet’s base pieces. A quick Google search led me to exactly what I needed–a Sketchup extension that added 90 degree rotations to the right-click menu. To use the rotation, I had to convert my objects–which were still comprised of individual lines and faces–into components, which are essentially solid grouped objects.
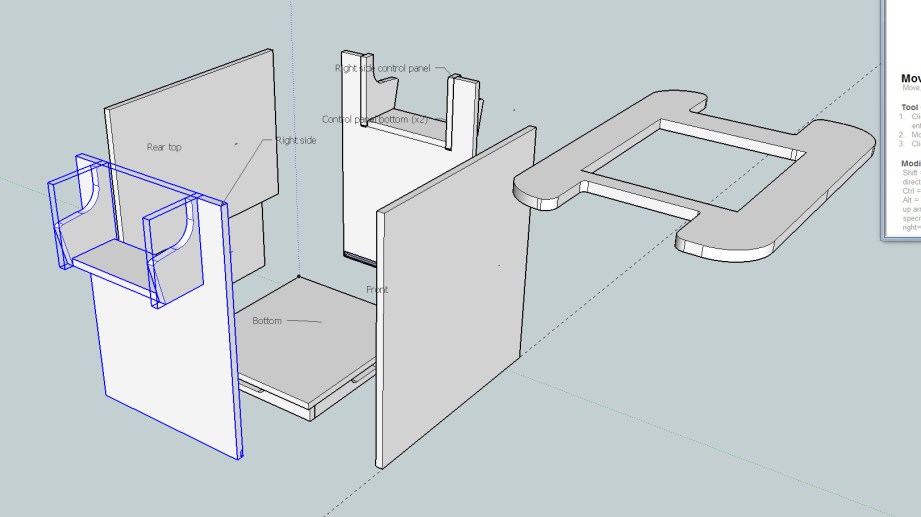
Once I’d converted my objects into components, I realized two cool things. One: Any edits I made to a component would affect every copy I had of that component. This came in handy when I discovered that I needed to make notches in a few pieces so that they would lock into place. Two: Selecting a component’s corner with SketchUp’s move tool allows you to snap that corner to another component’s corner. Once I figured that out, I was able to put together the entire cocktail cabinet in about 15 minutes.
There were only a few parts I didn’t render–internal supports that you can’t see, the coin box we won’t need since we’re building a MAME machine, and the control panels, since I wanted to create custom layouts for those. Adding the player-one-and-two panel to the front of the cabinet was the next step. Since the front panel was 21.5 inches wide, I decided to create a control panel to fit that and allowed for 3/4-inch on each side for supports.
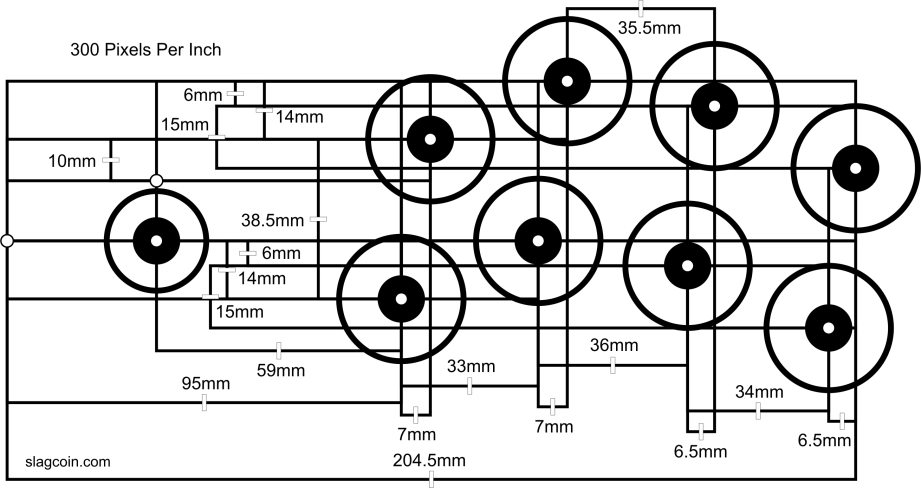
Fitting two joysticks and two six button layouts into that space was going to be a tight fit. Slagcoin, the site I turned to to research joysticks and buttons, also offers this nugget of wisdom about control panel layouts: “A big problem with many designs is there is not a large enough panel in front and on the sides of the devices to rest the hands. In addition to well-organized buttons and joysticks, a large enough empty space of panel should be available to rest the palms.”
Cramming the buttons and joysticks together would’ve offered more space, but I decided on the standard Japanese arcade layout used on Sega’s Astro City cabinets. That meant two curved rows of well-spaced buttons…and not enough room to fit both players comfortably on one panel. To make sure, I even imported Slagcoin’s layout diagrams into SketchUp and sized them to scale.
At this point, I essentially had the Pac-Man cocktail cabinet complete to its original specifications. The front panel obviously wasn’t going to be long enough to support two comfortable, properly spaced six button layouts. I also measured the dimensions of Ultimarc’s U-Trak trackball, which is more compact and easier to install than most arcade trackball options–it doesn’t require a giant faceplate to cover up its installation on top of the control panel. At this stage, we weren’t positive if we wanted to install a trackball or not, but if we did, it would be on one of the smaller side control panels. And those definitely didn’t offer enough space for a trackball.
We decided to add four inches to both the long and short sides of the cabinet, while leaving the height the same. To accommodate the possibility of a trackball, I also added an inch to the depth of the control panels, making them six inches deep. I ended up skipping modeling the front control panel, since it wasn’t in the original plans; it would enter the project during the cardboard phase.
Sizing up the existing components helped me figure out a couple SketchUp features that I didn’t get at first. The primary one was using the measurements field in the bottom right corner of the SketchUp window. First, I’d click on a component and use the “Scale” feature to stretch it out horizontally. When I was sizing pieces to the proper dimensions earlier, I didn’t realize I could type the exact dimensions into the Measurements box because it always looks like it was grayed out and disabled. But I could; it just looks disabled.
That didn’t work quite as well with scaling, because the scale tool uses a percentage relative to the original size of the component. With some math, I was able to come up with percentages for the pieces that needed to be scaled up 4 inches–like a factor of 1.33, for example–and precisely resize them. I confirmed the size of each piece with the tape measure tool before reassembling the 3D model.
With a complete 3D model that looked good, it was time to start cutting cardboard.
A Mockup with Cardboard
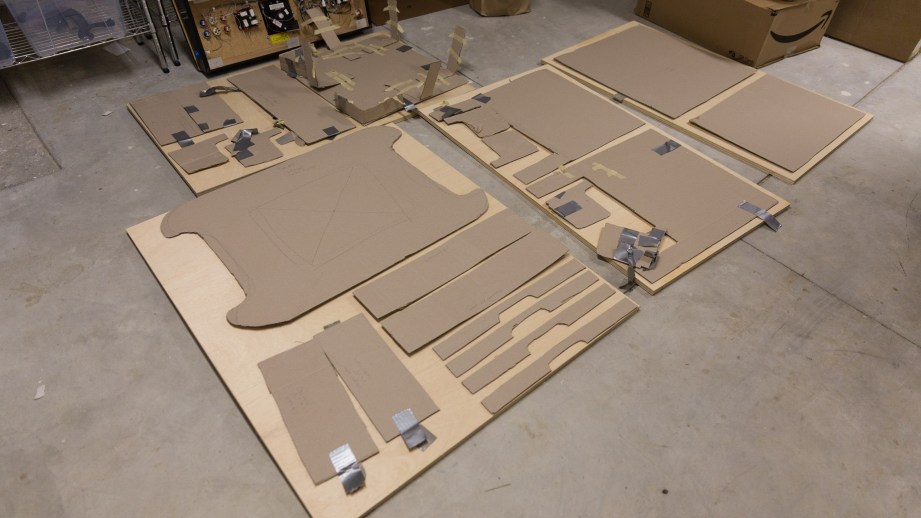
Since we didn’t want to jump straight into woodworking without a good model of what our arcade machine would look like, we bought a stack of 40×48 inch sheets of cardboard from Amazon. To recreate the 3D arcade cabinet, we worked off Kyle Lindstrom’s Pac-Man plans while adding four inches to the appropriate panels.
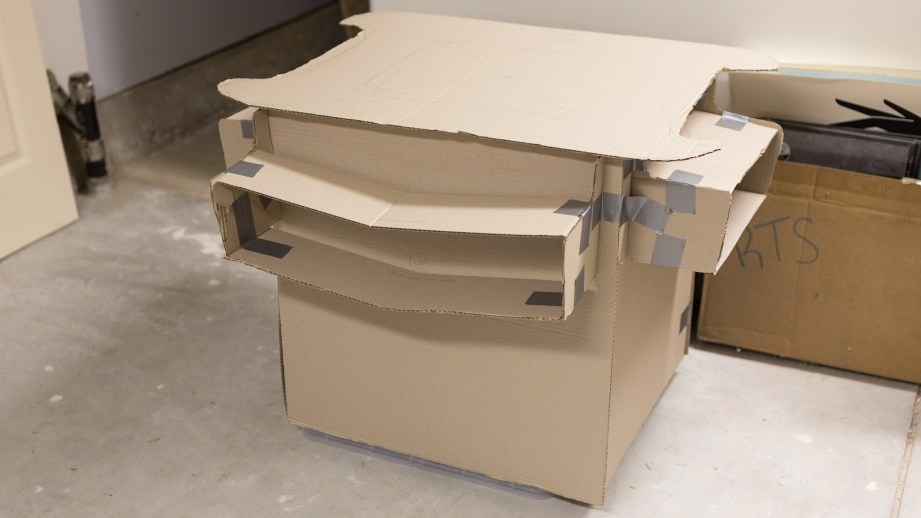
We drew each piece with a pencil, guestimated on the few curves in the design, and cut pretty quickly with a boxcutter. As a result, most of the pieces weren’t cut perfectly straight or exactly the right dimensions, but they were close enough for a mockup build.
Finally, with all the pieces cut out, it was time to assemble the cardboard into something that looked like an arcade cabinet. While the real deal will be held together with screws and glue, we opted for a simpler tool for the lightweight mockup: Tape. Lots and lots of tape.
To give the sides extra support and hold them together, we cut a bunch of scrap cardboard into strips and taped those to the corners, holding them together with masking tape and duct tape. Because we used cardboard, some of the dimensions weren’t quite right. For example, the side control panel width was designed to fit between two 3/4-inch wood supports. Our cardboard supports weren’t even close to 3/4-inch, so we were left with a gap.
But for the most part, everything fit together surprisingly well. Aside from the saggy front control panel, the cardboard cabinet held itself together and reassured us that the few extra inches we added would do the trick. It was time to buy and cut plywood to build the real thing.


16 thoughts on “Designing a Custom Arcade Cabinet in Sketchup”
Leave a Reply

One Day Builds
Adam Savage’s One Day Builds: Life-Size Velocirapt…
Adam embarks on one of his most ambitious builds yet: fulfil…

Show And Tell
Adam Savage’s King George Costume!
Adam recently completed a build of the royal St. Edwards cro…

All Eyes On Perserverance – This is Only a Test 58…
We get excited for the Perserverance rover Mars landing happening later today in this week's episode. Jeremy finally watches In and Of Itself, we get hyped for The Last of Us casting, and try to deciper the new Chevy Bolt announcements. Plus, Kishore gets a Pelaton and we wrack our brains around reverse engineering the source code to GTA …

One Day Builds
Mandalorian Blaster Prop Replica Kit Assembly!
Adam and Norm assemble a beautifully machined replica prop k…
House of MCU – This is Only a Test 586 – 2/11/21
The gang gets together to recap their favorite bits from this past weekend's Superb Owl, including the new camera tech used for the broadcast and the best chicken wing recipes. Kishore shares tips for streamlining your streaming services, and Will guests this week to dive into the mind-bending implications of the latest WandaVision episod…

One Day Builds
Adam Savage’s One Day Builds: Royal Crown of Engla…
One of the ways Adam has been getting through lockdown has b…

Making
Adam Savage Tests the AIR Active Filtration Helmet…
Adam unboxes and performs a quick test of this novel new hel…

Making
Weta Workshop’s 3D-Printed Giant Eyeballs!
When Adam visited Weta Workshop early last year, he stopped …

One Day Builds
Adam Savage’s One Day Builds: Wire Storage Solutio…
Adam tackles a shop shelf build that he's been putting off f…

Show And Tell
Mechanical Dragonfly Automata Kit Build and Review
Time for a model kit build! This steampunk-inspired mechanic…
Spending a fiev hours with SketchUp will save a whole lot of pain and tears later on.
Solving problems in design is far cheaper than trying to recover on the work chop floor.
Good luck guys.
Wow, Sketchup sounds like an absolutely frustrating program to use. You could model all the pieces and assembly with dimensions that you can tweak and modify in about an hour with a real CAD program.
Great article, Wes. I am looking forward to this series, as I also want to build a MAME Cab. Been grappling with the cocktail style cab, like you are building, or a more traditional standing cabinet.
You should look at Hyperspin for the front end. Though you are very far from that step in this series.
Check out the tutorials on Sketchup, there are much easier ways to do what you are trying to do. As Wassman said, an hour or two of the tutorials will save a lot of time and tears.
A really rough cardboard mockup might be a great idea for you if you’re going back and forth on the size. I’m not sure how much space constraints play into your decision, but if it is, then do a rough mockup and leave it where you want to put it for a little while and see if it’s annoying, awkward, ugly, etc in your intended area.
I moved my cab from my parents basement where I worked on it between summers in college to a smallish apartment living room that I shared with three other roommates. One actively wanted it there and took a bus 5hrs with me to my parents and rode with me in a U-Haul back, one was fine about it, one was kind of on the fence about it. Once we got it into the living room, it was definitely a bit awkward for the room. It left a relatively narrow passing space between it, the couch, and coffee table. The one on the fence about it wasn’t too thrilled with it especially since she had no interest in playing it. If it wasn’t so big, she probably wouldn’t have cared. I was ecstatic to finally have it in my post-college apartment and not just play the few times a year I visited my parents, so I didn’t care about the size.
Point is, a full size cab is deceivingly large from what you see in an arcade or something where it’s a big open area, high ceilings, etc. It amounts to basically having a refrigerator in your living room!
I agree, i’ve tried to use sketchup, having used CAD in college, and find it insanely maddening. I’m sure if I spent a lot more hours learning it, I could produce useful results, but it does not (to me) live up to the “CAD for everyone” name it was sort of marketed under.
Every time I use SketchUp it just makes me miss working on AutoCAD in back in high school. Every action seems to take twice as many steps.
C-Bol
I only tried it once for a few minutes when it first came out. Lots of people seem to have incorporated it into their design flow so I thought maybe it got better, but this article doesn’t make it seem like it has.
well to be honest, any article about a program or product written from the perspective of not really knowing how it works will give you that idea. Sketchup is a good program for conceptualizing things. Not really good for much else, I’ve found.
agreed. I use Sketchup as a concept artist, and while a model that I create in the program doesn’t make it into final artwork, it is a great first port of call to rough out perspective, and the relation of 3D objects to each other in 3D space. Very intuitive and idiot-proof. Not good for much other than sketches, as the name would imply.
C-Bol Same here. I use CAD every day for ~8 hours a day and sketchup just doesn’t work for me.
If you’re looking for a 2D drafting program there are a lot of free professional offerings now. Draftsight is the one I’ve used and is made by the company that makes SolidWorks http://www.3ds.com/products-services/draftsight/overview/
If you’re still taking classes and for non-commercial applications a lot of the professional 3D CAD software companies have student versions at a reasonable price. Autodesk Inventor even has a free 3 year student version, it’s the professional version so it comes with a simulation suite as well: http://www.autodesk.com/education/free-software/inventor-professional I’m not a huge fan of how Inventor controls but their outreach to students is pretty awesome.
All Autodesk software is now free for students, any student regardless of major or level, it is a pretty amazing program and can only help them broaden their customer base.
One of the issues I had with the “lid” was the cut-outs over the player controls on each side. I had decided to go with a specific art overlay after I’d cut the lid. And the machine I had chosen did not match the cut-outs of the Pac-Man layout. I had to re-cut the lid so it matched the final art work which matched the machine of choice.
As a hobbyist woodworker, I use SketchUp all the time, and find it an invaluable tool. I even use it to make pieces that are laser-cut and placed in my final pieces. Once you figure out how it works, it’s very quick to use (especially when you learned to properly use components and guides).
But I understand the frustrations of people coming from commercial CAD software that costs lots of money. There are certain things you just cannot do in SketchUp that are possible in other software. But if you’ve never used those programs, SketchUp is great.
I’ve yet to find a better free CAD program (since I’m not a student, “free for students” does not work for me).
I just used Sketchup to layout and design my Mame boxes (it is a new design for a mame system)
I was able to find models for my exact joystick and buttons – to ensure holes were the right size, and everything would fit in the box before hand – so a great resource for free.
Once you learn the shortcuts and tricks behind SU, it is just as fast as AutoCAD, for simple woodworking projects, and a lot easier to learn if you have never used a CAD program than it would be to jump straight into CAD.
Granted I have to run SU 8 to use an export to svc plugin, but I can also export all the faces to SVC – if it is a laser cut project! really easy to bring your conception to reality, granted it won’t make a cut sheet or run your table saw for you. but 3d printing and 2d laser cutting – it is above the curve for home makers!
could you email me the plans for the cabinet so I could build the cabinet myself.