


Bits to Atoms: Building an ‘Evil Dead’ Chainsaw
For Halloween, I'm going to show you how I made one of my favorite costumes. The parts and tools needed to build your own Evil Dead 2 chainsaw are all actually pretty reasonable. In this guide, I'm going to walk you through my process of building one, in which a key piece was replicated using 3D printing.
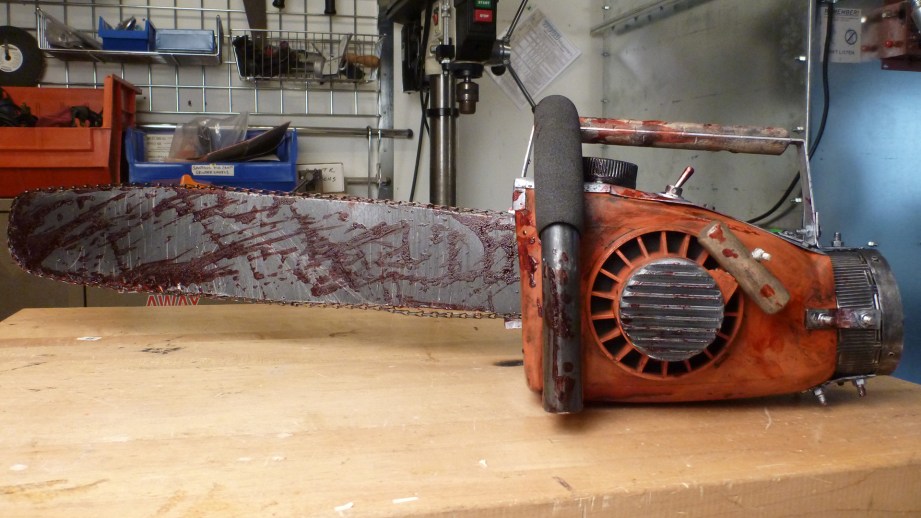
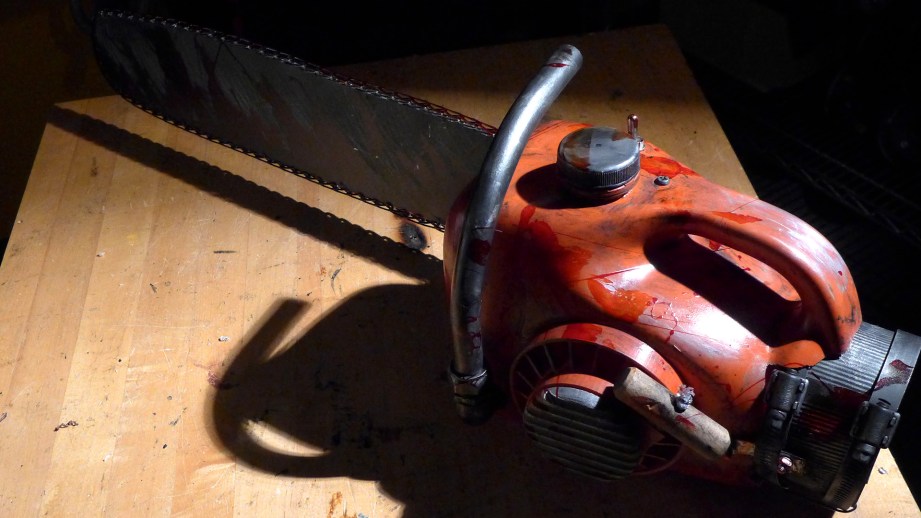
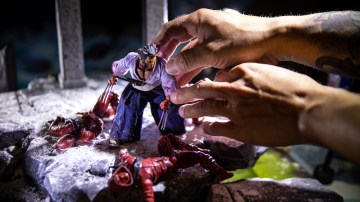
Evil Dead 2 is one of my favorite movies of all-time; one that I may have bought more times than even Star Wars. (I own it on Betamax!) My wife even took me to the site of the original Evil Dead cabin near her home in Tennessee. For those who have not experienced this gem, at a pivotal moment in the film, Ash, played the amazing Bruce Campbell, replaces his severed hand (which he cut off because it was possessed) with a chainsaw. He then uses said chainsaw to saw off the barrel of his shotgun, holsters it and as the camera zooms in, proclaims, ‘groovy!’. Instant classic.
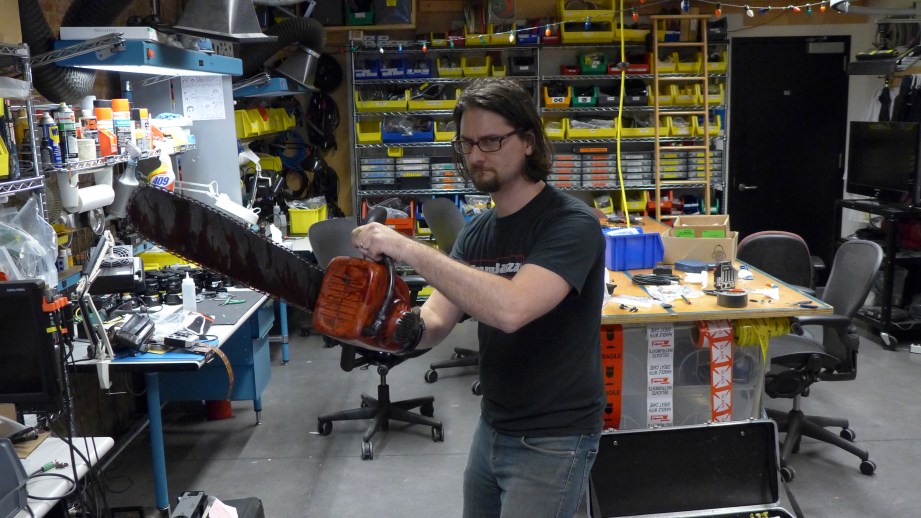
About three years ago, I find myself at the grocery store and look at a jug of Arizona Ice Tea. My brain connects the dots and I decided that it looked like the base of a chainsaw, which lead to me building an Evil Dead 2 chainsaw replica for Halloween. Unfortunately, that was also the same year Hurricane Sandy hit New York, so we were evacuated and Halloween was cancelled. But the year after that, I am even more ready with an exact costume that’s weathered and bloodied…and I get one of the worst colds ever which cancels Halloween again. Mark my words–this is the year that I will finally get to use my Evil Dead 2 chainsaw–and maybe you can too!
The parts and tools needed to build your own Evil Dead 2 chainsaw are all actually pretty reasonable. A key piece is 3D printed–I’ve provided the files for download–and we’ll discuss alternatives if you don’t have access to a 3D printer. To start off, I captured a bunch of screengrabs from the film for reference, but the best photos I found were from the excellent Evil Dead Chainsaws site, which makes amazing replicas.
The original prop was based on an actual Homelite chainsaw that was heavily modified and cast in plastic and rubber so Bruce could fit his hand inside and use it safely. I tried to duplicate key aspects of the original for my first version, which required some light metal work for the top piece and 3D printing the distinctive side-grill. For the version I’m presenting here, I’ve simplified the parts and process while still producing a killer chainsaw replica.
NOTE: I have posted an updated version of this guide on Instructables.
The Parts You’ll Need
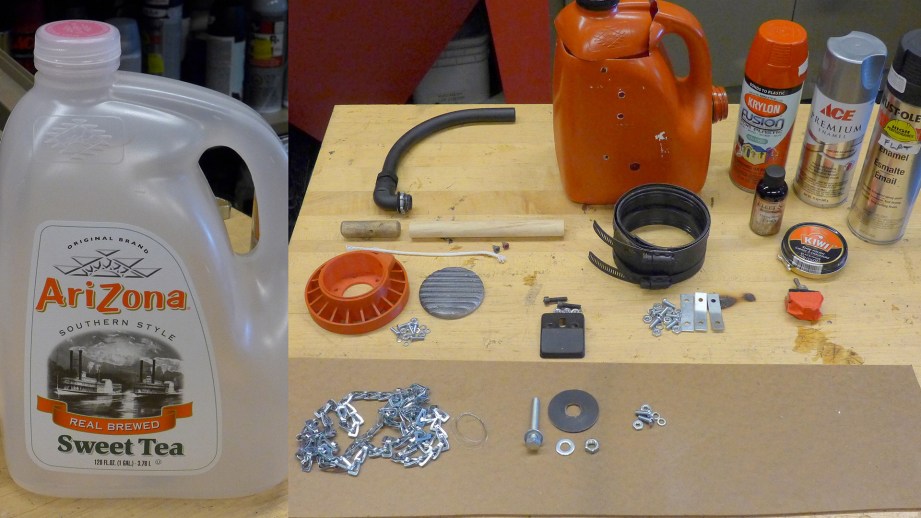
- 1 gallon Arizona Ice Tea jug
- 3″ or 4″ diameter hubless pipe clamp – 3″ should work for most people, I could only find a 4″
- 1″ or longer angle brace/brackets x3
- 10″ (approximate) ¾” dowel rod (or old broom handle)
- 6″ (approximate) thin rope, shoelace, etc.
- ½” diameter 90 degree conduit
- ½” diameter conduit compression fitting elbow
- 4 – 5′ sash chain – this depends on how large you make the blade
- 30″ x 5″ (approximate) piece of ⅛” MDF (fiberboard)
- 3D printed side grill – download here – or get a printed version here – alternatives are discussed below
- Small wood or drywall screws (for dowel) x2
- #6 x ½” – ¾” machine screws, lock washers and nuts x6
- #10 x ½” – ¾” machine screws, lock washers and nuts x8
- Large bolt approximately 1 ¾” long and nut – can be any diameter – for blade cover
- Large washer to match above bolt – needs to be at least 1 ¾” in diameter
- Thin wire for attaching sash chain
- Krylon Fusion Sun Dried Tomato paint – has to be Fusion or similar paint made for plastics
- Black paint (matte)
- Silver paint
- Black paste shoe polish
Optional Components
- Greeblie and screws for side–I used a basin hanger
- Toggle switch
- Varnish for dowel handle
- Fake blood (I used Fleet Street Drying blood, which is expensive but great. I used ‘Fresh’ but think I should have got the ‘Dark’ blood)
Tools Used
- Drill and bits
- Jigsaw or bandsaw
- Hot glue gun
- Wire brush
- Razor knife, scissors, etc.
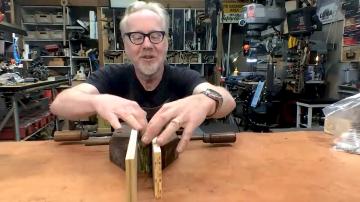
I was figuring out the best assembly order as I went along, so please forgive pictures not exactly matching the steps. I also managed to delete my picture with all the raw parts so the parts shown have already been painted, etc.
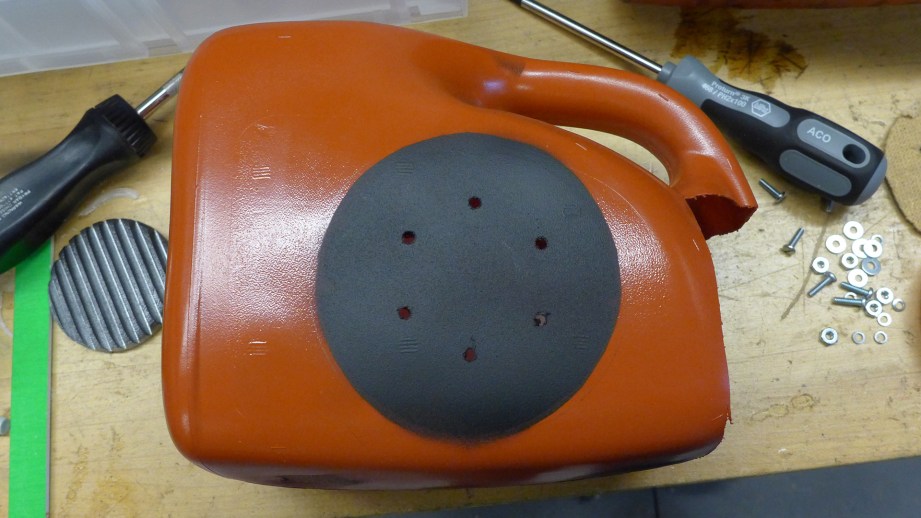
Step 1: Cutting the Jug
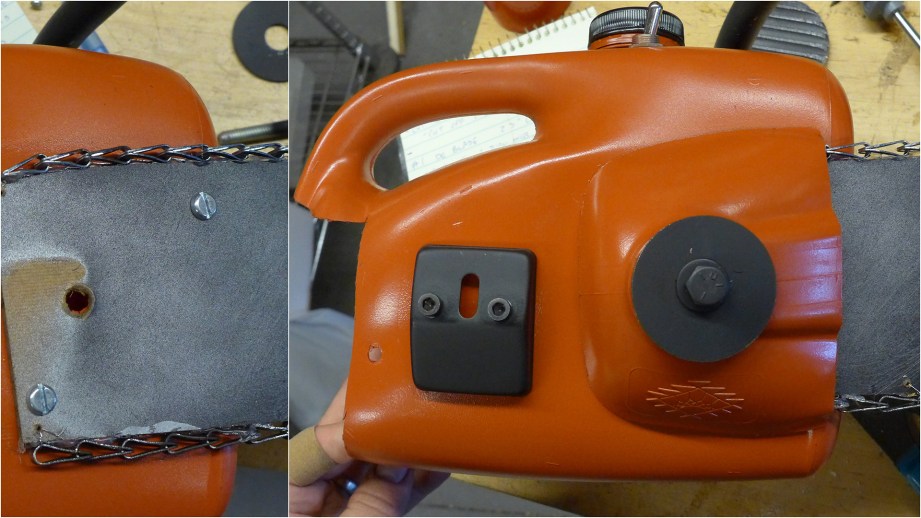
Use the pipe clamp to figure out exact area of the jug top to cut out – I made the clamp flush with what would be the bottom of the chainsaw. Make clean cuts since we will be using the top of the jug as the blade cover. Be careful, it’s tougher to cut than you think. I used a razor saw, but a razor knife, coping saw, hot knife, etc. should work as well.
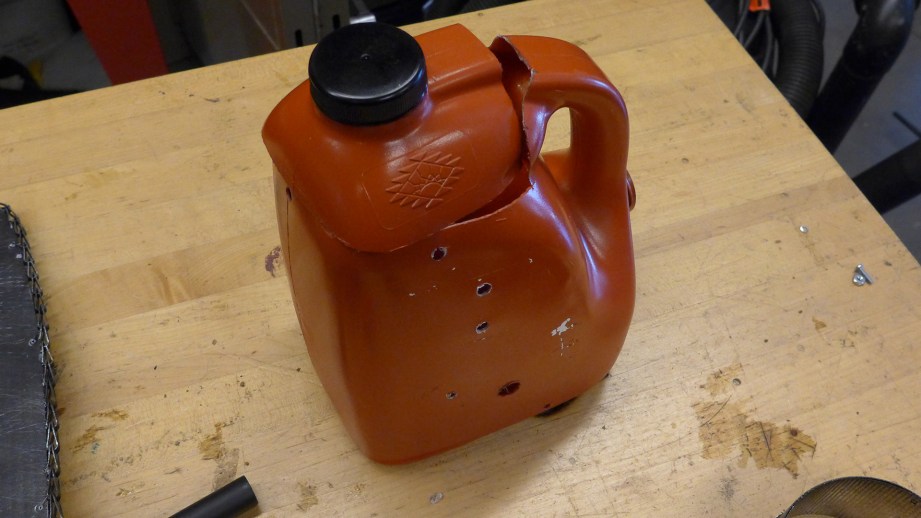
Take the portion we removed and cut the spout and lid off–we will use this as the gas cap.
Step 2: Mounting the Blade
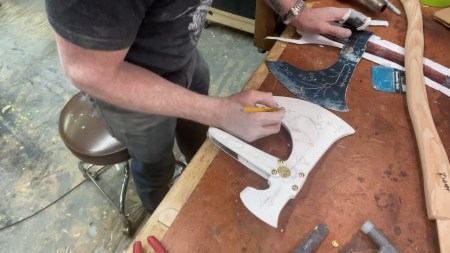
Plug in the hot glue gun to preheat. Meanwhile, draw a chainsaw blade shape onto the MDF–mine was 23″–the only exact measurement is the mounting-end which should be around 3″ wide to ensure the blade cover fits over it. We need to reserve at least a 4″ x 4″ square of the MDF for later.
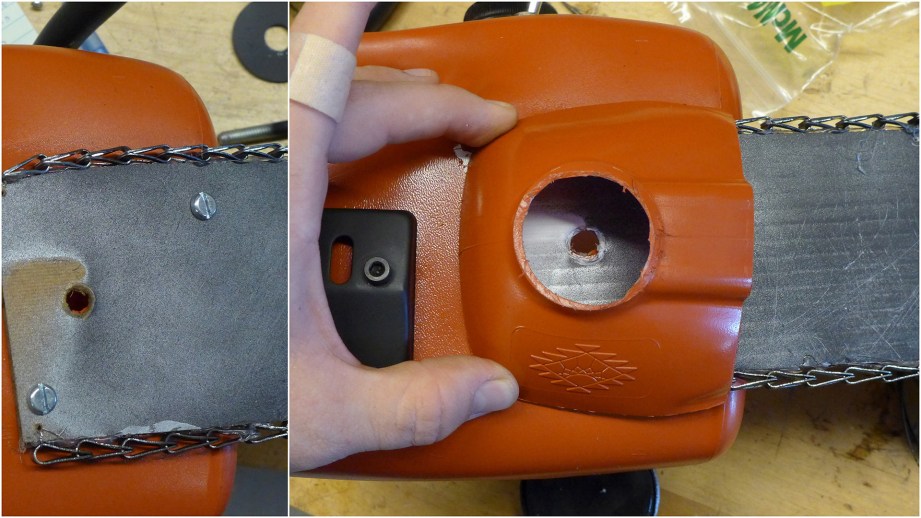
Cut out the blade with a bandsaw or similar tool. Place the jug top we cut off over the base of the blade and mark the blade at the center of where the jug spout used to be. Remove the jug top and mark two diagonal holes for mounting the blade–it doesn’t matter where as long as they fit under the blade cover.
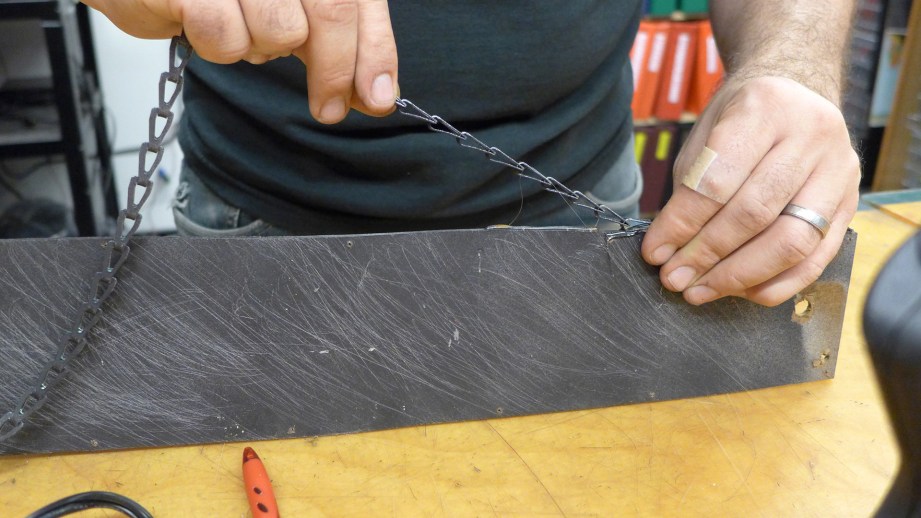
Drill out the diagonal holes for #10 screws and the center hole to fit the large bolt (1 ¾”) you have. Drill small holes around the edge of the blade about every 8″ or so for attaching the sash chain with wire – make sure to make holes at the very back of the blade at the top and bottom. Attach the end of the sash chain to the back of the blade with wire. Now use the hot glue to attach the chain the rest of the way around. Hot glue works pretty well, but as the chainsaw gets banged around, it will let loose in spots, so also use wire to attach the chain.
Give the whole blade a coat of silver paint and then a splotchy coat of black. Once dry, use a wire brush, etc to scratch it up.
Step 3: Drilling the Jug
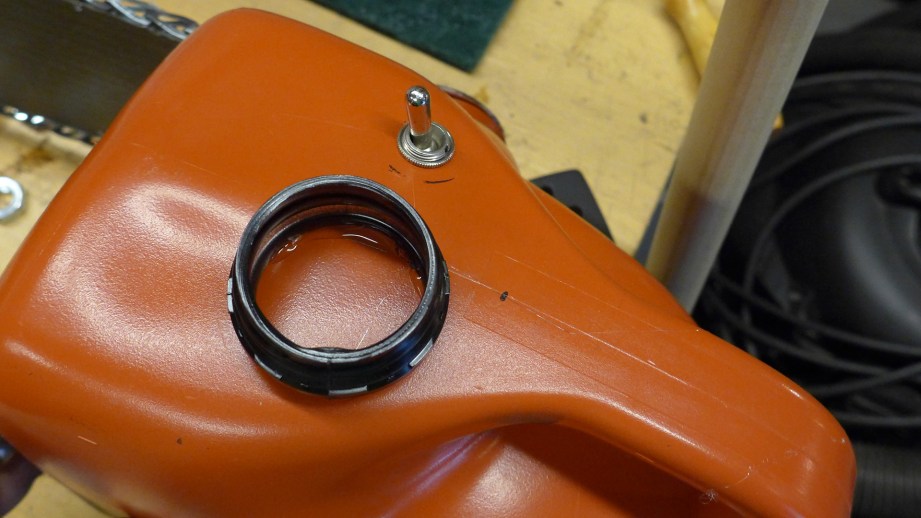
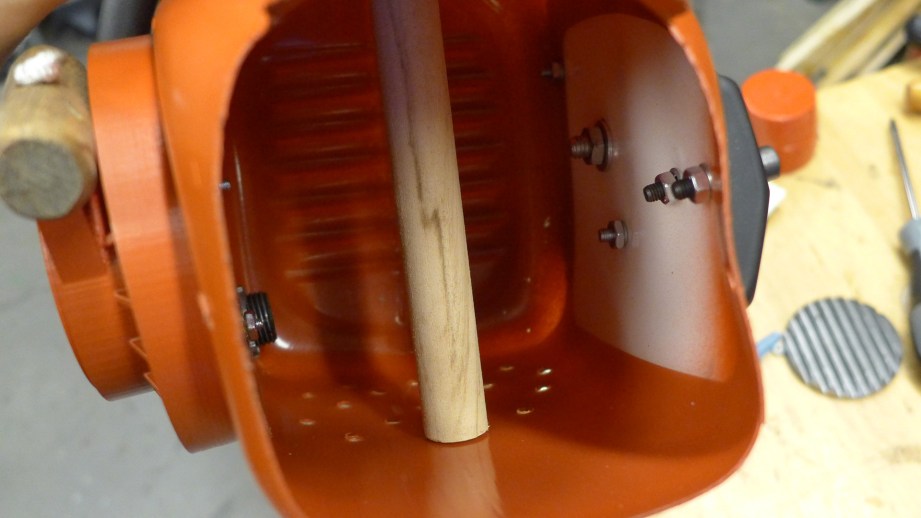
First, cut a piece of dowel to about 6.5″ for the interior handle, reserve the rest for the pull cord handle. Decide on placement of your interior handle (I suggest vertically), mark the top and bottom, and drill holes. Use the 3D printed grill base to mark and drill holes for #6 screws. Drill a hole for the conduit elbow toward the bottom-front of the chainsaw–you may have to use a spade bit or even razor knife for this. Drill holes on each side and bottom of the hand opening for the braces – I used #10 screws here. Decide on the blade angle and use it to trace the holes onto the body and drill out.
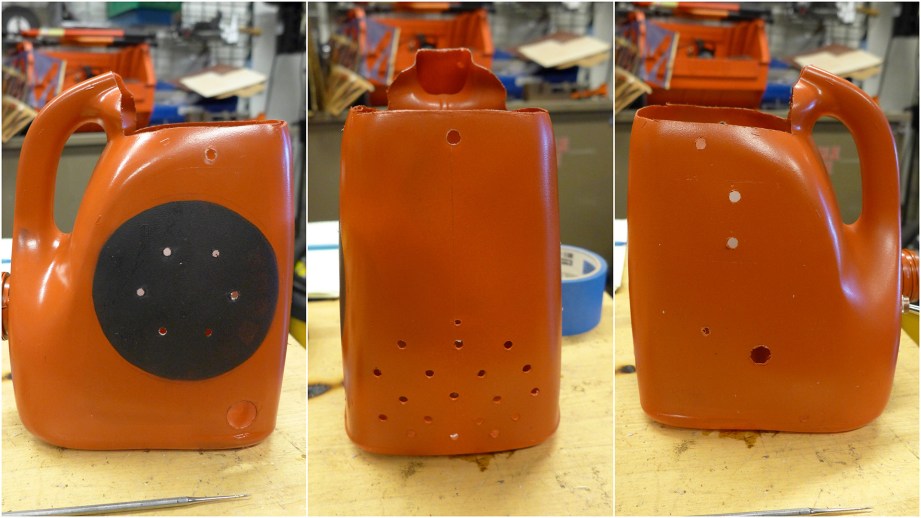
If you are adding a greeblie on the blade-side and/or a toggle switch on top, drill holes for those as well. I’d also recommend drilling some holes in the bottom or front of the chainsaw for ventilation–it gets sweaty in there!
Finally, hot glue the jug spout to the top of the chainsaw as the gas cap.
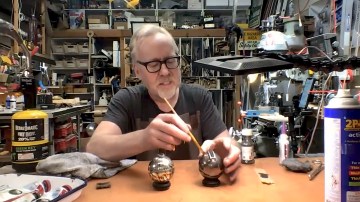
Step 4: Painting!
Using Krylon Fusion or similar ‘for plastics’ paint is important for the body. The jug flexes easily which would cause most paint to crack and come off. Remove the ‘gas cap’ from the spout and paint the body, blade cover (jug top) and 3D printed grill base red. Paint the gas cap, pipe clamp and conduit handle black. Optionally, paint the side greeblie, large blade washer and bolt black as well.
Once dry, trace the grill base onto paper and cut it out to make a mask to paint a black circle where the base will mount–optional, but a nice touch. Paint the 3D printed grill silver — I printed in black and gave it a splotchy coat of silver so it looked exhaust-stained. Otherwise, give it a coat of silver and a spritz of black to achieve same look.
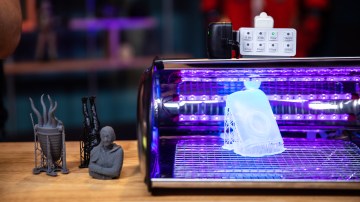
Step 5: 3D Printing the Grill
The Evil Dead chainsaw has a distinctive grill that I couldn’t find a suitable piece for, so I designed and 3D printed one which you can download. For those without access to a 3D printer, something else will have to be substituted. My original plan was to cut off the bottom of a small, plastic flower pot and use that as the side grill–if you come up with a better idea, let us know. Here are the directions for the 3D printed version:
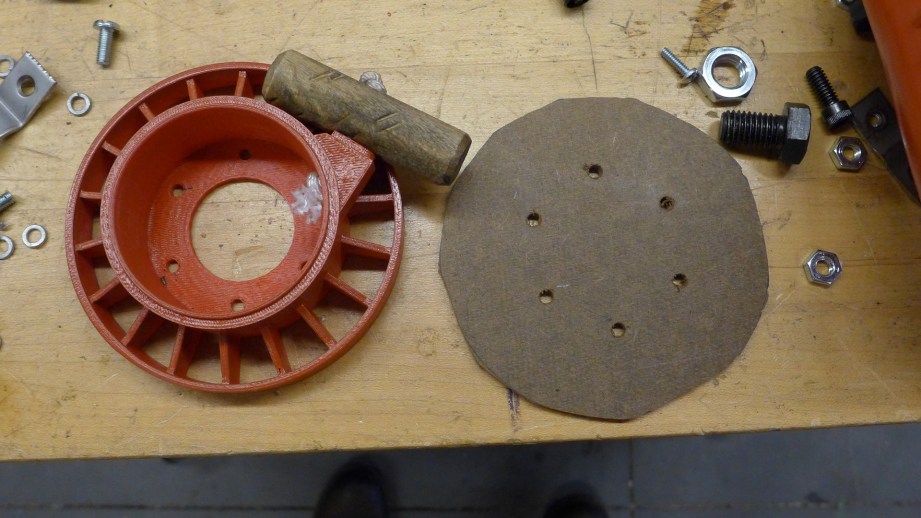
Trace the grill base and mounting holes onto a piece of MDF – cut out and drill holes. This is technically optional, but using this backer when mounting the grill will flatten out the side of the jug and make the grill fit flush which looks better. Take the remaining piece of dowel rod (approximately 2.5″) and drill a hole for the cord. Bang up the handle with a hammer or screwdriver to weather it — I also beveled the ends. I stained the handle with some dark varnish or just grime it up with some shoe polish or black paint. Grime up the rope with some shoe polish, knot the end and thread it through the grill base. Put handle on rope and knot it as close to handle as possible–trim.
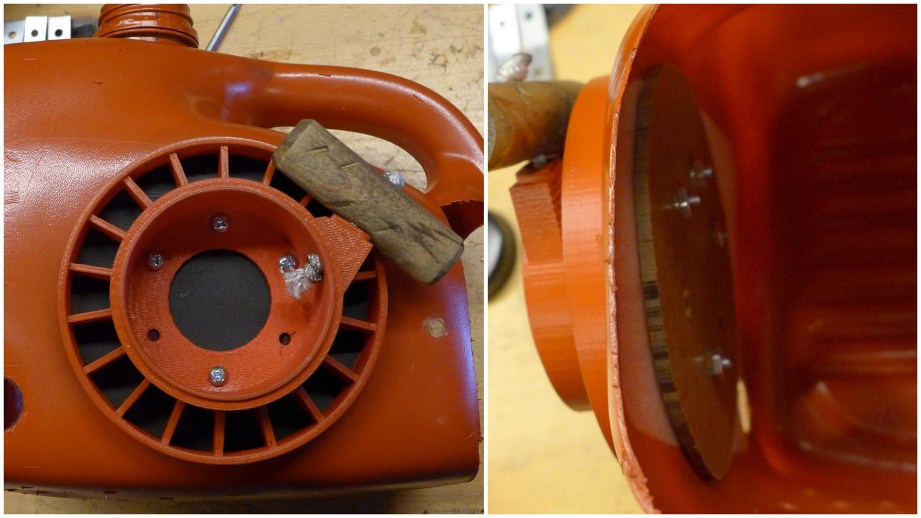
Mount the grill base to the chainsaw body with #6 screws and the MDF backer on the inside. You shouldn’t need to use all the screws, 4 is probably enough to pull the grill base flat to the body. The last step is to glue the grill onto the base but I’d do that once everything else has been put on – just in case you mess up and need to remove the base.
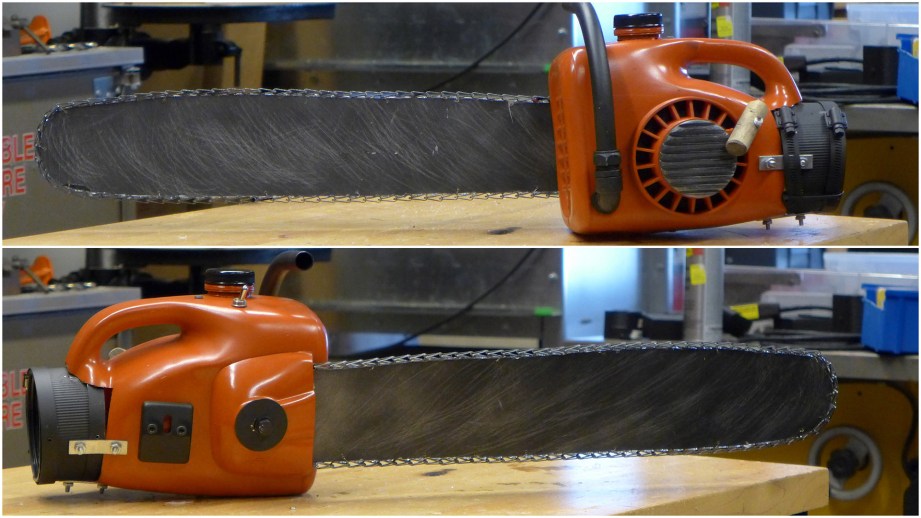
Step 6: Accessorizing with Greeblies
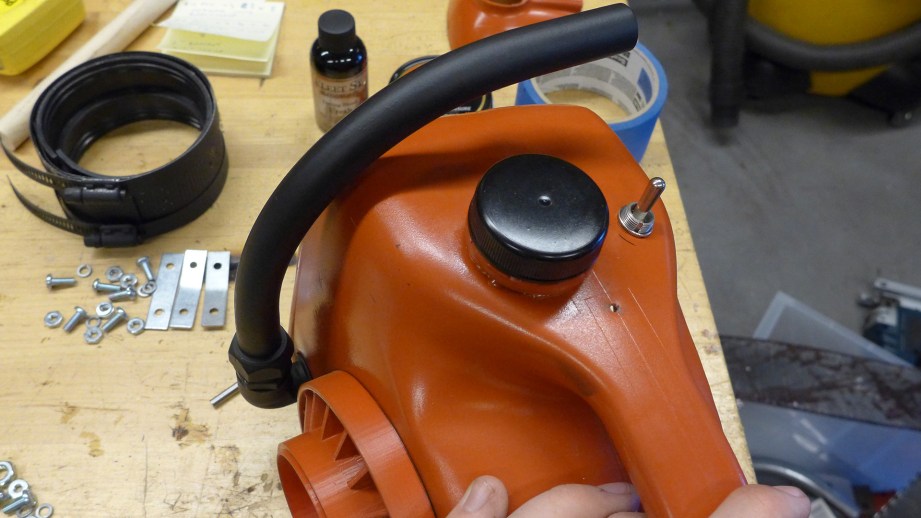
Attach the conduit side handle and optional parts like the toggle switch and side greeblie.
Install the blade with the diagonal #10 screws. Attach blade cover with large washer and bolt. Tighten until cover is nice and snug.
Lastly, install the inside dowel handle. Drill small pilot holes for the screws, otherwise the wood will split.
Step 7: Hand Clamp
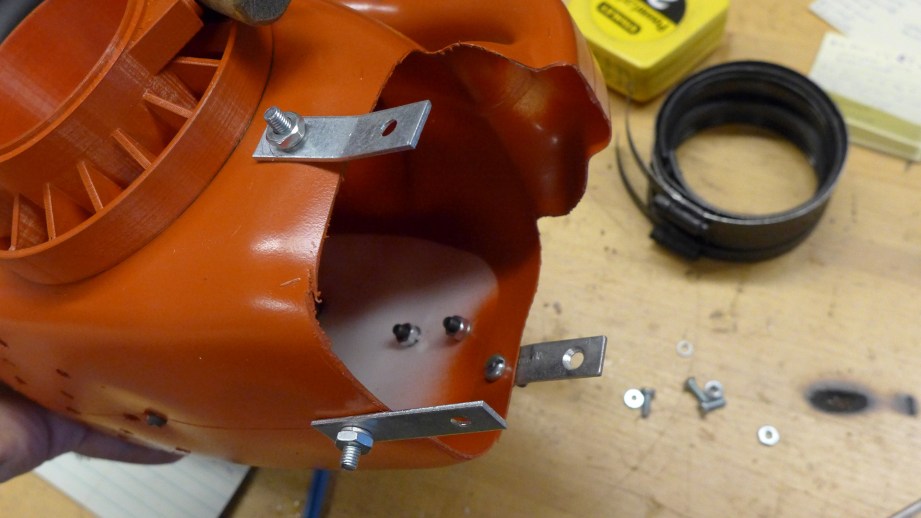
Attach the three braces for the hand clamp using #10 screws. They should have a slight angle to them which you can make with a vice and hammer. Adjust the pipe clamp to the desired diameter, position it inside the brackets and mark the holes.
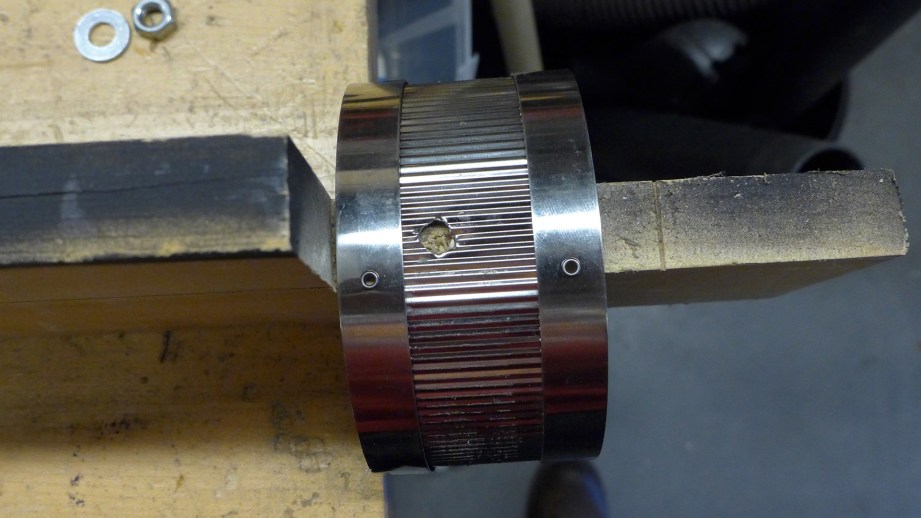
Remove clamp and drill holes. BE CAREFUL – drill bits like to grab and twist thin metal. I used a piece of wood inside the clamp for stability and backing. Next, install clamp with #10 screws.
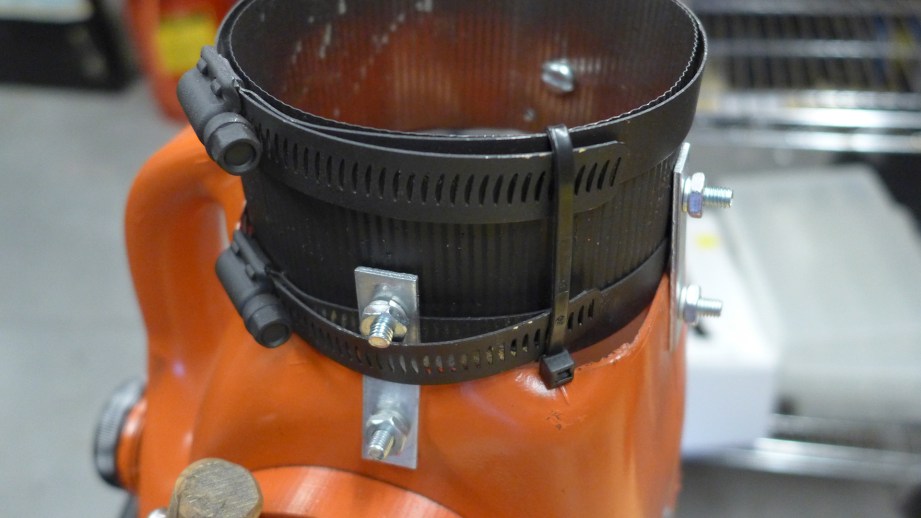
The clamp I got from Ace had a rubber gasket which made for nice protection from all the metal. You may want to install padding if your clamp does not have this. If there’s a lot of extra hose clamp sticking out, you may want to strap it down with a cable tie like I did.
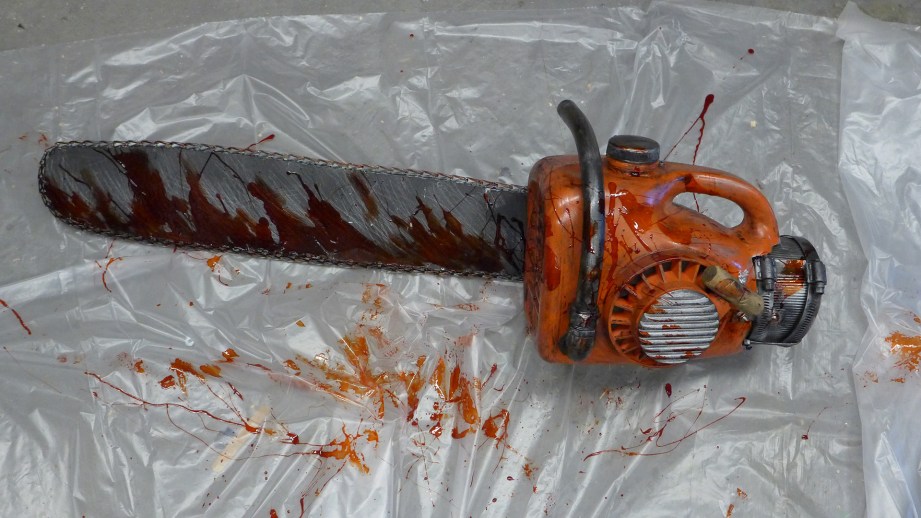
Step 8: Weathering
(See Adam’s weathering videos for tips–he’s much better than I am.)
Dry-brush or use a rag to apply silver paint to the raised areas of gas cap, conduit handle, hand clamp and any other areas you desire. Use black shoe polish all over for grime. I love how this works since you can actually build it up in nooks and crannies like grease. Put it on heavy and then wipe off what you don’t want. Add whatever else you want – rust, sawdust etc.

Optionally, add some blood and gore. For my original chainsaw I used Kryolan F/X dark blood which looked awesome and I was told it would dry–it did not–three years later and it is still gooey. Our good friend, Frank Ippolito told me to get Fleet Street Drying blood which looks great and did indeed dry. It has a rubbery, tacky feel, but is dry to the touch–it’s not cheap but a little went a long way. I got the fresh but wish I had got the dark instead and I applied by dipping a chopstick into the bottle and flinging it onto the chainsaw.
Finishing Up
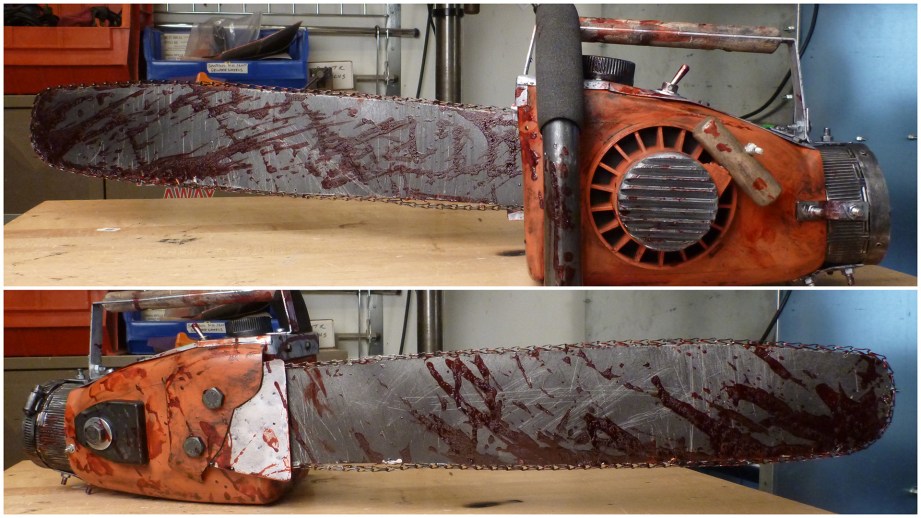
If you’re looking to make a more accurate version of the chainsaw, the addition of thin aluminum sheet and strip, some more dowel rod and extra nuts and bolts will get you on your way–it’s not that hard. And for the full Ash costume, you will also need some brown pants and the blue shirt which was harder to find. The best I came up with was a Dickies shirt that I painted the buttons to match the original shirt. A gripe I have about a lot of cosplay costumes it they’re not ‘lived-in’ or weathered enough, so I went to town with scissors, sandpaper, wire brushes, fake blood, coffee, and shoe polish to make the clothes look appropriately abused. I also made Ash’s harness out of a pair of WWII style leather suspenders and web belts.
Hope you enjoyed this special Halloween Edition of Bits to Atoms! If you dive into this project make sure to post pictures in the comments!
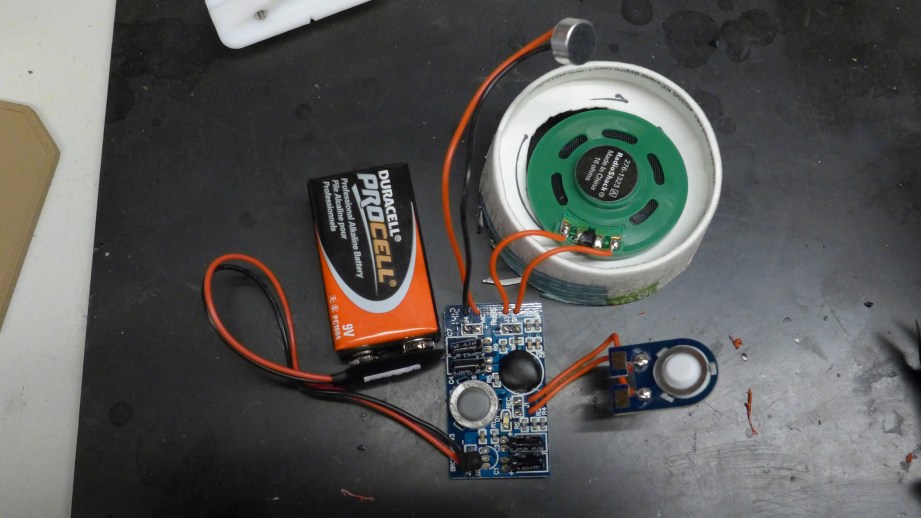
UPDATE: Since I first started this project 3 years ago, I have been searching for an economical way to include sound effects. I was using an old voice recorder inside, but the speaker was too small. Today I found the perfect solution for $12 at Radio Shack – that’s right, Radio Shack – glad to see they are getting back to their roots! It’s a simple 9V board with speaker that can record up to 20 seconds. I added a bigger cone made from a cup to increase the loudness – make sure to mount over vent holes so you can hear it well.


14 thoughts on “Bits to Atoms: Building an ‘Evil Dead’ Chainsaw”
Leave a Reply

One Day Builds
Adam Savage’s One Day Builds: Life-Size Velocirapt…
Adam embarks on one of his most ambitious builds yet: fulfil…

Show And Tell
Adam Savage’s King George Costume!
Adam recently completed a build of the royal St. Edwards cro…

All Eyes On Perserverance – This is Only a Test 58…
We get excited for the Perserverance rover Mars landing happening later today in this week's episode. Jeremy finally watches In and Of Itself, we get hyped for The Last of Us casting, and try to deciper the new Chevy Bolt announcements. Plus, Kishore gets a Pelaton and we wrack our brains around reverse engineering the source code to GTA …
Making
Adam Savage in Real Time: God of War Leviathan Axe…
Viewers often ask to see Adam working in real-time, so this …

One Day Builds
Mandalorian Blaster Prop Replica Kit Assembly!
Adam and Norm assemble a beautifully machined replica prop k…
House of MCU – This is Only a Test 586 – 2/11/21
The gang gets together to recap their favorite bits from this past weekend's Superb Owl, including the new camera tech used for the broadcast and the best chicken wing recipes. Kishore shares tips for streamlining your streaming services, and Will guests this week to dive into the mind-bending implications of the latest WandaVision episod…

One Day Builds
Adam Savage’s One Day Builds: Royal Crown of Engla…
One of the ways Adam has been getting through lockdown has b…

Making
Adam Savage Tests the AIR Active Filtration Helmet…
Adam unboxes and performs a quick test of this novel new hel…

Making
Weta Workshop’s 3D-Printed Giant Eyeballs!
When Adam visited Weta Workshop early last year, he stopped …

One Day Builds
Adam Savage’s One Day Builds: Wire Storage Solutio…
Adam tackles a shop shelf build that he's been putting off f…
What a fun build!
Cool project, Sean!
.
I now regret tossing that empty apple juice container that I had into my recycle bin. I’m now gonna have to dig something else up to use to make one of these faux chainsaws..
Wow! That’s spectacular! Well done, sir!
great job
Beautiful staining job.
excellent build! i want to make one now!!
awesome! love the use of the jug..clever!
Just excellent! Thanks for sharing!
Yeah, really sick of ice tea.
I know. You should check out the replica site I list at beginning of article, they sell add-on pieces for converting into an Evil Dead chainsaw.
Mission accomplished – got to use my Evil Dead chainsaw and Ash costume.
Thanks so much for these instructions!!! I wasn’t able to make it exactly like you but it turned out so sweet!!! I was the only female ash and I had to sweetest chainsaw hand ever!
Awesome, though it might be nice to wait until there are 3d printers that most people can afford (like under $500) that just work right out of the box with no tweaking or tuning before telling us to just 3d print things.
i started using this to make a chainsaw for my ash costume. I found a lack of specifcity that made me crazy. I decided to use the beginning of this as a launchpad and I basicly winged it. It came out really well. One note: you want to use bicycle chain not what he uses here. it looks much better. heres the finished product at NYCC this year, with bonus pic of me and Norm.