


Tested Builds: LED Hypnocube, Part 3
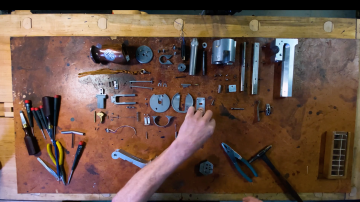
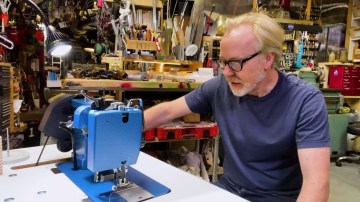
The Hypnocube’s 64 LEDs continue to be prepped! Confidence levels remain high as this week’s build continues. No soldering iron burns yet! To watch and follow along with the build, sign up for a Tested Premium Membership by clicking here.


19 thoughts on “Tested Builds: LED Hypnocube, Part 3”
Leave a Reply

One Day Builds
Adam Savage’s One Day Builds: Life-Size Velocirapt…
Adam embarks on one of his most ambitious builds yet: fulfil…

Show And Tell
Adam Savage’s King George Costume!
Adam recently completed a build of the royal St. Edwards cro…

All Eyes On Perserverance – This is Only a Test 58…
We get excited for the Perserverance rover Mars landing happening later today in this week's episode. Jeremy finally watches In and Of Itself, we get hyped for The Last of Us casting, and try to deciper the new Chevy Bolt announcements. Plus, Kishore gets a Pelaton and we wrack our brains around reverse engineering the source code to GTA …
Making
Adam Savage in Real Time: God of War Leviathan Axe…
Viewers often ask to see Adam working in real-time, so this …

One Day Builds
Mandalorian Blaster Prop Replica Kit Assembly!
Adam and Norm assemble a beautifully machined replica prop k…
House of MCU – This is Only a Test 586 – 2/11/21
The gang gets together to recap their favorite bits from this past weekend's Superb Owl, including the new camera tech used for the broadcast and the best chicken wing recipes. Kishore shares tips for streamlining your streaming services, and Will guests this week to dive into the mind-bending implications of the latest WandaVision episod…

One Day Builds
Adam Savage’s One Day Builds: Royal Crown of Engla…
One of the ways Adam has been getting through lockdown has b…

Making
Adam Savage Tests the AIR Active Filtration Helmet…
Adam unboxes and performs a quick test of this novel new hel…

Making
Weta Workshop’s 3D-Printed Giant Eyeballs!
When Adam visited Weta Workshop early last year, he stopped …

One Day Builds
Adam Savage’s One Day Builds: Wire Storage Solutio…
Adam tackles a shop shelf build that he's been putting off f…
Two questions – if its a 4 x 4 x 4 cube, why are you soldering 8 in a row?
Also, as a UK viewer “soddering” – is that how its pronounced in the US? The l is not silent on this side of the pond.
#trivial
Love the show.
The rows of 8 get cut in half after they’re finished. Also, the term “solder” comes from the old french “souder”, which is why the L isn’t pronounced.
Thanks for both answers, I’m much obliged.
I was thinking the same thing, until I went looking for the instructions (which are now available on hypnocube). Also, as an Aussie viewer, the l is not silent here either…
I would guess that Norm gets to the last one, but doesn’t complete it due to having difficulties with one (or more) of the solder joints, to the ground pin.
To answer will question on different solders on part 1, Lead free have a melting point at more than 400°C while SnPb is at about 300°C.
Depending on the type of device you have to solder it can be pretty difficult to solder without damaging the device.
I was pretty shocked by the oversize of your pliers maybe you could invest a few bucks in one more adapted to your usage (like half the size 😉 ) if you plan to do more kits like this one
I’m quite sure that Norm couldn’t resist making the “ohm-inous” pun! 🙂
Consider this my futile attempt to send advice time-traveling into the past. 🙂
As I was watching struggle with soldering the long wire to the LED leads, I kept thinking that maybe if you took a pair of alligator clips and clamped the two LED leads flanking the one you’re working on to the long wire, it might prevent the long wire from drifting all over the place when you touched the tip of the soldering iron to it. Once you got a couple of the LED leads attached to the long wire, you could probably proceed as you were since the long wire would then be sufficiently tacked in place.
I love the conversation this episode, it was mostly Will talking about being an old man whether meaning to, speaking about night vision and talking to the doctor and also not meaning to but complaining like an old man about them doing away with his choice cereal!
Norm probably didn’t think of it as he was soldering all of those leads…
I’ve got to admit, I would much rather watch a LEGO-building fiesta, than a soldering fiesta any day.
Just saying..
Soldering jokes are funny, Will. It’s axiomatic.
The guys who made this kit really should have included sockets for those IC’s. That’s pretty standard. You’re adding pennies to the cost of the kit and saving huge amounts of frustration if anything goes wrong. Also, the chances of ruining an IC during assembly is virtually eliminated.
The time has really flown by while listening to (and casually glancing at) these while I’ve been doing stuff around the house…that said, I’d really love a Benny Hill themed time-lapse of the process when it’s all done.
Question for those in the know. I’m really interested in this Hypnocube, but have zero soldering experince or experience with LED’s/Curcuit boards (I knew I should of taken electronics in highschool, but CAD, Woodworking, and Automotive was too good to pass up). Would this project be too far beyond my skills, or is there another project that would be a good starter to practice the skills required? Obvoiusly I’ll need to do a lot of reading online, and of course just practice, but I’m very interested in all of this.
From what I can see, the Through-hole soldering part of this project is reasonably simple for a beginner, however the soldering of the LED’s could be problematic for a beginner solderer. There are many kits available which are through-hole soldering kits – like the ‘simon says’ on sparkfun that you could look into if you want to get into soldering.
Also, make sure you do read up on how to solder as Will was not entirely accurate when he mentioned needing to crank the temperature in order to solder IC’s safely. You leave it at the correct melting point for the solder and you solder it as normal. Temperature release can be done by altering pin on the IC.
Quick into to soldering is:
1. Once tip is on and hot (temperature depends on solder) place it to the pad of the board and touch the lead of the component at the same time.
2. leave it for a breif period to warm up a bit
3. introduce the solder to the top of the iron (between the iron tip and lead) and let the solder flow down and onto the pad below.
4. remove the solder
5. after a short pause, remove the iron and keep the component stable until the solder has cooled.
Best of luck.
flux would have made the steel wires easier (additional besides the rosin core), it will help the solder wet out. nice to keep on hand for difficult solder work.
Thanks for the great responce and tips! I’ll look more into it after Christmas and give it a go.
need a Metcal Power Tower or Hakko, yes you snip the leads btw…. check for lifted Pads after using the huge snips
I bought the cube and subscribed to the premium membership based on your intro video. I previously built a “Useless Box” I enjoyed that keep finding these quirky things and making videos.