


Bits to Atoms: 3D Printing Quicksilver’s Stereobelt
How Sean modeled, printed, and assembled a movie-accurate Stereobelt from the latest X-Men film with very little reference.
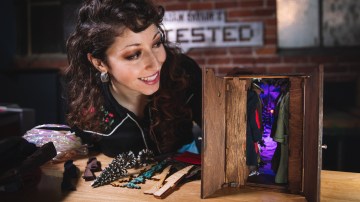
Remember a few months ago when I spent time obsessing over Quicksilver’s audio gear from X-men: Days of Future Past? I thought that exploration was enough to get it out of my system–until my friend Hadley told me that she would be cosplaying as Quicksilver for New York Comic Con. Without missing a beat, I proclaimed that I had to build her an accurate Stereobelt prop. And so my obsession began anew.
To recap: the Stereobelt, a little-known predecessor to the Walkman, predating Sony’s portable cassette player by seven years and cobbled together from existing tech. Only one picture and a patent document of it can be found in all of the interwebs, yet the savvy production designers on Days of Future Past based Quicksilver’s unit on the Stereobelt, therefore giving him probable audio gear for 1973.
Setting out to create my own Stereobelt, I ran into an immediate problem: a lack of good reference material. Other than the magazine cover of Quicksilver, which showed only one side of the belt, I was unable to find any good reference of the other side or back. At this point, the Blu-ray hadn’t been released and unlike every other Marvel movie, there was no “Making-of” book. So, I started work on what I had reference for, figuring that I may have to improvise the opposite side and revise it when I could get ahold of the movie. I didn’t have a lot of time to build the Stereobelt, so my original intention was to keep it simple and print it as one solid piece. The front and back caps would cause some print issues since they were both tapered and would have to use supports to print as one piece. The caps would also print better if the slopes were oriented upwards, so I decided to compromise and print the body and caps separately and assemble using simple square pins and glue.
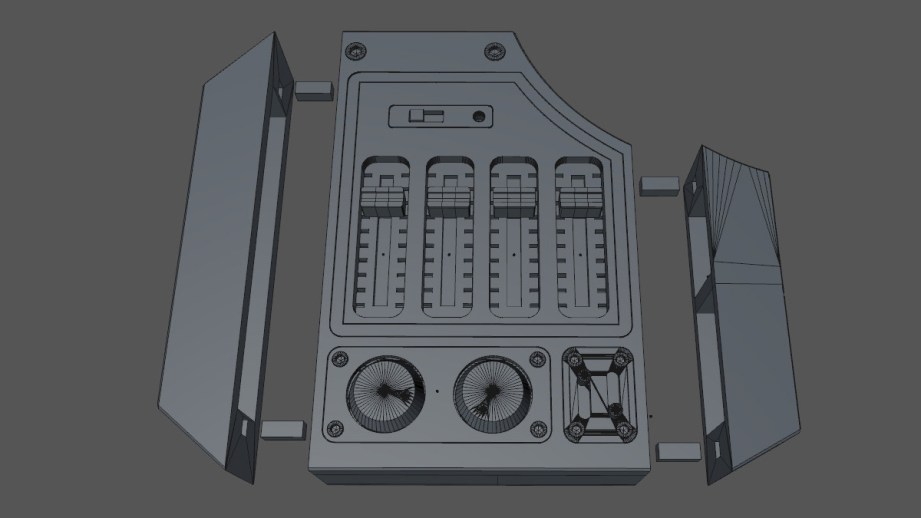
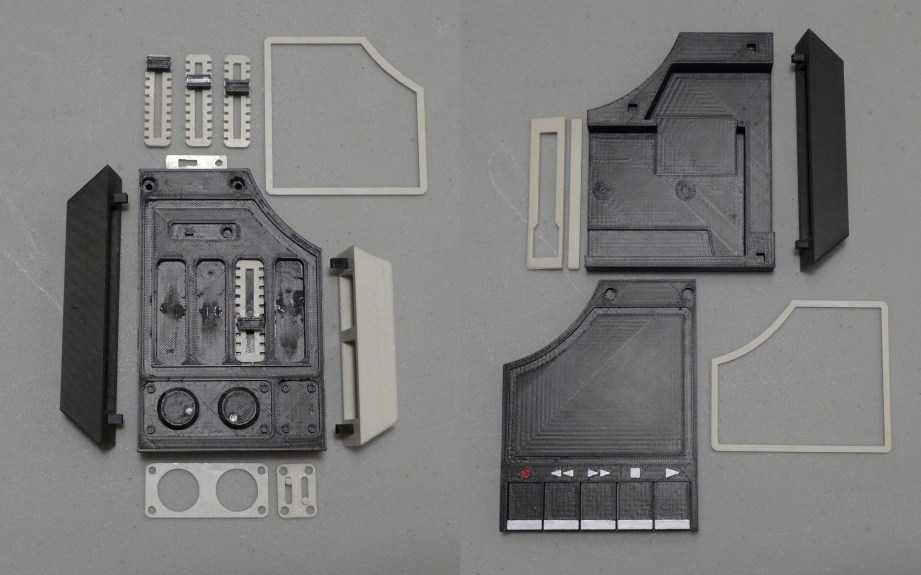
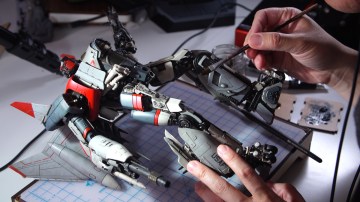
Unlike the Hellboy Millenbaugh Motivator, for which I took meticulous measurements using Photoshop, I totally eyeballed the size and proportions of the Stereobelt on paper. Once it looked right, I started building in 3D and quickly realized another issue – if I built this as one piece, painting and finishing would be difficult since it had a lot of trim pieces. I also liked the idea of being able to print this out in two colors, assemble with no painting and still have it look good, so I decided to break it up into more pieces.
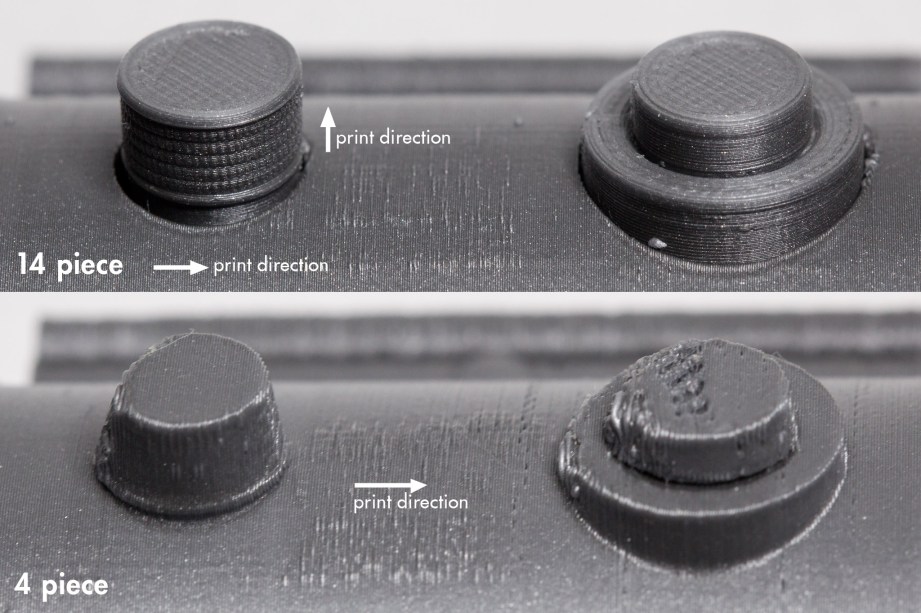
This brings up an important point concerning design for 3D printing. It’s far easier to build items as one piece; you can cram pieces together until it looks good. And as long as it’s a valid mesh, it should print, but it may not give you the best results. The illustrious Ducati motorcycle and lightsaber builder, Jacky Wan (aka Valcrow) demonstrates the disadvantages of this approach with his 14-piece vs. 4-piece lightsaber. The 4-piece lightsaber was easier to build in 3D and quicker to print but the quality of the print suffers since detail quality is compromised due to non-optimal print orientation. By breaking the model into 14 pieces, each part can be positioned for the best possible print detail.
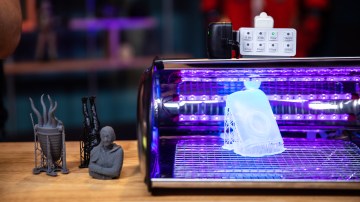
This higher quality comes at a price: it’s much harder and time-consuming to design models that fit together and/or have mechanical function. I decided to compromise and build all the silver parts and caps as separate pieces while keeping the main body, including details such as screws, knobs and switches as one piece. This is another good example of how design differs depending on the printer you use. With an FFF machine–aka FDM (Fused Filament Fabrication aka Fused Deposition Modeling)–you can easily model and print something as a solid piece, since you can specify how dense the interior should be, therefore saving a lot of material and time. But on almost every other type of printer, this would print as one solid piece through-and-through, wasting a lot of material and costing a fortune.
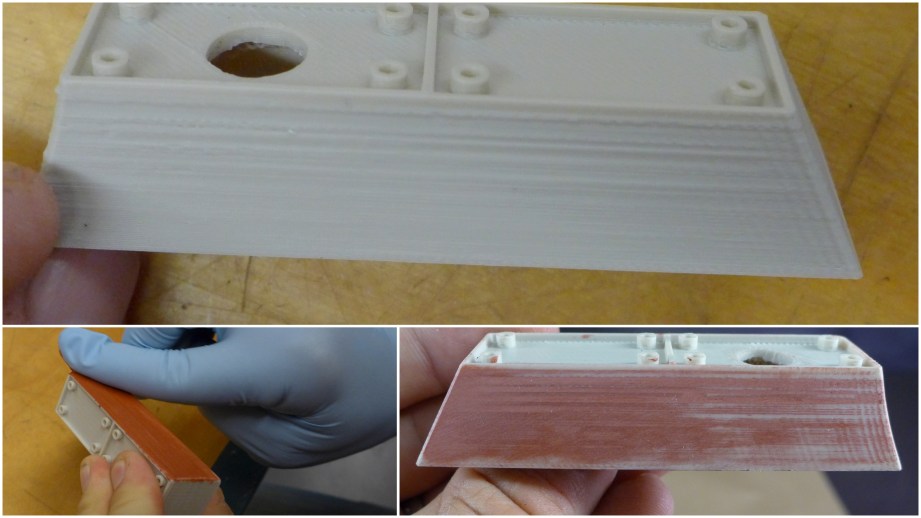
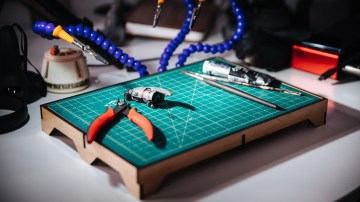
I used a 10% infill for the Stereobelt, but it still took a long time to print and on an early print, I lost power, only minutes away from completion, ruining the entire thing. Yet another advantage of breaking models into multiple pieces — failures cost less time and money. I had some difficulty printing the front cap, the sides were turning out really rough, probably due to geometry that the slicing software was having trouble with. Even if a mesh is ‘good’, certain geometries can cause problems when slicing the model. In this case, I think it was due to the inner and outer walls of the model being very close together. I adjusted the model, but rather than waste the print, I decided to try some finishing techniques. To smooth things out, I used Bondo Glazing Putty skimmed over the surface–you can’t put this on thick, since it dries so quickly. Even if a print turns out great, the glazing putty is a good way to hide the print layers and with some light sanding, it’s ready to paint.
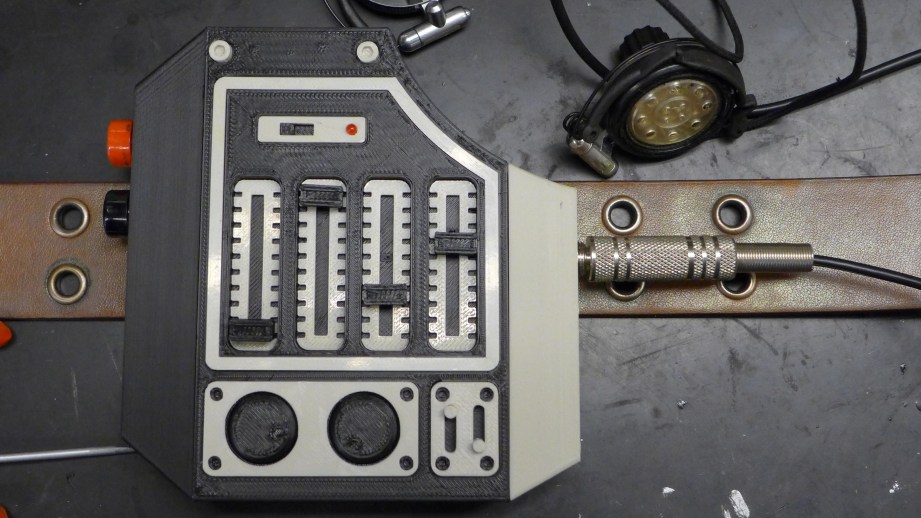
With the right side of the Stereobelt done, I found some new high-res photos just in time to start the left. This side seemed simpler, since it didn’t have as many knobs and switches, but I wanted it to hold an actual cassette which complicated matters. This side needed a cavity to hold the tape, so it would have to be printed with support to hold up the top of the unit. All that support would have to be cleaned out of the interior, so the tape could be inserted. This sounded like a pain and it would take longer to print, so I sucked it up and broke this side into a top piece and base that would print separately and be glued together. This also allowed me to glue nuts on the inside for mounting the unit to the belt. On the other side, I had simply screwed right into the plastic, which didn’t hold very well and needed to be glued.
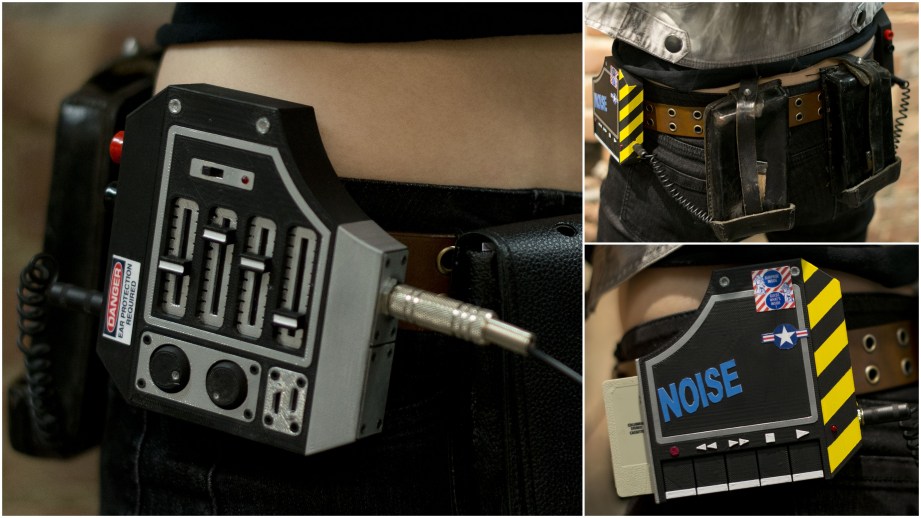
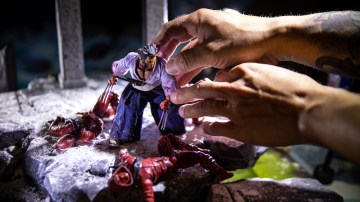
I didn’t have the time to Bondo and sand all the pieces, so I painted them as-is, which still turned out pretty well and the movie-accurate belt made attaching the units easy. I knew there were battery units on the back of the belt, but had no pictures, so I improvised by using an old German ammo pouch. I cut the pouches apart, hand-stitched the ends close with a sewing awl and used black Sharpie to cover up the fresh cuts. I used actual hardware for the headphone jack, rear outputs, power connections and LEDs. All of these could have been 3D printed, but the real parts are functional, easily obtained, cheap and look better. I was lucky to have a pair of old headphones that were passable for Quicksilver’s and with the addition of a movie-accurate plug and glued-on volume knobs they looked pretty good. I may try to make some 3D printable headphones down the road.
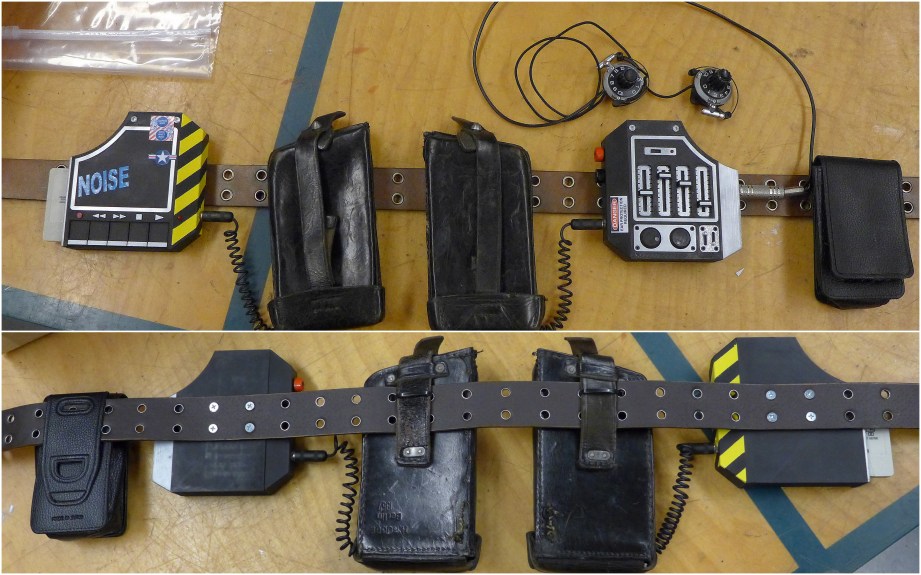
I was only able to make out some of the stickers that were on Quicksilver’s Stereobelt, so they’re not movie-accurate, but appropriate, I think (special thanks to Jason for figuring out one of them in the original Stereobelt article comments). They were simply printed, covered with clear tape, cut-out and glued on. Everything was attached to the belt and we were ready for New York Comic Con!
During construction, the first question everyone asked was, “does it really work?” and this got me thinking. It would be nice to have the option. So, glutton for punishment that I am, I went back and redesigned the right-side unit so it printed in two pieces, leaving space to install a MP3 player, batteries, etc. This also cut down on print time and made it possible to glue in nuts for more secure mounting to the belt. Norm and I also did a video walk through of the belt which you can check out here.
I think my Stereobelt obsession has now come full circle and I can (I hope) rest easy. If you have a similar fascination with this vintage gear, there’s still time to put together your own Quicksilver costume for Halloween. I’ve posted the 3D files on Thingiverse, so download your Stereobelt and get printing! (If that’s not your thing, maybe an Evil Dead chainsaw is more your speed…)


15 thoughts on “Bits to Atoms: 3D Printing Quicksilver’s Stereobelt”
Leave a Reply

One Day Builds
Adam Savage’s One Day Builds: Life-Size Velocirapt…
Adam embarks on one of his most ambitious builds yet: fulfil…

Show And Tell
Adam Savage’s King George Costume!
Adam recently completed a build of the royal St. Edwards cro…

All Eyes On Perserverance – This is Only a Test 58…
We get excited for the Perserverance rover Mars landing happening later today in this week's episode. Jeremy finally watches In and Of Itself, we get hyped for The Last of Us casting, and try to deciper the new Chevy Bolt announcements. Plus, Kishore gets a Pelaton and we wrack our brains around reverse engineering the source code to GTA …
Making
Adam Savage in Real Time: God of War Leviathan Axe…
Viewers often ask to see Adam working in real-time, so this …

One Day Builds
Mandalorian Blaster Prop Replica Kit Assembly!
Adam and Norm assemble a beautifully machined replica prop k…
House of MCU – This is Only a Test 586 – 2/11/21
The gang gets together to recap their favorite bits from this past weekend's Superb Owl, including the new camera tech used for the broadcast and the best chicken wing recipes. Kishore shares tips for streamlining your streaming services, and Will guests this week to dive into the mind-bending implications of the latest WandaVision episod…

One Day Builds
Adam Savage’s One Day Builds: Royal Crown of Engla…
One of the ways Adam has been getting through lockdown has b…

Making
Adam Savage Tests the AIR Active Filtration Helmet…
Adam unboxes and performs a quick test of this novel new hel…

Making
Weta Workshop’s 3D-Printed Giant Eyeballs!
When Adam visited Weta Workshop early last year, he stopped …

One Day Builds
Adam Savage’s One Day Builds: Wire Storage Solutio…
Adam tackles a shop shelf build that he's been putting off f…
Awesome, as usual! These are great tips for 3D print hobbyists of all levels of experience.
Nice
What resolution did you end up printing this at? 300micron? This is ABS right?
Yep, ABS, printed at .2, which is what I end up using most of the time.
Nice. Love your articles.
Interesting, I Have that same piece that you show with the glazing compound printing right now Printing at 0.3, Trying to use it as a slight comparison mark between Slicing software. I guess when its done I will throw it back in there at 0.2 since 0.3 won’t quite be on the same level.
btw have you tried out simplify3d? In most of my print comparisions so far, it seems to have much better ooze and extrusion control.
Nice build! Always nice seeing other people’s process. And I got a mention too! 😛
Hey! Really nice work on the models, your attention to detail is great and love your assemblies. I was disappointed to have just missed you at NYC Maker Faire.
Simplify 3D is on my list but I have had trouble bringing myself to spend $140 on a program that has no trial version. It’s been out long enough that it seems pretty solid.
your stuff is AWESOME. would love to chat with you sometime about your 3d prints, including that ducati bike!!!
Credit where credit is due after all, you do some amazing work.
I would think that since you would most likely do an article about your experience, that if you got in contact with their PR department they would probably comp you a license.
Anytime! love your show! I’m my username
Yeah I was running around filming stuff for the first day. :/ I learned you guys were there later in one of your articles. I’m sure there will be other opportunities!
Thanks!
Nice read
I love seeing how other people are using their printers, very helpful. I did buy a battery backup for my printer, to many short power outages where I live, maybe spend the $140 on that rather than Simplify3D. That being said, I can’t imagine going back to Makerware after using Simplify3D. Hope to see more of these articles on Tested in the future.
hey are you commissioning these if so how much? i really need one at my house by nov 2 the late -est. i’m a 34 inch wait and 41 inch hips. please get back to me thanks. 🙂
Hello! It’s look very cool! Have I any possibilities to buy this staff all complete?