


Bits to Atoms: Building the Millenbaugh Motivator, Part 2
Sean Charlesworth recaps his project working with Adam building the Millenbaugh Motivator for the Hellboy Mech-Glove project. This week, he discusses how he built the plans for his design, based on reference photos provided by Adam.
Sean Charlesworth recaps his project working with Adam building the Millenbaugh Motivator for the Hellboy Mech-Glove project. This week, he discusses how he built the plans for his design, based on reference photos provided by Adam.
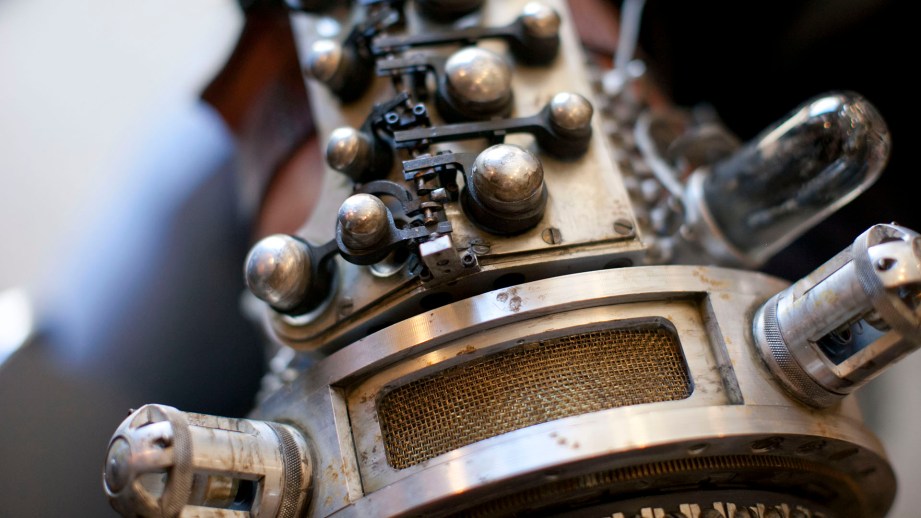
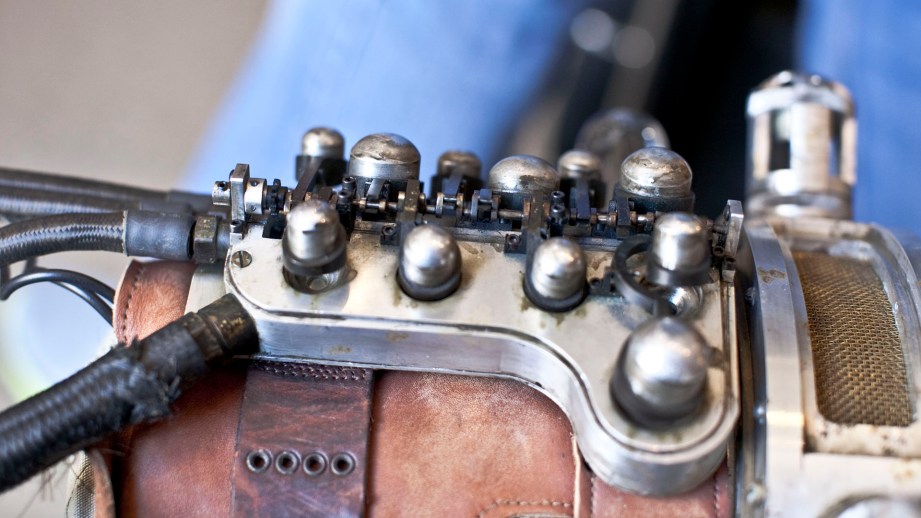
I have been tasked with building a 5″ x 4″ mechanical block with a crankshaft assembly and a variety of small ‘valves’ that clop open and close. It’s the Millenbaugh Motivator for Adam’s Hellboy Mecha-Hand replica, so named for Scott Millenbaugh, the original fabricator at Spectral Motion. Scott machined the original out of metal (aluminum, I think) and there are many tiny precision pieces all driven by a small crankshaft. A lot of work went into this–all the parts are tiny and I can’t imagine having to machine all of them from metal.
Having made replicas like this for many years, Adam knew exactly what was needed: lots and lots of good reference. As Harrison Krix discussed in his Halo Needler build articles, blueprints are the Holy Grail for building a replica, but these usually aren’t available or may have never even existed. For us mere mortals, reference typically comes from ‘Art of the Movie’ books, DVD extras, movie screengrabs and, if you’re really lucky, at Comic-Con or similar events where the original may be on display. Often, this original will be in a case or roped off so it becomes a game of fighting the crowd to snap as many pictures as possible through the display case which reflects everything and is smeared with nerd-grease.
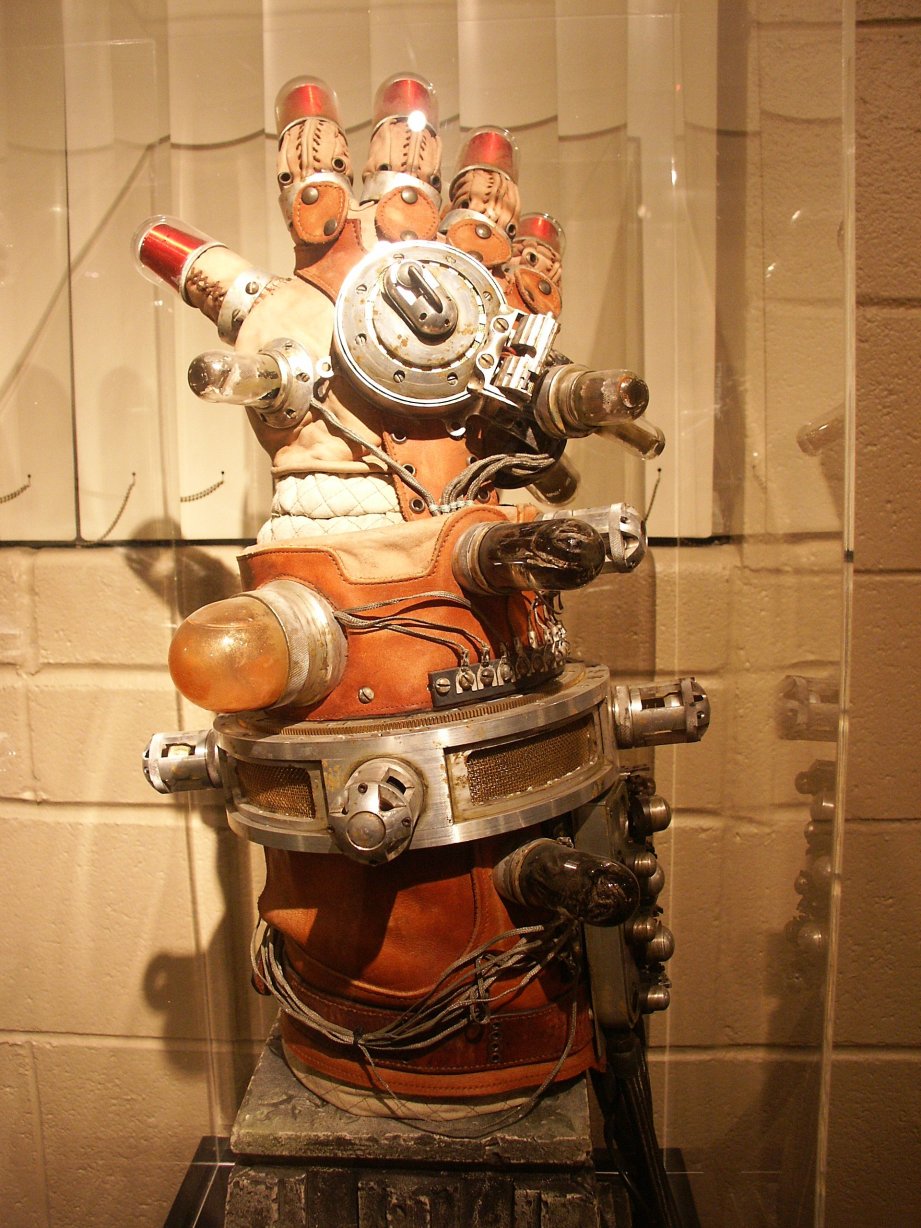
Adam has a lot of friends and connections and was able to get access to the original prop at Spectral Motion and took tons of great photos and most importantly, measurements! For the most useful reference photos you want to make sure to not use a wide angle lens as it will distort the image. Using a normal or telephoto lens will ensure the pictures look closer to how they do in person (at least 70mm).
I pored over the pictures and started making notes, but I was in the middle of another project and couldn’t start modeling yet, so Adam and I were emailing back and forth about details. This was around last December and even before any of the Inventern stuff, my wife and I had bought tickets for the NYC MythBusters- Behind the Myths show and when Adam found out he made sure to get us backstage. The show was great and I was recognized as the Inventern twice which was weird for me but nice nonetheless. We went to the after-show meet and greet where they took pictures with fans, answered questions and handed out signed photos. We briefly met Jamie who was under the weather at the time and looked really tired and Adam really like my wife’s Zorg t-shirt.
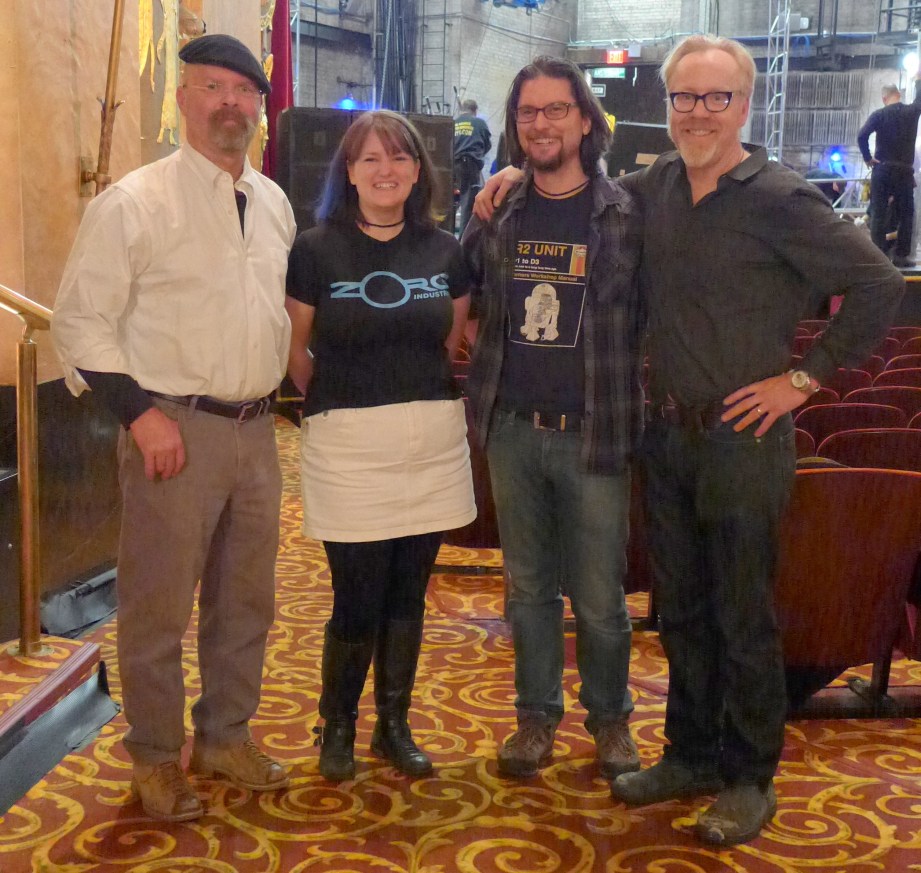
On our way out, Adam waved us back and said he was having a get-together afterwards and we should come – swoon. We thought it was going to be an after show party with the crew, etc. but it turned out to be a small get together with his friends and family! We’re looking around the group and there’s Tom Sachs and John Hodgman – what!? To be honest, we felt a little intimidated and quietly drank our beers in the corner.
Eventually, we struck up a conversation with an older couple next to us. Turns out the gentleman was Alan Rose, the creator of The World at Your Feet papercraft books that Adam has mentioned many times. Adam was such a big fan, that he had invited Alan and his wife, who both seemed to feel as overwhelmed as us, they were a very nice couple. Adam made sure to take time to introduce us around and was like, ‘oooo! There’s someone you really need to talk to!” and for the next hour we found ourselves chatting with David Dunbar, the Executive Editor of Popular Mechanics. I dropped some 3D printing knowledge on him while Kate chatted with Mr. Hodgman who came over to congratulate me on the Inventern win–it was a weird night. Adam was very kind to invite us, was once again a gracious host and we ended up having a great time.
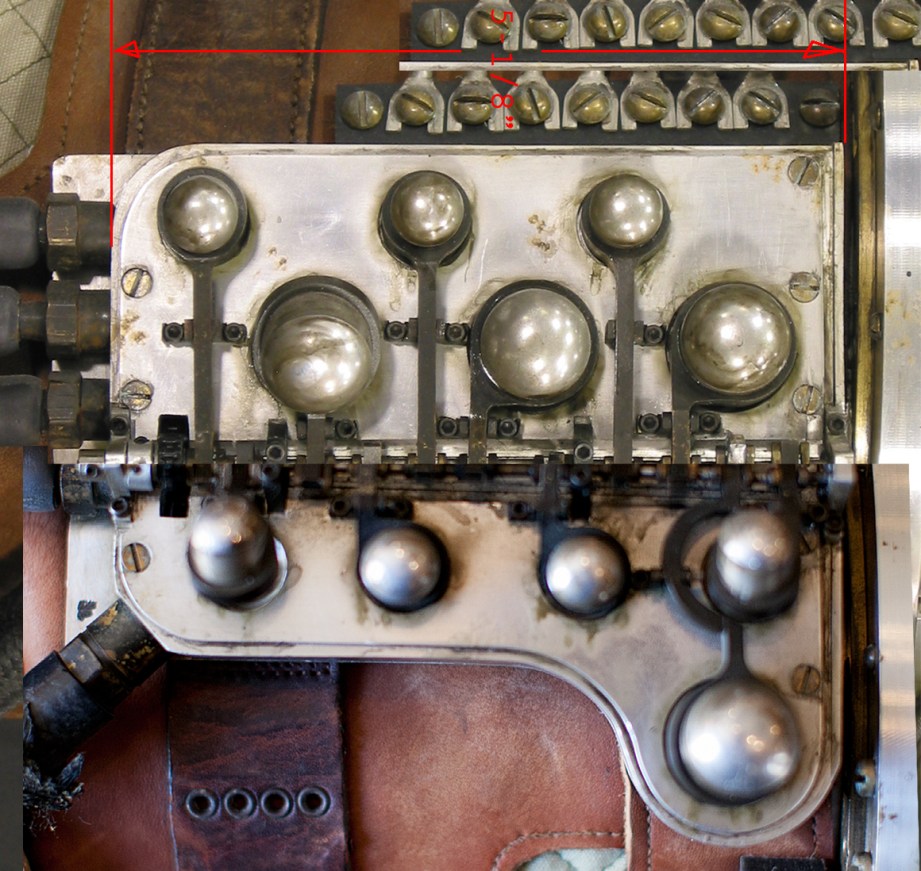
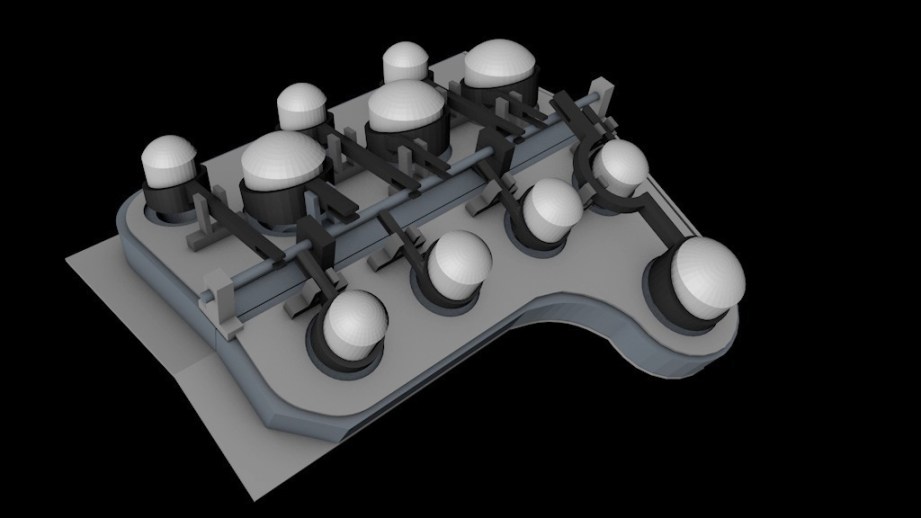
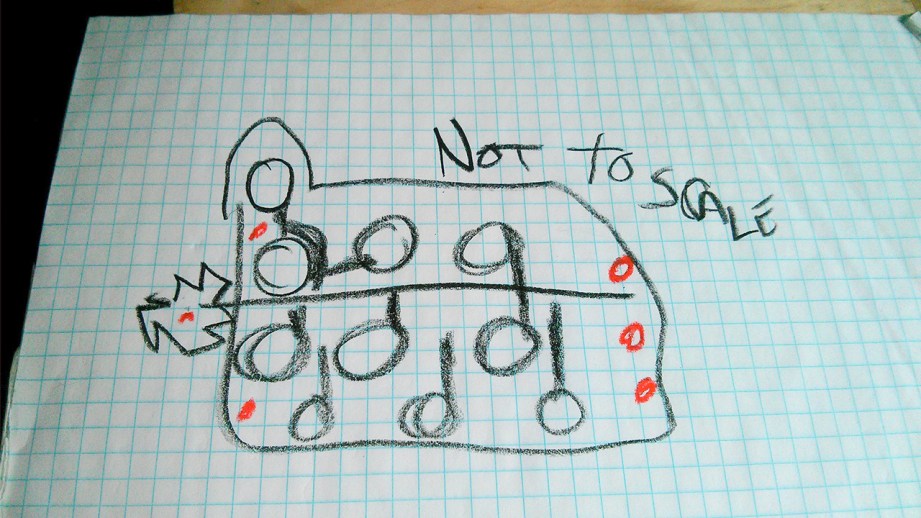
During our adventure, Adam and I were able to quickly work out some motivator details in person rather than play email tag. The picture above was the key piece that Adam sent me: a head-on picture of each side, combined into one photo with a known measurement. This made things much easier and made it possible to use Photoshop to figure out most of the other measurements. Here’s how I went about doing that:
Taking reference measurements with Photoshop
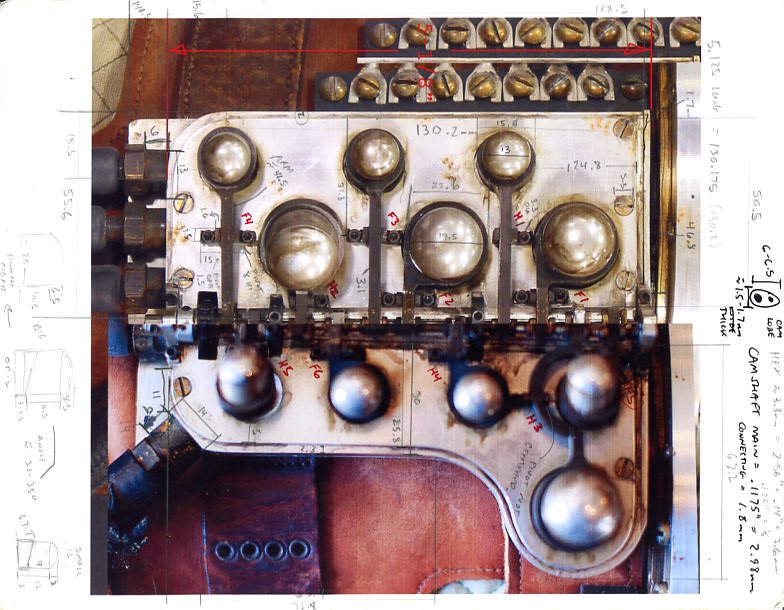
After a few hours in Photoshop with various reference photos, I had a hi-res printout covered with measurements. This was the guide I used to build a lot of the motivator and spec hardware. Even with really good pictures and Photoshop it can be tricky to get accurate measurements. Sometimes I would have to measure the same part in various photos and average it out. Sometimes the measurement I took just didn’t look right when I built it in 3D and I would have to fudge it. Whatever works!
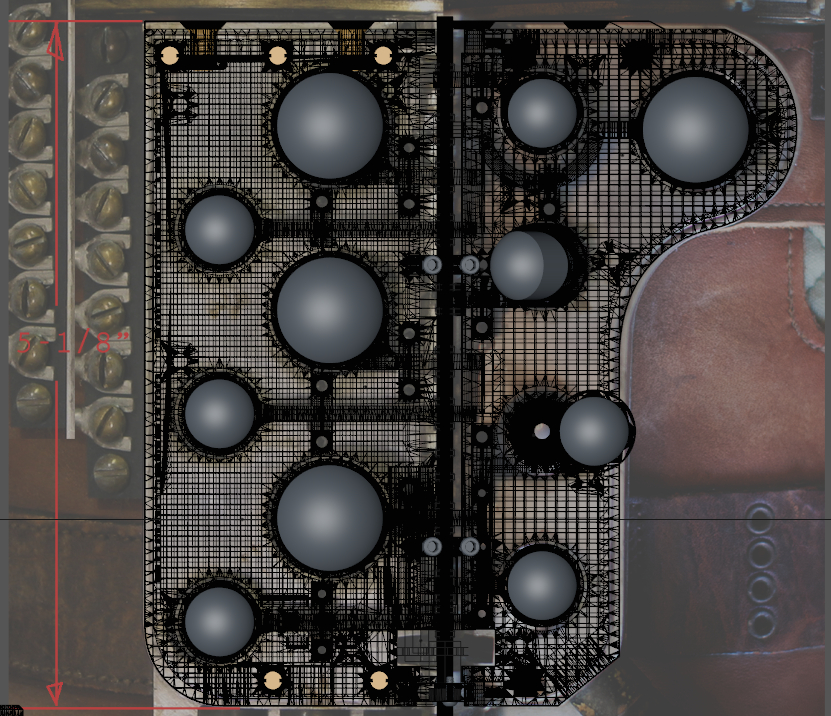
With proper measurements, I could start building in 3D which required figuring out all the components, how they related to each other, and possible problem areas. I imported the primary reference photo into Cinema 4D and resized it to match the known measurement of the block. I could now use it for the size and spacing of many of the parts. I didn’t want to get too detailed with what I built until I confirmed what was needed with Adam. Fast forward a few weeks and I had expected to have a rough version built but was held up doing revisions for another job. Adam emailed to check on progress and I was kind of mortified to tell him I hadn’t even gotten started! I sent him the following photo and told him I had drawn up plans and made great progress, he thought it was pretty funny, told me not to worry about it.
Shortly after, I was able to sit down and model a very rough version that represented all of the separate pieces as I saw it, proportions and how they would go together. Even with all of the reference pictures, this was tricky as there were some pieces that I couldn’t get a clear view off and had to infer details. There were internal structures which couldn’t be seen at all and even lighting and shadows could make things appear drastically different from picture to picture. Overall, Adam agreed with my proposed structure so we were set to start building parts for real. I asked Adam if he wanted the entire motivator 3D printed or more of a hybrid assembly and we bounced back and forth on this a few times. Initially, Adam thought he would have the thinner top plates cut out of metal and maybe the valve domes as well. Regardless, I would build the entire thing in 3D so it could all be printed if needed, even if it was just for reference. To cover our bases, I also picked metal stock sizes that were as close to my Photoshop measurements as possible and used those for the top and bottom plates and the body of the motivator. This way we could 3D print the parts or easily cut them from metal stock right off the shelf.
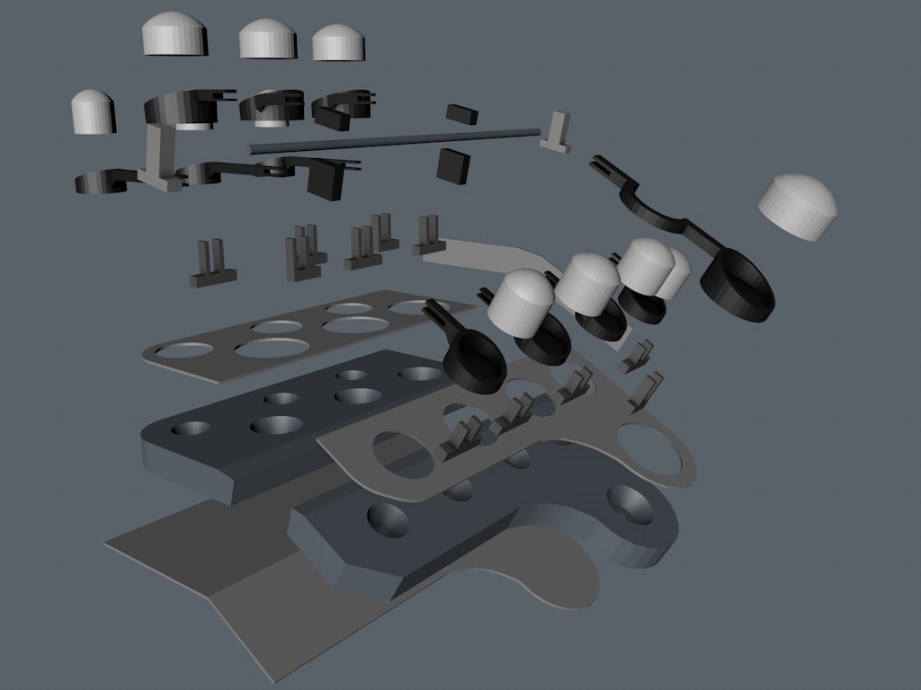
While building the rough version I realized that I couldn’t make a lot of the parts that way I normally do. I do a lot of box modeling, which I have demonstrated on projects like the MintyBoost box, which is taking basic geometric shapes and continually extruding and modifying them outwards to keep everything as one big, clean mesh. The valve arms in particular would be very difficult to build this way, so I would have to do something else for the final version. As Adam has said, he’s always learning something new and I know exactly what he means. I ended up trying a lot of different ways to build the motivator, some worked out really well and some crashed my computer. It may have not been the most elegant way, but it turned out alright in the end.
Tune in next week when we dive into building the fine model of the motivator, spec out hardware, do some test prints and work out the mechanics.
- Part 1 – Becoming The Inventern
- Part 2 – Reference & Measurements
- Part 3 – Prototypes
- Part 4 – Final Print
- Part 5 – Finishing Work
All photos courtesy Sean Charlesworth unless otherwise indicated.


8 thoughts on “Bits to Atoms: Building the Millenbaugh Motivator, Part 2”
Leave a Reply

One Day Builds
Adam Savage’s One Day Builds: Life-Size Velocirapt…
Adam embarks on one of his most ambitious builds yet: fulfil…

Show And Tell
Adam Savage’s King George Costume!
Adam recently completed a build of the royal St. Edwards cro…

All Eyes On Perserverance – This is Only a Test 58…
We get excited for the Perserverance rover Mars landing happening later today in this week's episode. Jeremy finally watches In and Of Itself, we get hyped for The Last of Us casting, and try to deciper the new Chevy Bolt announcements. Plus, Kishore gets a Pelaton and we wrack our brains around reverse engineering the source code to GTA …

One Day Builds
Mandalorian Blaster Prop Replica Kit Assembly!
Adam and Norm assemble a beautifully machined replica prop k…
House of MCU – This is Only a Test 586 – 2/11/21
The gang gets together to recap their favorite bits from this past weekend's Superb Owl, including the new camera tech used for the broadcast and the best chicken wing recipes. Kishore shares tips for streamlining your streaming services, and Will guests this week to dive into the mind-bending implications of the latest WandaVision episod…

One Day Builds
Adam Savage’s One Day Builds: Royal Crown of Engla…
One of the ways Adam has been getting through lockdown has b…

Making
Adam Savage Tests the AIR Active Filtration Helmet…
Adam unboxes and performs a quick test of this novel new hel…

Making
Weta Workshop’s 3D-Printed Giant Eyeballs!
When Adam visited Weta Workshop early last year, he stopped …

One Day Builds
Adam Savage’s One Day Builds: Wire Storage Solutio…
Adam tackles a shop shelf build that he's been putting off f…

Show And Tell
Mechanical Dragonfly Automata Kit Build and Review
Time for a model kit build! This steampunk-inspired mechanic…
Cool R2 t-shirt, Sean!
How does the 3D printing deal with the faceted sides that make up curves and tubular forms?
Do you need to sand them down at all?
The polygons are so small that you don’t see them anymore. And the motors are so fine that they can draw in curves.
Another great installment. Sounds like the Inventern process was quite an experience! 🙂
Since this was the rough version I used low poly count parts. If I printed this version it would turn out just like the picture with rough edges and faceting. The final version has really high poly counts to smooth everything out.
Really enjoying your articles, looking forward to the next one.
When you reverse engineer something it helps to remember that human beings are logical, like even numbers, use standards and are cheap and lazy. Screws come in standard sizes and if you can guess about what size the screw is you can get all the dimensions from machinery’s handbook or Efunda online. angles will be even and be more than likely 15, 30, 45 or 60 degree because those angles are the ones available in tooling and easy to cut without a lot of excess calculation. All that stuff costs money and nobody likes to spend extra money if they don’t have to.
Yep! I touch on that next time, it’s why I picked stock sizes for the plates. I was convinced that this must be built from found parts but I’ve been told it was designed and milled from scratch.
Sean,
Even it the plates were milled out from scratch, going with stock sizes is a pretty good bet. I don’t know what the time budget was for the glove, but I bet it was pretty short. On the other hand you can put a part on a CNC and mill it out real fast. That’s probably what Mr. Millinbaugh did for the base and the top plate. The domes were turned from 3/4 and 3/8 stock using a ball turner. The flat head screw around the edge were probably #4s, but they might be #6s. You don’t see much machine hardware in brass bigger than #6 or so because any bigger and you use steel or stainless. I’m a big fan of stainless everything for small stuff, small stuff being smaller than what you use in a car, but that’s just my preference. At least that’s if hardware cost is not an issue. The hose barbs look like 1/16, but I’m not sure why he used internal threaded fittings with a nipple. Maybe that’s what he could get at the hardware store.