


Bits to Atoms: Building the Millenbaugh Motivator, Part 5
Sean recaps the finishing and detailing of his Motivator project. The tricky part: making his 3D printed parts look like metal.
After three months of work, the Millenbaugh Motivator has been completed and the parts have been delivered. As Adam has demonstrated before, finishing is extremely important and he immediately got to work on the Motivator parts in order to detail and finish it along with his Mecha-Hand for Comic-Con. There were some difficulties with the crankshaft due to tight tolerances and the addition of paint, but I’m working on a revised version for him to use later.
Now that I delivered everything to Adam and am back home, the only thing left to do is the finishing work on my own Motivator! And to be honest, this is the part that I’ve been kind of dreading. This goes way back to when I was a kid and built a lot of models. I would be super meticulous on all the details, get to the very end, and ruin the final paint job–every time. This has stuck with me and almost every time I work on a project, I get to the end and often peter out, leaving it unfinished for long stretches (or sometimes forever). In hindsight, I just didn’t have the right tools or know the right techniques for finishing work. I’d spray paint when it was too humid, too cold, too windy, too dirty, using crappy paint or my really bad airbrush setup. I had a subscription to Fine Scale Modeler magazine and would constantly try higher-level techniques before I understood the basics which almost always ended poorly. In the end, I just thought I was really bad at painting and finishing and it subconsciously kept me from finishing or even starting many projects. I still haven’t fully painted the Stormtrooper Blaster I made five years ago!
I decided to not screw around with the Motivator and just finish it, but I wasn’t sure how. On the trip to San Francisco, I’d hope to do some painting and finishing with Adam but we ran out of time. I did pick his brain about it and we tossed a few options around. Early on, while I was still building the Motivator, Adam was seriously considering metal plating the whole thing and asked me to look into it. I called just about every place in NYC and surrounding area and didn’t have much luck. Coating plastic, or electroplating, is done all the time–it requires the plastic to be coated in a conductive paint, which the metal plating will adhere to. It seemed like most of the places that do this work usually plate metal and they either didn’t do plastic at all or were reluctant to do so and they didn’t really want to do small jobs such as the Motivator. In the end, Adam decided to move on and figure out a different approach.
I had been doing my own research and found ALCLAD, a metal paint system that looked absolutely amazing but required an airbrush setup and skills which I didn’t have. I have never produced a satisfactory metallic finish with spray paint so decided to try Rub ‘n Buff since Adam and The RPF have mentioned it many times. Rub ‘n Buff is a wax-based paste with metal particles suspended in it and, once applied, it can be buffed to a shine, unlike most paints. It’s readily available at just about any art or hobby store, cheap, relatively low-key health-wise and easy to apply (in theory).
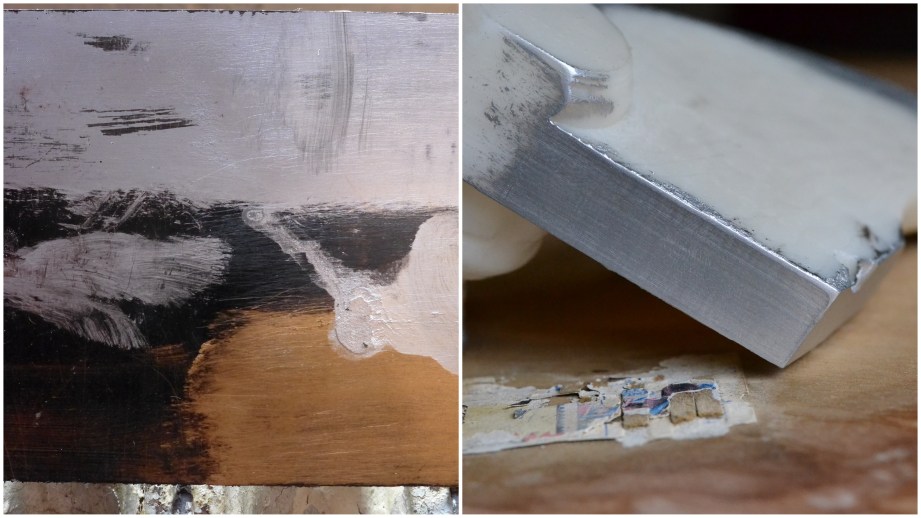
The NYU print lab was kind enough to give me a scrap piece of plastic to experiment on and I also used some of the black ABS I used for the top plates. It seemed simple enough: apply the Rub ‘n Buff, wait a while and then buff it to a shine. I like how it was looking on the black plastic vs. the white–I felt that where the black peaked through made it look more like real, weathered metal. I needed to do a little clean up on the 3D printed parts since there were some ridges from printing–even with high-resolution parts you can get stepping, which is where you can see the layer transitions.
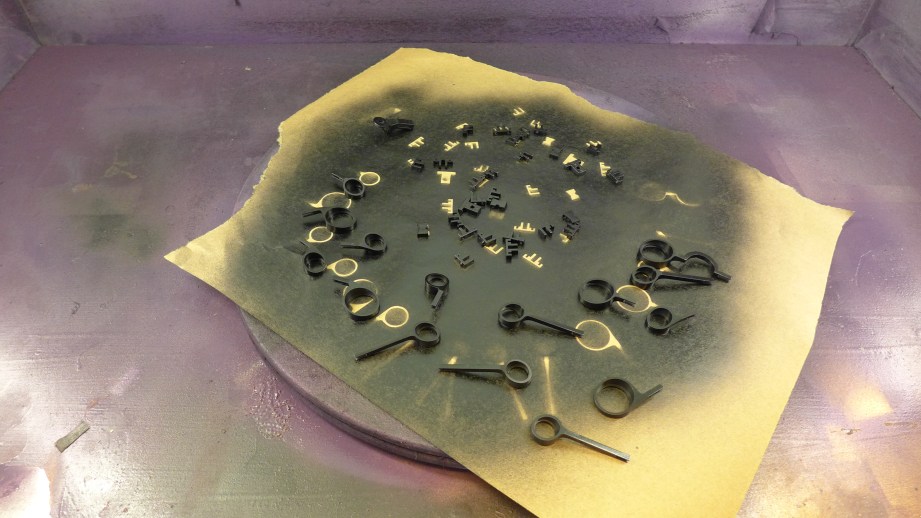
The resin used in the ProJet printer is easily sanded and painted like any other plastic so this wasn’t an issue and only required light sanding. During my tests I also discovered that if I hit the surface lightly with a scotch-brite pad before applying the Rub ‘n Buff it gave it a brushed-metal look. I painted everything with black Krylon Fusion spray paint which is specifically formulated for plastics and requires no priming – turned out great. Next came the silver Rub ‘n Buff – which turned out terrible. I had a bad time with it – either it would not lay down evenly or clumped up in blobs and I really messed it up by trying to put on a second coat. All my tests had turned out ok but they were mostly small patches – covering large areas was not going well. Luckily, the Rub ‘n Buff came off fairly easily with some alcohol but I needed to figure out what I was doing wrong. My technique was to apply it using a small square of cotton rag, let it dry for a while and then buff it to a shine but this wasn’t working on the large parts. Once again, The RPF to the rescue–I found this armor video by Arturo Delgado that made everything clear:
Making armor with Rub ‘n Buff (application at 4:15) Credit: Arturo Delgado
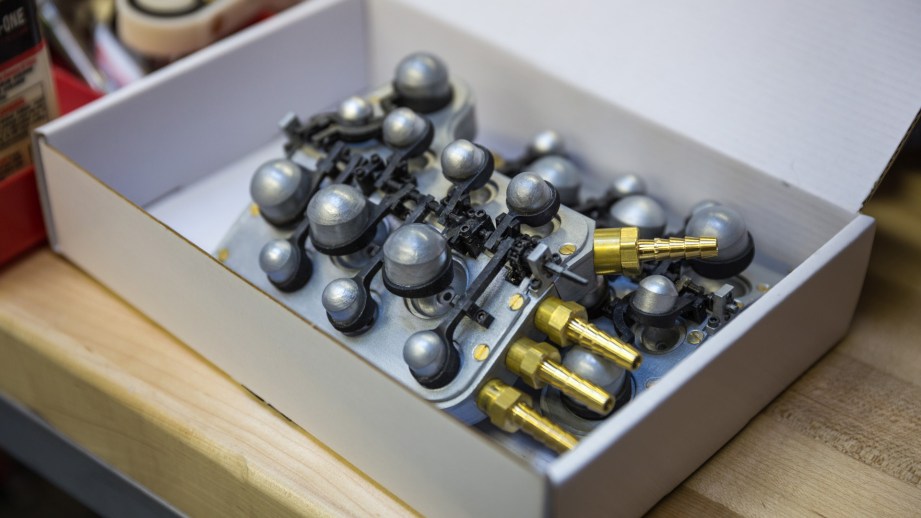
Following the advice from the video, I ditched the rag applicator and literally got my hands dirty by applying the Rub ‘n Buff with my fingers. As messy as this was, it really worked, as it allowed me to apply it in a very thin layer that worked into all the nooks and crannies and body heat and friction melted the wax just enough to make it really stick. It was also important to let it dry for a few hours so the wax could harden in preparation for buffing. I lightly buffed the parts with a cotton rag and it was starting to look really good. I got a little carried away at times and the black paint started to peek through but, as I hoped, it just made it look more like worn metal.
So far so good, the Motivator was looking as close to real metal as I could get it, but now for the part I always put off: weathering. The valve arms had a weathered bronze-look so I started with the black spray paint and then used antique gold Rub ‘n Buff and a small brush to highlight the edges–this turned out great and gave me hope for the rest. I added some green patina as well and planned on using some acrylic paint to add some rust and other grime. Didn’t think this one through; the wax-based Rub ‘n Buff repelled the water-based acrylic paint, just like a newly waxed car. I also tried some enamel paint, which dissolved the Rub ‘n Buff. Oops. Eventually I found that leaving the paint thicker by using less water got it to stick ok and the Motivator was starting to look nice and worn. I also used some india ink for stains and black shoe polish that worked really well to simulate built-up grime and gunk around parts.

I also needed to weather all the brass parts but wanted to make this look really legit and age it for real. Googling ‘brass weathering techniques’ led me to a Pirate forum of all places where I found thorough instructions–all in pirate-speak. Techniques included soaks in various liquids such as salt water, ammonia and vinegar, but none of these worked very well. I ended up using Birchwood Casey Brass Black, a chemical typically used for blueing and blacking gun metal. This worked amazingly well and produced the exact look I wanted in seconds and after a little steel wool and green patina, it looked perfect.
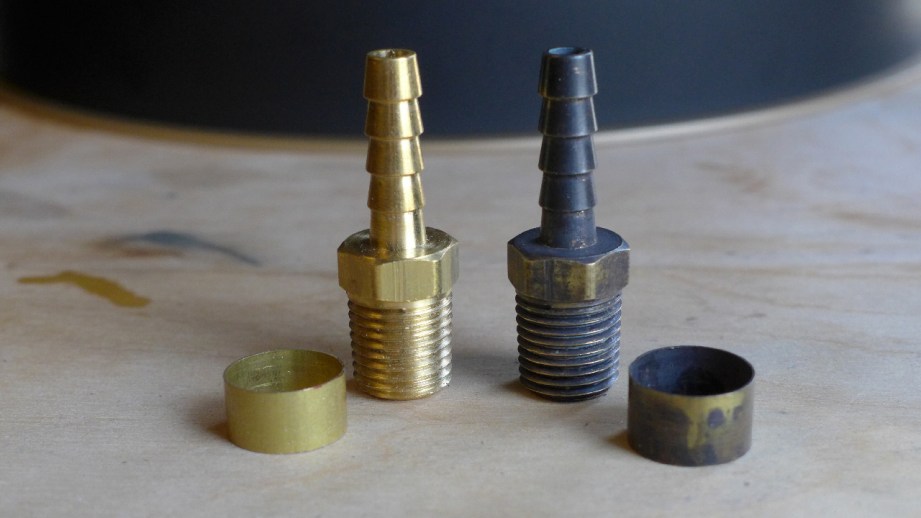
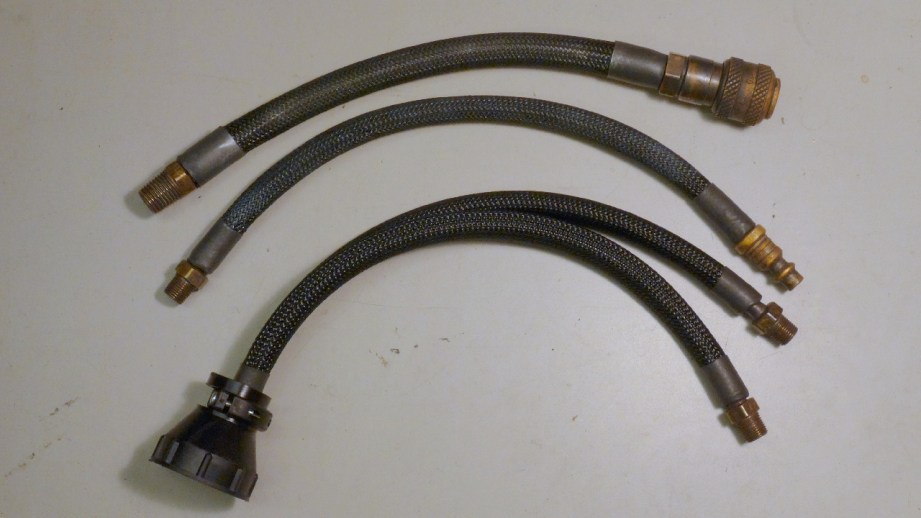
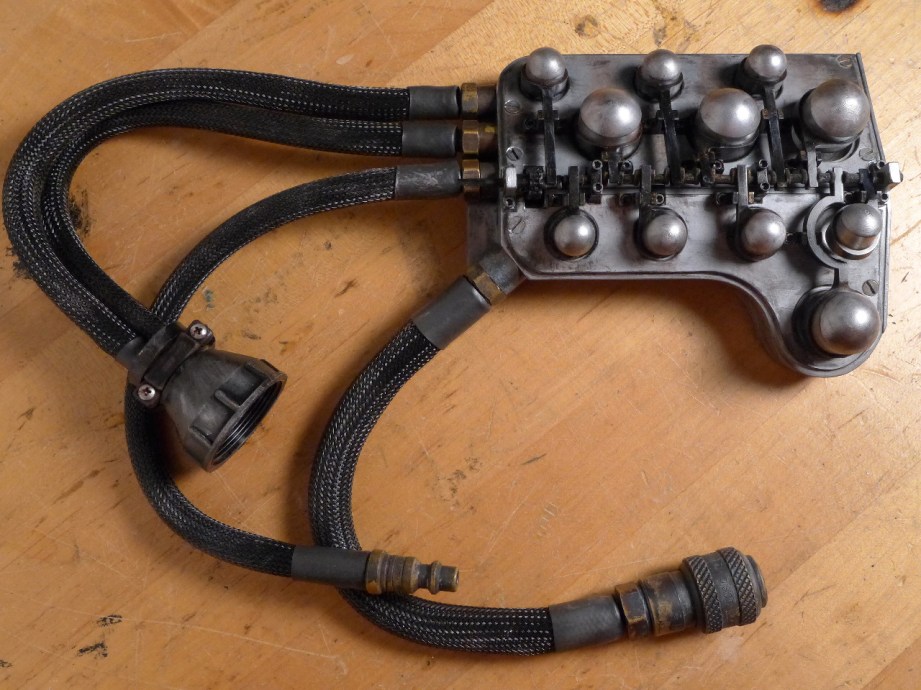
The last detail were the hoses, but I didn’t have all the needed parts. I had already specced the hose barbs that mounted on the block and Adam gave me the large plastic connector for one end and some braided sleeving but I needed the rest. I ended up getting brass air fittings for the other hoses and a super-flexible PVC tubing for the inner hose. Since my Motivator will never be attached to a full Mecha-Hand and probably be displayed in a cabinet, I shortened the hoses to make them more manageable. The problem I ran into was even with the super-flex hoses, I couldn’t pose them and they would tend to spring open and push the Motivator around. I solved this problem by inserting an armature wire in each hose, so they could hold a pose.

Considering that I had never attempted a Rub ‘n Buff finish and with my long history of choking on the finishing work, I am extremely pleased with how this turned out. I also realized that I really like working on ‘used’ items, not only because they look cool, but there’s more leeway on the finishing–although a bad weathering job can be just as ugly as a bad finishing paint job.
Adam gave me one of the plaques he had made for the Mecha-Hand, which gave me a good idea of how to display my Motivator, sans Mecha-Hand. I need to gather materials and do some work for this display, but it’s gonna be pretty cool. I’ll make sure to post an update whenever I get it finished.
Thanks for coming along on this adventure, you’ve all been very supportive and kind during my work on this project–it’s part of why I like our community so much. I’ll be on hiatus for the next few weeks, but stayed tuned for the next 3D printing article: a Halloween special!
In case you missed the other installments of the Millenbaugh Motivator build recap:


18 thoughts on “Bits to Atoms: Building the Millenbaugh Motivator, Part 5”
Leave a Reply

One Day Builds
Adam Savage’s One Day Builds: Life-Size Velocirapt…
Adam embarks on one of his most ambitious builds yet: fulfil…

Show And Tell
Adam Savage’s King George Costume!
Adam recently completed a build of the royal St. Edwards cro…

All Eyes On Perserverance – This is Only a Test 58…
We get excited for the Perserverance rover Mars landing happening later today in this week's episode. Jeremy finally watches In and Of Itself, we get hyped for The Last of Us casting, and try to deciper the new Chevy Bolt announcements. Plus, Kishore gets a Pelaton and we wrack our brains around reverse engineering the source code to GTA …

One Day Builds
Mandalorian Blaster Prop Replica Kit Assembly!
Adam and Norm assemble a beautifully machined replica prop k…
House of MCU – This is Only a Test 586 – 2/11/21
The gang gets together to recap their favorite bits from this past weekend's Superb Owl, including the new camera tech used for the broadcast and the best chicken wing recipes. Kishore shares tips for streamlining your streaming services, and Will guests this week to dive into the mind-bending implications of the latest WandaVision episod…

One Day Builds
Adam Savage’s One Day Builds: Royal Crown of Engla…
One of the ways Adam has been getting through lockdown has b…

Making
Adam Savage Tests the AIR Active Filtration Helmet…
Adam unboxes and performs a quick test of this novel new hel…

Making
Weta Workshop’s 3D-Printed Giant Eyeballs!
When Adam visited Weta Workshop early last year, he stopped …

One Day Builds
Adam Savage’s One Day Builds: Wire Storage Solutio…
Adam tackles a shop shelf build that he's been putting off f…

Show And Tell
Mechanical Dragonfly Automata Kit Build and Review
Time for a model kit build! This steampunk-inspired mechanic…
YAY! I’ve been waiting for the final installment! Thanks, Sean!
Hey Sean! Great finish (yes – pun intended!) to the Motivator article series! I look forward to seeing more articles from you in the future – your work is really inspiring and you’ve got some great talents.
Thanks for these wonderful series of articles on the Millenbaugh Motivator, Sean!
It turned out great.. 👍
I’m an engineer in the auto industry and I spent 7 years doing interior parts, needless to say I have had to chrome a lot of plastic. My favorite source hands down was a place called Adept Plastic Finishes http://www.adeptfinish.com they are very state of the art and where always up for odd jobs and prototypes. Also I’m sure if you said you where doing a project for Adam the would be excited to help.
That said you results look awesome, I need to work on my rub and buff technique, my stuff never looks that good.
For full scale stuff the rub and buff technique looks like it works really well. One thing to remember is that most metal objects, unless they are deliberately smoothed and finished actually have tool marks and a fairly rough finish. I imagine the motivator as a one off secret project for a secret military organization would not have the attention to finish that a consumer product manufacturer would. So the rub and buff effect is perfect.
Great writeup on the weathering, Sean.
It might be prototype hardware, but it is still made by German engineers, so it can’t be too beat up 😉 I have a book about the German industrial designer Dieter Rams that show some examples of his prototypes for things like travel radios etc., all handmade in his basement workshop 50-60 years ago, but in many cases it would be tough distinguishing them from production items. And most of those aren’t even functional prototypes 🙂
Kim_a
What I was talking about was the final finish. Most consumer products are shiny and polished because the are ground, polished and plated for that look. but one offs and prototypes don’t get that kind of attention. They are more than likely to just receive the finish they need to work. Here’s case in point. This is a component for a large particle accelerator:
https://www.flickr.com/photos/jccarlton/10463643316/
See the lack of finished surfaces and how dull it looks. Not the clean shiny look of a product that everybody sees. Experimental stuff is really hacked together. You would be amazed at some of the things we did when I worked at the lab.
Not surprised at all, they are functional items after all, not products on a shelf. Like Adam, Will and Norm have said about their interactions with NASA hardware, it all feels very hand-built and hacked together. 🙂 No need to make it pretty.
Still, it clearly wasn’t unheard of for the Germans to finish their prototypes back then. The book I referred to (Dieter Rams: As Little Design as Possible) show several prototypes of electrical equipment from the Braun archives and Rams’ personal collection. Most of these are built in the early 50s to late 70s. On the functional prototypes the metal is variously polished or finished with ceramic/chemical coatings. Only a few of the design-models/shells are left bare or with the tooled surface. So finishing was certainly not out of the question even for one-offs.
well you know what they say. Its all in the presentation, and if you take pride in your presentation it goes a long way.
Obviously there could be a difference between how they’d treat a component in a scientific apparatus like the Mecha-Hand and a prototype for an electronic consumer product. But even the early Enigmas were nicely finished from what photos I can find 🙂 Things that go into the field, which the Mecha-Hand did, could always do with a coat of something. Wouldn’t want corrosion to stifle the summoning of the old gods :p
Sean check caswell plating, they have all the stuff for platting plastic and also pen plate kits here is the conductive paint:
http://www.caswellplating.com/copper-conductive-paint-4oz.html
or if you have deeper pockets
http://www.caswellplating.com/electroplating-anodizing/plating-non-conductive-parts/silvaspray-conductive-paint-8-oz.html
When i final make space in my store room i want to setup a small scale plating section for anodise and other finishes but as with everything its time and money and at the moment i have neither spare lol
I am going to have to check out that ALCAD Lacquer, As I have a prop that is about 4 feet long that needs a good thin coating. I should be able to spray it out of my HVLP setup for the bulk of it.
I learned when I was a kid that you can weather brass and smaller plated metals by dropping them in water with an electrode attached between the tank and the object. You use some denture cleaning tablets on the water. You don’t need to cycle the water through. Just let it sit for a few days or a week and you will get an accelerated corrosion effect. It works great if your not in a hurry and has a natural and organic look to it.
Further to platting plastics I came across a company making sprayable metal finishes a few years ago, the steel rusts and the iron is magnetic no matter what the substrate. It looks like they have added more finishes since i tested the brass finish on a wooden speaker cabinet. The brass was very good even cold to the touch.
http://www.verometal.co.uk/index.php
$EME Thanks for the tips will check them out.
Yep. I’ve had the Millennium Falcon cutaway model in a closet for at least 11 years – haven’t touched it yet.
AB is definitely on the list to do and so is casting. I’ve tried the Montana paint before and had problems with it running like crazy.
Astounding job Sean! You really hit this one out of the park with this series. The Mecha Glove is one of my favorite props of all time and I had been following the build on the RPF over the years and it is so cool to see it come together like this. Have a cold one on me sir!
Coming from the guy who built articulated Iron Man armor that is a big compliment – thank you! I am still working on putting some Motivator kits together, will keep you all posted.
Hey I know I’m late to the party here but I’m wondering if it would be possible to acquire any parts from you guy’s? Looking at my own Glove Build going forward. Thanks for any suggestions!
skoshigod