


Bits to Atoms: Designing the 3D Printed Gowanus Monster
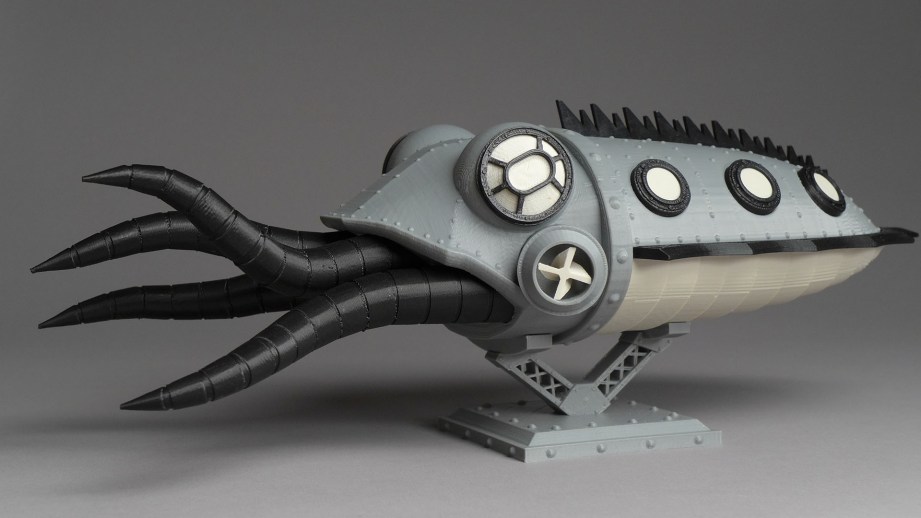
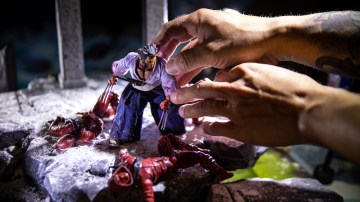
Prowling Brooklyn's polluted Gowanus Canal, the Monster sinks innocent kayakers and grabs unaware hipsters, pulling them down into the depths.
Prowling Brooklyn’s polluted Gowanus Canal, the Monster sinks innocent kayakers and grabs unaware hipsters, pulling them down into the depths. The Gowanus Monster was a commission I did for Bold Machines, a product development workshop headed by Bre Pettis, one of the founders and former CEO of MakerBot. The Monster was done as one in a series of proof of concept characters for an animation, all of which can be downloaded for free. This is how I created it.
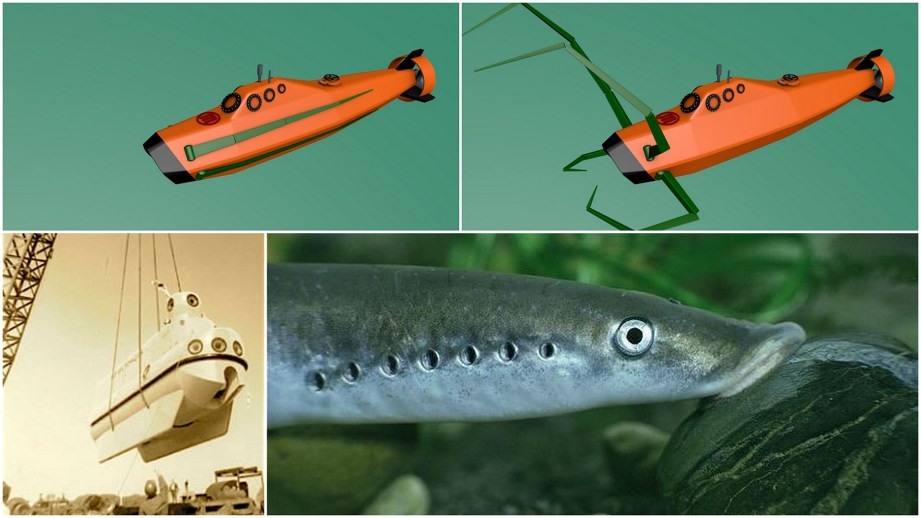
Bold Machines was very interested in my Octopod design and tasked me with designing another submarine to fit their storyline. Initially they wanted to add some local flavor and referenced the Quester I, a homemade sub built in the 1960’s by a Brooklyn shipyard worker. A local legend that never did launch and is currently marooned in the middle of Coney Island Creek. They were also really interested in having some type of tentacles for grabbing ships. I was not getting much design inspiration from the Quester I, but tried to stick to a small craft and took some inspiration from lampreys. Mechanical arms would fold back into the body, springing open to grab ships or treasure.
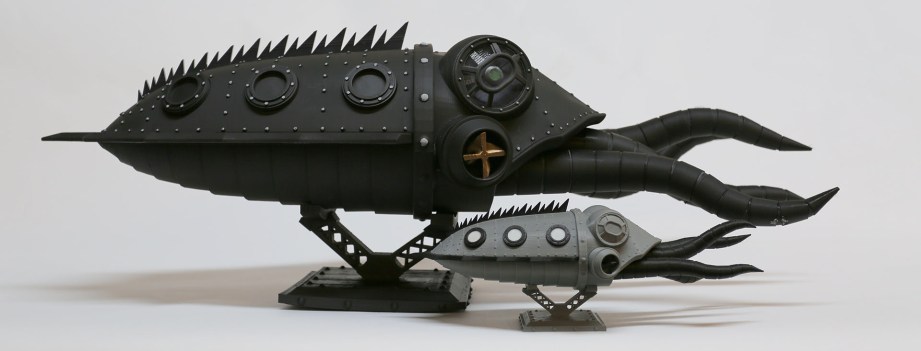
They liked it, but wanted something more like the Octopod–in fact, they wanted the Octopod, but I wasn’t ready to let go of my baby and it would have needed a tremendous amount of work to print on an FDM machine. Going back to the drawing board, I decided to create something that would be found in the same fleet as the Octopod and based it on a fellow cephalopod–the cuttlefish.
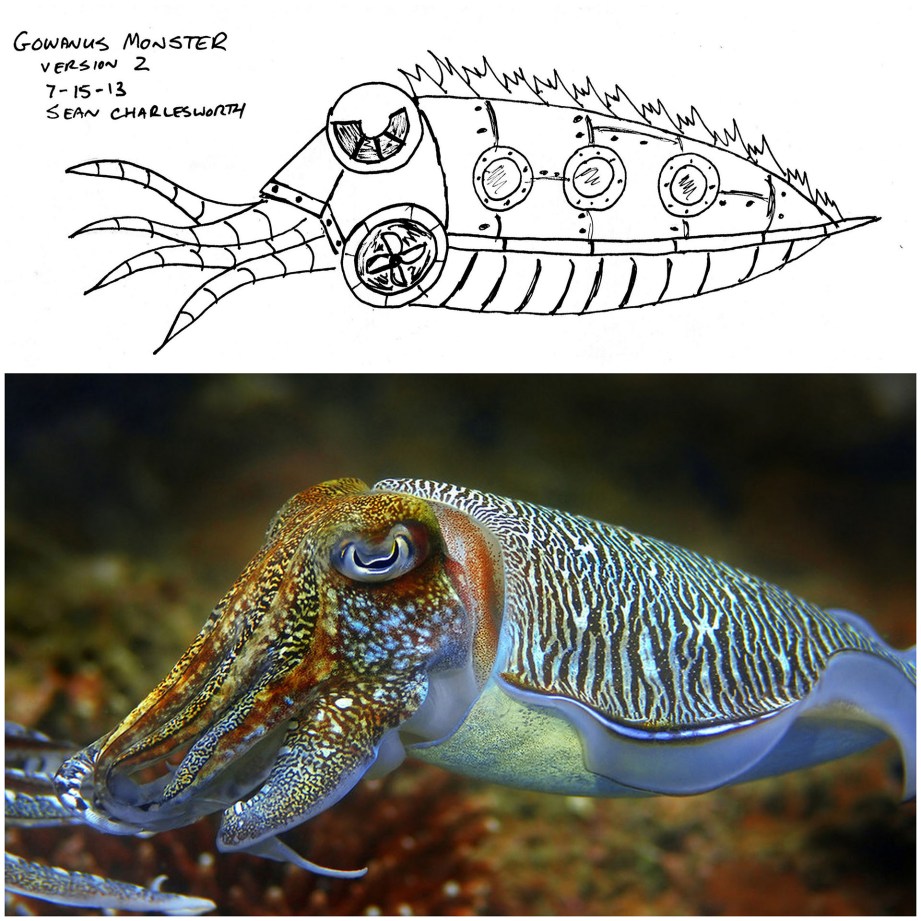
Sometimes I sketch things out and other times I will ‘sketch’ in the 3D program – using basic shapes and cramming them together to get a rough draft model. The latter was my approach for the first version of the sub, but for version 2 I did some sketches. Being such a close cousin to the Octopod, the design hit home. The first pass at building the model was a lot of basic shapes scaled and modded to look right. The propellers, portholes and eyes were borrowed directly from the Octopod. The only part that had extensive modeling done at this point was the head.
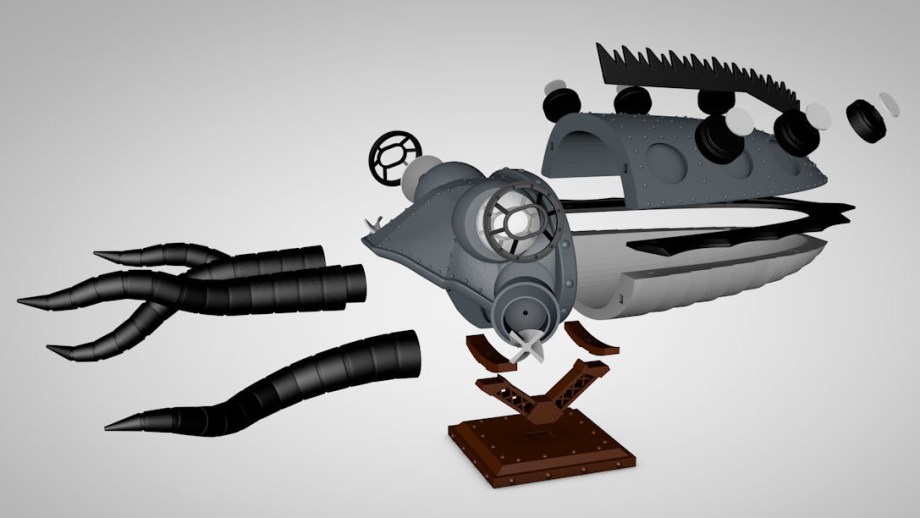
The draft was quickly approved so I could move onto the final version which needed divided up into multiple parts to print well (and fit on the print bed). For printing purposes, I knew the head, tentacles and body would need to be individual pieces, then I realized that to fit my vision, there needed to be even more parts. I pictured being able to really customize the look of the Monster by printing multiple pieces in different colors. So the portholes, eyes, fins, etc all became separate pieces which would allow for customization and better prints.
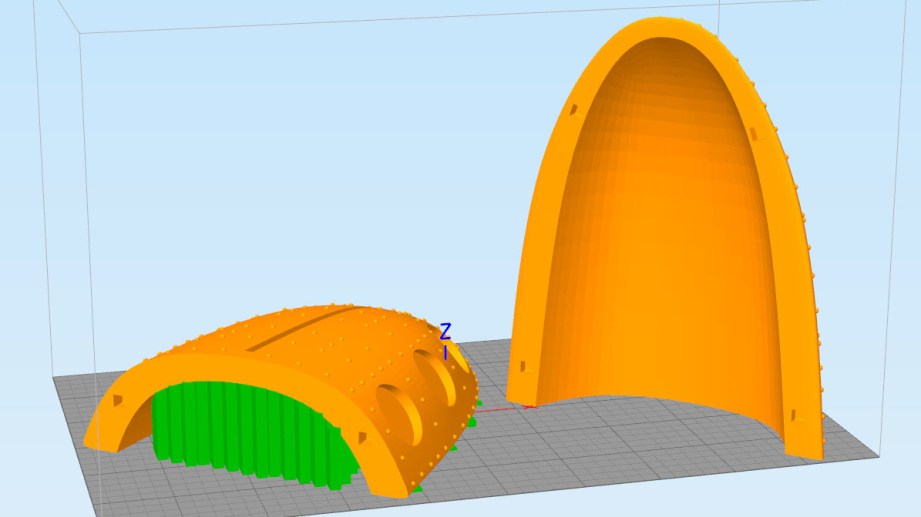
A lot of thought went into how to design and position pieces for printing. For example the body halves could have been solid pieces, but that would have drastically increased the print time and material used. I made them hollow, but now they couldn’t print laying down without using supports to hold it up, which defeated the purpose of making it hollow. The solution was to print them on end and by gently sloping the inside hollow, they could print without supports. Printing in this orientation also improved the resolution of the print. Due to the curvature of the body, printing laying down would have resulted in a stepping effect from each layer being slightly smaller to form the curve. By printing the most complicated cross section of the piece in the x & y (left to right & front to back on the print bed) axis, I got better detail and the curvature was more gradual so it turned out very well in z as well (up direction). This design approach was also discussed in the Quicksilver Stereobelt article.
With this in mind, the propeller housings were separated from the head so they could print upright. The propellers were also removed and redesigned as they needed to be printed at a much slower speed due to their small size and the curvature of the blades. The head was the only part that needed support as I couldn’t figure out any way to avoid it. I wanted the body halves to fit inside the collar of the head which would not only make a nice hidden seam but hold the body together as well. I decided to use square pins to align and hold all the parts together. But this created another issue as I could not have pins sticking out from flat bottoms that needed to sit on the print bed and I didn’t want support structures holding up pins sticking out from the body halves. The solution was to make sockets in all the parts and print the pins as standalone parts.

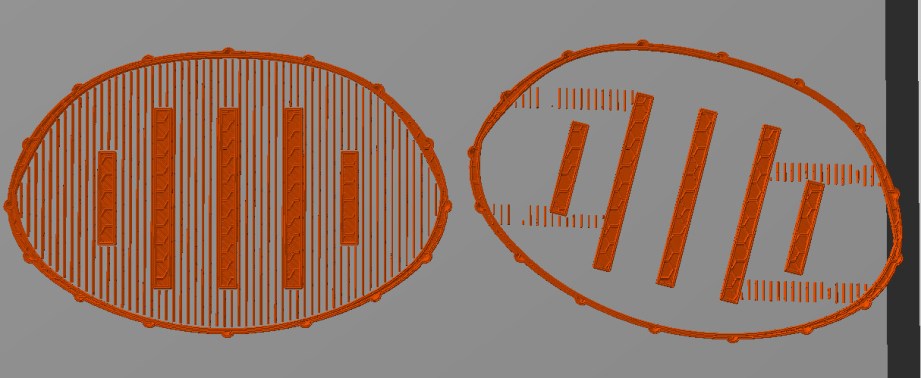
Between adding pin sockets and the collar to the head, I now had a large overhanging space that would need a lot of support material. To solve this issue, I added a few built-in supports to hold everything up and allow bridging to happen – which is simply when the printer spans an open space with filament. The plastic coming out of the nozzle is hot and pliable, but not liquidy, so it can span a certain distance without drooping too much or breaking. You can take advantage of this by not using supports on unseen portions of the model. The bridging may get a little messy but that’s OK since it’s out of sight. By adding my own supports I was able to cut down on material used and print time. The only spots that needed support were the pin sockets, but the amount of material and time spent were negligible. The head demonstrates another interesting 3D printing tip for supports. While I knew the pin sockets were the only spots that needed support, the MakerBot slicing software kept putting support everywhere.
The solution was to rotate the head slightly on the print bed which reduced the support–but why? Typically slicing software will have a direction it likes to print a surface in and for the head there would be large areas being bridged. In an effort to make the bridging tidy, the software put in supports. By rotating the head, the orientation of the printed surface remained the same, but it changed the bridging distances. The slicing software felt it could now span the distance alright and only put supports under the pin sockets. This will vary wildly depending on the slicing software you use, or even the version. Some software, such as Simplify3D allow you to add and remove supports manually.
When printing many parts that have to fit together tolerances have to be right. The annoying thing is, tolerances vary a lot depending on the printer you’re using, how well it’s calibrated, the type of filament, etc. A print done on my home FDM machine that fits together perfectly will probably fit sloppily if printed on a professional machine. It’s a pain, but sometimes I will have various versions of a model, each tweaked to print correctly on different printers. For FDM printers I will usually start with a tolerance of .2mm for parts that fit together and this will often need adjusted after one or more test prints.
The most challenging portion of the Monster was the tentacles. I really wanted to have fully poseable tentacles, but time and budget would not allow for it as it would have involved many iterations and test prints to get right. I compromised by having four uniquely posed tentacles that snapped in and could be rotated to vary the pose. I knew snap pins would work well for this and rather than reinvent the wheel, I used excellent snap pins designed by the prolific whpthomas on Thingiverse and available via a Creative Commons license.
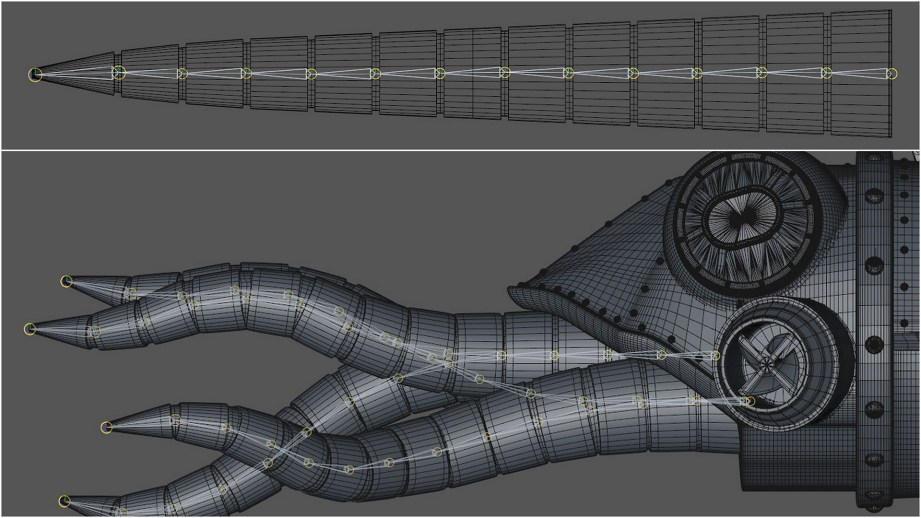
The tentacles were modeled perfectly straight and then a joint system, typically used for animation, was created and tied to the model. This allowed me to adjust each joint to pose the tentacle. The challenge was getting a dynamic pose which would still print easily. Once again, many versions later, I had four that worked but they have still been the problem child of the project. The slicing software I had at the time printed them fine, but a few versions later refused to print without getting a bunch of sags and bad overhangs. Simplify 3D would print one solo fine, but if you tried printing all four at the same time, it got messy.
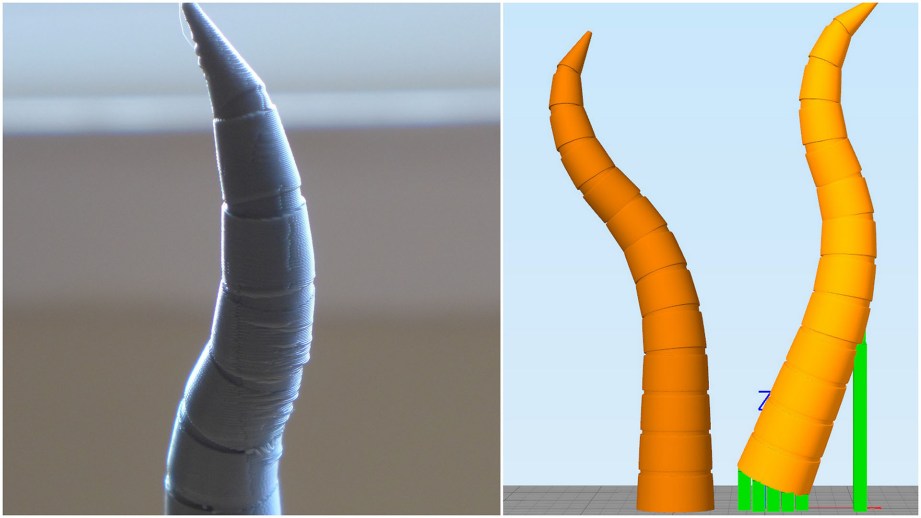
This is the stuff that drives me nuts. I found that printing only one outer shell (wall thickness) made for a nice finish, but the tentacles were really fragile even with a lot of infill. My final approach was to print the tentacle at an angle rather than sitting flat on the print bed. I would get it as straight as possible to minimize overhangs and then use support on the very bottom – this ended up working pretty well. Eventually I will go back and repose the base models to print better.
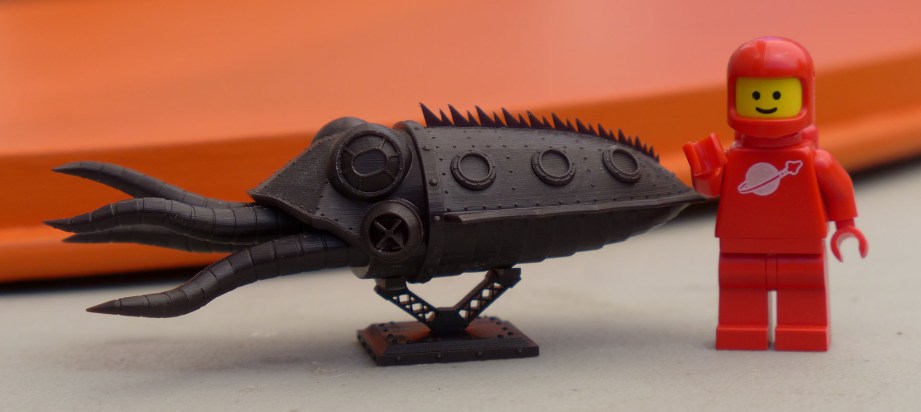
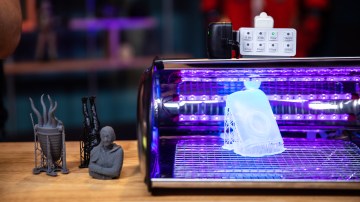
Once all the prints were done, all the parts simply fit together with the pins, mostly without glue. Even though the Gowanus Monster was far less complicated than his big brother, the Octopod, it was a challenge to design for optimal printing and assembly. I’m very please with how it turned out and so was Bold Machines. The final version was about 13″ long and Bold Machines printed a gigantic one about 2.5 feet long on a MakerBot Replicator Z18. They also sent me a mini 4″ version printed on an SLA machine at .05mm resolution (compared to .2 mm on my printer) and is one of the nicest prints I have. As cool as the little guy is, it illustrates something we talked about earlier. To print this on the SLA machine required completely reworking the model so that it was all one piece.
If the Gowanus Monster tickles your fancy, download and print your own from Thingiverse. For those without a printer, I also have a few kits on my Etsy store. A few tips for successful prints:
– Print the connection pins and propellers slower than normal
– Try rotating the head slightly to reduce supports
– Try straightening the tentacles as much as possible and use supports at the base
– Try printing tentacles one at a time
– Experiment with number of shells for the tentacles
– If all else fails, print duplicates of the straighter tentacles instead of the curviver ones
– Download the eye insert to make the eye a different color, it’s listed under ‘Remixes’ on the Gowanus Monster page.
Enjoy and don’t hesitate to ask questions in the comments!


5 thoughts on “Bits to Atoms: Designing the 3D Printed Gowanus Monster”
Leave a Reply

One Day Builds
Adam Savage’s One Day Builds: Life-Size Velocirapt…
Adam embarks on one of his most ambitious builds yet: fulfil…

Show And Tell
Adam Savage’s King George Costume!
Adam recently completed a build of the royal St. Edwards cro…

All Eyes On Perserverance – This is Only a Test 58…
We get excited for the Perserverance rover Mars landing happening later today in this week's episode. Jeremy finally watches In and Of Itself, we get hyped for The Last of Us casting, and try to deciper the new Chevy Bolt announcements. Plus, Kishore gets a Pelaton and we wrack our brains around reverse engineering the source code to GTA …
Making
Adam Savage in Real Time: God of War Leviathan Axe…
Viewers often ask to see Adam working in real-time, so this …

One Day Builds
Mandalorian Blaster Prop Replica Kit Assembly!
Adam and Norm assemble a beautifully machined replica prop k…
House of MCU – This is Only a Test 586 – 2/11/21
The gang gets together to recap their favorite bits from this past weekend's Superb Owl, including the new camera tech used for the broadcast and the best chicken wing recipes. Kishore shares tips for streamlining your streaming services, and Will guests this week to dive into the mind-bending implications of the latest WandaVision episod…

One Day Builds
Adam Savage’s One Day Builds: Royal Crown of Engla…
One of the ways Adam has been getting through lockdown has b…

Making
Adam Savage Tests the AIR Active Filtration Helmet…
Adam unboxes and performs a quick test of this novel new hel…

Making
Weta Workshop’s 3D-Printed Giant Eyeballs!
When Adam visited Weta Workshop early last year, he stopped …

One Day Builds
Adam Savage’s One Day Builds: Wire Storage Solutio…
Adam tackles a shop shelf build that he's been putting off f…
I like what you did with the windows. The oblong center window represents a cuttlefish’s pupil very well and it also makes sense to give a driver (captain?) an unobstructed view outside from an engineering perspective.
Sean, what CAD software do you use? Also, which ones do you use for the support analysis? You did mention Simplify3D.. is that your go to?
So next up is a squid based design to complete the family?
I’d like to do a crab.
Not CAD, Cinema 4D, a poly modeler. Run through netfabb for mesh repair. At the time this was done with MakerBot Desktop, have since moved to Simplify3D for most stuff.