


Building a Studio Scale Death Star Laser Tower Model, Part 1
Prop builder David Goldberg walks us through his replica process, and shares the files for his build!
Hello Tested! My name is Dave Goldberg. I’ve been a professional model maker working in the movie and television industry for more than thirty years. These days, most all of the visual effects shots that use to be done with models are done with computer graphics, but there is a movement of people, like myself, building Studio Scale replicas of classic models from old movies. Studio Scale is a term used to describe replica models that are the same size as the original filming models.

Like many people, Star Wars: A New Hope was a seminal film for me. It came out during my freshman year in college and immediately changed the direction of my education and career. From that moment on I wanted to build models for the movies. While I built models for many movies and televisions shows over the years I never got the opportunity to work for a Star Wars film. But now I can do the next best thing, build them for fun!
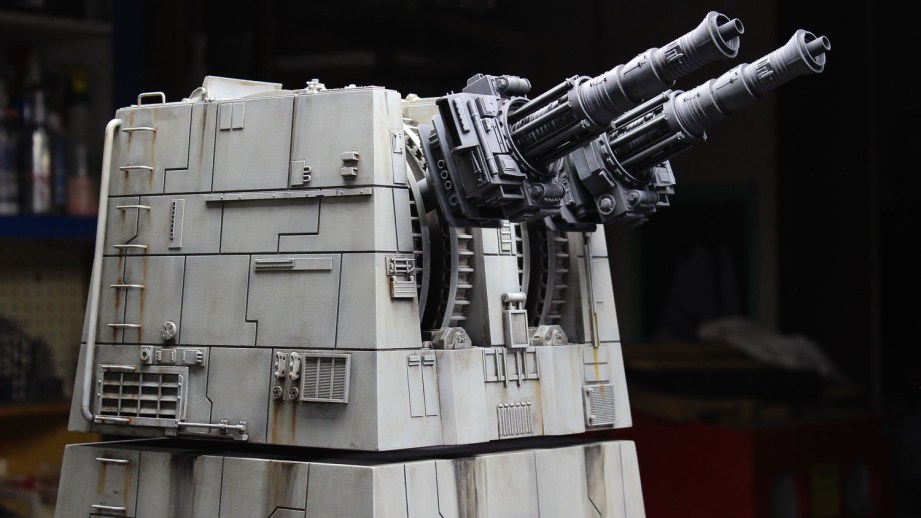
For this project I’ll be making a studio scale replica of one of the Laser Towers from the Death Star seen during the final battle in the film. I am also excited to be making this an “Open Source” project. I’ll be posting the model files for anyone to use freely for non-commercial purposes. They may be used to create your own model but not to create parts, kits or finished models for sale. The repository of model files is here.
These files are for the model as I will be building it outlined in this series of articles using CNC routing, laser cutting, kit bashing, some 3D printing and good ol’ fashioned scratch building. However, if desired, a competent 3D modeler should be able to convert the master model so that the entire Tower can be 3D printed, either at Studio Scale or smaller.
Reverse Engineering from Reference Photos
“Reverse Engineering” is a term used to describe the process of figuring out the size and shape of something using photographs. This can be done in 2D or 3D, although reverse engineering in 3D requires some pretty sophisticated software and detailed information about the photos must be known such as the focal length of the lens, exposure aperture and distance to subject. 2D reverse engineering is basically digital tracing over a photo and then determining its size using landmarks of known size and/or some educated guessing!
Fortunately there are a wealth of photos of the original Laser Tower model on the web. The original filming model was on public display a few years back part of the touring Star Wars Exhibition and several fans shot extensive photos of it and posted them online for the benefit of fellow modelmakers. There are also some nice still images of the model in the Special Features section of the Blu-Ray disc of the movie.
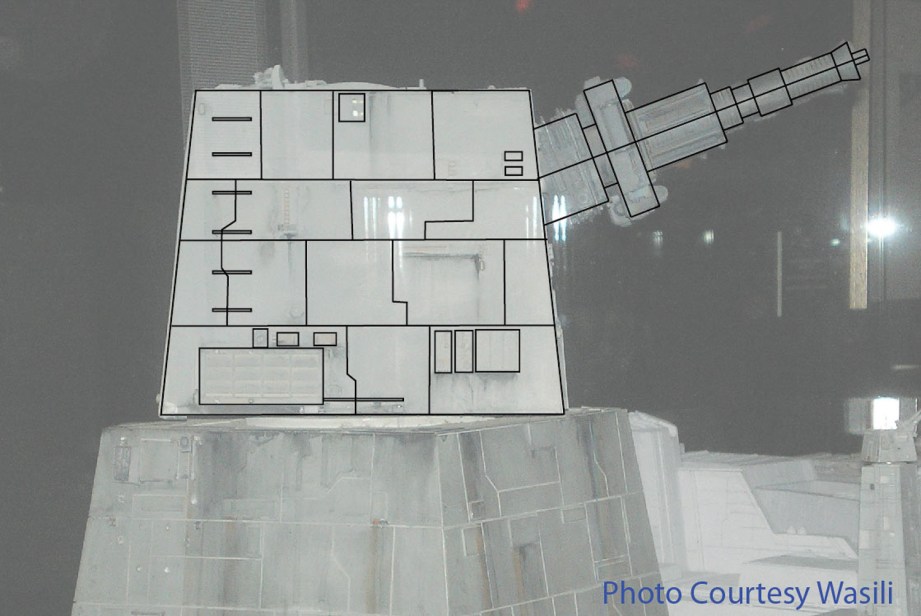
The trick to successful reverse engineering is to start with a photo shot square on to the model with as little perspective in it as possible. Most digital drawing and modeling programs will allow a photo to be imported and drawn over. For modeling projects like this one my software of choice is Rhino 3D, which allows me to import photos and create 2D drawings, as well as 3D models which can be used for 3D printing, laser cutting and CNC routing, but more on that later.
The trick to successful reverse engineering is to start with a photo shot square on to the model with as little perspective in it as possible.
Once I had drawn the basic outline of the turret and some key details over the photograph it was time to establish the actual size for the model. Sometimes the actual dimensions or scale of a model is known, or even better, it was possible to place a ruler next to the model during photography from which the size can be determined. Neither of those were a possibility in this case. However the laser barrels on the model were actually the engines from a known plastic model kit, a Revell 1/32 scale Mig 21, and I was able to purchase one of these kits on EBay. This would prove valuable both later on as a “donor part” for the model but also now as a way of determining the size of the turret by scaling the photograph and the drawn outlines to match the measured size of the kit part.
3D Modelling
Using the 2D over-drawing as a guide, as well as other photographs, I proceeded to 3D model the Laser tower in Rhino 3D. This involved careful examination of the various reference photos from different angles as well as some educated guesses as to what areas might look like that could not be seen clearly. Over time a pretty comprehensive 3D model emerged.

For the film, only the turret and a short section of the tower below it were actually built, as those were all that were necessary for the planned shots. I wanted my tower to be a little more imposing, so I extended the bottom of the tower to almost double the height of the model to 3 feet. This also allowed me to have fun making up some additional details lower on the tower not seen on the original filming model.
One of the great powers with using 3D modeling software in the design of physical models is that it allows you to not only work out the design but methods of fabrication as well. I broke up the solid mass of the tower into the various pieces from which it would be assembled. This “virtual model kit” allowed me to fine tune the construction long before starting the physical build. A digital form of “measure twice, cut once!”

From the 3D model of these individual parts accurate line drawings could be extracted. These drawings were then exported as .dxf files for use in CNC routing.

Next time, we’ll discuss how I constructed the casework for the model structure. In the meantime, post your questions and comments about this build in the comments section below. See you next week!
Photos and images credit David Goldberg
David Goldberg is a professional modelmaker, propmaker, visual effects supervisor and mechanical designer with more than 30 years experience working in the motion picture, television and theme park industries.


7 thoughts on “Building a Studio Scale Death Star Laser Tower Model, Part 1”
Leave a Reply

One Day Builds
Adam Savage’s One Day Builds: Life-Size Velocirapt…
Adam embarks on one of his most ambitious builds yet: fulfil…

Show And Tell
Adam Savage’s King George Costume!
Adam recently completed a build of the royal St. Edwards cro…

All Eyes On Perserverance – This is Only a Test 58…
We get excited for the Perserverance rover Mars landing happening later today in this week's episode. Jeremy finally watches In and Of Itself, we get hyped for The Last of Us casting, and try to deciper the new Chevy Bolt announcements. Plus, Kishore gets a Pelaton and we wrack our brains around reverse engineering the source code to GTA …

One Day Builds
Mandalorian Blaster Prop Replica Kit Assembly!
Adam and Norm assemble a beautifully machined replica prop k…
House of MCU – This is Only a Test 586 – 2/11/21
The gang gets together to recap their favorite bits from this past weekend's Superb Owl, including the new camera tech used for the broadcast and the best chicken wing recipes. Kishore shares tips for streamlining your streaming services, and Will guests this week to dive into the mind-bending implications of the latest WandaVision episod…

One Day Builds
Adam Savage’s One Day Builds: Royal Crown of Engla…
One of the ways Adam has been getting through lockdown has b…

Making
Adam Savage Tests the AIR Active Filtration Helmet…
Adam unboxes and performs a quick test of this novel new hel…

Making
Weta Workshop’s 3D-Printed Giant Eyeballs!
When Adam visited Weta Workshop early last year, he stopped …

One Day Builds
Adam Savage’s One Day Builds: Wire Storage Solutio…
Adam tackles a shop shelf build that he's been putting off f…

Show And Tell
Mechanical Dragonfly Automata Kit Build and Review
Time for a model kit build! This steampunk-inspired mechanic…
This is really great, thanks David. I’m always interested in learning more about kit bashing in general.
Nice article, looking forward to read the rest.
Very Cool! Looking forward to seeing more
I kind of want to live in a full-size laser tower.
I would pull up in my Sandcrawler, park around back, climb the ladder up to the turret. Then I would just kick back, pop open a beer, and watch the stars. Maybe spin the turret around once in a while.
The reality is, 99.9% of the time there really isn’t any action. Just peaceful.
-)
(I believe I followed your build on the TheRPF earlier this year — at least I only discovered it earlier this year. Very cool.)
There was a fantastic model I that I saw likely on the RPF. It was motorized with the turret rotating and the canons even pulsing in and out firing with sound effects and I believe light too. It was very impressive but I’m having a hard time finding it. Anyone else see it?
space rust?
I discuss rust in space in Part 4, painting and weathering. Stay tuned!