


Building a Studio Scale Death Star Laser Tower Model, Part 2
Prop builder David Goldberg walks us through his replica process, and shares the files for his build!
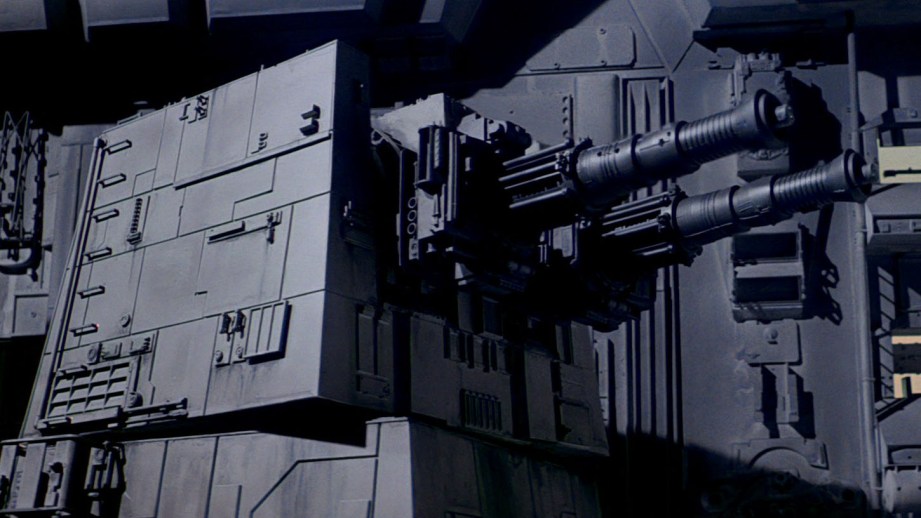
This month, prop maker David Goldberg shares with us his build of a studio-scale replica of the Death Star laser tower from Star Wars. In Part 1, David explained sourcing reference images and creating a 3D model. Today, he dives into the fabrication of the tower and laser cannons.
While the some of the materials and construction methods used to build the original Death Star Laser Tower filming model are not known, it was most likely made of a core structure of either wood or Plexiglas covered with panels cut from styrene sheet. The original model also had a mechanical armature and motors inside it that would rotate the turret and move the barrels to simulate firing at the Rebel X-Wing fighters. I’m building a static, non-moving display model so an interior mechanism won’t be needed. (At least for now. I’ve designed the casework in such a way that I can put a mechanism into it a later time if desired.)
I’m going to fabricate the model using a more high tech approach than was available to the modelmakers at ILM in the 70’s. Rather than hand cut styrene panels to clad the core structure, I’m going to use a CNC (Computer Numerically Controlled) router to both cut out the structural components as well as cut panels lines into the surface using the .dxf drawing files exported from the 3D computer model.
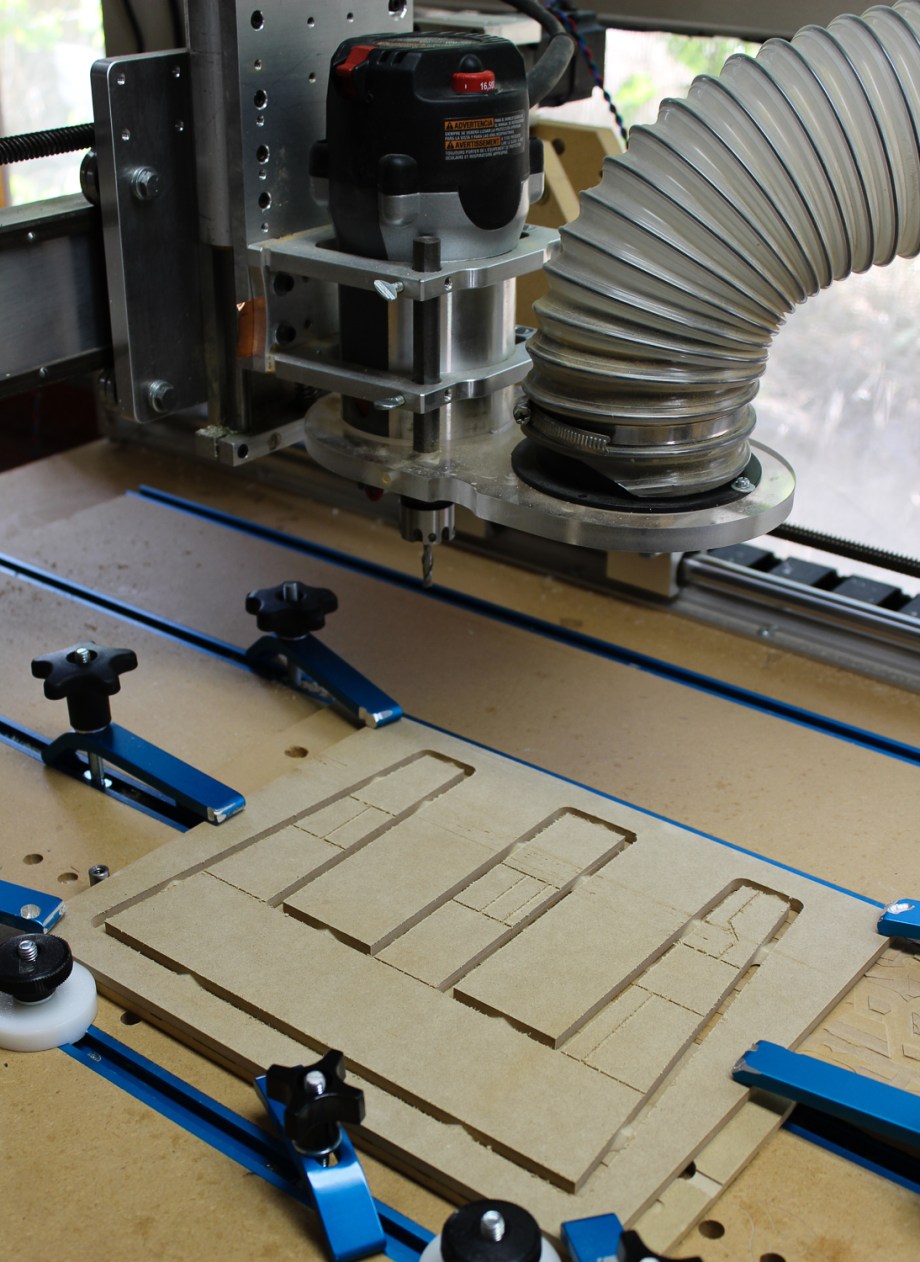
The material from which I’ll cut the casework is a special premium MDF (Medium Density Fiberboard) ¼ inch thick made by Plum Creek. This material is similar to the fiberboard found at most home center and lumber stores except that it has a smoother surface and a denser, more consistent core. It’s used mostly for making paint grade cabinets and signage and paints beautifully, even the cut edges.
The .dxf files were loaded into the computer that controls the CNC router. I use a software program called V Carve from Vectric. The .dxf files are imported into the program where the various cutting depths, speeds and bit sizes are determined. V Carve calculates and exports the “G-Code” which is a standard machine language used to control CNC machine. The G Code is then imported into a program called Mach 3 that actually sends the control signals to the stepper motors that drive the router.
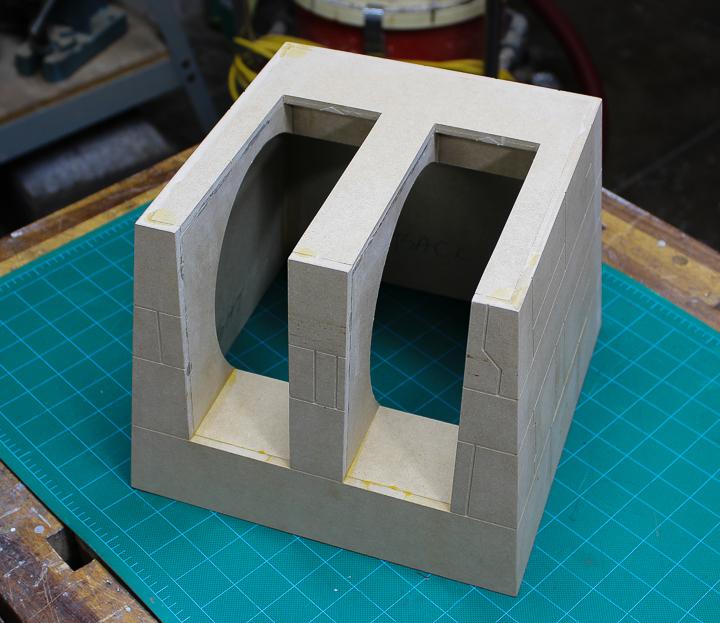
The parts were cut out of the MDF sheet material with a ¼ inch diameter router bit and the panels lines routed into the surface with a 1/16 inch diameter bit.
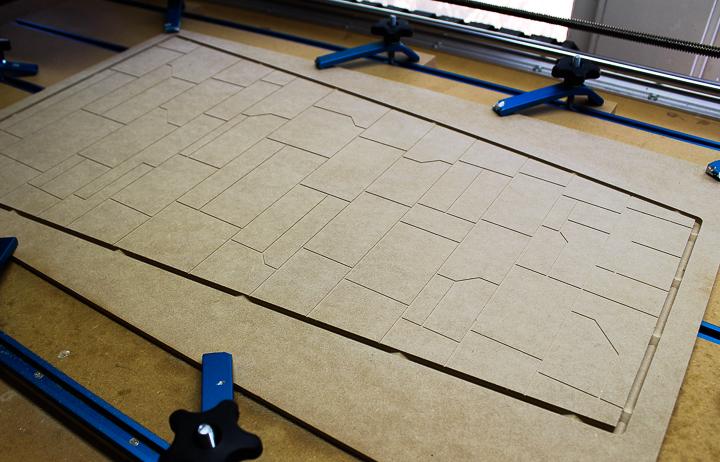
After being cut out on the CNC, the outer corners of the sides were mitered to a 45-degree angle on the table saw. In the end I had a stack of parts, my own kit, ready to assemble!
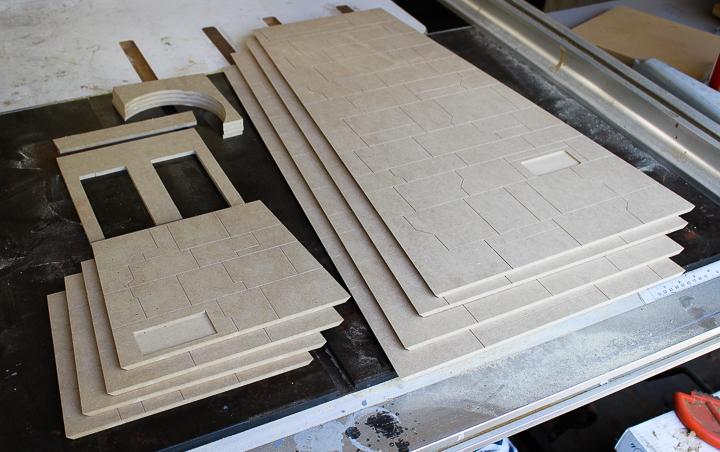
MDF is a wood product and can be glued together easily with carpenters glue. The precision of the computer cut parts ensured that everything went together cleanly and accurately.
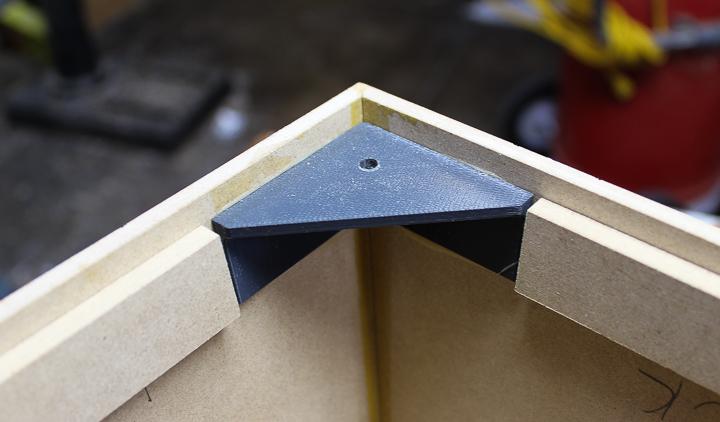
In order to be able to get into the turret for assembly I wanted the bottom panel to be removable. This was achieved by 3D printing corner brackets with angled sides that could be glued into the inside corners. The printed brackets had little hexagonal pockets into which hex nuts were glued, which in turn allowed for the bottom panels to be held in place with flat head machine screws.
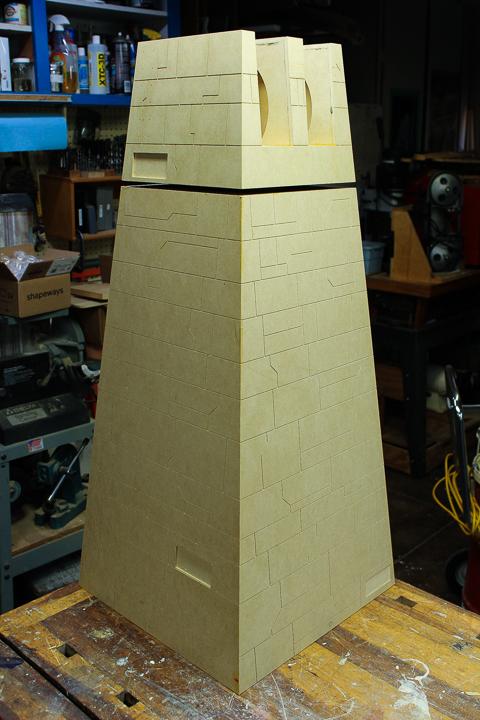
The assembled casework for the tower is of a really impressive size! Man this sucker is big! And the CNC routed panel lines are really clean and sharp.
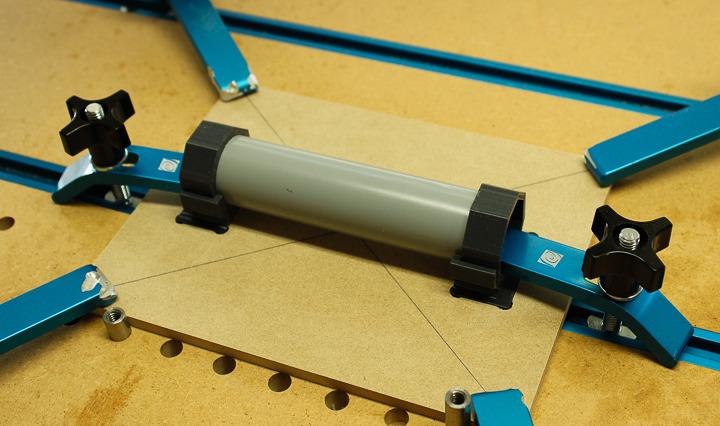
The curved tracks alongside the laser barrels were made by first cladding CNC cut pieces of MDF with styrene sheet. On top of the styrene were glued short pieces of Plastruct ABS plastic Tee structural shapes, the same material that was used on the original model. This was then capped with a narrow styrene strip to complete the assembly.
With the structural casework of the Tower finished it was time to turn my attention to the details.
Building the Laser Cannons (Pew Pew!)
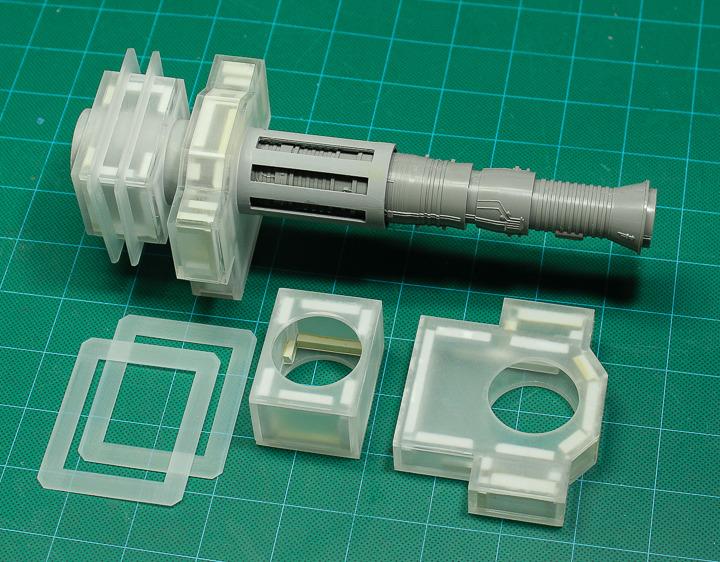
The twin laser canons were comprised of three main components – the barrel (the engine from the Mig kit), a slotted sleeve into which the barrel was inserted and rectilinear base assembled out of laser cut acrylic sheet. I was only able to purchase one of the vintage Mig kits on EBay so it was necessary to make a silicone mold of the engine part and cast the two pieces needed for the model.
The slotted tube sleeves were cut from plastic tubing available from Plastruct. To cut the eight slots in each tube I leveraged the power and precision of computer modeling, 3D printing and CNC routing. I design a jig fixture comprised of 3D printed octagonal end buttons which fit into the ends of the cut piece of Plastruct tubing and were held in place by a length of threaded rod and a couple of hex nuts.
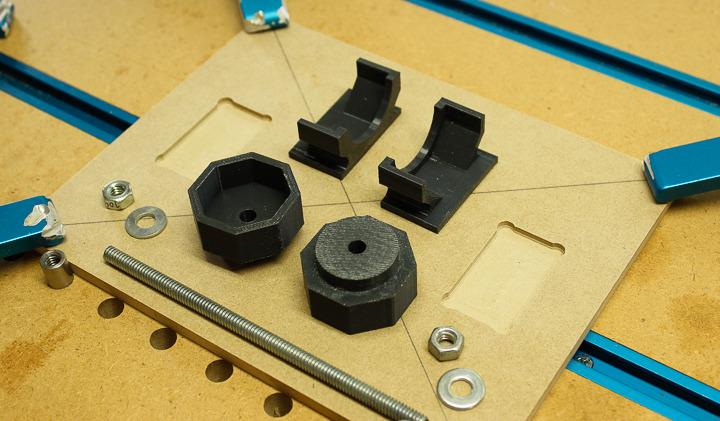
This assembly was then clamped into a set of matching 3D printed cradles which in turn fit into rectangular pockets milled into a MDF base plate on the CNC. Once the tube was securely clamped into the cradles the correctly sized slot could be cut using the CNC router.
Then the tube/button assembly was rotated 45 degrees in the cradles, clamped down and the next slot cut. This was repeated until each tube had been cut with eight identical slots. A little bit of clean up with a square needle file to sharpen up the corners and the sleeves were done.

The bases of the laser canons were first 3D modeled in Rhino and then broken down into the component pieces, the same way as was done for the MDF tower casework. In this case the parts were to be laser cut from 1/8″ and 1/16″ thick acrylic sheet. As with the drawing files for the CNC, the files for the laser cut parts were exported as .dxf files which were then used to run the laser cutter.
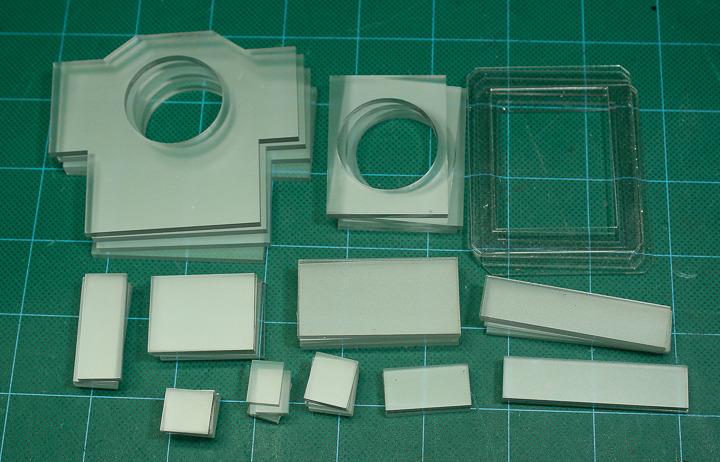
The cut parts were glues together with solvent cement. Short pieces of 1/8″ square styrene strip we glued into the inside corners of the structures to help re-enforce them.
That completes the casework of the tower and cannons. Next week, we’ll dive into the detailing with greeblies!
Photos and images credit David Goldberg
David Goldberg is a professional modelmaker, propmaker, visual effects supervisor and mechanical designer with more than 30 years experience working in the motion picture, television and theme park industries.


3 thoughts on “Building a Studio Scale Death Star Laser Tower Model, Part 2”
Leave a Reply

One Day Builds
Adam Savage’s One Day Builds: Life-Size Velocirapt…
Adam embarks on one of his most ambitious builds yet: fulfil…

Show And Tell
Adam Savage’s King George Costume!
Adam recently completed a build of the royal St. Edwards cro…

All Eyes On Perserverance – This is Only a Test 58…
We get excited for the Perserverance rover Mars landing happening later today in this week's episode. Jeremy finally watches In and Of Itself, we get hyped for The Last of Us casting, and try to deciper the new Chevy Bolt announcements. Plus, Kishore gets a Pelaton and we wrack our brains around reverse engineering the source code to GTA …

One Day Builds
Mandalorian Blaster Prop Replica Kit Assembly!
Adam and Norm assemble a beautifully machined replica prop k…
House of MCU – This is Only a Test 586 – 2/11/21
The gang gets together to recap their favorite bits from this past weekend's Superb Owl, including the new camera tech used for the broadcast and the best chicken wing recipes. Kishore shares tips for streamlining your streaming services, and Will guests this week to dive into the mind-bending implications of the latest WandaVision episod…

One Day Builds
Adam Savage’s One Day Builds: Royal Crown of Engla…
One of the ways Adam has been getting through lockdown has b…

Making
Adam Savage Tests the AIR Active Filtration Helmet…
Adam unboxes and performs a quick test of this novel new hel…

Making
Weta Workshop’s 3D-Printed Giant Eyeballs!
When Adam visited Weta Workshop early last year, he stopped …

One Day Builds
Adam Savage’s One Day Builds: Wire Storage Solutio…
Adam tackles a shop shelf build that he's been putting off f…

Show And Tell
Mechanical Dragonfly Automata Kit Build and Review
Time for a model kit build! This steampunk-inspired mechanic…
Very cool. I am always amazed at the community of people, the greeblie-spotters, that can identify things like the MiG engine.
In a way, I’m a little disappointed when I see that the model builders (at ILM, for example) would more or less just use a MiG engine wholesale for the majority of the gun. I guess I wanted it to be something that was a little more designed ahead of time and not so “improvised”.
The realist in me though understands deadlines, time constraints … and lets admit it, the gun turret was not really a star of the film (well, maybe it was for some of us :-)).
And truth be told, they fooled me.
I do feel the very obvious automobile-transmission-on-the-side-of-the-Millennium-Falcon could have been better disguised.
thanks David, these are super fascinating. I hope people are reading.