


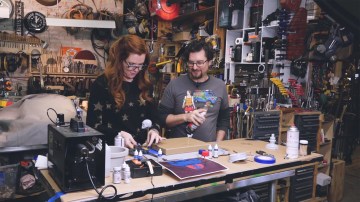
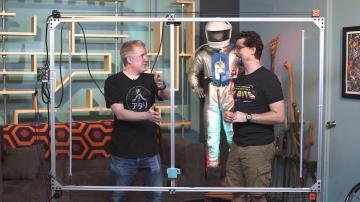
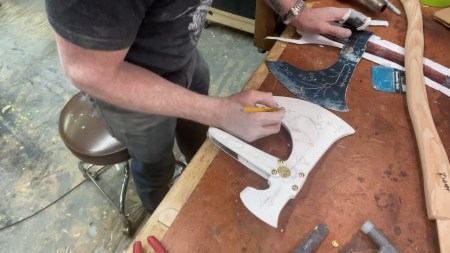
Bits to Atoms: Thermal Detonator, Part 2
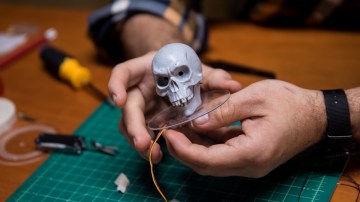
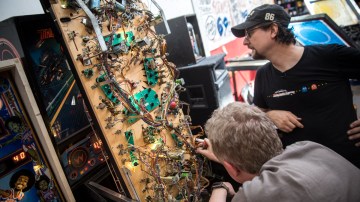
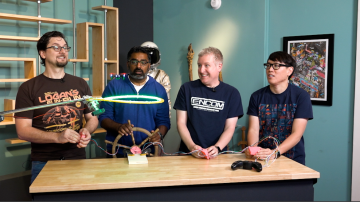
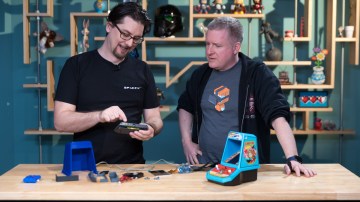
Sean and Jeremy’s epic quest to fabricate a metal thermal detonator comes to a thrilling conclusion! With Frank’s molds perfected, it’s time to experiment with pewter casting, using Kishore’s backyard forge. But all the pieces still have to come together to fit Jeremy’s electronics!


63 thoughts on “Bits to Atoms: Thermal Detonator, Part 2”
Leave a Reply

One Day Builds
Adam Savage’s One Day Builds: Life-Size Velocirapt…
Adam embarks on one of his most ambitious builds yet: fulfil…

Show And Tell
Adam Savage’s King George Costume!
Adam recently completed a build of the royal St. Edwards cro…

All Eyes On Perserverance – This is Only a Test 58…
We get excited for the Perserverance rover Mars landing happening later today in this week's episode. Jeremy finally watches In and Of Itself, we get hyped for The Last of Us casting, and try to deciper the new Chevy Bolt announcements. Plus, Kishore gets a Pelaton and we wrack our brains around reverse engineering the source code to GTA …
Making
Adam Savage in Real Time: God of War Leviathan Axe…
Viewers often ask to see Adam working in real-time, so this …

One Day Builds
Mandalorian Blaster Prop Replica Kit Assembly!
Adam and Norm assemble a beautifully machined replica prop k…
House of MCU – This is Only a Test 586 – 2/11/21
The gang gets together to recap their favorite bits from this past weekend's Superb Owl, including the new camera tech used for the broadcast and the best chicken wing recipes. Kishore shares tips for streamlining your streaming services, and Will guests this week to dive into the mind-bending implications of the latest WandaVision episod…

One Day Builds
Adam Savage’s One Day Builds: Royal Crown of Engla…
One of the ways Adam has been getting through lockdown has b…

Making
Adam Savage Tests the AIR Active Filtration Helmet…
Adam unboxes and performs a quick test of this novel new hel…

Making
Weta Workshop’s 3D-Printed Giant Eyeballs!
When Adam visited Weta Workshop early last year, he stopped …

One Day Builds
Adam Savage’s One Day Builds: Wire Storage Solutio…
Adam tackles a shop shelf build that he's been putting off f…
Yaaaaaayyyyyyyyyyyyy!!!!!!!!!!!!!!!!!
Cheers
Steve
I concur with your statement. 🙂
I was waiting for this, great work guys!
Glad to see this! I love this series
This series might possibly be my favorite from tested.
Thank you very much.
I’ve been waiting for this great job.
When you do do a second pace maybe make a video of either Adam or Frank doing a weathering job on the metal.
Going back to watch Part 1, brb
Thanks to all involved. Sean & Jeremy, this was an awesome undertaking. It would be cool to see a small followup, but any content from this series is eagerly awaited on my end. Thanks Tested!
Looks great, sounds great. Nice job guys, I’m loving these Bits to Atoms segments!
I’m sorry, but I had to pause this episode half way through assembly to say that this is the best maker content I have seen. This show makes me so freaking happy!
What a neat project. This is a great series. Well done all!
Thanks for all the positive comments! This series is definitely helping me to dive into unknown waters and get more comfortable with messing up. We do hope to do a follow up down the road.
I love this series. I’d like to echo others in saying that it is my favorite show on the site right now. I really enjoy seeing the iterations and problem solving, and appreciate you guys taking risks using new materials and unfamiliar crafting techniques.
The finished product looks fantastic. I’d love to see a followup with a little weathering and feedback from some of the contributors. Adam did say he wanted one; I’d love to see his reaction.
Great job. Can’t wait to see what you make next!
I am building my sand casting setup now and I am looking forward to the absolute JOY you experienced when you cracked your first pour! Way to go guys!
St-Moritz Storm Chrono in black, nice choice Sean.
I was almost certain that he was going to start juggling them in that final shot. I think I gasped a bit at the thought. Great build.
That was amazing. So well done on all fronts.
Impressive work on the moulding. I used to make pewter figures (unsuccessfully!). It’s not as easy as it looks.
Rather than soldering magnets for the switch, you could use a reed switch. Just bring the magnet on the thumb slider close to the reed switch and the switch closes.
No nasty soldering to magnets and alignment isn’t much of a problem, so long as the magnet gets close to the reed switch.
something like:
http://www.newark.com/hamlin/mdsr-4-22-38/switch-reed-spst-no-500ma-200vdc/dp/01C1811
This is so cool.. I completely shared and joined in your excitement watching when you popped everything out of the mold..well done guys…by far a great series…please do more..
Brian
Oh man, I had to open Tested before going to bed and then this shows up… * sigh * 😉
I love how all three of them were super excited when they opened the molds for the first time!
Hey might there be any chance of possibly giving one away assembled or as a kit to some lucky Tested viewer?
Brian
great work everyone, and that includes joey and the whole behind the scenes crew. that was both really good watching as a video, as well as a wonderful undertaking.
i especially like how it starts deceptively simple, and then throws you in the deep end of the pool. but you guys pulled through, leveraged skills and equipment from the rest of the tested crew (and the rpf!), and you got that giddy feeling of unlocking a part of the map that was off limits before.
I concur will everyone else, excellent project, and amazing collaboration! I will be looking forward to the followup.
I have been waiting for this! Can’t wait to see this…and possible release of the 3d files? 😉
Awesome series! Watching that first casting come out, they’re like kids at Christmas.
that had been mentioned, thanks for the tip, will look into it.
No plans to release the files for this particular project – sorry! Got some additional advice on a chemical darkener for the pewter – will try it out and report back.
This project was amazing! Absolutely one of the best Tested series!!!
This project was amazing! Absolutely one of the best Tested series!!!
Kishore, your yard needs some serious work done.
Awesome job guys! This series alone makes the premium membership worth the money!
Awesome work on this guys, i’d love to see a follow up, specifically when you show it to Adam – also love to see all your improvements that you make. Jeremy may be able to make your wiring live easier if he put the LED’s on pcbs, or made a routing board that sits between the other boards you already have – depends on the room and how things actually connect. Definitely thing the pewter would work better as a shell over 3d printed internals, rather than completely integrated.
Love the series… It’d be nice if it could be more frequent… but then you guys wouldn’t have the time to actually do anything as elaborate as this project!
This is definitely the best series on tested in a long time! Hope they continue to be more regular 😀 Amazing work guys!
Countspatula is it possible to release some reference images and dimensions of the model? 🙂
Awesome job everybody!
I knew this would come up! Should have made that bet with Jeremy and Sean.
We hadn’t weeded in weeks because I’ve been busy. I’ll get on it.
Great video everybody!!
Joey could have a second career in voice over narration.
I’ve had this metal bucket sitting around doing nothing. I am now going to make my own backyard forge with it and some other bits and pieces (extra pipe, old hair dryer etc) lying about. Excited about this idea!
Anywhere to find out more about the metalized paind effect on the plastic version? The one that a friend of Tested finished?
Now we need to get a couple of wax pulls from your molds. Do a little lost wax casting with aluminum.
Love the jump into the deep end!! Great work.
When weathering my pewter castings I just hit it with some black spray paint and then wipe it off with some fine steal wool. It really makes all the texture pop and the steal wool polishes the pewter at the same time. Great project!
This has been a great project, and the production values have suddenly jumped to a whole new level with Joey’s recap at the beginning. So nicely edited. I’m sure this is edited down from many hours of footage. :o)
Im super impressed with you guys for pulling it off; and it was really nice to see the collaboration between everyone to make this happen. So far one of my favourite things to watch on tested. Oh yea, one last thing…I WANT ONE!!!! Lol thanks guys.
Loved this video was super excited to see it. I have a small idea about adding speaker holes to the body in the future iteration f this project. Have you considered hiding the speaker holes in the panel lines of the body so you can still keep the visual integrity.
are you guys going to share the files?
Utterly astounding. Extraordinary accomplishment.
Any running tallies on how much things sort’a cost– minus your time considerations, of course. That’s priceless.
Awesome and very inspiring. Need to print and solder something.
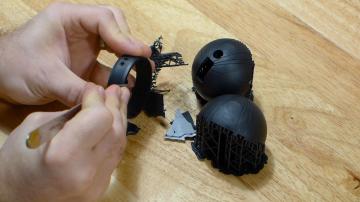
Those molds! Frank is really amazing! I played a little bit with simple “flat” one sided molds and pewter casting, it’s such fun! I never had the nerve to do a two sided mold
What I love about these guys is that they show you their mistakes. Well, some of them at least. 😉
Then they deal with the mistakes and they move on.
I also made lead/pewter figures many years back, and learned how the two-part molding process worked. As soon as I heard they were going to do molding for casting pewter parts, I knew that this was going to be a trip down memory lane for me. And then they chose to do a different type of mold casting, and I thought to myself “Hmm, that’s not what we always did … Let’s see how this works out!”
Lesson learned, sure. But now I know more about both sides of those processes, and I know more about when to use what type of process! So, double-win for me!
Very cool build, well done guys! Yes much more stuff like this please 😀
Do a run of these on the rpf!
I *LOVE* it.
There’s some vocabulary for you all to learn here:
The “sprue” is the extra metal you need to cut off from the vent/pour holes, and the “flash” is the little fins of metal that sneak into the seam between the two molds.
Well done, gents!
This is exactly what i love about Tested. Great work guys.
Looking forward to more Bits to Atoms
What a fantastic project guys, I loved that you tried new things and showed that mistakes are made, but can be worked around and improved on. The final detonator looked amazing and I agree the defects from the casting just add to the overall look and once it’s weathered they will pop and add so much character to it. I look forward to a 3rd part with a refined design and then let Jeremy work on a tidy stack for the electronics. have you thought about a hall affect sensor for the switch ?
Wonderful mold work, as always.
Awesome stuff guys,
Since the shells have pretty deep channels in them on the outside, you could grind out some material on the inside to create opening for the sound to come through. This would be less visible than sound holes and as long as the LEDs had a dark backer or a 3D printed shroud on the backside, you would not have light bleed either.
Great build guys !!! Looks amazing
yup, he needs to do some serious housekeeping out there or he needs a small colony of guinea pigs or a couple of rabbits
great build, really enjoyed this immensely 🙂
could you put up a parts list for all the electronics in case we want to make our own versions? i’m not skilled enough with 3D design and printing so will have to look for someone who already makes the shell!
i watched the king of random forge vid good job also nice jets hat
I rewatched this series today and it is just so good I felt like commenting some more praise! It’s like the Ocean’s Eleven of Tested builds!
Sean’s design, modelling and printing, Jeremy’s electronics and design, Adam’s reference library, Frank’s moldmaking, and Kishore’s barbeque-skills!
Loved this ! Want one now !
This was just brilliant. Thanks!
Hi all,
Just signed up for ‘Premium Content’…….why did it take me so long!!!
I’m loving having access to all of the new content!!!
I’m a film industry prop maker from the UK, and have recently been working from my own workshop, rather than in the studio’s…..the traffic really takes the shine off the experience!!
Working on your own can be very lonely……but I’m never alone when I’ve got lots of ‘Tested’ videos to watch!!!
Recently worked at friends of ‘Tested’ FBFX, and from the conversations I’ve had there…..I’m not the only industry guy who watches ‘Tested’ videos on a regular basis!!
Keep up the fantastic work guys and gals….you’re an inspiration to us all!!
Peace & positive vibes
Dave
My favourite video yet!