


The Volpin Project, Part 12: Finally Time to Paint!
After more hours of sanding, priming, filling, sculpting, molding casting, cutting and drilling than I care to count, it's finally time to get some color onto the Halo Needler Prop. Parts are trimmed, mounting points are sorted out, and electronics are done. Let's break out the airbrush!
After more hours of sanding, priming, filling, sculpting, molding casting, cutting and drilling than I care to count, it’s finally time to get some color onto the Halo Needler Prop. Parts are trimmed, mounting points are sorted out, and electronics are done. Let’s break out the airbrush!
Haha, whoa now! You didn’t think it would be off to the races just like that, did you? Unfortunately, there’s still just a bit more prep to go. While your parts are in primer, you might see some things that weren’t apparent on the raw castings. Some seam lines may need a bit of filler, and there may be a small divot or a bubble leftover from the casting process which will need to be filled. We’ve covered bondo and spot putty before waaay back in articles 5 and 6. The process is the same here for any low spots or damaged areas: fill, sand, smooth, and primer. The filler I’m using here is a lighter weight than standard Bondo – it sands more easily and is slightly finer, allowing it to fill small pinholes like this more easily.
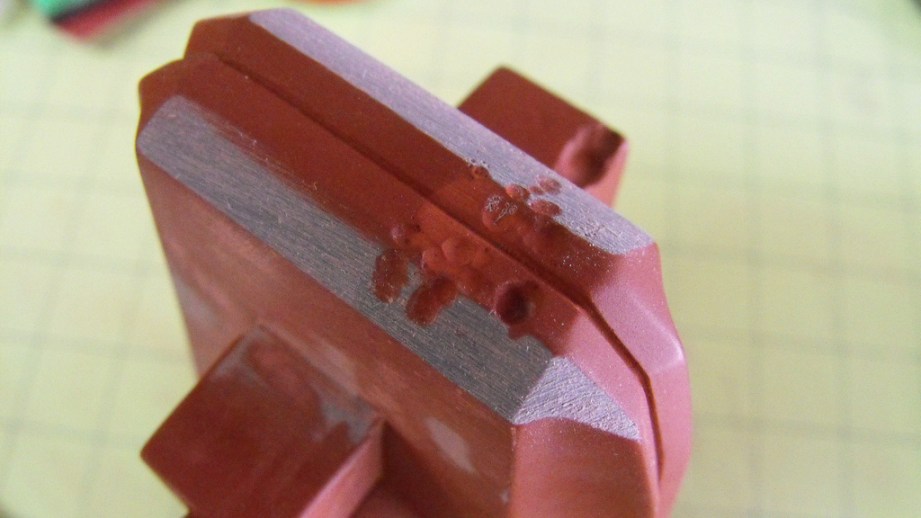
More subtle areas, like the slight texturing I had on one section of the lower emitter, can be blended into shape with the lightweight spot putty used before.
Once these areas are filled and sanded, make sure to cover them with primer to match the rest of the part being painted. A different surface will pick up paint differently (unsealed filler versus primer) and you want a consistent finish across your entire piece.
Before going to paint, my preferred method to smooth the primer coat is a few passes with various fine grit sanding sponges. You can sometimes find these in hardware or auto parts stores, but more likely you’ll need to order them online. Make sure whatever primer you’re using can be wet sanded! Those that can’t will absorb moisture like a sponge and completely ruin your eventual paintjob. I add a bit of dish soap to the water I use when sanding, as it helps lubricate the surface so the sponge doesn’t get clogged. When you’re finished sanding, wash the part with clean water and let it dry.

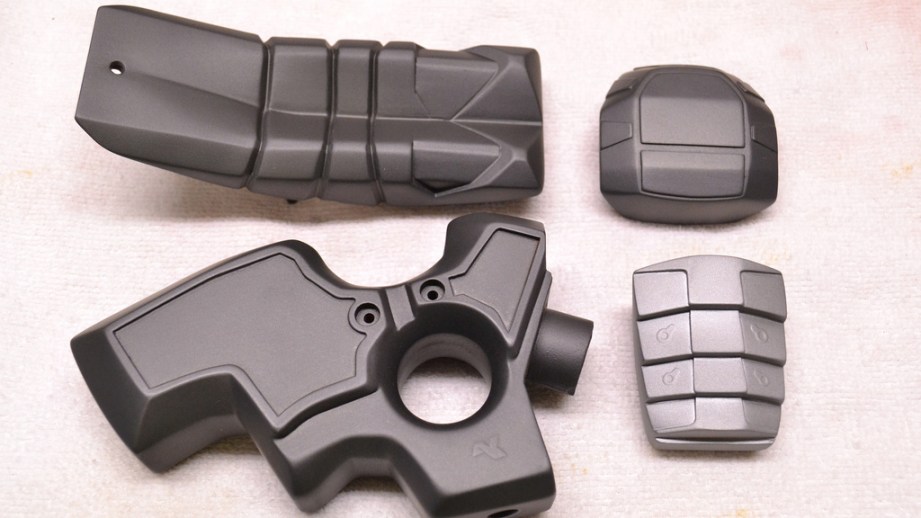
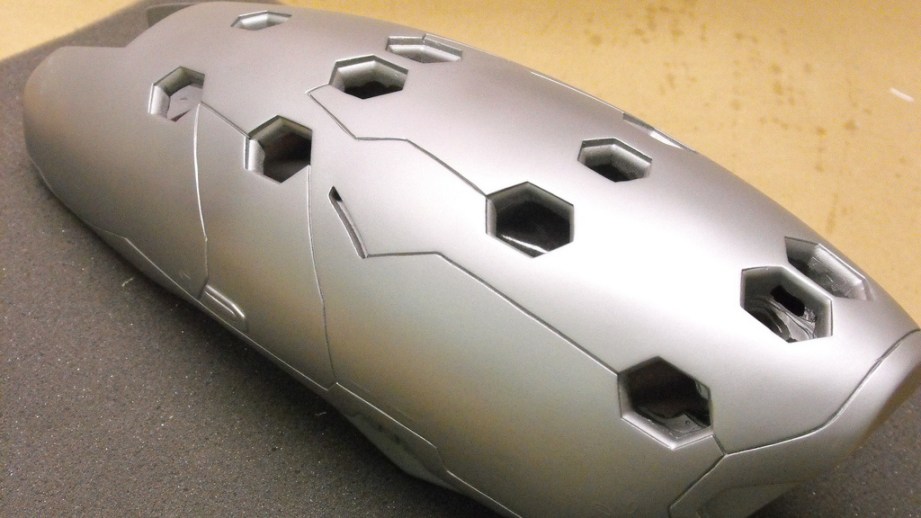
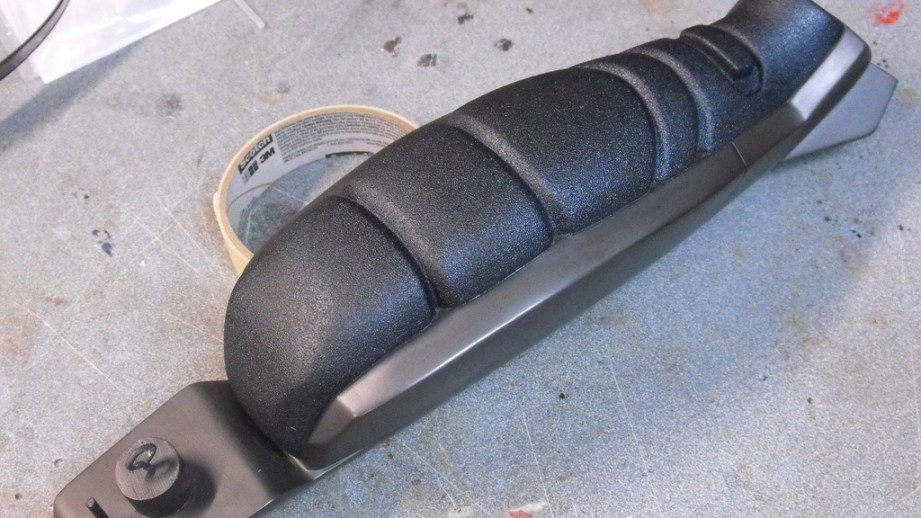
Some parts of the Needler were very easy to paint and only required the application of a single color. The grip, rear vents, lower handle attachment, and “barrel” (for lack of a better term) are mostly single color with a few accents here and there. The base coat of paint was done with Testor’s Buffable Metalizer lacquer, in magnesium (the lighter silver) and gunmetal (the darker). Accents and highlights to these parts will be done later on with brush paints, which I’ll cover in the weathering article next time.
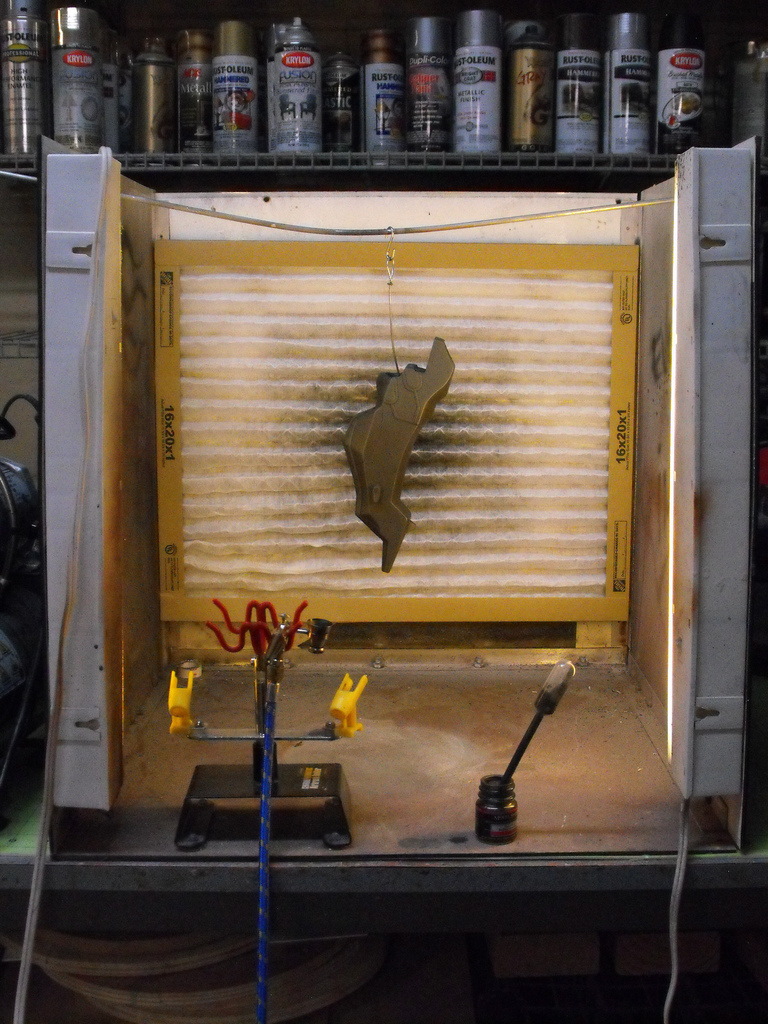
If you happen to live in an area where mother nature can be somewhat unpredictable or the conditions aren’t always great for painting, it might be worthwhile to build or look into buying a small spray booth. All the parts here were painted in my small booth which isn’t much more than a 4 sided open box hooked up to an exhaust fan through a rear vent. I also added two small fluorescent lights to make seeing what I’m doing a little easier.
A Few Tips for Painting
The “dries in 10 minutes” claims on hardware store spray cans is pure garbage. You may be able to gently brush against paint in 10 minutes, but true full cure can take days depending on the paint. There’s more to paint than I can cover in one article, but I’ll be using two kinds here: Lacquer and Enamel. Lacquer dries faster and is a harder paint than most enamels, while enamel paints are easier to get in a wider variety of colors but take several days to fully cure. Enamel can be painted over lacquer, but you cannot paint lacquer over enamel! While there are exceptions to every rule, it’s best to stick by this one.
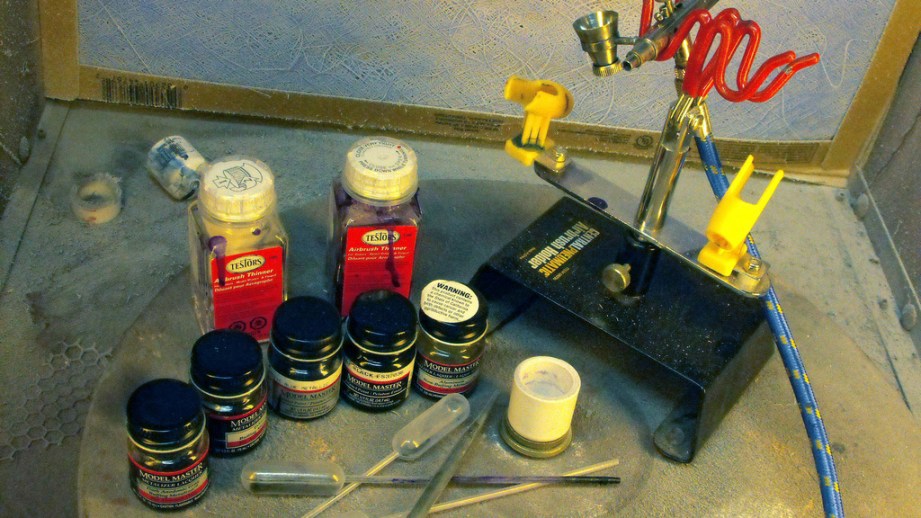
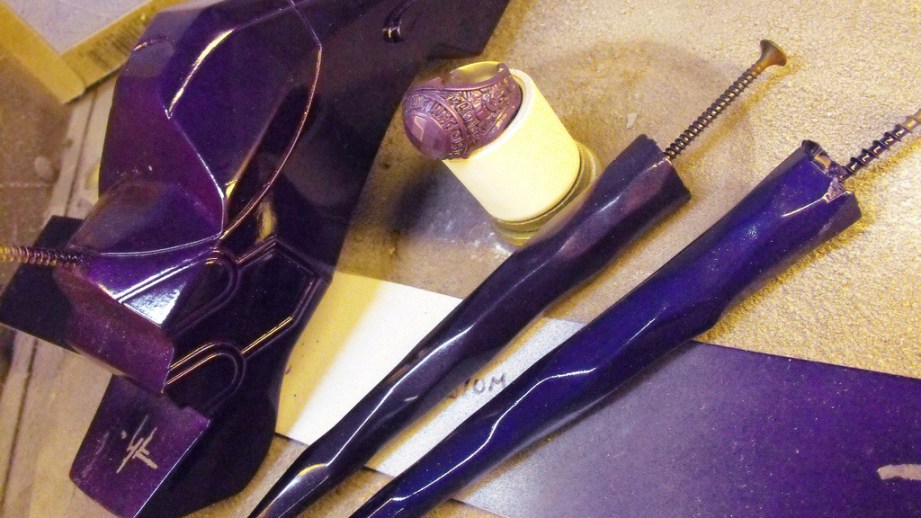
If you’re in doubt (and despite the hundreds of cans of paint I’ve gone through in my career, I still am!) use test pieces. Not only will you be sure all your hard work doesn’t disintegrate in a wrinkly mess, but you can test different mixtures and layering techniques on parts that you haven’t put dozens of hours into preparing… like a casting of your class ring, for instance.
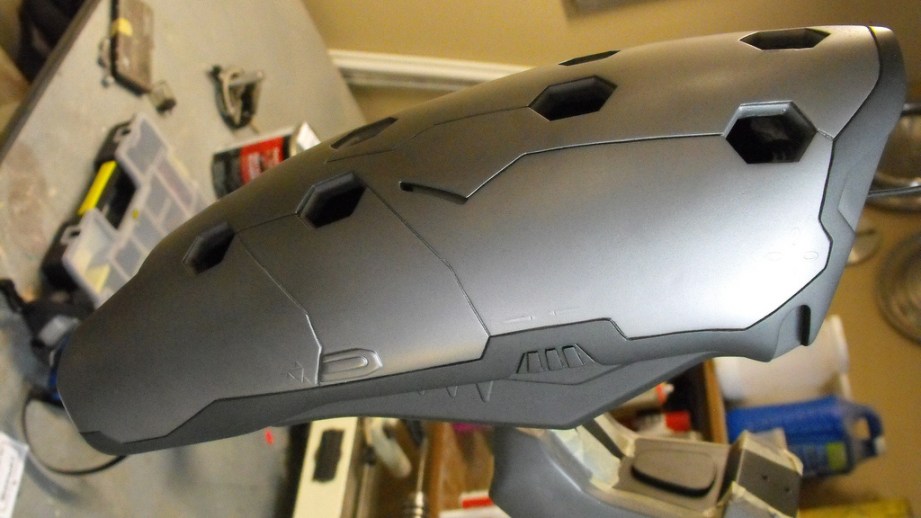
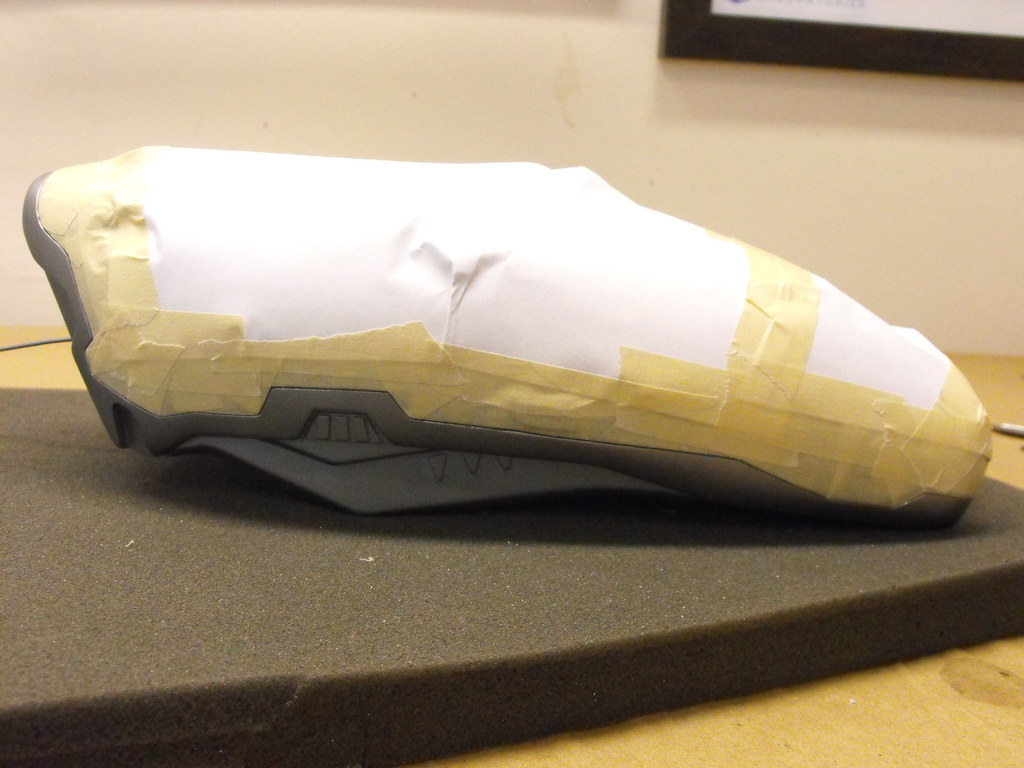
The rest of the pieces not shown above all have some amount of layering that will need to be done to get the correct effect. Generally its best to paint lighter colors first, then mask off areas for coats of darker paint. The bulk of the upper casing will need to be a brighter purple, and in order to get that correct (stay with me here…) I started by painting it silver.
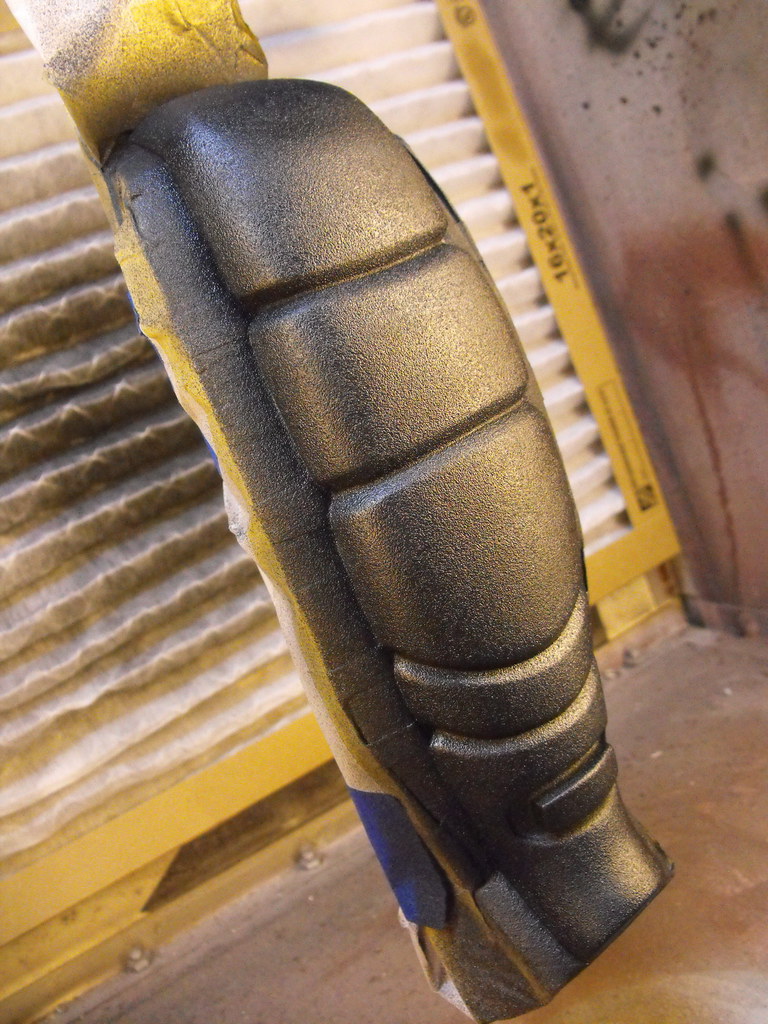
Before I jump into the shiny purple paint, here’s a little trick I learned a while ago when playing with textured paint. The lower casing on the Needler has a padded-looking grip with a dark blue pebbled texture covering its surface. If you ever need a good grip-texture-simulation, this is something worth remembering. First off, the piece gets masked off so it looks like some weird grub thing.
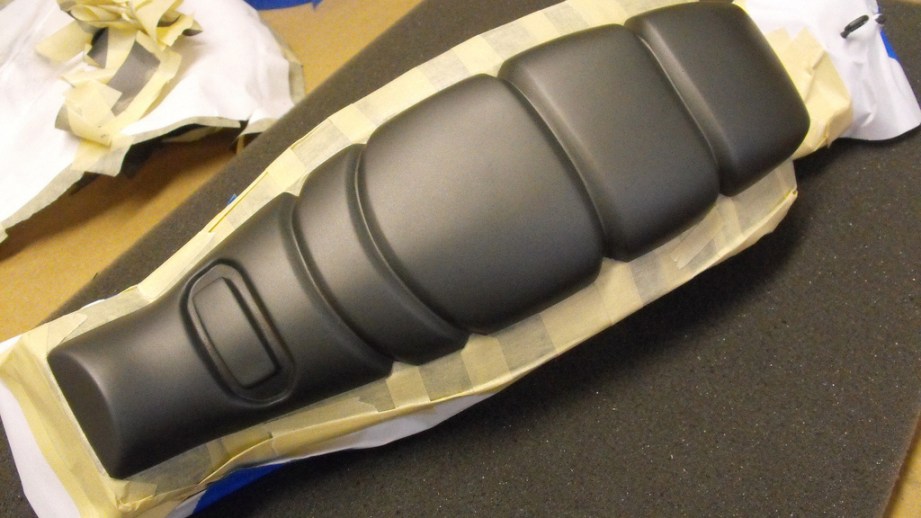
The textured paint I use for this process is Rustoleum “Multicolored Textured” spraypaint. The multicolored part is important because they do sell a monochromatic version, and the texture isn’t as apparent. A few notes: this stuff comes out fast and it is very easy to put way too much paint on, so test it out on some scrap first. Additionally if you ever plan on molding a part with this paint on it, the petroleum that creates the texture will inhibit platinum silicone from curing. I learned that the hard way…

You don’t need to wait for this to fully cure before topcoating it, and painting within a couple hours will actually help your color coat bond to the texture more easily. I started by airbrushing flat black enamel over the surface, then followed it up with a pass of thinned translucent blue. The paint will dull out the sharper edges of the texture and leave a slightly rubbery feeling grip texture once it’s fully cured.
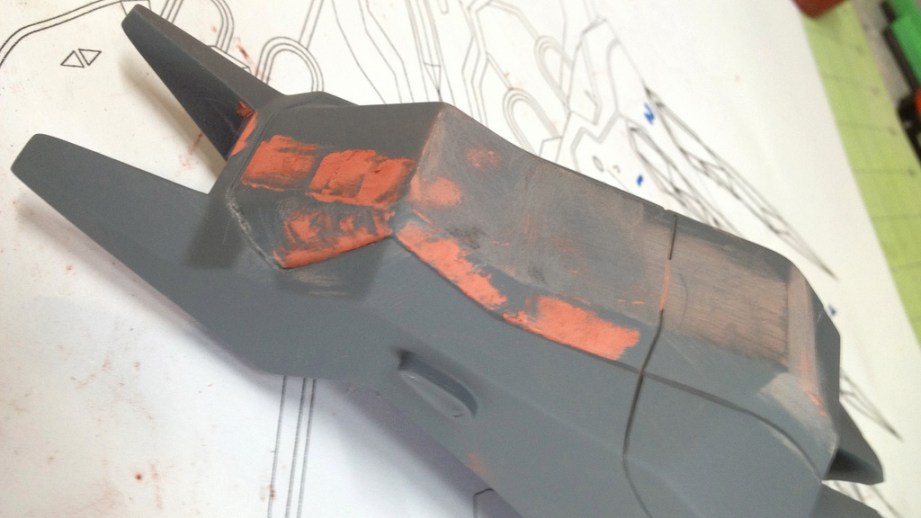
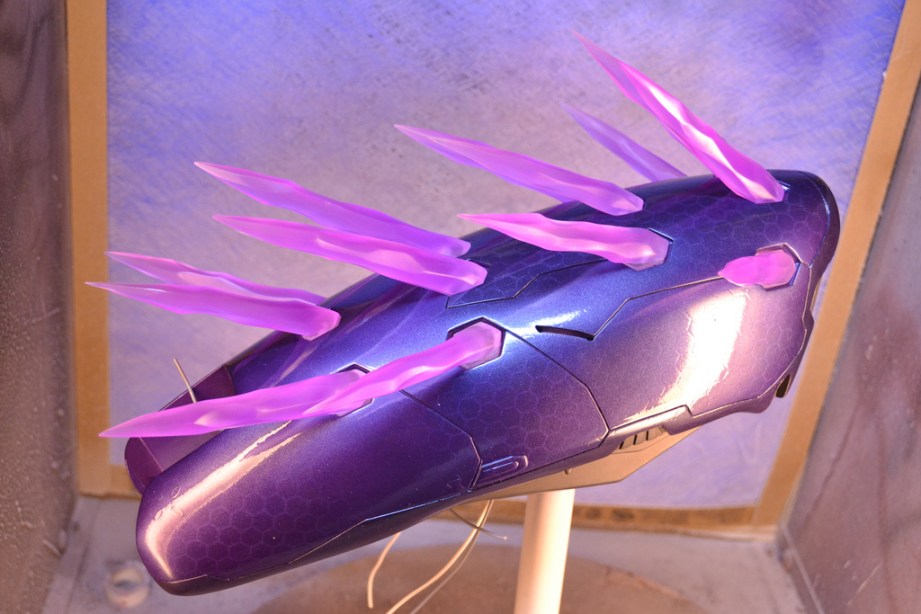
The reference images I have for the Needler show that the purple color on the upper casing is split into a lighter and darker area around the long seam line that circles the base of the part. After letting the lighter silver cure for 48 hours, I masked off this part of the casting and covered the exposed area with gunmetal silver lacquer.
Not all masking tapes are created equally. Just as with your paint testing, you might want to test out if your masking tape will peel off your basecoat or leave residue behind. It’s a crummy lesson to learn when you’re on your third pass of masking tape and peel it back to find exposed primer.
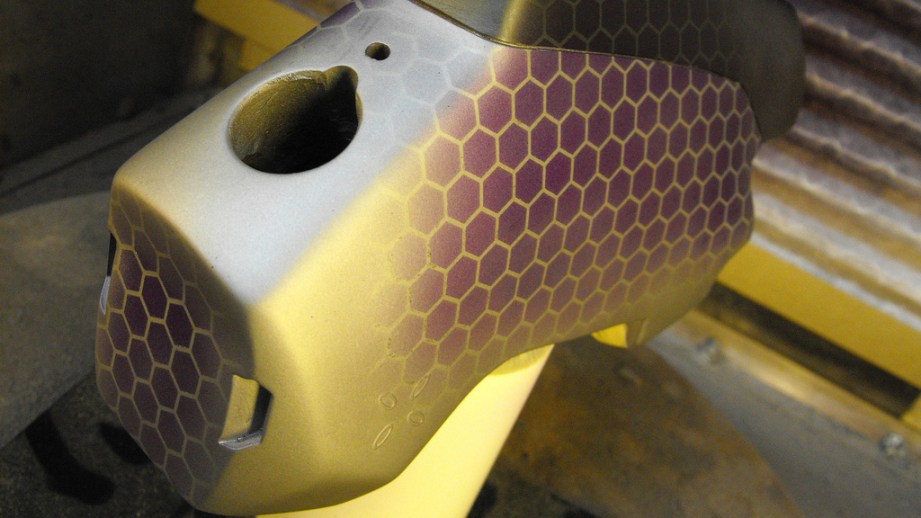
So why did I paint this silver and not purple? Good question! The technique I settled on for creating the subtle hexagon pattern on the surface of the purple parts required a lot of thin passes of translucent paint to get a color-shift effect, and I found the best way to do this was over a coat of bright silver. After the two base coats had fully cured, I set up my laser cutter to trim out a large hexagon paint mask out of stencil vinyl.
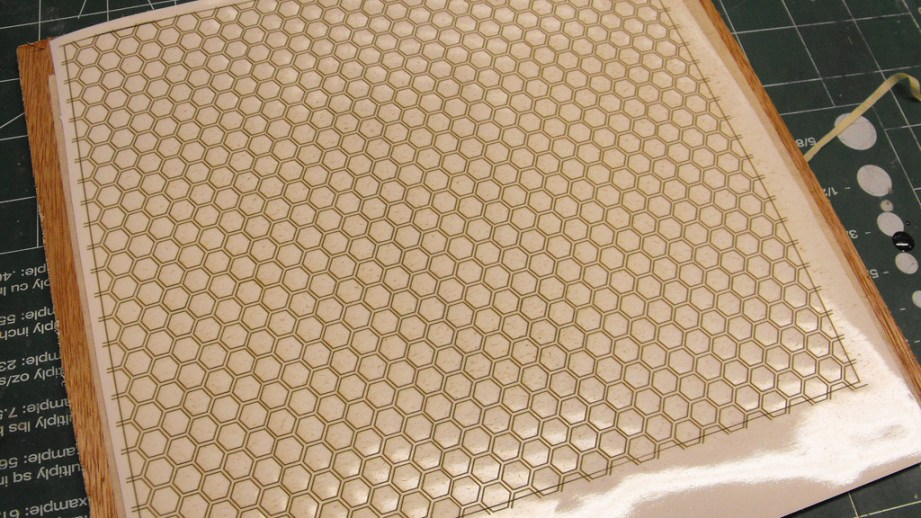
Since the large surface area and compound curve of the purple sections meant getting the pattern to cover the entire surface seamlessly would be nigh impossible, the pattern was simulated by cutting various shapes of hexagon mask and applying them across the surface of the gun in the same facing direction.
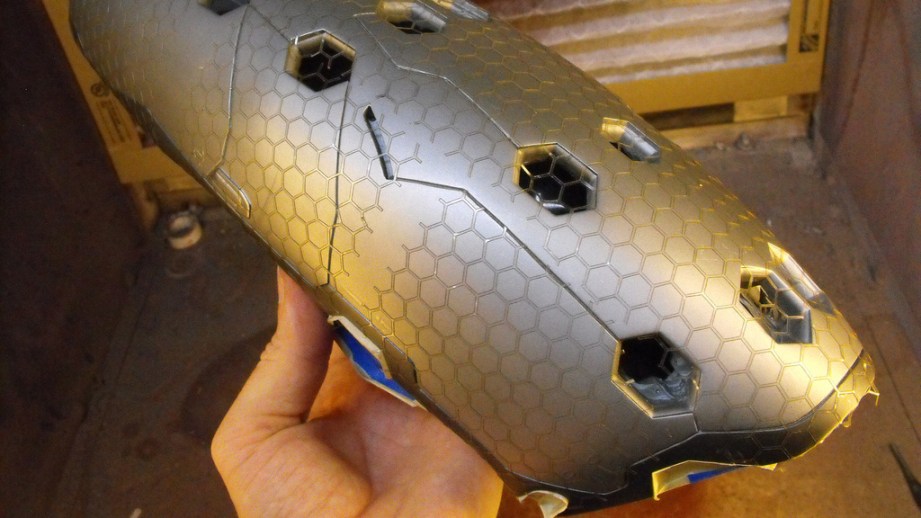
When these areas were painted, I feathered out the purple color at the edges of the paint masks so the seams wouldn’t be apparent. The purple used here is an enamel pearlescent clearcoat.
When the rest of the part is painted with the purple clear, the areas of the casings without hex patterns blend into one another, while the masked off areas appear darker, leaving the negative space brighter due to the silver basecoat. Cool!
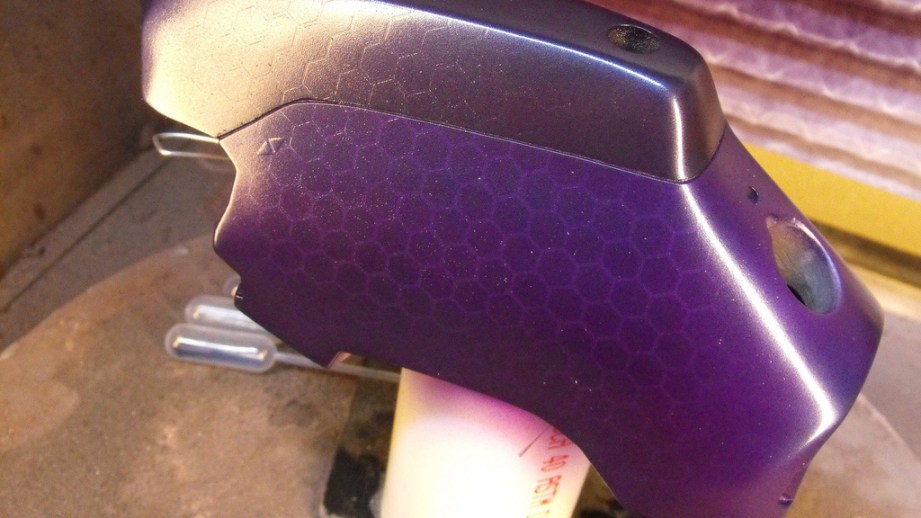
I also used a little bit of a metallic dark blue, thinned out with some enamel clearcoat, to give the purple a bit of a color shift around the sharper edges and corners. This isn’t true “color shifting” paint, but the gradient of purple and blue across the surface does mimic the effect pretty well. If the initial pass of color looks a bit pebbly, this is due to the spray density of my airbrush and the very light coats of paint I was using.
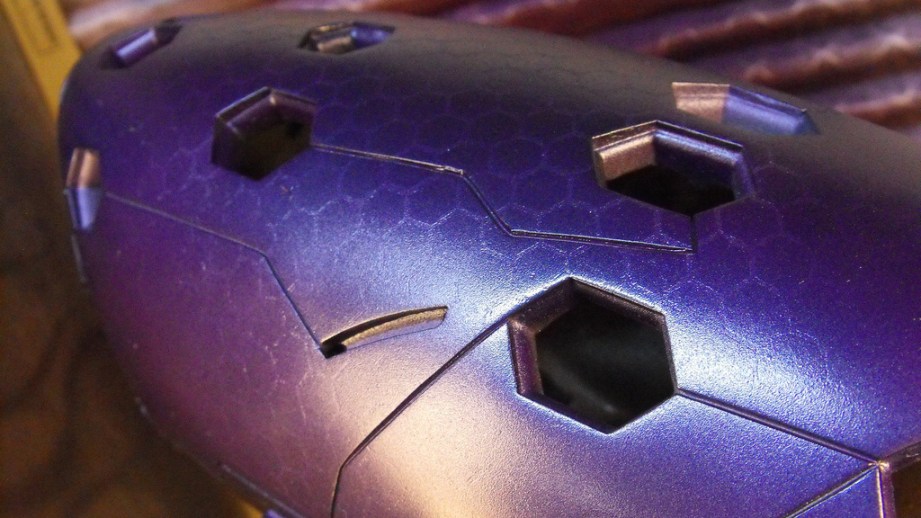
Thankfully, we have a wonderful thing called “clear coat” to remedy this! Again, test first if you’re not certain! Enamels don’t like to be painted over while they’re curing, so it’s best to wait at least 48 hours before applying an enamel clear to your surface. Once these parts set up for two days, I treated them with four coats of enamel clear–thin passes, five minutes between each coat. Shiny.

Oh, also, lighting is everything when it comes to a paint job like this. Here’s the same paint but with the lights of the spray booth turned off. I’m quite happy with how varied the finish can be in different lighting conditions.
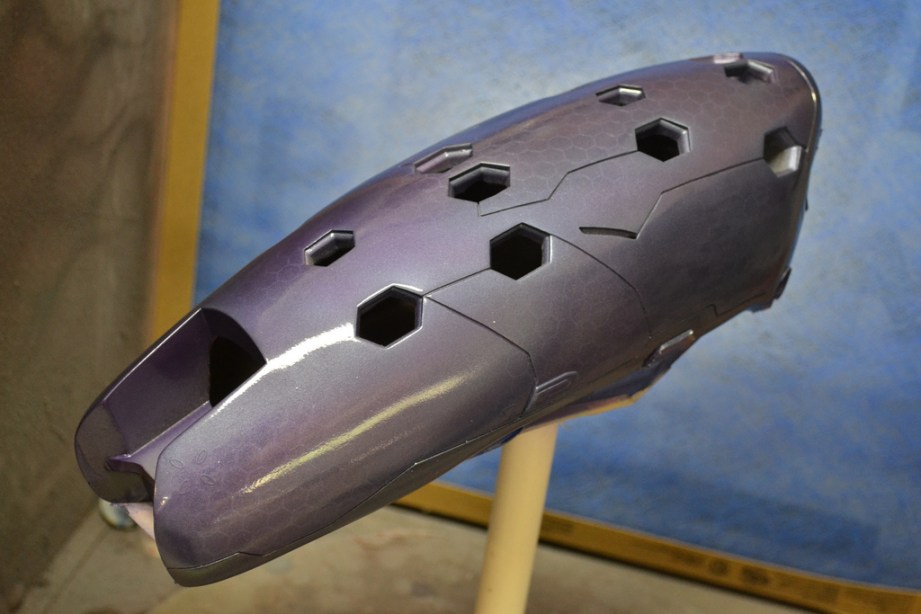
Nothing is glued in place here yet, but I couldn’t resist seeing how everything looked all together (after letting the clearcoat dry fully, of course!)
We’ve got some very shiny Needler parts now that will need a few battle scars before anyone believes this is a weapon of space combat and not something found next to a junior sized burger and fries. The next installment of the series will be all about getting paint to tell the story of the life of this gun: weathering.
The Volpin Project, Part 1: Introductions
The Volpin Project, Part 2: References and Blueprinting
The Volpin Project, Part 3: Selecting Materials
The Volpin Project, Part 4: Taking Shapes
The Volpin Project, Part 5: Bondo Strikes Back
The Volpin Project, Part 6: Details, Accents, Refinements, and Mockups
The Volpin Project, Part 7: Introduction to Moldmaking
The Volpin Project, Part 8: More Complex Moldmaking
The Volpin Project, Part 9: The Casting Process
The Volpin Project, Part 10: Illumination and Audio
The Volpin Project, Part 11: Prepping for Paint


8 thoughts on “The Volpin Project, Part 12: Finally Time to Paint!”
Leave a Reply

One Day Builds
Adam Savage’s One Day Builds: Life-Size Velocirapt…
Adam embarks on one of his most ambitious builds yet: fulfil…

Show And Tell
Adam Savage’s King George Costume!
Adam recently completed a build of the royal St. Edwards cro…

All Eyes On Perserverance – This is Only a Test 58…
We get excited for the Perserverance rover Mars landing happening later today in this week's episode. Jeremy finally watches In and Of Itself, we get hyped for The Last of Us casting, and try to deciper the new Chevy Bolt announcements. Plus, Kishore gets a Pelaton and we wrack our brains around reverse engineering the source code to GTA …

One Day Builds
Mandalorian Blaster Prop Replica Kit Assembly!
Adam and Norm assemble a beautifully machined replica prop k…
House of MCU – This is Only a Test 586 – 2/11/21
The gang gets together to recap their favorite bits from this past weekend's Superb Owl, including the new camera tech used for the broadcast and the best chicken wing recipes. Kishore shares tips for streamlining your streaming services, and Will guests this week to dive into the mind-bending implications of the latest WandaVision episod…

One Day Builds
Adam Savage’s One Day Builds: Royal Crown of Engla…
One of the ways Adam has been getting through lockdown has b…

Making
Adam Savage Tests the AIR Active Filtration Helmet…
Adam unboxes and performs a quick test of this novel new hel…

Making
Weta Workshop’s 3D-Printed Giant Eyeballs!
When Adam visited Weta Workshop early last year, he stopped …

One Day Builds
Adam Savage’s One Day Builds: Wire Storage Solutio…
Adam tackles a shop shelf build that he's been putting off f…

Show And Tell
Mechanical Dragonfly Automata Kit Build and Review
Time for a model kit build! This steampunk-inspired mechanic…
Oh man, it’s looking fantastic.
You’re likely already fully aware of this but just in case (since I work with laser machines): Cutting most types of vinyl with a laser cutter isn’t generally a good idea. It releases chloride gas, which is both toxic to you, and corrosive to the machine’s sensitive parts. If you already knew and took precautions, then this notice is for anyone else reading it who didn’t know!
This is easily one of my favorite things that has been on Tested all these years. Fantastic work.
That faux-colour-shift paint job is awesome. It will look so solid with the weathering.
Good call! I should mention that the stuff I used is actually not the vinyl itself but the acrylic adhesive transfer tape that’s more commonly used to transfer a vinyl decal onto a surface. Apologies for the misdirection!
My jaw is on the floor already! It looks incredible and with the weathering it will looks superb.
If I found that thing in my bag with a junior burger and fries I’d be ecstatic!
I’ve always heard that rattlecan paint is pretty good because the mix between cans is very consistent, it that true?
“fill, sand, smooth,..primer”
AKA the painters mantra.