


The Volpin Project, Part 9: The Casting Process
To create the Needler's eponymous spikes, we'll need to make molds and cast each piece in urethane casting resin. Today, I'll discuss the process of making solid casts, hollow parts, and translucent pieces of that material.
We’ve now burned through a few gallons of very expensive silicone rubber to make molds of every one of the Halo Reach Needler prop’s 12 individual parts. There are a bunch of Needler-shaped cavities that need to be filled with something, and in a similar theme to making the molds themselves, there’s a variety of ways to go about doing so.
Techniques and materials will vary depending on the final use of the piece, but for the purposes of this tutorial we’ll be concentrating on urethane casting resin and leaving out other plastics such as epoxy or polyester. I’ll cover solid casts, hollow parts, and translucent/clear pieces as well.
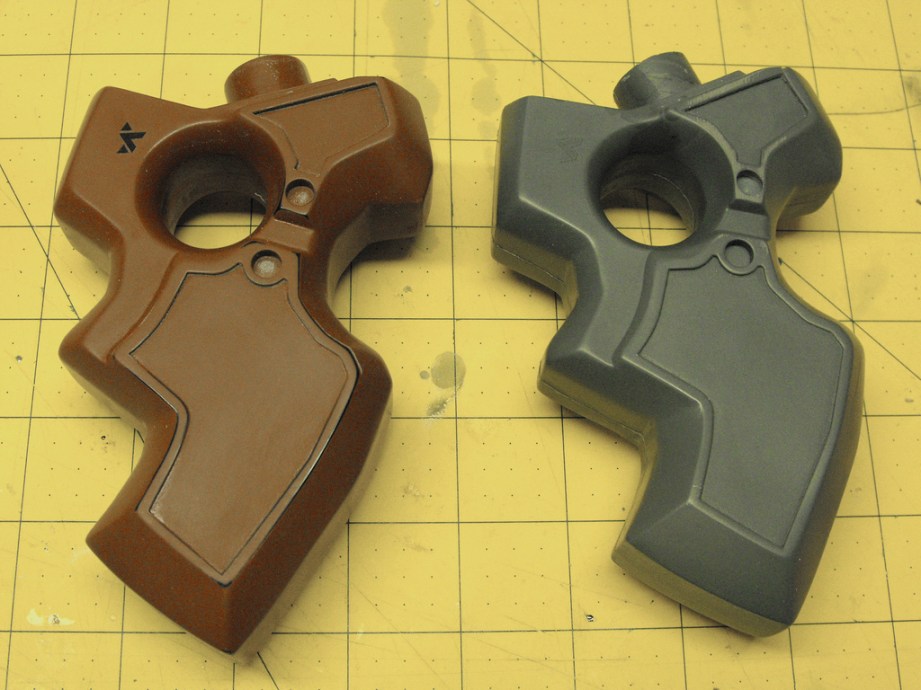
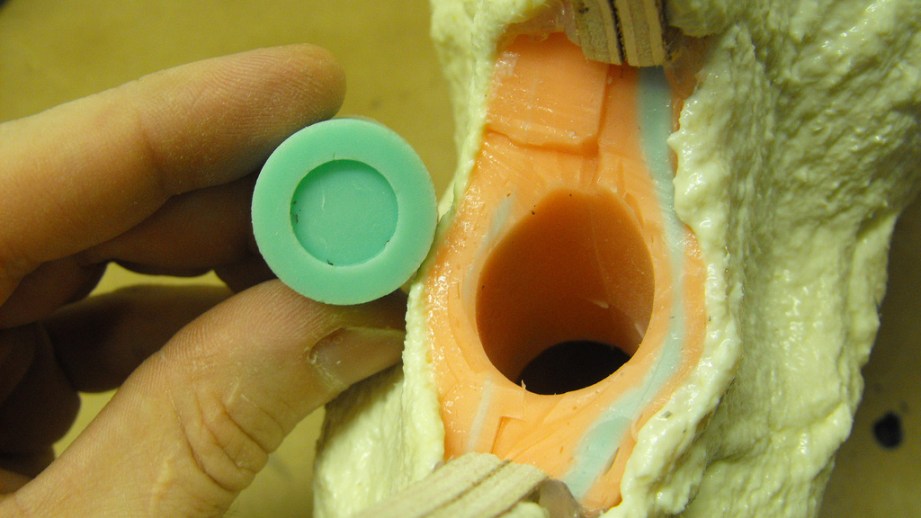
The most basic parts to be made will be the solid pour castings. For these parts I’ll be using Smooth-On’s product “Smooth Cast 320” and the detail bit that sits underneath the upper casing will be used as an example (apologies for the process photo, I didn’t have a shot of the completed master before molding.)
The initial step after removing your master part from the mold will be to apply a powder layer to all facing edges of the mold. Personally I use baby powder, but I have heard other propmakers use talcum as well. This may seem like an odd step, but this will help reduce bubbles in the finished part. You can think of the thin layer of powder like a paper towel over a spilled drink. Just like a napkin will wick up moisture, a thin coat of powder in your mold will allow the resin to flow more easily into detail edges. What you’re working against here is the surface tension of the liquid, which will have a more difficult time seeping into detail areas without this step.
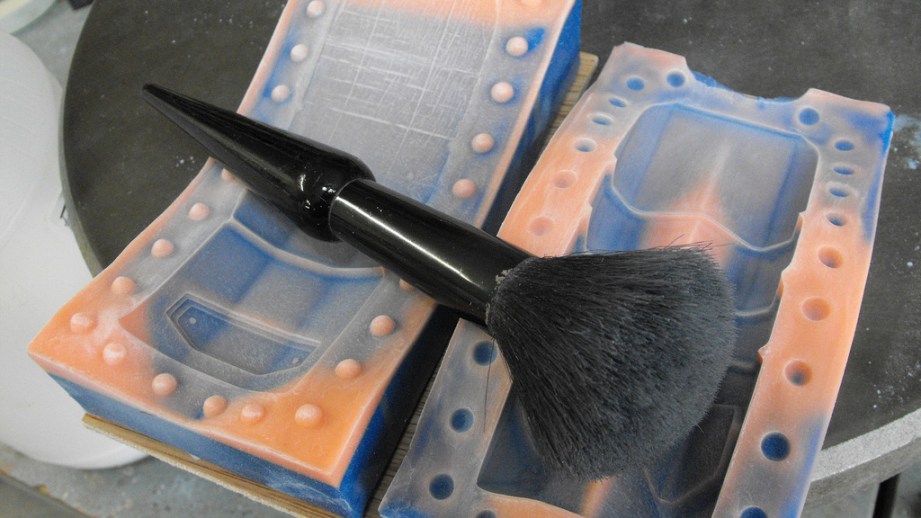
I also use this brush for my eyeshadow (no not really, please don’t do that…) A brush like this one will help evenly distribute your powder. If there are any clumps or thick places, it will act as a barrier instead of allowing the resin to flow and you’ll have a void in your casting. A thin dusting is all you’re after here.
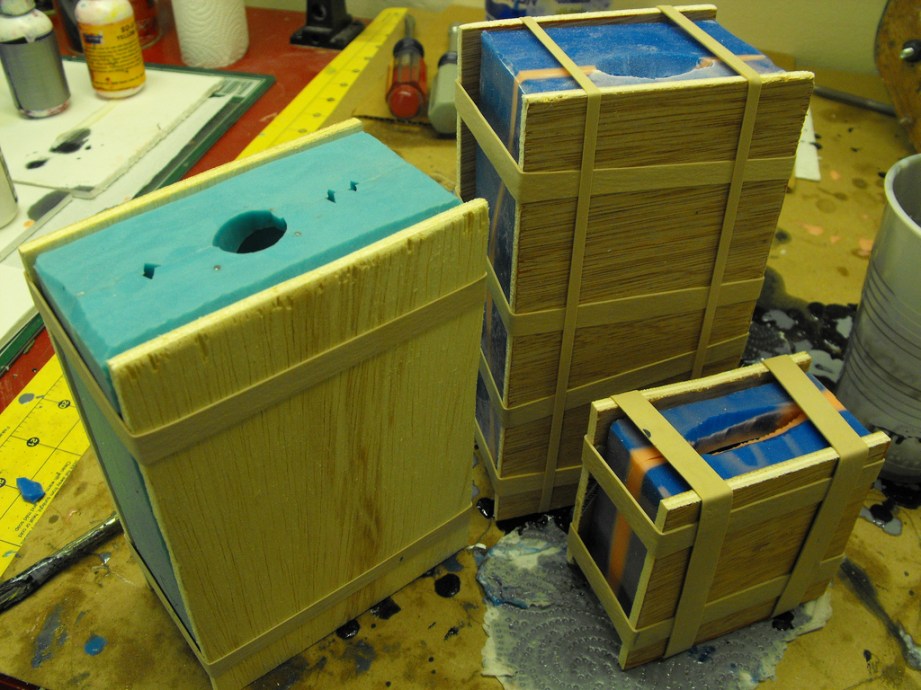
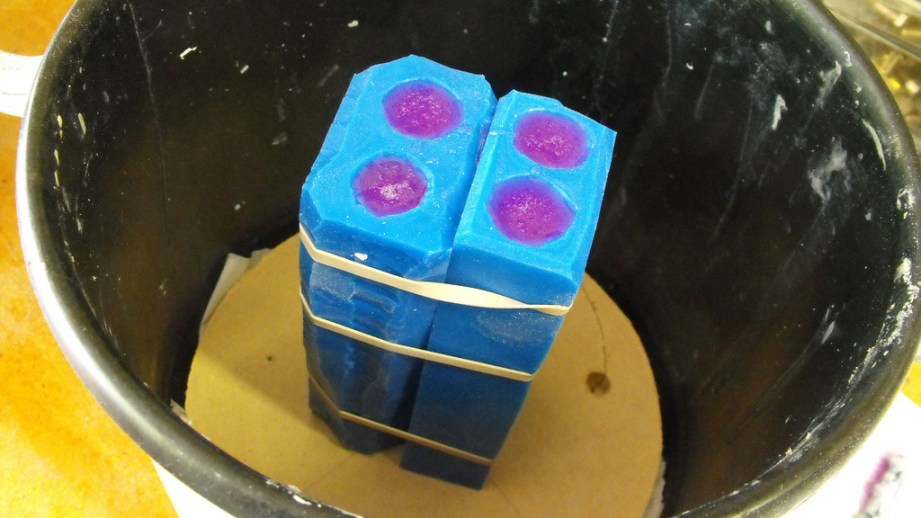
Block molds, like the ones shown here, are fairly easy to reassemble. Sheets of wood are trimmed out about ½” wider on all dimensions, and the silicone mold is placed between these boards and rubber banded together. I’ve seen people use materials like foam core and cardboard here, but my personal philosophy is to use a more rigid material to cut down on any possible distortion of the silicone. Larger molds, like the one shown below, will need thicker support and more robust means of holding them together.
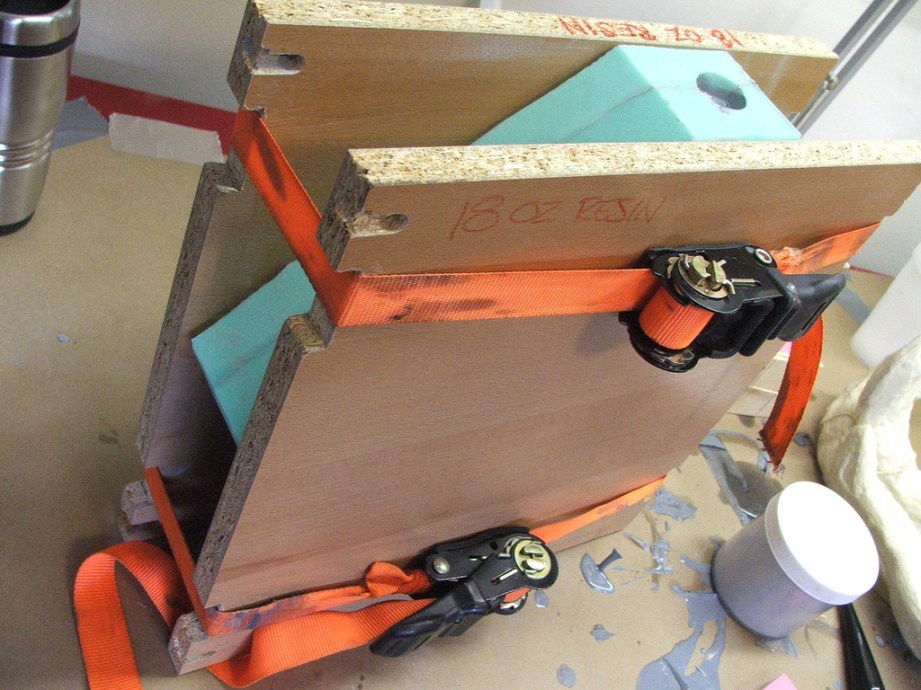
It’s important to make sure that the rubber bands/straps holding the mold together aren’t too tight or too loose. Overtightening means the part will ended up being compressed and squished; too loose and the mold won’t seal well, allowing all the casting resin to pour out of the thin seam line.
Smooth Cast 320 is mixed in a 1:1 ratio by volume. It’s important to get these ratios as exact as possible to prevent curing issues. Getting the ratios off can lead to a bunch of frustration later down the road as the resin might not cure, or even worse, it may seem to cure, but will have a slightly waxy feel to the surface. This will prevent paint from sticking to it and be an absolute nightmare later on down the road. Always read the labels and follow the instructions. If the bottle says shake/stir before every use, do it!
After measuring out your resin, mix the two parts in a third container and add dye if desired. 320 will cure to a sort of eggshell white, which won’t show very well in case the paint gets a scratch on it later down the road. I prefer to dye most of my castings a neutral gray for this reason.
When pouring resin, make sure to rotate your mold slightly to allow any trapped air bubbles to escape. If you have a large open cavity mold this will be easy to spot, but 2 part molds with small pour spouts, like the one shown above, are trickier. Give a light series of taps on the side of the mold to release any trapped air after the mold has been filled with resin.

As the resin cures, the color will change. Without dye it will turn from an amber beer color to off white. At this stage you won’t be able to get any more air bubbles out! All resins have different demold times based on temperature and density of the casting, and for 320 that’s specified as 10 minutes. I like to let my parts sit a bit longer; uncured resin is still quite flexible until fully cured, and demolding before it becomes rigid can lead to warped or distorted parts.
I typically wait at least 30 minutes, then it time for the fun part. Pop off the rubber bands and slowly peel back the silicone to reveal your (hopefully) perfect casted part!
Casting the Needles
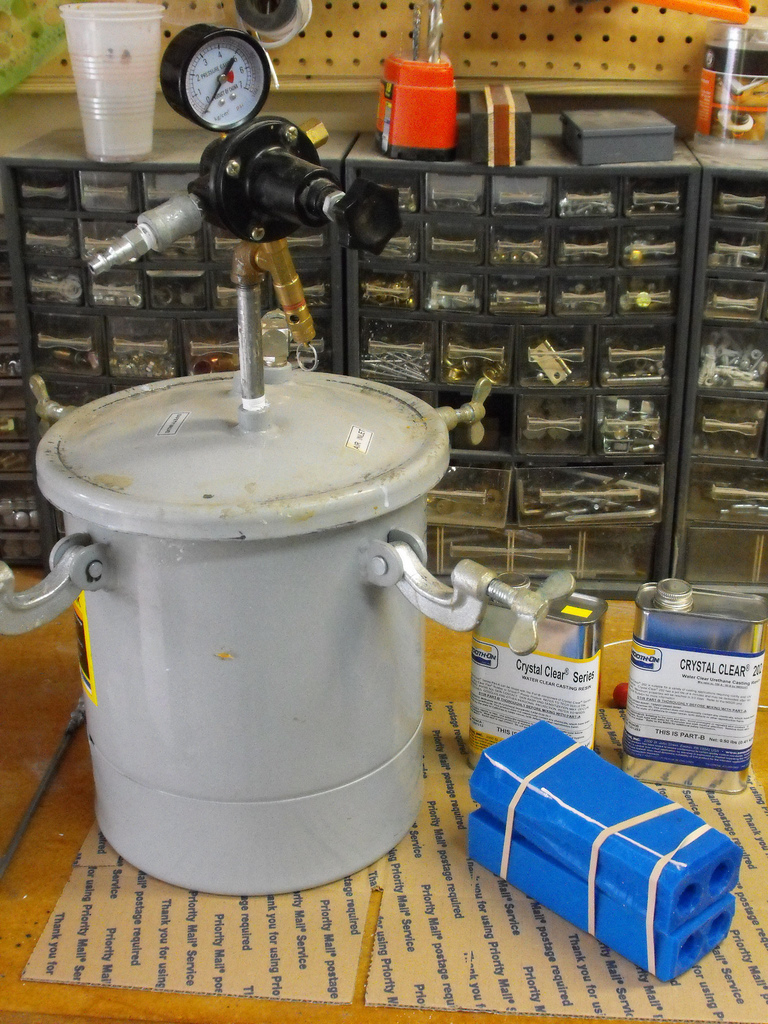
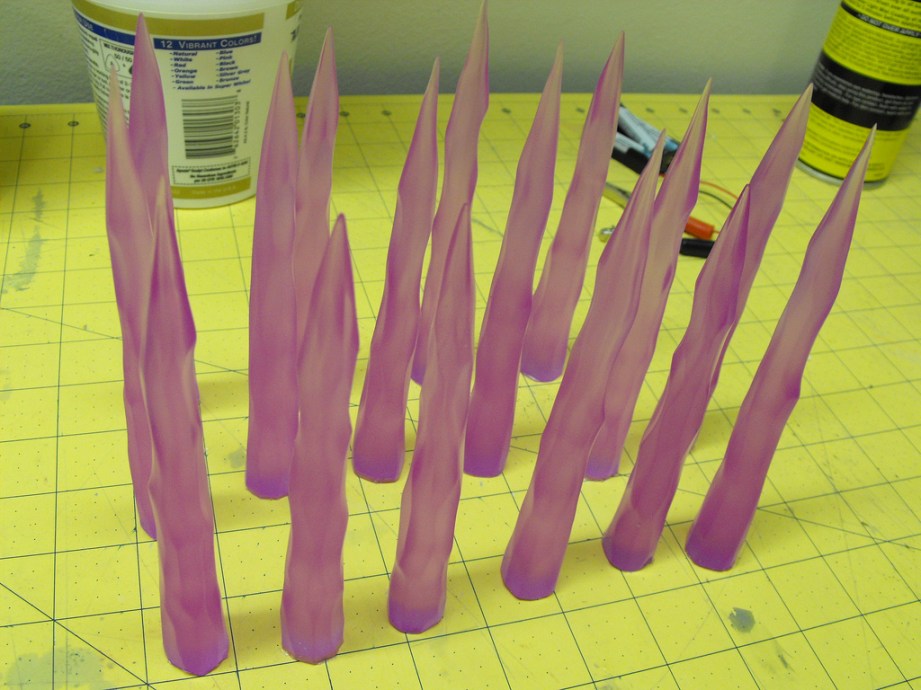
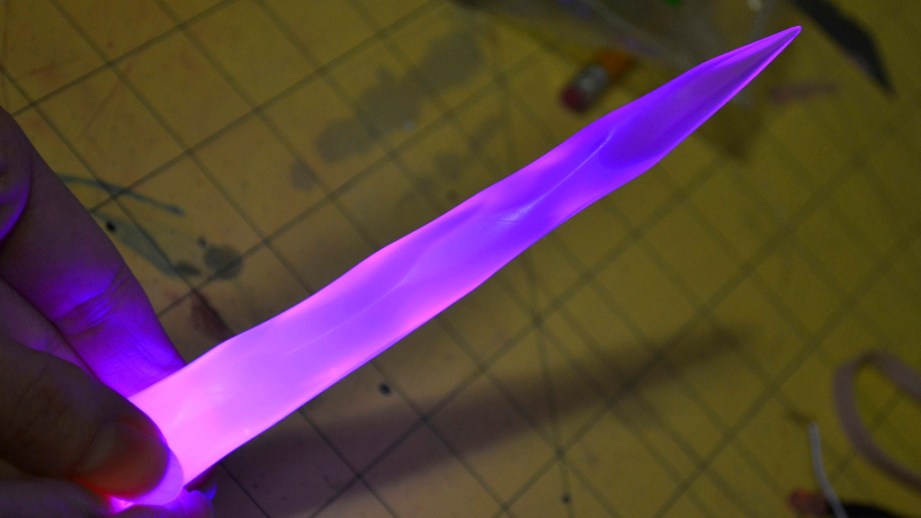
The needles for this prop are produced in a very similar way, with one added element: pressure. All cured casting resins will have air trapped inside them, but due to the opaque finish these are largely not noticed. With clear parts, even the tiniest bubbles will cloud the resin. Since liquids (in this case, the uncured resin) are not compressible while gasses (the air bubbles) are compressible, the solution is a pressure pot. In short, putting a curing resin casting into a pressure tank results in the air getting collapsed into solution while the resin solidifies. Important: This can only be done with vacuum-degassed silicone molds! If there is any air trapped in the mold you’re pressurizing, it will also be compressed and your castings can be distorted as a result.
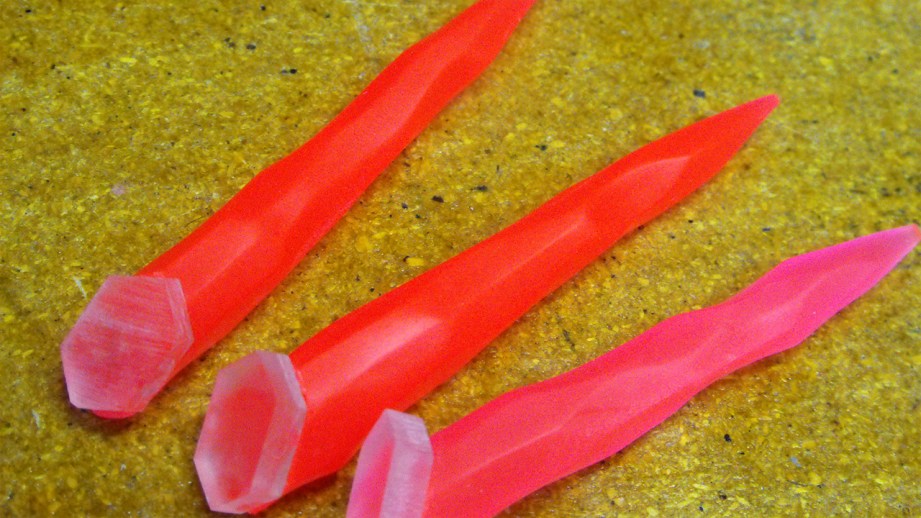
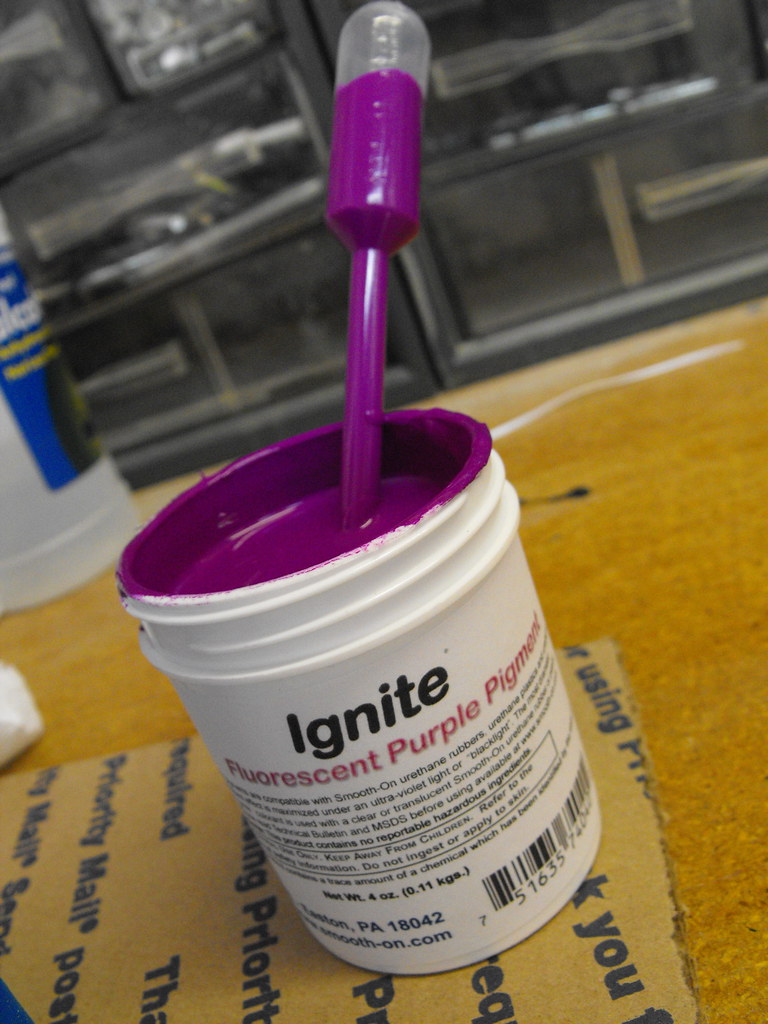
The one shown here is a re-purposed painting canister lent to me by my friend Jay. The needles are cast in a resin called Crystal Clear with a couple drops of fluorescent purple dye to give them some color. This stuff is potent! Only two drops were needed for every four needles.
After pouring the resin into the mold cavity, the silicone is placed into the pressure tank and the lid is screwed tightly shut. The castings are pressurized for 90 minutes at 60PSI to ensure all the bubbles are taken care of.
After a few sessions, all 14 are completed! This resin can be a bit finicky and will take 3-5 days (!!) to reach completely cure. I removed the needles and left them sitting upright like this to avoid any distortions from resting on their sides while they finished curing.
Slush Casting
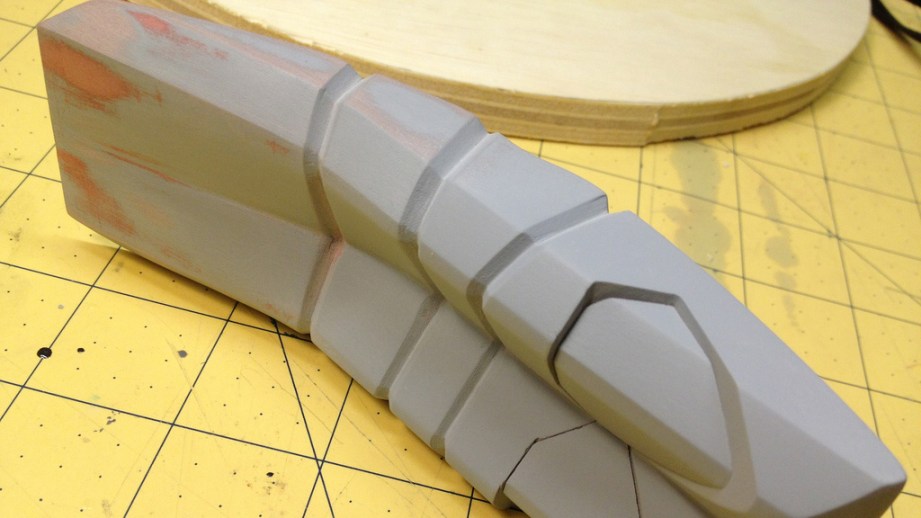
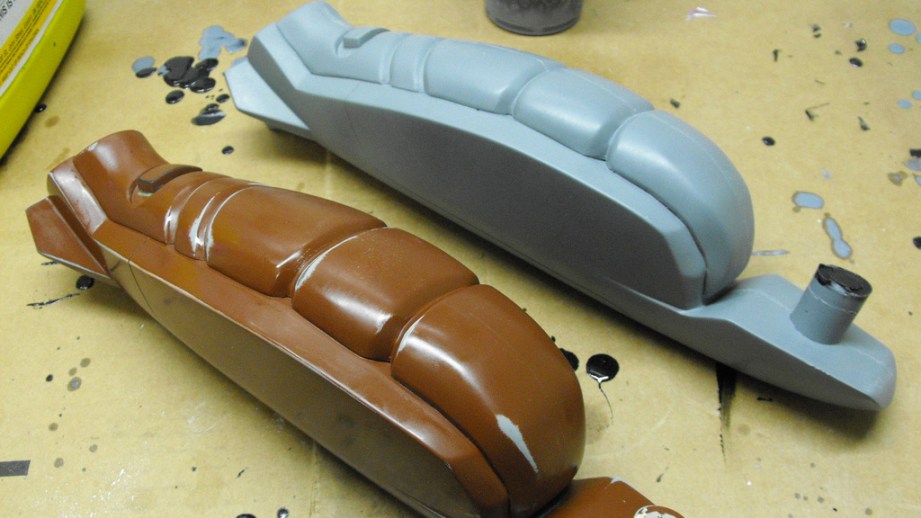
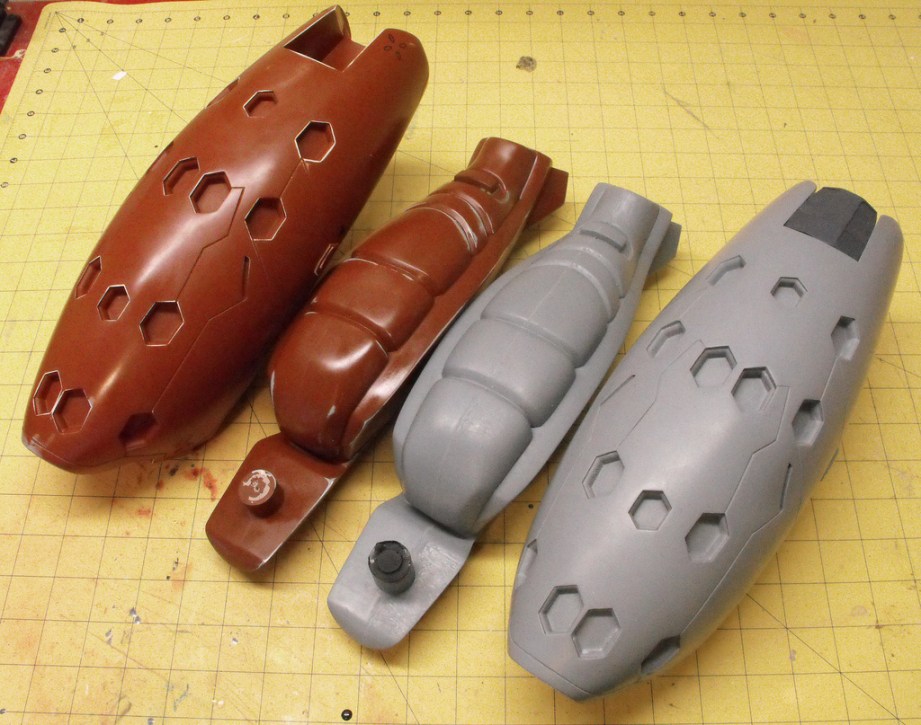
There are more than a couple parts on the Needler that can’t be done in one solid pour for a variety of reasons. Weight is a big concern, but there’s also cost–the upper casing would easily be half a gallon of resin alone if it were cast solid, and that’s nearly $50! Also, electronics will have to live inside there and carving out all that resin after the fact would be a huge pain.
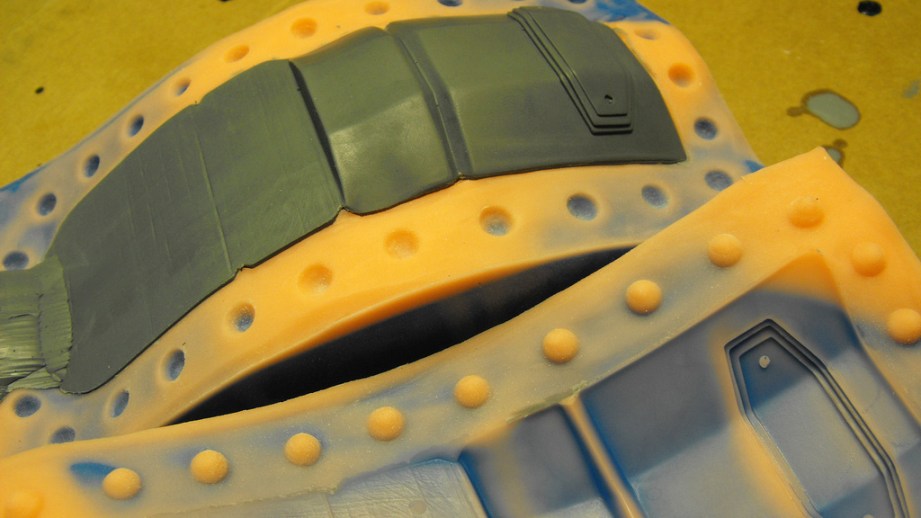
This component, and several others, will be slush cast in order to make them hollow. Slush casting is a process where a small amount of resin is added to a mold which is then sealed shut. In the case of the upper casing, 14oz of Smooth Cast 320 is added as a first pass. After being sealed shut, the mold is slowly rotated by hand until the resin cures against the outer walls of the cavity, resulting in a hollow piece. I’ll use the lower casing as an example.
As with before, the mold is opened and the master sculpt removed. Powder is added and the mold is re-assembled making sure that all registration keys are aligned before tightening all the bolts around the perimeter.
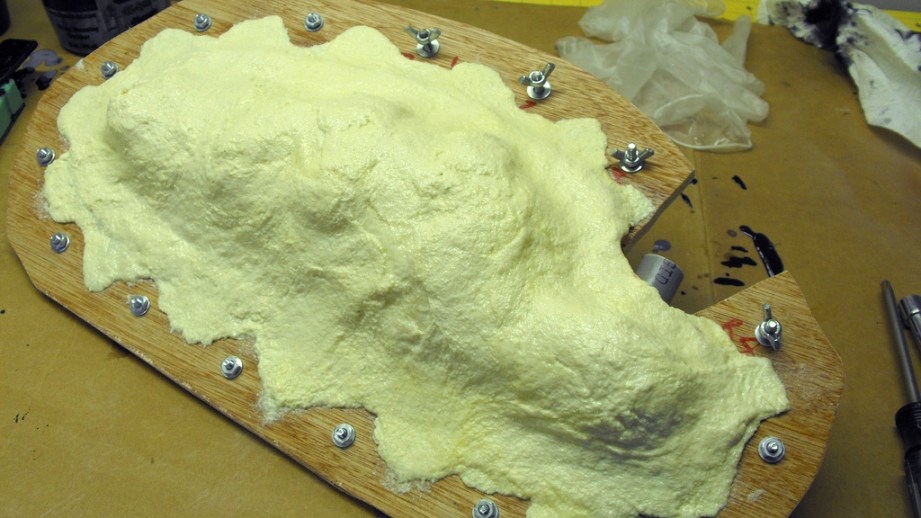
One of the things to be wary of in sealed-mold slushcasting is the internal pressure of the casting against the mold. Curing resin heats up quite a bit, and with a hollow casting that means the mold itself begins to become pressurised as more heat is produced, expanding the air in the sealed cavity. You need to have a place to pour resin into the mold, but the plug in this pour spout can come rocketing out (along with a bunch of searing hot half-cured resin) if it fits too loosely. In other pictures you might have seen that I used ½” PVC pipe as my pour spouts, and that’s because it’s very easy to plug a perfectly round hole. I pour excess silicone into PVC end caps to create plugs for my slush cast molds, taking the guesswork out of of keeping the pour spout sealed.
Slush casting will take some getting used to; it takes time to develop a feel for where the resin is flowing and how evenly the resin is coating the inside of the mold. I have found it to be easiest to go in two or sometimes three smaller batches of resin, opening up the pour spout after the first coat is mostly cured and adding more resin as necessary. Larger batches of plastic will cure faster as there is more material to produce more heat, and this can lead to a big uneven clump somewhere on the inside of your part.
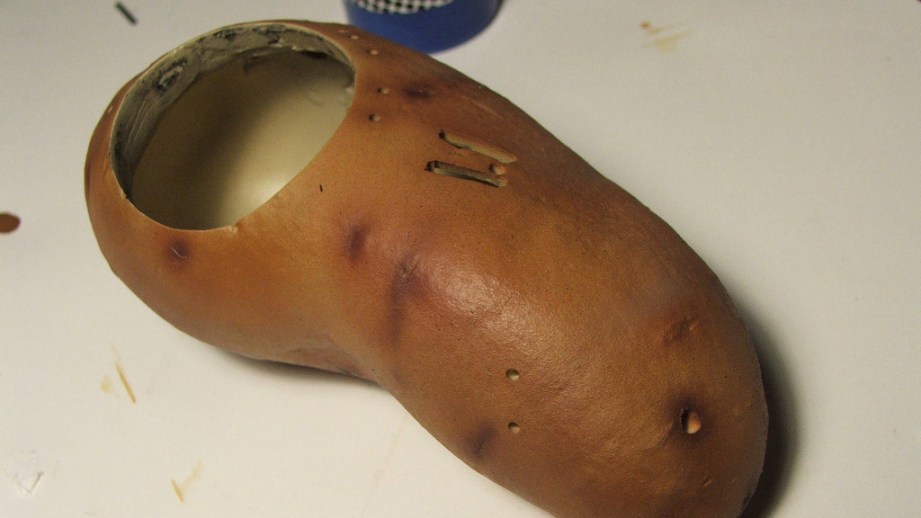
I’d like to show you what the inside of one of these looks like, but that would mean I’d need to chop a perfectly good Needler part in half! Instead, here’s a hollow resin cast potato (what? no, you’re weird) I made for a project a while back with a front section trimmed out. You can see how slush casting the part makes for a hollow piece that is lighter, cheaper, and ready to install electronics into.
I’ve found a good way to keep track of the curing rate of the plastic is to take your mixing cup and tip it onto its side as you’re slushing the mold around. Resin will run down the side of the cup while it’s still liquid, so every now and again, re-position the mixing cup to see if it’s still runny. When the resin in the cup no longer moves, the resin inside your mold won’t either!
There are mechanical solutions to this as well which won’t make your arms as tired; these machines are called rotocasters. They’re fantastic things and unfortunately I don’t have the room for one, so I get my workout by tossing molds around! This video explains how a rotocaster works fairly well. If you plan to make a habit of doing stuff like this, they’re fairly convenient to have around.
Since slush cast parts are thinner than block pour castings, leave them to cure for a bit longer before removing from the mold to prevent any distortion. It’s also a good idea to go ahead and powder your mold for whenever you plan to use it next time, since it will need to be re-assembled for storage anyway. Slush casting will definitely tire you out on the larger molds, but it’s good exercise! I’ve finished the upper and lower casings so far, and these parts weigh a fraction of their mold master counterparts.
For the next installment in this series I’ll be covering electronics–from simple LEDs to adding in sound effects and a basic amp chip, all working off an Arduino. Look forward to some cool glowy stuff in the future!
Happy casting, and see you in two weeks. We’re more than halfway done!
The Volpin Project, Part 1: Introductions
The Volpin Project, Part 2: References and Blueprinting
The Volpin Project, Part 3: Selecting Materials
The Volpin Project, Part 4: Taking Shapes
The Volpin Project, Part 5: Bondo Strikes Back
The Volpin Project, Part 6: Details, Accents, Refinements, and Mockups
The Volpin Project, Part 7: Introduction to Moldmaking
The Volpin Project, Part 8: More Complex Moldmaking


7 thoughts on “The Volpin Project, Part 9: The Casting Process”
Leave a Reply

One Day Builds
Adam Savage’s One Day Builds: Life-Size Velocirapt…
Adam embarks on one of his most ambitious builds yet: fulfil…

Show And Tell
Adam Savage’s King George Costume!
Adam recently completed a build of the royal St. Edwards cro…

All Eyes On Perserverance – This is Only a Test 58…
We get excited for the Perserverance rover Mars landing happening later today in this week's episode. Jeremy finally watches In and Of Itself, we get hyped for The Last of Us casting, and try to deciper the new Chevy Bolt announcements. Plus, Kishore gets a Pelaton and we wrack our brains around reverse engineering the source code to GTA …

One Day Builds
Mandalorian Blaster Prop Replica Kit Assembly!
Adam and Norm assemble a beautifully machined replica prop k…
House of MCU – This is Only a Test 586 – 2/11/21
The gang gets together to recap their favorite bits from this past weekend's Superb Owl, including the new camera tech used for the broadcast and the best chicken wing recipes. Kishore shares tips for streamlining your streaming services, and Will guests this week to dive into the mind-bending implications of the latest WandaVision episod…

One Day Builds
Adam Savage’s One Day Builds: Royal Crown of Engla…
One of the ways Adam has been getting through lockdown has b…

Making
Adam Savage Tests the AIR Active Filtration Helmet…
Adam unboxes and performs a quick test of this novel new hel…

Making
Weta Workshop’s 3D-Printed Giant Eyeballs!
When Adam visited Weta Workshop early last year, he stopped …

One Day Builds
Adam Savage’s One Day Builds: Wire Storage Solutio…
Adam tackles a shop shelf build that he's been putting off f…

Show And Tell
Mechanical Dragonfly Automata Kit Build and Review
Time for a model kit build! This steampunk-inspired mechanic…
Those needles turned out very well.
Needles look badass, awesome work
Looks fantastic, thanks so much for sharing!
Needler has always been among my favorite game weapons. It’s nice to see it receiving so much love and attention here.
And for the uninformed who think the Needler “sucked until the X game”, you just weren’t using it properly!
You know, you could add a metal disk with an LED in the middle and a couple of wires to turn that potato into GLaDOS pretty easily
Why does he have a potato? http://volpinprops.blogspot.com/2011/06/glados-potato-portal-2.html
Great post. I know this sounds super silly but I love watching resin cure like you posted in the animation gif above, its so neat seeing it go from clearish to the white.
Good post sir thanks again for sharing, I have to go make some molds of my own now.