


Bits to Atoms: Printing My Custom Cutaway Lightsaber
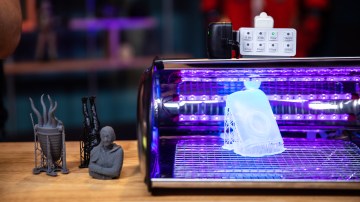
With all the design work done for my Custom Cutaway Lightsaber, it's time to 3D print everything on the Form 2 SLA printer.
With all the design work done for my Custom Cutaway Lightsaber, it’s time to 3D print everything on the Form 2 SLA printer. We were lucky enough to get a pre-production Form 2 from FormLabs and had been printing a ton of projects before the official release. We were very pleased with all the prints as Formlabs had upgraded all of the items (and then some) on my wishlist from my time with the Form 1+. The Form 2 had been living up to my expectations but I designed some of the lightsaber parts to torture test it further.
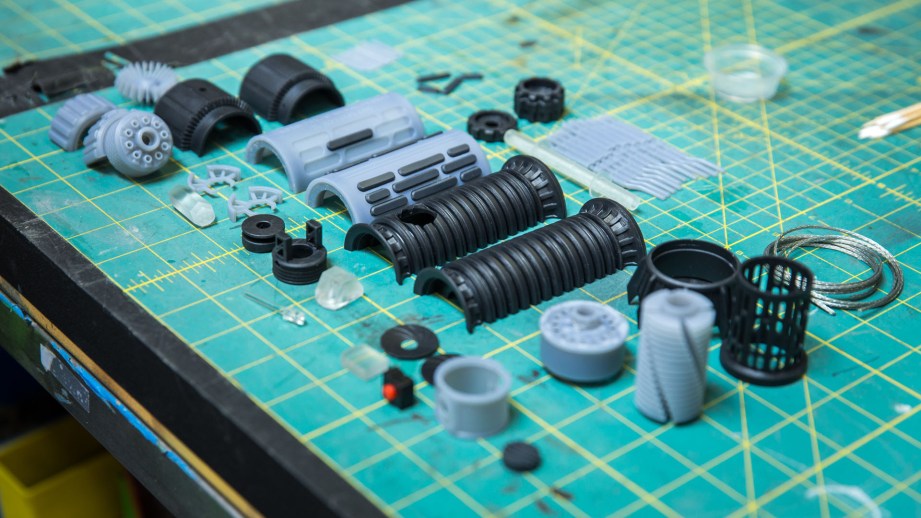
While the Form 2 was more than capable of printing out an entire half of the saber in one piece, I broke it up into many parts for a few reasons. First, I wanted to show off various resins and designed the saber to make use of the black, grey, clear and flexible materials, most of which had just had formulation upgrades. Second, I wanted to see what the tolerances and fit quality were like for assemblies. Third, as we have talked about before, prints tend to look better when all the parts aren’t globbed together but instead printed as individual pieces. Plus, the quality of parts can sometimes be affected by orientation and printing everything as one piece is not always optimal.
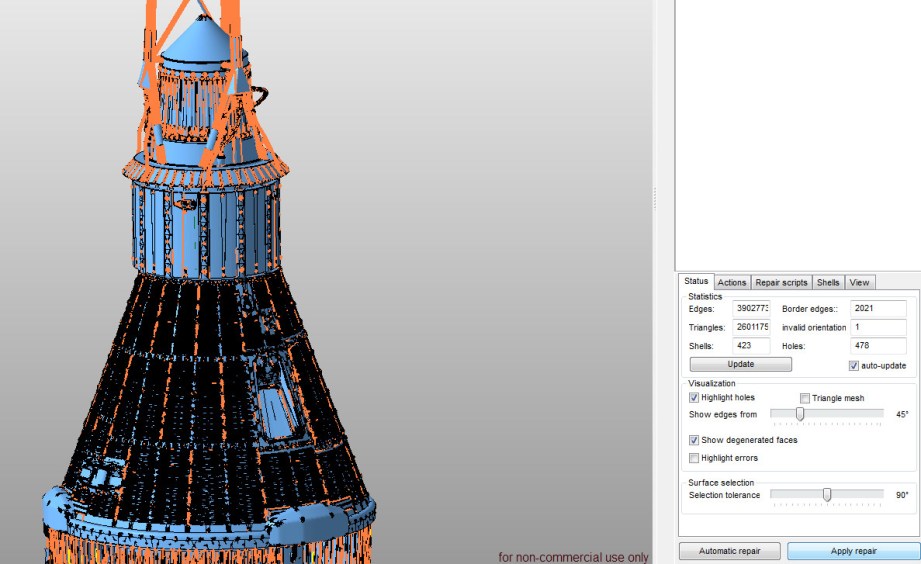
Once modeling was finished, the next step was to export all the parts as STL files – generally the standard for 3D printing. The grips and pommel were exported as a whole piece and then cut in half using Netfabb – this was a case of using the right tool for the job. Netfabb (recently acquired by Autodesk) is also my goto program for mesh repair which is a vital part of 3D printing. Any holes, flipped polygon faces or other irregularities can cause a print to fail. Formlabs PreForm software has Netfabb repair functionality built in and will warn you and offer to fix possible issues upon model import.
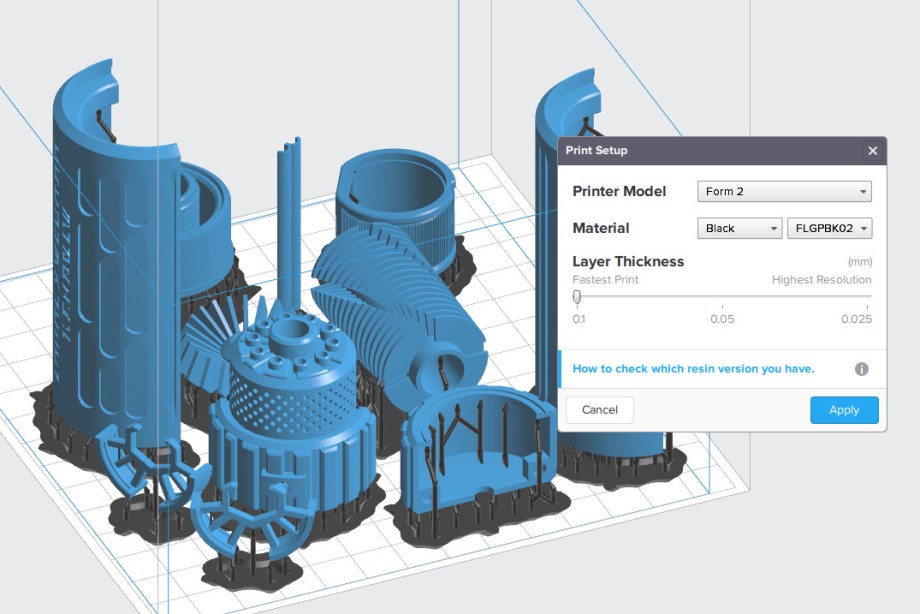
With the mesh repair done, the STL files were brought into the Formlabs software, PreForm to prepare for printing. When launched, PreForm will ask for the resin type and resolution being used – this can also be changed later. Typically I will fill the platform with as many parts as possible, so I would print all the black, grey, etc parts at one time. The only time I separated out parts of the same resin type was if they needed to be printed at different resolutions. You can’t print models at different resolutions in the same print job, which is typical of most 3D printers. Most of the prints I have done on the Form 2 have been at the lowest layer height setting of .1mm and the parts have turned out great. I did print the spiked top of the saber at .05mm due to its sloping sides – with an angled surface you may start to see a stepping effect due to the thickness of each layer.
Next, all of the parts need to be oriented and supported for optimal printing. Most parts will require some type of support structure which not only anchors it to the print platform, but supports holes, angled surfaces and delicate features. PreForm can automatically do this and will arrange parts and place supports for the best chance of a successful print and generally does a fine job. However, the software doesn’t know what side may be visible and which may be hidden on the finished product. Ideally you want the support structures to attach to hidden or less noticeable surfaces since they do leave a small mark and require cleanup. More often than not I find that parts get oriented in such a way that supports will be placed on surfaces that I would like perfectly clean right out of the printer.
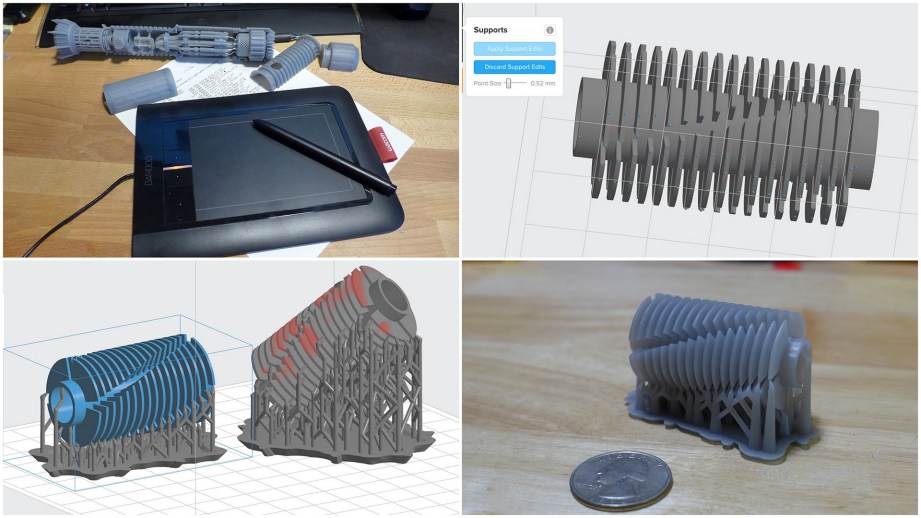
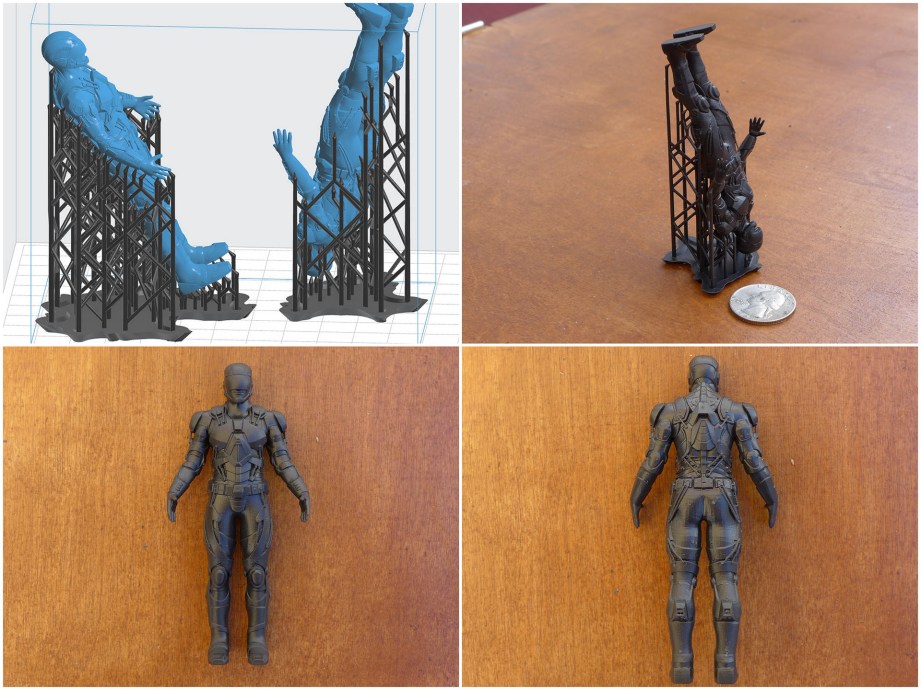
For the lightsaber I ended up doing custom supports for all the parts. PreForm gives you a lot of control over this by allowing you to simply click on an existing support point to delete it and then click on any surface to add a new one. With the quantity of supports I had to do, I found using a graphics tablet with pen worked very well and made things go faster. I used a standard Wacom tablet – nothing fancy. A computer with a touchscreen and pen would also work great for this. I also attempted something a little unusual by placing most parts complete vertical.
Typically, a part should be oriented at a slight incline. This makes the beginning layers smaller and less likely to fail during the peel process where the resin tray moves back and forth in order to break free the layer that was just printed. In the vertical position, most parts will have a larger surface area that needs to be peeled and the strain may break it loose from the supports and cause a print failure.
With a large bottom surface area you may also get some initial turbulence in the liquid resin which may cause some mushiness or pitting on the bottom layers. Most of my parts had a reasonable vertical surface area so I tried printing that way and it worked fine for most everything, although I did get some pitting on parts with a larger bottom area. Once you get a feel for the printer I have found that you can get away with much smaller and fewer supports than what is generated automatically as long as you understand your model and how the Form 2 will print it.
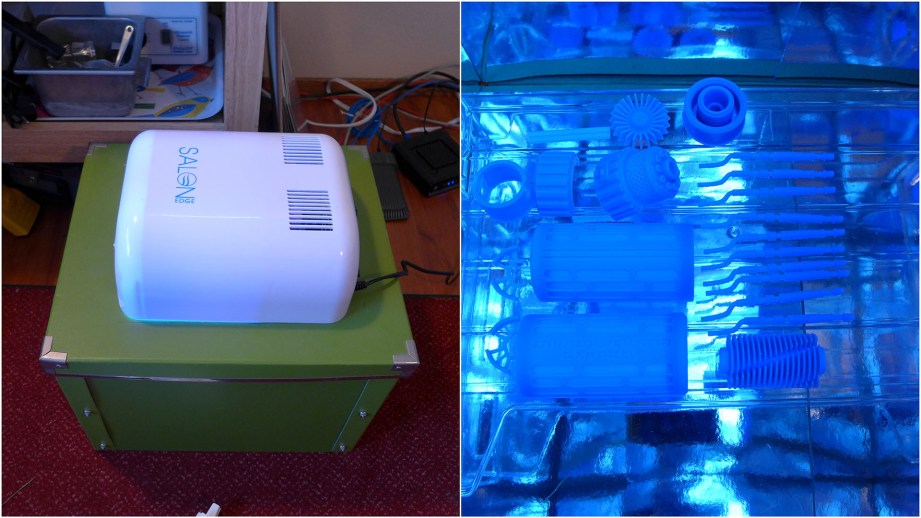
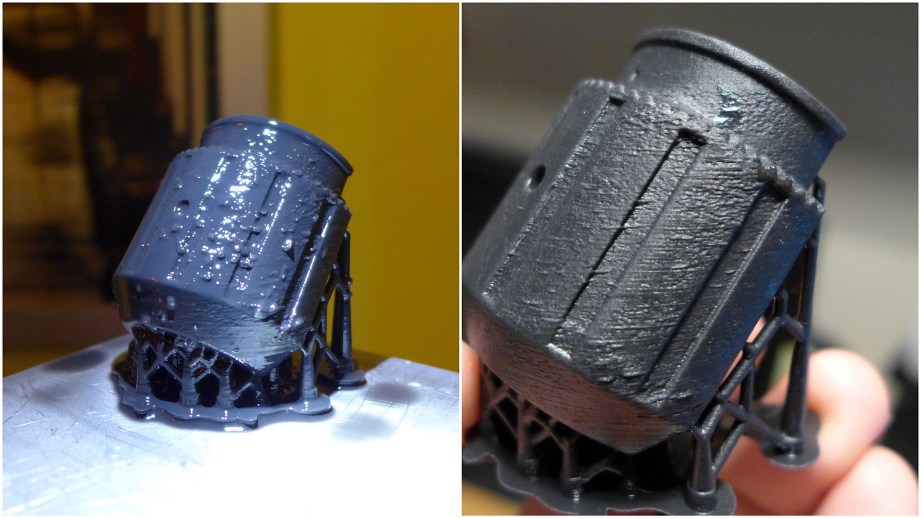
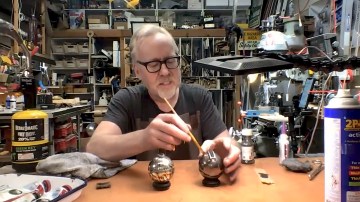
Once the print is finished, the entire print platform is removed and the print is popped off by using flush cutters underneath the angled support base. Into the first vat of isopropyl alcohol to soak for 10 minutes to loosen up any liquid resin still on the print. The inner mesh basket can be used to agitate the print to wash off resin. My personal routine is to then use a super-soft toothbrush to lightly scrub the print as I have found agitation often does not remove all the resin. Use gloves and don’t use a stiff brush as it may mar the surface. Next it’s into the second, cleaner, vat of alcohol for the final rinse.
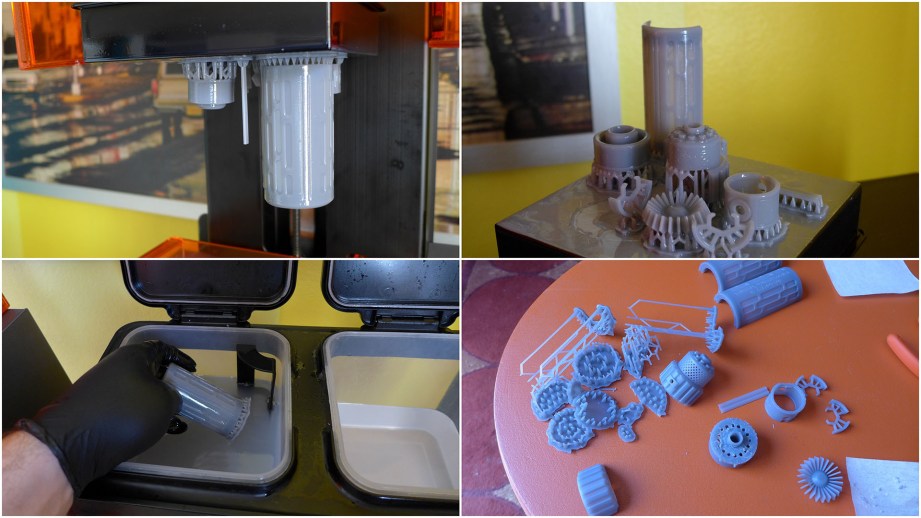
After drying, it’s time for the final cure in a UV ‘oven’ which you can build yourself. UV curing is recommended but not necessarily needed if you are printing with the standard resins and don’t plan on any sanding, painting, etc. Some of the other resins such as Tough and Flexible really need to be post-cured. When prints come out of the Form 2 they are almost fully cured and fine for display as-is, but if they need to be sanded, etc, they really need a bit more UV to harden completely. I do not recommend setting parts in sunlight to cure as it’s not controlled and intense sunlight can even warp thin parts. Formlabs has a guide for building your own UV oven – mine cost under $50 by using an Ikea storage box, UV nail salon lamp, mirror board and a letter tray. I lined the box with the mirror board as a reflector and the clear letter tray is flipped upside down to raise the print and allow light to hit the bottom. I cure the print for 1 hour, flip it to the other side and do another hour.
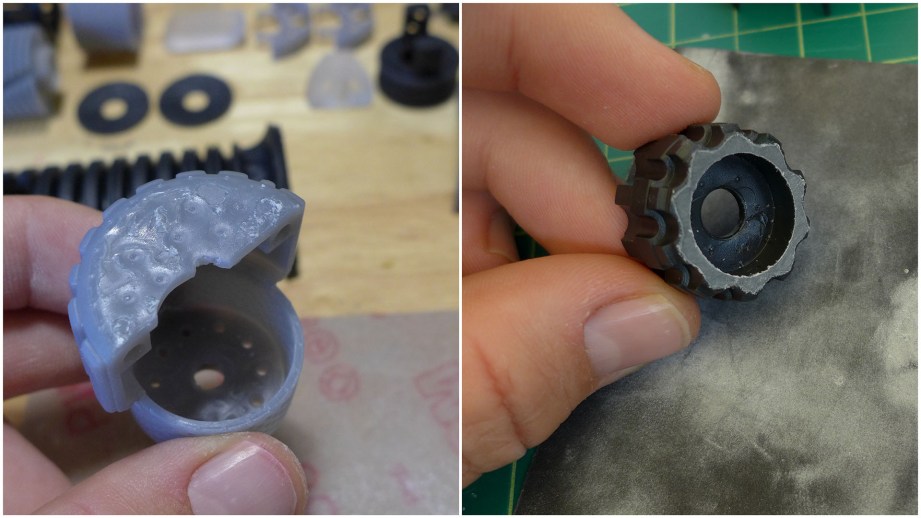
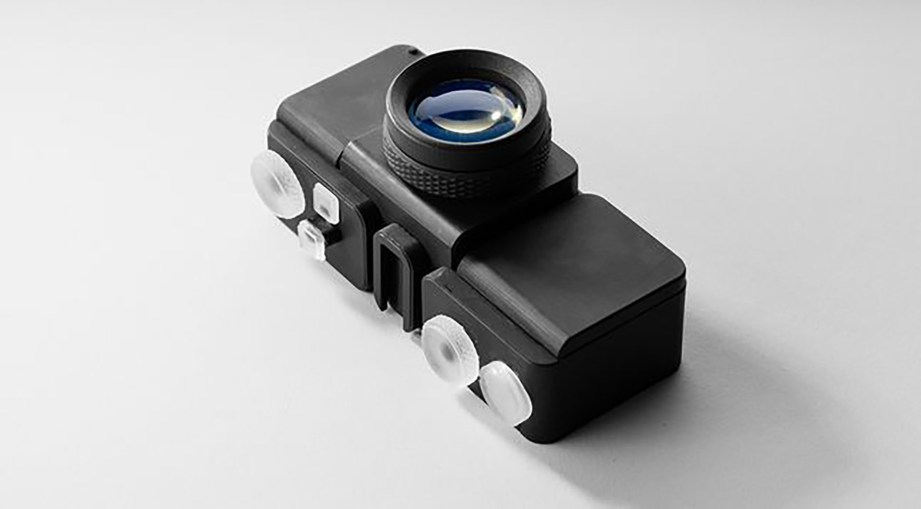
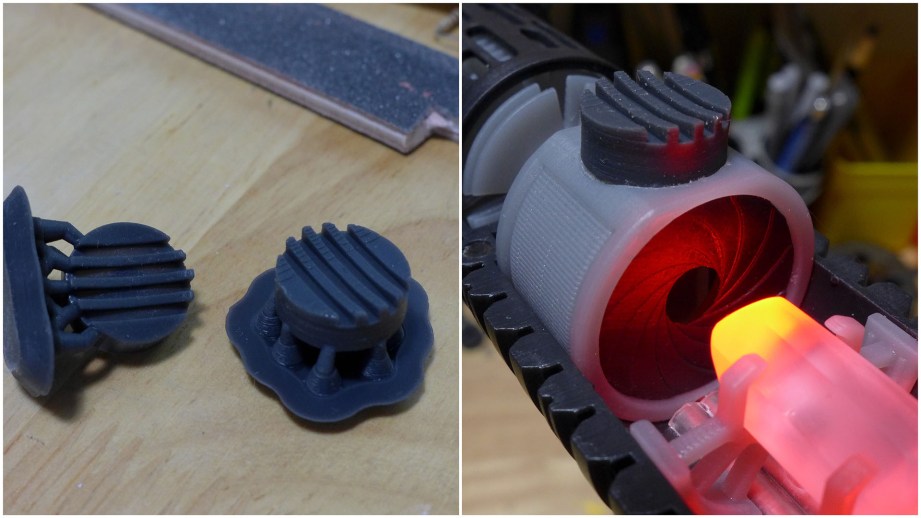
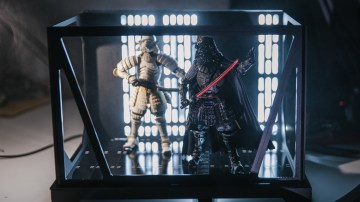
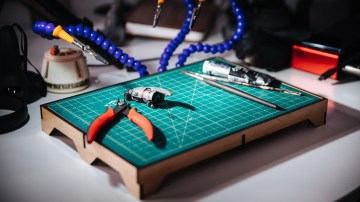
Now it’s time to remove all the support structures. Depending on the model and support point size, this can be done by simply tearing them off. This tends to leave more marks to clean up so I typically use flush cutters and an x-acto to remove them. I also tend to remove the supports BEFORE the UV cure as the resin is slightly softer and I feel the supports are easier to remove. I have also found that removing supports on delicate parts, such as the saber cooling fins can sometimes chip the model as the resin is more brittle after curing. Any further support marks can easily be sanded and if the model is not going to be painted, mineral oil can be used to clean up any finishing marks. For more clarity, clear parts such as the crystals, can be wet-sanded with fine grit sandpaper and acrylic polish. If you have enough patience, clear parts can be made almost transparent – like the lens on the 3D printed camera. The newest clear resin formulation also resists yellowing which the previous version would tend to do when exposed to UV light for an extended period.
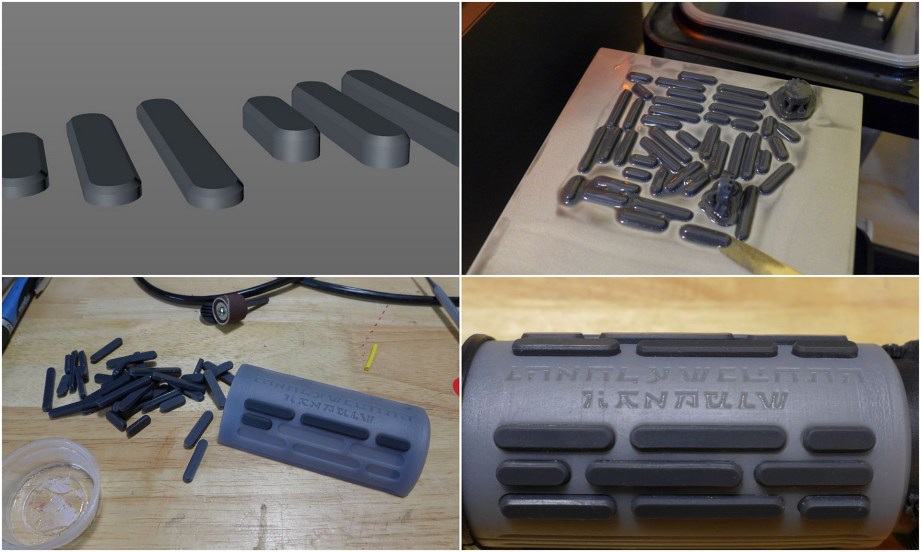
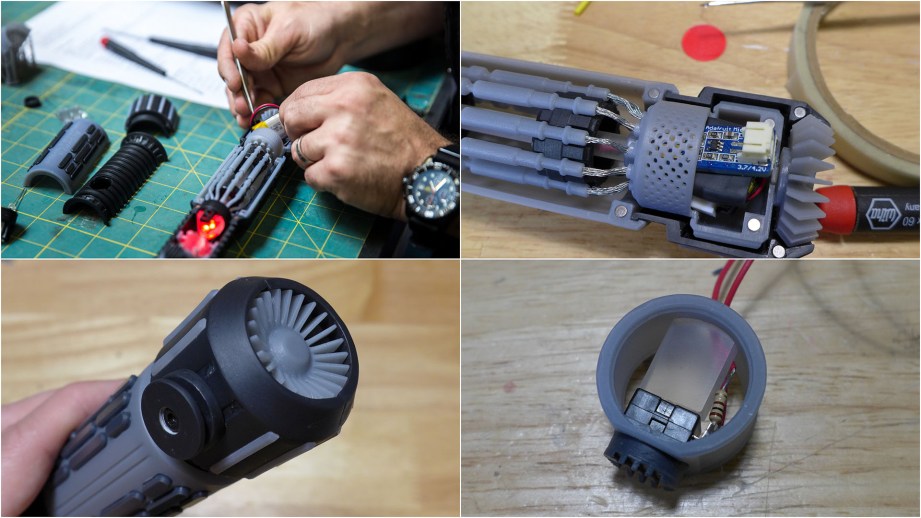
The lightsaber was my first attempt at using the Flexible material and I was very pleased with the results. Flexible has a Shore hardness of approximately 80 which is about the hardness of a shoe heel. It was perfect for the handle grip pads and even worked for the on/off button which needed to flex. The flexible material takes longer to print than the other resins – I believe this is because it needs to be ‘baked’ more by the laser. The initial bases for supports in particular take a long time to print. Partly due to time constraints and partly because I wanted to see if it could be done, I printed all the grip pads directly on the platform rather than use any supports. This cut down on how long the print took and post-processing clean up. It worked perfectly but this is not a technique to use for all prints, especially if dimensions need to be exact. The Form 2 needs to really bake and compress the first few layers of a print to ensure it sticks to the print platform. So a print that is 1mm thick, may turn out .5 – .75mm thick if printed directly on the bed. The grip pads were very simple, so I added an extra .25mm to the thickness and they came out at exactly the size I needed.
I used supports for the button which need to be much thicker than normal due to the flexible nature of the material. As discussed last time, I had to try a few different versions of the button to get the wall thickness just right so it was strong but still flexed. In the end it worked perfectly and survived being handled all weekend at Maker Faire. The Flexible material is great and I would love to see a softer version added to the resin line up.
While the Form 2 has been a workhorse with very few failed prints, I did have a rough patch when I started the final saber parts. All of my prototypes had turned out great, but with only a few days to finish the final version for Maker Faire, I started getting prints that looked like the Elephant Man. Lots of little boogers everywhere, uneven print lines, mushy details – what was up? At first I thought it was the new resin formulations as these weird prints coincided with switching to the new resin. Turns out the laser on my pre-production Form 2 went out of adjustment – but an overnight shipment later and I had a new production model Form 2 and the prints were beautiful. The new printer has been going a few months now and the only failed prints were due to some attempts at using minimal custom supports. My original printer has since been rehabilitated and is printing away.
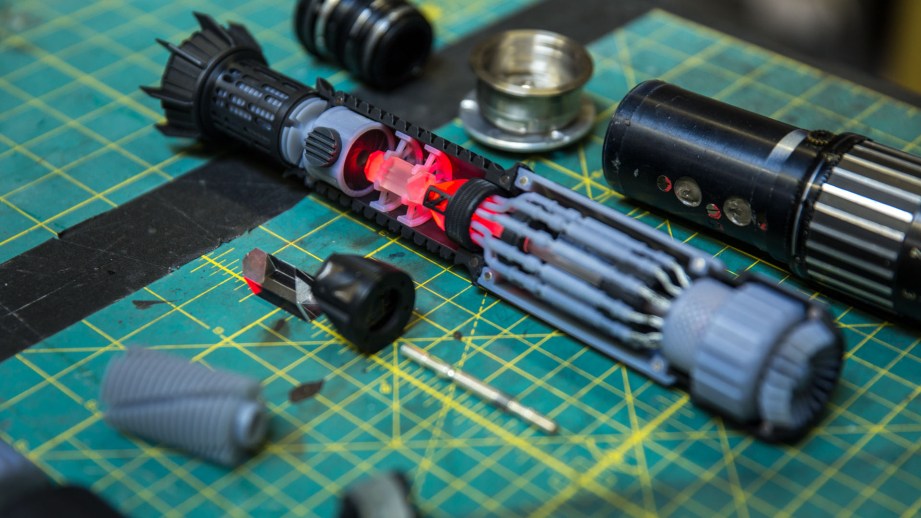
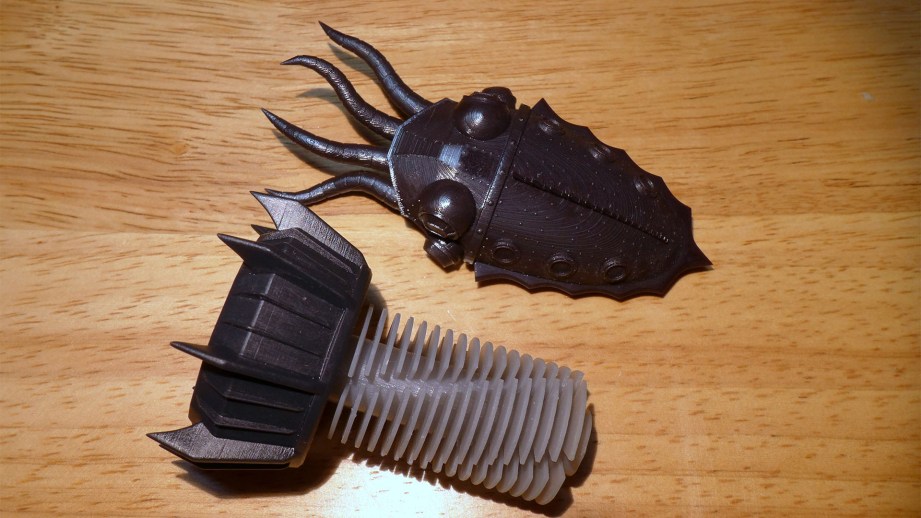
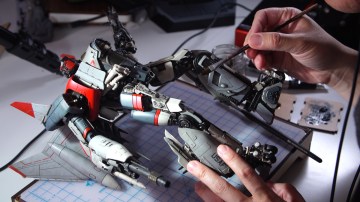
All of the parts I designed as torture tests turned out beautifully. All the pinholes, knurls, fins and precision parts turned out great. Hardware such as the switch and the few screws I used fit perfectly, although care should be taken when threading parts as the standard resin is acrylic-like and can be brittle. You can watch how the lightsaber goes together and read about how it was designed in my previous entries. I used super glue to assemble all the parts – it worked great on the resin, including the flexible parts. If you end up with any hazing from the glue, it can easily be hidden using some acrylic polish. My intention was to show off the different resins, so no finishing work was done other than sanding support marks. If desired the parts can easily be painted and weathered just like any model kit.
I am very pleased with how all the parts printed and the flexible material was a nice option to have. My particular favorite is the black resin as it really shows off details well. Even my ‘torture test’ pieces such as the cooling fins turned out great although I do feel custom supports were a must on this particular part. I was also pleased with how well the clear part lit up and transmitted light – I would like to do some further polishing on them for even better clarity.
Finally, I will answer the question I get asked most often about the Form 2 – “how much do the prints cost?’. This was difficult to answer until I crunched a bunch of numbers and came up with my own formula for print costs. I felt that just calculating just cost per mL of resin was not enough, as the resin trays are also a consumable. Here’s how I broke it down –

Most of the resins cost $149 per 1000mL cartridge, then there’s shipping ($13 to San Francisco) and tax ($12 CA tax). A resin tray is rated to last approximately 2 cartridges of resin (2000mL) before it should be replaced. I calculated half the cost of a resin tray which is what would be ‘used’ per 1000mL resin cartridge and I added shipping and tax ($72/2 = $36). So with the cost of resin, half the cost of a tray per cartridge, shipping and tax I came up with a cost of approximately $210 per liter or 21¢ per mL. I also figured I should calculate something for print time as prints can take many hours. I arbitrarily picked $1/hour as I have no idea how much power the printer uses – eventually I will get a outlet meter reader to figure it out. To put this all in perspective, the lightsaber prints use approximately 223mL of resin, take 26.25 hours and cost $75 to print (according to my formula). This means you should be able to print approximately 4.5 lightsabers per 1000mL cartridge of resin. In the end, I tend to react on a gut-level – for example after using up a roll of filament for my FDM printer I feel satisfied that I got a lot of prints – it was a good value. I have felt the same with the Form 2 resin cartridges – when it comes time to order a new one I feel like I got a lot of quality prints for the money.
I’ve also been asked how much does it really cost to get setup with the Form 2. Generally my answer is $4000 – 4500. The printer itself is $3499, which includes the cleaning station, one cartridge of resin and a resin tray. You’ll probably want to add additional resins and a dedicated tray for each – let’s say 2 more ($420). You need to buy isopropyl alcohol to fill the cleaning tanks ($40) and it tends to last for quite a while. You will want to put together a UV oven for curing the prints ($100 or less). You can also add an annual service contract for $500/year.
So ends the epic journey of crafting our own lightsaber! You can download and print your own saber from my Pinshape account, print settings, hardware list and assembly guide are included. A link for my custom PreForm support layouts is located on the project page and may save you some setup time. Also be sure to read about how it was designed, check out the original reveal video and watch how to assemble your own. Yub yub!


6 thoughts on “Bits to Atoms: Printing My Custom Cutaway Lightsaber”
Leave a Reply

One Day Builds
Adam Savage’s One Day Builds: Life-Size Velocirapt…
Adam embarks on one of his most ambitious builds yet: fulfil…

Show And Tell
Adam Savage’s King George Costume!
Adam recently completed a build of the royal St. Edwards cro…

All Eyes On Perserverance – This is Only a Test 58…
We get excited for the Perserverance rover Mars landing happening later today in this week's episode. Jeremy finally watches In and Of Itself, we get hyped for The Last of Us casting, and try to deciper the new Chevy Bolt announcements. Plus, Kishore gets a Pelaton and we wrack our brains around reverse engineering the source code to GTA …
Making
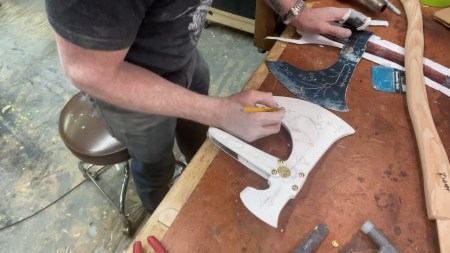
Adam Savage in Real Time: God of War Leviathan Axe…
Viewers often ask to see Adam working in real-time, so this …

One Day Builds
Mandalorian Blaster Prop Replica Kit Assembly!
Adam and Norm assemble a beautifully machined replica prop k…
House of MCU – This is Only a Test 586 – 2/11/21
The gang gets together to recap their favorite bits from this past weekend's Superb Owl, including the new camera tech used for the broadcast and the best chicken wing recipes. Kishore shares tips for streamlining your streaming services, and Will guests this week to dive into the mind-bending implications of the latest WandaVision episod…

One Day Builds
Adam Savage’s One Day Builds: Royal Crown of Engla…
One of the ways Adam has been getting through lockdown has b…

Making
Adam Savage Tests the AIR Active Filtration Helmet…
Adam unboxes and performs a quick test of this novel new hel…

Making
Weta Workshop’s 3D-Printed Giant Eyeballs!
When Adam visited Weta Workshop early last year, he stopped …

One Day Builds
Adam Savage’s One Day Builds: Wire Storage Solutio…
Adam tackles a shop shelf build that he's been putting off f…
Thanks Sean, great write up and especially appreciate the cost breakdown. I really like the level of detail in the parts.
Maybe consider a small sonic cleaner from Harbor Freight as a cleaning option. You can fill it with any cleaner, so iso-alc would work in one too and prevent any marring. I’m assuming the soft brush and marring is only possible while ‘wet’. Does the plastic remain soft and vulnerable after the resin sets up?
I use an ultrasonic for other 3D prints, but you don’t want to use it with alcohol – too much of a fire hazard! After the plastic sits awhile even without UV curing it does firm up.
Thanks Sean.
Is there are alternative to NetFabb that you like? Like something that doesn’t cost an arm and leg? Mainly I have been looking for mesh repair.
MantaBase I am so irritated that AutoDesk has bought Netfabb and priced it through the roof on a subscription base. There used to be a free basic version to download. There is still a free cloud version active through Microsoft but who knows how long it will last: https://azure.netfabb.com/
There’s Meshmixer http://meshmixer.com/ also thru AutoDesk but still free. And MeshLab http://meshlab.sourceforge.net/ which I think is abandoned but can do a lot although is hard to learn. Simplify3D also has repair built in which is a growing trend with slicers.
Thanks! I will give those a look. It’s been an ongoing problem for me – to the point I have put a couple projects aside.
Yes – Autodesk, in my opinion, is having a very difficult time understanding their periphery markets. Their pricing structure seems to be determined with dice. They are not receptive of complaints though, in my experience.
disclosure: I am an Autodesk share holder
Thanks a lot it really amazing and credit to the designer.