


We take the newly-released Tesla Model X for a test drive, courtesy of a friend of Tested. Here’s how the Model X compares with the Model S, how the gull wing doors work, and what it’s like to drive with Tesla’s Autopilot mode on the freeway. It’s exciting and terrifying at the same time!
Tested Builds: Perfect Grade Gundam, Part 3
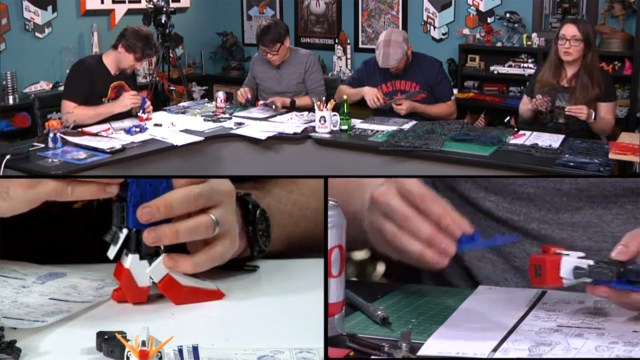
As assembly of this Perfect Grade Zeta Gundam resumes, we continue to be impressed by the amount of detail built into the kit. There’s so much that’s hidden under the armor! Thanks to Sean, Frank, and Danica for joining for this week’s build! (Follow along the rest of the week by joining the Tested Premium member community!)
Adam Savage Mini Science Fair Project

In honor of the 2016 White House Science Fair, Adam spotlights some counter-intuitive science, demonstrating how an acorn-shaped object can roll evenly — just like a ball bearing! Find out more about #WHScienceFair here!
Science Fair Projects – Still Untitled: The Adam Savage Project – 4/12/16

This week, we talk about Adam’s upcoming trip to the White House Science Fair, our own first science fair projects, and the trouble with troubleshooting connected devices in the home. (Apologies for any jackhammering noise that got through in the podcast–construction was happening next door!)
Tested Builds: Perfect Grade Gundam, Part 2
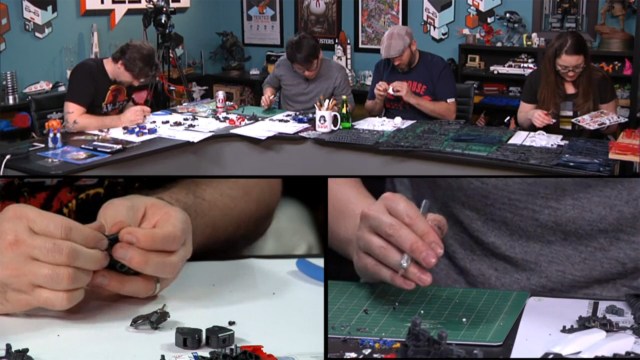
With our team assembly line smoothed out, we tackle the arms and legs for this impressive Perfect Grade Zeta Gundam kit! But it might be time for a new foreman–who will step up? (Follow along the rest of the week by joining the Tested Premium member community!)
Tested In-Depth: Oculus Rift vs. HTC Vive

We’ve now reviewed both the Oculus Rift and HTC Vive, but after spending more time with both virtual reality headsets, we’re able to do more direct comparisons between them. Jeremy and Norm discuss in-depth the differences in lenses, display quality, ergonomics, tracking, and software. Do we have to pick a side?
Tested Builds: Perfect Grade Gundam, Part 1
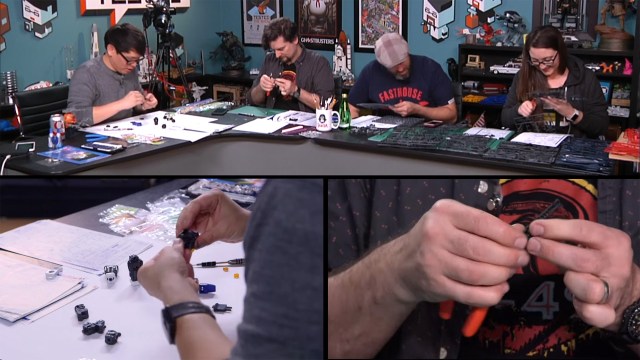
Welcome to another week of builds! We’re tackling a new type of kit this week: gunpla! And for our first Gundam build, we’re going big with a Perfect Grade Zeta Gundam at 1/60 scale. Norm is joined by Sean Charlesworth, Frank Ippolito, and special guest Danica Johnson to work together and build this mecha! (This first video is available for everyone–watch the rest of the build by signing up with the Tested Premium member community!)
How To Assemble the 3D-Printed Ghost Trap
Watch how the 3D-printed ghost trap project comes together in this step-by-step build tutorial! Sean puts together his ghost trap kit, explaining the design of each piece along the way. You can download the files for the print here, and buy hardware kits here. Thanks to Dremel for providing the 3D printer and tools for us to build this project! Learn more about the Dremel 3D Idea Builder here.
Shot by Joey Fameli and edited by Adam Isaak
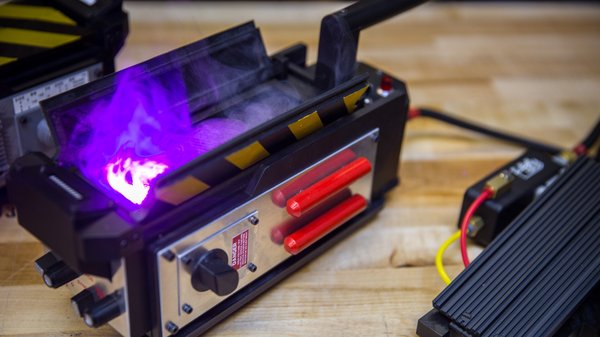
Inside the Electronics of the 3D-Printed Ghost Trap
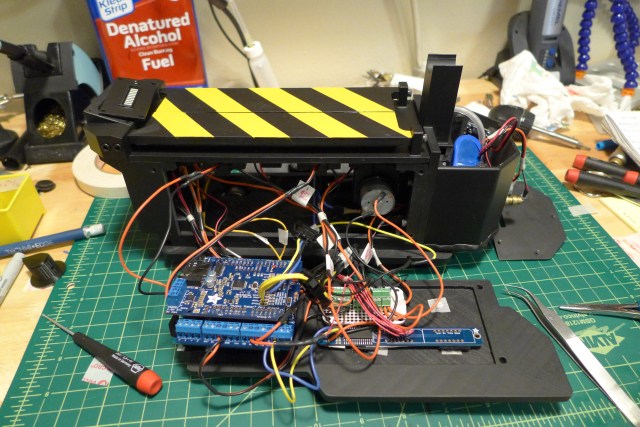
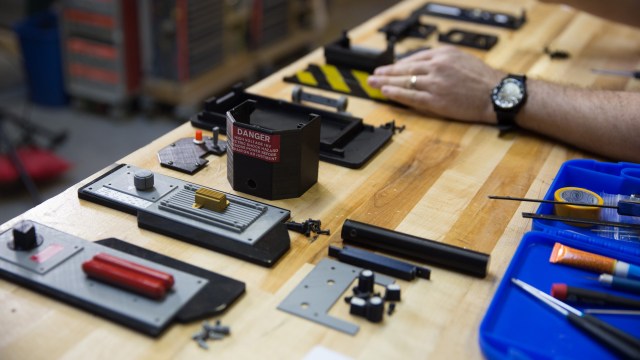
Thanks to Dremel’s support and use of their 3D Idea Builder printer and a host of great tools, we were able to build a working, 3D printed, Ghostbusters Ghost Trap. Last time, we took a look at the modeling and design of my 3D printed Ghost Trap, this time we’re going to delve inside and see how it works. As we were developing the Ghost Trap project I proposed making a fully functional trap that could open and close with lights and sound. While I am handy with a soldering iron and can generally pick out components for a project, I am no electronics expert and have no experience programming microcontrollers. It’s something that has been on my to-do list for a long time so originally I planned on learning the Arduino as part of the Trap build.
While designing the first iteration of the door mechanism, the amount of work I had to do started to sink in – fully model the trap and pedal, make sure it all fits together while making room for electronics, source hardware and obscure parts, design a door mechanism, figure out a system for smoke, sound, lights and get all the files ready for public release. Oh, and learn how to program the Arduino and make it run the whole thing. I was in over my head and simply did not have the time to do everything and it really bugged me. I like knowing how to do things and I wanted to learn how to program the Arduino, but I had to be realistic about it. Luckily, Jeremy Williams came to the rescue with his electronics and programming expertise–he’s tackled zombies before, so ghosts were not a problem.

I compiled a wish list of functions for Jeremy consisting of a ‘must-have’ and ‘dream’ list. At the very least the trap had to open, lights come on, sound effects play. The ultimate dream-build was open and close, lights, sound, smoke and vibration – all controlled via the foot pedal. It took a while for me to communicate to Jeremy what I did and did not know, so he could figure out exactly how much he had to do. I knew I could physically wire everything up but I didn’t know how it should be wired. Jeremy and I sat down with all the components, figured out where we needed resistors, how much power we needed, what should get hooked up where, etc. and then it was my turn to wire as much as possible. A habit I’ve picked up from 3D modeling is to label everything and organize it, so you can turn a scene over to someone else and they can navigate the project with relative ease. I kept this in mind when wiring the trap and made sure to label all the wires and dress them so I could deliver a tidy setup to Jeremy.
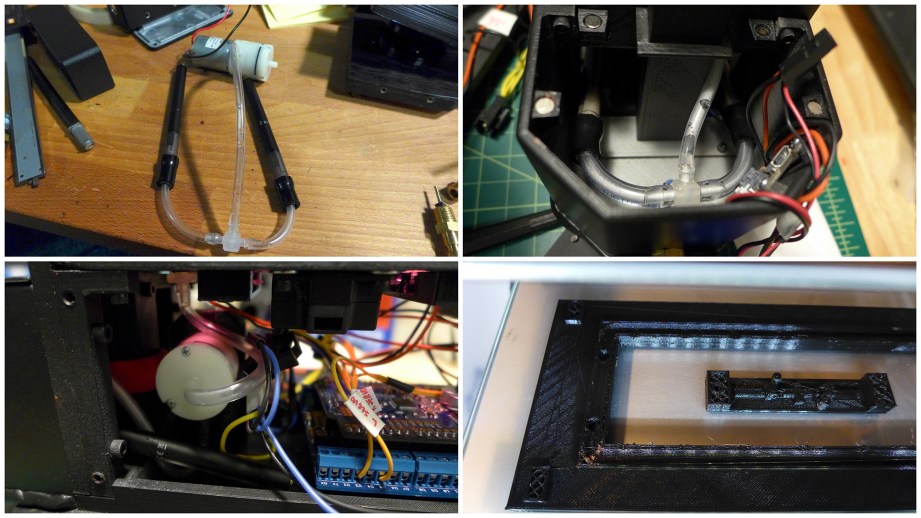
Almost all of the electronics were purchased from Adafruit in NYC which has been a favorite of ours for a long time. They produce their own quality components and have a curated selection of outside parts as well. There may be cheaper ways to do what we did, but we knew that the Adafruit stuff would ‘just work’ and it was a one-stop shop. For various reasons, we went with the popular Arduino microcontroller for the heart of the Trap. Since we were going to release the code to the public, we wanted something widely used that everyone could mod. Additionally, Adafruit produces a nice music shield (add-on board) for the Arduino that handles MP3 decoding and had a built-in amplifier for speakers. Finally, all the components we selected ran off 5V, as does the Arduino, so our power setup was simplified.
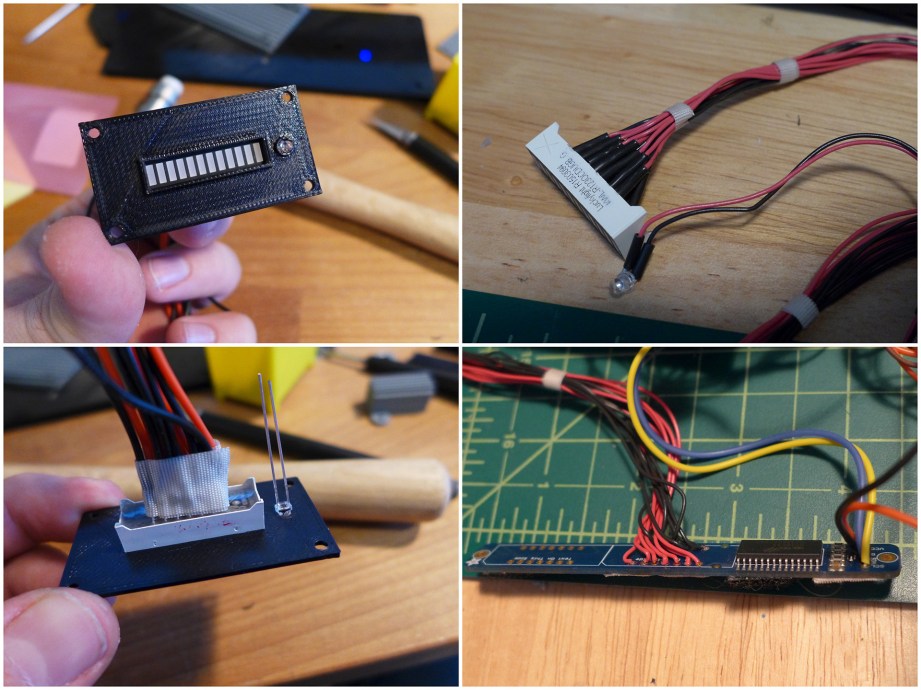
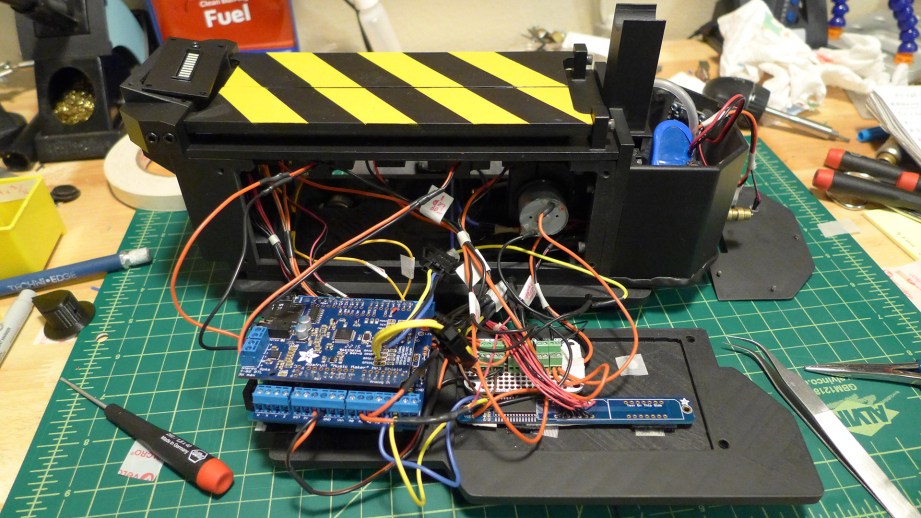
A popular choice of power for hobby projects are 3.7V LiPo batteries but since most of the components used needed 5V we added a boost board that converts the 3.7V to 5V (by black magic). As an added bonus, the boost board can be used to turn the Trap on/off and also charges the battery via USB! Another key feature of the Ghost Trap is the illuminated bargraph at the front that fills to show the Trap is full. Adafruit had another custom item that was perfect for this but needed a little customization. The original kit consists of a controller board that two bargraphs mount to but it was too big for the space available. My solution was to only use one of the bargraphs and to solder individual wires to each pin that ran back to the controller board mounted in the body of the Trap. A tedious soldering job but it worked perfectly. High-intensity 1 watt LEDs were used for the main lighting when the Trap opens. I had used these on my TARDIS kits and had already designed a custom mount that I reused here. An intense, pink lighting gel from film & TV production was used to get the color right.
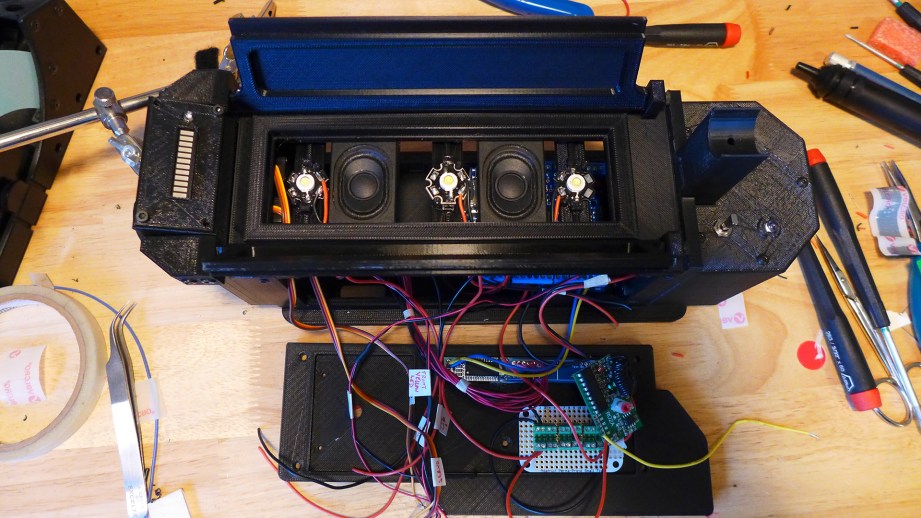
Sound effects proved to be another challenge as I couldn’t find any. Searching the prop forums, I could easily find SFX for the proton pack, but was not coming up with much for the ghost trap. In 2009 Terminal Reality released Ghostbusters: The Video Game which managed to reunite the entire movie cast to voice the characters. They released the SFX files to the public but I couldn’t find them anywhere. Luckily our own Frank Ippolito and GBFans member Jack Doud both hooked me up with various versions of the game SFX. I handed these over to Jeremy to add to the music board and he went above and beyond by editing them to be more movie-accurate.
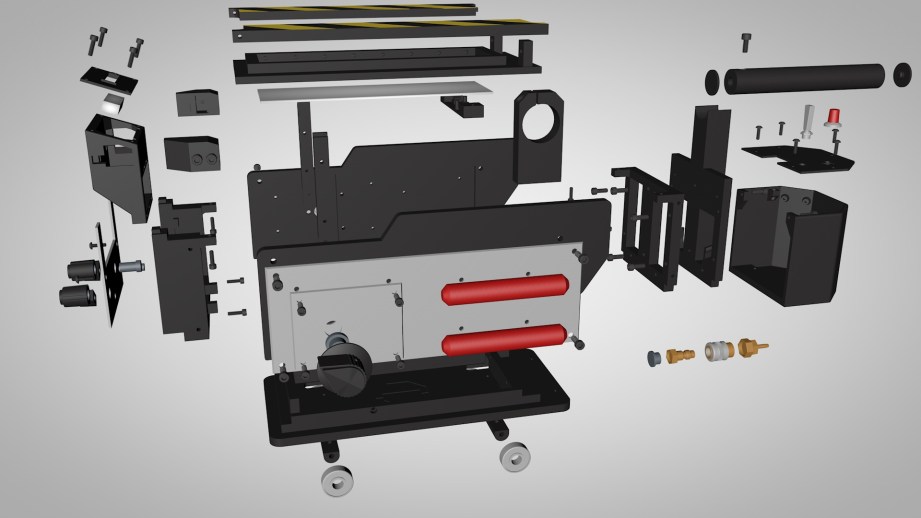
The biggest challenge with making a functional trap was figuring out the door mechanism. I still don’t know exactly how they worked in the films, but often props will be shot at a certain angle or designed in such a way as to hide the actuating mechanisms. I had seen other fan-made traps use servo-driven rods attached to the doors, but I didn’t like how you could see the rods sticking out through the top. The rear portion of the door simply attached with screws, so there was no way to drive them there, but the front attached to what I called the ‘wings’. I had to figure out how to cram a mechanism into such a small space. The immediate problem was that the wings were held in place by two screws that passed directly through where the door axle went. Since this would be 3D printed, I decided to make the wings and the center console one piece and the screws would basically be decoration. This didn’t work as I realized that I needed more room to work during assembly which lead to making the wings separate again. But I still needed to attach them without screws, so I used dovetails which allowed the wings to be slide into place and held secure – success!
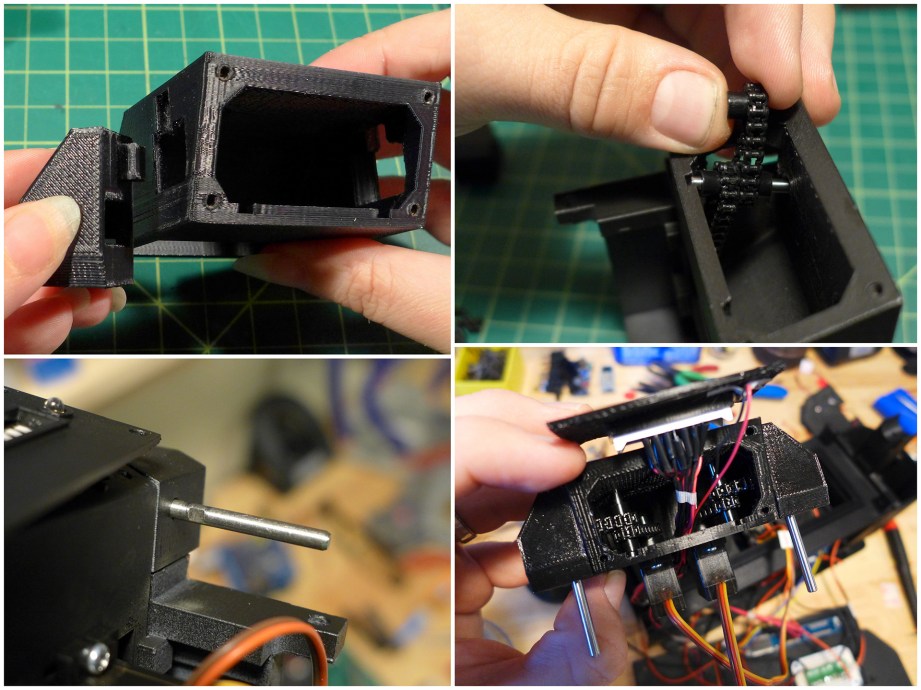
My initial design for the door mechanism was to have servo-driven levers that pushed the doors open through the wings. On paper it seemed doable, but after building it in 3D I quickly realized it would never work – there simply wasn’t enough room. Next I considered a series of gears that led from the servos mounted below up to the wings. Once again, there simply wasn’t enough space. I was getting pretty frustrated and started randomly going through my part bins looking for inspiration. I found some miniature chain I had from working on the Hellboy Millenbaugh Motivator for Adam. The chain connected the crankshaft to a motor hidden inside the Motivator and had worked great – this could work. I tried running the chain from the servo to the door axle in the wing – it was close but the chain rubbed on the housing. To solve this I had to add a transfer shaft that allowed me to make an ‘L’ with the chain. The next problem was how to get the axles in that small space. There was no way to push them straight through, they had to be dropped in from above. I realized that once the chain was tensioned it would hold the axles in place so I made a slot they could drop down into – it actually worked!
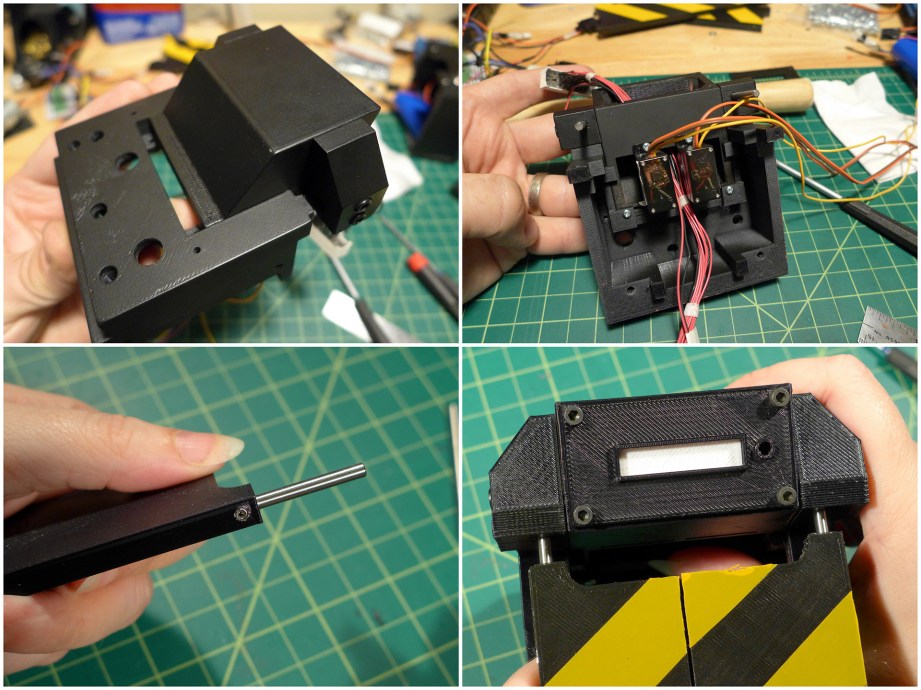
I knew that this setup would need adjustments made once assembled and I wanted to be able to get to the mechanism relatively easily. The entire door mechanism can be assembled in just the top portion of the front unit. It then slots into the bottom and the wings lock onto posts. We tested the mechanism using tape on the axles to represent the doors, so we wouldn’t break anything while working out the bugs. The only real bump we ran into was the doors would sometimes hit each other when closing. Because they are keyed to each other, every once in awhile the timing would be just right and they would hit against each other or even jam. Through the Arduino code Jeremy could not only control what angle the doors open to but the timing as well, so he put a slight delay on the top door closing – problem fixed.
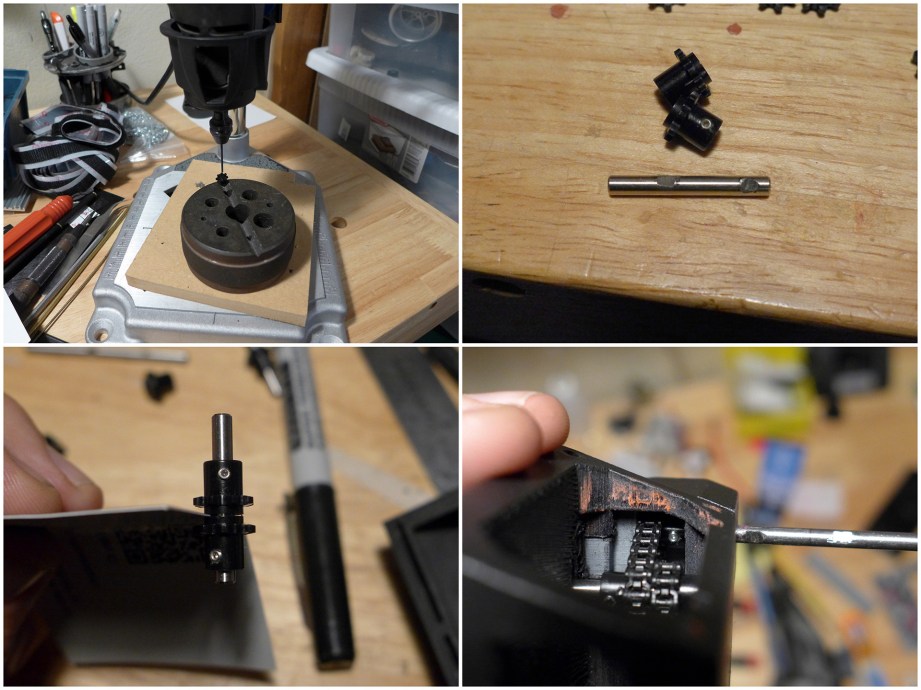
The door mechanism was working great so I proceeded with the final assembly of the Trap but ran into problems. After the Trap was triggered multiple times, the doors started slipping and would lose their correct position. There were already set screws holding the doors to the axles, so it had to be the gears slipping. The sprockets that I used were press-fit style paired with precision shafts and required a fair amount of force to get on. But over time the torque from the chain mechanism was making them slip, thus causing the problem. My initial thought was to glue the sprockets in place but this presented two problems – first, this would prevent any further adjustments and second, the manner in which the mechanism went together would spread glue to where I didn’t want it, causing moving parts to be glued together. The solution was to disassemble everything and use tiny set screws on each gear. Dremel had sent me a rotary tool workstation that I was able to use as a mini drill press to make the set screw holes on the tiny gears. I also had to grind flats on all the shafts for the set screws – kind of tedious, but in the end it allowed for adjustment of the mechanism and it didn’t slip at all.
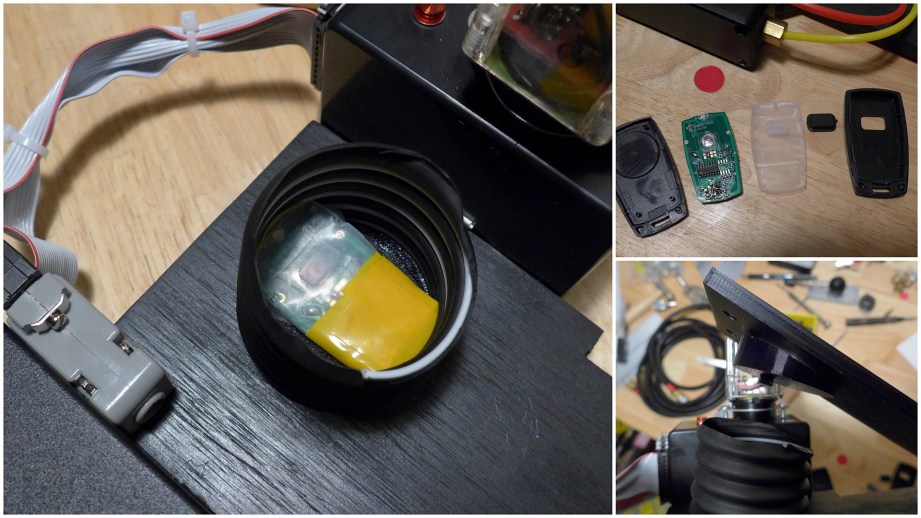
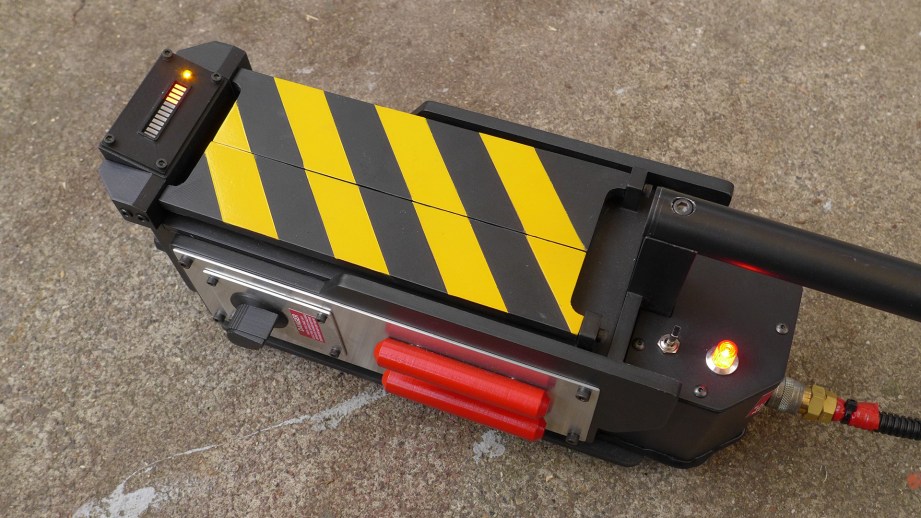
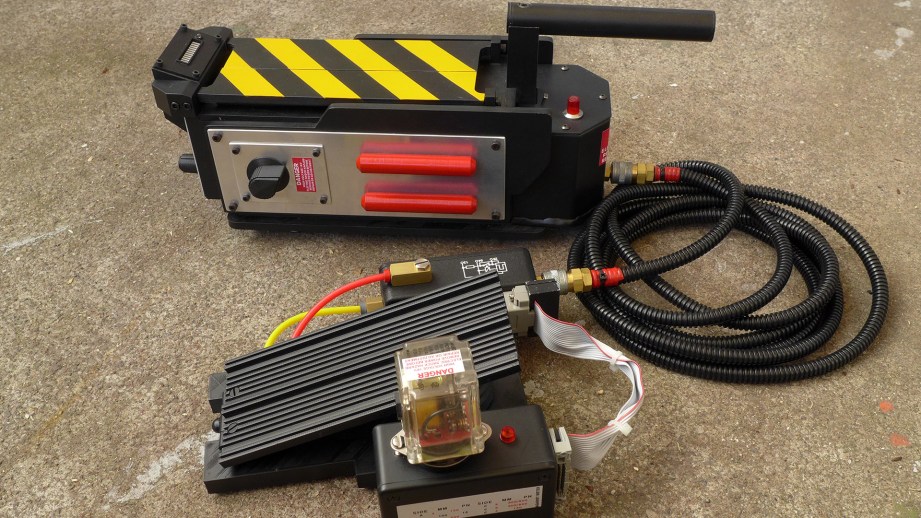
Late in the game Jeremy and I ran into a big problem involving triggering the trap from the pedal. The movie trap is connected to the activation pedal via a hose which uses real pneumatic connectors. The male end on the trap and pedal is simply an open, brass nozzle and the female couplers on the hose have a spring loaded plunger inside to seal the hose when disconnected. This makes it impossible to run wire down the hose and still allow you to disconnect it from the trap and pedal. Our solution was to use an RF transmitter in the pedal to wirelessly trigger the trap – seemed like a good plan. However, when it came time to implement this setup we discovered that the RF hardware was not very reliable and tended to have terrible range. A few of the receiver boards even spontaneously fried themselves.
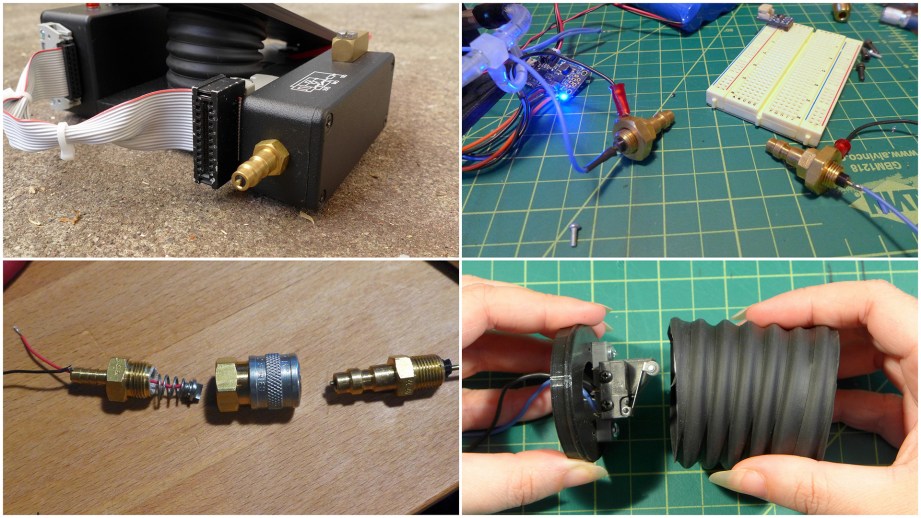
My eventual solution was to 3D print an insert for the male connector which held a brass rod and turned it into a 2 contact connector. By taking the female connector apart I was able to solder a wire to the plunger which luckily sat in a rubber ring that insulated it from the body. When the male connector was plugged in, the brass rod made connection with the plunger and the connector bodies made the second connection. A microswitch was added to the pedal bellows and we had a working hardwired setup. It has been suggested to me that we should have used an air pressure sensor or even fiber optics and that would be really cool, but we were running out of time and the electronics were already over budget so we went with this solution. Knowing that others would be building their own kits I also wanted to keep it as simple as possible and in the end it worked fine.

At this point we had accomplished all the must-haves for the trap so it was time to see what we could do off the dream list. While building everything else I had been researching how to make the trap smoke. I wanted it to be substantial, repeatable, self-contained and easily refillable. My initial thought was to a smoke unit made for model trains. These turned out to be bigger than I expected, expensive, and many needed to be held upright at all times. I briefly considered some type of dry ice setup, but if you wanted to show off your trap on the spur of the moment, like a dinner party or say, a date, it wasn’t practical. I found something called the Wizard Stick – a toy for generating smoke – it was not magical. At this point I was thinking about e-cigarettes and discovered that others have used them for props – but I couldn’t find documentation on how to do it. I even bought a professional magic DVD that showed how to generate mysterious smoke on command – yep, e-cigarettes, but the setup wasn’t practical for the trap. This is when I went down the vaping rabbit hole and watched a lot of terrible YouTube videos to learn all about the different kinds of vaping units and fluids or ‘juice’. Did you know that there is extreme vaping called Cloud Chasing where complex vaping units are built so you can blow dragon-like clouds? There are competitions.
Here’s the takeaway from my research. You have the lower end of e-cigarettes that tend to look like cigarettes and are pressure activated, so when you inhale, they automatically heat up and vaporize the fluid. They have limited capacity and tend to use pre-loaded cartridges that have different flavors and nicotine content. I didn’t want any of that for the trap. The higher-end vaping units have better atomizers which heat and vaporize the fluid and use tanks that can be refilled with vape juice. These tend to be a lot more expensive and you typically need to hold down a button to heat and vaporize the fluid before inhaling. Since the fancy units tended to be bigger and had the further complication of having an activation button, I decided to use the pressure activated models. The cheap ones that I bought were fine for proof-of-concept but they simply didn’t put out enough smoke and tended to come in flavored, non-refillable cartridges. I finally found a mid-range model that was small, pressure activated AND had refillable tanks.
Further research revealed that to really make dense smoke you want to use vegetable glycerin. The final puzzle piece was finding the right air pump. The prop e-cig setups (and the magic trick DVD) typically used a setup where an air pump or blower bulb (like for cleaning cameras) was used to basically blow on the cigarette backwards. Rather than inhale on the correct end, these setups would blow on the ‘wrong’ end which still activated the atomizer and blew out some smoke. This didn’t make any sense to me – why not suck on the e-cig like normal? I think the reason is air pumps that have an outlet and inlet are harder to find. I could find tons that had an outlet to blow air out, but there was no real inlet, the pump just sucked air through small holes, the frame, etc.
After much eBaying I finally found a small air pump with legit in and out hookup for hoses. I simply hooked the e-cigs up to the inlet and the outlet went to the 3D printed pipe inside the top plate. I used two e-cigs to generate more smoke in a short time and to keep them from overheating. It works great and I can typically shoot the trap off 8 or more times before needing a refill or recharge. The Arduino code can be tweaked for how long the smoke runs and to turn it on when the trap is closed. I have had a lot of questions concerning the smoke unit, it’s a pretty simple list – Joyetech e-Roll Starter Kit which had 2 e-cigs, 3 tanks and a charger, a 6V air pump with inlet and outlet – no specific model number, just search eBay, vegetable glycerin and matching hose.
There were of course more items on the wish list such as vibration and ghost noises, but we started running out of time and space. We’ll be releasing the Arduino code at a later date and it will be fun to see what fans do with it. There’s so much more that could be done – an accelerometer inside so the trap growls and shakes when moved. Air or light activation via the hose. Motorized trap. Jumping trap. The list goes on. Download and print your own trap and see what you can do with it.
Once again, thanks to Dremel and their 3D Idea Builder for making this project possible!
Download and print your own Ghost Trap and Pedal here.
Get hardware and deluxe upgrade parts for your trap at Charlesworth Dynamics.
Read about the 3D design and assembly of the trap here.
Watch Norm and I demo and discuss the Ghost Trap.
Watch Jeremy Williams and I discuss Trap electronics.
Episode 346 – April Foolish – 4/7/16

Norm, Jeremy, and Will meet up this week to discuss the new Star Wars Rogue One trailer, pooly-implemented April fools gags, a new 3D printing technology, and Tesla’s Model 3 pre-orders. Plus, with the the release of the HTC Vive, we share our thoughts on the hardware and learn about Will’s new VR show!