


This week, Adam, Norm, and Will discuss home repairs, and why it’s so darn difficult to get them done. Well, we eventually get around to that. We discuss Nick Nolte, the connection between Rocky and Bladerunner, while Will makes a series of startling revelations.
Episode 194 – A Very Special Episode of TIOaT – 11/21/2013

This week, Will and Norm are joined by Gary Whitta and Jeff Green. They discuss the Playstation 4, the last week of pre-Xbox One news, the rise of videogame streaming, the iPad Mini w/ Retina’s display problems, Jeff’s colonoscopy, and Oxford Dictionary’s word of the year. All that, and a lot more nonsense on this week’s show.
The Talking Room: Adam Savage Interviews Vince Gilligan
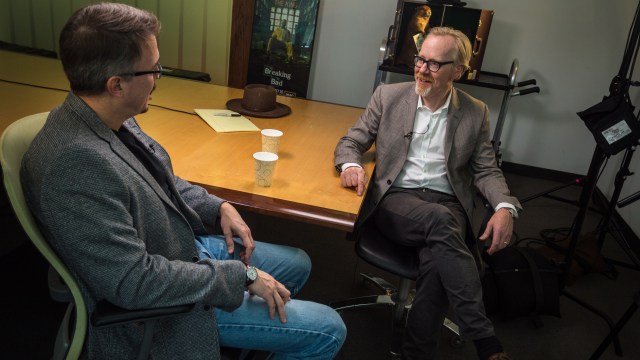
Vince Gilligan is a writer, director, and the creator of Breaking Bad. He was a writer and producer on X-Files, and co-created its spinoff, The Lone Gunmen. Join Adam Savage for a conversation with Vince Gilligan, as they discuss the writing in Breaking Bad, the process of running a hit show, and stories from the writers’ room.
The Zoidberg Project, Part 3: Making a Mold Jacket and Eye Blanks
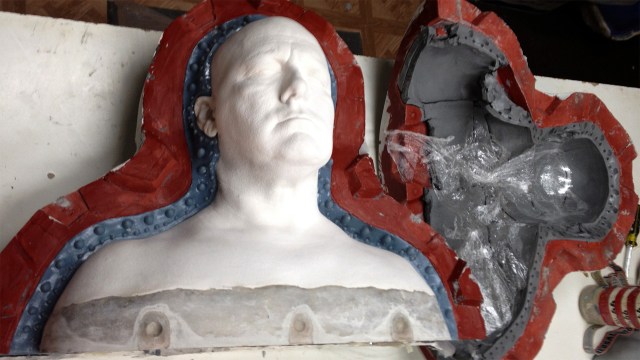
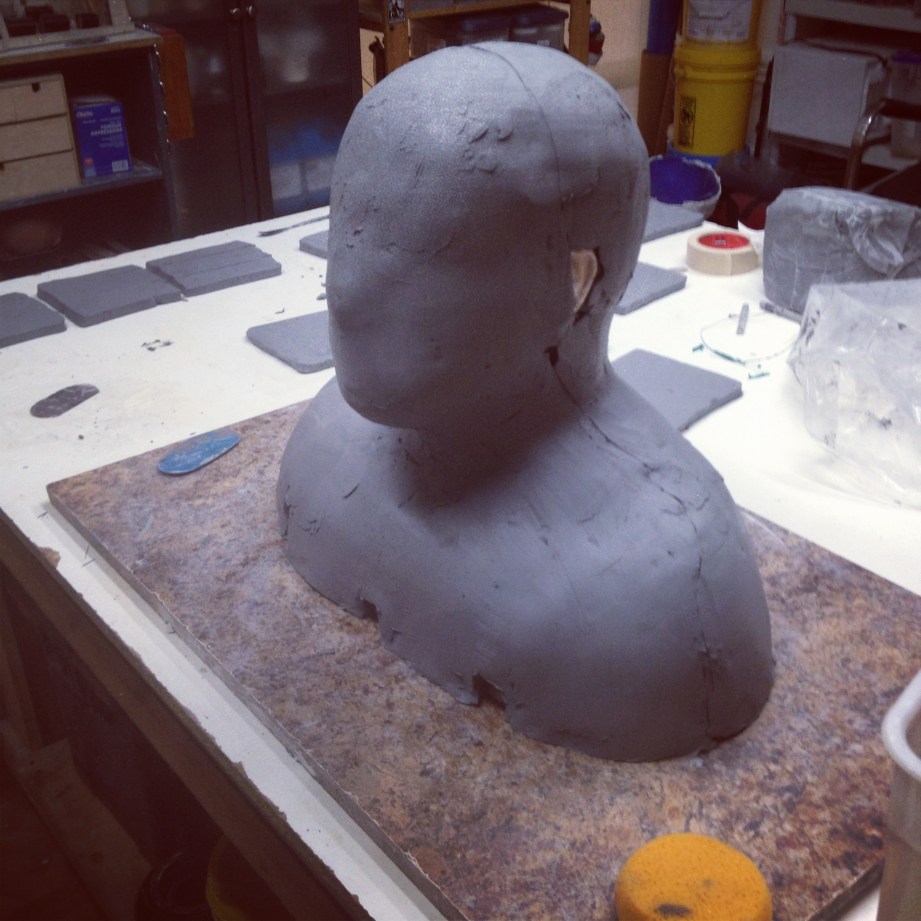
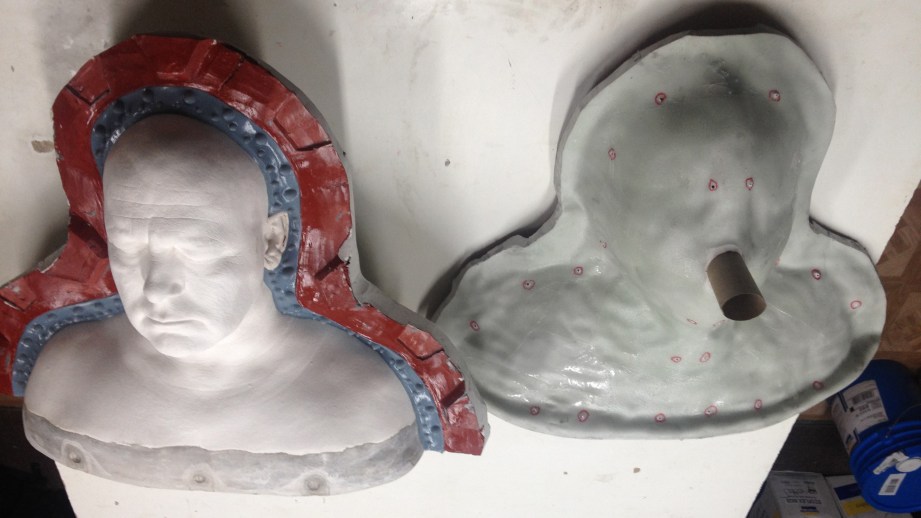
The head cast I wrote about making last time is only the first step in making a core to sculpt on for The Zoidberg Project. While there is a way to cast a proper, useable core straight out of the Body Double mold, I want to make some alterations and have a longer-lasting master mold for future use.
Out of the Body Double life cast mold we discussed last time, I pull a hydrocal casting. There are two kinds of plaster stone that we primarily use in the effects industry for casting: Hydrocal and Ultracal. They differ in their dry hardness. Hydrocal is a bit more porous and fragile, but can be cast quickly for “waste” molds, while Ultracal is stronger and can be used for molds that need to be baked or repeatedly used. Hydrocal my choice for casting this first copy of the head because I can do it in one batch very quickly.
To make this first Body Double cast, I fill the mold at the ears first, one at a time while the life cast is on its side, so that I won’t get any air bubbles in that delicate area. Then once those are set up I’ll brush a layer of plaster throughout the entire mold and scrub it into the details, and then continue adding plaster until the cast has a decent thickness (about 1/2″ thick).
Next, I’ll prop this first cast up a little higher with wood blocks to build out a sturdier base. In making the Body Double mold, I only cast my model to just below the shoulders, but will need more of a base in future casts for sturdiness. To make this base, I simply spatualate some Ultracal below the cast to build a quick-hardened surface. I’m using Ultracal here because I have a little more work time to refine the surface and make it smooth.
Once that’s all set, I’ll need to make a silicone jacket mold, also known as a case mold. I want to make a new mold so that it will be easier to cast parts and make multiples. Because i know that I’ll be using this a lot in the future and for this project, I want a more long-term and durable mold. The Body Double mold that we made directly from the life cast is great for a few castings, but after a while, it will be more prone to ripping and wear-and-tear. I have some Body Double molds that have had dozens of castings out of them and are still fine, but I really just want this mold to be made a certain way for future steps. You can make a jacket mold a few different ways, but I know I’ll end up pulling multiple castings of this head, so I want a mold that will last a long time, so the following guide is my preference for making one. (The other way is to do a brush-up, which is a process that I will do later in the project and explain then).
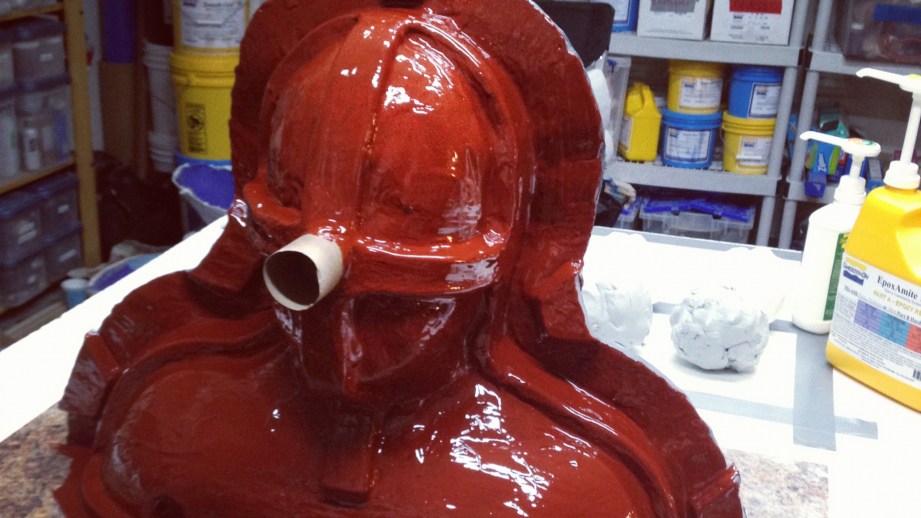
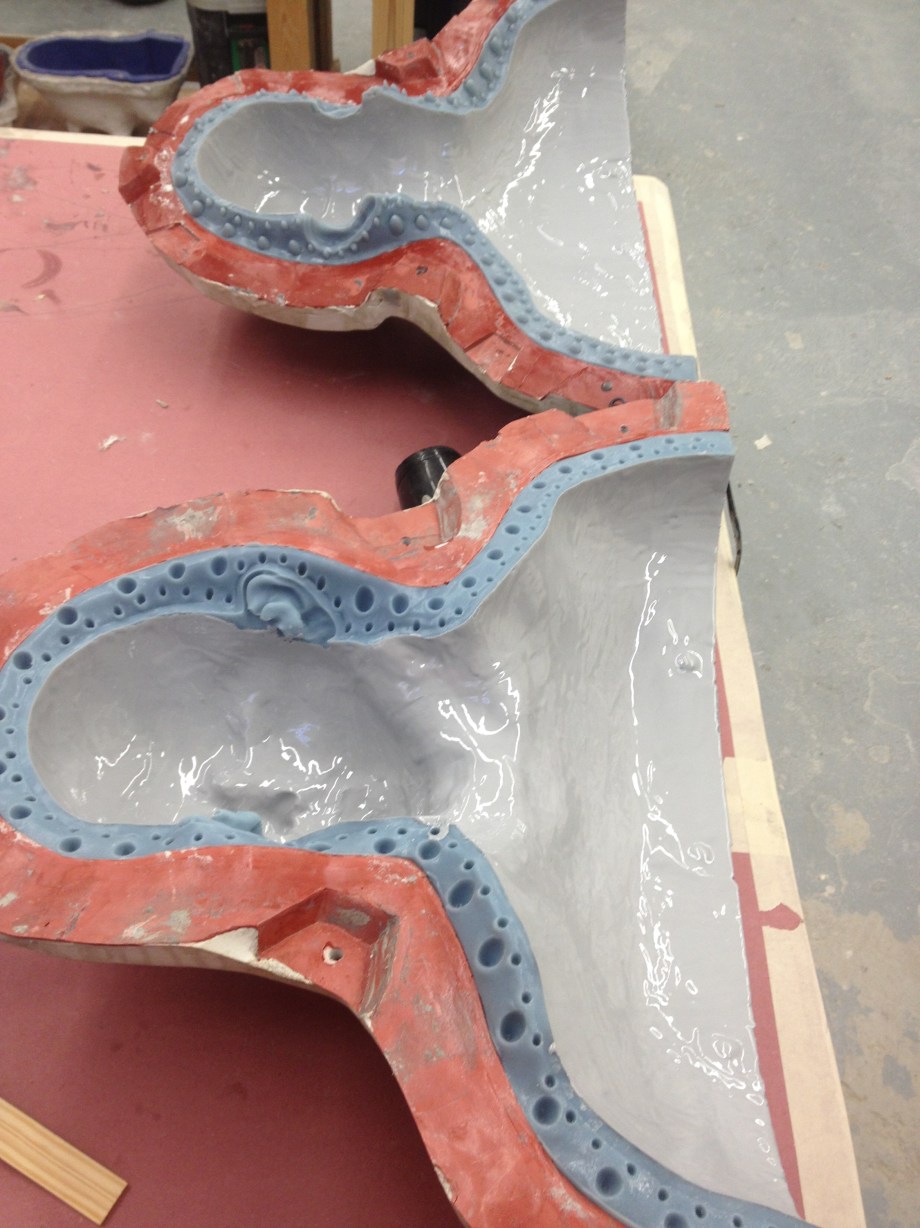
Making a jacket mold is a lot of making the life cast, but using a static head instead of a living model. We’re able to spend more time making this jacket and use longer-lasting materials. For this type of mold, I want a layer of silicone all around the head, which is then engulfed by a rigid epoxy jacket to hold it in shape. As a first step, I’ll wrap the head in plastic wrap (to ease cleanup) and put a half-inch layer of water coat white clay (Laguna EM210) all over the head.
Then I’ll lay a couple bars of clay about one inch wide (still half-inch thick) along the edge of the head. This is where I’ll separate the front and back of the jacket mold. I’ll lay another bar of clay going from ear to ear across the front of the face, and another from the forehead over the nose and down to the center of the chest. These bars will help the silicone register into the epoxy jacket.
There are a bunch of different configurations of registration that I have seen people use, and after you do a few of these molds, you’ll develop an opinion about what you like, and what each mold requires. I also take an empty paper towel roll and put it where the two sets of registration meet in the middle of the face. This will be for the pour spout later on. The same configuration is done for the back of the head, too. I’ll use a few coats of Crystal Clear Acrylic spray to seal this whole thing and when it’s dry, I can lay up a dividing wall to separate the front and back halves. This is done by putting a wall of the same clay along the center of the head. I’ll also add a couple trapezoid registration keys to this, and Crystal Clear the whole thing again.
To start on the jacket, I need to use another release over the Crystal Clear–a couple coats of Freecote Lifft or Mann Ease Release 400, then brush on a layer of Smooth-On Epoxacote Surface Epoxy coating (red or grey, itdoesn’t matter). Now here is where I’m going to cut some corners, because I know I can. Normally to make an epoxy mold, you want to include glass cloth reinforcement, but this mold isn’t going to necessarily need it. (It doesn’t hurt to have it, I just know I can move along faster and skip the step).
I’ll go ahead and press in about ¾-inch thick layer of Freeform Air Epoxy Putty. This is an easy-to-use 1-1 dough, meaning you combine two equal parts of the mixture to create your final material. I’ll pre-measure out about four or five softball-sized balls of each component and set them aside, then I knead the batches together until they’re a consistent material. To help with adhesion to the jacket, I brush on a coat of Epoxamite 102 (medium set) over the surface coat. Then, I pinch off a handful of the dough and press it out between my hands to about the thickness that I want and press it into the surface coat. (I’ll cover the epoxy dough more thoroughly in upcoming mold tutorials). And just because I want a nicer looking finish to my mold, I’ll take one big sheet of 10oz Fiberglass cloth and lay it on top and tap in a layer of Epoxamite 101 (the fast set).
Once the front side is done, you can pull off the clay separating wall, give it a couple coats of the release spray (lift or 400) and repeat the same process on the back.

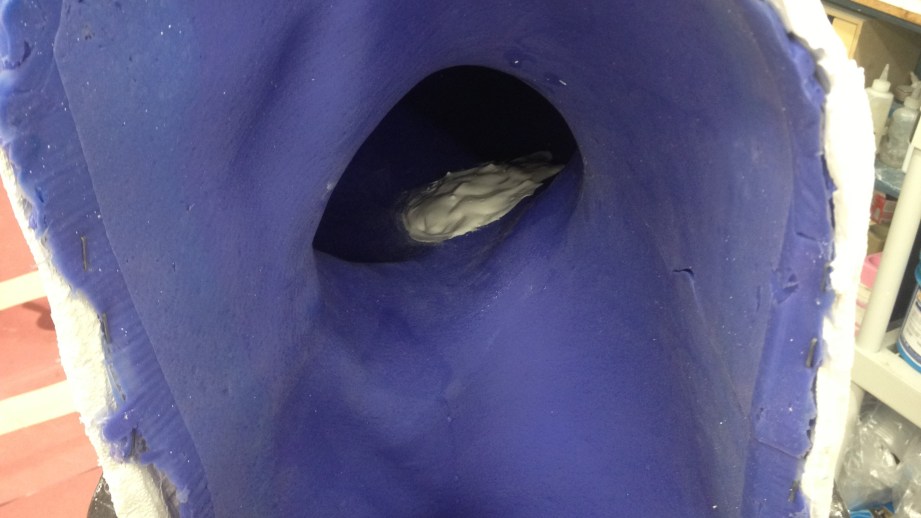
You can use a belt sander or reciprocating saw to clean up the edges of the mold. With the mold on its back or front, gently and evenly pry it open, leaving the head cast still in one of the sides. Clean the clay out of the empty side to create a void between the head and case that will be filled with silicone. Then fix the clay in the remaining side so it has a nice surface and some registration points. I usually do a row of small dots to help the edge of the silicone line up, then a row of larger shapes to help with more general registration (you can see this registration better in the picture below).
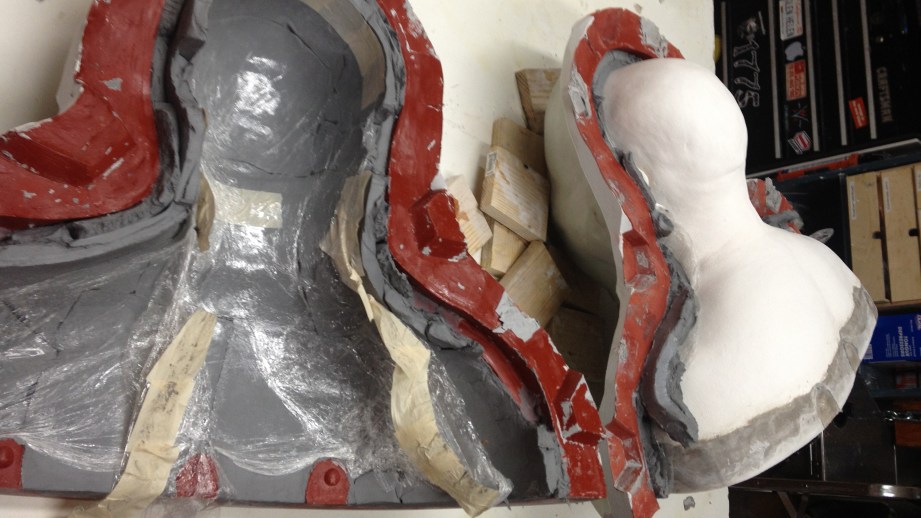
You will want to drill some bleeder holes in the case, to help air escape from the mold as it fills.
The hard shell of the jacket is now done, but it still needs a silicone interior so you can use it for casting. So now it’s time to add that. Spray a coat of Crystal Clear into the jacket, strap this all together and pour in the silicone! I made this mold about a year ago, so I’m trying to remember which silicone I used. I think it was Dragonskin30 with a little bit of pigment in it. For a cheaper option, Moldmax 30 works just fine too.
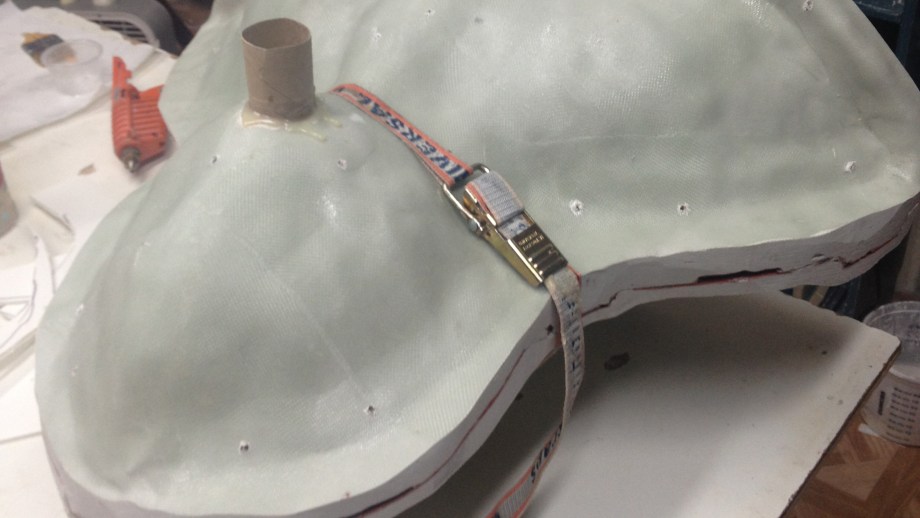
Once one side is all set, flip it over and remove the other side, clean it off, spray some more Crystal Clear, and poor the silicone in.
When that silicone is all set, you can pop it all open and pull the plaster out, and give it a wipe-down with some alcohol to clean off any residual Crystal Clear.
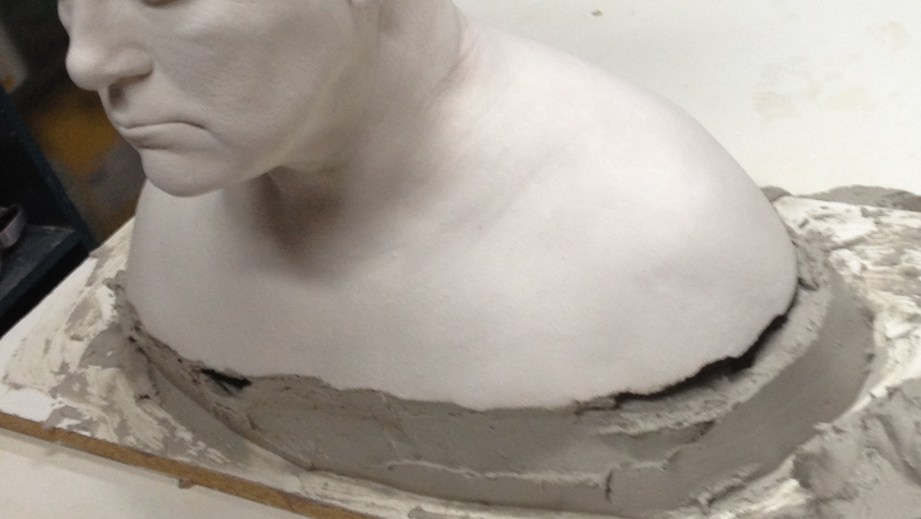
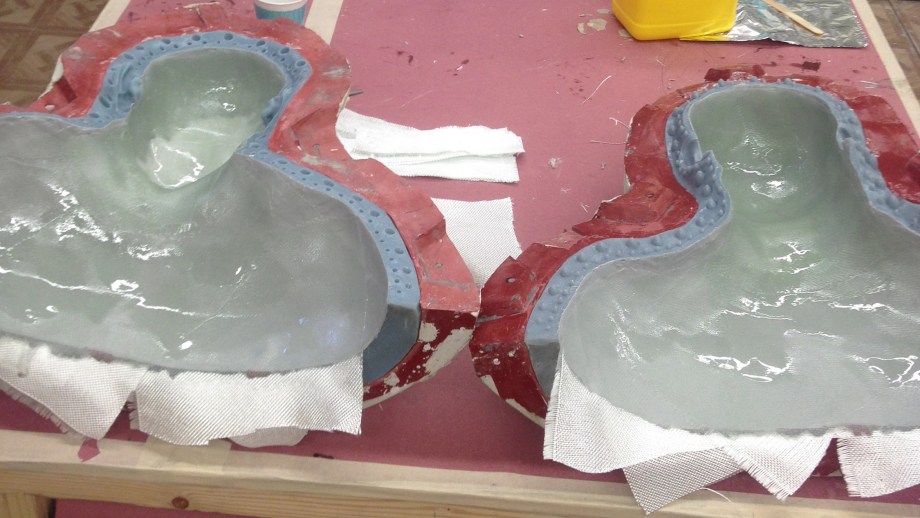
Now we can finally create a cast with the epoxy core to sculpt Zoidberg’s head on. Here’s how we’re going to do that with the mold jacket I just created. With the mold open and clean, spray a few cotes of release (lift or 400) inside (this merely helps the mold last longer). Just as before, brush in a layer of Epoxacote Grey and let it sit for about 45 minutes. For this cast, I’ll do a second coat of Epoxacote as soon as the first coat sets long enough to leave a fingerprint impression, but not stick to my finger.
Because this will be the primary core for the molds, I want it to be as strong and durable as possible. I’ll then laminate five layers of 10z Fiberglass cloth in with Epoxamite 102. I do this part with the molds open, and take care not to go over the edge–as a matter of fact, I go just a little shy of the edge where the molds will line up. I will let the glass overlap on the open bottom, though. After I apply the first three layers of cloth, I pack in some Freeform Air, then finish it off with the remaining two layers. This creates a sandwich construction and will be really strong. I’m not sure if I will be bolting the face into the mold, so that’s why I give the extra reinforcement in the face.
Once it has mostly set, I’ll close the mold and brush in a coat of Epocacote Grey into the seam, and back it with another five layers of glass cloth. Also, I add a little dough to this bottom area just like I did with the face. This just gives a little extra rigidity to this open end. When it’s all set up, I pop it open and trim the bottom with a sawmill or belt sander. Phiew—done!
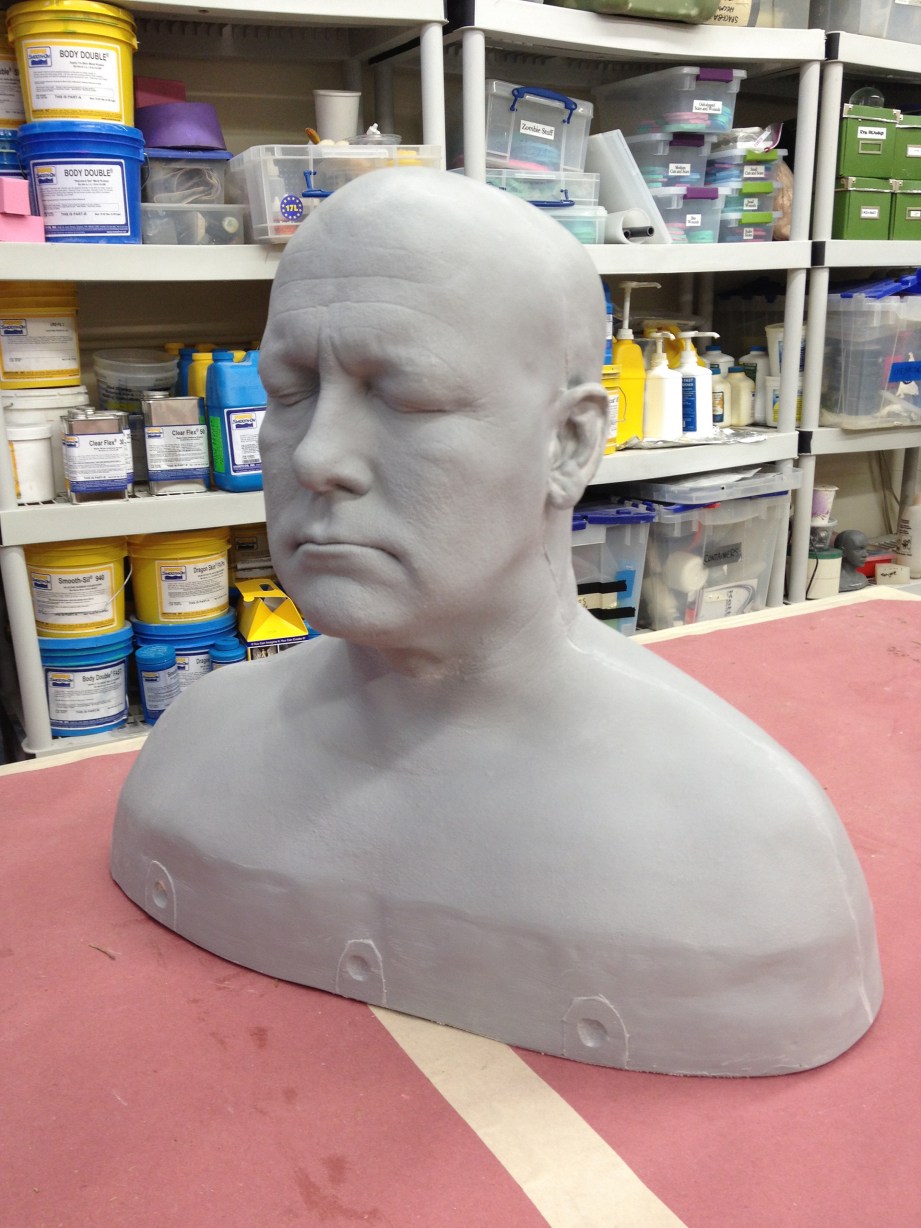
At this point I’m almost ready to start sculpting. But I still need eye forms for Zoidberg. While I’ll be sculpting the Zoidberg mask out of clay, the spherical eyes will be a separate material, for which I need temporary forms to sculpt around. Remember that with the Ackbar mask I made for Adam, I used book magnifiers as the eye forms. Zoidberg’s eyes will have to be different. I want my mold to have a tight fit around the eyes, so I want to make forms that can be bolted into the mold. I have two different sizes to test out in the sculpture, so I’ll mold and prep them both, just in case. I got two different sized acrylic half domes that reflect a scaled-up size from the small Zoidberg maquettes that I sculpted, and dumped some Moldmax 30 on them.
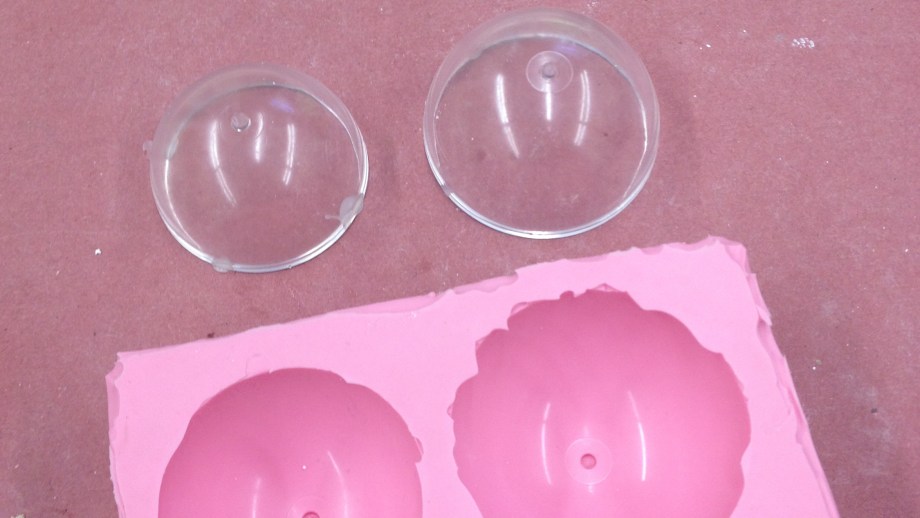
For these eye forms, I want to use a resin that will withstand baking for the foam latex step, so I use Smooth Cast 380. It settles out a bit, so I have two jiffy mixers (one for each component to avoid contamination). I mix parts A and B together, pull the new form out, and chuck the form in a lathe to drill and tap it for a bolt that can be used in the final mold.

All of these steps and re-molding and particular ways I cast things up will make sense in the long run. I was taught long ago by two of tmy favorite lab-techs in LA (Roland Blancaflor and Rob Freitas) that you have to think ahead to the next steps and make sure that you aren’t making the job more complicated for yourself (or someone else) in the future. Making good cores and good molds and doing clean lab work just makes it easier to do castings and get good parts. Stay thirsty, my friends. Next time, my hands get dirty with some sculpting.
Thanks to Iwata-Medea and Smooth-On for providing materials and sponsoring this project.
Travelling Like a Rock Star – 11/19/2013

Astronaut Chris Hadfield on Why We Need a Space Program
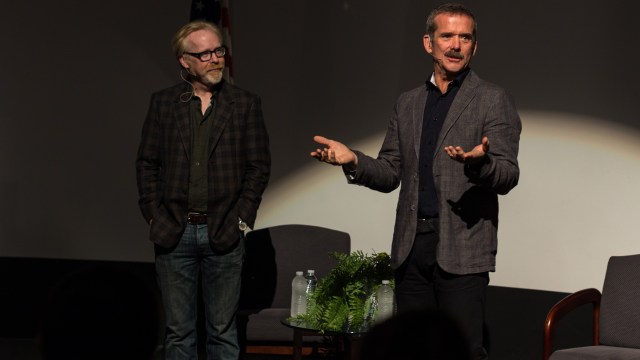
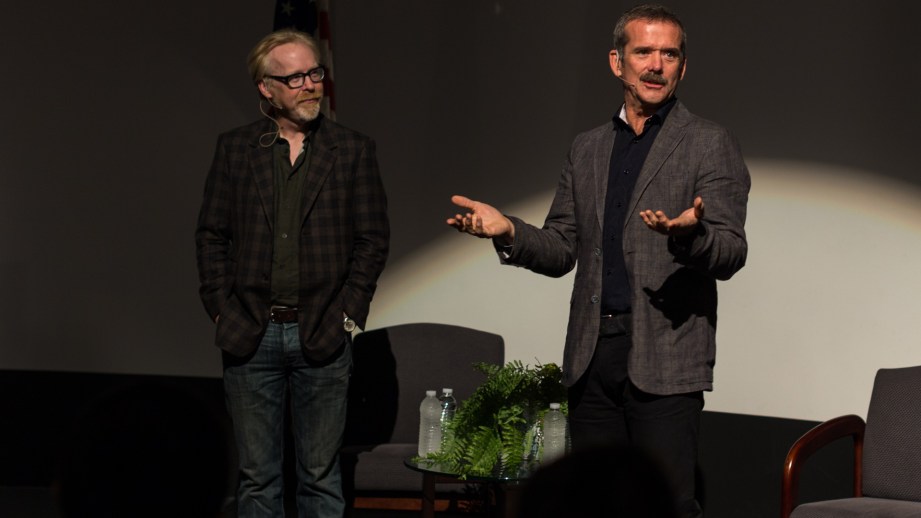
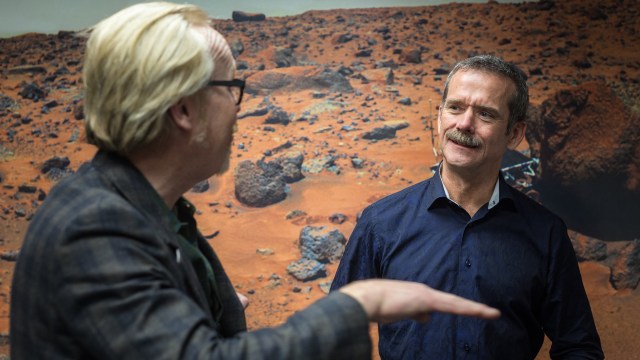
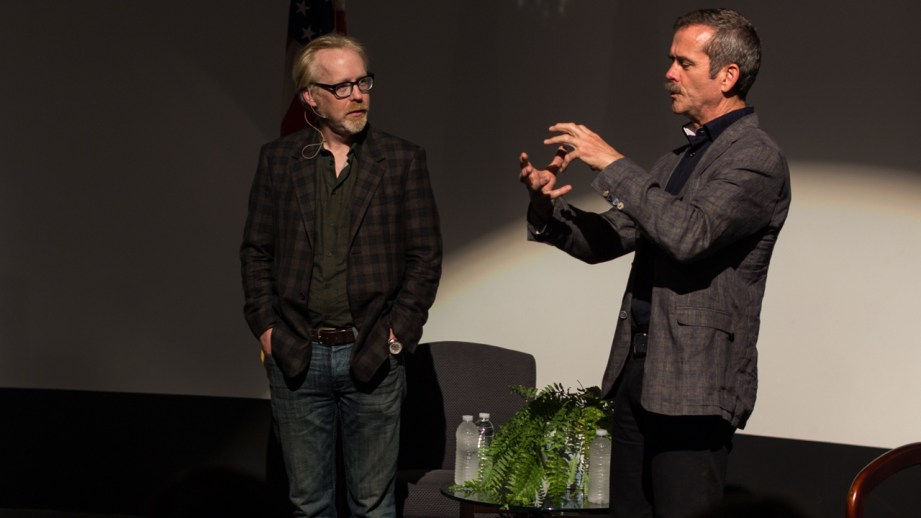
After the audience Q&A, Adam finished his conversation with retired-astronaut Chris Hadfield by asking an important question: “Why do we need a space program?” This is the reasoning Colonel Hadfield gave, an explanation we should also remember and a message we are all deputized to spread:
“If anybody asks, or if you’re just thinking about it in your own mind. It’s a question you ought to ask all the time. ‘Why do we spend money on space exploration.’ It’s a valid question. You ought to ask it. We’re not spending our own money, we’re spending the money of the whole country. We’re spending someone else’s money. So why is it worthwhile? I’ve asked myself that right from the beginning. I don’t want to waste other people’s money just so I can go for a ride. As much fun as it is, that’s not the point.
So, number one. The direct benefit. What did we learn from doing it? There’s understanding the Earth itself. All the ways we observe our planet, though the observatories that we’ve built, through the long-term looking of the changes of the atmosphere–the changes in the surface, measuring the temperature. All of the satellites that we’ve launched, whether unmanned, launched from the Shuttle, or things that are on the outside of space station. We have 200 experiments running inside–that teach us about things like fundamental fluid physics and how flame propagates.
We invented a box about this big that is a flow cytometer that you can do blood analysis in a machine in ten minutes. It’s called Microflow. We recognize the need on the space station for it, and brought the right people together to build it. Because when you have the common enemy of complexity and cost, you bring together people who would never talk to each other otherwise. So that box is being tested in Canada, with experiments being done in Ghana right now. There’s a whole suite of direct applications that come back. That’s one.
Two, is that it’s absolutely fundamental to our nature. Right from the earliest of history. The only reason that there are people in North America is that each successive generation has taken the best of their technology and carried it as far as they could go. And 30,000 years ago, people starting coming to this continent, and pushing us [forward]. Every dissatisfied teenager is an emissary for taking the best of technology and seeing what’s over the next hill. And as we invented the next level–canoes, sailboats, and watches so we could figure out longitude. As we invented steamboats and locomotives and airplanes and spaceships, we have always taken the very best of our technology to take us as far as we could go, so that we could better understand the universe around us.
“You have to provide your children with a challenge that is right on the edge of impossible.”
And that’s cultural. That’s how we understand everything that goes on. That’s fundamental. That’s not going to be denied just because it’s expensive. It’s going to happen. It’s a repeated historic artifact of who we are. So space travel is the direct result of that need.
But the third reason is inspirational. You have to provide your children with a challenge that is right on the edge of impossible in order for a nation and a culture to grow. And it hugely inspired me, back in 1969, when I saw the guys walk on the moon. If you look at PhDs per capita, this country has never inspired more people to pursue higher education than we did as direct result of the Apollo program. Because we challenged people to do something really new.
Last week, I was in New York, and I visited Tumblr. And Tumblr is an amazing social media capability. And it’s a 27-year-old who thought of it and runs the whole thing. It’s recently capitalized, and created a tremendous amount of wealth. It’s brought in all of these brains, that are working together in a really interesting and creative environment. None of those people are astronauts. None of them are in the space program, but they are fascinated and inspired by the space program. And a large reason for doing what they want to do is because of the inspiration that comes from a nation that has space exploration as part of what it does.
To me, those are the three great pillars of why we explore space and why we’re always going to.”
And that’s it from Adam’s conversation with Chris Hadfield last week! In case you missed the previous segments, here they are:
Astronaut Chris Hadfield on The Value of Social Media
Colonel Chris Hadfield wasn’t the first astronaut to tweet from space, but his engagement with fans and the people who followed him on social media was unprecedented. One attendee at his conversation with Adam last week at NASA Ames asked how he felt about the reception of his social media presence, and whether that kind of interaction was planned from the start. His response is transcribed below.

“Social media is a really interesting new invention. It’s not just what it seems to be. It is kind of a changer of behavior and human communication. I’m really impressed with it. And the word that is important is ‘social.’ The big difference for me is this. A lot of media is a broadcast. ‘This is our product, this is what we’ve done, and we are now sending it to you.’ Like all of the news you watch on television, all of the advertisements. All of the media that exists is a prepared message that is broadcast at you.
The wonder of social media, when it’s used properly, is that it is an invitation to come aboard into my world. If you want. And that’s a real difference. And at first I had no interest in social media. Even Twitter–I thought ‘what a stupid name.’ Twitter sounds like two eleven year olds talking to each other–why would I have anything to do with that? But the first time I used it was when I was living at the bottom of the ocean. And they said, ‘we want you to tweet.’ And as commander of that mission, I explained to everybody [at the Aquarious underwater laboratory] what it was supposed to be.
I watched–and the beauty of it was–the guys who would never ever tell you a cool thing they had seen, or a transient emotion they had, or some insight that had occurred to them, suddenly had an outlet with which to share those things. Not only with the whole world, but with the members of the crew. And as the commander, I would go through and read what the guys had tweeted during the day and be delighted! It was like they had invited me into their emotions, thoughts, and observations that they would never have, otherwise. So then I thought ‘ah, I understand this. This is really interesting.” This is a whole different way to share something personal and honest at an almost effortless and instantaneous level. I was converted, then.
So I recognized, once I got to orbit, that this was going to be a terrific way–so long as we had connectivity–to be able to share the experience. I wanted to do it on my first and second spaceflights, but we just didn’t have the technology yet. And I still didn’t know this last time. So I went to my son Evan who had just finished his MBA and I made a deal with him. I said ‘I’m going to send you an email and a picture, and can you please tweet it for me because I don’t know what the connectivity will be.’ But it turned out we did have good connectivity most of the time, enough bandwidth so I could log in from the space station.
“It allowed not only me, but other crew members, to honestly share the human experience with anybody in the world who wanted to come on board.”
It allowed not only me, but other crew members, to honestly share the human experience with anybody in the world who wanted to come on board and see what was happening. And that is what really works with social media. A lot of people treat social media as another extension of a bullhorn. ‘Hey, look at me now. Hey, buy my soap.’ And that’s not how it is successful. Social media is a way to honestly show what is interesting and intriguing to you and let people look at it if they want to. And it spoke for itself.
I was delighted and amazed by the number of people who came on board with us, who wanted to see it. Evan sent me a note, a couple months into it, and said ‘Hey dad, ask people what they want a picture of.’ And hundreds of thousands of people from around the world said ‘I want a picture of my home town.’ Because, number one, I love it. It’s where I’m from. But more importantly these people wanted to see how how their home towns fits into the context of the rest of the world. And I was in the position to show them that. And for me, that was hugely unifying. These people were connected, on board, so I could take pictures of every home town that I could manage while I was up there. I took about 45 thousand pictures in the time I was up there. So people could get a better global perspective of how they fit in. Social media allowed that.”
Of course, you can find Colonel Chris Hadfield on social media at @cmdr_hadfield and Facebook.
Episode 193 – But Wait… – 11/14/2013

This week, Will and Norm are joined by Loyd Case and Jeremy Williams to discuss the iPad Mini’s stealth launch, the imminent launch of the Playstation 4, the nature of the word review, Yahoo’s domain name sale, and Avegant’s new retinal projector display. All that, plus hands on with the iPad Mini w/Retina, the Nexus 5, and Loyd’s camera changeover.
Astronaut Chris Hadfield on Next Steps for Space Exploration

In his conversation with retired astronaut Chris Hadfield for the Bay Area Science Festival last week, Adam turned the microphone to the audience at NASA Ames to let attendees ask the Colonel some questions. A Google employee referenced Google X’s moonshot division and asked Hadfield what he thought the next moonshots in space exploration should be. Was it reaching Mars, or doing something with media in space? Here was Hadfield’s response:
“I look back in history when I try to predict the future or talk about where we’re going next. There are really good historical examples of how we explore. We almost invariable send out a probe–I look back at my family’s history and in 1826 my family in southern Scotland sent out a probe. And the probe was their 19 year old son, and his job was to go to a new place, have a look at whether it was habitable or not, what really existed there, and come back, report on it, and see if that’s a place the family should go or not.
And [my ancestor] went to Montreal. He crossed the Atlantic, spending 70 days on a ship. People were dying all over the ship. It was a really rough crossing. They got to North America and he saw there was opportunity, got through all the problems, came back, and his family decided to come across and settle in the new place based on the conditions the ‘probe’ had reported back.
A hundred years later, we started sending probes to Antarctica. And you would read about the people who died on that trip; the people who got trapped in the ice. But then technology came along and it became easier–you could fly down to the South Pole in a day. You could maybe live in Antarctica in the warm areas year-round. And then you could eventually live at the South Pole year-round. It started with probes, but then we started staying longer and longer, until now, almost a hundred people live in the South Pole year-round.
We’re now a hundred years past that and 13 years ago this month we left Earth. And the first crew–Expedition 1–representing the best of 15 leading nations of the world stopped living on the planet. Started living away from the Earth [on the International Space Station]. And that’s the result of the probes that we had been sending 40 years prior. We’re just starting to sail within sight of land, only 250 miles up. But we are now figuring out all of those things we need to learn to permanently live away from the planet. There’s a lot of stuff we didn’t get right–I still have some osteoporosis in my body because our exercise equipment isn’t advanced enough yet. And I had to fixed the toilet, gosh, I don’t know how many times. We need a closed loop system before we can go further. We can’t constantly bring water on the way to Mars. We need a perfectly closed-loop system and we’re figuring out how to get that to work.
But we’ve sent a lot of probes to each planet in the Solar System, basically. We’ve got something driving around on the surface of Mars, we’re orbiting Mercury, we’ve got something on its way to Pluto right now. We’ve sent a lot of probes, including one successfully from here [NASA Ames] to the Moon. And we’ve even sent people to the Moon, as probes.
“To me, obviously what’s going to happen is once we’ve learned enough on the space station, we’ll go back to the Moon.”
So, to me, obviously what’s going to happen is once we’ve learned enough on the space station, we’ll go back to the Moon. It’s obvious. It’s 3 days away. We’re not going to ignore the Moon and launch a hairbrained one-off adventure–at least not anything more than a probe–to anywhere else in the solar system. It just doesn’t make sense. We need to learn so much on the Moon. We need to learn power generation. We need to learn resource usage and management. We need to learn navigation. We need to learn closed-loop environmental systems. We need to learn surface dust. We don’t know much about the Moon, really. We’ve never really lived there. We just sent a few probes. So we have a whole generation of learning to do, including engines to take us further. There’s a great place on the Moon to vacuum test engines, ion engines, or whatever we come up with. I think the natural progression is from low-Earth orbit to the Moon–learn a lot of stuff there–and from there we’ll be able to go further.
One of the great probes in history was Columbus going across the Atlantic. He couldn’t get funding. He had to get an international crew and international funding. And it was kind of one-off. And he didn’t settle in North America. He didn’t do all the things to make it habitable. He just showed the way. The International Space Station would have never survived if it hadn’t been an international [effort]. If fact, if you look back, we never would have gone to the Moon if it hadn’t been a proxy extension of the Cold War with the Soviet Union and the US. And if a popular President hadn’t made a big mandate, and if he hadn’t been subsequently shot. We never would’ve gotten to the Moon. And even as it was, Nixon was canceling Moon landings even before we got the first Moon landing done. You can’t build something that long and that complicated that will outlast multiple Presidential administrations because of all the political pressures the Presidents are under. You have to somehow tie it to a longer-term theme, and the only way to do that, as proven by the International Space Station, is make it an internationally-committed program, where you have inter-governmental agreements that are unbreakable.
So I see the next step to be an extension of what we learned with the International Space Station, and to mount first unmanned, and then semi-man tended, and then permanent presence on the Moon as a global human venture, which with any logic at all, will also include China.”
More from Adam’s conversation with Chris Hadfield at NASA Ames tomorrow, including Hadfield’s reasoning for why we need a space program.
World War II Airplane Turret Restoration
The shed in Fred Bieser’s back yard looks deceptively ordinary from the outside. Corrugated metal walls are interrupted on one side by a pair of garage doors. It’s a big shed, the kind you have plenty of space for when you live outside Atlanta, GA. Most people would have to work to fill it with a lifetime’s worth of accrued junk, our spare furniture and boxes of books. Bieser, though, has filled it to the brim with thousands of parts from World War II aircraft.
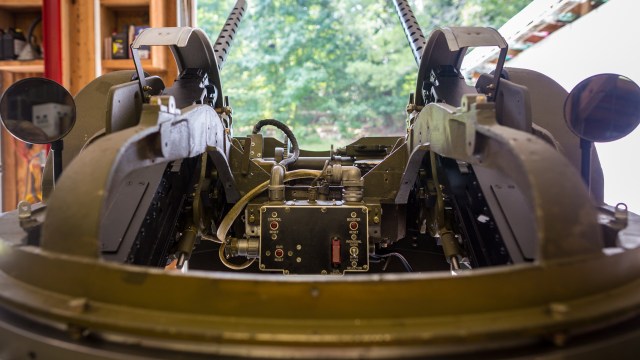
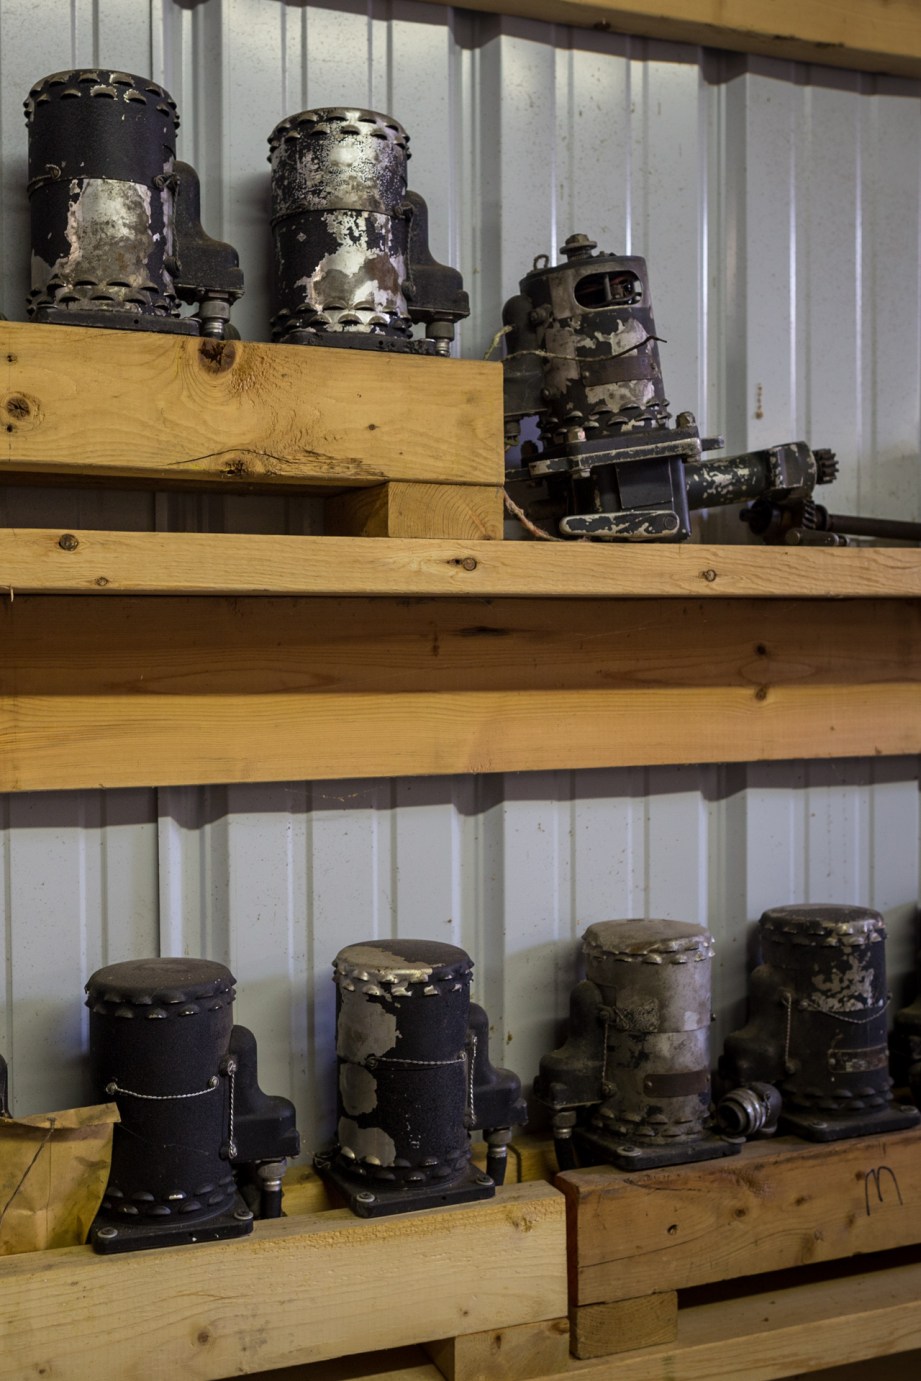
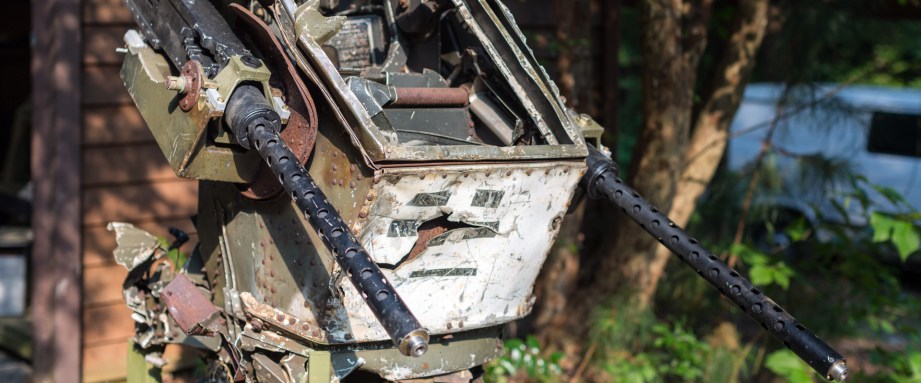
Dozens of hand controllers and motors, used to turn the turrets that were once attached to bombers like the Boeing B-24, line narrow shelves. Seventy-year-old electronic components are strewn about, their insides exposed and corroded, awaiting repair. Three mangled turret husks–a few hundred pounds of crumpled and rusty metal–are pushed into one corner. That’s what most World War II-era turrets look like, these days, after decades in junkyards or scrap heaps.

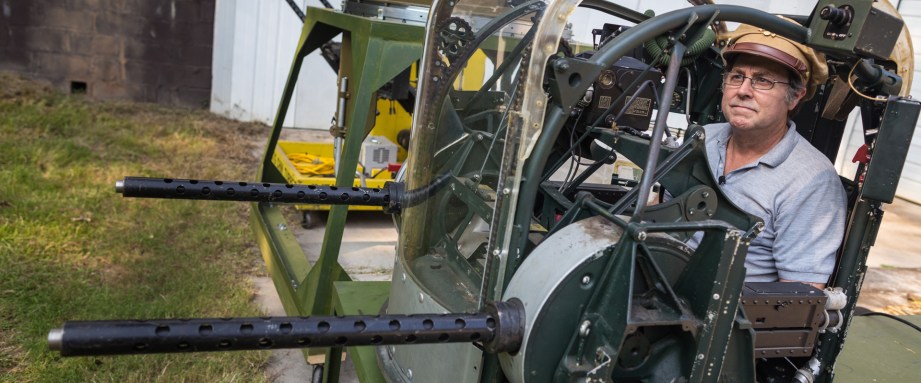
Most turrets–but not all. In the middle of the shed, seemingly untouched by time, are two fully operational World War II aircraft turrets. They look almost brand new because Bieser put as much as 1000 hours of work into restoring each one.
A lifelong aviation fan, Bieser has been collecting turret parts, as well as other airplane relics and memorabilia, for more than 30 years. In the 80s, that meant going to salvage yards and aviation scrapyards, paying 50 cents a pound for mangled turrets that weighed hundreds of pounds. Taking apart that salvage was how Bieser first began learning the intricacies of turret restoration.
“They were usually in such poor condition there was no way I could damage them any more,” he says. “By disassembling these things I could learn how they were put together, and this really helped me a lot later on when I started putting them back together. So for about the first 10 years I just bought these things wherever I could find them. eBay came along at that point, and I started finding parts on eBay. Eventually I just built up an inventory of turret parts that I had squirreled away over the years.”
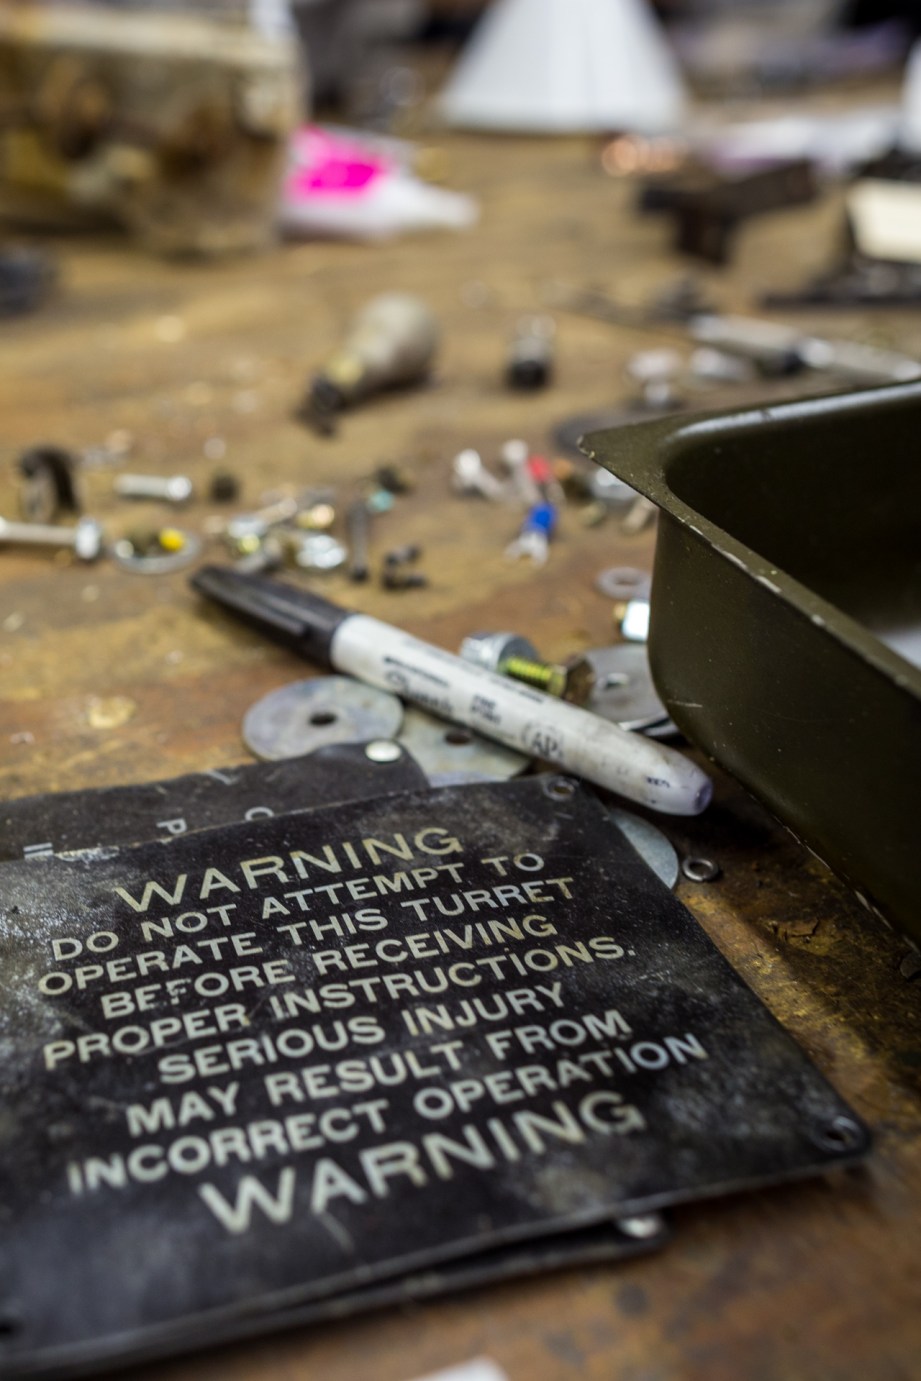
Restoring a turret to working order, much less getting it close to the state it was in 70 years ago, is even more difficult than it sounds. Surviving parts are in limited supply. And making new ones, Bieser discovered, isn’t really an option.
“Originally I thought I was just going to be able to take something to a machine shop and have it made, but as it turns out the technology 75 years ago was actually very highly advanced, and some of the stuff you can’t even make today,” he says. “A lot of it was top secret, especially the guidance systems, the gun computing sights…The Japanese and the Germans didn’t have it. Probably the most influential thing was the casting of molten aluminum, or in some cases magnesium. Magnesium’s pretty unstable material and they really pushed the envelope when it came to forming these parts and casting them…If you can find anybody that is willing to try it, usually the parts you get back are nowhere near as good as the parts that were originally made in the factory.”
With the enormous aircraft factories of the 1940s long gone, using surviving parts is the only viable way to restore a turret. After building up his inventory, Bieser began learning how to put the pieces together. He’s now fully restored nine turrets, each taking 1-2 years of on-and-off work. By now he’s worked out a process, which begins where you might expect: with the base.
Fixer-Uppers
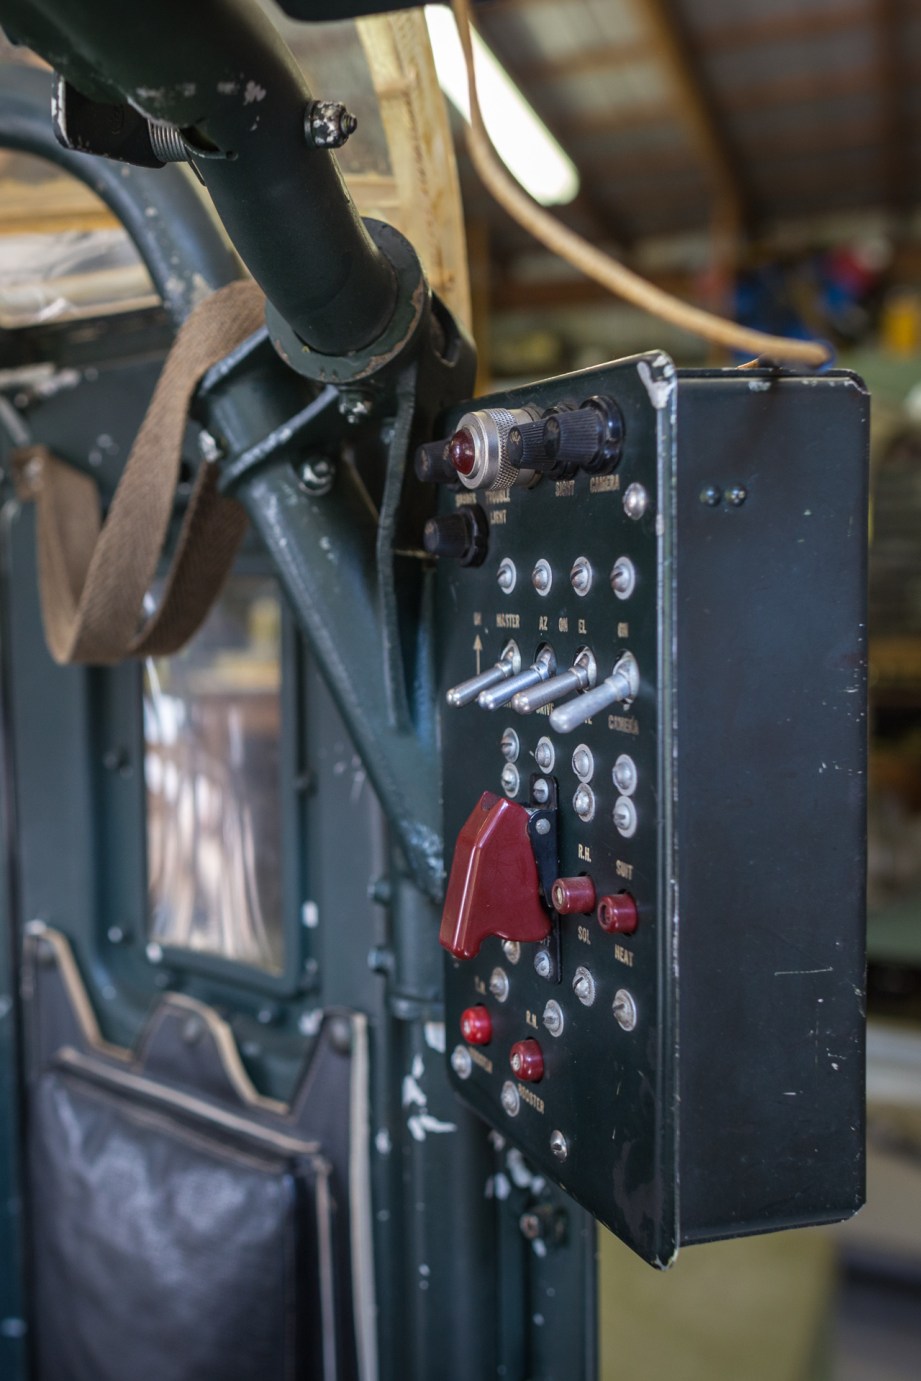
Working on a turret requires getting at it from all angles, so Bieser had a welder fabricate a rolling metal stand that he could mount a turret to. The mounting ring which attaches to the stand was originally used to attach the turret to the airplane fuselage, and it connects to the platter, which supports the turret. 21 bearings allow the platter to roll on the mounting ring. Once the turret is attached, it can rotate 360 degrees on the metal stand.
Next, Bieser dives into the electrical system. “Most of the turrets I restore are electrically driven, and you want to start with two drive motors,” Bieser says. “One’s for elevation and one’s for azimuth. These drive motors, you have to restore them and make them work, and I’ve got a little test jig that I put them on where I can test the motor by itself. Once I’ve got the motors mounted to the actual base unit, I usually start with the electrical system. The hand controllers, and the junction boxes, [which] are full of relays. Occasionally I’ll find a vacuum tube, but most of the time it’s just relays and really large circuit breakers. Once I get the electrical system working separate from the turret, then I go ahead and restore the rest of the turret, which means putting in the rest of the bearings and cleaning and painting all the parts that go on it.”
Simple as that–turret restored! Almost. Hundreds of hours of work go into restoring “the rest of the turret,” which involves installing dozens of components in the correct order and hooking everything together.
The motors are a good example. On lucky occasions, Bieser lucks out and finds a working drive motor on eBay, though he still needs to get it serviced before putting it to work for the first time in 70 years. Usually, the motors he pulls off mangled turret husks are too damaged to repair. But sometimes they’re fixable.
“A lot of times when you find them they look like hell on the outside, but once you pull the cover off and clean the thing out and inspect it on the inside, the inside is really nice,” he says. “The drive motors are literally at the center of the turret, and if it’s crushed from the outside in, they kind of get protected, as long as they haven’t been laying underwater for 50 years.”
Another vital step in cobbling together turret components is testing them for fit. Because most World War II turrets are now crumpled, rusty metal, they yield a limited number of salvageable parts. Eventually, Bieser collects enough parts to Frankenstein one turret together, starting with the best base he can find to build off of. “Some of the turrets I [rebuilt] are literally six, eight, 10 turrets in one,” Bieser says.
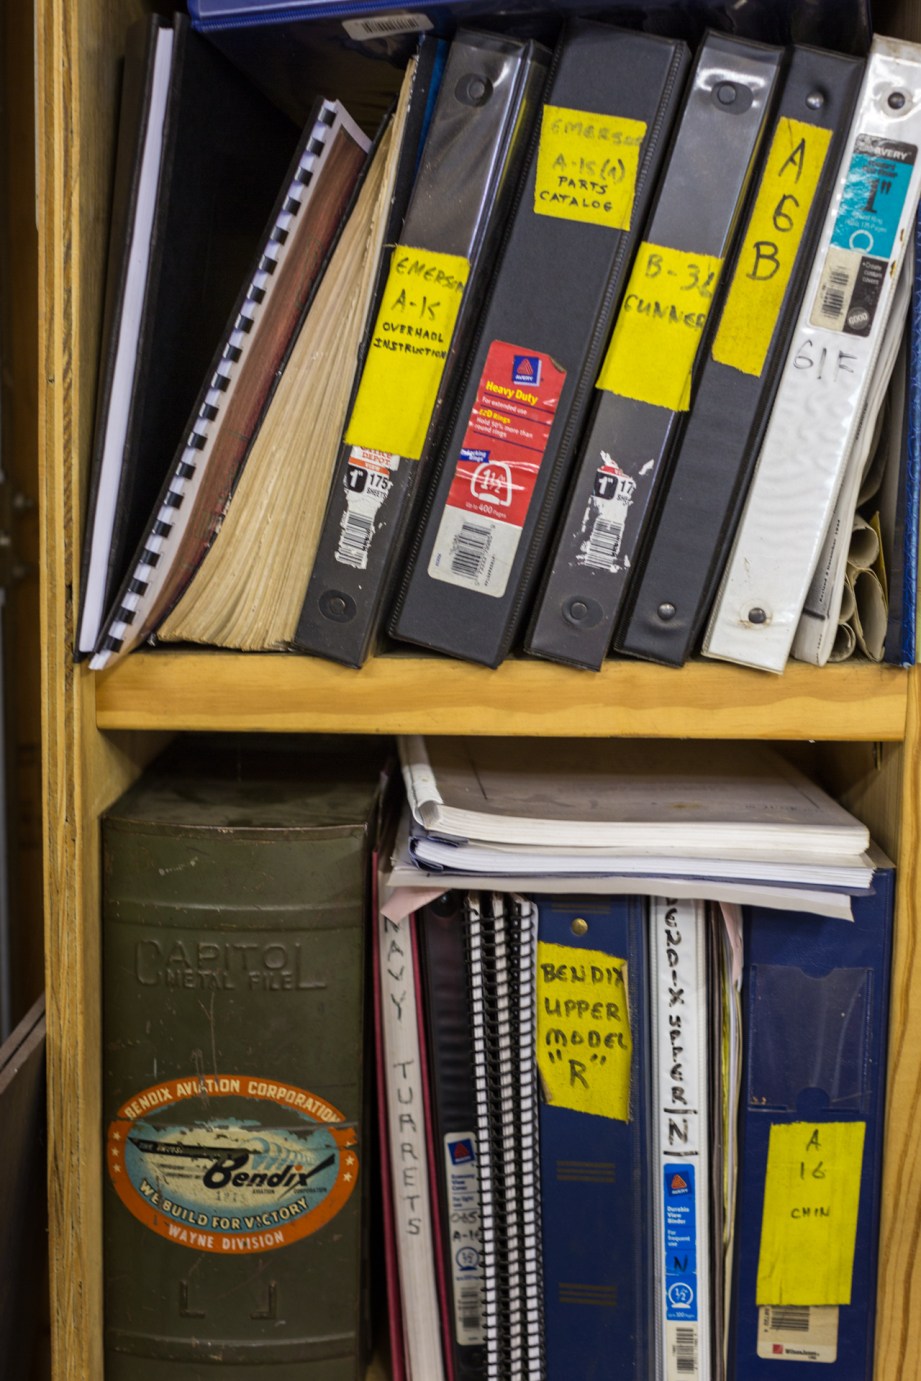
Combining parts from different turrets is tricky, because even the same turret models sport some differentiation. Over the years Bieser has built up an expansive archive of 70-year-old manuals from the military or the actual turret manufacturers, which often contain exploded diagrams of parts fitting together and electrical schematics. As vital as they are, the manuals vary in quality from manufacturer to manufacturer. Worse, they’re not always accurate.
“During the course of the war, every week or month the designers would change something according to how the war was going,” Bieser says. “So they were constantly being modified and updated. Part of the puzzle is trying to identify which part of the production run this particular turret was made in. There’s a lot of little clues that you can pick on that tell you what part of the production line this came from.”
Sometimes parts from different periods of a production run are compatible. Sometimes they’re not. Bieser compares them to 3D jigsaw puzzles.
“If you remember in Star Trek, they had a chess game that was on three different levels,” he says. “It’s kind of like the same thing for me. These things are really elaborately conceived and designed and fabricated and they have to go together a certain way, so there’s a lot of puzzle solving that goes into it… The most important part is testing for fit as you go. If you’ve got two parts, you want to check and make sure they fit together, and the next part has to fit behind it, and the next one after that. So there’s a procedure you have to go through that you’re constantly checking the fit, and the operation of these things as you go, especially for anything that has a bearing drive involved in it. You have to make sure there’s no binding, nothing sticking or any kind of a slippage.”
Over the years, Bieser has developed enough familiarity with the component manufacturers to find bearings and electric relays–parts that are almost always shot and need to be replaced–on eBay, even when they’re aren’t listed as aviation components. But some it can still take years to find all the parts he needs. And until he’s sure he own all the components, he doesn’t start building. Bieser has had some turrets in storage for 15 years, waiting for the right parts to take on a restoration project.
After rebuilding a particular turret model for the first time, subsequent restorations go quicker. Still, those take hundreds of hours of work for Bieser, and hundreds more for friends who help him out. Even when a turret is restored, the work’s not done. Showing them off is an entirely different challenge.
Safe for Kids
Bieser first started collecting turret parts and restoring turrets for a practical reason: They’re small. He worked on a Piper Cub plane as a kid, but knew he couldn’t afford a hangar big enough to house an airplane. So he turned to turrets, which are small enough to fit in a basement. But once he restored his first turrets and started to take them to airshows, he realized he’d found his niche. Turrets give Bieser an opportunity to teach future generations about World War II, and to honor the veterans who found in the war.
“Turrets are one of the most undertold stories of World War II, and it seemed to wrong to me that this part of our aviation history, particularly World War II history, was going untold,” he says. “Most people don’t even know what a turret is, and when they see one at an air show, especially the kids, when they see these things they’re fascinated by them, because they’re about as far away from a video game as you can get. And then when they see another little kid in there spinning around in it, they pretty much have to get in it. So there’s an educational potential right there, a teachable moment.”
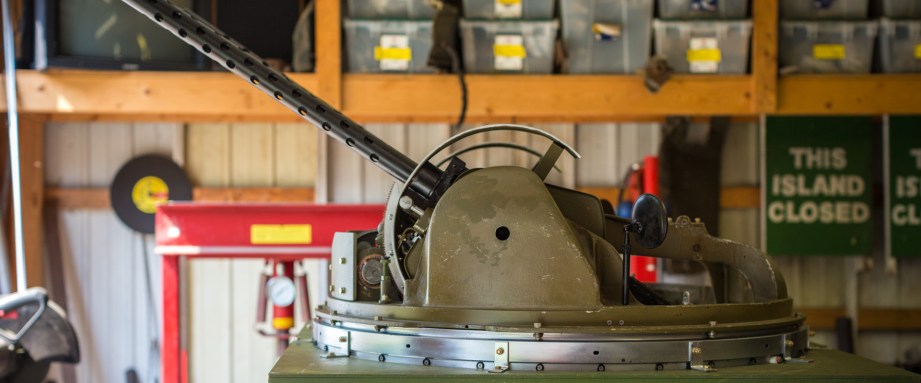
The turrets don’t fire, of course; there’s no ammunition, and Bieser uses fake barrels that look and feel real, but are solid through the middle. Otherwise, they’re completely functional. Getting the turrets running at air shows and museums took some ingenuity for Bieser–and a whole lot of direct current.
Ideally, the turrets run off of 28 volts of DC power, so Bieser created a makeshift power supply by wiring pairs of 12 volt car batteries together. He’d charge up the batteries, take them to airshows, and use them to power the turrets for 20 to 30 minutes at a time, then scramble to switch to a new set when the turret sucked them dry.
“I was literally juggling car batteries trying to run these things, and that was just nuts,” he said. “Eventually I found power supplies that I could plug into the wall, and later on I found these power supplies I’m using now, which put out a true 100 amps of 28 volts DC.”
The turrets power on with the flick of a few switches, so easily that it’s hard to imagine how much work it took to provide them with a consistent power source. During World War II, the turrets were powered by Amplidynes, which offered dramatically more power than standard generators. The same technology powered early electric elevators, radar systems and naval guns.
Bieser doesn’t keep most of his turrets after restoring them; they’re sold to museums like the Mighty Eighth, which is working on completely restoring a B-17 Bomber. Restoration is his way of honoring the veterans who served in World War II, and he hopes that that teachable moment, the excitement kids have when they clamber inside one, will give future generations a tangible connection to history.
“Most of the planes you see at air shows do not have working turrets,” he said. “A very few of them in the last few years have started adding working turrets, but most do not. They just have a dome with a couple barrels sticking out of it. We hope to change that in the future, and I’m working with several aircraft owners now. So hopefully it will get better.”