


At Comic-Con? Check. Have a Chewie costume? Check. Adam dresses up as his favorite non-human character to be inducted into the 501st Legion: the largest international fan organization for Star Wars cosplayers.
SPOILERCAST: Pacific Rim – 7/30/2013
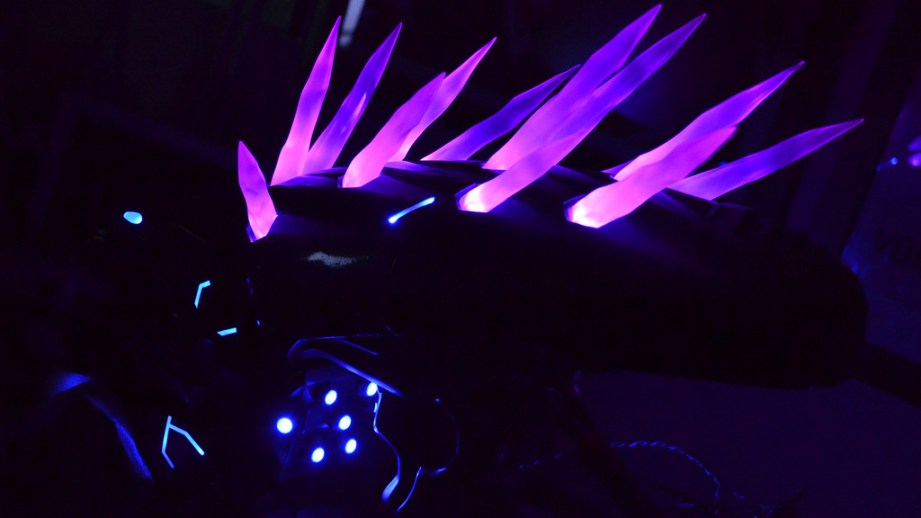
The Volpin Project, Part 14: Putting It All Together

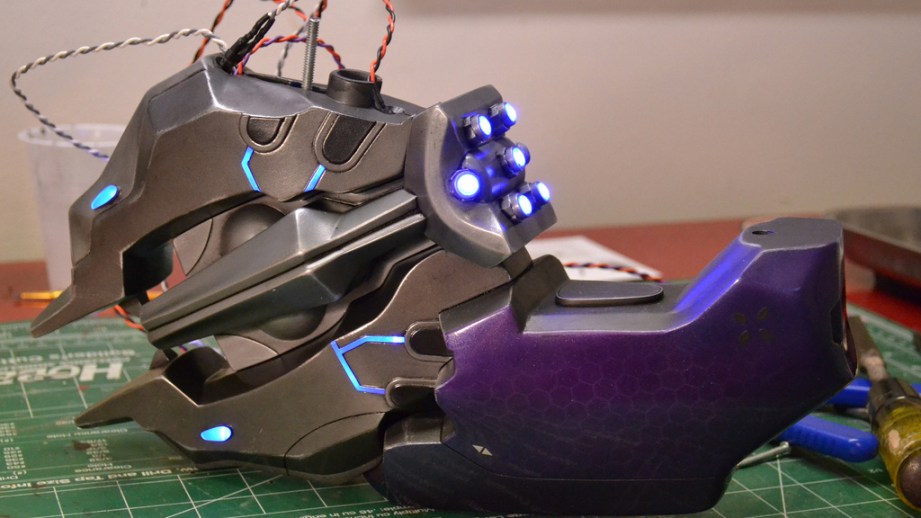
Weathering, painting, sculpting, molding, sanding and casting… it’s all come down to this. After several months of building and finishing the Halo Needler prop’s numerous components, it’s time to bolt all the parts together and transform the mishmash of plastic bits into a complete and whole prop. There are 24 bits that need to be assembled in a very specific order, and that doesn’t count any of the screws, wires, circuit boards or other electrical components. Let’s get to it!
If you recall, back in Part 11, I spent a lot of time figuring out how everything fit together, along with cutting out proper holes for switches and other components. Several fit checks and dry assemblies (that means piecing together with no glue) were tested to make sure everything would align properly before painting and weathering was applied. That made this process much, much easier.
It’s best to have a plan for this stage of assembly. Much in the same way any IKEA flat-pack furniture has an order in which pieces go together, the Needler can only be assembled one way, in one order. First, all of the illumination has to be sorted, and that means securing LEDs and routing their respective wires through the channels drilled in each part back when the mounting solutions were sorted out.
Some parts are much easier than others. The middle “barrel” piece has seven oddly placed bulbs which needed a lot of wrangling to get the wires to go the proper direction.
The upper casing was similarly complex. I actually sorted out a lot of this a while back before the Needler was painted. Since the recesses in the upper casing were made by vacuum-forming over acrylic hexagons, I laser cut a second set to fit back into these holes.
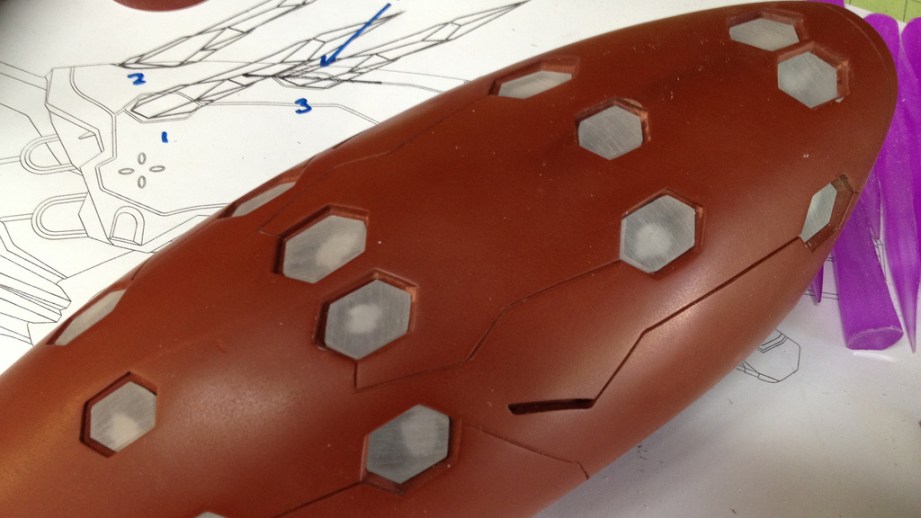
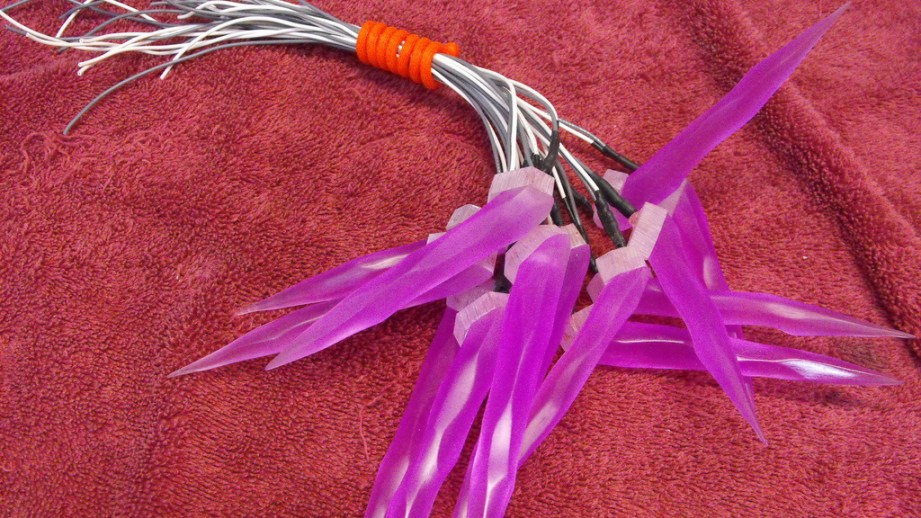
Each needle was cut individually to its proper length and angle then glued to these acrylic inserts with superglue. In testing this (“testing” means I glued one set together wrong and had to pry them apart) I found that a hammer and chisel were needed to separate the two parts once the glue cured. Seems strong enough!
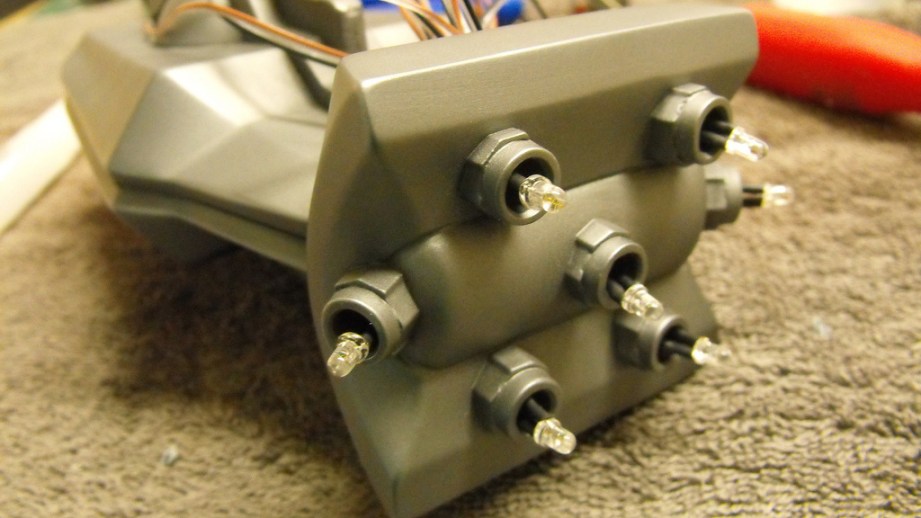
5 mm holes were then drilled into each mounting plate at an angle parallel with the direction of the needle. These were the recesses for the pink LEDs, which were also secured with superglue.
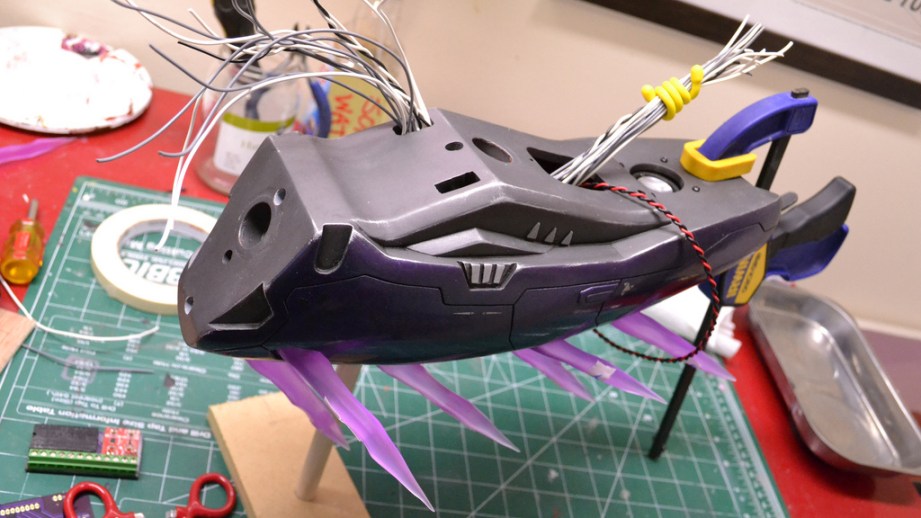
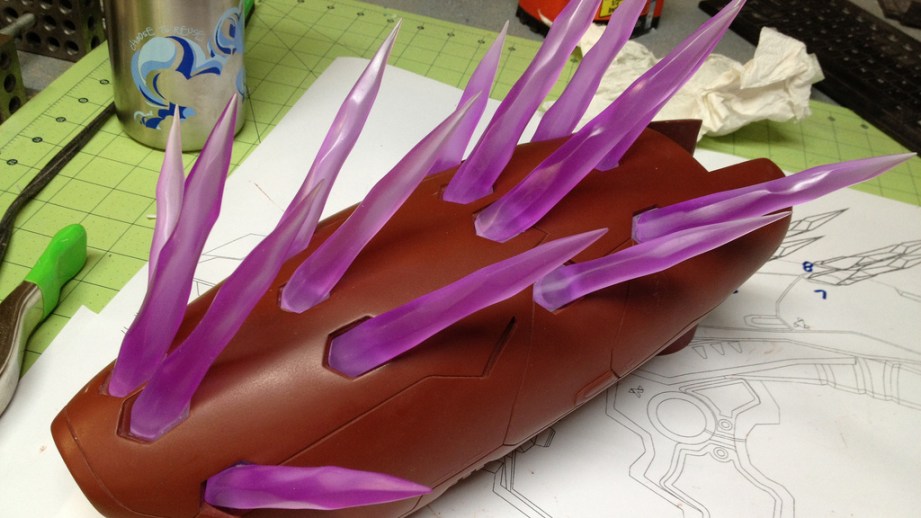
Each individual needle was glued into the casing using 5-minute epoxy. Numbered pieces of tape were applied to each so I knew which needles had been curing for longer; I could only mount three at a time without possibly bumping into adjacent pieces and knocking them out of alignment. You’ll notice one missing needle in the middle center; this was left out intentionally as that opening is used later on to tighten screws on the handle and upper emitter. Once those pieces were mounted, that needle was then epoxied in place.
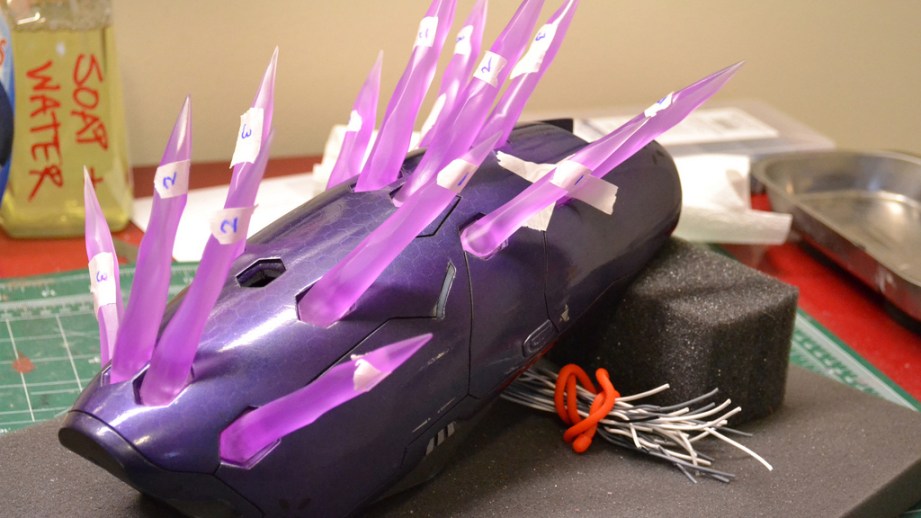
When you’re using any sort of glue to secure parts together, make sure to scrape away any paint where you’re going to be applying your adhesive until the bare material is exposed. This makes sure the material itself is bonding to the epoxy, instead of bonding the epoxy to a thin layer of paint which will eventually break away.
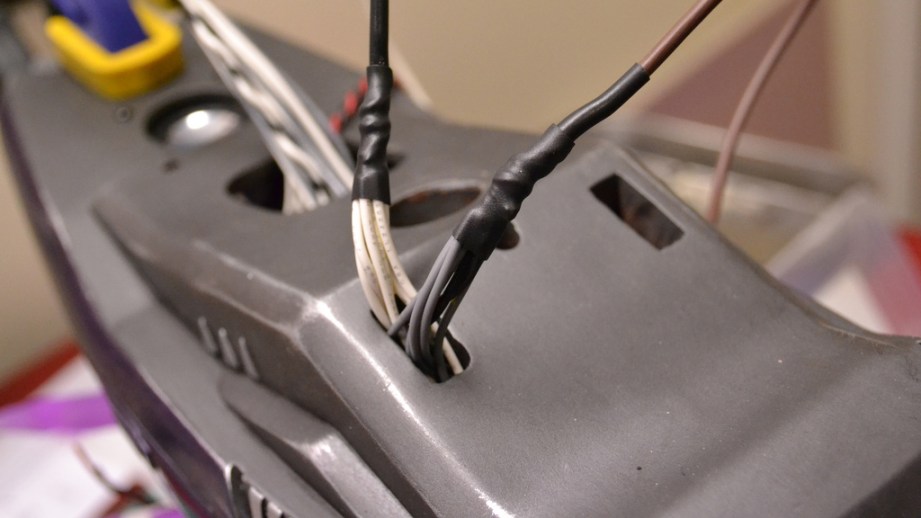
There were a lot of wires coming out of the parts at this stage, and it wasn’t necessary to run every single line to the power supply or circuit board individually. Bridge individual power and ground connections into single lines to make routing power much easier.
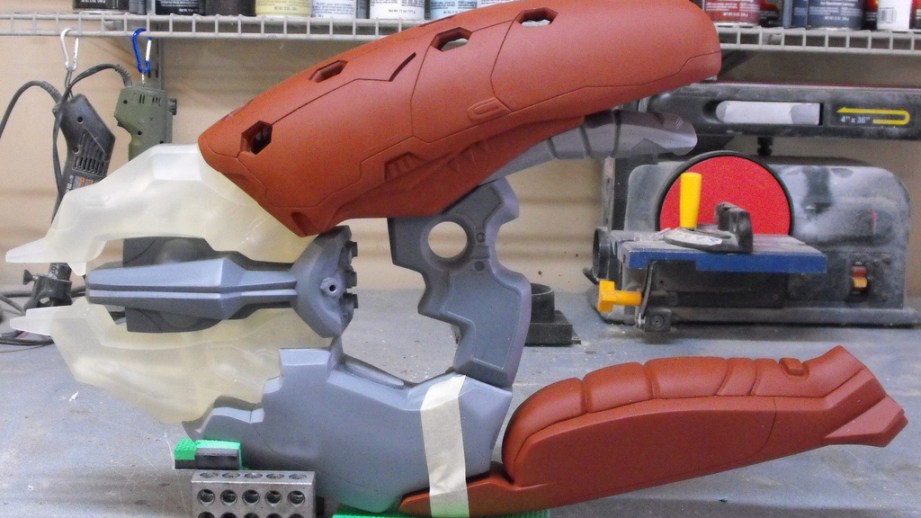
The Needler is built from the bottom up, starting with the lower casing and lower emitter. There are two screws that hold these parts together, but for good measure I added a small amount of 5-minute epoxy to the joining edges as well.
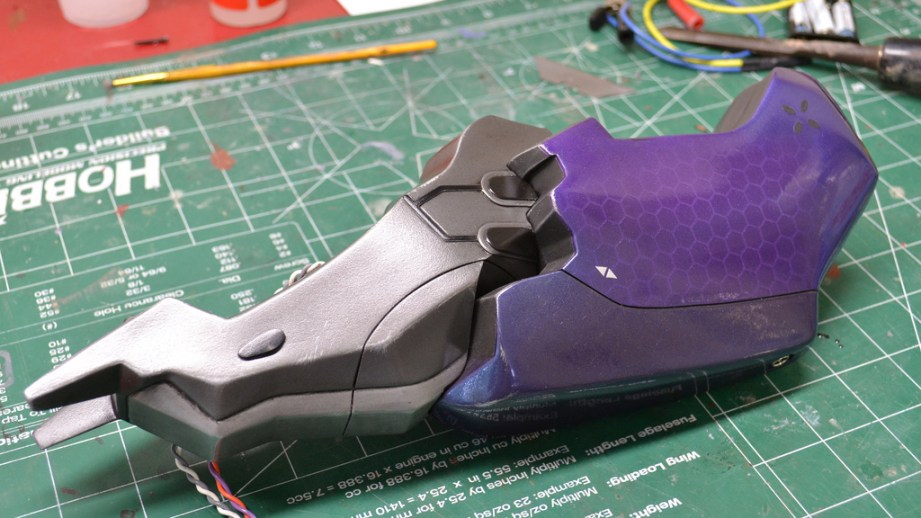
The barrel section was then added, along with the upper emitter. The wires visible here power the LEDs in the emitters and barrel, and also run to the lower casing where the wall power input jack is located.
I’m really bad at listening to my own advice, but if you’re smarter than I am make sure to check your illumination and wires at each stage of assembly. More than once I’ve fully assembled a project only to find out that a bulb had gone dead somewhere in the process. Not so this time, whew!
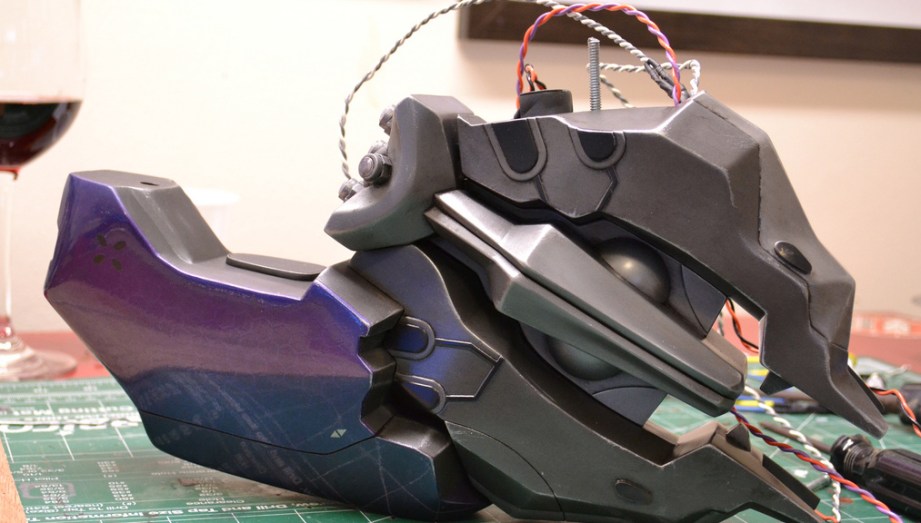
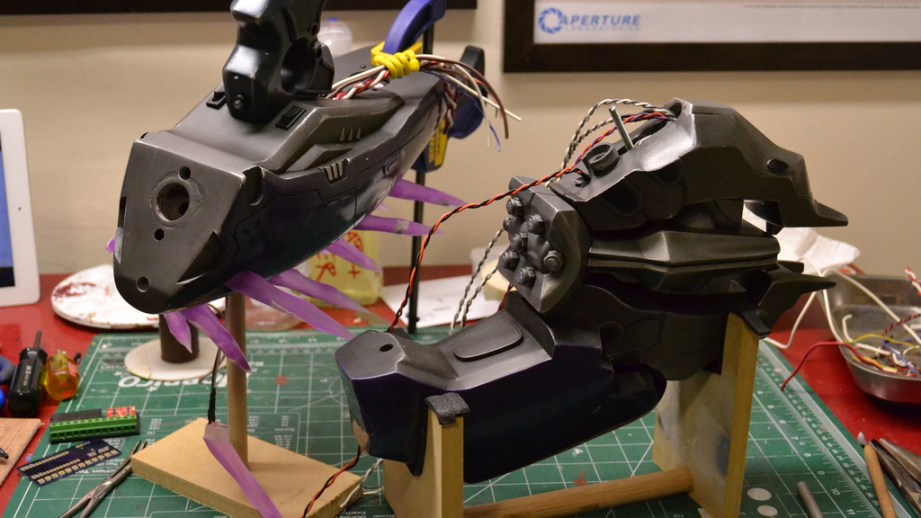
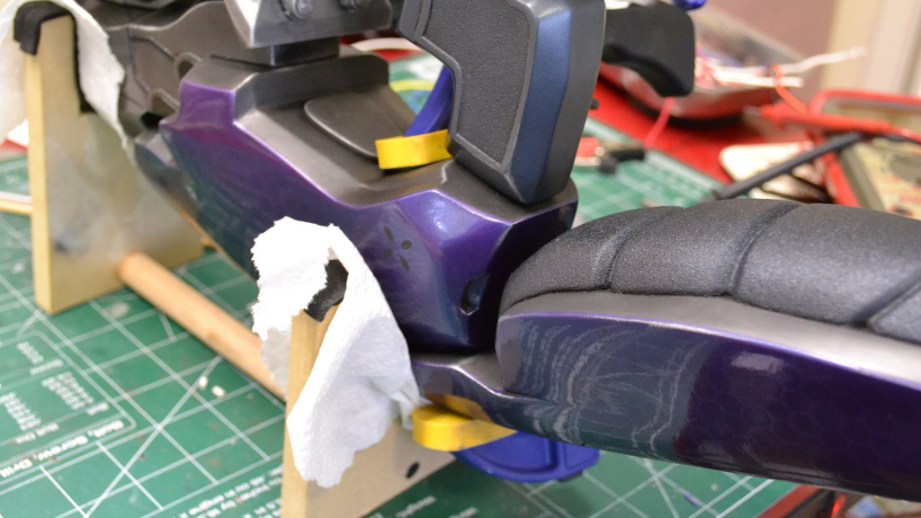
For the first time that I can recall, I built a set of MDF assembly jigs while putting a project together. Most of the stuff I make typically has a flat edge that makes it easy to set down, but the Needler doesn’t really like to be placed on its side. A simple cradle was made for the grip and emitters, using the cross-sections of some parts that I made waaaay back in Part 2. Having the parts secured this way made assembly and wiring much easier, and I think it’s a step I’ll be repeating in the future.
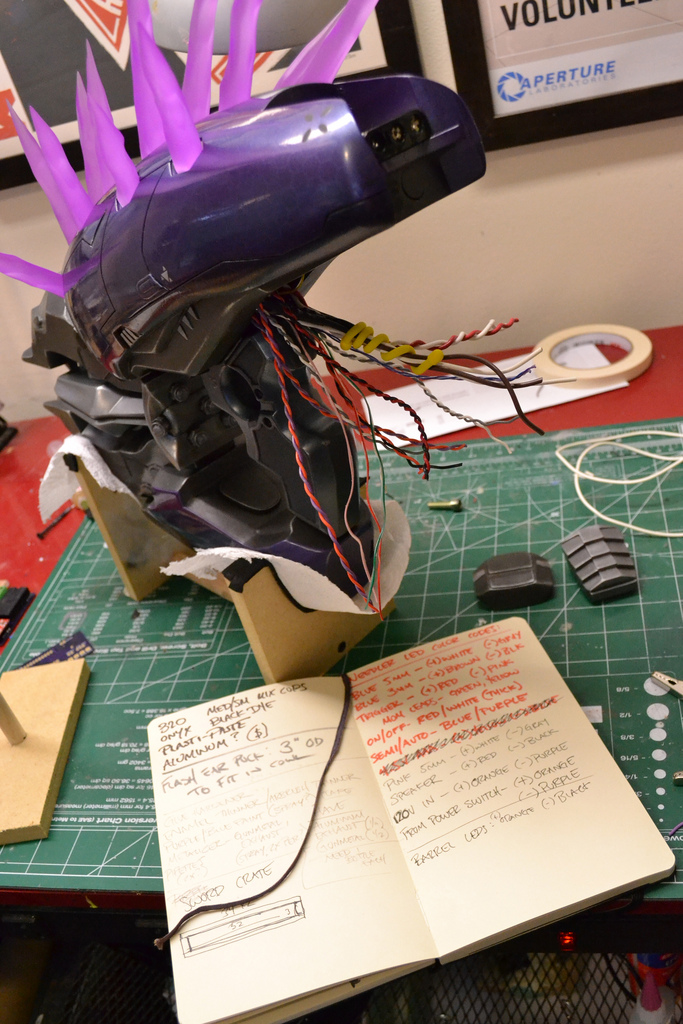
With the upper casing and handle secured, there were a lot of loose wires hanging about. I keep a record of all the wiring colors so all of this makes sense to me after I planned out circuit months in the past. A lot of soldering followed.
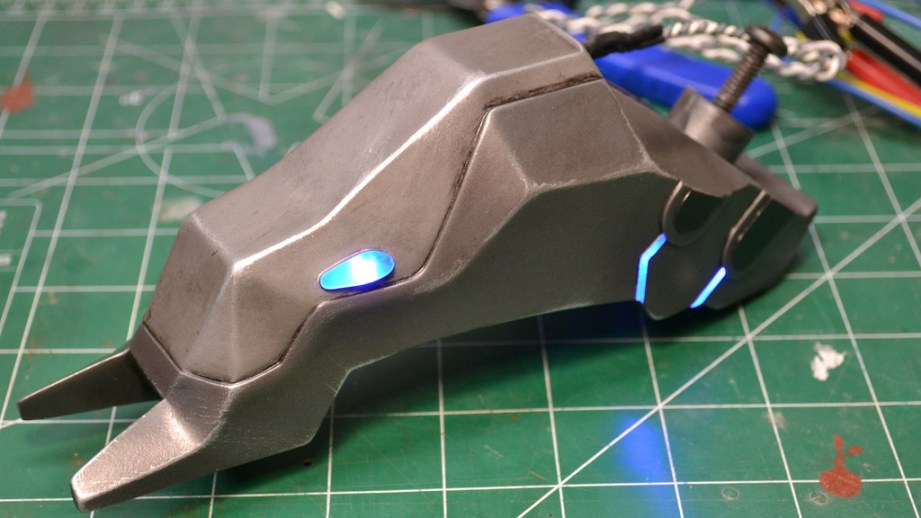
Eventually the rat’s nest was pared down into something a bit more manageable, and all the wires were routed into the audio/power board. The large open panel behind the grip was cut out specifically to allow this part to be installed after the wiring was complete.
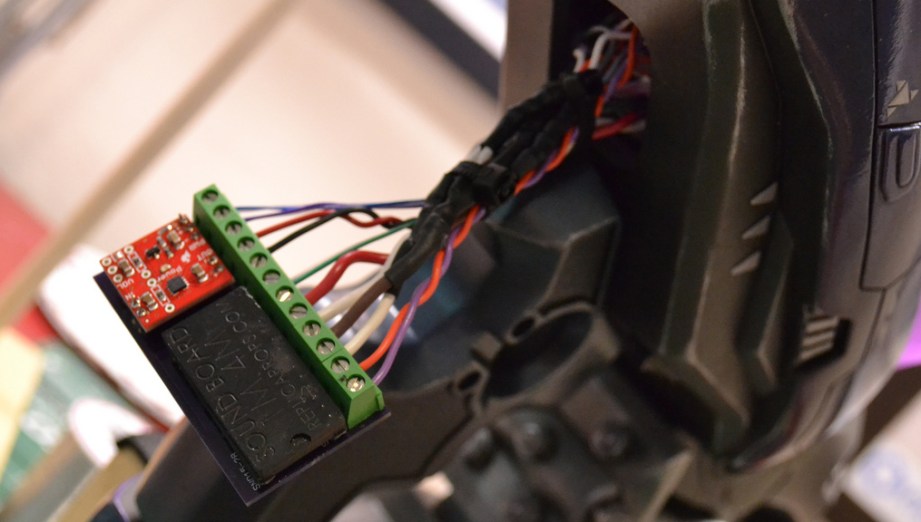
With the wires sorted, I could mount the chip inside the upper casing and seal up the top by installing the rest of the grip parts. These cover up the access panel seen above, so I had to make sure to test all components one last time before closing it. Once it’s closed I wouldn’t be able to crack it open again!

For the bottom, the final part to be installed was the lower padded grip. This is because the handle is held in place with a large coarse threaded bolt that is accessed through the mounting area for this part. It’s like a chess game getting this thing together! Unlike all the other pieces, this one is held in place with epoxy alone. The assembly jig held the part in place while the glue cured.
Thinking of the assembly jigs led me to the idea that a display stand should be created for this prop. The Needler can’t stand on its own, and laying it on its side just isn’t an option. Since I have a laser cutter, I have a huge box full of small scraps that aren’t really good for much more than little details here and there. I raided this box and drew up some plans in Illustrator based on some HALO architecture and came up with this:
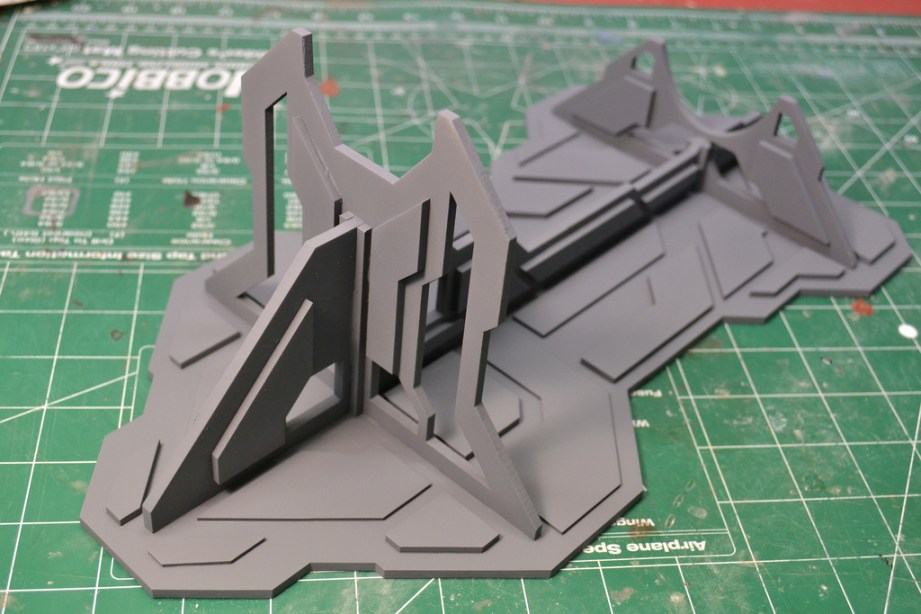
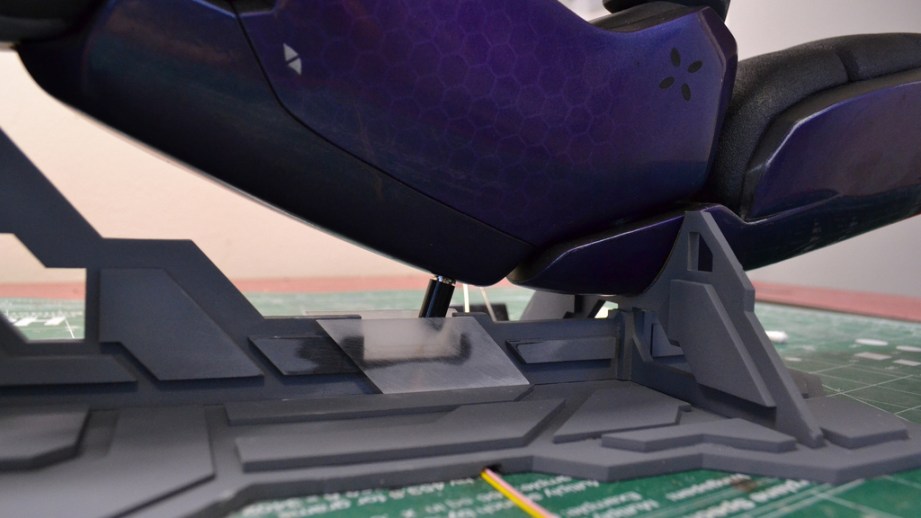
The stand is all acrylic parts and holds the Needler level and secure. I also added a small recessed area in the middle of the base where the power jack inserts into the lower forward casing.
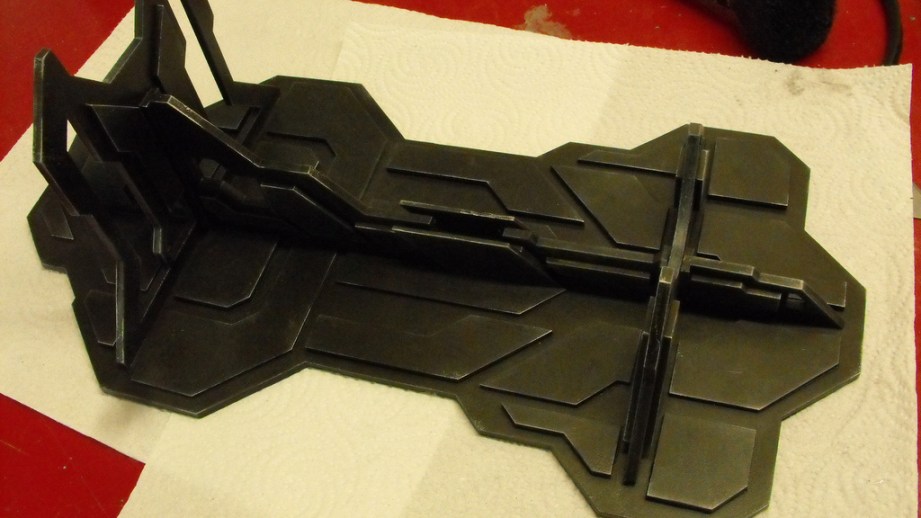
Of course, this needed some paint and weathering to look authentic to the rest of the prop. Raiding more spares, I emptied the last bits of several cans of flat black, metallic gunmetal, and dark bronze to come up with an interesting layering of color that doesn’t detract from the Needler itself while still being interesting to look at. I need a better picture than this, but that’s coming soon…
The only thing left to do now is take this prop out for a photo shoot and then bring this guy to Dragon*Con. If you’re in Atlanta for the convention make sure to keep your eyes open for a spikey glowing purple alien weapon in the crowds!
The Volpin Project, Part 1: Introductions
The Volpin Project, Part 2: References and Blueprinting
The Volpin Project, Part 3: Selecting Materials
The Volpin Project, Part 4: Taking Shapes
The Volpin Project, Part 5: Bondo Strikes Back
The Volpin Project, Part 6: Details, Accents, Refinements, and Mockups
The Volpin Project, Part 7: Introduction to Moldmaking
The Volpin Project, Part 8: More Complex Moldmaking
The Volpin Project, Part 9: The Casting Process
The Volpin Project, Part 10: Illumination and Audio
The Volpin Project, Part 11: Prepping for Paint
The Volpin Project, Part 12: Finally Time to Paint
The Volpin Project, Part 13: Weathering The Needler
This Is Only a Test #178 – We’re Back – 7/25/2013
Comic Con 2013 Edition – 7/23/2013
Adam Savage Flash Mob at Comic-Con 2013 [Teaser]
![Adam Savage Flash Mob at Comic-Con 2013 [Teaser]](https://mdvip-tested.md-staging.com/wp-content/uploads/sites/5/2013/07/50378-_v2c0628.jpg?w=640)
Adam recruited over 75 fans to cosplay as him at Comic-Con 2013. Here’s a teaser of what the Adams were able to do. We’ll have the full video from the flash mob up next week on the site!
Adam Incognito at Comic-Con 2013 as…Adam Savage
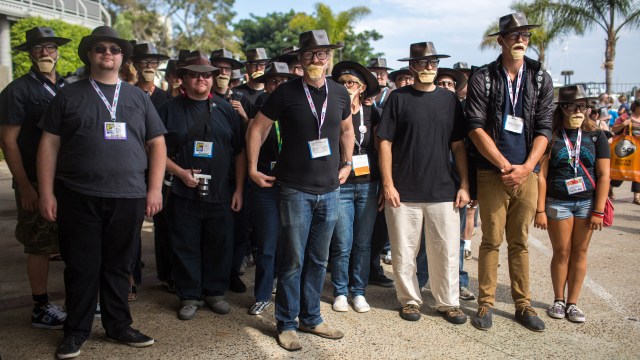


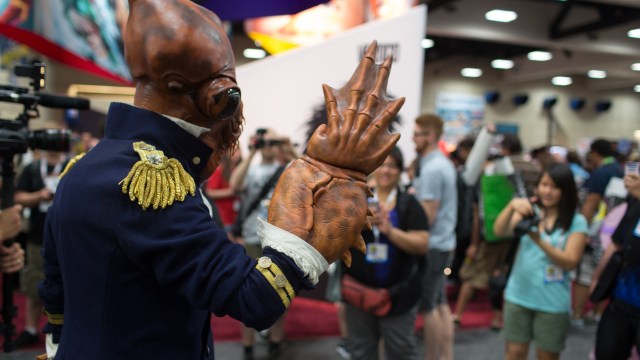
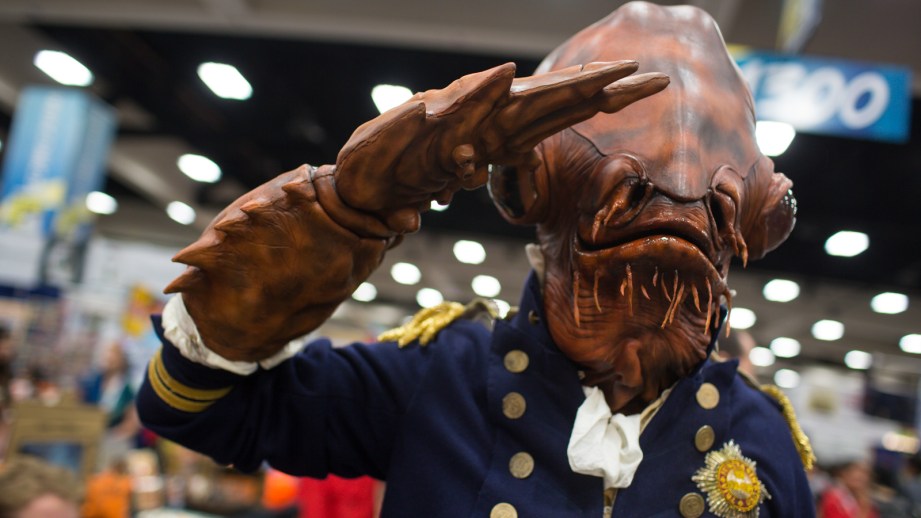
Photo Gallery: Adam Incognito as Admiral Ackbar at Comic-Con 2013


The Making of Adam Savage’s Admiral Ackbar Costume

I was 11 when Star Wars came out. While the movie as a whole (and the resulting maturation of special effects through the 80’s) shaped me as a person, a nerd, and movie fanatic, I think that not enough attention has been paid to the series’ invention and characterization of non-human characters. Those characters are amazing, to put it mildly. First and foremost, of course is Chewbacca, who may be (alongside 2001’s Moonwatcher, also constructed by the genius Stewart Freeborn) the greatest non-human character in film.
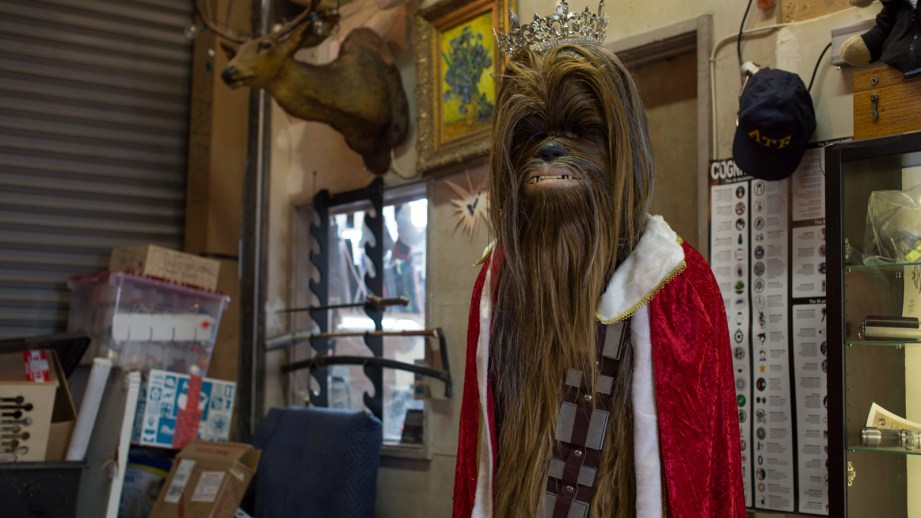
And I’ve gone out as Chewie. First at Dragon*Con 2008 and then several times since then for Halloween and other functions. Chewie is the Bono of non-human characters. People just walk up to you and hug you just because. It’s thrilling to give people the experience of being near a Wookie.
But today I want to talk about Ackbar. Admiral Ackbar to you and me. The leader of the Rebel Alliance for the climactic battle at the center of Return of the Jedi, Ackbar and his fellow Mon Calamarians from the planet Mon Calamari are so awesome they almost cancel out how shite the Ewoks are. Almost.
Like I said, I’ve always loved Ackbar. His huge eyes. His lobster hands. The excellent heavy felt tunic he wears with the super wide collar. It all just works. The combination of elements look just like they should: that Ackbar is a super competent, peace loving fish man from a planet of aliens. It’s clear that you’d like to have a beer with him.
I have collected a few Ackbar masks over the years, but I’ve never been completely happy with them. Don’t get me wrong, there are some lovely fan sculpts out there, but I always strive for the strictest accuracy in my costuming. In my zeal, “Admiral Ackbar” is a search term I regularly entered into eBay’s search field.
About six years ago I hit gold. A foam latex casting, supposedly from original molds appeared in my results.
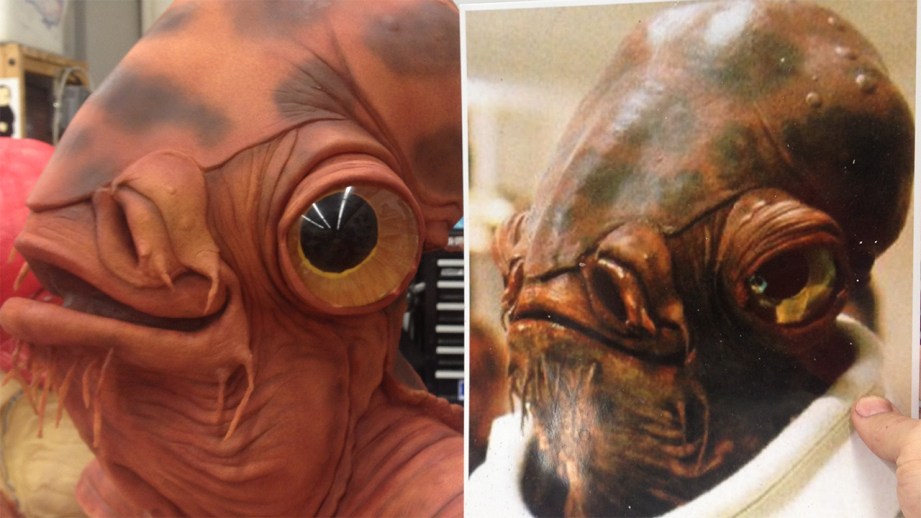
I started breathing heavily. I immediately copied the photo and put it into Photoshop. Then I scoured my Ackbar folder for close ups of the actual mask. Pay dirt: I found a pose of Phil Tippet’s original sculpt in my collection that was in the same position as one of the auction photos. Putting them side by side, and then layering them over each other with a transparency filter, I was able to authenticate that the casting was, in fact, from the original Ackbar molds. The first time, to my knowledge, such a casting had made it out into the world. I snatched it up for… let’s just say it was a good price.
This year I decided to dust off that casting and make a full and perfect Ackbar costume for Comic-Con 2013. Here’s how that costume was brought to life. (Editor’s note: Adam incognito photos here.)
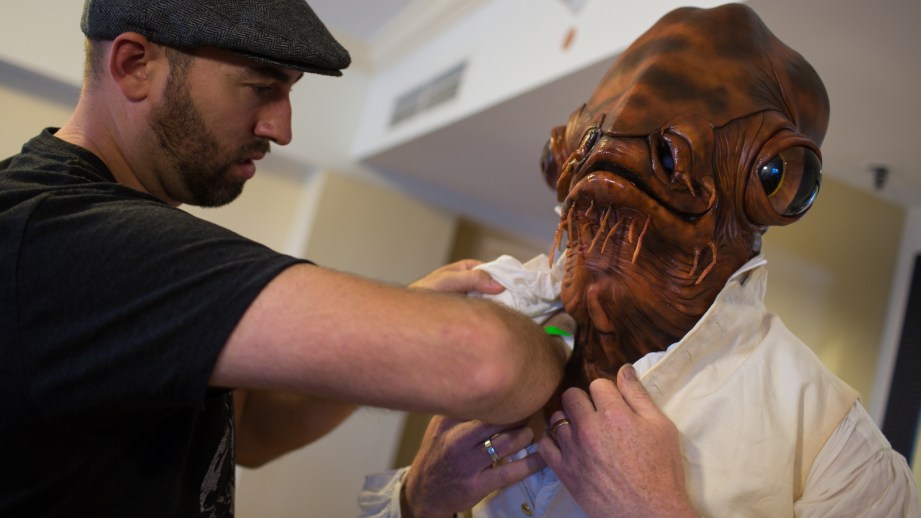
First and foremost I reached out to my friend Frank Ippolito for help. Frank and I had met when he and another friend, Ezekiel Zabrowski (who works for Penn and Teller) directed me in their horror short Night of the Little Dead. In that film I not only acted alongside my friend Penn Jillette, but I also got to have my scalp ripped off.
Frank was also in the first run of the SyFy reality show Face Off, and is actually (drumroll) making a return in Season 5 of Face Off when it airs in August.
Frank was more than willing to help. He would have to do several things to make this costume work. I wanted to be able to manipulate the mouth. I wanted it to be as accurate as possible.
First things first, Frank would have to re-mold the original Ackbar head of mine. Given that it was a soft casting, this isn’t easy. Here’s Frank explaining how he re-molded that piece (with his words in italics).
The Original Plan
FRANK: When I received the mold from Adam, I wasn’t sure what I was getting myself into. We had briefly discussed making it a silicone mask, and that the translucency and movement would be really cool. So I set out to figure out how to make this happen.
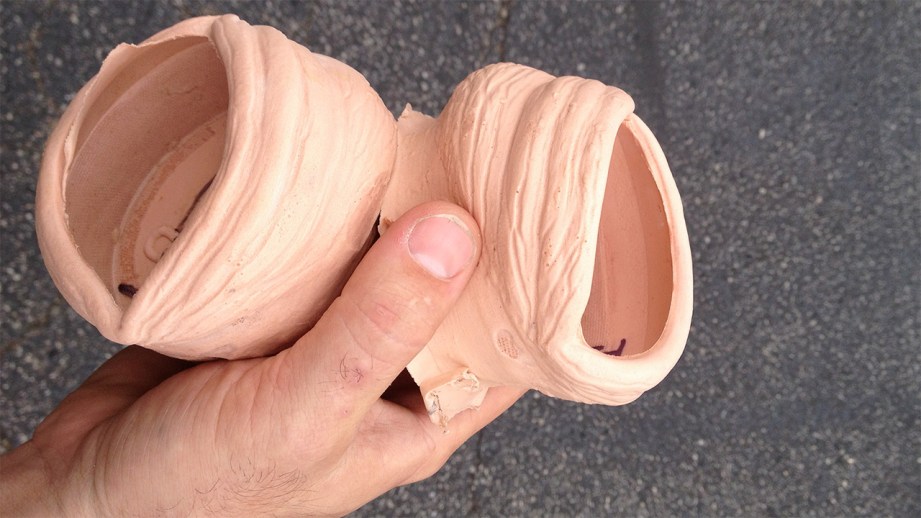
First up was to pull a latex/polyfoam copy out of the mold to see what the casting would look like. I used this casting to help map out how it would go together.
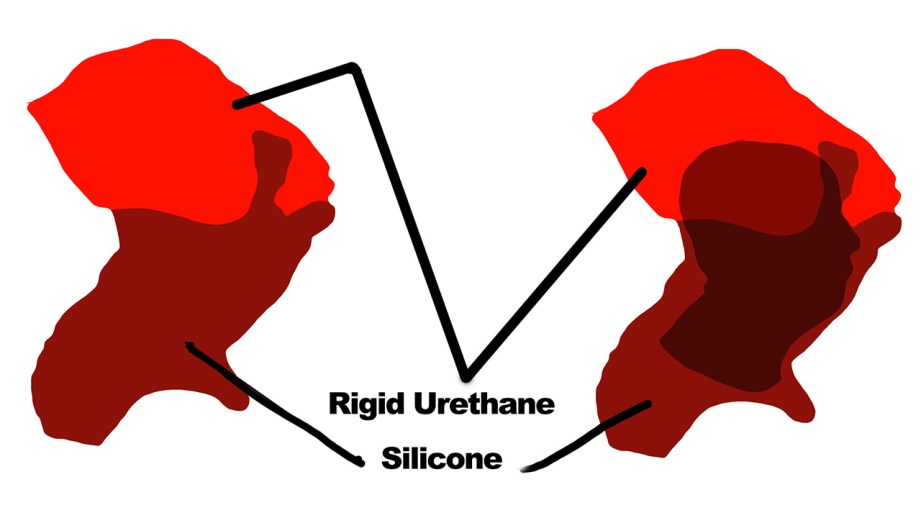
The mold that Adam had had made of his original was a brush-up urethane with a fiberglass jacket. This prevented me from using platinum based silicone (the urethane inhibits platinum from setting up) and the mold wasn’t set up to have a core put in it. So I would have to use a tin-based silicone and brush it into the mold, and try to maintain a consistent thickness.
To save weight (and silicone volume, because silicone is heavy), I thought it might be a good idea to make a hard resin shell on the top of his head, and have that support the weight of the silicone. I cast a fiberglass copy of this part, then started a silicone brush-up into the mold for the rest. Once I got into this process, however I quickly realized I was pushing a boulder up the wrong hill.
This was not going to work the way we thought it was.
The whole thing needed to be started over. I jumped on the phone with Adam and explained my new plan of attack (and how much more it was going to end up costing) and he readily agreed to my new plan.
At that point, I was whisked away to be on Face Off, so for two months I couldn’t work on the Ackbar mask. But I promise you, I lay awake many nights thinking about how I was going to pull it off when I got back. Bonus problem: at that point I would only have three weeks to complete the entire project!
The New Plan
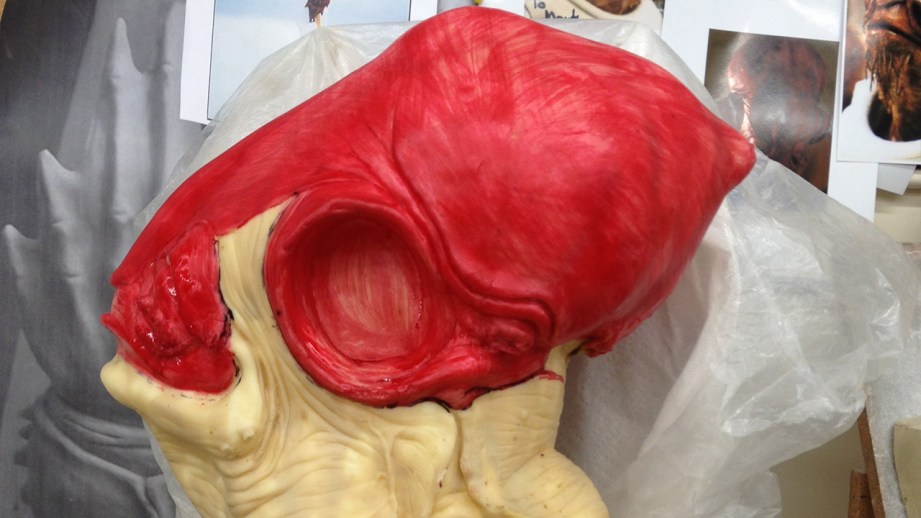
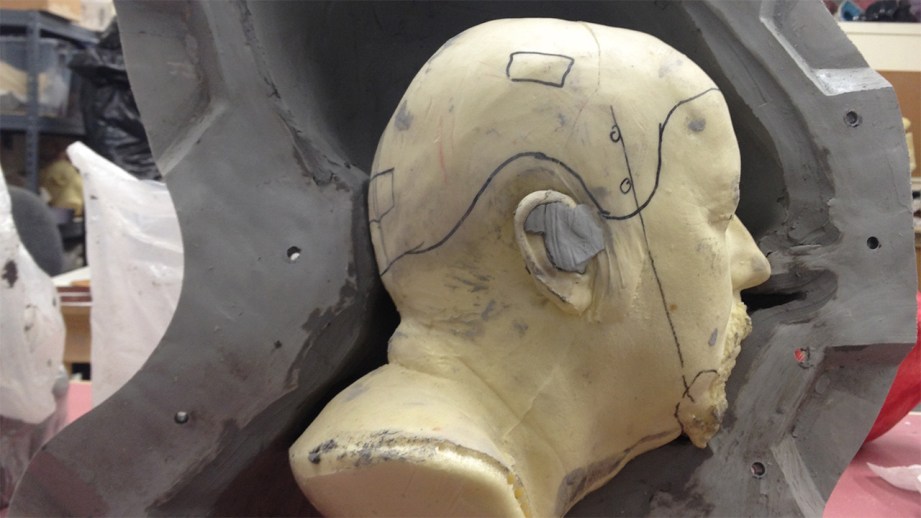
New step number one was to make the best casting out of the existing mold as possible. I used Moldmax Stroke from Smooth-On to do a brush-up, then back filled it with polyfoam. This casing enabled me to fix the errors in Adams original casting and subsequent mold. Upon close examination, I started understanding some key details about Adam’s sculpt and the final mask from Return of the Jedi: I noticed that the nostrils were cut out for the actor to see out of and there were some bumpy sections on the head. There were also little tendrils in the Ackbar head in the film that weren’t in the sculpt. Lastly, and then I needed to fix the seams.
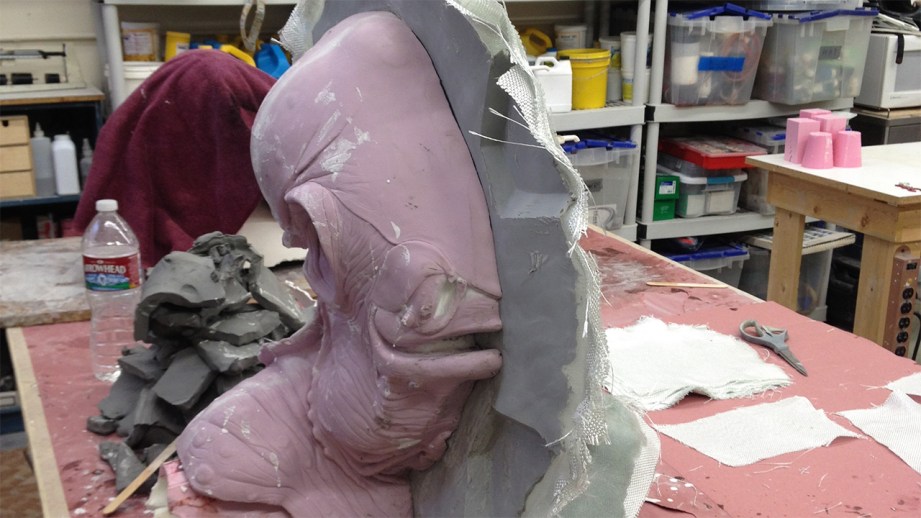
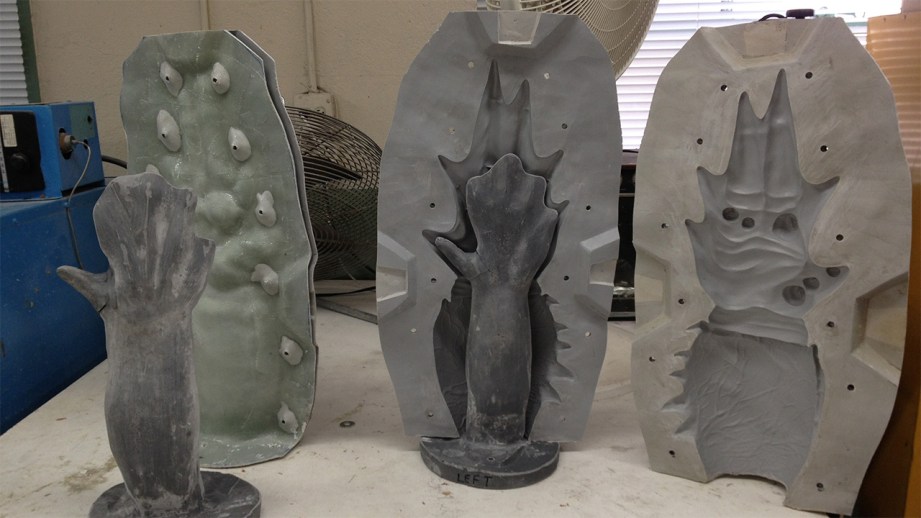
While inspecting the casting, and trying to figure out how I want to divide the mold sections up, I noticed there was a hint of a seam line right up the middle of the head. I’m assuming that the original was molded left/right . As much as I don’t want a seam up the middle of the head (hard to hide, time-consuming to fix), it was clearly the easiest way to tackle this particular mold.
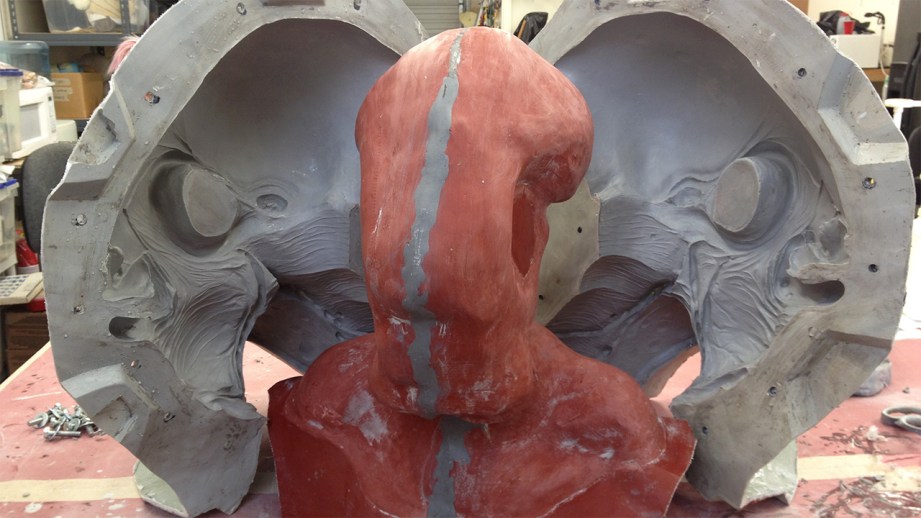
For the mold I decided to use Smooth-On’s Epoxies. The Epoxacote grey surface coat and epoxamite 102 laminating resin would work out great for this. I used a little Freeform Air (also from Smooth-On) to fill in some sections between the surface coat and the glass layers (5 layers of 10oz cloth) When the mold sections are done, I trimmed it and glassed in some t-nuts. I like to do this on most of my molds so that you don’t need to fumble around with a nut on the other side of the flange, just zip in the bolt, and be done. This allows the fiberglass mold to be quickly and easily assembled and disassembled.
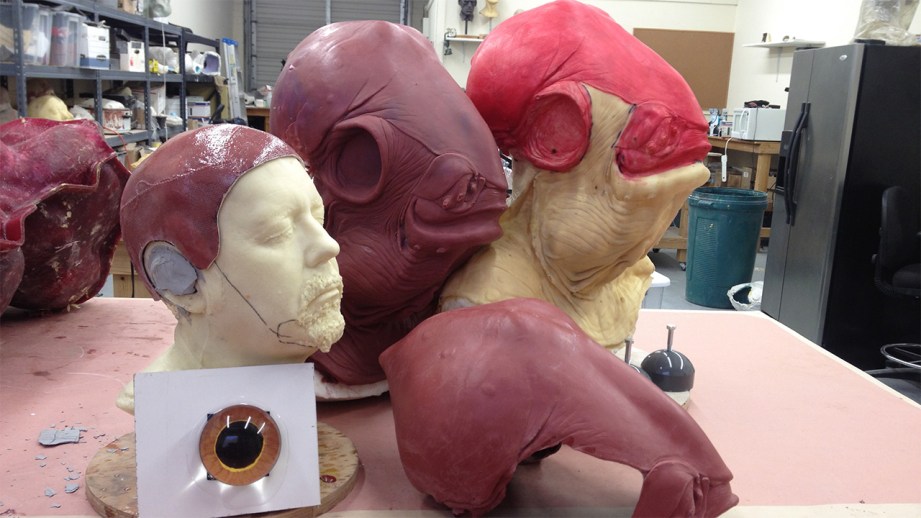
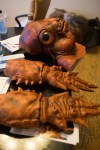
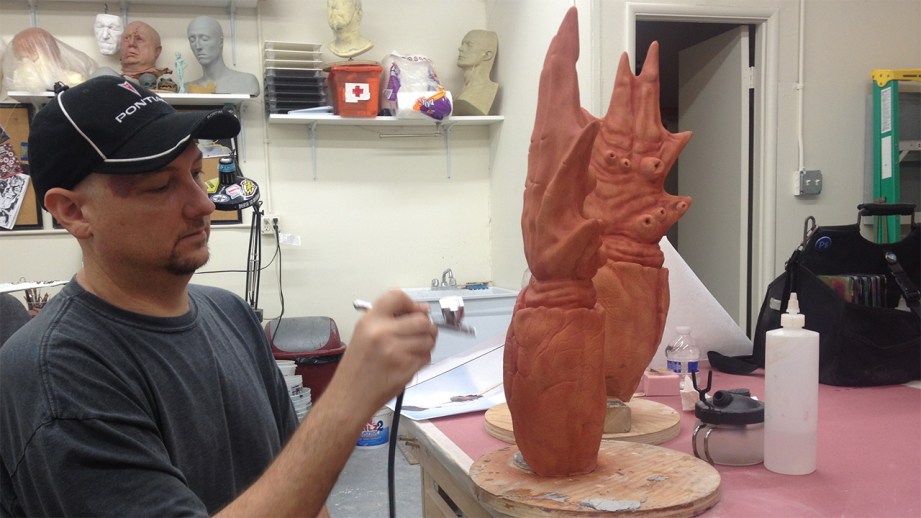
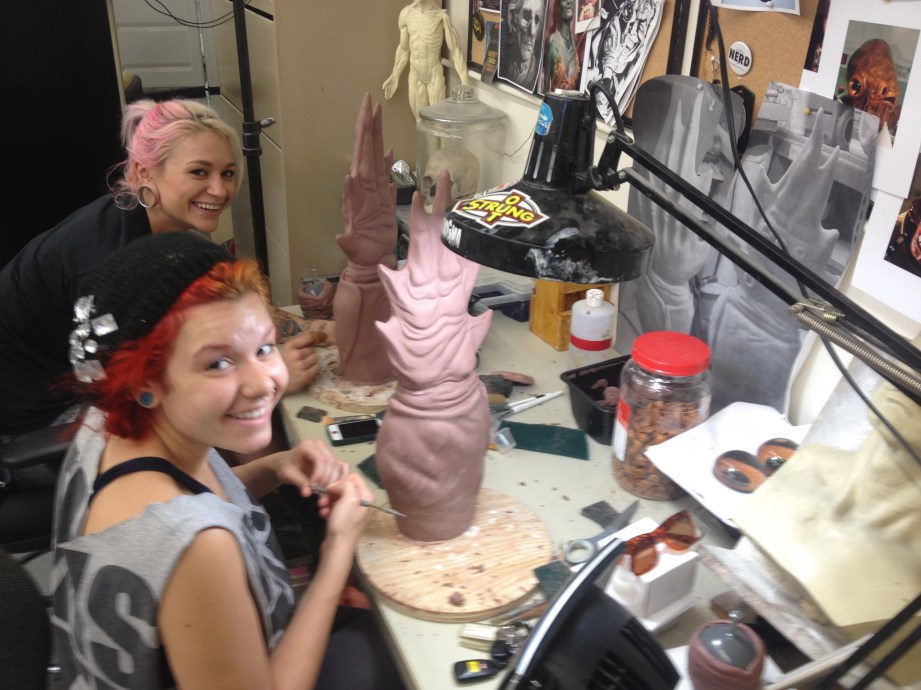
While this was all going on, I brought in a couple friends to work on the hand sculptures. Eddie Holecko blocked the sculpture out, I Refined them, then Alana Schiro and Nora Stahl worked on texturing and smoothing. This freed me up to also sculpt other details in between the gajillion other steps I still had to do. We did all of the sculptures with Monster Clay (from Monster Makers in Cleveland).
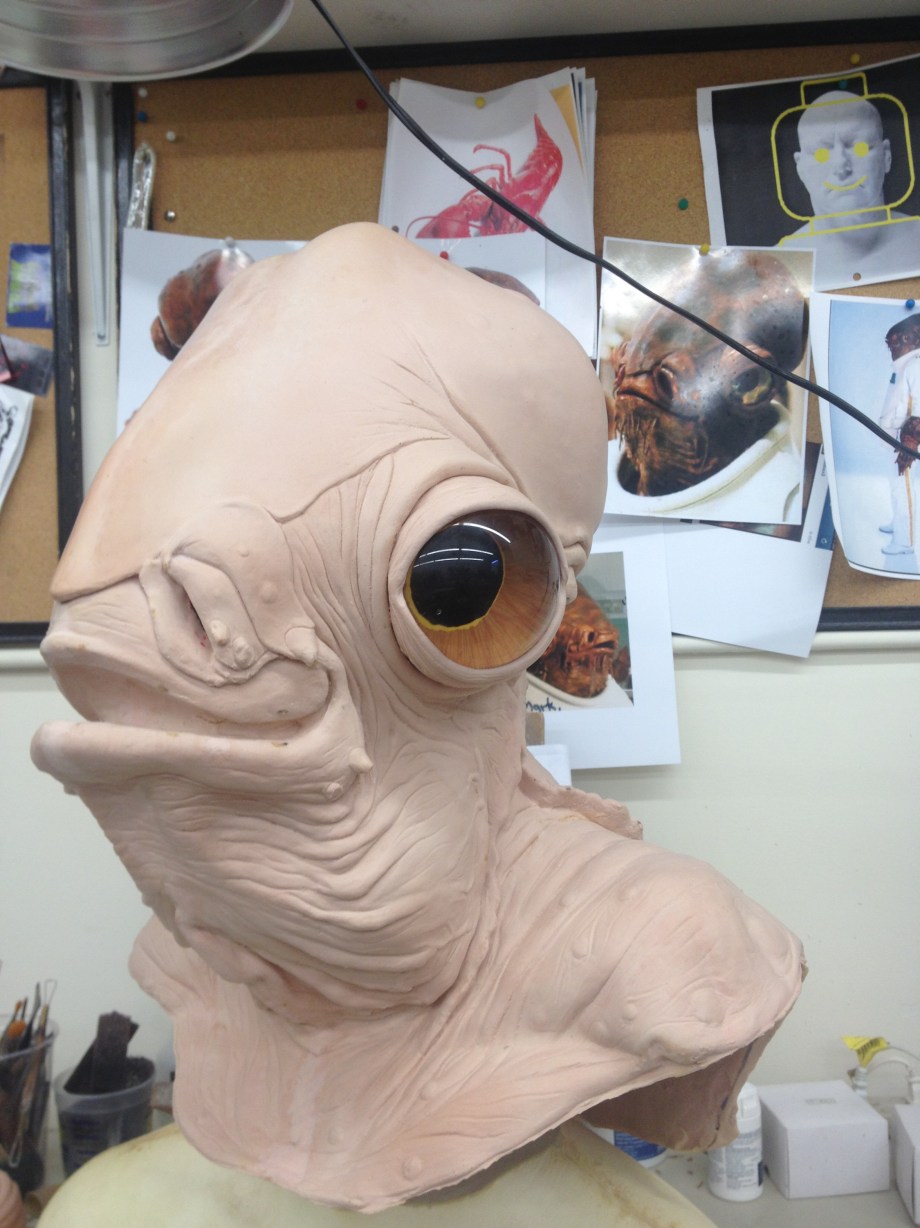
ADAM: My purchased casting had no eye stalks or eyes, even. Frank would have to re-make the eye stalks from scratch. I didn’t need them to move or blink like they did in the film (I’ll add that later, can you say Arduino?) so they’d just end up being static additions. But what about those deep clear eyes of Ackbar? How to do those?
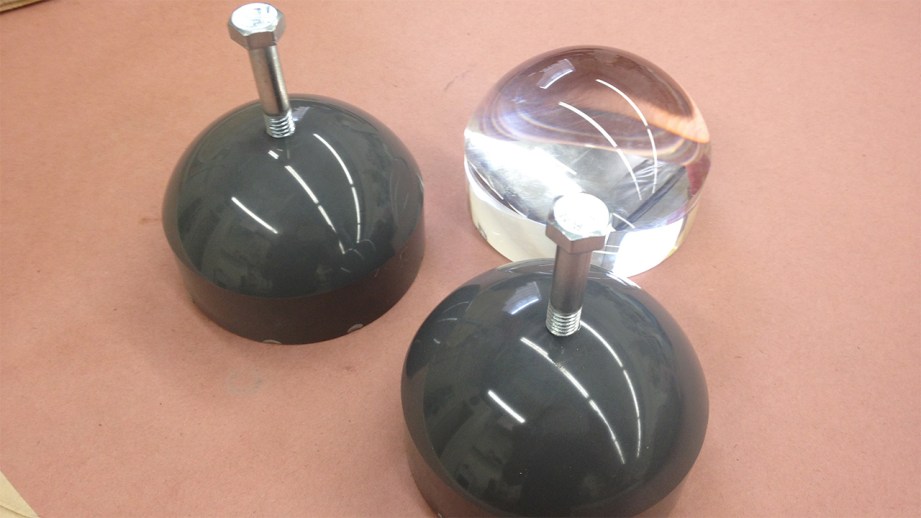
The thing is, clear casting materials are really difficult to work with. Fortunately I came up with an idea a few years ago and I suggested it to frank: What about using a pair of those book magnifiers? Like the one that came with my Oxford English Dictionary that’s in the Cave.
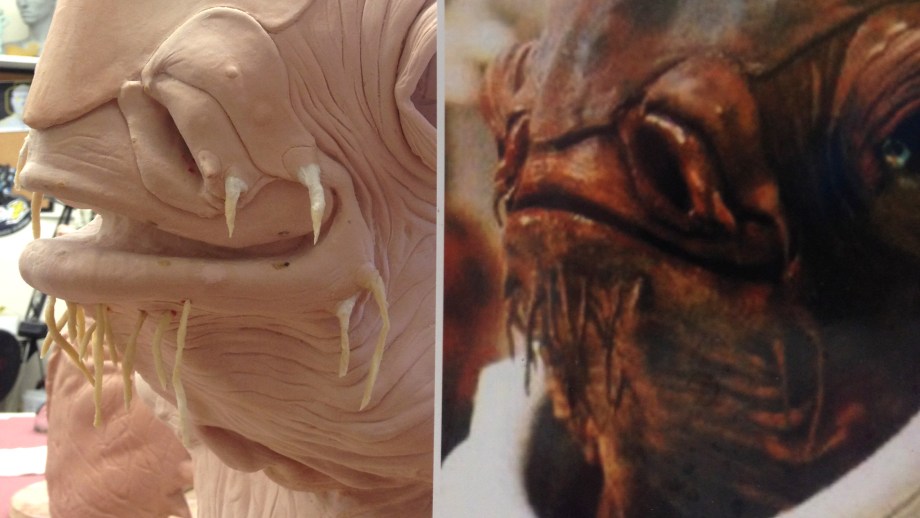
For reference, I had pictures of a pair of Ackbar eyes that sold at auction a few years ago. They had been painted by Phil Tippett and they gave fantastic details about the paint job. As Ackbar’s eyes are a crucial part of the costume, we had to get this right. And Frank did a superb job.
The Eyes
FRANK: To sculpt the eye stalks correctly, I made some quick castings out of adams original mold with ‘Free Form Air’ of each of the eye sockets. This will give me correct shapes to get the forms of the sculpture right. I use some monster clay around a urethane casing of the eye form. My pal Miranda Jory finished off the texture on the eye stalk sculptures while I was jumping back and forth between other steps for Ackbar.
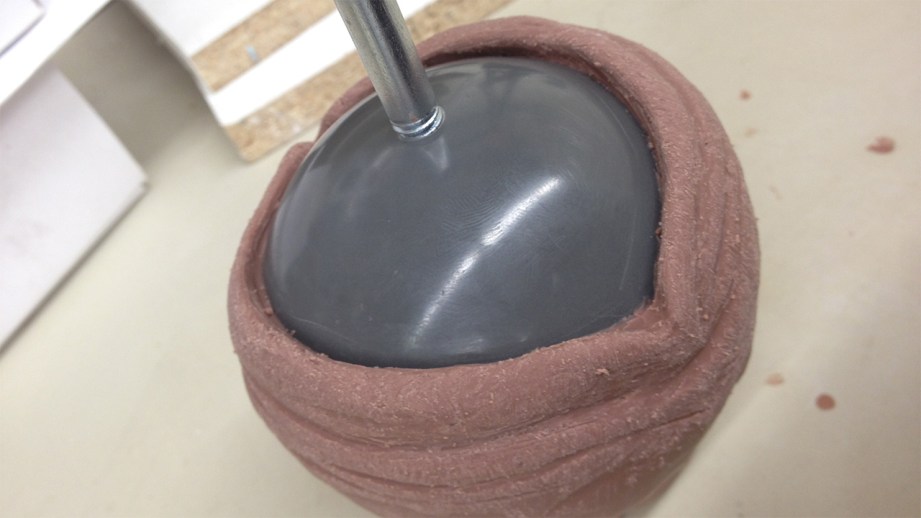
To mold the stalks I just boxed them up individually and poured in a 40 durometer platinum silicone from Smooth-On. Having a flexible mold saved me from making a two-part epoxy mold and having to seam the eye stalks. The rubber helps let the eye from flex in and out since its a tight fit in the thin stalk.
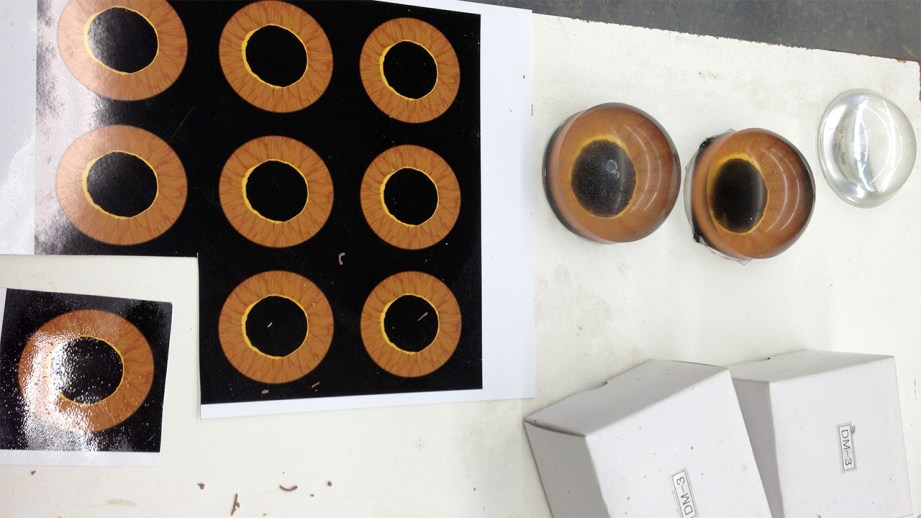
For the eyes, Adam had suggested a 3-inch magnifying dome, so I ordered a couple of these. Adam also sent me a picture of an Ackbar eye that was up for auction at some point, (From Phil Tippett’s personal collection) which gave me a great image of what the eye’s paint job was like. I took this into Photoshop and stretched the off-camber photograph into a clean and perfect circle.
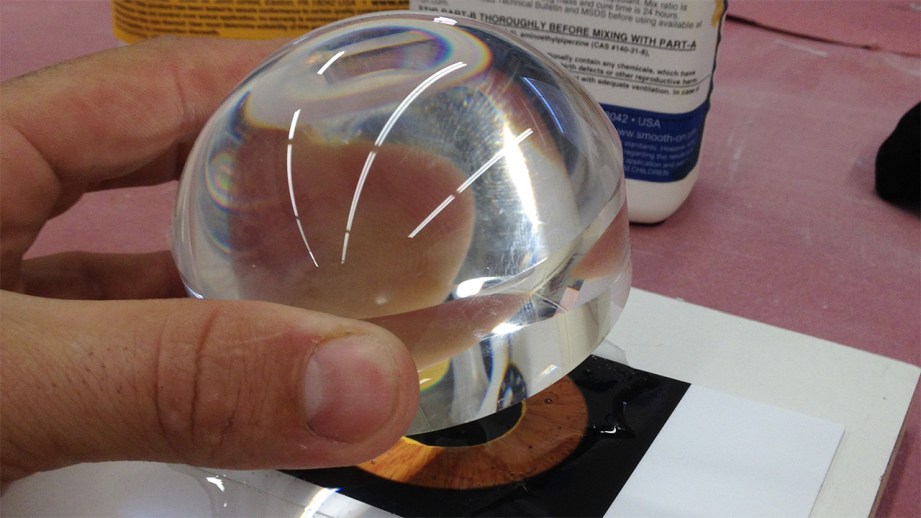
Then on a new layer I painted over the existing reference to give myself a nice clean image of the eye. After a couple tries, I got the size right for magnification and printed it out, and epoxied it onto the back side of the dome.
The Head
FRANK: Back to the head mold. With the two halves of the fiberglass mold done, I need to make a core. The core is also made from fiberglass and allows us to inject a special foam latex into the mold that comes out the perfect thickness and also makes sure that the actor’s head fits in the mask.
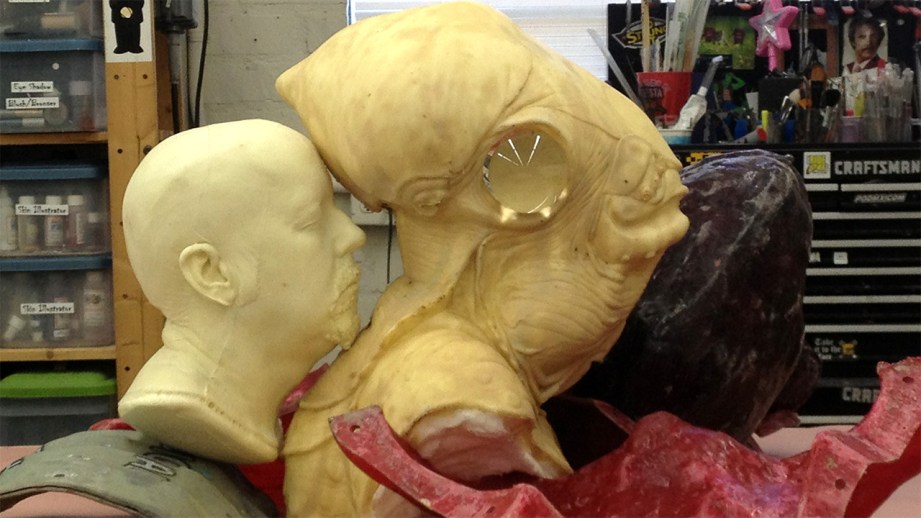
Because I had torn off Adam’s scalp during Night of the Little Dead, I had a master mold of Adam’s head that had been used during that production. An accurate casting of his head would allow me to perfectly fit the Ackbar to Adam without any guesswork.
I took my casting of Adam’s head and positioned it in the mold approximately where it wanted to be sitting, and lay in water clay to represent the desired thickness of the final casting. Then Chris Alexander and I glassed up the two halves of the core and then I glassed them together once the mold was bolted closed. When this is all set up, all I had to do was clean it out and send it off for foam latex.
In this process, the outer fiberglass mold was bolted together, and then the core bolted to the outer mold. Foam latex, about the consistency of a makeup sponge, is injected into the cavity between the inner and outer mold.
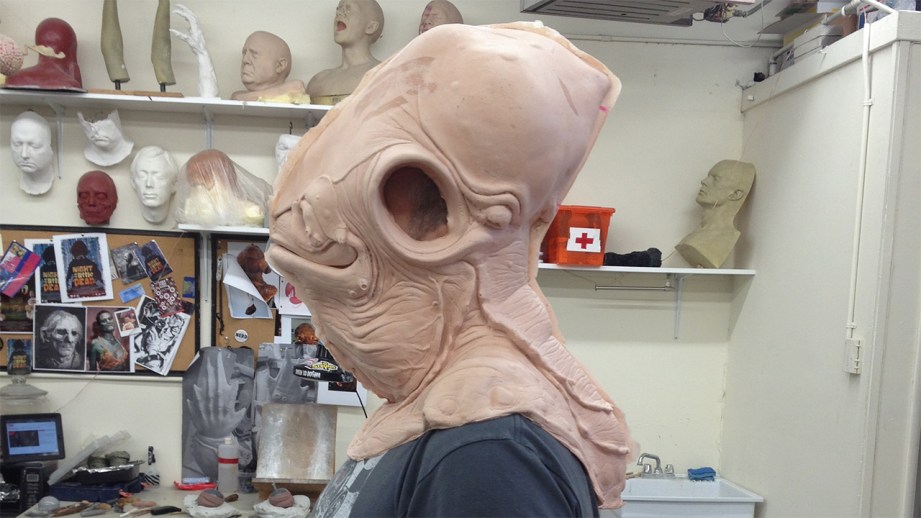
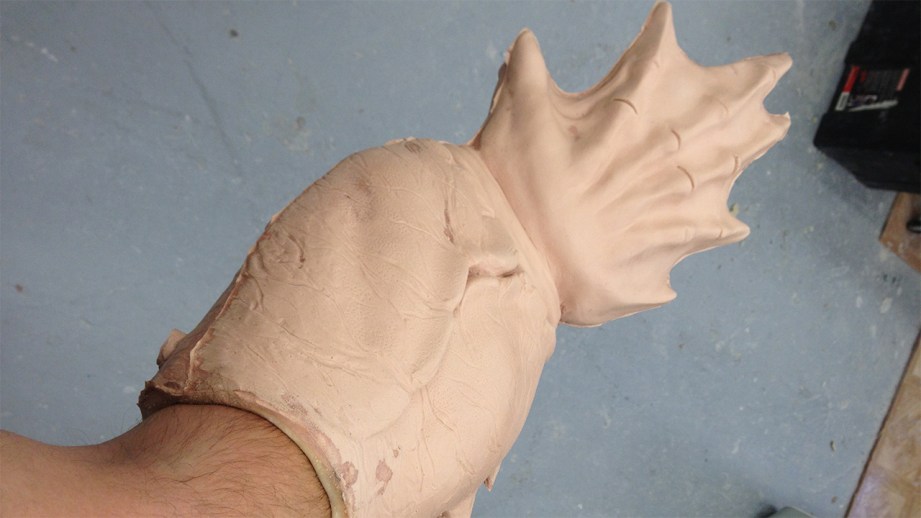
I split the foam runs up on this project between two friends that have their own shops that only run foam and do castings. Roland Blancaflor and Mark Viniello. Once their foam castings were done, they needed to be seamed and patched. Between scissors and burning with a hot tool (like soldering iron) the seam is removed while small batches of foam latex are put on the seam to fill the tiny gap. This was done by Tim Leach. It’s hard work to get right, but crucial to remove evidence of the mask’s manufacturing process.
The Hands
Just like with the head, the hands had some last-minute changes. Originally, we were just going to run slush latex copies, but because we opted to make more long term epoxy molds on the hand sculptures, this is a bit counter productive when it comes to casting latex.
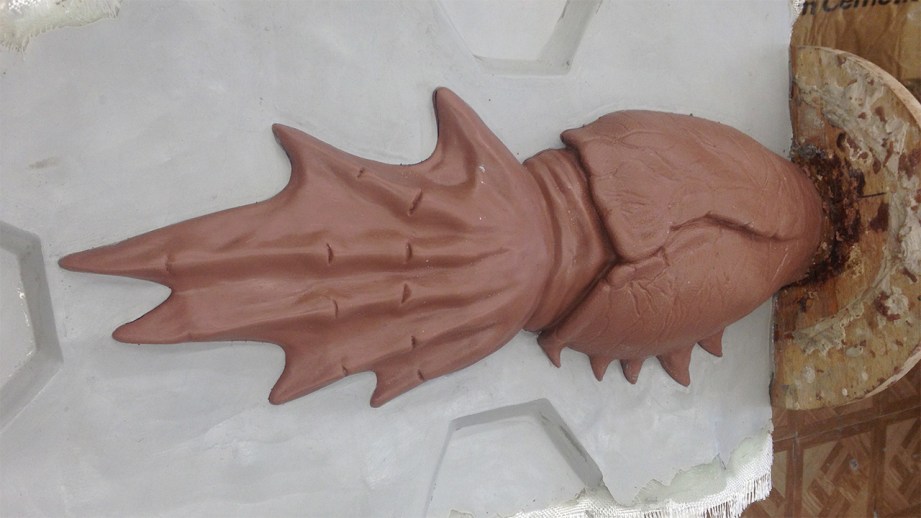
The normal mold material for latex is plaster. As plaster is porous, it holds on to the latex so that the resulting casting is exactly the shape of the original mold. Epoxy isn’t porous, and as the latex dried in the epoxy mold, it shrunk. I also had to rotate in the latex in layers, otherwise it will never dry.
After the first layer, I noticed it pulling away from the surface as it dried, so…lets just say there was another late night call to Adam to approve another deviation in plans, and I jumped into making another set of fiberglass cores for the hands, the same way I did the head. Also like the head, these would have foam latex injected into them.
Assembly and Finishing
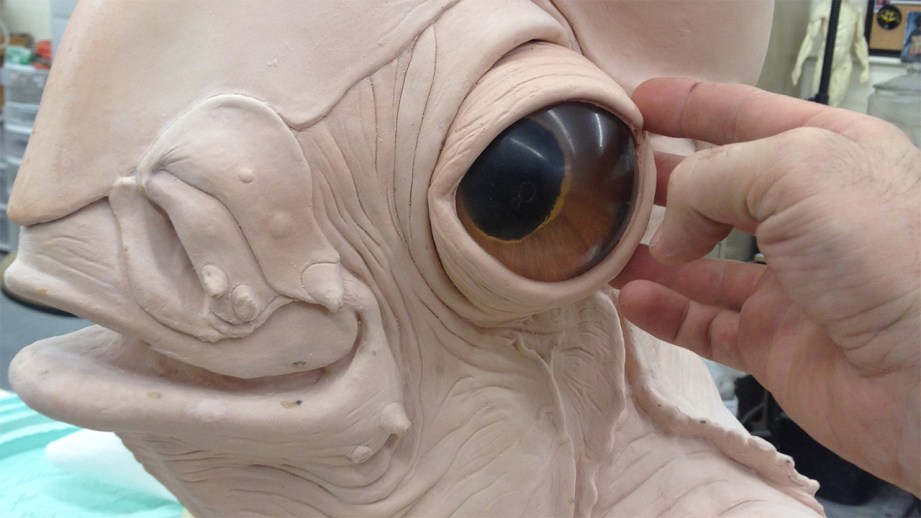
The eye stalks that I sculpted (and molded and cast in foam latex) were glued in place with barge cement. I also needed to make a core to fit inside the foam casting to hold the shape of Ackbar’s quite large head. Without this he might look great from the front, but a bit like a deflated balloon from the side. Unacceptable.
I made a quick plaster bandage mold on the head’s fiberglass core and then lay in a thin layer of fiberglass inside that. I added little bit of soft polyfoam to the inside so that it sits on the head correctly and is (hopefully) comfortable. Once it was trimmed up, I fitted it into the head mask and move onto the last details.
Ackbar has a bunch (17 that I can count) of little tendrils on his chin and around his mouth. From the reference I had, I figured I could make these by rolling a little cotton in latex, then gluing them on the foam casting. Bingo. It worked like a charm.
Painting
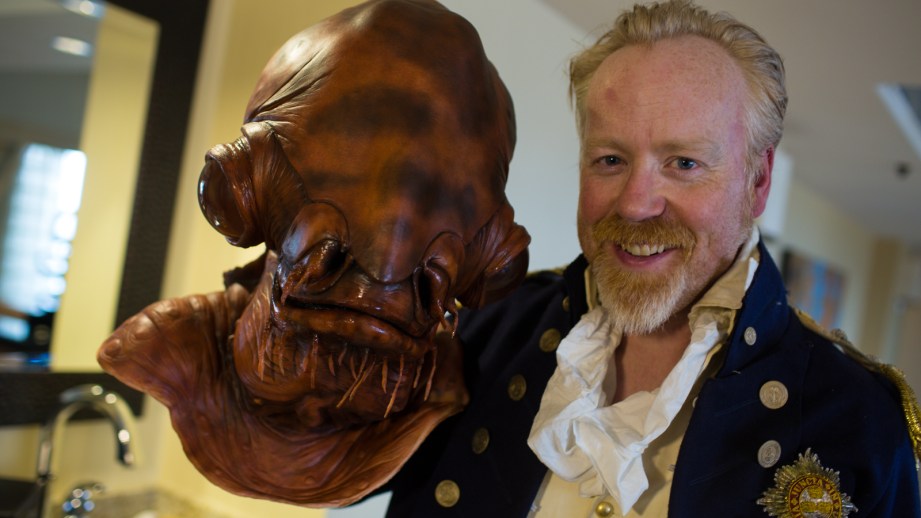
Time for paint! The paint scheme for Ackbar is pretty simple, I used just four colors to get it done. A salmon-ish color, purple-ish red dark brown, yellow and burnt umber.
To paint a foam latex mask, I prefer taking rubber cement and thinning it with naphtha, then tinting it with oil paints. This can be airbrushed or hand painted on. It doesn’t clog the details, and sticks perfectly to the flexible foam mask material without too much wear and tear as it moves.
My buddy Doug Stewart (who is a great painter) popped over for a couple hours to jump on helping me with the paint. Final touches were to spray some v-gloss sealer and put a little silicone on the mouth and nose to keep the wet look. Done and done.

In hindsight, I would use a vacuform of the core inside of the foam latex casting, and use mattress or reticulated foam to cut down on some weight. I also think the eye domes are too dome-y. The pictures seems to show his eyes being a little flatter. Maybe a machined and polished form would be more accurate. Also adding a simple spring mechanism that can be controlled via cable down to inside the hand would make mouth movement really cool. Eye blinks would be tough, unless the new eye form was designed to accommodate. Even a little voice modulator or sound board thing would be cool to have in the head.
People that helped with this Project:
- Nora Stahl
- Eddie Holecko
- Alana Schiro
- Miranda Jory
- Chris Alexander
- Doug Stewart
- Mark Viniello
- Roland Blancaflor
- Tim leach
Build photos courtesy Frank Ippolito. Find more of Frank’s work at Frankippolito.com or on Twitter @frankippolito
See more photos of Adam as Admiral Ackbar, getting ready and walking through Comic-Con, here.
Adam Unveils Wired’s Comic-Con 2013 Robot
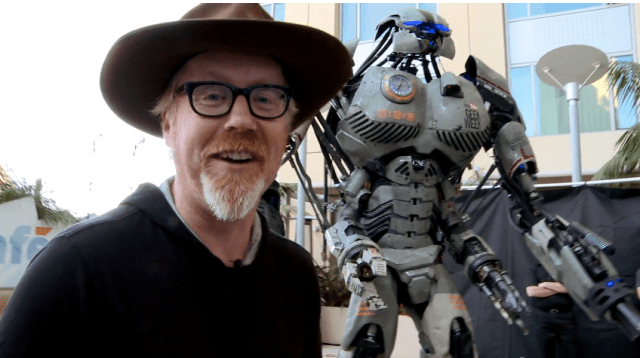
Wired magazine collaborated with Stan Winston Studios and Legacy Effects to build a one-of-a-kind 10 foot tall robot to roam this year’s Comic-Con. Adam stops by Wired to unveil the mech, which took 24 days to build and has an incredible range of movement.