


Friend of Tested and pinball fanatic Jeremy Williams stops by the office to show off his latest project: an Arduino-powered system to add programmable lights to pinball playfield boards. This custom kit, which Jeremy invented, turns old pinball machines into amazing animated wall displays.
Episode 171 – Soft Gs For Everyone! – 5/23/2013

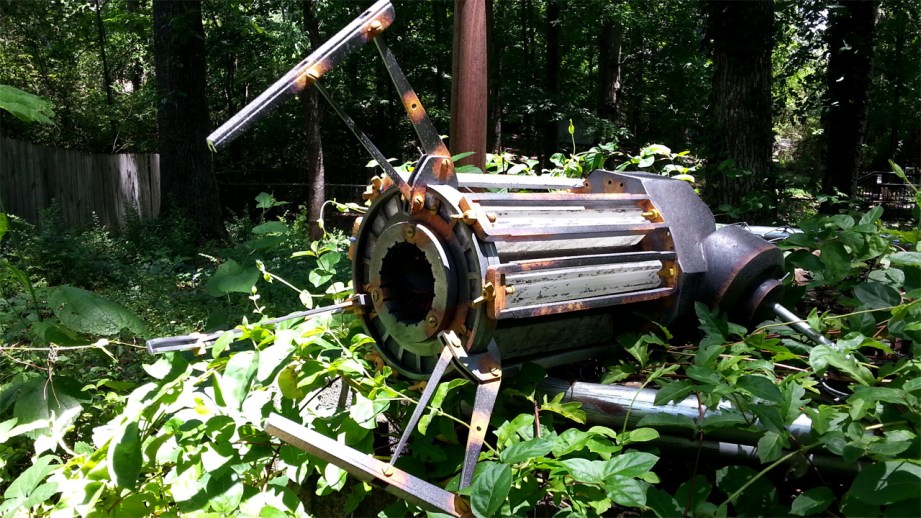
How I Built a Half-Life 2 Gravity Gun Prop
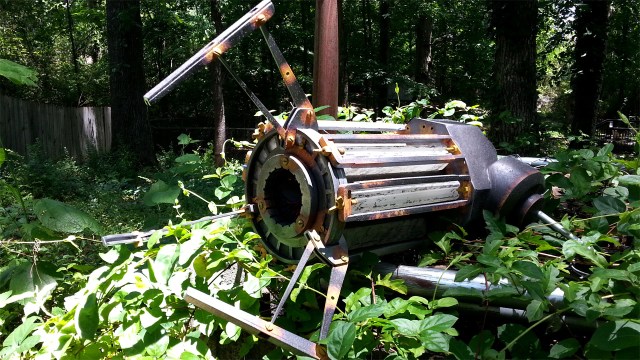
The Gravity Gun from Half-Life 2 has always been one of my favorite video game guns, both in terms of design as well as use. It was always amazing to me that it took almost eight years for accomplished prop builders to take a crack at it, given how iconic both the weapon and the game are to the broader gaming community.
In December 2012, I decided to start on a build of it myself.
For the uninitiated, the Gravity Gun is one of the primary weapons and tools that you use in the video game Half-Life 2. It allows you to pick up and throw various objects in the game. You only get to see it from the 3rd person in a few instances, thankfully one of which is when another character in the game is holding it.
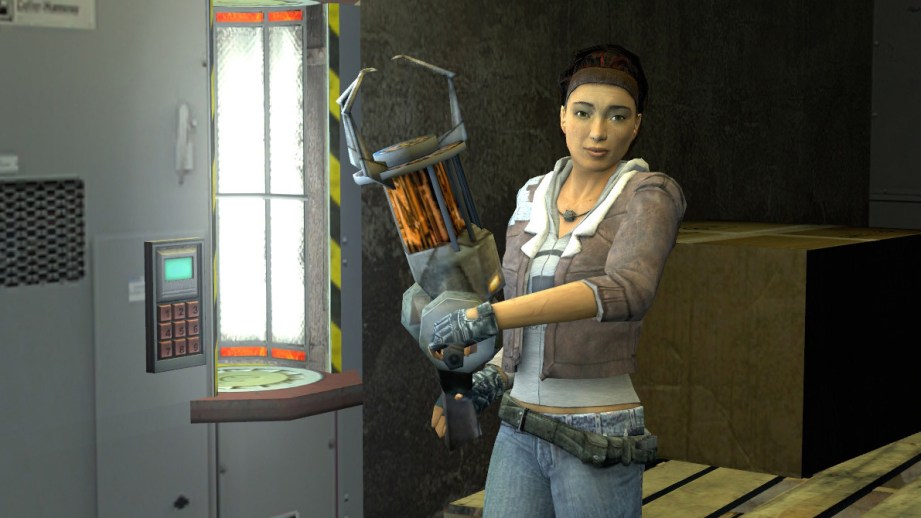
You can see the size of the weapon here, and I used this image to help determine the scale used when building everything. Coming from a 3D design background, my primary prototype building methods utilize laser cutting and 3D printed parts. Props from video games make the first steps easy, since in most cases you can easily extract a game model into a workable format. However there are a few caveats to this:
Most of these models are built in such a way that there are many intersecting solids–that is, two objects sitting inside one another without any way to connect – or with many missing “faces”. Especially in view models, which are the models you see in your HUD when holding a weapon, any side of the gun that isn’t viewable from the camera gets removed to save rendering time.
Secondly, especially with older games, a lot of weapon and items models are incredibly low poly and have a great number of their details in their texture. In a weapon like the Gravity Gun, which comes from a game that came out almost 10 years, the model quality is pathetically low.
So, this necessitated remodeling the entire gun. This isn’t a huge deal as it’s something that is needed for pretty much any project. But it required a lot of cleanup and a lot of rebuilding. This process took a couple of weeks, but in the end yielded our digital master.
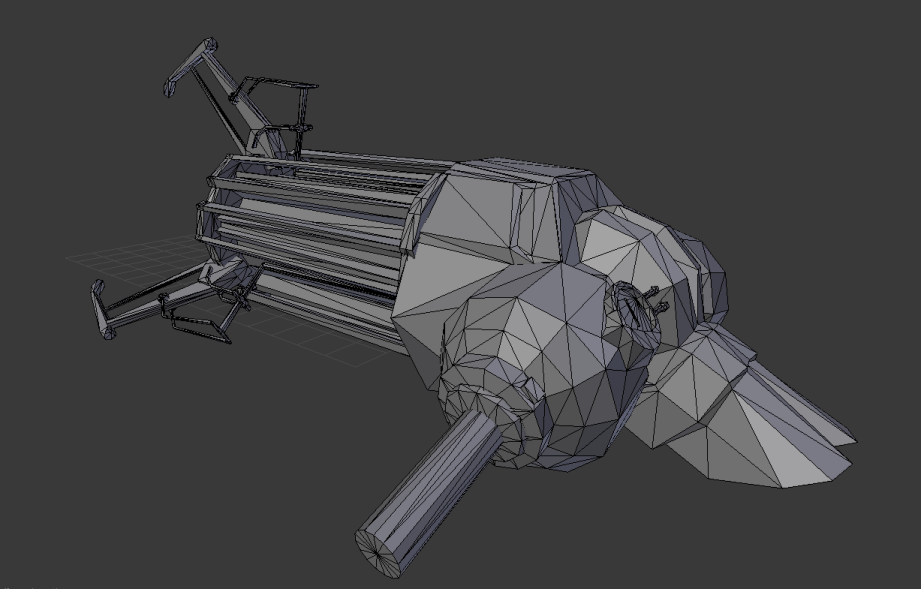
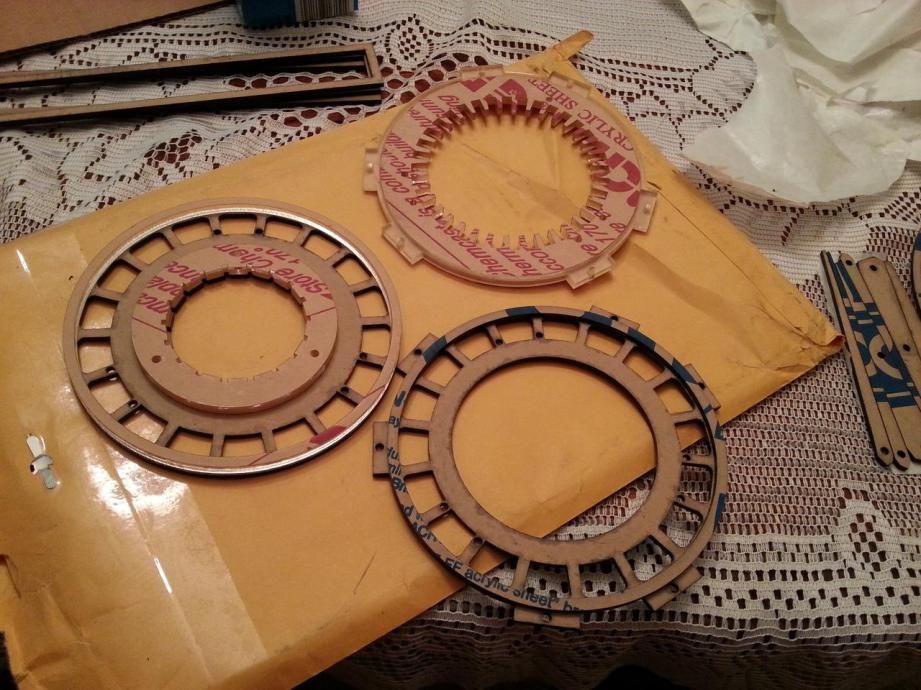
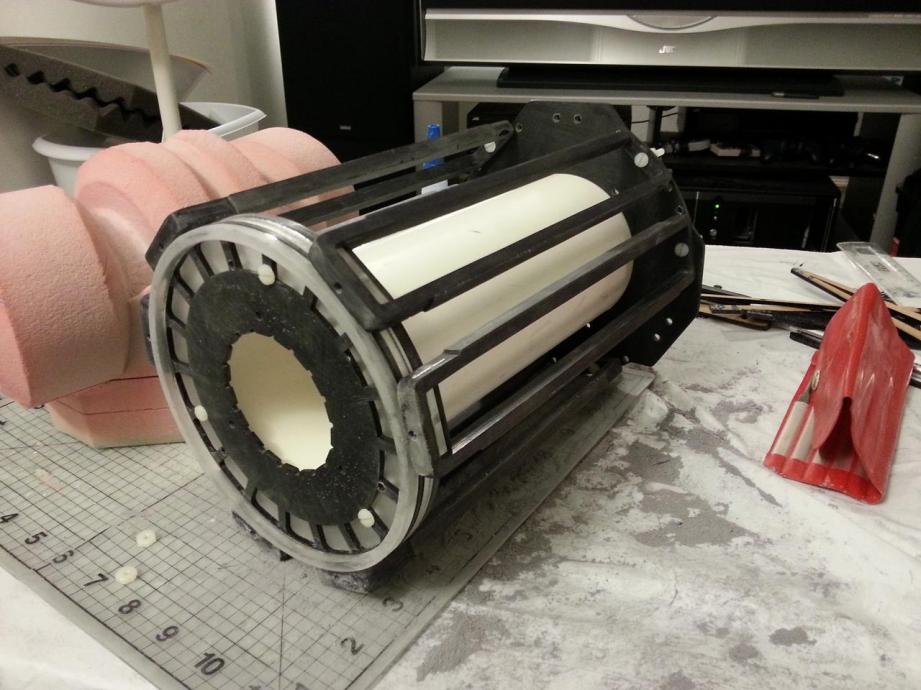
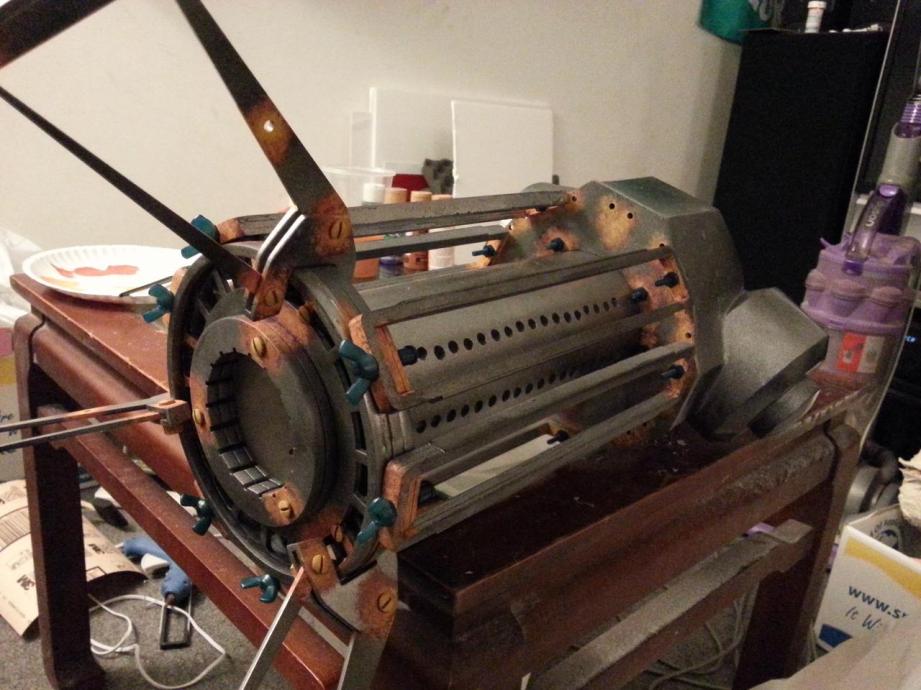
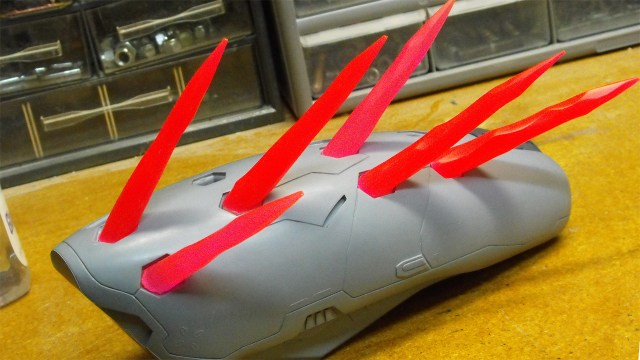
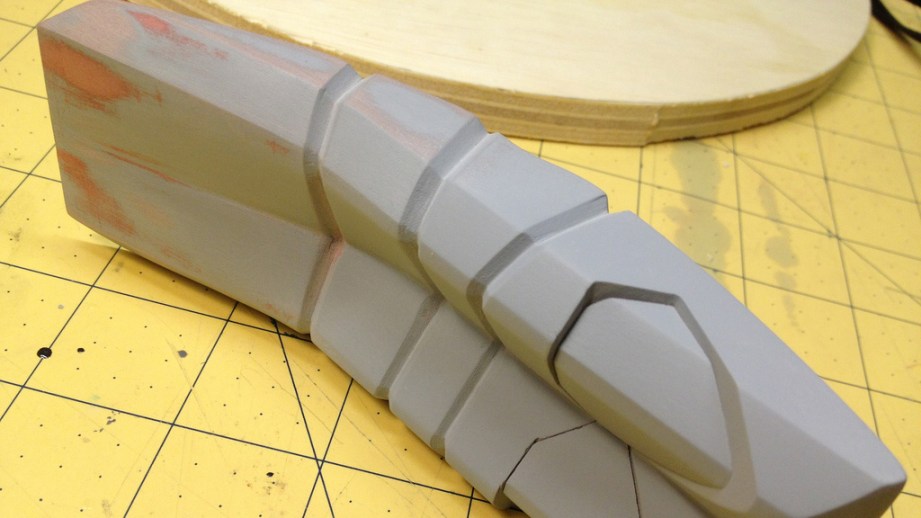
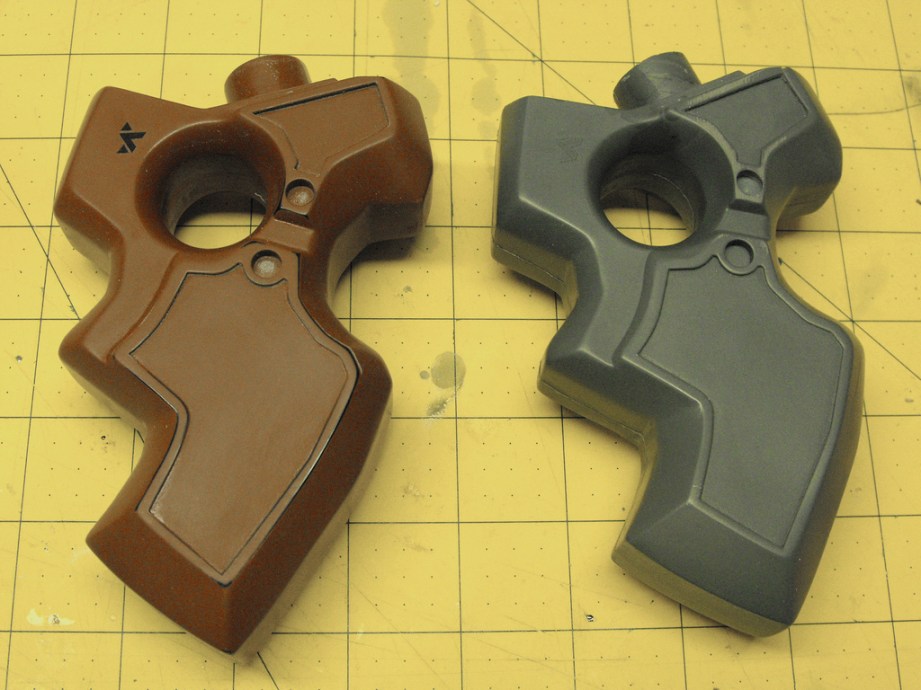
The Gravity Gun breaks down into two very distinct sections: the front barrel made up of flat objects, a mostly plain circular “barrel”, and six energy crystals with accompanying “cages”. And the rear drum base which consists of a couple circular “drums” connected to a weirdly shaped geometric base, the rear pistol grip handle and the left side bar handle. Altogether there are about 25 or 30 individual pieces which would need to be put fabricated, and once the 3D master was sorted out, I started making 2D templates for the sections that would be laser cut.
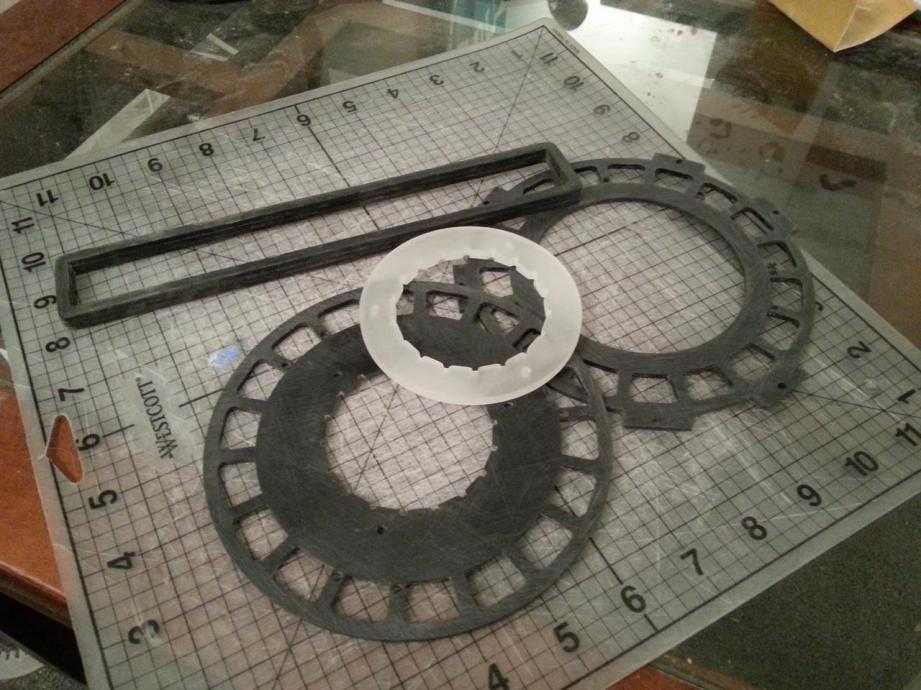
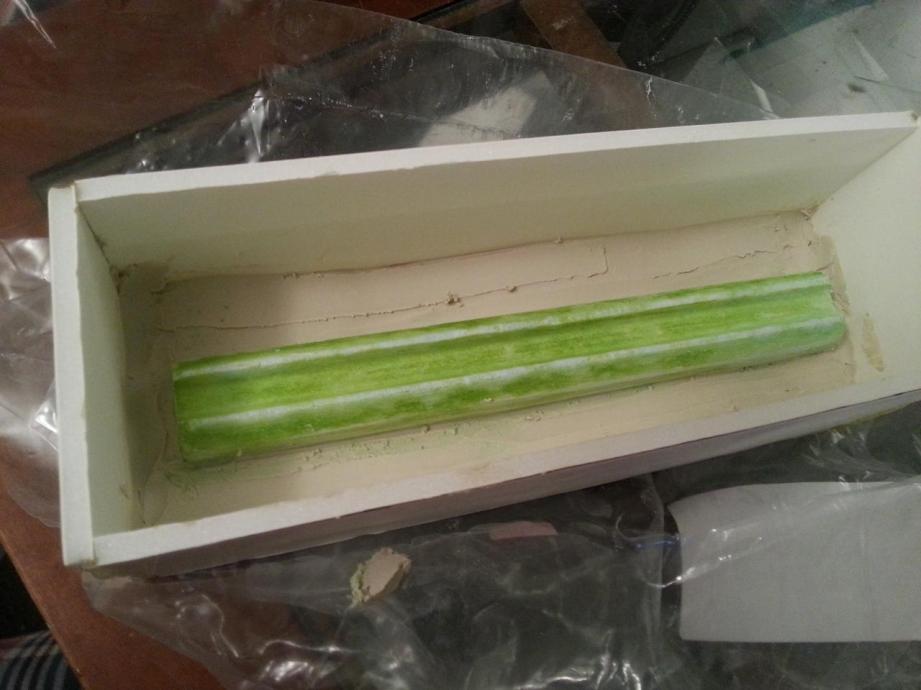
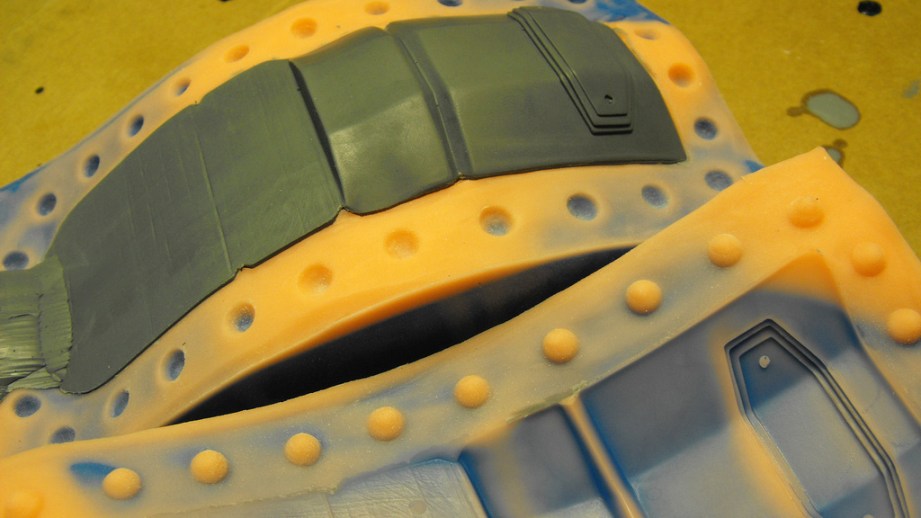
The front of the barrel section is made up of a series of stacked sheets, which would be laser cut out of acrylic. The back plate of the barrel section would also be made from laser cut acrylic. Along the barrel itself – a 3″ piece of PVC pipe – are six “crystal” bars and six corresponding rectangular “cages”. These cages too were made from three cut pieces of acrylic.
The acrylic needed a lot of sanding in order to get rid of the perfectly level surface to allow it to accept paint and to bond together with the few sections that needed gluing.
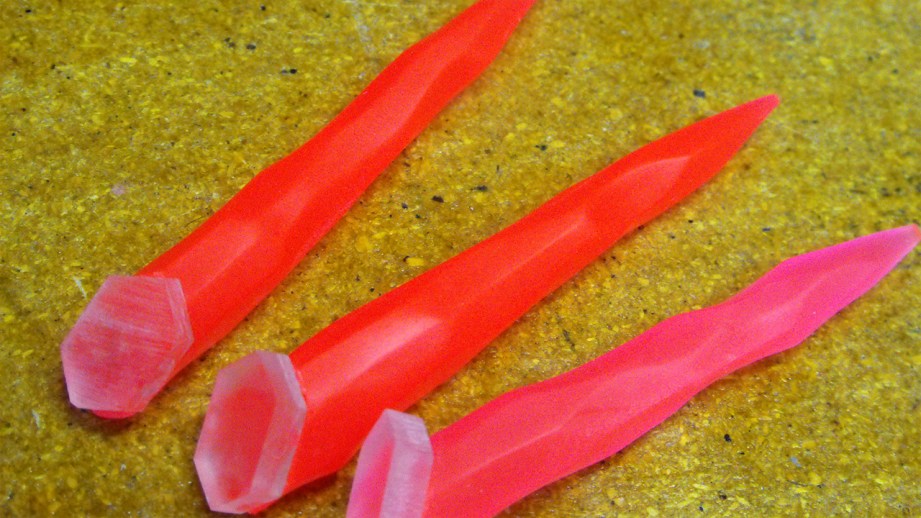
Meanwhile, I set about making a mold of the crystal bars which were 3D printed and for the cages (not pictured).
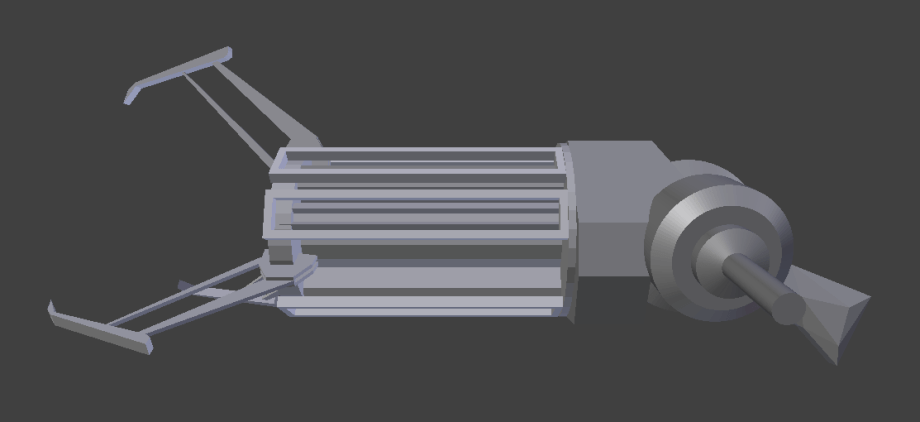
At this point, the acrylic pieces were nearly finished and ready for paint, and the casts for the six crystals and six cages was finished. I purchased a small fortune in the fasteners needed for the project, a total of about 60 nylon nuts and bolts, and mocked everything up.
Looking pretty good!
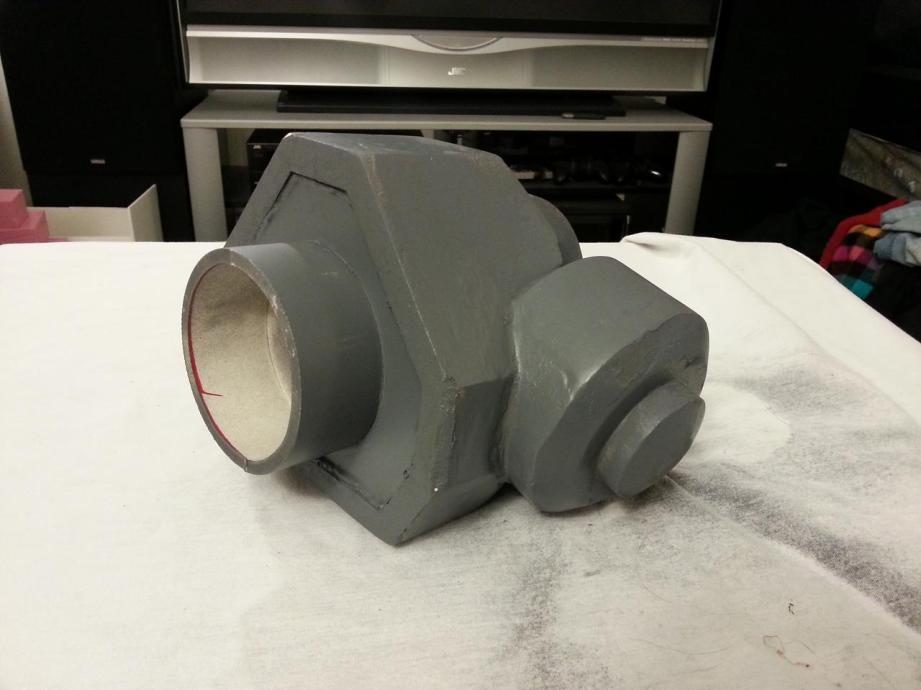
Now that the front barrel was in pretty good shape, I turned my attention to the rear base. The 3D printing method that I used, a plaster based printer, has a lot of pros and a lot of cons. The best part about it is that it is dirt cheap to buy materials needed. But unfortunately, that means the end result suffers a lot of issues. The plaster is heavy, brittle, extremely porous, and has a texture over the surface that leaves a lot to be desired. This issue can be resolved by using high fill primer and giving each coat a light sanding, but it’s still far from perfect.
My plan was to make a 2 part jacket mold for the rear base and rotocast it, leaving the interior empty both to keep the weight of the object down as well as leaving room for electronics. Unfortunately, my inexperience and frugality meant my final mold suffered more than a couple of problems.
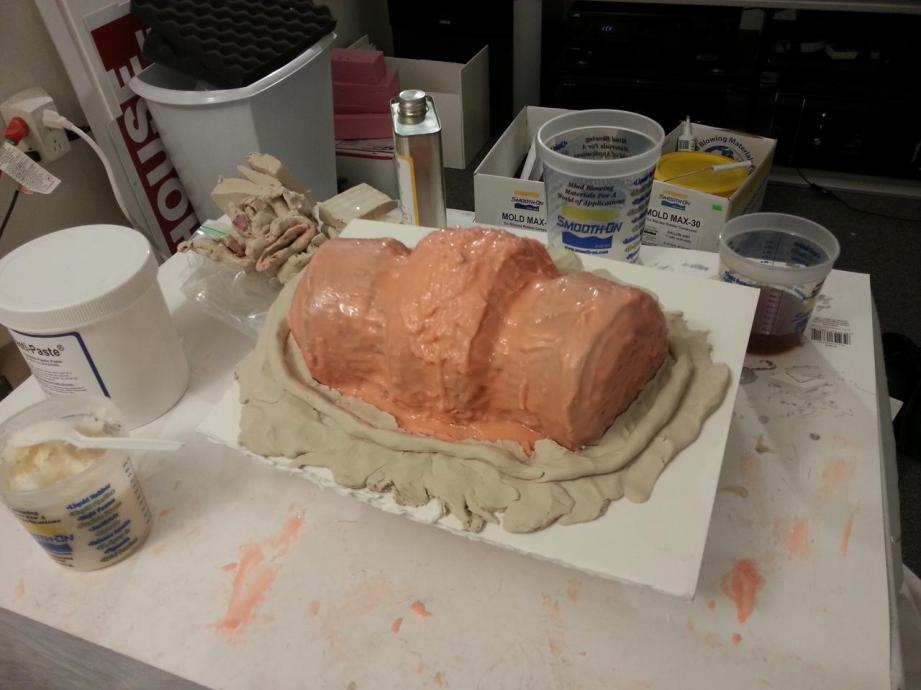
The silicone was far too thin in a few places, resulting in some sagging in the mold once the mother was applied. I also tried to cut corners and chop up an old mold to fill in some of the deep undercuts, but I seemed to have made a huge mistake here. While the axiom of “silicone always sticks to silicone” is true, be sure you are using the same grade of silicone! You can’t mix tin cure and platinum cure silicones, like I did, otherwise you’ll run into the problem where the new silicone won’t fully cure.
What this meant was these big chunks were left in the pull that would need to be cut out, and the sections that sagged needed to be filled in heavily with body filler and leveled out. Thankfully all of the hard edges still seemed to be in square, so it was tedious but not totally impossible.
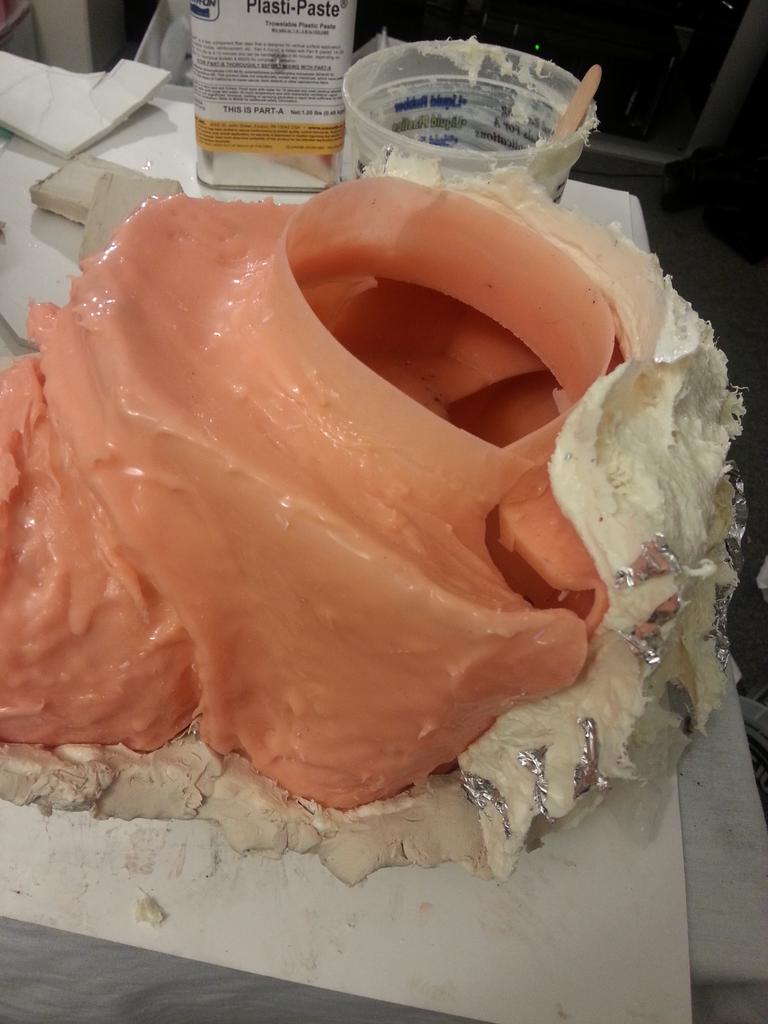
Once all of the issues were cleaned up and I hit it with a coat of primer, it was looking miles ahead better than where I started.
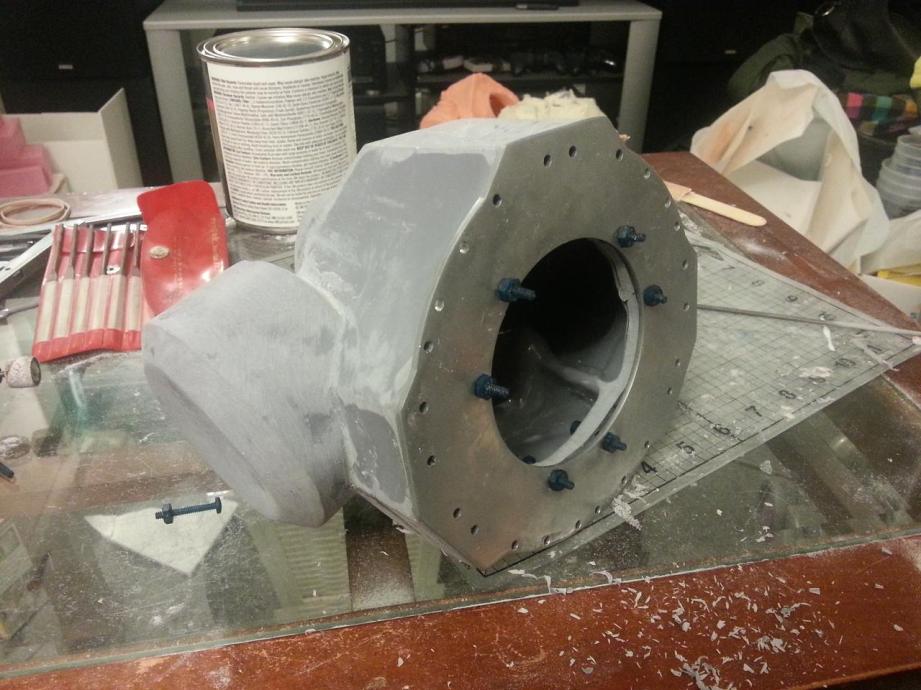
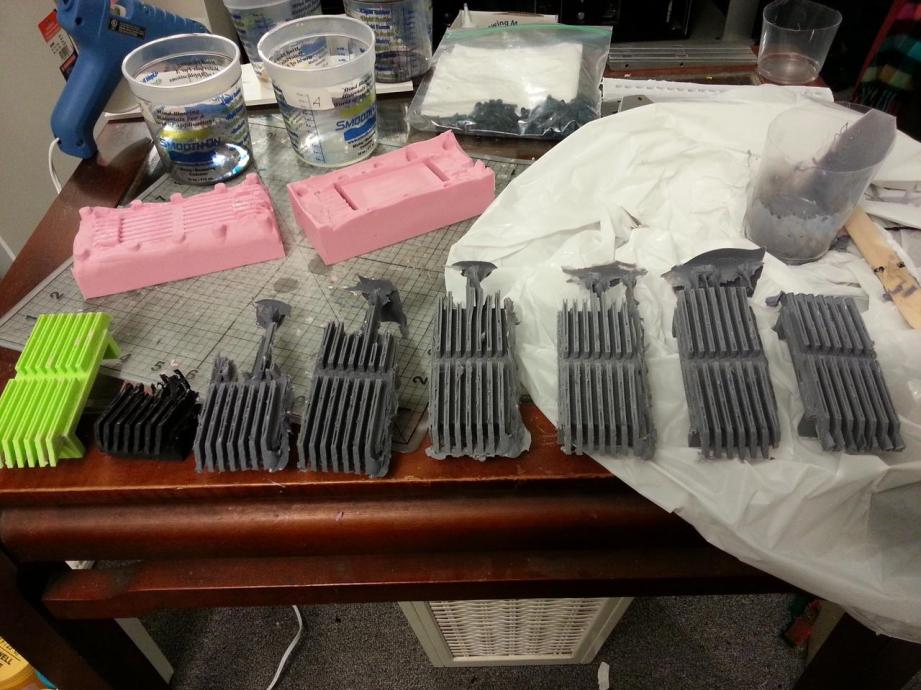
Taking a page from Harrison Krix’s Gravity Gun build, I modeled up a “heatsink” that goes on to the bottom of the rear drum body and had it 3D printed in an ABS printer, which was then molded and cast as well. A few attempts later and I have a nice resin pull of the heatsink.
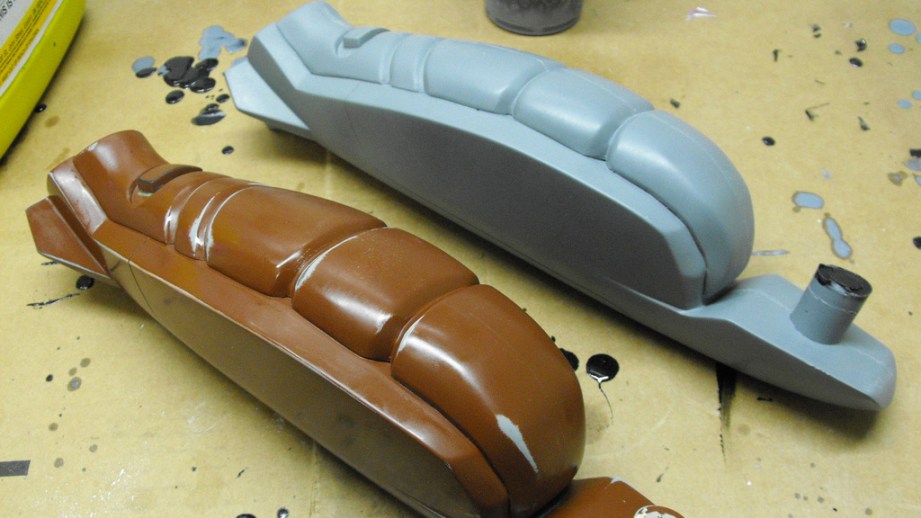
At this point I give the acrylic pieces their first coats of paint. Eventually all of the parts will be given a similar paint scheme–dark gray primer, followed by high gloss silver, then varying thin coats of light, medium, and dark gray metallics. None of the parts have the same exact looking paint since the design of the weapon makes it clear it was a hodgepodge of found items, rather than something made in a factory. All of the parts look similar enough but are not identical.
Then it was time to detail. The metallic parts were given a few washes in blacks and browns to dirty them up, and then all of the bolt holes were painted with a rust coloration. The rear plate and front barrel were painted in such a way to make it appear as if years of slow rust slowly dripped downwards. The rear drum base and the heatsink were also more heavily weathered on the bottom side, as if it sat level for most of its age.
The last thing needed was to wire the thing up, but this was such a rush job (that will need to be completely redone as well) that I didn’t get any photos of it being done.
I set a deadline for myself of a small local convention here in Atlanta, and all in all I met the goal. Up to this point, I consider the project about 90% complete.

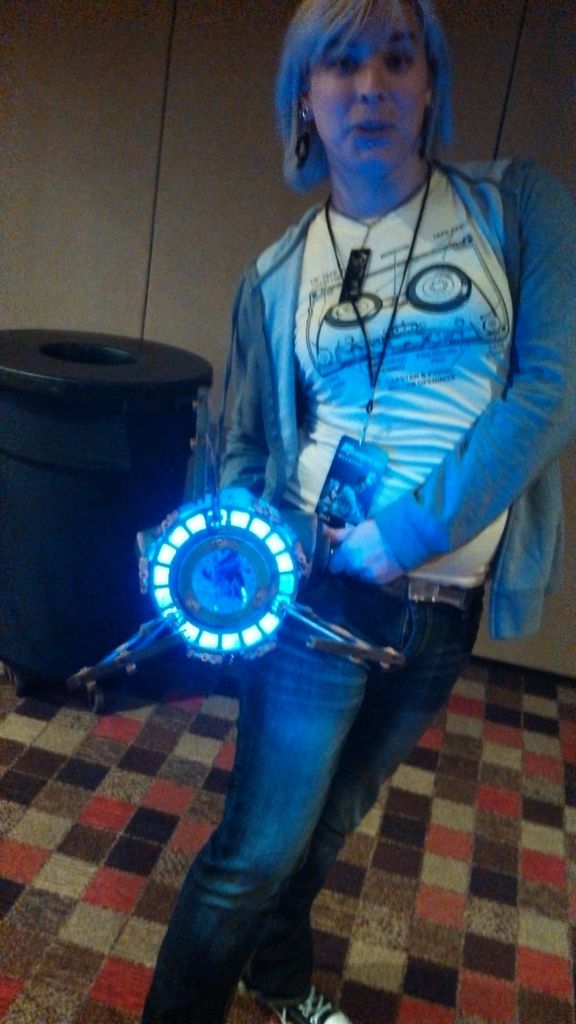
There are a few things left that I’d like to do. There is a small “vent” on the left side that needs to be added. I need a more accurate handle rather than a 4″ bolt. I also want to rewire the lighting to use programmable LED strips. The blue is a little too “icy” blue and not enough white-blue to make it look like electricity. The project continues!
Michelle Sleeper is an Atlanda-based prop maker, and the creator of Overworld Designs. This post originally appeared on her blog, and is reprinted with permission. You can also follow her progress on TheRPF, and see an extensive gallery of all her Gravity Gun photos here.
The Volpin Project, Part 9: The Casting Process
We’ve now burned through a few gallons of very expensive silicone rubber to make molds of every one of the Halo Reach Needler prop’s 12 individual parts. There are a bunch of Needler-shaped cavities that need to be filled with something, and in a similar theme to making the molds themselves, there’s a variety of ways to go about doing so.
Techniques and materials will vary depending on the final use of the piece, but for the purposes of this tutorial we’ll be concentrating on urethane casting resin and leaving out other plastics such as epoxy or polyester. I’ll cover solid casts, hollow parts, and translucent/clear pieces as well.
The most basic parts to be made will be the solid pour castings. For these parts I’ll be using Smooth-On’s product “Smooth Cast 320” and the detail bit that sits underneath the upper casing will be used as an example (apologies for the process photo, I didn’t have a shot of the completed master before molding.)
The initial step after removing your master part from the mold will be to apply a powder layer to all facing edges of the mold. Personally I use baby powder, but I have heard other propmakers use talcum as well. This may seem like an odd step, but this will help reduce bubbles in the finished part. You can think of the thin layer of powder like a paper towel over a spilled drink. Just like a napkin will wick up moisture, a thin coat of powder in your mold will allow the resin to flow more easily into detail edges. What you’re working against here is the surface tension of the liquid, which will have a more difficult time seeping into detail areas without this step.
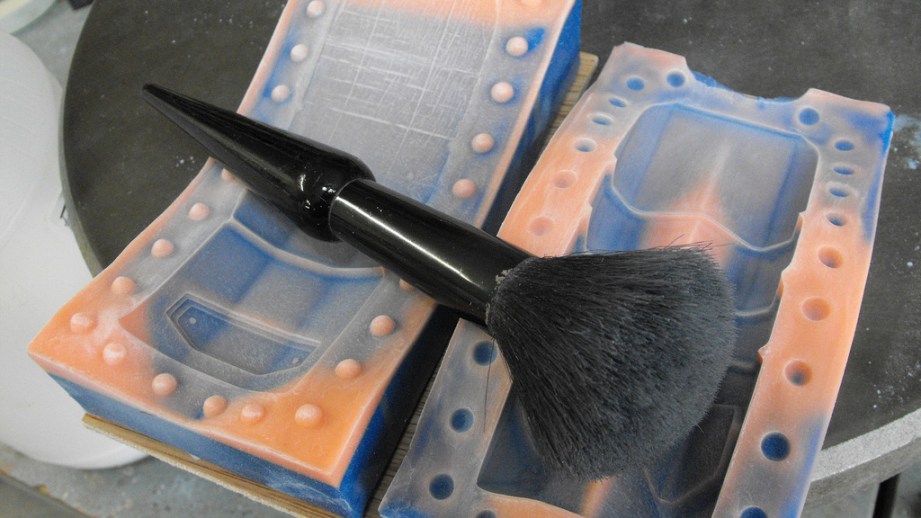
I also use this brush for my eyeshadow (no not really, please don’t do that…) A brush like this one will help evenly distribute your powder. If there are any clumps or thick places, it will act as a barrier instead of allowing the resin to flow and you’ll have a void in your casting. A thin dusting is all you’re after here.
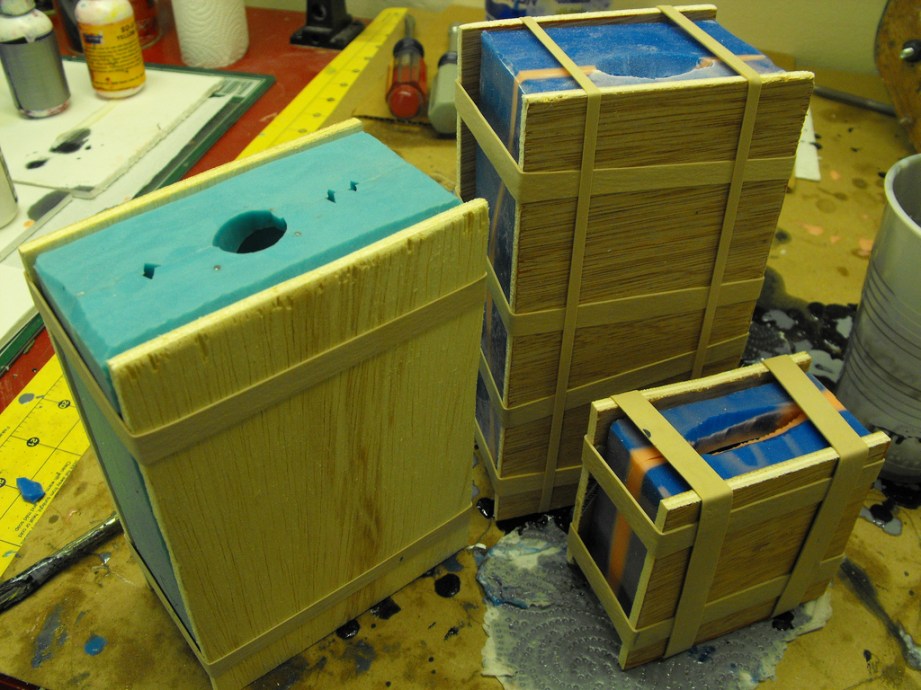
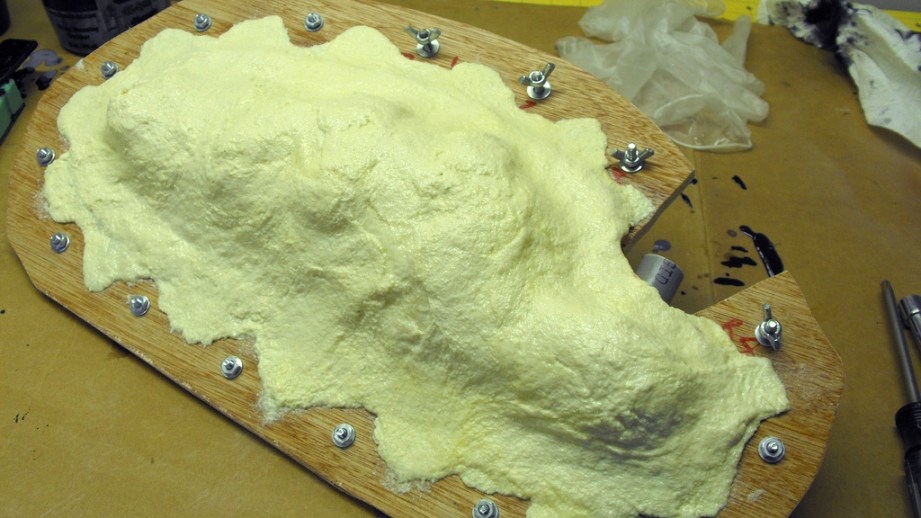
Block molds, like the ones shown here, are fairly easy to reassemble. Sheets of wood are trimmed out about ½” wider on all dimensions, and the silicone mold is placed between these boards and rubber banded together. I’ve seen people use materials like foam core and cardboard here, but my personal philosophy is to use a more rigid material to cut down on any possible distortion of the silicone. Larger molds, like the one shown below, will need thicker support and more robust means of holding them together.
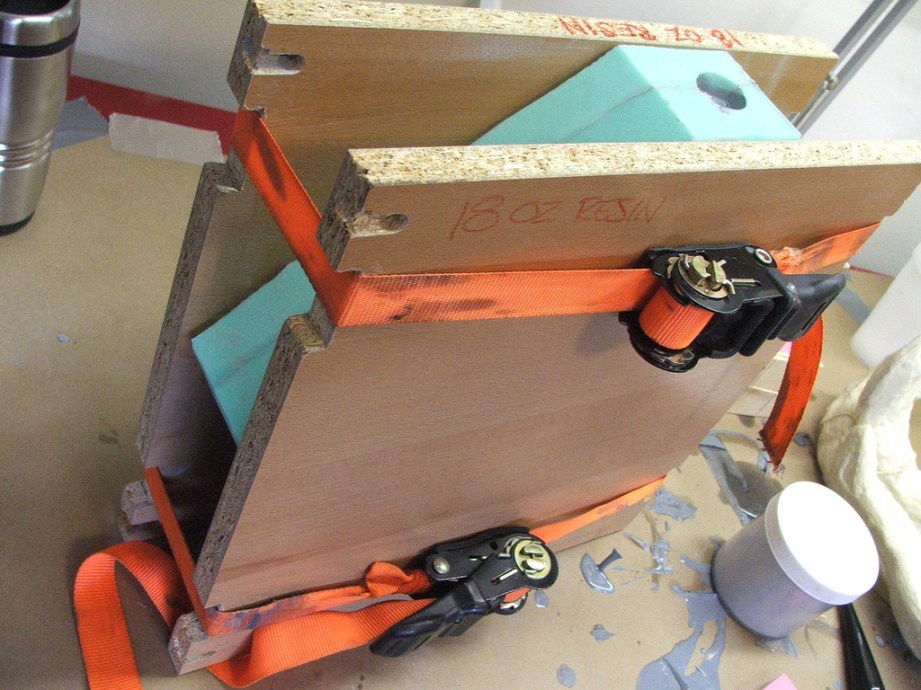
It’s important to make sure that the rubber bands/straps holding the mold together aren’t too tight or too loose. Overtightening means the part will ended up being compressed and squished; too loose and the mold won’t seal well, allowing all the casting resin to pour out of the thin seam line.
Smooth Cast 320 is mixed in a 1:1 ratio by volume. It’s important to get these ratios as exact as possible to prevent curing issues. Getting the ratios off can lead to a bunch of frustration later down the road as the resin might not cure, or even worse, it may seem to cure, but will have a slightly waxy feel to the surface. This will prevent paint from sticking to it and be an absolute nightmare later on down the road. Always read the labels and follow the instructions. If the bottle says shake/stir before every use, do it!
After measuring out your resin, mix the two parts in a third container and add dye if desired. 320 will cure to a sort of eggshell white, which won’t show very well in case the paint gets a scratch on it later down the road. I prefer to dye most of my castings a neutral gray for this reason.
When pouring resin, make sure to rotate your mold slightly to allow any trapped air bubbles to escape. If you have a large open cavity mold this will be easy to spot, but 2 part molds with small pour spouts, like the one shown above, are trickier. Give a light series of taps on the side of the mold to release any trapped air after the mold has been filled with resin.

As the resin cures, the color will change. Without dye it will turn from an amber beer color to off white. At this stage you won’t be able to get any more air bubbles out! All resins have different demold times based on temperature and density of the casting, and for 320 that’s specified as 10 minutes. I like to let my parts sit a bit longer; uncured resin is still quite flexible until fully cured, and demolding before it becomes rigid can lead to warped or distorted parts.
I typically wait at least 30 minutes, then it time for the fun part. Pop off the rubber bands and slowly peel back the silicone to reveal your (hopefully) perfect casted part!
Casting the Needles
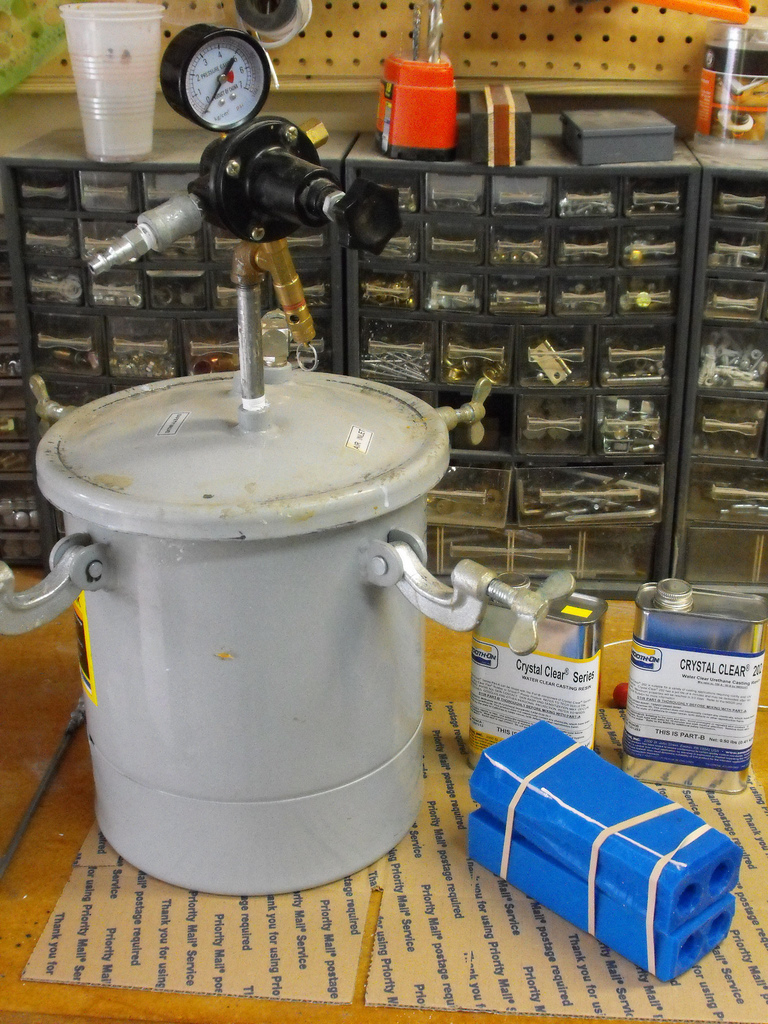
The needles for this prop are produced in a very similar way, with one added element: pressure. All cured casting resins will have air trapped inside them, but due to the opaque finish these are largely not noticed. With clear parts, even the tiniest bubbles will cloud the resin. Since liquids (in this case, the uncured resin) are not compressible while gasses (the air bubbles) are compressible, the solution is a pressure pot. In short, putting a curing resin casting into a pressure tank results in the air getting collapsed into solution while the resin solidifies. Important: This can only be done with vacuum-degassed silicone molds! If there is any air trapped in the mold you’re pressurizing, it will also be compressed and your castings can be distorted as a result.
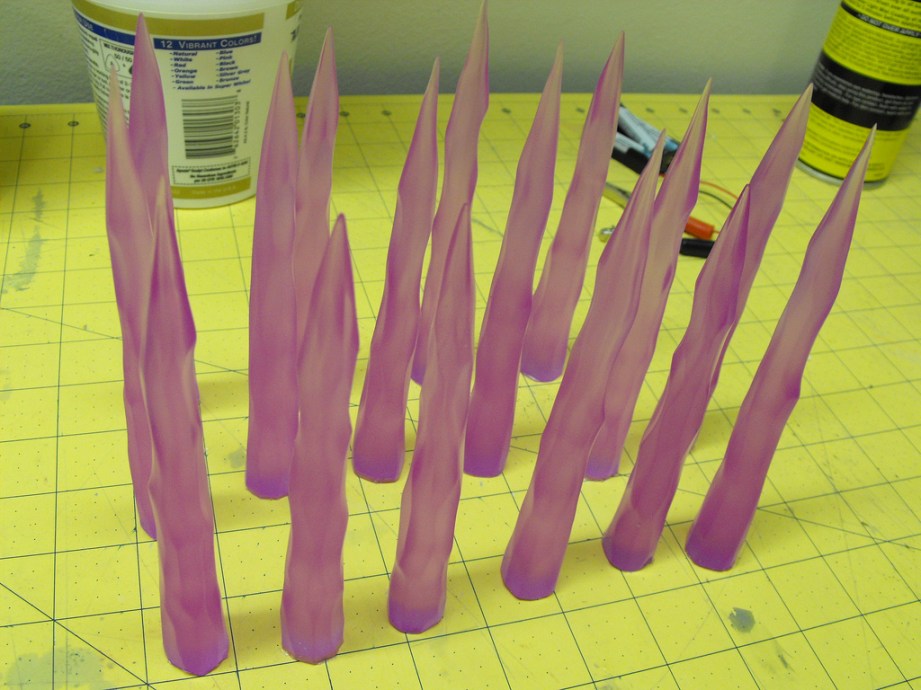
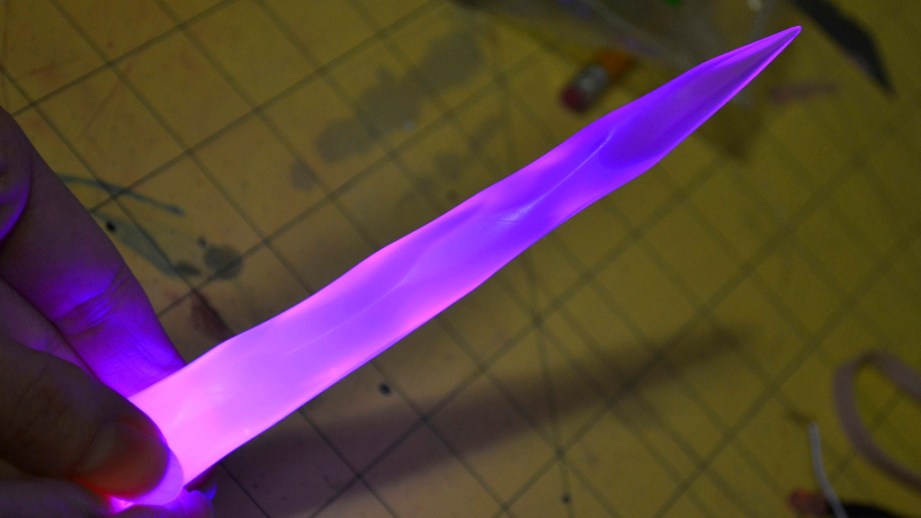
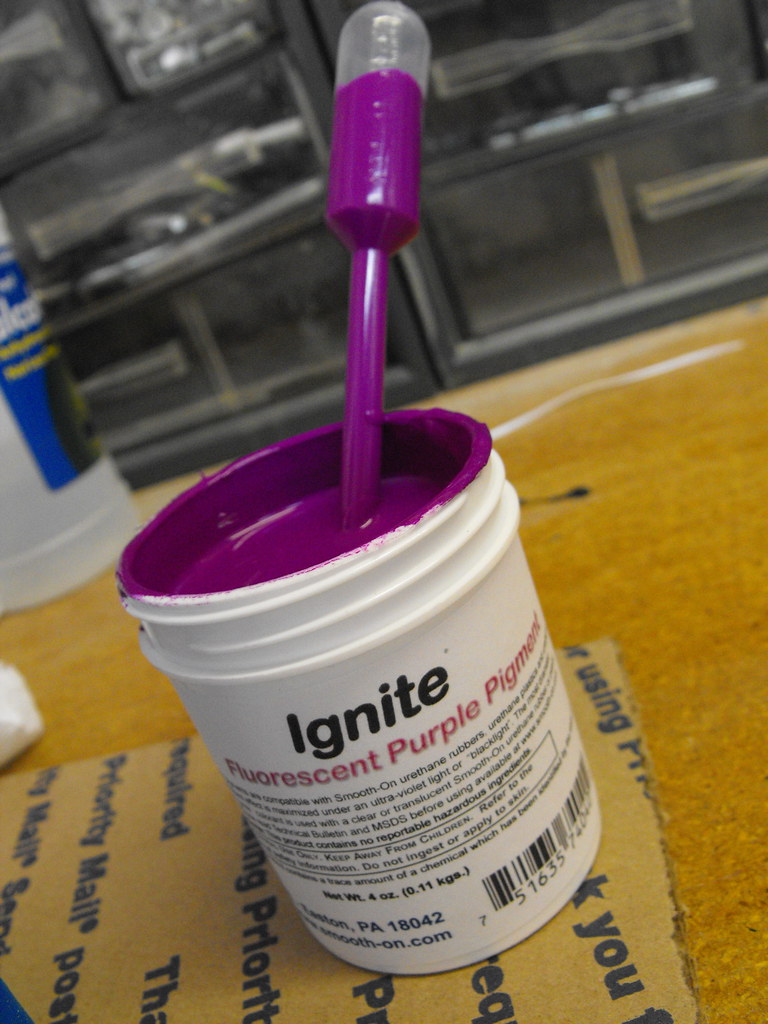
The one shown here is a re-purposed painting canister lent to me by my friend Jay. The needles are cast in a resin called Crystal Clear with a couple drops of fluorescent purple dye to give them some color. This stuff is potent! Only two drops were needed for every four needles.
After pouring the resin into the mold cavity, the silicone is placed into the pressure tank and the lid is screwed tightly shut. The castings are pressurized for 90 minutes at 60PSI to ensure all the bubbles are taken care of.
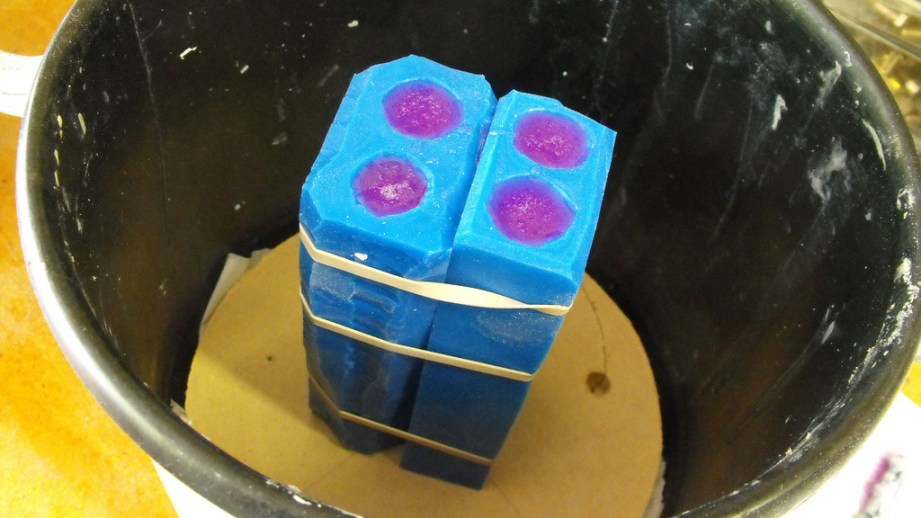
After a few sessions, all 14 are completed! This resin can be a bit finicky and will take 3-5 days (!!) to reach completely cure. I removed the needles and left them sitting upright like this to avoid any distortions from resting on their sides while they finished curing.
Slush Casting
There are more than a couple parts on the Needler that can’t be done in one solid pour for a variety of reasons. Weight is a big concern, but there’s also cost–the upper casing would easily be half a gallon of resin alone if it were cast solid, and that’s nearly $50! Also, electronics will have to live inside there and carving out all that resin after the fact would be a huge pain.
This component, and several others, will be slush cast in order to make them hollow. Slush casting is a process where a small amount of resin is added to a mold which is then sealed shut. In the case of the upper casing, 14oz of Smooth Cast 320 is added as a first pass. After being sealed shut, the mold is slowly rotated by hand until the resin cures against the outer walls of the cavity, resulting in a hollow piece. I’ll use the lower casing as an example.
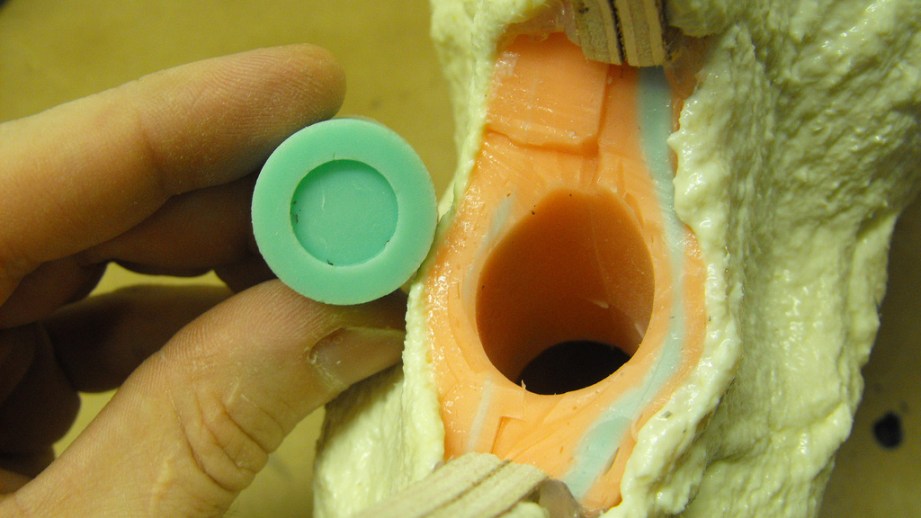
As with before, the mold is opened and the master sculpt removed. Powder is added and the mold is re-assembled making sure that all registration keys are aligned before tightening all the bolts around the perimeter.
One of the things to be wary of in sealed-mold slushcasting is the internal pressure of the casting against the mold. Curing resin heats up quite a bit, and with a hollow casting that means the mold itself begins to become pressurised as more heat is produced, expanding the air in the sealed cavity. You need to have a place to pour resin into the mold, but the plug in this pour spout can come rocketing out (along with a bunch of searing hot half-cured resin) if it fits too loosely. In other pictures you might have seen that I used ½” PVC pipe as my pour spouts, and that’s because it’s very easy to plug a perfectly round hole. I pour excess silicone into PVC end caps to create plugs for my slush cast molds, taking the guesswork out of of keeping the pour spout sealed.
Slush casting will take some getting used to; it takes time to develop a feel for where the resin is flowing and how evenly the resin is coating the inside of the mold. I have found it to be easiest to go in two or sometimes three smaller batches of resin, opening up the pour spout after the first coat is mostly cured and adding more resin as necessary. Larger batches of plastic will cure faster as there is more material to produce more heat, and this can lead to a big uneven clump somewhere on the inside of your part.
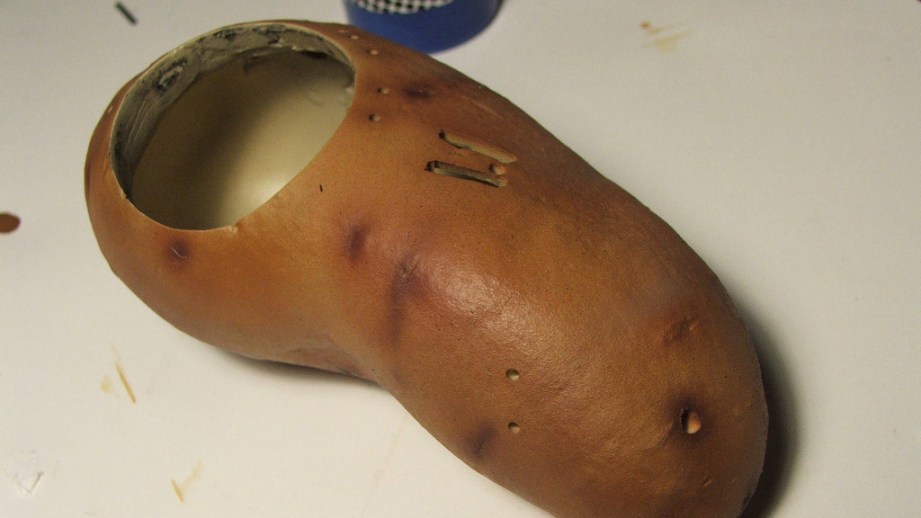
I’d like to show you what the inside of one of these looks like, but that would mean I’d need to chop a perfectly good Needler part in half! Instead, here’s a hollow resin cast potato (what? no, you’re weird) I made for a project a while back with a front section trimmed out. You can see how slush casting the part makes for a hollow piece that is lighter, cheaper, and ready to install electronics into.
I’ve found a good way to keep track of the curing rate of the plastic is to take your mixing cup and tip it onto its side as you’re slushing the mold around. Resin will run down the side of the cup while it’s still liquid, so every now and again, re-position the mixing cup to see if it’s still runny. When the resin in the cup no longer moves, the resin inside your mold won’t either!
There are mechanical solutions to this as well which won’t make your arms as tired; these machines are called rotocasters. They’re fantastic things and unfortunately I don’t have the room for one, so I get my workout by tossing molds around! This video explains how a rotocaster works fairly well. If you plan to make a habit of doing stuff like this, they’re fairly convenient to have around.
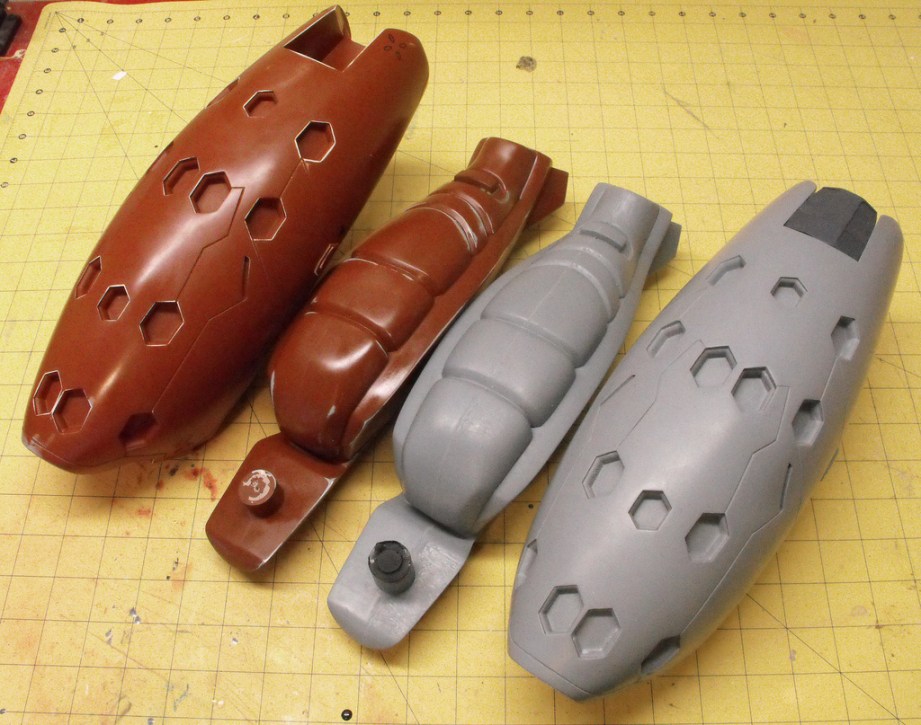
Since slush cast parts are thinner than block pour castings, leave them to cure for a bit longer before removing from the mold to prevent any distortion. It’s also a good idea to go ahead and powder your mold for whenever you plan to use it next time, since it will need to be re-assembled for storage anyway. Slush casting will definitely tire you out on the larger molds, but it’s good exercise! I’ve finished the upper and lower casings so far, and these parts weigh a fraction of their mold master counterparts.
For the next installment in this series I’ll be covering electronics–from simple LEDs to adding in sound effects and a basic amp chip, all working off an Arduino. Look forward to some cool glowy stuff in the future!
Happy casting, and see you in two weeks. We’re more than halfway done!
The Volpin Project, Part 1: Introductions
The Volpin Project, Part 2: References and Blueprinting
The Volpin Project, Part 3: Selecting Materials
The Volpin Project, Part 4: Taking Shapes
The Volpin Project, Part 5: Bondo Strikes Back
The Volpin Project, Part 6: Details, Accents, Refinements, and Mockups
The Volpin Project, Part 7: Introduction to Moldmaking
The Volpin Project, Part 8: More Complex Moldmaking
Chris Hadfield and Chef Traci Des Jardins Make a Space Burrito
Keeping in mind the challenge of mixing food ingredients in micro-gravity, chef Traci Des Jardins concocts a recipe for spicing up astronaut Chris Hadfield’s meals on board the International Space Station. Commander Hadfield also shares with Jamie and Adam the foods he misses most after spending six months in space.
Will & Norm Visit Space – 5/14/2013

This week, Adam discusses the problem with golfing in a tuxedo on a canyon rim, while Norm and Will recount their recent visit to the Johnson Space Center. Learn about the second largest swimming pool in the world, what the Space Shuttle’s crew area is really like, and why you don’t want to be the person who opens an airliner’s door.
Adam Savage on Working Smart at Maker Faire 2013
Adam surprised the crowd at this year’s Bay Area Maker Faire by riding in on a giant steampunk Nautilus vehicle. From the top of that machine, he gave his annual speech to makers, talking about the value of working hard and working smart, and giving advice about how to find a career that utilizes maker skills.
Chris Hadfield Tests Jamie and Adam’s Space Game
How do astronauts on board the International Space Station spend their downtime? Jamie and Adam learn about Chris Hadfield’s clever “space darts” invention, and propose a new game for Hadfield to test while he’s on orbit. This one involves creative use of duct tape!
Tested Makes Gourmet Space Food for Astronaut Chris Hadfield
Jamie and Adam chat with astronaut Chris Hadfield about the limitations of food preparation on board the International Space Station. While astronauts can’t really cook their own meals, Jamie and Adam challenge celebrated chef David Chang with the task of devising a recipe that Commander Hadfield can test…in space!
Episode 170 – Audio-Only Edition – 5/16/2013

This week, Will, Norm, and Wes discuss Google I/O, Hangouts, Maps, Music, paid YouTube channels, the problem with Kepler, the Microsoft/Google brouhaha, and a whole lot more. We didn’t do fake outtakes, but Norm did discuss the fall TV upfronts at length, so it’s pretty much the same thing. Enjoy!