
Will and Gary join Norm to talk about babies, sacs, Blackberry’s new phones, quarterly report season, the future of Netflix, and a whole lot more. All that plus what we’ve been testing and a very hungry edition of fake outtakes.
Maker Profile: Bill Doran’s Punished Props

We have tremendous admiration for makers who find a way to turn their hobbies into their day jobs, especially when that means leaving an already stable career. That’s one of the reasons we’re fans of Bill Doran, who makes props as Punished Props. Even though Punished Props has only been Bill’s full-time job for under a year, he’s been extremely prolific and has created some really memorable pieces. We’ve known Bill for a while–Gary actually introduced us to him when he was looking for a set of custom Mass Effect armor. And if you watched our Octoberkast 24-hour podcast last year, you saw us auction off one of Bill’s custom Paladin pistol props for charity. We had it in the office for a few weeks and I didn’t want to let it go.
Even though he seems like a maker who never stops working (evident from the frequently-updated Punished Props facebook page), Bill took some time to share with us his prop-making background and current build process.
Let’s start off with your origin story, if you will. What was the first prop you made, and what were your skills at that point?
If I dig way back, I think the first prop that I built was a lightsaber. When I was 15 there was nothing I wanted more than to be a Jedi, and of course each Jedi must construct his own saber! It ended up being a dowel with some PVC pipe and a whole lot of different sized washers on it. If memory serves correct, the whole thing was held together (rather poorly) by an unholy amount of super glue. The project demanded only the most rudimentary skills; cutting PVC and dowel as well as gluing things together.
Walk us through, then, your growth as a prop builder. What were the new skills you learned with each prop you’ve made?
As I got older, I did a lot of craft type projects. We had a “hobby shop” in our basement where we constructed a lot of radio controlled vehicles with my dad. In that time I learned a lot more about cutting things out with power tools and assembling and painting finished pieces. I also took every single drafting, shop, and design class that my high school offered.
I went to college for 3D computer art, but the curriculum also included a lot of traditional 3D design and sculpture type of classes along with the 3D modeling and animation classes. This was an instrumental part of my learning more about creating finished pieces completely from scratch. Although I’m glad that I didn’t keep any of those finished art pieces, they are pretty terrible!
All of those skills came into play when I started building video game props for my convention costumes. Most recently I’ve gotten a lot of practice with techniques like using a lathe, mold making, plastic resin casting, and painting pieces to mimic in-game reference art. All of that has come through thousands of hours of failing, practicing and re-doing things until they are satisfactory.
When you come across a new challenge or required skill you don’t have, what are the resources you go to looking for guidance? Friends in the prop-making community? YouTube?
I find that looking up instruction videos on YouTube can be very useful. You tend to have to wade through a lot of not-so-useful videos, but there are some real gems on there. I also like to find any reference materials that materials suppliers produce. Both Tap Plastics and Smooth-On have extensive reference materials on using their products. I also have a Tap Plastics retail store nearby and will pick their brains whenever I’m there.
I also straight up try and duplicate the techniques that other prop makers are using. There is a growing trend for makers to share their techniques and methods on the internet and that has proven extremely useful for me. I always do my best to pay it forward for the next breed of makers. This is why I provide detailed build write-ups on my website whenever I finish a project!
The best, and most fun, method of procuring technique advice is from in-person interactions with other prop makers. There is nothing more fun than talking shop over some beers at Dragon*Con!
So what skills are you looking at learning next?
Since I have a very strong background in 3D computer art and modeling, I would really like to start 3D printing parts! My wife (also a talented 3D modeler) had a Mass Effect helmet printed at Shapeways and I was drooling over the resulting piece! The technology is getting to the point now where I could 3D print nearly all of the parts for a build and only really need to do clean-up, priming, and sanding before it is ready to go under some silicone for mold making.
I also want to get my hands on a milling machine to start making more functional parts out of metal. Most of my work now is done in plastic, but if I were to build something that needed to resist some high stress forces, I’d really need it to be metal. Also, mills are wicked cool and I could use one to make a far more durable and accurate lightsaber than my attempt 15 years ago!
3D printing sounds like it could really help with your work.
I haven’t done it yet, mostly because I have some things in the works that are kind of large and the cost to have them printed is a bit prohibitive. I would very much like to have some smaller things printed to test that possible workflow. Also, I imagine that I will have my own 3D printer in my shop before the year is out! *fingers crossed*
Give us a sense of your current design and build processes. Do you have something you’re comfortable with now after building so many props?
I’ve done several projects over the last couple of years using a very similar process. It’s been a bit refined, but the overall workflow hasn’t changed much.
Reference Images & Design
I collect a LOT of reference images! This is a skill and habit that I picked up back in my 3D modeling days. If I can get in-game renders, that is always fantastic. Some PC games like Skyrim, Mass Effect, and anything made by Valve have ways for you to pull out the game models and get superb orthographic views to work from. If you can’t get in-game models, then you need to fire up Google Image Search! I always filter by the largest images possible. I will spend hours looking for good shots and download way more than I think I need. If I see really good, high res character or weapon turnarounds, I will download all of them, even if I don’t currently have plans to build them. I’ve got quite a library of images!
I do all of my 2D design work in Inkscape, but anything like CorelDraw or Illustrator will do the same trick. If I can, I get the most orthographic of my reference images to use as outlines for the drawings. I do a mixture of tracing and “best guesses” when I’m laying out the design. This is where having multiple references of an object at different angles comes in handy. I also find that by scrutinizing the images to get a good blueprint, I gain an intimate familiarity with the pieces that comes in very handy when building the parts later on!
Also during the design phase I am constantly running thought experiments in my head. I end up assembling the project over and over again so that I have a full understanding of what materials and tools I will need. I’ve done enough builds now so that I have a pretty good idea of what will and will not work. This understanding has come at the cost of many previous failed attempts! I look forward to learning more from my future failures too.
Building the Master
Actually building a piece takes up the bulk of the build process. I tend to stick to a handful of materials that I am most comfortable with. These include styrene, PVC (foamed sheet and pipe), MDF, polyurethane plastic resin, Bondo, and acrylic plastic. Many of my dagger and pistol builds are made by layering different thicknesses of sheet plastic and then shaping and filling it into the final form.
My preferred tool for this kind of work is my scroll saw. When I can scrounge up the cash, I know I need to get a good bandsaw, but until then, my Craftsman 17″ scroll saw is the workhorse of my shop! The layers that get cut out are all assembled and epoxied together. Then the shaping is usually done by Dremeling off parts, filling gaps and bevels, and sanding. So. Much. Sanding.
Any kind of tubular piece ends up either being made from PVC pipe or something that I turn on my lathe. I’m looking at you, gun barrels and dagger handles! Lately I’ve been doing lots of lathing from polyurethane plastic. I like that I can make a starting form out of liquid plastic resin that is close to the finished shape. This way I waste less material and time. The plastic also has no grain, like wood does, and handles lathing beautifully!
Most of what I build ends up being molded in silicone and then cast from plastic resin, so I am always keeping that in mind as I assemble parts. Sometimes it’s better to build two pieces that can be cast separately and glued together after being cast and painted. I also have to keep in mind whether or not the project requires lighting or moving parts. All of these factors weigh heavily when making build decisions. Once the entire piece is finished it gets sanded and primed about a million times to prep it either for painting or molding.
Mold Making
If there is one specific skill that I could point to that makes me able to do this as a career, it’s mold making. It’s been a long, expensive journey, but I’ve finally gotten the hang of making good molds. There is a steep (did I mention expensive?) learning curve to making a mold and it is nigh impossible to gain that experience without actually doing it. Molds make it possible for me to take a piece that took a week to produce and copy it in a matter of hours. This time savings alone is what allows me to function as a business!
Once they’re ready, all of my shiny pieces get clayed up for molding. This is a long, painful, necessary process. It’s good to remember that spending an extra couple of hours on this will save you hours on each pull that you take from the mold. It doesn’t make it less painful in the present, but future you will thank you!
My Keening claying took at least 8 hours.
Again, this is a process where an smidgen of foresight will pay dividends come casting time. You really need to be thinking a lot about fluid dynamics and how you’re going to be pouring your resin when you’re designing your mold.
At this point, I start slinging the silicone! I just got a degassing chamber for when I pour my silicone and I can’t recommend it enough. The $300 investment will pay off immediately when you don’t need to fix bubbles on EVERY piece that you cast!
Casting
Once I’ve finished my molds, I am like an anxious puppy. I can’t wait to start pouring resin! For me, pulling a fresh piece out of a new mold is the most satisfying part of the entire build process.
Casting good, bubble free pieces is still something that I struggle with, but I’m getting much better at. I’ve recently done some cold cast pieces with metal powder and plastic resin that forced me to lock down a good method. I think there are six failed Keening handles in my shop that are a testament to my trial and error style of learning!
Most of my props are cast from polyurethane plastic resin. The parts that pop out of the mold usually need a little bit of clean-up along the seams as well as a bunch of sanding. Once they’re nice and smooth, they get primed and are ready for paint.
And then how do you approach painting and weathering for finishing your props? I notice you’ve repainted and refinished other toys–is that good practice?
Repainting existing toys and props is indeed excellent practice. You can get cheap, plastic toy guns for a couple bucks and paint them up to look like metal weapons. I did this for a number of projects in my early days of costuming and I still use all of the techniques that I picked up back then.
I generally start by spraying a base coat that’s the most prevalent color of the piece. Often times I’ll use a rattle can for this, unless I need a very specific color or type of paint. In those instances I’ll use my airbrush. At that stage I’ll also mask off areas that need extra texture and hit them with some texture spray paint. These are usually things like the grip on a pistol.
Lots of masking, spraying, and waiting happen during the finishing process. Sometimes you need to wait overnight or a day or two for one layer of paint to finish drying before you can move on to the next step. I like to make sure that I have plenty of other things to work on when I’m painting something. Fortunately, I always have plenty of things that need my attention!
With the base coat, colors, and textures applied the prop gets decals added to it and several good coats of clear coat. Then it’s time for weathering. I have a lot of fun with weathering, because it’s what really brings a piece into the real world. I like to consider what this particular object might have been through to end up in it’s current state. Adding dirt, grime, scorch marks, metal scratches, rust, and battle damage to a sidearm is very satisfying! I go through a lot of paint and paper towels, but it is well worth the materials and effort.
What part of a build do you find the most fun? Which part is the most labor-intensive?
During every build I hit a turning point where everything starts coming together. Usually it’s when I have enough done that I mostly just need to assemble what I’ve got into the final prop. That point is my favorite part. It’s as if the A-Team build montage music start’s playing in my head and I can hear Hannibal say “I love it when a plan comes together.”
The most time labor intensive part is definitely claying a piece for mold making. That part can go straight to hell. I wish I could pay someone else to do it, but I can’t afford it and I don’t trust anyone else to do it! Ha!
Turning this hobby into a full-time job is not an easy decision. What prompted you to feel comfortable turning Punished Props into a full-time gig?
The weird thing is that it didn’t even feel like a decision. I had been toying with the idea of making my costume and prop making hobby into more of a career for a year or so back in 2011. I had been following other prop makers like Harrison Krix and Lee Camara who had turned it into a living and kept telling myself “There’s no reason why I can’t do that too!”
Through the early part of 2012 I started getting a lot of recognition online for my work and commissions started stacking up. By March I had more than I could finish while splitting my time with my day job. Don’t get me wrong, I had a pretty decent day job. I had just hit my 4-year anniversary working at Microsoft. Now, it wasn’t exactly what I’d call my dream job, however, and the prop making was way more fun. So, when I had enough commissions lined up to keep the bills paid for a few months, I realized that I had already made the decision. It just seemed like the next logical step. In April I quit my job and started Punished Props full time! I have zero regrets and never been happier!
That’s extremely admirable. And what are some of the challenges you’ve encountered running a small business?
Getting the bills paid is always a legitimate challenge. For years I was very used to having a steady income and could count on rent money to be there when I needed it. Getting used to the feast or famine style of commission income has been very challenging. Fortunately I have a very understanding wife. Also I have become quite frugal.
Before you actually run a business, you rarely thing of the myriad of things that you need to do outside of the core practice. I can’t just spend my day building things like I would prefer. I have to answer commission emails, formulate price estimates, handle my social media outlets, schedule builds, ship things, fix things, and keep the shop in working order. Becoming this one man show is a real challenge and is way more work than I had thought it would be before I started. Eventually, when my business grows, I plan on hiring people to help with those tasks. That will be a glorious day!
That sounds exhausting and daunting. So for someone who’s interested in making their own props, what would you recommend someone just getting started to buy to build up their own workshop?
Most of my early stuff was done with wood and foam, but I quickly graduated to plastics. Rigid insulation foam from the hardware store is cheap and amazing to work with. I started with it and still use it on nearly every project nowadays.
For tools, it’s hard to go wrong with a good power drill and a coping saw to get started! I also recommend a set of small files, a good rotary tool (Dremel), an X-Acto knife, and some clamps. These are all fantastic tools that I started with and still use every day.
What types of props are your fans and customers most interested in? Swords? Pistols? Helms? What do you enjoy making the most?
I’ve sort of made a name for myself as the Mass Effect pistol and Skyrim dagger guy. I am totally OK with this. I love both of those games and am a huge fan of those kinds of weapons.
That being said, I’m not too picky about they types of things that I build. I like to build new things and challenge myself. I’ve made everything from swords and stones to shotguns and sidearms. They all provide their own set of challenges and nuances. The fact that I get up every day and spend most of it building things in my shop is what really keeps me satisfied.
For some reason I really like pistols; revolvers especially. I think they remind me of the knight’s sword. The trusty weapon that our hero always has at his side. Yeah. I like revolvers.
What’s next for you? Can you give us a hint about any future projects?
Today I am drawing the blueprints for a replica of Kerrigan’s Ghost Rifle from Starcraft II. I am really stoked about this project! It’ll be the largest firearm build that I’ve done by a long shot and it will provide for me a very legitimate challenge.
Other than that, I have a handful of smaller builds lined up that will keep me busy through the first part of 2013. I’m not taking any new costume commissions, but I do have a couple of personal costumes lined up for Emerald City ComicCon, PAX East, and Dragon*Con that I’m very excited about! I got my grubby mitts on a kit of Harrison’s steel axe from Skyrim that will look great on a Dovakin/Deathlord costume combo that I am planning with my wife!
Photos courtesy Bill Doran/Punished Props
The Volpin Project, Part 2: References and Blueprinting

A Needler from Halo 4 will emerge from my workshop in approximately seven months. Typically projects take a little less time than that (I swear!) but I’m going to be drawing out the process to detail things a bit more thoroughly as the project continues. To start this build off, I’m going to need a good set of detailed blueprints to reference as the build progresses.
Today’s article was intended originally to cover some aspects of planning the build itself, but I kind of went overboard with the “blueprints and references” segment here. I think this part of a build deserves a lot of attention and detailed explanation–hope you don’t mind!
Good blueprints are, in my opinion, the key to a really successful prop. There’s an old saying that goes “garbage in; garbage out” which can refer to anything from the quality of materials to the planning of the project. In this case, a good set of blueprints will make sure that all your parts fit together properly and are accurately scaled to one another. It’s the foundation of the project, and just like an architect wouldn’t make a house without a detailed set of plans, a good builder should take the time to spend a while on solid blueprints.
Ideally, I’m after something like this:
Obviously these have to come from somewhere, and if you happen to be into making props from video games like I am, then you’re in luck.
First, if a game has come out on PC, there is a pretty good chance there’s a vibrant and thriving modding community out there for it. These are players and artists who have been able to extract the models and textures from the game and edit or manipulate it in order to create aesthetic or game-changing mechanics mods. Larger games like World of Warcraft have literally thousands of people who have poured over code, yanked out models, and converted their files into something that can be read by most 3D modeling software, or even Photoshop. Seek out some of these communities, join their forums, search the archives. When I built a copy of the Terrible Shotgun from Fallout 3, I found some stellar references of the model from one artist who had revised the in-game model to be a bit more detailed. All I was after was the shape of the object, so the re-color didn’t matter much for my purposes.
Beyond that, some games even come with a handy built-in model viewer! Any object in Skyrim can be inspected from all possible angles in the inventory screen. In Borderlands 2, items like guns, grenades and shields can be examined as well from your inventory, and rotated freely. Versions of Halo that include the “Forge” feature enable players to set up custom maps and spawn items at will, then use a floating camera to view any angle in the scene. While not all games have features like this, the ones that do will make your life much easier should you decide to replicate a piece from that world.
Generally, my end goal is something like the following photo. Top, bottom, both sides (if they’re different) and the front and back. I really lucked out and happened to get in touch with a modder who had pulled the Needler’s 3D files out of Halo: Reach, which I was able to open in Photoshop as an .obj file and manipulate to my needs.
It might be that not every project needs this much detail, but the more you can put into your blueprints, the better. Its a good idea to grab 3/4 angle shots too, showing the piece from other perspectives than just these flat-on views. This will allow you to see how certain panels, lines and segments interact better than a flat angle shot would. On the shot below, I’ve removed the color so the image is a bit easier to interpret without any distracting shading.
A quick note about some references. Some model viewers and screen shots will be affected by something called “lens distortion.” Essentially, the closer an object is to the camera take a photo of it, the more distorted it will appear due to the narrower focal depth and shorter vanishing point. A picture is worth a thousand words here, so with that in mind check out this shot of my Daft Punk helmet sculpt.
On the right is fairly accurate representation, and the left photo is affected by lens distortion. Sometimes it’s difficult to obtain photos (or even in-game screenshots) that haven’t been distorted in this manner, but if your blueprint references have some amount of distortion like this, you may need to compensate a fair bit when drawing out your final project plans. Grab as many reference images as possible, and assemble them in one document to look for more consistent forms which will let you rule out details that may have been affected by lens distortion. If you happen to be lucky enough to have a 3D model to use, make sure you’re capturing your references in an orthographic mode. This will eliminate the vanishing point and remove any possible lens distortion from your references. The left image below is a perspective view, the right one is orthographic.
After I source enough shots, the individual references are tiled together in Adobe Illustrator. My blueprints are done with the pen tool and a .5pt stroke to make sure the lines I draw are as close to the models as possible. Video game models are polygons though, and for something like the Needler which should have a gradual even organic slope to the casing, sometimes you have to use your discretion and round off edges here and there. Some artistic liberty has to be taken when determining what to round off and what to leave jagged, but consider the final use of the object you’re building. Would the thumb hole of the grip be a jagged polygon, or a smooth rounded circle for more comfort?
You might be asking “If these references are all the right size and proportion, what do you need to spend hours and hours tracing them for?” Well, beyond my somewhat manic obsession with precision, the short answer is that they’re more reliable than the screenshots will be when it comes to making your prop. Take the grip on the Needler for an example. There’s an inset in the handle, and a raised area that sits around it. In the references I was able to gather, these details are crisp, but still fairly pixelated. Cutting a panel like this on a scroll saw where the blade is less than 1mm thick would be guesswork. You’d have a pretty good idea where the panel should be, but only within a few millimeters.
What’s a few millimeters though? On one part, not very much. Consider though, that all of your parts are off by +/-1mm on all sides. Every panel no longer fits correctly, and pieces that should be sitting next to one another have developed significant gaps. The precision of a vector tracing allows for much tighter tolerances, which translate to better props! The little pieces of styrene in the shot below were trimmed by hand on a scrollsaw, and needed precise spacing to simulate panel lines. Without proper blueprints, eyeballing things like this would be a disaster.
An hour in Photoshop and about seven hours in Illustrator later, we’re golden! The Needler is a very intricate piece, and most of my blueprints don’t take nearly as long, but it will all be worth it in the end.
Another benefit of vector-based blueprints is that you don’t lose any detail when scaling your piece. Scale is another very important element; props that are too big or too small will look incorrect no matter how well built they are (unless, that is, you’re going for something like 1/3 scale, in which case never mind!) Luckily, items like weapons are a bit easier than something like armor. I really lucked out with the Needler, because Microsoft has given their community a whole wealth of information about the HALO universe. A quick trip over to the HALO wiki reveals the Needler to be 22.75″ long. Scaling one segment of the blueprints to this size makes everything else scale accordingly with it, and we’re ready to print off a few copies to start the project!
This isn’t always the case though. When I built a copy of the M8 Avenger from Mass Effect a while back, scale was a bit trickier. I ended up using the below image and some Illustrator tricks along with a bit of math (nooooooooo!) in order to get the rifle the correct size. The blue line (a bit exaggerated in this shot for emphasis) is Commander Shepard’s height, while the yellow line is the length of the rifle. Under “Document Info – Objects” in Illustrator, you can get the length of any line regardless of orientation or curvature. The blue line here was 19.02″ long. If Shepard is 6′ tall–average enough–that’s 72″ total. 72/19.02 = 3.785.
Going back to the document info, the yellow line is 8.22″ long. 8.22(x)3.785 = 31.1″ – the length of the M8 Avenger for a 6′ tall person. My blueprints were scaled to 31.1″ long, and the project went forward.
And that’s it for blueprints and references! In the next segment of this project I’ll actually start putting materials together and building this Needler!
Consumer Electronics Show – 1/29/2013

Will and Adam welcome Norm back from the Consumer Electronics Show, and discuss some of the trends from this year’s event. Adam has never been to CES before, so we do our best conveying what it’s like to be in a massive convention hall filled with nothing but flat screen TVs.
Questions! – 1/22/2013
Episode 155 – Reveling in ExCES – 1/17/2013
Worklog: Tetris Shelves – Cutting and Assembly
Last week I talked about research, planning, and rounding up supplies and equipment for my Tetris shelves. After a month or so of careful planning, I had all the stuff I needed to get started, you know, actually building the shelves.
This week, we’re going to talk about ripping big sheets of plywood down into the appropriate sizes, I’m going to learn to use a plate joiner and biscuits, and we’ll explore the importance of clamps.
Breaking Down the Plywood Sheets
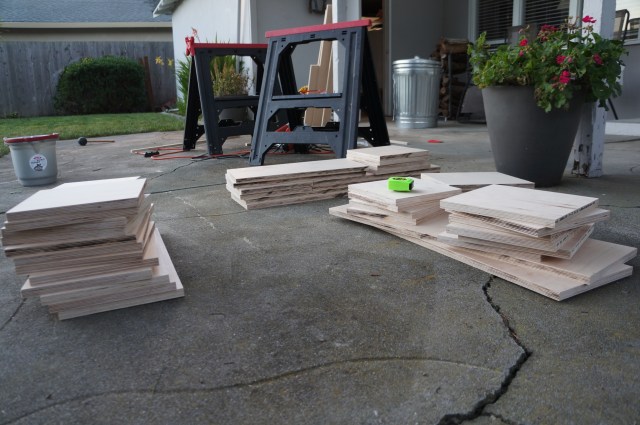
I didn’t fully appreciate the challenge of breaking down big sheets of plywood without a large table surrounding a table saw. I was able to get my 4’x8′ sheets cut down to 4’x4′ sheets that (more or less) fit in my car at the lumber yard, but I ultimately needed boards that are ten inches wide for the shelves. I sketched out each 4’x4′ sheet to make sure I’d actually get all the boards I needed, but I wasn’t sure how I was going to be able to make those cuts safely and accurately.
Breaking down the plywood was a three-step process–first, I had to make some rough cuts using a circular saw to make the sheets manageable on the small table saw I rented. This was actually the scariest part of the whole process, I’m not good enough with a handheld saw to cut a straight enough line on a four foot sheet. To keep my saw on track, I made an improvised guide using a couple of clamps and some scrap lumber I had laying around. By aligning the right edge of the saw with the guide, I was able to make my circular saw cuts much straighter than I would have been able to otherwise. Starting out, I wasn’t sure how accurate and clean these cuts were going to be, so I made sure to leave enough extra wood that I could fix any mistakes later on.
As I was making these cuts, I learned the incredible value of leaving notes to yourself on the materials. After each cut, I labeled each board with it’s original position on my sketches, as well as the boards I expected to get out of the piece and any notes specific to that piece. This helped me avoid making mistakes, and also took the guesswork out of my cuts. To know what I expected to get out of a board, all I had to do was look at my markings and consult my sketches.
Next, I needed to rip the smaller sheets into 10-inch wide boards. I set up the table saw and did a couple of test cuts to ensure that its guide was accurate (it wasn’t). After I started cutting the larger sheets, I quickly realized that the portable table saw wasn’t large enough to handle sheets as large as I was cutting without some extra support. I enlisted a helper to hold the boards level as they came off the saw and from that point on, the rips went very quickly.
I did the final cuts on the miter saw. While I could have used the table saw to do this, I was more comfortable making the precise cuts on the miter saw than the table saw. More importantly, because I’d labeled each piece as I cut it, I was able to cut each piece of shelf as quickly as I could measure and mark my boards.
As planned, I about a quarter sheet of plywood left over after I was done cutting. Before I packed up the tools, I inventoried all my pieces to ensure I had everything I’d need for a complete set of shelves. I also had a couple of pieces that were either marred or a bit short, so I used the leftovers to make replacements for them.
Learning to Use a Plate Joiner
Next up was using the plate joiner to cut slots for biscuits at each joint. I planned on using edge joints with biscuits to add stability and strength to the shelves. From what everyone told me and what I read online, a well constructed, glued joint would actually be stronger than screwing the shelves together or using some other mechanical attachment. I was skeptical, but sometimes you have to trust that the common wisdom is right.
In an edge joint, the narrow edge of the board butts up against the face of the board it will be attached to. To use biscuits, you cut small slots into the facing boards and then insert a small wooden puck into the slot–that puck is the biscuit. Biscuits make it easier to align the boards properly and add more surface area for glue to hold the final joint together. The biscuits also absorb some of the moisture from the glue and swell up, which also helps to make a more secure joint.
Cutting the slots for biscuits can be tricky–they have to line up perfectly and remain tight in order to work well. Luckily, I was able to borrow a plate joiner to help cut the biscuit slots. A plate joiner is a specialized saw that makes it easy to cut the oval-shaped slot for the biscuits into each board so that they’ll align perfectly. With the joiner I borrowed, you can do a variety of different types of cuts to join boards in many different ways.
Once I set up the plate joiner’s guides set up for the type of cuts I needed, cutting slots for biscuits was straightforward. All I had to do was line up the boards where they met, make a line across both pieces of wood, and then line up the joiner’s guide with the line on each piece of wood before cutting. Once everything was marked, it took longer to clamp and unclamp each piece of wood than it did to make the cuts. This sounds more complex than it actually is.
The joiner makes it easy to make these cuts reliably, but there are a few tricks worth noting. I found that the saw made a much better cut if I gave it a moment to get up to speed before plunging the blade into the wood. It’s also super important that you the blade only moves in or out of the wood on a single axis. If the joiner tilts while the saw is running, the slot for the biscuit will be too big, and your joint won’t be as secure. Finally, a large bench vise would have been handy for cutting biscuit slots in the faces of boards. I have a small vice, but it isn’t big enough to hold a 20-inch board without wobbling. I was able to make the necessary cuts by contorting myself, but this definitely wasn’t good for my back.
Gluing and Clamps (Bonus: Learning From Mistakes)
After months of planning and a couple of days of hard work, it was time to finally assemble my first Tetromino. I started with what seemed like the simplest piece–an L. My initial plan was to glue a few corners and clamp them long enough for the glue to set (about 30 minutes, according to the instructions), then move on to the next corner. I bought four corner clamps and figured I had two days of work in front of me.
Using this theory, I assembled the first L. I was extra careful, giving each joint a full hour for the glue to set. The first couple of pieces went together perfectly, but then disaster struck when I tried glue the last piece. I applied the slightest bit of pressure and…
… the whole thing collapsed. I said a naughty word and got back to work.
Luckily, this failure taught me lessons that saved me from even bigger mistakes later on. I immediately realized I needed more clamps–unless I wanted to take a month to finish gluing the shelves, I needed enough clamps to glue an entire piece at a time. With that in mind, I trotted down to my local Home Depot to stock up on corner clamps.
While there, I realized my second mistake. I didn’t actually have any clamps that could hold the joint together while I was securing the corners. Instead of using a tool, I was relying on mere human strength. In this case, the tool I needed was a bar clamp. Since I was already in for $150 worth of corner clamps, I went big on the bar clamp, and got a 33-inch Irwin bar clamp that you can cinch down one handed. Much later, I realized that some of the trickier clamping would have been easier with two of these, but I was able to make do with one.
By buying a big bar clamp and increasing the total number of clamps at my disposal to 16, I was able to glue and assemble one Tetromino every 12-24 hours, all while maximizing the strength of my joints. Yes, I had to cleanup the surfaces where the glue didn’t hold and cut the broken, glued biscuits out of their slots, but if I hadn’t realized that I needed more clamps, it’s likely the shelves would collapsed the first time I put them together.
Seven days later, I had a more or less complete set of Tetromino shelves, and I thought the hard part was done. After all, all that was left was sanding them and cleaning them up so they’d be ready for a quick prime and paint. More on that next week.
The Volpin Project, Part 1: Introductions and What I’m Building
Hello there! Allow me to introduce myself. I’m Harrison Krix, and I run a little outfit called Volpin Props in Atlanta. If you’re curious, you can read more about who I am and what I do in my conversation with Norm from a few weeks ago.
The short version is that I’m a professional propmaker. About 5 years ago I started making real-life versions of videogame items and since then, I’ve been teaching myself propmaking, learning new skills, and updating a blog on my projects as I finish them monthly over at my website. I met Norm about a year and a half ago to show off some pieces, and we’ve been talking for a few months about doing a guest spot on Tested to show people a little more in-depth view on some of the steps and processes I do when tackling a new project. Here’s what you can expect in the following series, which will document from concept to completion the design and creation of a new prop.
I am largely self taught, and 99% of what I do takes place in a small garage workshop and indoor studio out of my home. I have some fancy tools at my disposal–a vacuum forming machine I built and a hobby laser cutter as well–but largely the process you’ll be following over the course of this year can and will be accomplished by tools that are readily available in most hardware stores, or items that many builders would probably have access to in their own workshop or at a local hackerspace. I tend to do most of my work by hand, meaning you won’t need to know complex 3D modeling software or have access to the highest resolution 3D printer on the market either. In fact, many of the little tips and tricks I’ve picked up along the way are simple mechanical solutions to issues that many builders face with aesthetics regarding complex curves, symmetry, and precision angles.
Certain things may require a bit of outsourcing, and I’ll be sure to reference those as well when they arise. Overall, I’m hoping this will be an educational series that will teach people interested in propmaking some introductory processes, and might even have a kernel of knowledge here and there for the veterans in the world too.
For the sake of transparency, I will reiterate that I am a student of the school of trial-and-error, and that means a lot of the processes I have come up with might not be industry standards or the way the rest of the universe gets stuff done. Things I do work for me, but my methods aren’t the end-all-be-all. If you’re more comfortable with an established technique, feel free to wholly ignore all I’m writing!
I’ve got 17 articles planned, and each will be brimming with photos of the processes so you won’t have to endure nearly as much of my art-school-trained writing as you have so far today. This series will update twice a month, and the final project will culminate this August around the time of DragonCon when Norm comes to pick it up in person! Here’s how I anticipate breaking this project down:
References, blueprinting, and project planning. What I’m going to be building and the possible challenges along the way. I’ll also cover some basics of how I gather references and create my schematics.
Making the master sculpt – a 3-parter, these segments will start basic construction of a frame, then progress into more intricate details and finishing elements.
Moldmaking – There have been dozens of books written on the subject, but I’ll try to cover some of the basics here. There will be 2 parts to this – simple “block” molding, and more complex matrix molds.
The casting process – In which we’ll cover how to make 20 of something as identically as possible!
Electronics – Like anything trendy in the DIY world today, I’ll be stuffing an Arduino in here! I’m no EE, but I know my way around a soldering iron and some LEDs. This will be pretty basic, but will also cover things like LiPo batteries, electronic accessories, and some audio implementation into the prop.
Painting – Did I mention this piece will have a very fancy paintjob? One of the questions I get asked a lot about is painting and detail work, and we’ll cover the basics here.
Assembly – This sounds simple enough, but did you know there’s more than one kind of glue out there? What about screws, magnets, clasps? Recently I’ve become a viscosity snob, and I have about nine types of cyanoacrylate in various thicknesses and cure rates. Why? You’ll have to read to learn!
Weathering and detail work – Weathering can make or break a piece. It’s what transforms a prop from a static element into a replica that tells a story of its travels.
Project wrap-up – Kind of like what you just read, but I’ll probably have some lessons learned about this process and advice for myself, looking back.
The replica I’m going to be building has been on my “props bucket list” for the better part of a decade, even before I knew I wanted to be making replicas for a living. It is–cue drumroll–the Needler from Halo.
The Needler from the Halo series has evolved a lot over the course of six first-person shooter games and two versions of the XBOX. The version I’ll be tackling is the Halo Reach / Halo 4 model (the only real differences aesthetically are the paintwork.) The Needler needs to look alien, yet still real and not toy-like, in order for me to call the project a success.
The finished replica will be full sized, illuminated, and also play sound effects with the pull of the trigger. Not only are all the spines glowing translucent pink, but the gun itself has dozens of tiny lights buried all over its surface. The finish is an iridescent purple, the kind of mirage paint you’d see on a lowrider, with a subtle hexagon pattern overlay to make things especially difficult. I also have plans to make the piece sealed with a rechargeable LiPo battery embedded inside, so the end user will never need to change the batteries–just plug it in and light it up.
I’m fairly certain I know how to do at least 85% of the stuff I just listed above. Some of it will present new and unique challenges–pressure casting clear needles, painting a color-shift finish with hexagon overlay– while others will probably drive me up a wall, but once the dust clears I should be holding a full scale glowing alien explosive needle gun. Hopefully.
Thanks for reading along, and I’ll see you here in two weeks! As always, drop any thoughts or questions you may have in the comments section below!
Fallout shotgun photo by Dan Almasy