


This week, Adam, Norm, and Will spoil Guardians of the Galaxy. This episode is filled with plot details, character developments, and other spoilers for the film Guardians of the Galaxy, so if you don’t want that, don’t listen.
Bits to Atoms: Building an ‘Evil Dead’ Chainsaw

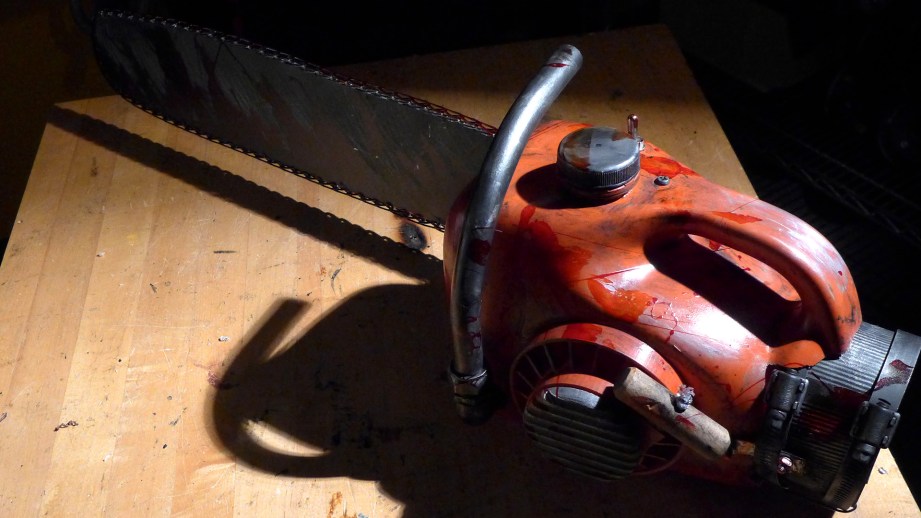
Evil Dead 2 is one of my favorite movies of all-time; one that I may have bought more times than even Star Wars. (I own it on Betamax!) My wife even took me to the site of the original Evil Dead cabin near her home in Tennessee. For those who have not experienced this gem, at a pivotal moment in the film, Ash, played the amazing Bruce Campbell, replaces his severed hand (which he cut off because it was possessed) with a chainsaw. He then uses said chainsaw to saw off the barrel of his shotgun, holsters it and as the camera zooms in, proclaims, ‘groovy!’. Instant classic.
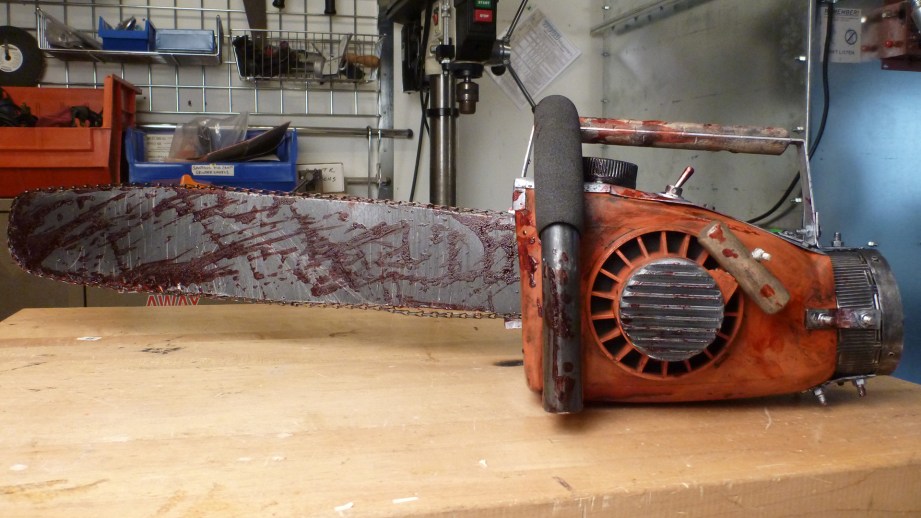
About three years ago, I find myself at the grocery store and look at a jug of Arizona Ice Tea. My brain connects the dots and I decided that it looked like the base of a chainsaw, which lead to me building an Evil Dead 2 chainsaw replica for Halloween. Unfortunately, that was also the same year Hurricane Sandy hit New York, so we were evacuated and Halloween was cancelled. But the year after that, I am even more ready with an exact costume that’s weathered and bloodied…and I get one of the worst colds ever which cancels Halloween again. Mark my words–this is the year that I will finally get to use my Evil Dead 2 chainsaw–and maybe you can too!
The parts and tools needed to build your own Evil Dead 2 chainsaw are all actually pretty reasonable. A key piece is 3D printed–I’ve provided the files for download–and we’ll discuss alternatives if you don’t have access to a 3D printer. To start off, I captured a bunch of screengrabs from the film for reference, but the best photos I found were from the excellent Evil Dead Chainsaws site, which makes amazing replicas.
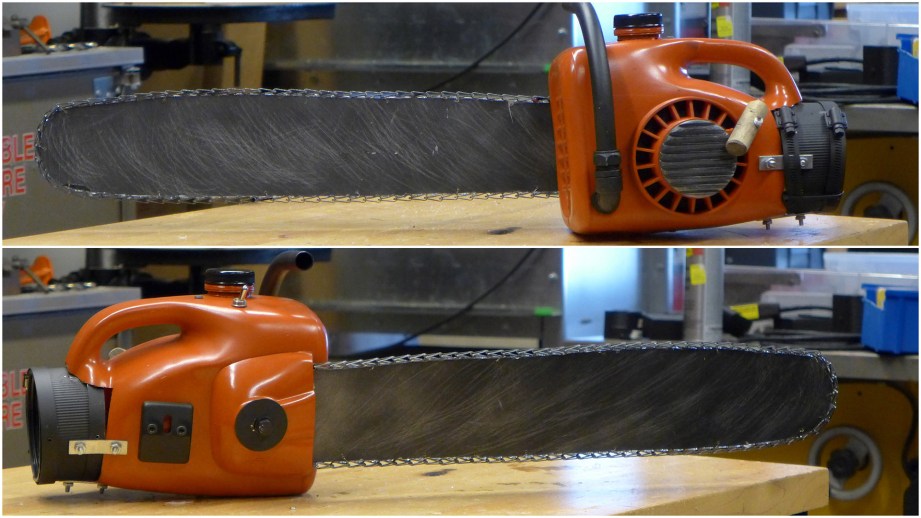
The original prop was based on an actual Homelite chainsaw that was heavily modified and cast in plastic and rubber so Bruce could fit his hand inside and use it safely. I tried to duplicate key aspects of the original for my first version, which required some light metal work for the top piece and 3D printing the distinctive side-grill. For the version I’m presenting here, I’ve simplified the parts and process while still producing a killer chainsaw replica.
NOTE: I have posted an updated version of this guide on Instructables.
The Parts You’ll Need
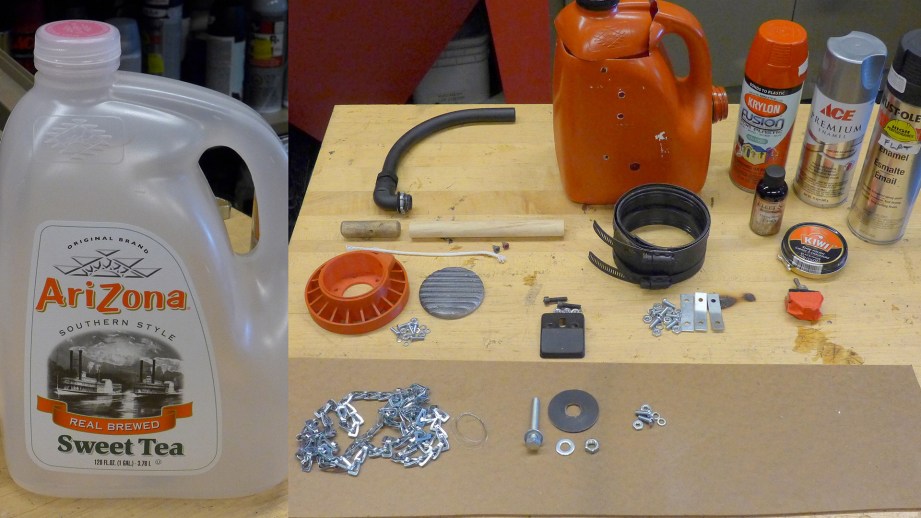
- 1 gallon Arizona Ice Tea jug
- 3″ or 4″ diameter hubless pipe clamp – 3″ should work for most people, I could only find a 4″
- 1″ or longer angle brace/brackets x3
- 10″ (approximate) ¾” dowel rod (or old broom handle)
- 6″ (approximate) thin rope, shoelace, etc.
- ½” diameter 90 degree conduit
- ½” diameter conduit compression fitting elbow
- 4 – 5′ sash chain – this depends on how large you make the blade
- 30″ x 5″ (approximate) piece of ⅛” MDF (fiberboard)
- 3D printed side grill – download here – or get a printed version here – alternatives are discussed below
- Small wood or drywall screws (for dowel) x2
- #6 x ½” – ¾” machine screws, lock washers and nuts x6
- #10 x ½” – ¾” machine screws, lock washers and nuts x8
- Large bolt approximately 1 ¾” long and nut – can be any diameter – for blade cover
- Large washer to match above bolt – needs to be at least 1 ¾” in diameter
- Thin wire for attaching sash chain
- Krylon Fusion Sun Dried Tomato paint – has to be Fusion or similar paint made for plastics
- Black paint (matte)
- Silver paint
- Black paste shoe polish
Optional Components
- Greeblie and screws for side–I used a basin hanger
- Toggle switch
- Varnish for dowel handle
- Fake blood (I used Fleet Street Drying blood, which is expensive but great. I used ‘Fresh’ but think I should have got the ‘Dark’ blood)
Tools Used
- Drill and bits
- Jigsaw or bandsaw
- Hot glue gun
- Wire brush
- Razor knife, scissors, etc.
I was figuring out the best assembly order as I went along, so please forgive pictures not exactly matching the steps. I also managed to delete my picture with all the raw parts so the parts shown have already been painted, etc.
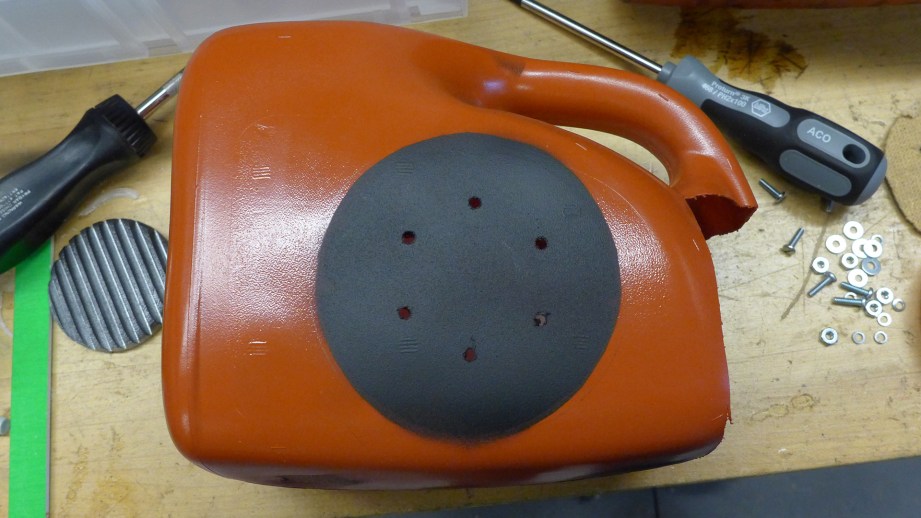
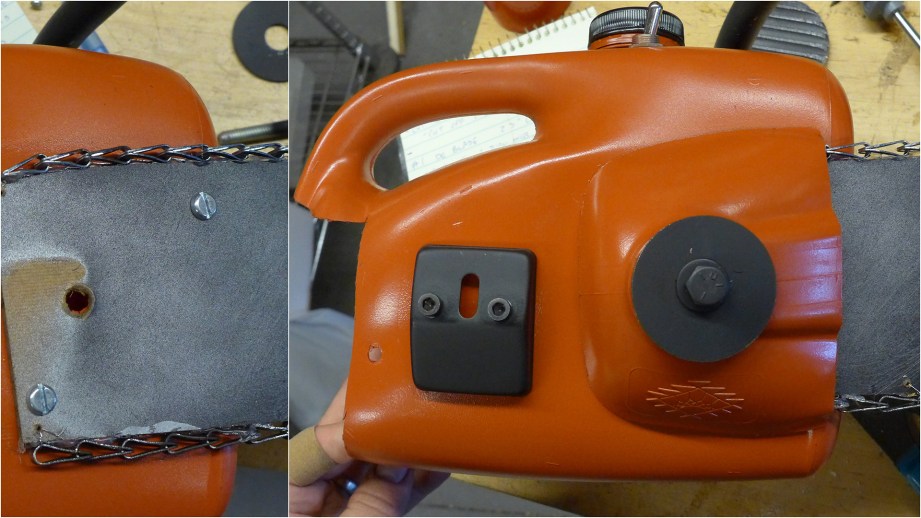
Step 1: Cutting the Jug
Use the pipe clamp to figure out exact area of the jug top to cut out – I made the clamp flush with what would be the bottom of the chainsaw. Make clean cuts since we will be using the top of the jug as the blade cover. Be careful, it’s tougher to cut than you think. I used a razor saw, but a razor knife, coping saw, hot knife, etc. should work as well.
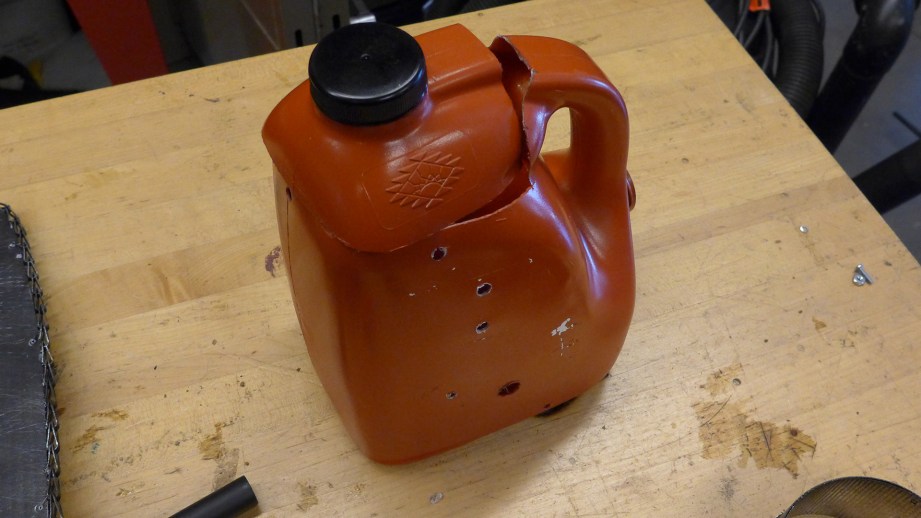
Take the portion we removed and cut the spout and lid off–we will use this as the gas cap.
Step 2: Mounting the Blade
Plug in the hot glue gun to preheat. Meanwhile, draw a chainsaw blade shape onto the MDF–mine was 23″–the only exact measurement is the mounting-end which should be around 3″ wide to ensure the blade cover fits over it. We need to reserve at least a 4″ x 4″ square of the MDF for later.
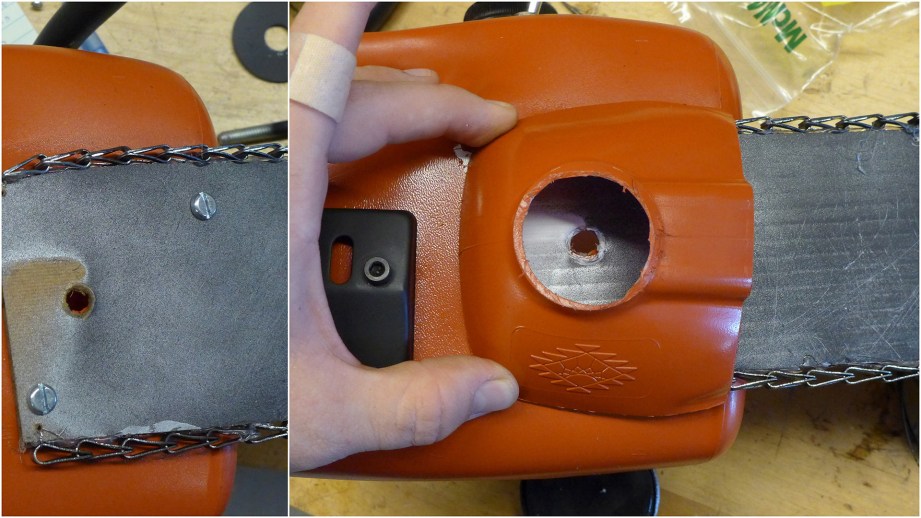
Cut out the blade with a bandsaw or similar tool. Place the jug top we cut off over the base of the blade and mark the blade at the center of where the jug spout used to be. Remove the jug top and mark two diagonal holes for mounting the blade–it doesn’t matter where as long as they fit under the blade cover.
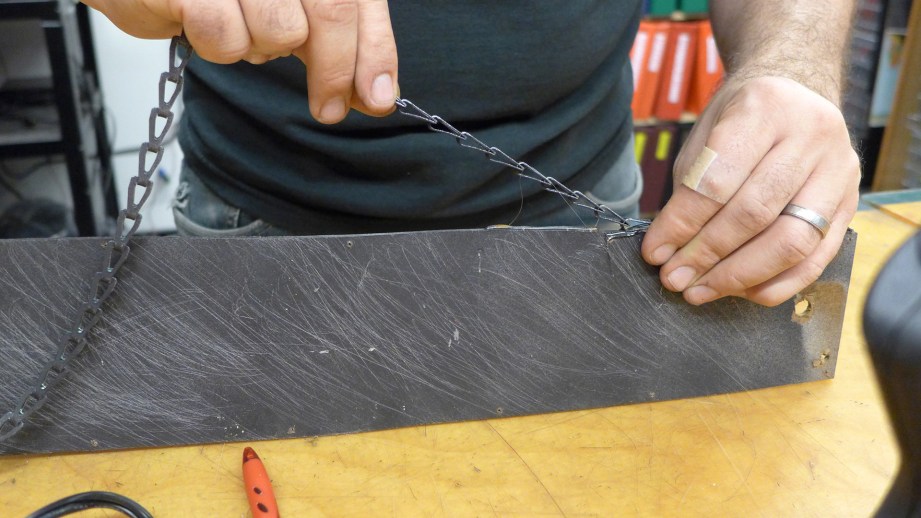
Drill out the diagonal holes for #10 screws and the center hole to fit the large bolt (1 ¾”) you have. Drill small holes around the edge of the blade about every 8″ or so for attaching the sash chain with wire – make sure to make holes at the very back of the blade at the top and bottom. Attach the end of the sash chain to the back of the blade with wire. Now use the hot glue to attach the chain the rest of the way around. Hot glue works pretty well, but as the chainsaw gets banged around, it will let loose in spots, so also use wire to attach the chain.
Give the whole blade a coat of silver paint and then a splotchy coat of black. Once dry, use a wire brush, etc to scratch it up.
Step 3: Drilling the Jug
First, cut a piece of dowel to about 6.5″ for the interior handle, reserve the rest for the pull cord handle. Decide on placement of your interior handle (I suggest vertically), mark the top and bottom, and drill holes. Use the 3D printed grill base to mark and drill holes for #6 screws. Drill a hole for the conduit elbow toward the bottom-front of the chainsaw–you may have to use a spade bit or even razor knife for this. Drill holes on each side and bottom of the hand opening for the braces – I used #10 screws here. Decide on the blade angle and use it to trace the holes onto the body and drill out.
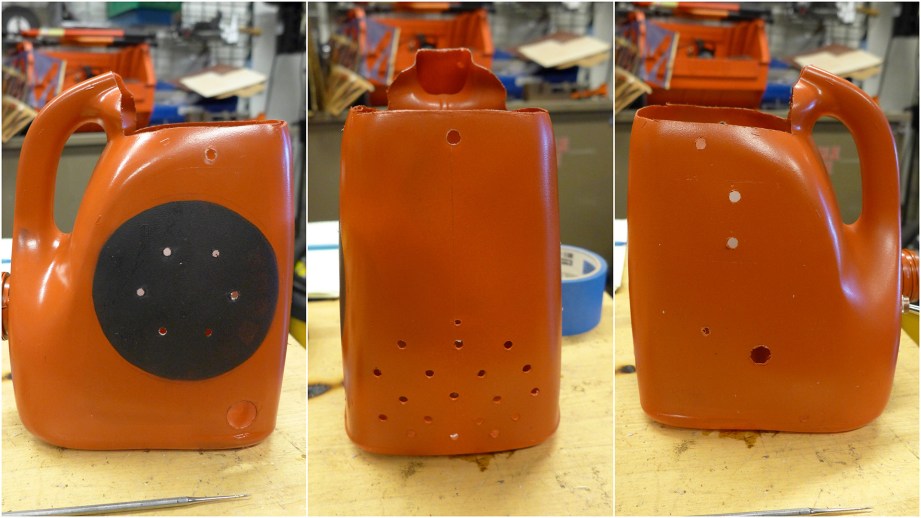
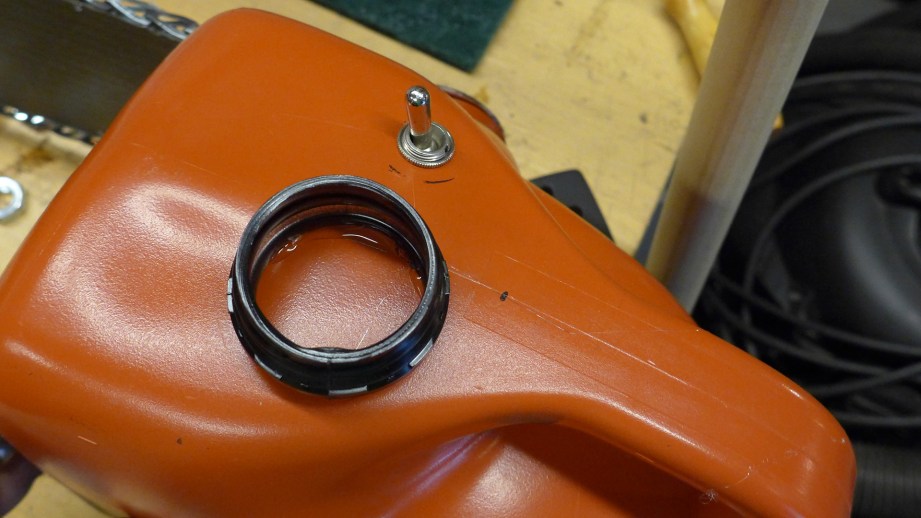
If you are adding a greeblie on the blade-side and/or a toggle switch on top, drill holes for those as well. I’d also recommend drilling some holes in the bottom or front of the chainsaw for ventilation–it gets sweaty in there!
Finally, hot glue the jug spout to the top of the chainsaw as the gas cap.
Step 4: Painting!
Using Krylon Fusion or similar ‘for plastics’ paint is important for the body. The jug flexes easily which would cause most paint to crack and come off. Remove the ‘gas cap’ from the spout and paint the body, blade cover (jug top) and 3D printed grill base red. Paint the gas cap, pipe clamp and conduit handle black. Optionally, paint the side greeblie, large blade washer and bolt black as well.
Once dry, trace the grill base onto paper and cut it out to make a mask to paint a black circle where the base will mount–optional, but a nice touch. Paint the 3D printed grill silver — I printed in black and gave it a splotchy coat of silver so it looked exhaust-stained. Otherwise, give it a coat of silver and a spritz of black to achieve same look.
Step 5: 3D Printing the Grill
The Evil Dead chainsaw has a distinctive grill that I couldn’t find a suitable piece for, so I designed and 3D printed one which you can download. For those without access to a 3D printer, something else will have to be substituted. My original plan was to cut off the bottom of a small, plastic flower pot and use that as the side grill–if you come up with a better idea, let us know. Here are the directions for the 3D printed version:
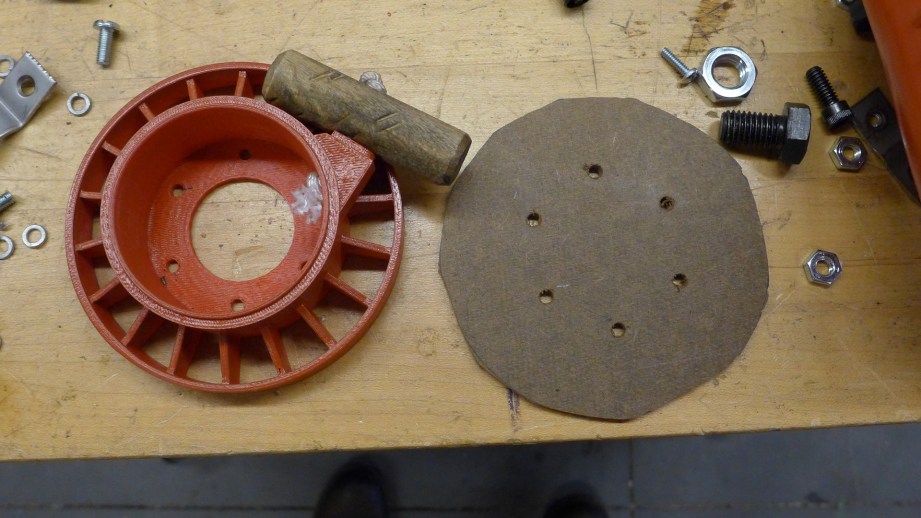
Trace the grill base and mounting holes onto a piece of MDF – cut out and drill holes. This is technically optional, but using this backer when mounting the grill will flatten out the side of the jug and make the grill fit flush which looks better. Take the remaining piece of dowel rod (approximately 2.5″) and drill a hole for the cord. Bang up the handle with a hammer or screwdriver to weather it — I also beveled the ends. I stained the handle with some dark varnish or just grime it up with some shoe polish or black paint. Grime up the rope with some shoe polish, knot the end and thread it through the grill base. Put handle on rope and knot it as close to handle as possible–trim.
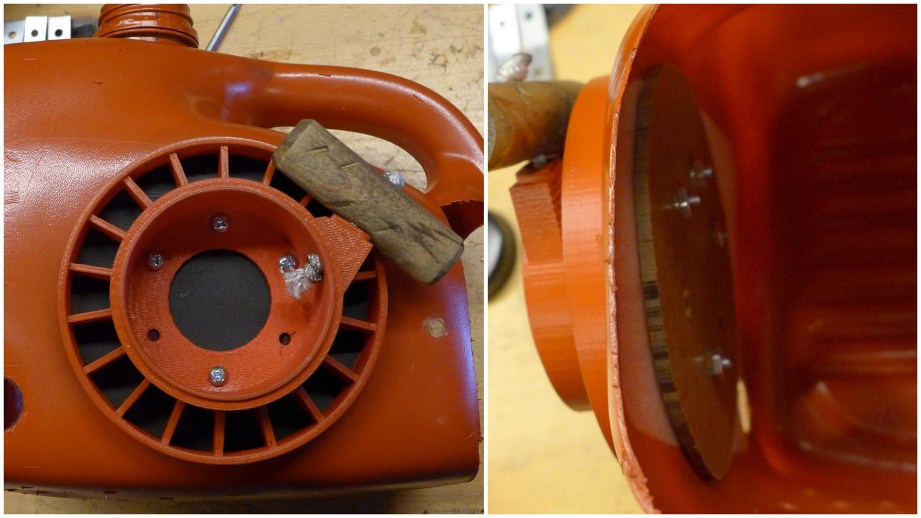
Mount the grill base to the chainsaw body with #6 screws and the MDF backer on the inside. You shouldn’t need to use all the screws, 4 is probably enough to pull the grill base flat to the body. The last step is to glue the grill onto the base but I’d do that once everything else has been put on – just in case you mess up and need to remove the base.
Step 6: Accessorizing with Greeblies
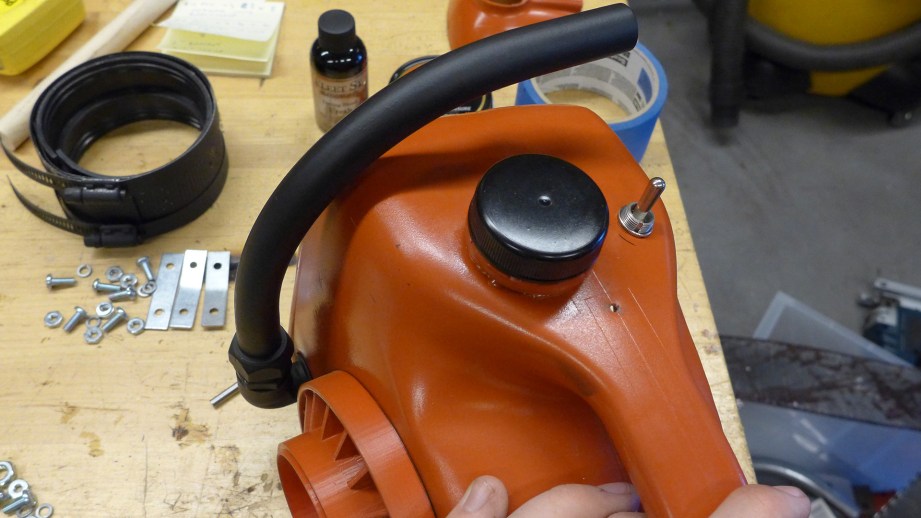
Attach the conduit side handle and optional parts like the toggle switch and side greeblie.
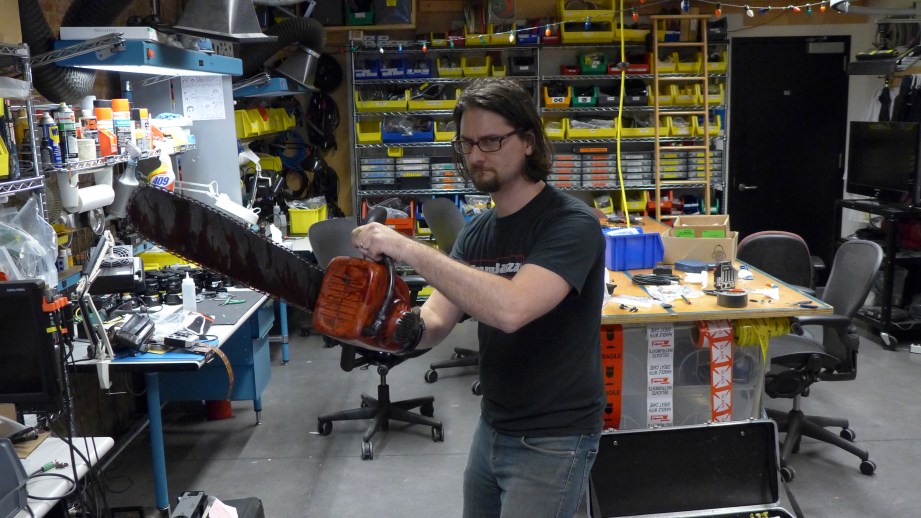
Install the blade with the diagonal #10 screws. Attach blade cover with large washer and bolt. Tighten until cover is nice and snug.
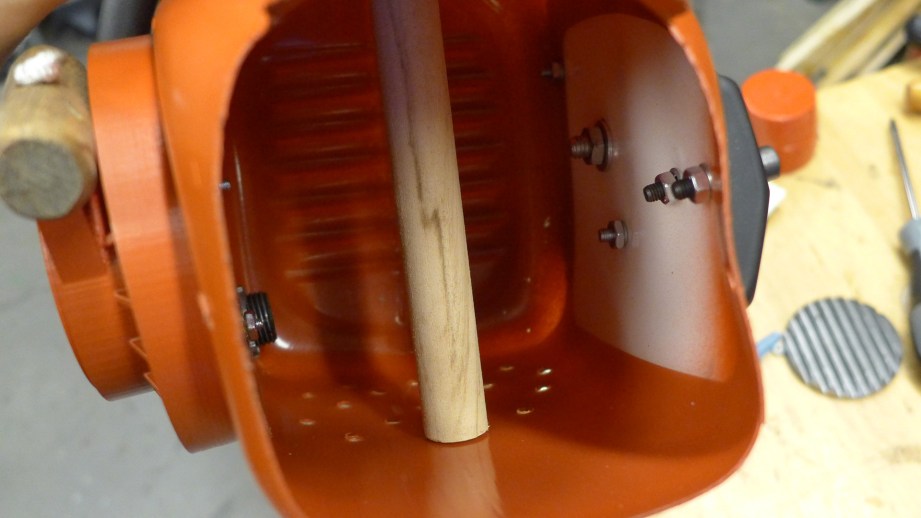
Lastly, install the inside dowel handle. Drill small pilot holes for the screws, otherwise the wood will split.
Step 7: Hand Clamp
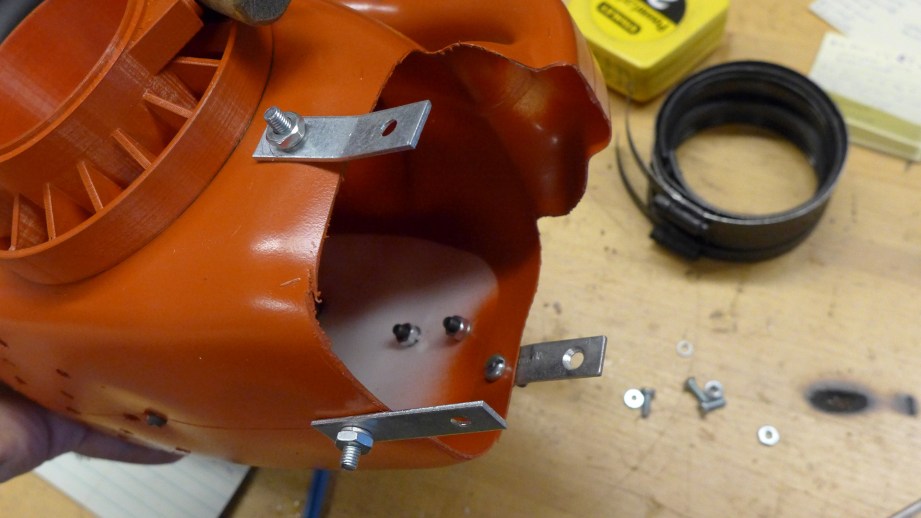
Attach the three braces for the hand clamp using #10 screws. They should have a slight angle to them which you can make with a vice and hammer. Adjust the pipe clamp to the desired diameter, position it inside the brackets and mark the holes.
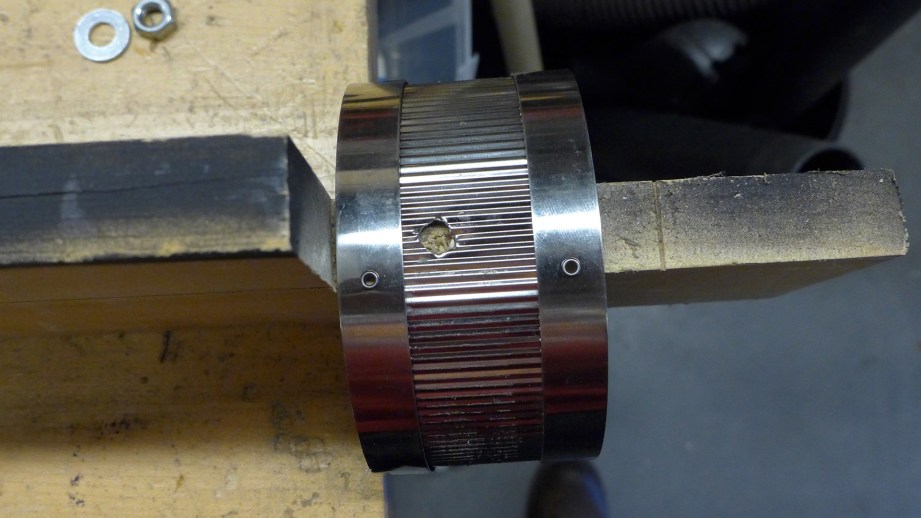
Remove clamp and drill holes. BE CAREFUL – drill bits like to grab and twist thin metal. I used a piece of wood inside the clamp for stability and backing. Next, install clamp with #10 screws.
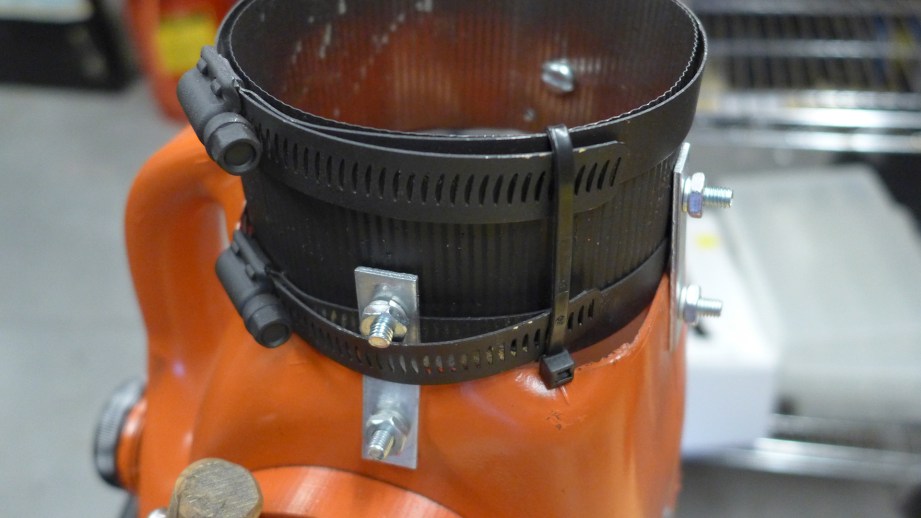
The clamp I got from Ace had a rubber gasket which made for nice protection from all the metal. You may want to install padding if your clamp does not have this. If there’s a lot of extra hose clamp sticking out, you may want to strap it down with a cable tie like I did.
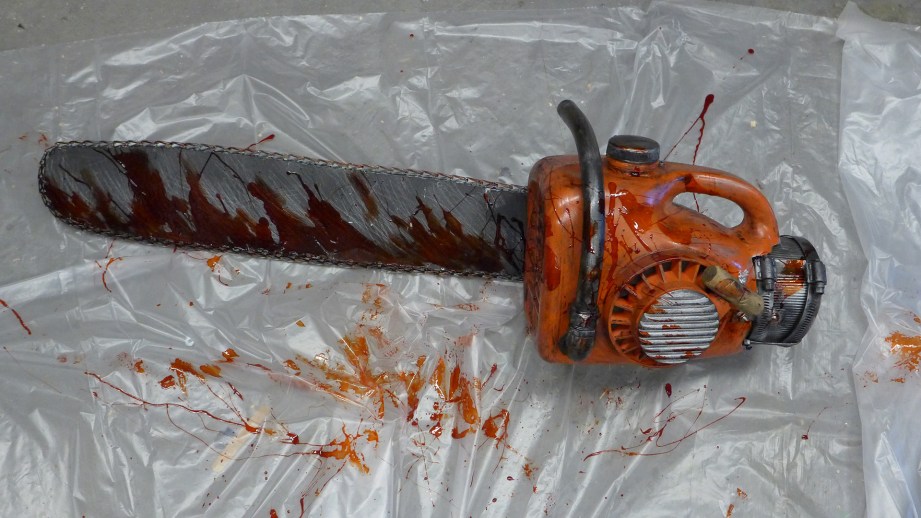
Step 8: Weathering
(See Adam’s weathering videos for tips–he’s much better than I am.)
Dry-brush or use a rag to apply silver paint to the raised areas of gas cap, conduit handle, hand clamp and any other areas you desire. Use black shoe polish all over for grime. I love how this works since you can actually build it up in nooks and crannies like grease. Put it on heavy and then wipe off what you don’t want. Add whatever else you want – rust, sawdust etc.

Optionally, add some blood and gore. For my original chainsaw I used Kryolan F/X dark blood which looked awesome and I was told it would dry–it did not–three years later and it is still gooey. Our good friend, Frank Ippolito told me to get Fleet Street Drying blood which looks great and did indeed dry. It has a rubbery, tacky feel, but is dry to the touch–it’s not cheap but a little went a long way. I got the fresh but wish I had got the dark instead and I applied by dipping a chopstick into the bottle and flinging it onto the chainsaw.
Finishing Up
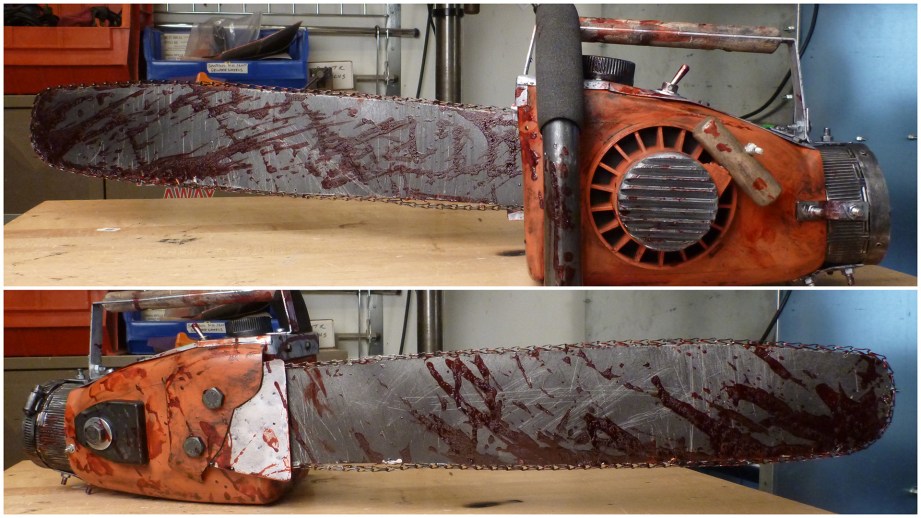
If you’re looking to make a more accurate version of the chainsaw, the addition of thin aluminum sheet and strip, some more dowel rod and extra nuts and bolts will get you on your way–it’s not that hard. And for the full Ash costume, you will also need some brown pants and the blue shirt which was harder to find. The best I came up with was a Dickies shirt that I painted the buttons to match the original shirt. A gripe I have about a lot of cosplay costumes it they’re not ‘lived-in’ or weathered enough, so I went to town with scissors, sandpaper, wire brushes, fake blood, coffee, and shoe polish to make the clothes look appropriately abused. I also made Ash’s harness out of a pair of WWII style leather suspenders and web belts.
Hope you enjoyed this special Halloween Edition of Bits to Atoms! If you dive into this project make sure to post pictures in the comments!
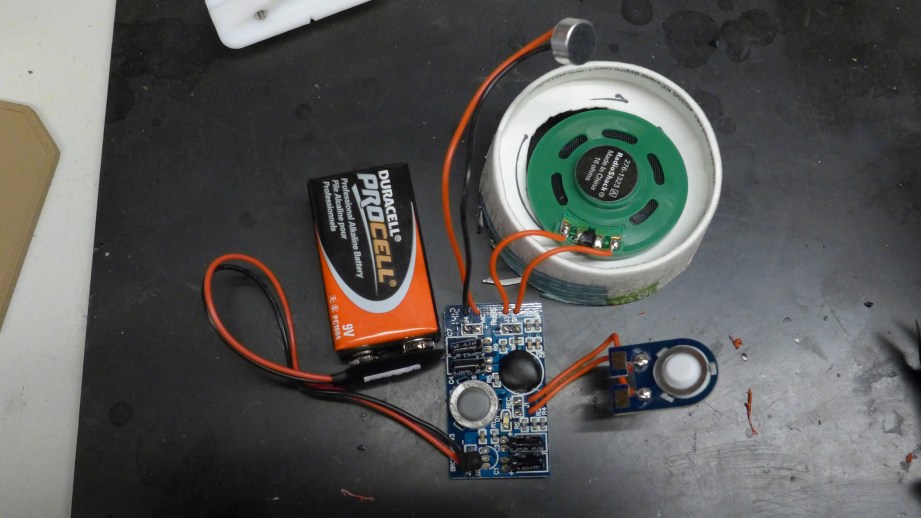
UPDATE: Since I first started this project 3 years ago, I have been searching for an economical way to include sound effects. I was using an old voice recorder inside, but the speaker was too small. Today I found the perfect solution for $12 at Radio Shack – that’s right, Radio Shack – glad to see they are getting back to their roots! It’s a simple 9V board with speaker that can record up to 20 seconds. I added a bigger cone made from a cup to increase the loudness – make sure to mount over vent holes so you can hear it well.
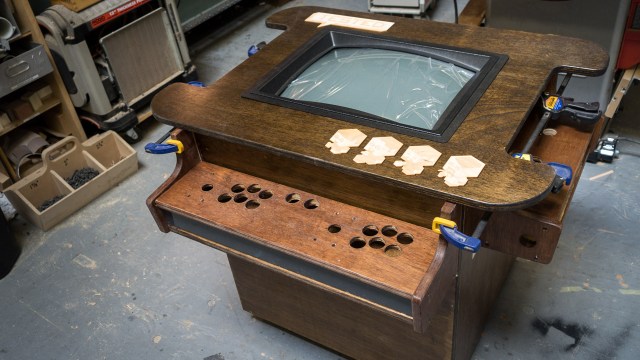
Building a Custom Arcade Cabinet, Part 6
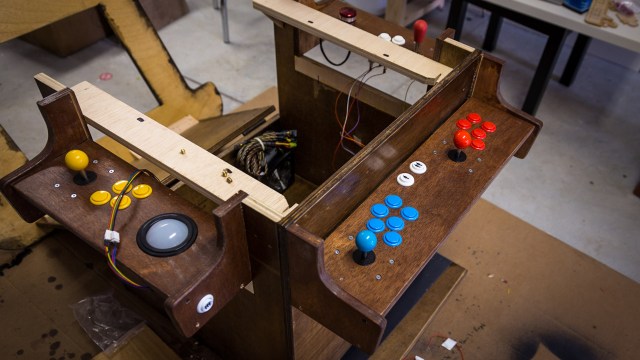
With the frame of the arcade cabinet constructed, Norm and Wes head back to the garage to begin the wiring of the buttons and other electronics. In this episode, we discuss the different types of custom arcade controls, the hardware to link them all together, and the tiny computer we’re going to build to run the software. (This video series was brought to you by Premium memberships on Tested. Learn more about how you can support us by joining the Tested Premium community!)
Camera operator: Benito Gonzalez
Editor: Benito Gonzalez
Music Library provided by Jingle Punks
Show and Tell: The Useless Box Kit
For this week’s Show and Tell, Norm assembles a kit of a machine he’s always wanted: a useless box. Flip the switch on the box and all it does is turn itself off. Simple, yet mesmerizing. The kit of laser cut plastic and some basic electronics isn’t difficult to put together, and makes for a great afternoon project.
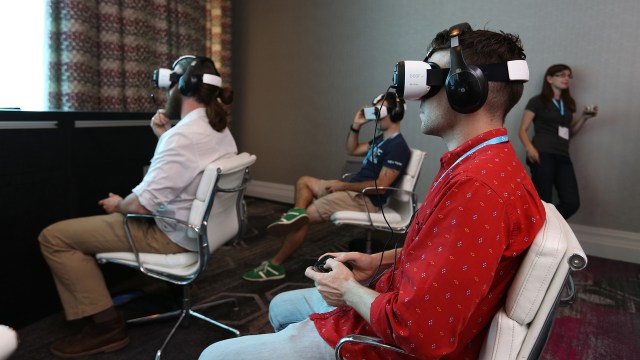
Episode 273 – Virtual Reality Reality – 9/25/2014
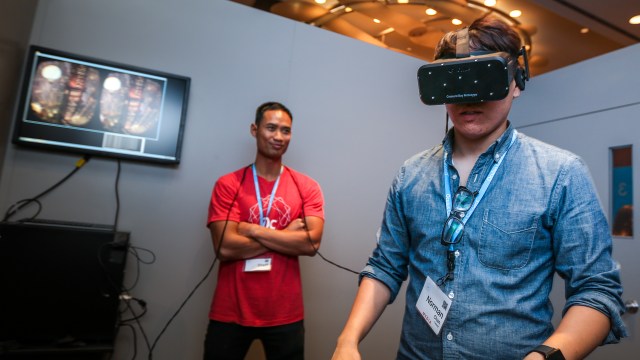
Hands-On with Samsung Gear VR at Oculus Connect
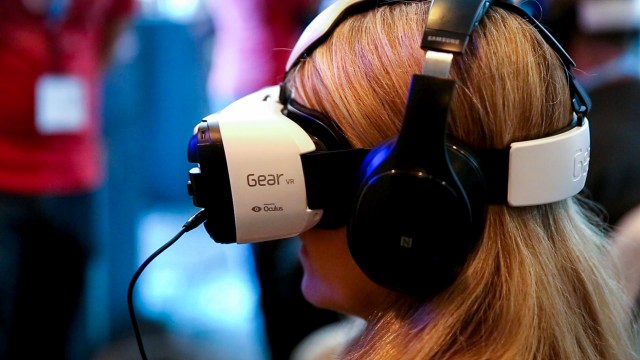
At Oculus Connect, Norm gets to try out the upcoming Gear VR virtual reality headset, a collaboration between Samsung and Oculus. It uses a Galaxy Note 4 for its brains and screen, with VR software and optimizations designed by John Carmack. Norm shares his opinion of display performance on the Note 4’s 60Hz 1440p screen, and whether the phone’s technology is sufficient for a good mobile virtual reality experience.
Bits to Atoms: World Maker Faire 2014 Recap

Hey everyone, Sean here with a World Maker Faire New York recap! I’ve been to every NYC Maker Faire and it keeps getting bigger. I’ve had a booth the last two years but was too busy to get one together this time. The upside was I actually got to see the convention and all the new 3D printers and accessories that were either just announced or being shown in person for the first time. Since Will and Norm were unable to make it this year, I wanted to share with you some of the projects and cool stuff I saw.
Within seconds of setting foot in the 3D Printing Village (one of World Maker Faire’s biggest draws) I ran into Anthony Campusano, a fellow maker who I’ve met numerous times and builder of an amazing Lament Configuration box from Hellraiser.

The fellow with him enthusiastically exclaimed, “I follow you on Twitter!” and it turns out to be Andreas Ekberg, who made the Tested Cruiser skateboard! I didn’t realize it until later but Andreas is also responsible for the Classic LEGO Spaceman print that has been on my to-buy list. I had a great time hanging out with my fellow makers. Now let’s take a look at some of the good stuff I saw.
Dremel’s 3D Printer
Dremel recently announced their 3D printer which I think is going to be a pretty big deal when it’s released in November. Design-wise, it’s similar to the MakerBot Replicator 2 which is good news since that printer has since been discontinued. Dremel’s printer is designed for printing PLA with a non-heated print bed and active cooling fan. It’s completely enclosed for safety with a magnetic front door and a top the lifts right off–if I owned the machine I would remove both. The custom-sized .8 Kg spools sit inside the machine, which mean other manufacturers spools won’t work but you could easily mount it outside the machine.
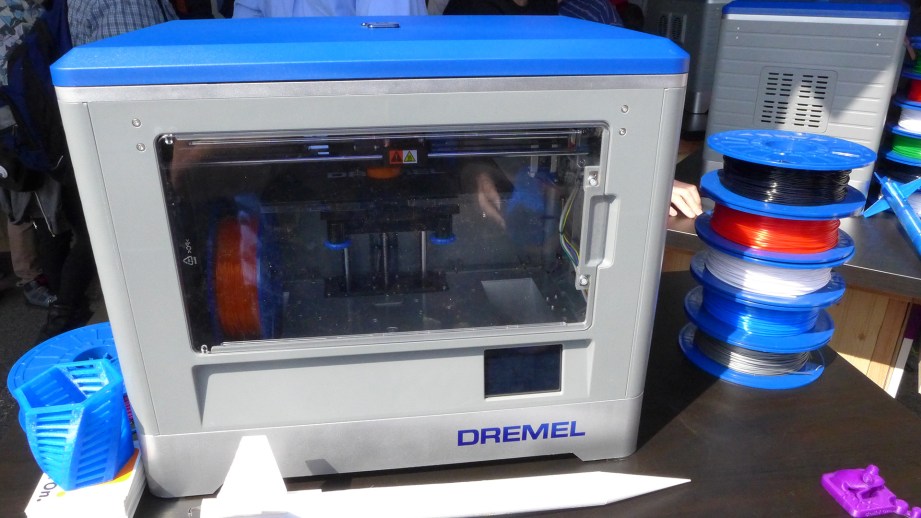
The printer has a 3-point manual leveling system with large, easy to turn knobs and a removable polycarbonate bed to make print removal easy. Dremel is using BuildTak (see below) on the print bed for improved print adhesion. They are using a spring-loaded extruder feed mechanism which has become the preferred setup for most of us. I like that they chose a pretty standard setup that can be disassembled. Since extruder clogs are going to happen no matter what, I asked them if they would cover extruder disassembly in the manual. They said ‘no’ but they would walk customers through it via a support line. Print quality looked good but they weren’t demonstrating the software, so I didn’t get into that.
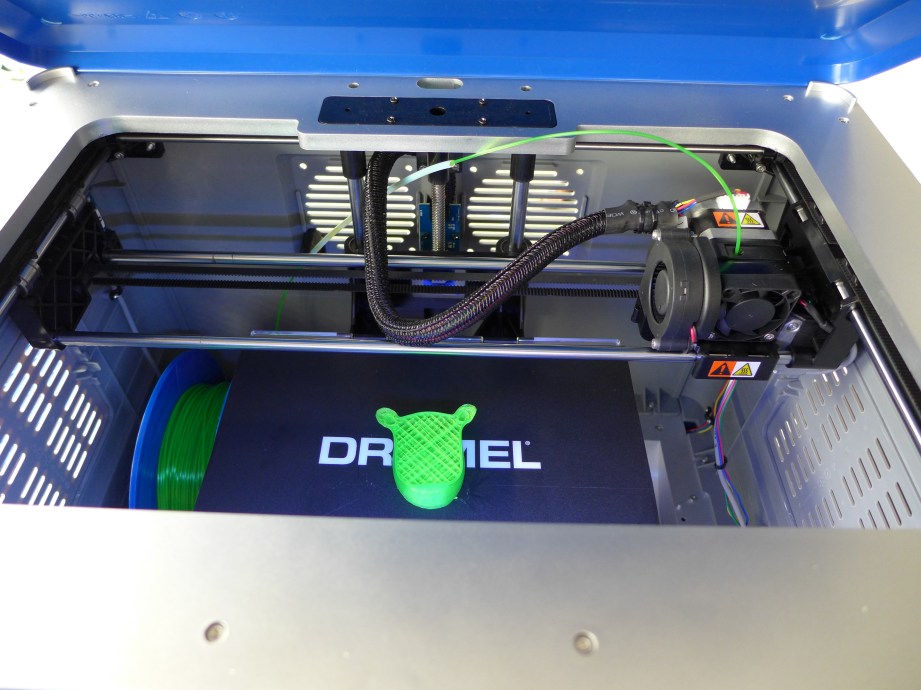
Finally, Dremel’s printer uses USB or SD card for model upload and has a decent size touchscreen interface for control. I predict this will be a hot machine as it’s from a trusted brand with wide reach and has a nice price point at $999. Spools run $30 for .8 Kg which put them at about the average price-point for PLA filament. Since this is Dremel, I asked if this meant we would be seeing a desktop CNC machine soon and they just grinned.
Ultimaker 2
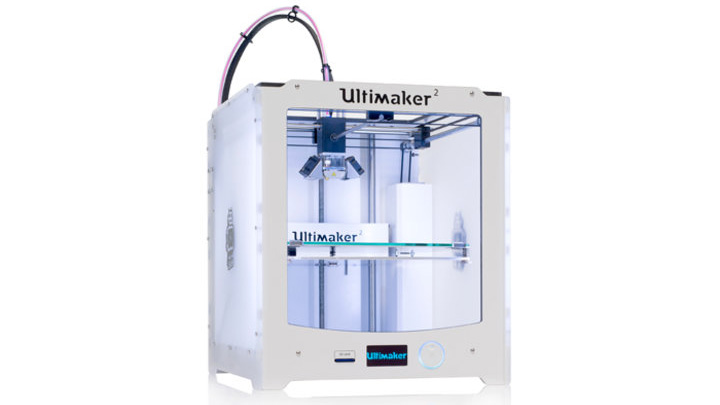
Although I have never owned one, I have always liked Netherlands-based Ultimaker machines and the Ultimaker 2 is really pretty. Ultimaker has always produced really nice prints and unlike MakerBot they still embrace their roots and offer the original Ultimaker as a kit. The 2 model comes fully assembled and can print ABS or PLA using 3mm filament. The 2 has a heated glass print bed for ABS printing, although the unit is not fully enclosed so I’m curious as to how large ABS prints will turn out. It still uses a bowden extruder, which means the filament is pushed through the feed tube by a mechanism on the back of the machine. This allows them to keep the actual extruder head very small and light which causes less momentum problems while printing at high speed. The Ultimaker 2 runs around $2500 and is a great looking machine from and established 3D printing company.
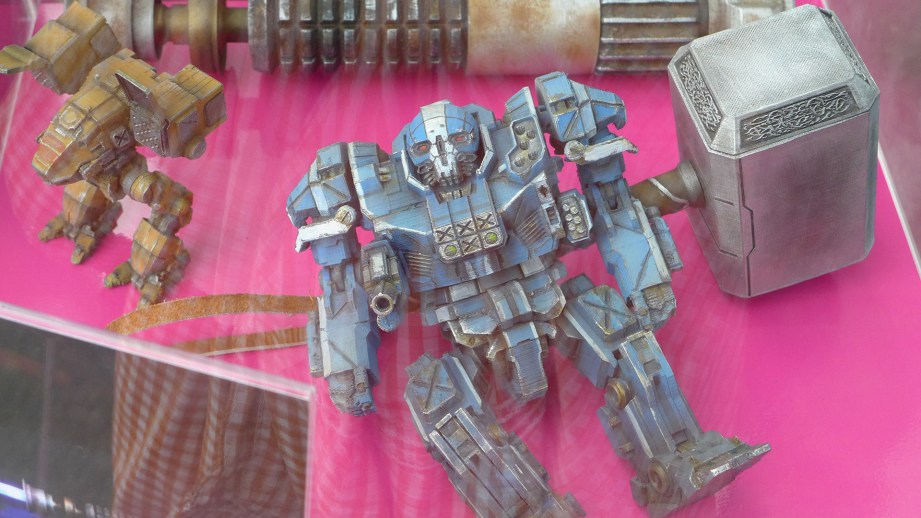
As a bonus, Ultimaker had Valcrow’s work on display and I was extremely disappointed to find out he had been hanging out at the booth and I missed him! As I mentioned before, you can download and print his lightsaber and Ducati motorcycle models. They also had something I had not seen before, Aaron Thomas’ impressive Ronin mecha that was completely printed on an Ultimaker. This guy was at least 18″ tall and had an incredible amount of parts and detail.
RoVa3D Printer
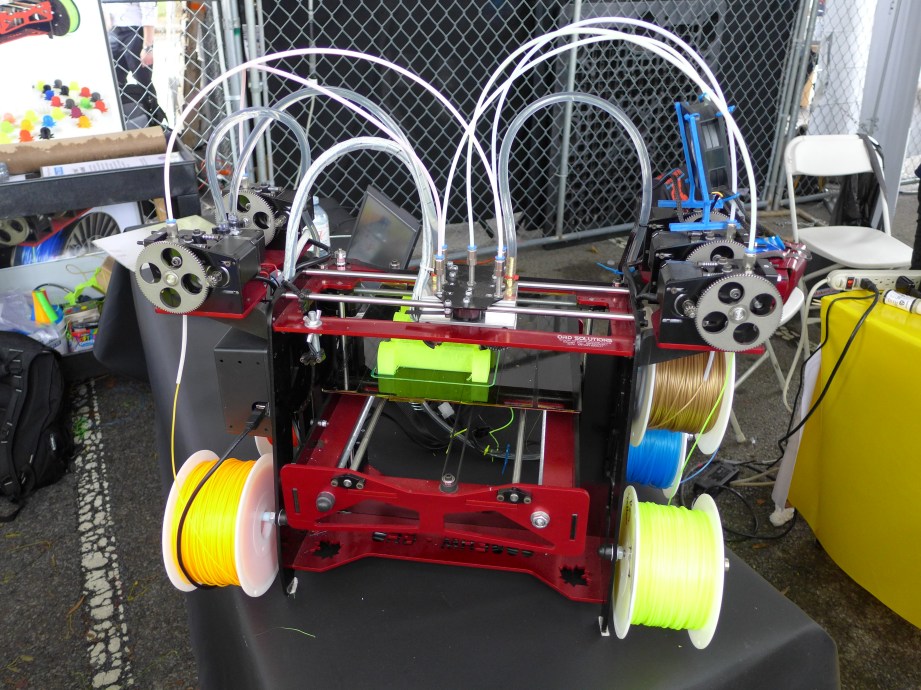
ORD Solutions from Canada had probably the craziest 3D printer that I saw at the Faire. They already had a successful Kickstarter for the RoVa3D 5-head printer. Yes, that’s right, five heads with liquid-cooling to prevent jams–this thing was impressive to look at. Construction quality looked top-notch, although you don’t want any small children around this thing with open print bed and stainless steel gears. It has a heated printbed, but once again, a fully open-air design can make printing ABS challenging. Print quality was very good and the five-color examples didn’t seem to have too much bleed/boogers between the colors. At $2500, the price is hard to beat if it delivers on quality and tech support.
Even cooler was their current Kickstarter for a paste machine which is retrofitted to print with anything from plaster to peanut butter! In a field overrun with Kickstarter machines ORD looks to be making unique machines with some quality construction.
Zeus
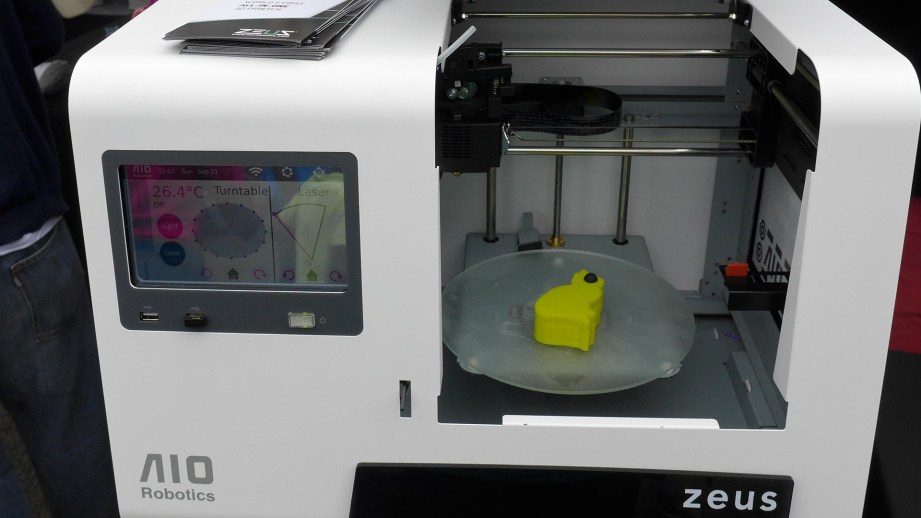
I unfortunately did not get to speak with the rep for Zeus printer which was successfully funded on Kickstarter, but it looks like a doozy. For $2500, It offers up scanning, slicing, printing and ‘faxing’ (that’s right) all in one unit. Construction didn’t look bad, print quality looked on par with other printers but I don’t know what objects I was seeing were scanned by the Zeus. I’m wary of this much packed into one unit for this price-point and look forward to hearing some real reviews.
BuildTak
BuildTak is a thin, textured plastic (reminds me of thin kitchen cutting mats) with adhesive on the back that you stick to your print bed instead of using painter’s tape, kapton or glue sticks. They have custom sizes for most popular printers or you can cut it yourself. Both Dremel (see above) and Afinia are using it for their printbeds and for only $10 I decided to give it a try and will report back later. The finish samples they had on hand weren’t smooth like when using kapton, but they were also nicer than painter’s tape and it seems to work with just about any filament.
It’s heavy enough that it seems tough to damage and cheap enough to replace if you do. You can not use acetone to clean it like I do for kapton, but alcohol is ok. Since it behaves differently than other surfaces, you probably need to set the nozzle to printbed gap differently than normal.
Printed Solid
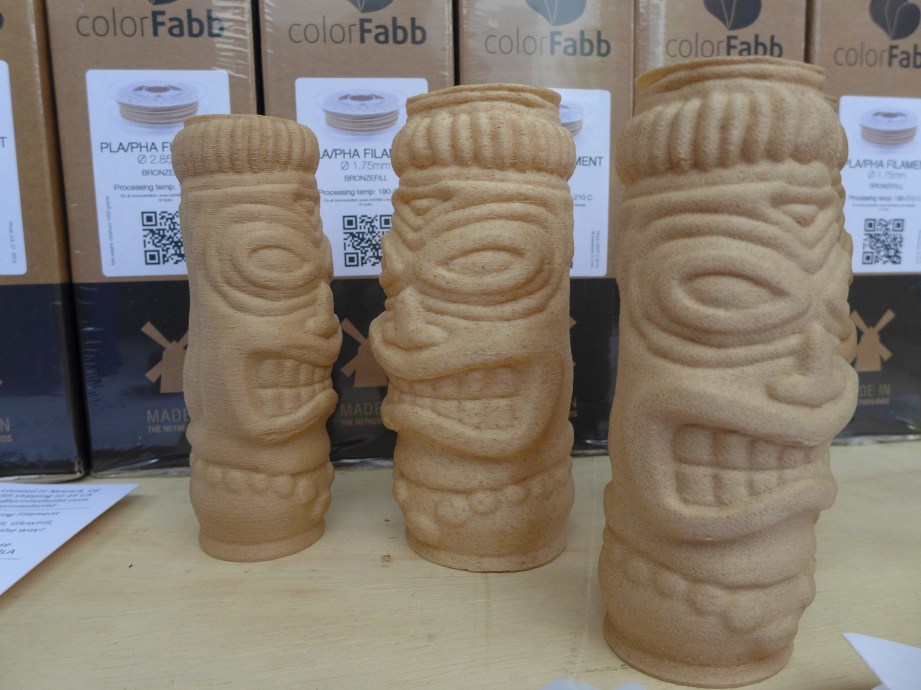
I was not familiar with Printed Solid before this Maker Faire, but they are offering up unique printer supplies and services. They are carrying Netherlands-based colorFabb filaments which have gorgeous PLA colors as well as some really exotic stuff such as wood and metal impregnated filaments. They have recently introduced XT filament, a copolyester that has low odor, is FDA compliant, prints like PLA but is tough like ABS–this stuff looks really promising. Printed Solid hooked me up with some woodFill and I bought some bronzeFill and will report back later with results. Printed Solid also offers services such as design and metal casting and silicon molding from 3D prints.
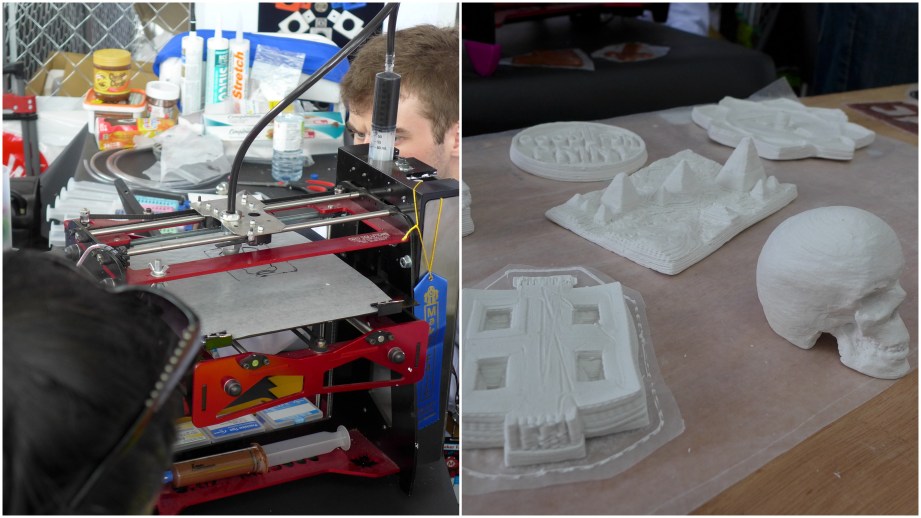
3D Kitbash
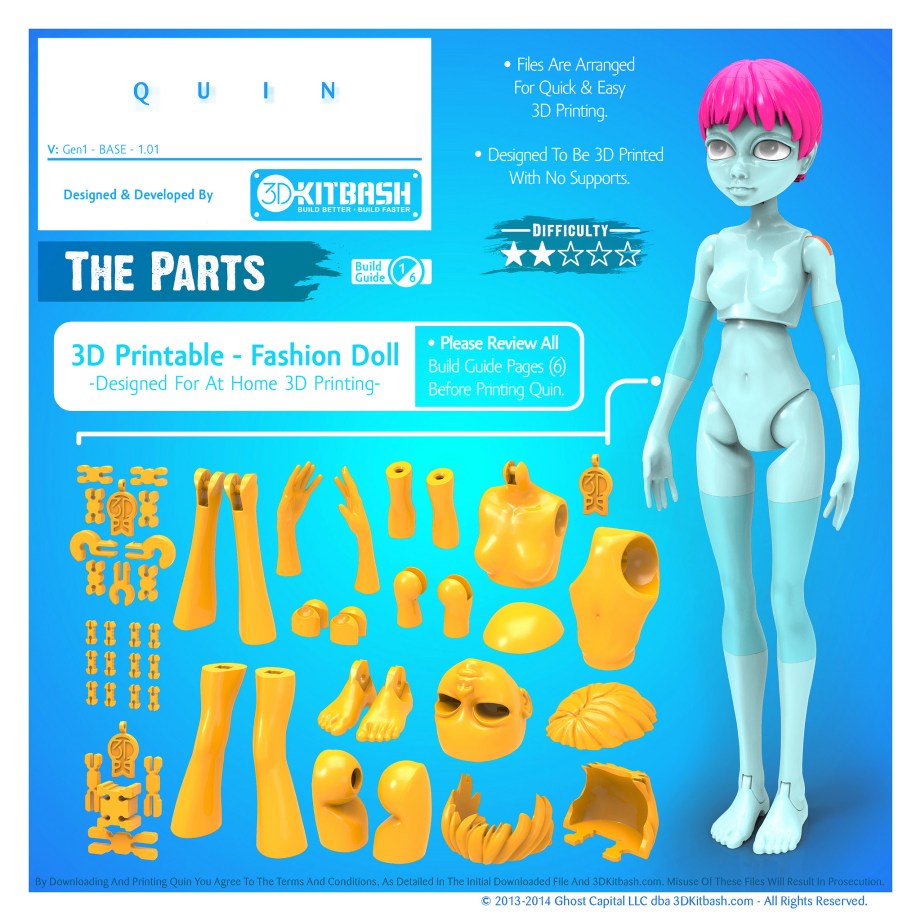
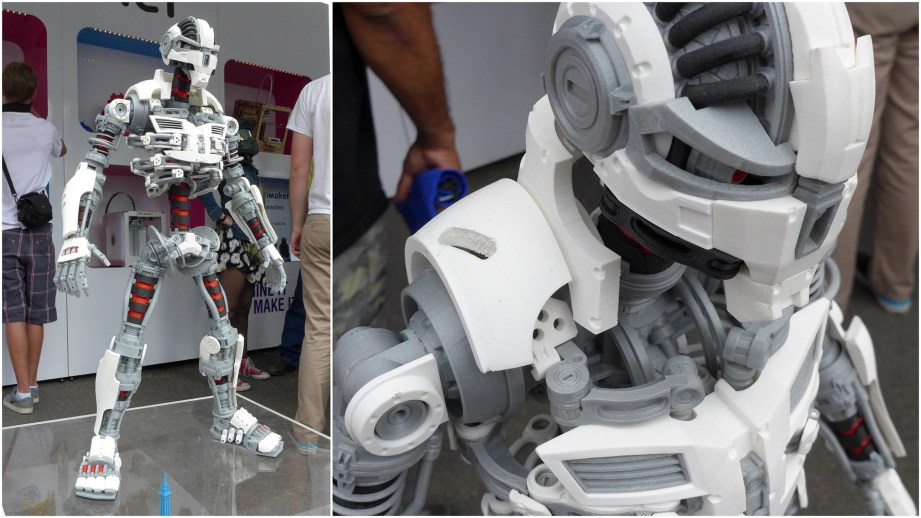
I spoke with Quincy and Natalie of 3D Kitbash who are offering up digital downloads for printing on your own machine. They have the Boneheads series of skulls including mounting plaques, printer test kits for calibrating your printer and Quin, their fully articulated doll. The work on Quin was really well done and fully printable on a FFF machine. She has various add-ons and options available for download and they are working on themes for her as well. I like that they are offering downloads as an STL which gives you a lot more flexibility in printing versus sites that are offering models only formatted for a specific size and printer.
Modio
Modio’s stuff was very neat and where I can see toy manufacturers going. They make an iPad app that gives you a palette of modular pieces to building your own action figures and then print them at home. I really like the aesthetics of their parts which just snap together to make some cool figures. They really need to offer more than just an iPad app and get this on Android as well as a web app.
UPDATE: Modio contacted me – they just released an iPhone app and are working on other platforms as well.
CRP
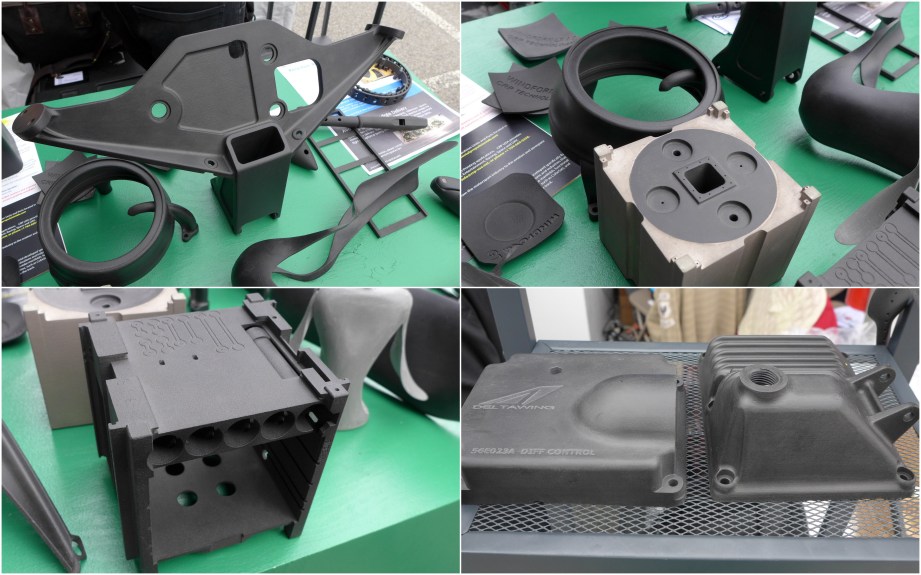
CRP had some of the coolest 3D stuff I have ever seen. While their services are out of reach for us mere mortals, they came to Maker Faire to share what they do – making 3D printed carbon fiber parts for the likes of Formula 1 and NASCAR. They use modified 3D Systems SLS (Selective Laser Sintering) machines to print extremely light and strong parts for high-end applications. I was able to take one of their 3D printed carbon fiber parts that was dish-shape and pop it inside out and it popped right back into place with no problem – amazing stuff.
That about wraps it up for my experience at this year’s World Maker Faire. It was a great time as always and I even got recognized as Adam’s Inventern! Maybe next year I’ll see you guys there.
Books and Burner Phones – 9/23/2014
Building a Custom Arcade Cabinet, Part 5
We’re getting close! In this fifth episode of our custom arcade cabinet build, Norm and John tackle some mistakes made in the original plywood cutting and then work together to assemble the cabinet frame. The challenge of finding a way to mount the heavy CRT monitor inside the chassis requires some problem solving and precise measurements, but this thing is finally starting to look like a real cocktail cabinet! (This video series was brought to you by Premium memberships on Tested. Learn more about how you can support us by joining the Tested Premium community!)
Shot and Edited by Benito Gonzalez
Music Library provided by Jingle Punks
Hands-On with Oculus Rift “Crescent Bay” Prototype Virtual Reality Headset
Norm goes to Oculus Connect to get a hands-on demo of the new “Crescent Bay” feature prototype of the Oculus Rift virtual reality headset. We interview Nate Mitchell and Palmer Luckey of Oculus VR to talk about what’s new in the headset, reveal some technical specifications, and then walk through the entire demo experience–with 1080p video from the private demo room!