


In this week’s super-sized episode, Adam answers questions submitted by Etsy users, including how he finds the best stuff on Etsy, how the indie crafts movement stacks up to mass production, and whether it’s possible to swim in mayonnaise. Enjoy!
Episode 167 – Questions & Answers – 4/25/2013

The Volpin Project, Part 7: Introduction to Moldmaking
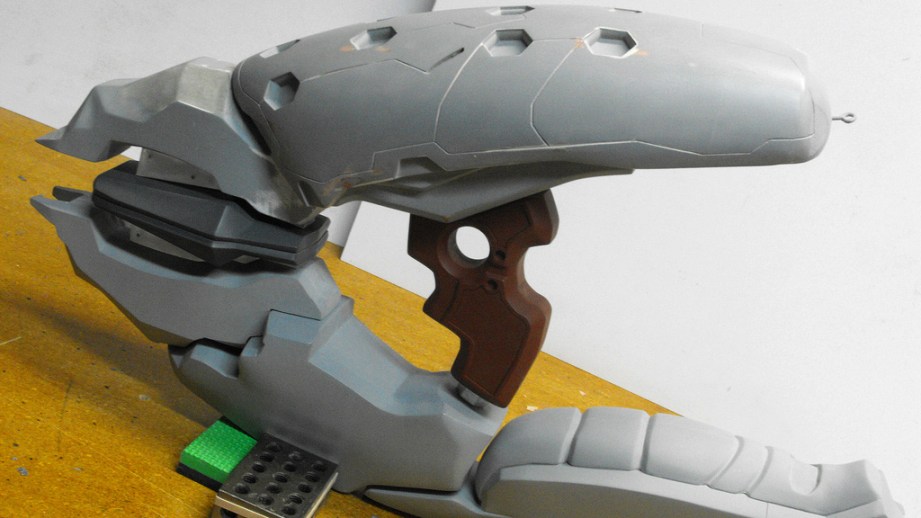
Our Halo Needler prop is somewhere around 15 pounds at the moment, an amalgamation of wood, foam, bondo and various types of plastic. While the shape of the whole thing is spot-on, the prop leaves a little bit to be desired with how heavy and fragile the mishmash of materials ends up being. The parts we’ve got so far have to be molded, then cast in urethane plastic. This will yield a piece that is both far lighter as well as more durable, since it’ll all be one cohesive material through and through.
There are many types of techniques to make molds, and just as many types of materials to make molds with. The techniques covered in this and the next build installment will give an overview on the processes for making hard copies–that is, a piece that ends up being cast in rigid plastic. First, to those who aren’t familiar with moldmaking, I’ll cover a bit of terminology. Important moldmaking terms will be bolded.
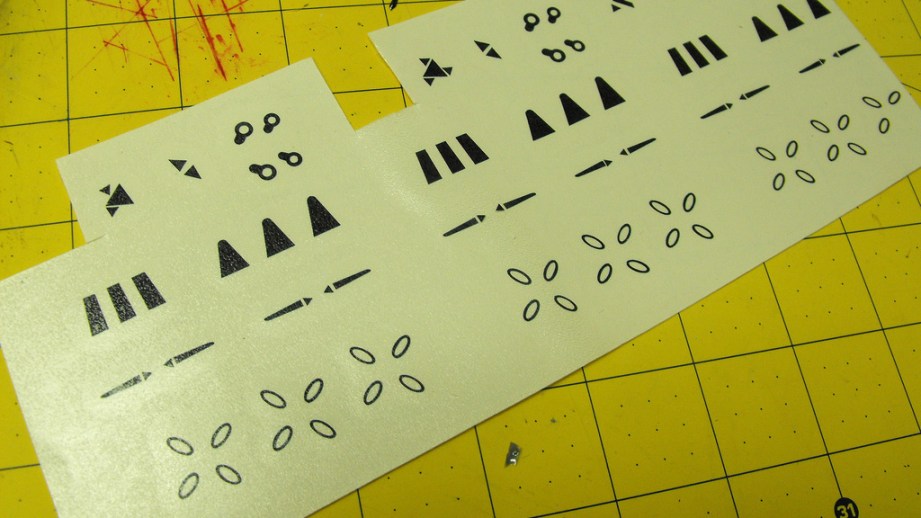
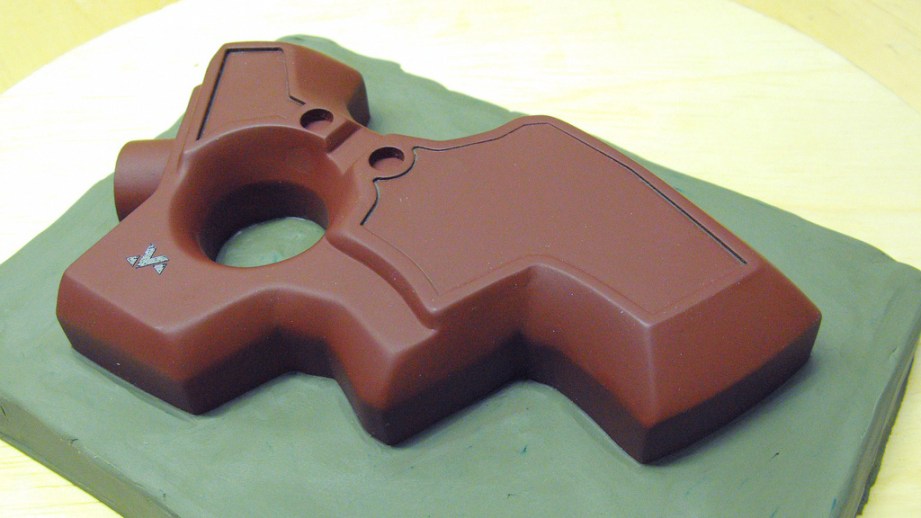
The part to be molded is referred to as a “master” or sometimes as the “sculpt.” For the purposes of this article I’ll be covering molding the grip section of the Needler. The grip here is made from MDF, Acrylic, PVC, Bondo and some epoxy clay. This is the grip master.
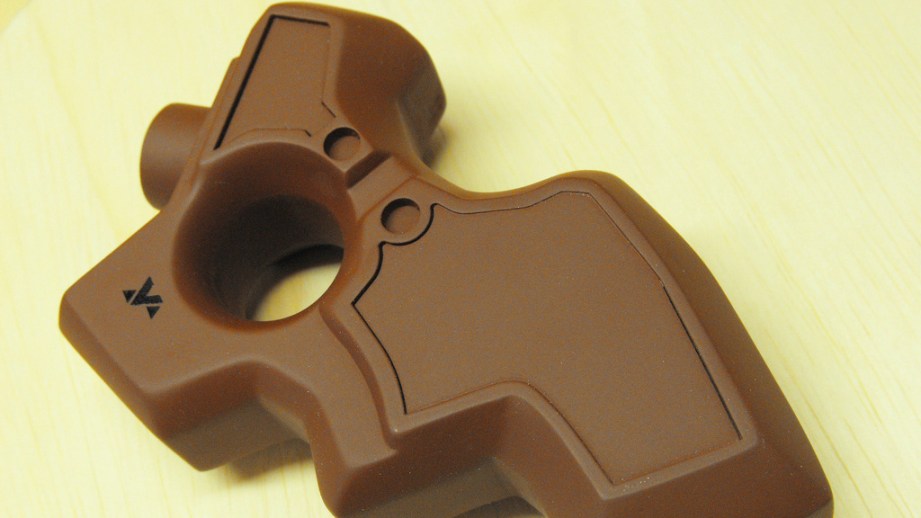
(Of note in the shot above is a little trick I learned from some of the modelmaking guys at the Replica Prop Forum. The little black arrows on the grip were cut at a local sign shop and adhered to the grip before molding. After making the mold and pouring a casting in resin, this will create small raised details in the final part.)
To make the mold, the material I’m using is silicone. The “mold” is anything into which casting material is poured in order to make a copy. Many people confuse the word “mold” with the finished result of the casting process. The pieces that come out of a mold are referred to as “castings.” Molds can be made from plaster, resin, silicone, latex–any number of materials based on the end goal of the mold and the part that is being replicated. I use silicone because it is versatile, lasts through many uses, and yields the best results for the type of work I do.
There are two kinds of silicone you’ll run into when making molds: “Platinum cure” and “Tin cure“. Generally tin-cure silicones are cheaper and less prone to curing issues, but less durable and can also shrink over time. Platinum-cure silicones shrink less, are very durable and more archival, but are more expensive and can be finicky about curing depending on environmental factors as well as what kind of materials the mold master has been made from. More on that last part in a bit.
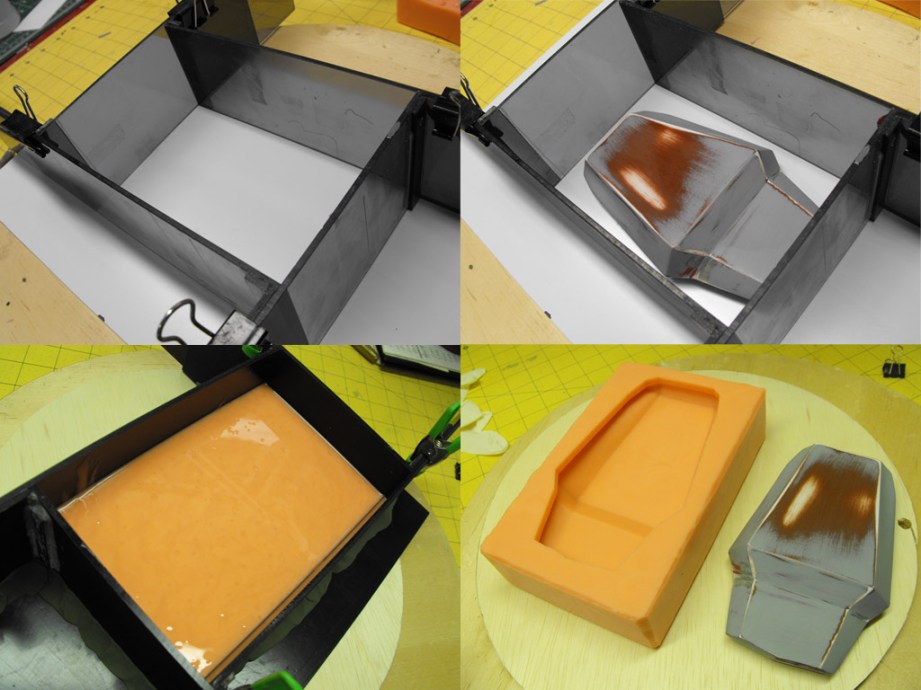
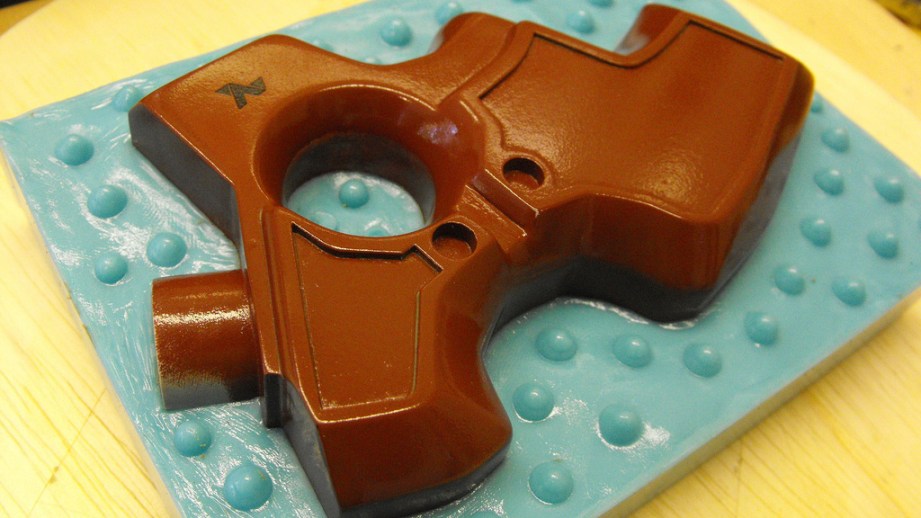
The easiest kind of mold to make is a one piece block mold. This is useful for making parts that have a flat back and detail on only one facing side. In the shot above, the “barrel” part of the Needler is placed into a mold box with a flat base. Clay is used to seal the mold box to prevent leaks around the base and edges, and silicone is mixed then poured over top of the master part. After allowing 6 hours of cure time (for this particular silicone) the walls are removed, then the master part is demolded from the silicone, and its ready to make copies!
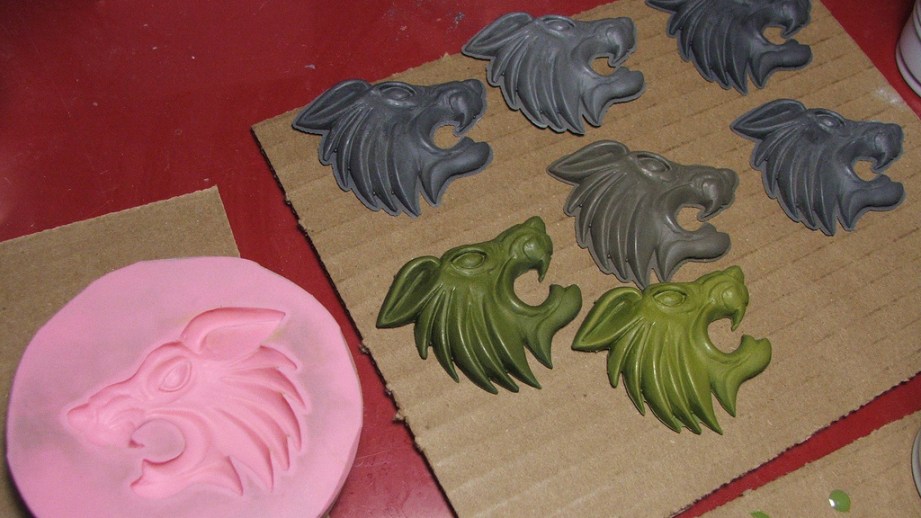
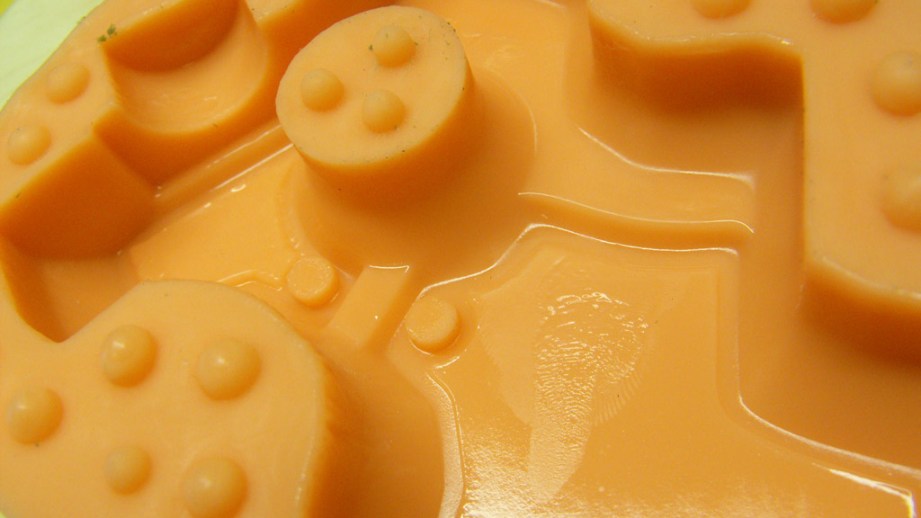
The benefits of a large block mold is simplicity. They’re quick to set up, easy to make and difficult to get wrong so long as you make sure the mold box is properly sealed before pouring. They do use a lot more material than other moldmaking techniques though, so larger block molds can be pricey and impractical. These are best used for small detail and accent parts, like the wolf heads in the picture below.
Let’s say you have a part that has detail on both sides and you can’t do a one piece mold. Again, there are many techniques for this, but I’m going to be illustrating the two piece block mold now. Let’s go back to the Needler grip I mentioned earlier. This part has raised details on all sides and will need to be replicated exactly in order to align properly with all the other parts of the Needler that have been built so far. The piece will have to be molded in two halves, which will be assembled before making a cast copy and split apart to remove the finished casting once cured. Done properly this technique can yield very accurate results.
A good idea before doing any sort of moldmaking is to take some time with clay and fill in any small cracks or hairline seams that have been created while building the master. Mold making silicone is specifically designed to pick up very fine details (even fingerprints) so most pourable silicone will seep into small cracks and can lock your part into the mold, or even produce tears in the silicone when pieces are removed over time.
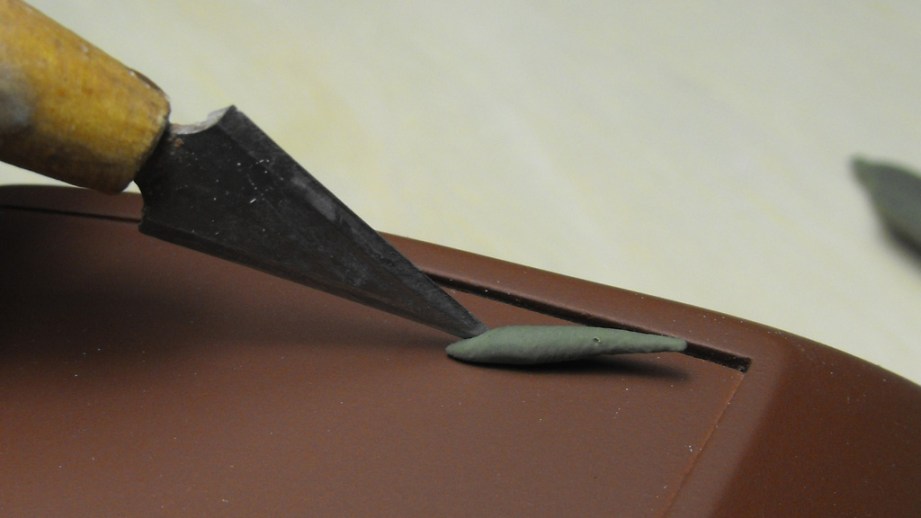
A note on the clay as well: any clay used with silicone needs to be free of any sulfur. Sulfur in the clay will keep your mold silicone from curing, and you’ll just end up with a blob-like mess no matter how long you leave it to cure for.
To start out with a two part mold, pick where the seam line on your part should be located. Ideally, this is on a broad flat area that will be easy to sand or fill if your mold has any registration issues later on down the road. For the grip, I set the part down on a flat surface and sculpted clay around the perimeter along the flat front and back, leaving the sides open to the mold area.
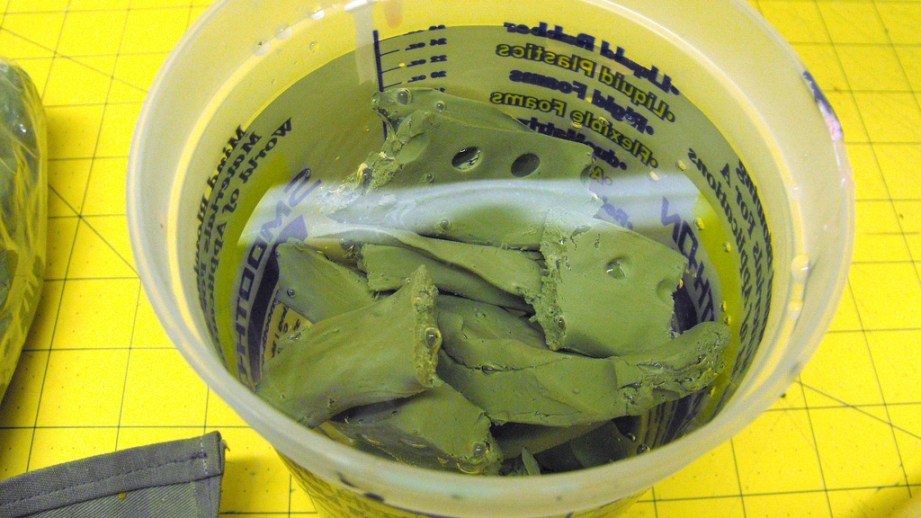
To make shaping the clay easier, I typically toss it in a bucket of warm water. This will soften your clay and make smoothing out lumps and getting a flat even surface much simpler.
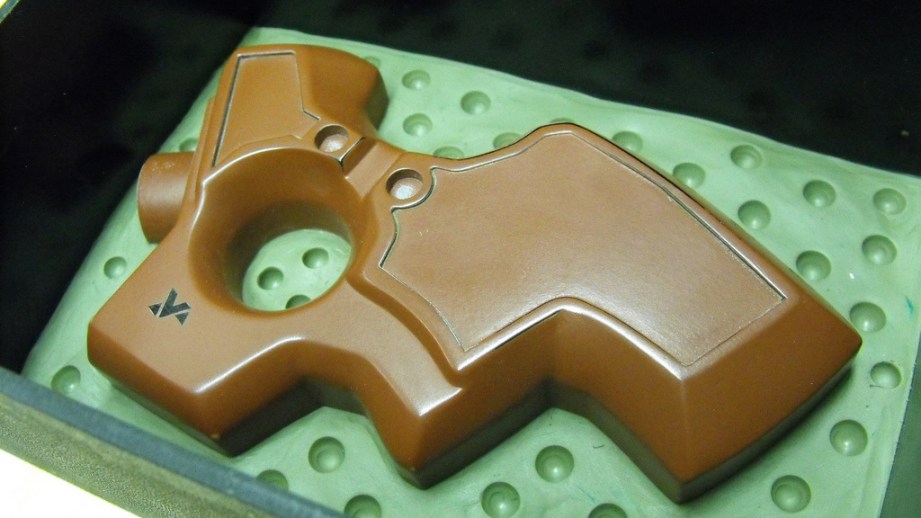
Once the part is embedded in the clay and your edges along the seam line are smooth and even, it’s time to add registration keys. These are the little divots in the photo below. After the silicone is poured and cured, removing the clay will reveal little cones in the surface of the silicone. These will eventually align with the other half of the mold, making sure that when the two halves are assembled later on, everything lines up correctly. Without these keys, the two halves of the mold will slide across one another and result in a part with misaligned seams and symmetry issues.
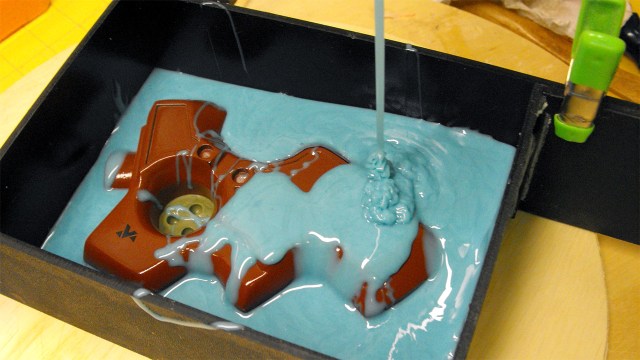
Now, just add blue goo. The silicone shown here is Smooth-On’s Mold Star 16 Fast, a platinum cure silicone that sets in just 45 minutes. In the shot below you can see I’m adding the silicone in a thin stream. This “tall pour” method of adding rubber helps remove trapped air from the silicone by stretching out air bubbles along the thin stream of silicone as it’s poured until they pop. Typically I use a vacuum degassing chamber to remove air from my rubber, but since this stuff starts to set up in about 6 minutes, I didn’t have time to properly degass the material before pouring it. Make sure to pour from one corner and allow the silicone to seek its own level over your master part naturally.

You might recall I mentioned earlier that platinum cure silicones can suffer cure inhibition issues, and that’s exactly what happened to me on the first attempt with this mold. I put the master part under the rubber too early, and the final primer coat hadn’t fully cured yet. The uncured primer released chemicals into the first pour of a different kind of platinum cure silicone, and the result was a very gummy mess that refused to cure even after 12 hours. I removed the part, allowed the primer to dry fully for a complete day, and tried again.
After leaving the mold for an hour to cure, the part is flipped over and the clay from the first half is removed along with the mold walls. There may be some residual clay along the seam lines which can be removed with an exact-o knife or similar clay scraping tool. Once this is all cleaned up, put the mold walls back in place and add mold release. Mold release is a spray-on material that prevents silicone (among other things) from sticking to or adhering to itself. This part is very important, as forgetting to add mold release will leave you with a very pretty solid block of rubber that you’ll have to cut your part free from. That isn’t necessarily death to the entire mold, but it does negate all the work done with the clay earlier.
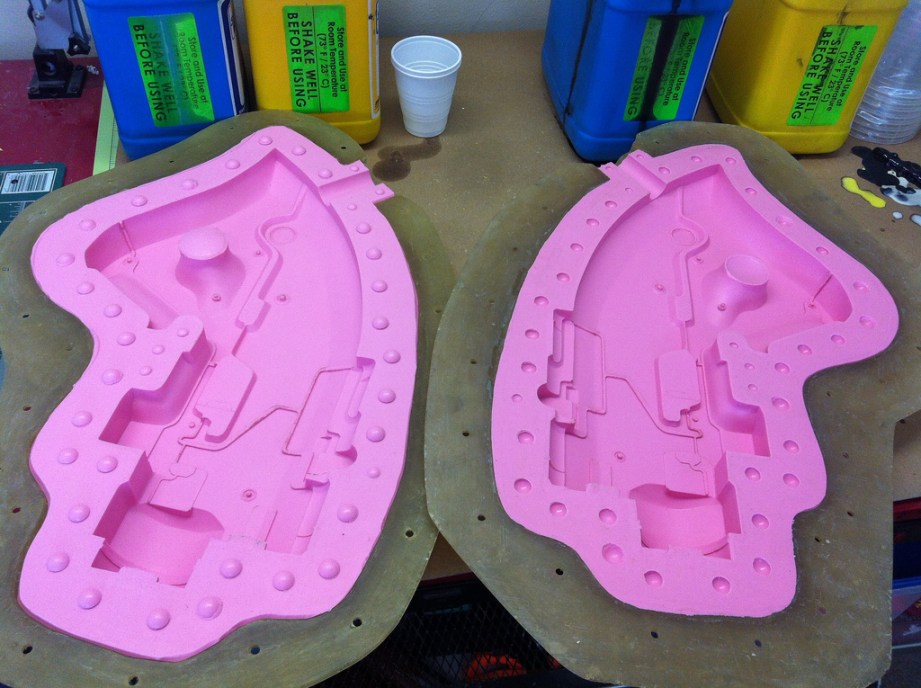
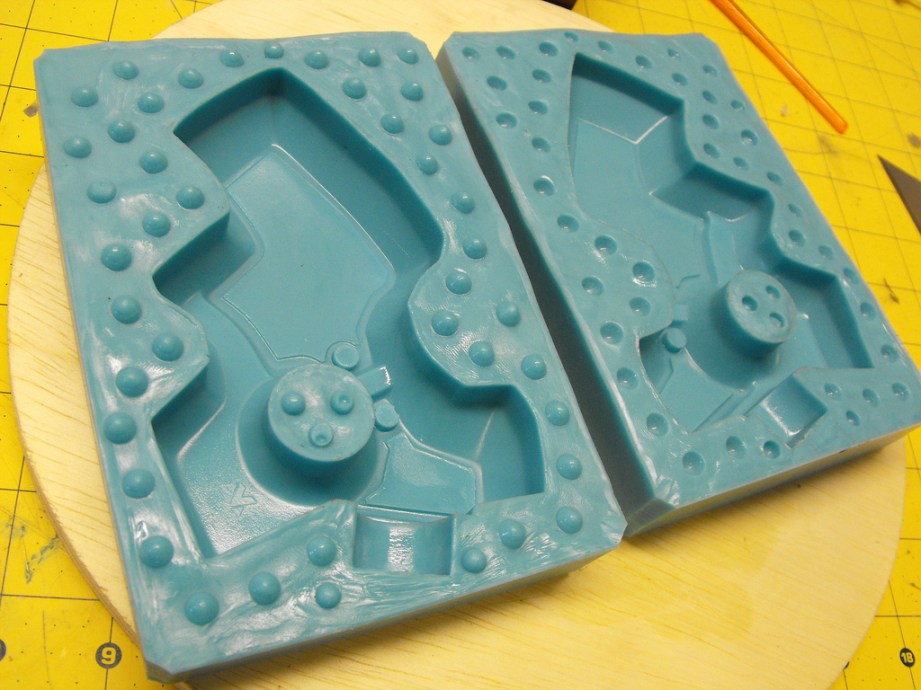
Once both halves are cured, you can open the mold up and remove your master. Pretty!
Lastly, there needs to be a hole in the mold to add casting resin, and a couple smaller holes to allow air to escape. Some people like to add these before pouring the mold, sculpting small channels in clay to block out pour and vent spouts. I’ve found cutting them out of the finished block with an exact-o knife to be far easier after the silicone is cured. You may lose a few grams of material, but you save some time.

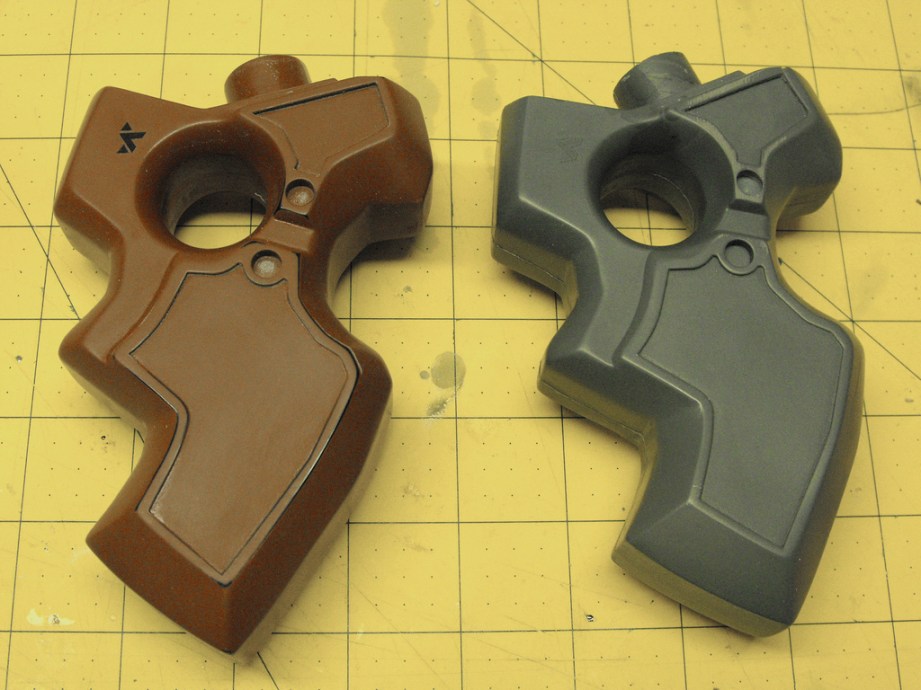
The details of the casting process are going to be covered in another article later on down the road, but here’s a quick shot of the finished piece, cast in Smooth-On’s “Smooth Cast 320” urethane casting resin. An exact, but far more durable copy, and the ability to make dozens more later on down the road.
Thanks again for reading! I’ll be going into more complex moldmaking techniques for the rest of the Needler parts in the next installment. See you then!
The Volpin Project, Part 1: Introductions
The Volpin Project, Part 2: References and Blueprinting
The Volpin Project, Part 3: Selecting Materials
The Volpin Project, Part 4: Taking Shapes
The Volpin Project, Part 5: Bondo Strikes Back
The Volpin Project, Part 6: Details, Accents, Refinements, and Mockups
Fox Vs. the Jayne Hat – 4/23/2013

Hacking a $20 Toy Helicopter into an Autonomous Drone
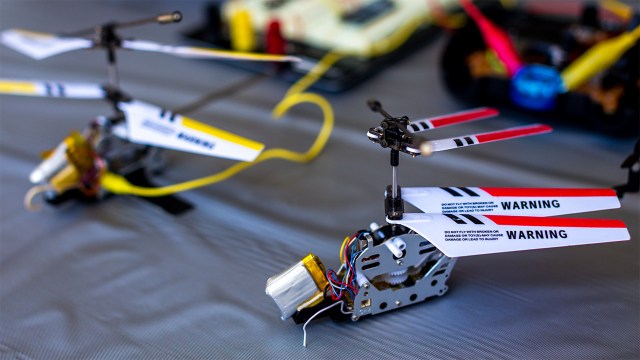
We chat with Kyle Moore, a member of the Stanford Robotics Club, about his project that converts cheap remote-controlled toy helicopters into autonomous drones that can map and navigate around environments.
Episode 166 – Lake Wobegon Is a Lie – 4/18/2013

This week, Wes, Norm, and Will explore the problems with Minnesota public radio, the rash of new apps from Facebook, and the problem with CISPA. All that, plus reader questions, more on the Oculus Rift, the problem with the Surface Pro, and another edition of fake outtakes.
Worklog: Tetris Shelves – Sanding, Priming, More Sanding, and Painting
Sorry for the break unexpected break gang. My daughter was born the week after the last installment, and just as I was starting to recover, I got sick and was out of commission for a few more weeks. Everything’s groovy now though, and I’m ready to wrap up the build log on my first project of 2013, a set of modular Tetris shelves for my baby’s room. If you’re just joining us now, you should probably check out part 1 and part 2 before you read this.
When we last left off, I’d successfully assembled five Tetrominos, using biscuits, glue, and square clamps to join everything together. At this point, I was pretty sure that the hard part was done, and all I had left was a little bit of painting and sanding. I couldn’t have been more wrong.
Sanding Really Sucks
For a project like my shelves, sanding serves two purposes. It was important to smooth over any rough edges where my board cuts were slightly off. Typically these little mistakes amounted to edges that were just fractions of an inch off, but the effect was jarring. Any place that the boards didn’t perfectly line up, I sanded until the joints were smooth. I also made sure to sand down any places where glue had dripped or the board edges had burned during my initial cuts.
This is where an orbital sander is extremely handy. My orbital sander–a cheap Black & Decker model–uses a quarter-sheet of sandpaper and allowed me to remove material much more quickly than I could by hand. I experimented with different grit sandpaper, remembering that lower grit numbers are more coarse and will remove excess material more quickly, and found that 150 grit was great for sanding down edges that didn’t meet, while 220 or 300 were better for sanding the surfaces and edges of boards.
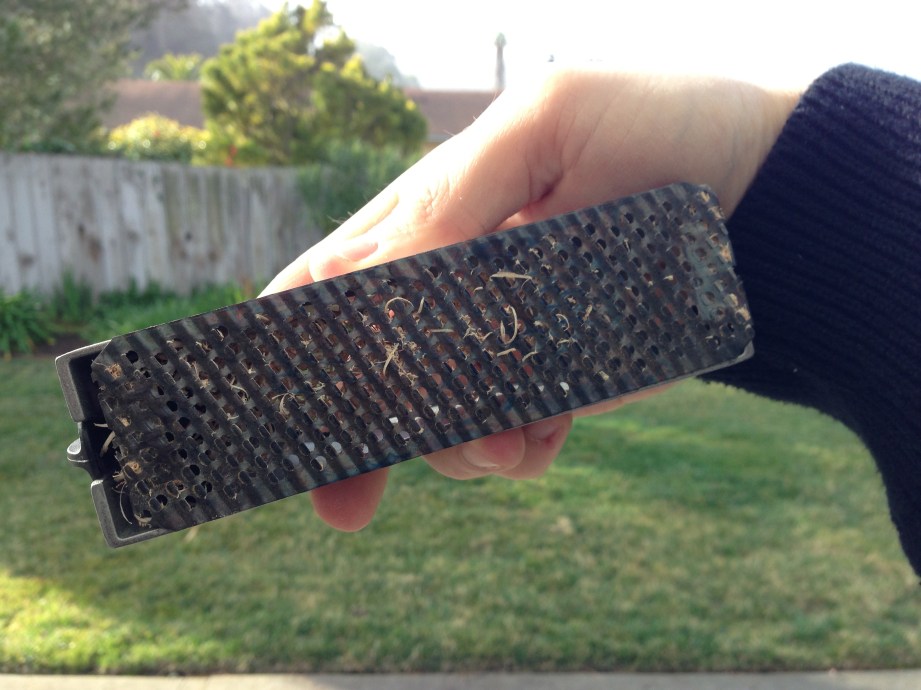
There were also a handful of joints with particularly bad overlap. To take the excess wood off of those joints faster, I used a rasp. A rasp is basically a cheese grater for wood. Once the offending pieces almost lined up, I also needed to sand the surface of each piece before priming to ensure a clean surface for primer adhesion.
The entire time I was removing material, I was cognizant of the fact that it’s very easy to remove too much material and very difficult to restore material once sanded. Whether I was rasping or sanding, I was careful to remove a bit, check my seams, and then remove more if needed.
All told, the first sanding pass took between 20 and 30 hours to complete all five pieces. The sanding was absolutely backbreaking work, but the finished shelves would have looked crummy had I not taken the time to sand them properly. Sanding both allowed me to fix any minor flaws and cover any mistakes I had made while assembling the shelves.
As a warning–I did a fair amount of my sanding inside, but I used a respirator mask to block particulate the entire time I was working. I also coated everything in my garage with a fine layer of dust because I was cheap and didn’t buy the Shop-Vac attachment for my sander. As a result I’ll have to spend a weekend in the near future dusting the entire garage–not fun. The difference between a good sander with a vacuum attachment and the one I have is so great that the next time I need to sand anything substantial, I’ll probably pony up for a new sander and the adapter.
Priming
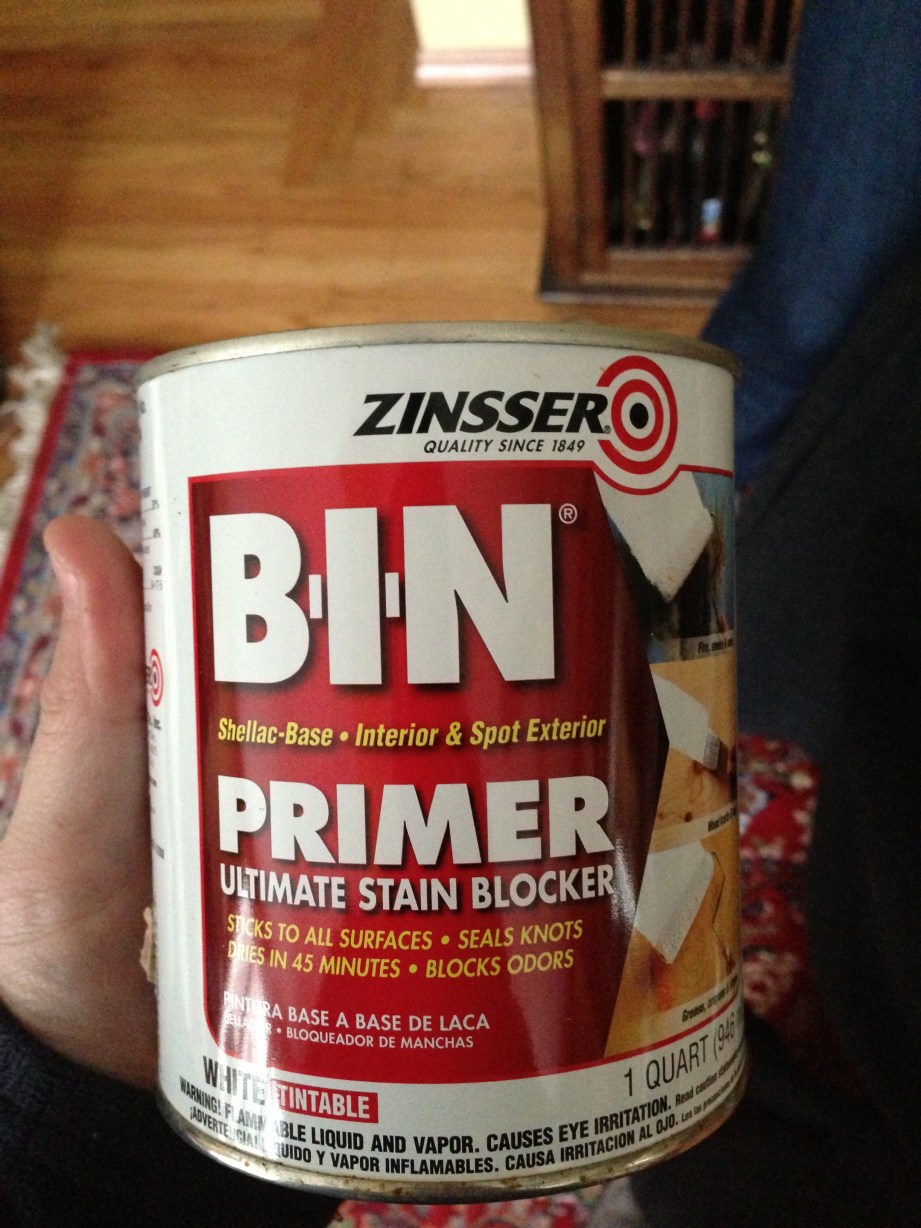
After consulting the helpful professional at my local paint shop, I bought a gallon of Zinsser B-I-N Primer from Home Depot for my first coat. Why use primer? Well, there were two reasons. Using a primer designed for use on new wood reduced the number of coats of paint I needed to finish the shelves. It also has a high particulate count, which help fill in the handful of gaps that I found in the side of the thin-ply I used to build the shelves. By using the primer, along with a little wood filler, I was able to avoid having to add veneers to the cut edges of the plywood, which saved me a ton of time. If I was doing this over again, I’d have had a light grey tint added to the primer–in its pure white form, it required two coats of the thinner colors to cover the white. Had I bought the paint from a real paint shop instead of Lowe’s, I would have been able to get a slight tint added the primer, which may have helped get decent coverage with the first coat of paint.
Applying the primer is just like painting–except instead of paint, you’re applying a viscous colloidal suspension of particles and a stinky water base. First, I wiped the entire shelf with a damp rag, to remove the last traces of the dust from the first sanding pass. After the shelves dried, I used a 2.5-inch brush to apply a liberal coat of primer to every side of the shelves, starting with the top piece. It seems like the best way to avoid drips and weird corners was to skip every other face, then come back and finish the unpainted faces after the rest of the paint had dried. To do the last side, I rested the shelf on two pieces of scrap wood, then let it dry for at least 2 hours, but preferably more. Then, it was time for more sanding.
I used a finer grit sandpaper on the primer than I did when sanding the naked wood. The goal when sanding the primer was to smooth any rough patches I’d inadvertently added when I applied primer. After some experimentation, I found that 220 or 300 grit paper on the orbital sander did a good job taking off rough spots without removing too much of the primer.
Aside from a handful of spots I missed, I was done priming. I wiped off the sanding dust from each piece with a damp rag, and was ready to paint.
Painting
Because these shelves were going in my kid’s room and I don’t have a good place to let them air out, I wanted to stay away from paint that would need a long time to dry away from people. Even though it isn’t the best paint for furniture, I ended up going with a glossy latex paint. I was able to put it in the baby’s room after a day or two of drying, and if she scrapes chunks of paint off it isn’t the end of the world.
As I wasn’t exactly sure how well the latex paint would work on furniture, I didn’t want to spend a ton of money on it on the chance it didn’t work. With that in mind, I bought quarts of Valspar from Lowes and of each color I needed. I matched the colors by bringing stuff from home that was the colors I wanted and comparing it to the many thousands of color swatches at the store.
I used a couple of nylon brushes to do the actual painting, both 2-inch and 3-inch versions, making sure to avoid drips. After a fair amount of experimentation, I found that painting adjoining surfaces was a surefire way to mar fresh paint, so I switched to painting alternate edges.
Unfortunately, because I was using bright colors of paint, I needed to apply at least two coats of paint to every shelf. That did give me the opportunity to fix a few rough patches and drips that happened while I was painting. A few moments with some fine grit sandpaper were enough to fix the mistakes.
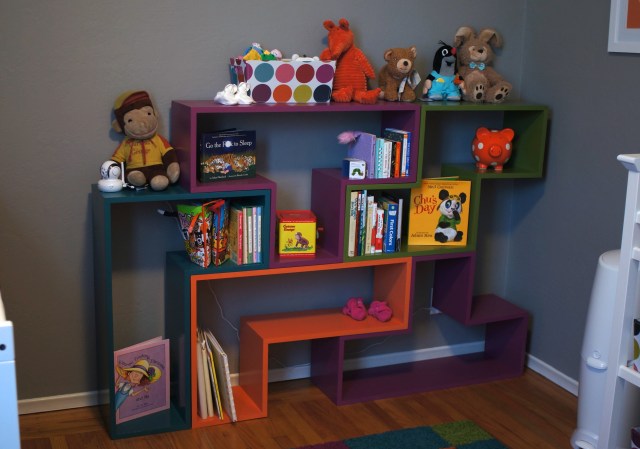
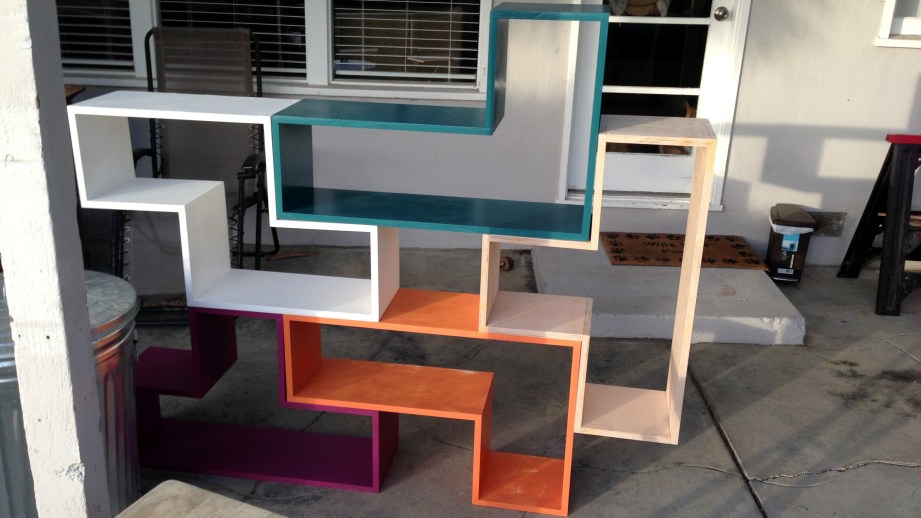
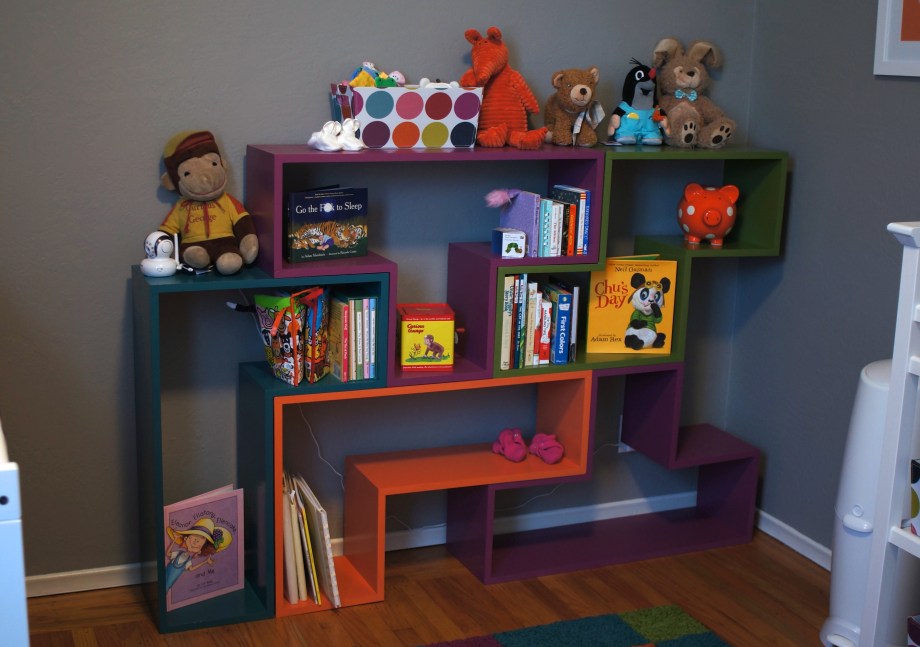
The Finished Product!
After a few days in the garage to give the paint plenty of time to dry, it was time to set the shelves up. I originally thought I was going to have to add a sealant to them in order to prevent sticking when they were attached to each other, but when the paint was fully dry, I didn’t have any serious sticking problems. The arrangement my wife and I chose for the layout gives us plenty of shelf space and leaves each piece both well supported and locked into place. I do need to tether the shelf to the wall, but I can do that with a pair of screws and some inexpensive nylon webbing.
All told, I spent about $700 on the shelves–$220 on wood, $200 on clamps, $60 on tool rentals, $50 on saw blades, $60 on paint and primer, $30 on sandpaper, and another $50 on assorted small tools and consumables (mostly glue and biscuits). About half of that was on tools, tool rentals and other stuff I’ll be able to use again in the future–at least if I ever have a project that requires 16 corner clamps again. It took me somewhere between 60 and 80 hours of work to complete the shelves, spread out over a month or so. I guess it’s kind of a cliche, but I was surprised that finishing the shelves too much longer than actually assembling them.
The shelves turned out much better than I thought was possible. They actually look like they were made by someone who knows what they were doing. The individual piecesjoin up properly at the seams much better than I anticipated, so the individual pieces look like one unified piece of shelving when they’re assembled. My careful measurements and all those corner clamps really paid off as the good fit saved me from having to make either of the mechanisms I designed to affix the shelves to each other.
I wish I built enough pieces to take the shelves all the way to the ceiling. Knowing what I do now, I’d pay a wood shop to break down the plywood sheets for me and rent a sprayer to prime and paint the shelves, which would save me a ton of time. I’m carpentered out for the time being though. Maybe I’ll build the rest when she’s old enough to help, if she’s into them.
Episode 165 – In the Shower – 4/11/2013

Adam Savage’s One Day Builds: Strandbeest Model Kit
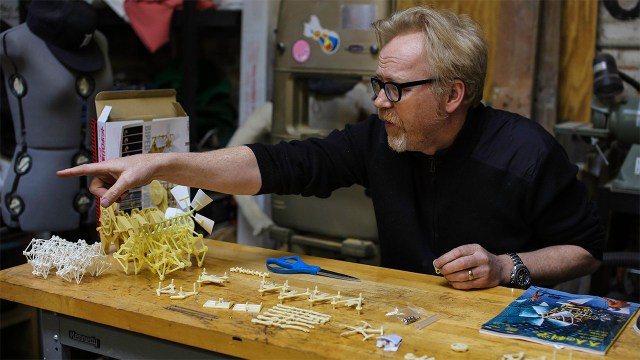
Adam geeks out over a new Japanese model kit of a walking biped machine based on artist Theo Jansen’s Strandbeest creations. In building the kit, Adam explains his organization skills and the challenge of deciphering building instructions in a language he can’t read.
The Volpin Project: A Detour in Rapture

[Harrison is away on an overseas trip this week, so he hasn’t had the opportunity to continue working on the Halo 4 Needler prop. In its stead, he sends over this writeup of his recently constructed mask from the first BioShock game. –Norm]
I suppose it’s no secret that I’m a pretty big BioShock fan. BioShock: Infinite has recently been released and I’m really excited by all the props that game will open up to me. But before I can get to those there was one object from the world of Rapture I wanted to take a crack at building: the Splicer mask. Here’s my journey building on leading up to the launch of the next BioShock chapter. And if you want to take a pass at making your own Splicer mask, I sell raw styrene copies of the finished mask in my store, ready for trimming and paint!
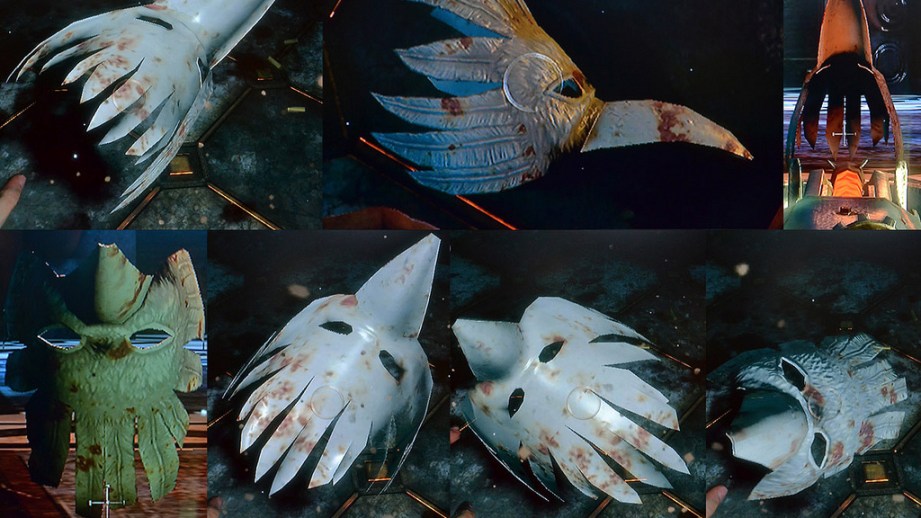
The Splicer characters in BioShock wear once-festive party masks that have been smattered with blood and cracked with abuse during their time in Rapture. My favorite design has always been the bird Splicer masks, so when I got a commission for one earlier this year, I jumped on it.
Gathering reference was a bit tricky here. I don’t have the PC version of the game and though someone unfolded a pepakura model of the mask some time ago, it has since disappeared after the demise of Megaupload. Nothing left to do then but fire up the game! One of my save files happened to be very convenient as my character was wearing the Big Daddy suit and the Splicers would ignore him. Perfect for gathering reference images. I found a bird splicer, dispatched the poor fellow, then used the “Telekinesis” plasmid ability to get about a hundred different views of the mask.
I used these references to put together a set of blueprints, then commenced building.
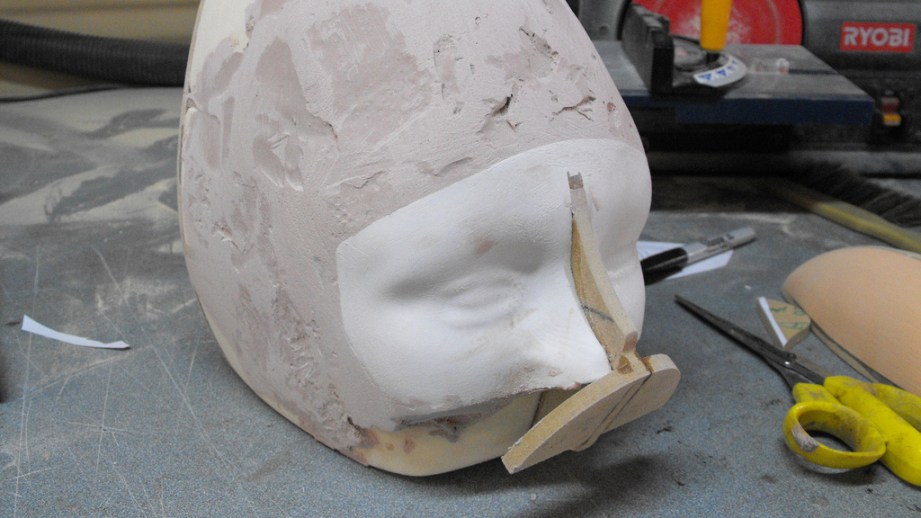
The plan was to sculpt a base mask form that would be used as a vacuum forming buck. This would be split into two parts, with the beak being separate from the rest of the mask.
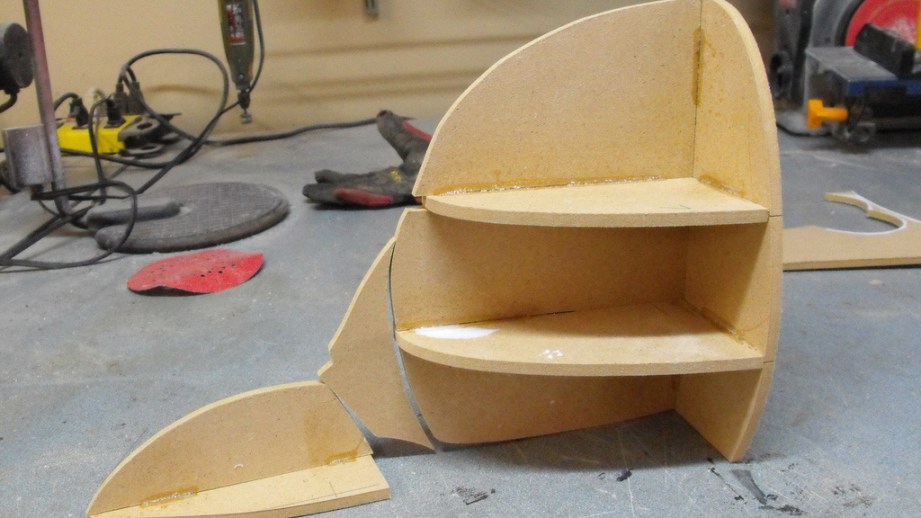
I began by making a series of MDF sliced sections, then filling the cavities with foam and sanding them to a rough shape.
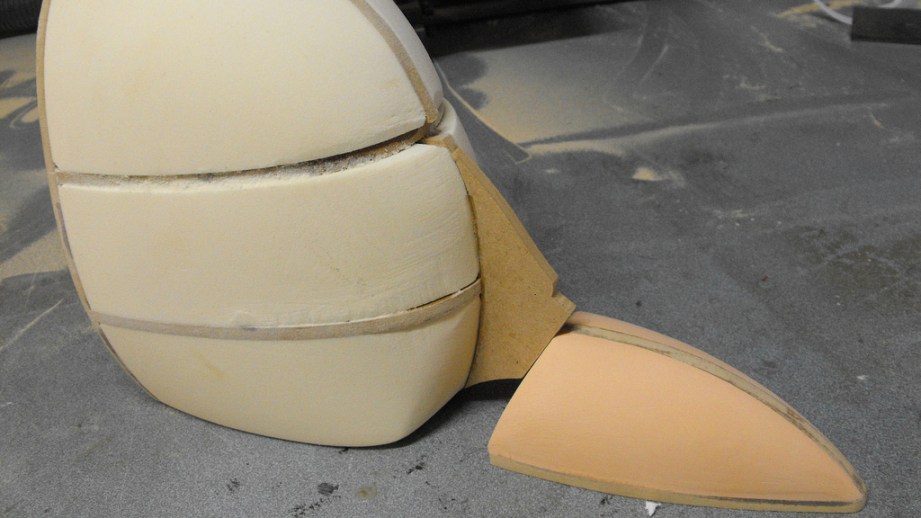
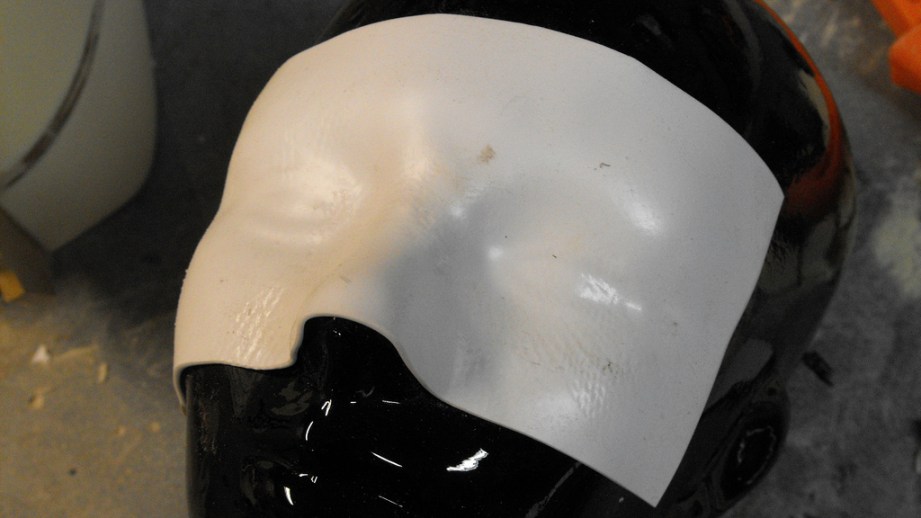
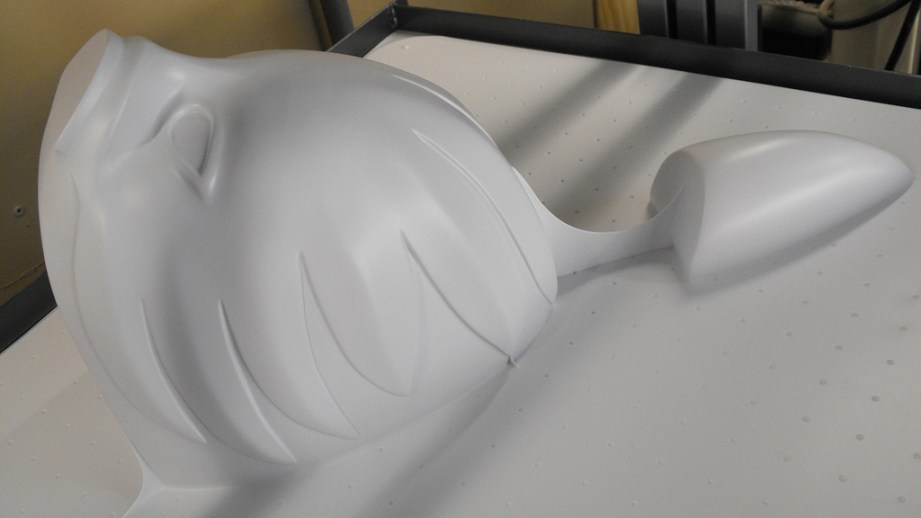
The design for the eye area of the mask was actually borrowed from a glass wig head in my shop. I took a scrap chunk of 0.1″ styrene and heated it over the form, pressing it into shape as it cooled.
The resulting piece was trimmed down and glued to the MDF and foam frame. Bondo was then used to blend the styrene into the foam panels and make the entire dome more uniform.
This looked very, very strange.
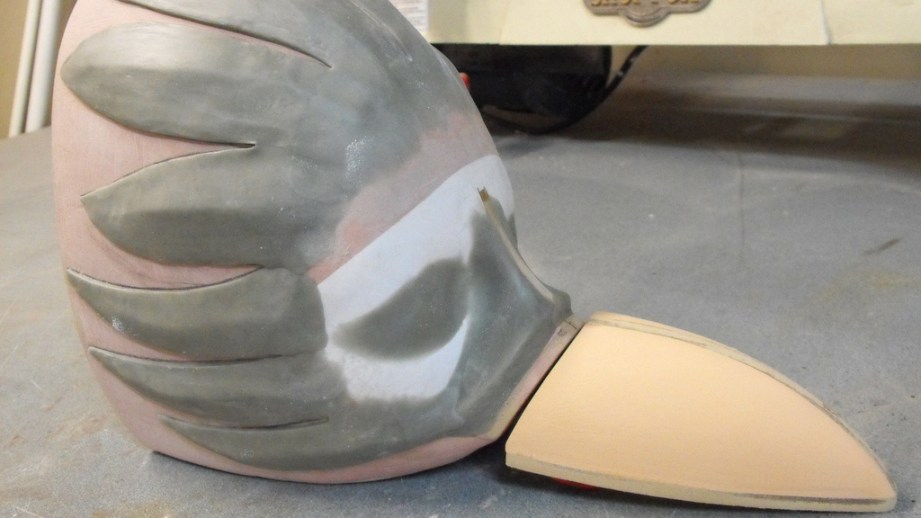
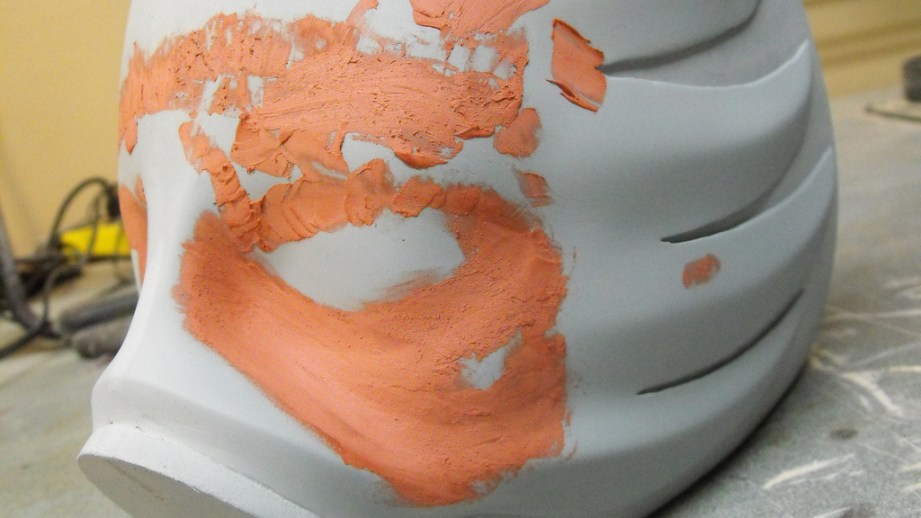
Several passes with Apoxie Sculpt followed this step. I began by roughly blocking out the feathers and filling in the eye areas to sit further out from the mask. The mounting lip for the beak and bridge of the nose was also extended and filled in here.
Primer and sanding followed, and then some filler putty.
The last detail needed were a couple of raised edges around the eyes. These were also done with Apoxie Sculpt, after a lot of measuring and cutting out a paper template to use in order to make both eye holes symmetrical.
The first pull was done in .040″ styrene plastic, which proved to be too thin after stretching over the large form. There was also significant webbing when trying to do both pieces at once, so I had to separate the beak and the face sections.
The second pass, done in .060″ plastic, was much more successful.
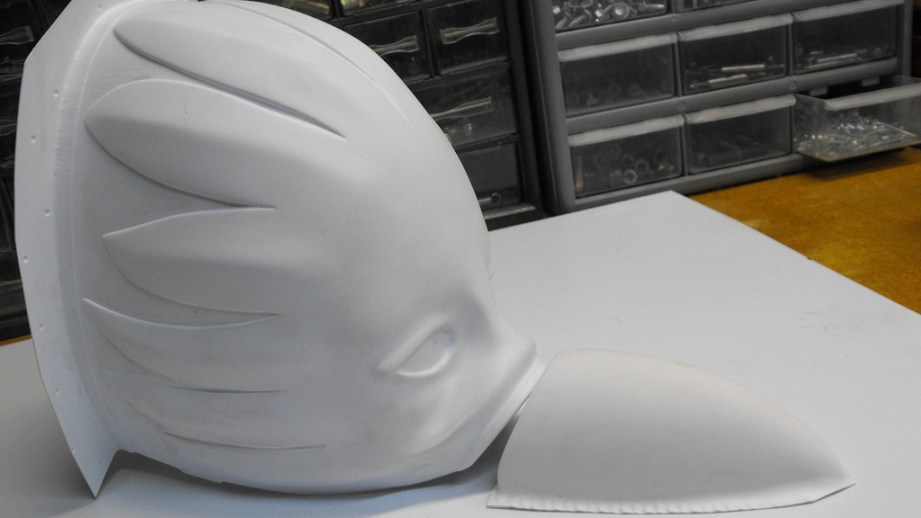
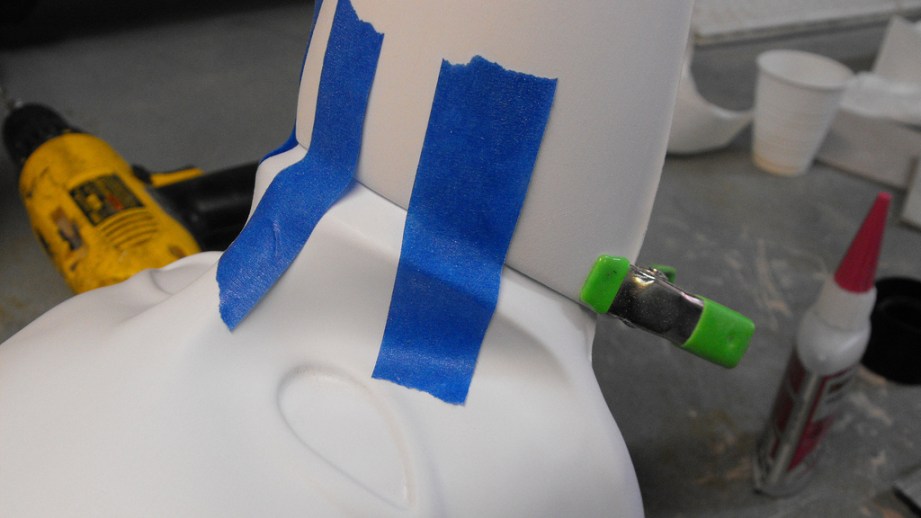
After the parts were trimmed, the beak was taped into place and secured in the corners with small spring clamps. Superglue was used to bond the two styrene segments together permanently.
A few passes of primer and a fine grit sanding sponge were used to prep the masks for paint. At this point my client requested a second mask, so I pulled another copy and assembled it as well.
The two finished masks would have very different paint jobs, so they each got a different base coat color. One is a light tan eggshell, and the other is satin black.

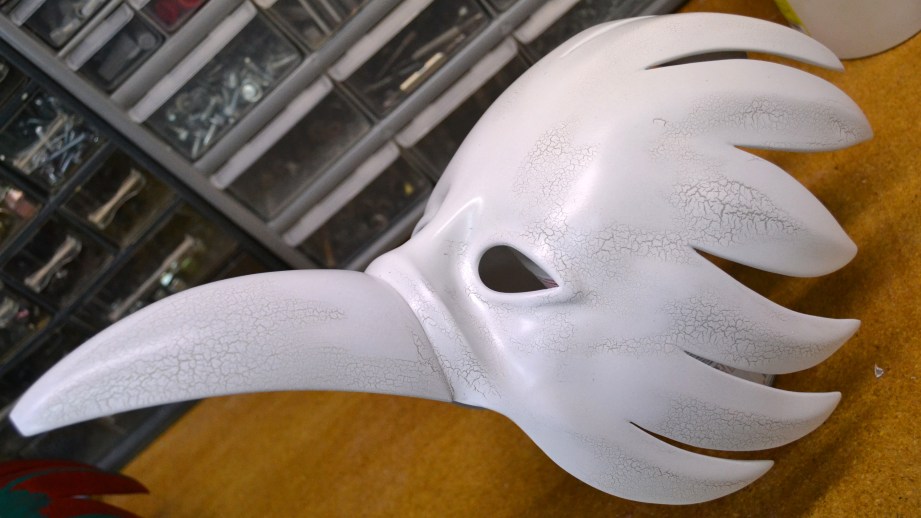
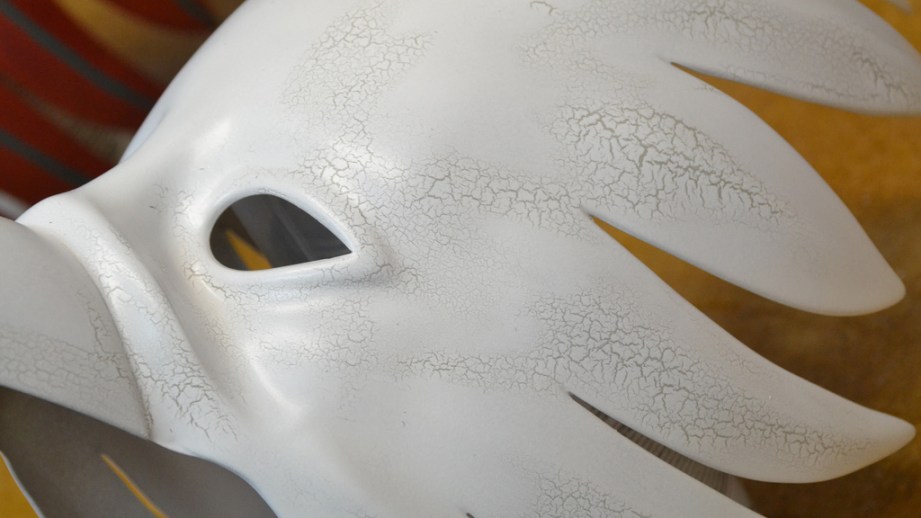
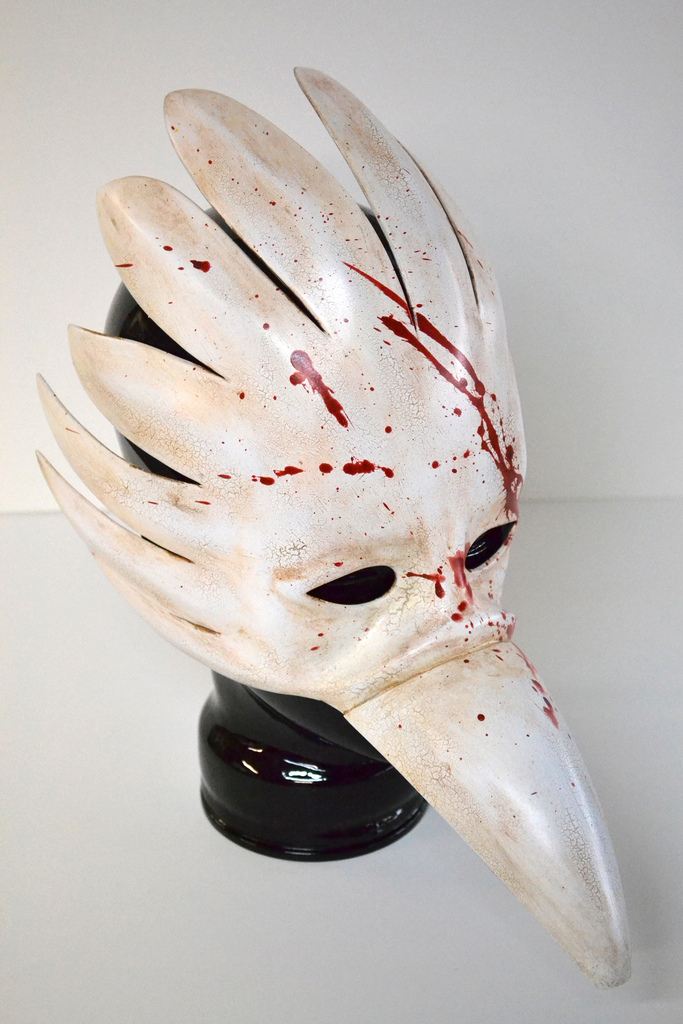
I went through a LOT of test pieces before settling on this finish for the masks. My client wanted a look that emulated cracked porcelain on the white mask. I had about a dozen test scraps before landing on the right finish. The base coat was tan colored, which was then brushed over with Elmer’s white glue. This wasn’t watered down, but it was brushed on pretty thin–enough to make the surface appear “wet” but not enough where you could see the white tint of the glue. While the glue cured, thinned acrylic paint was airbrushed over the entire part. I found that the cheaper the paint was the better it cracked; I imagine this has to do a lot with how flexible the cured acrylic is. The stuff I used was Blick brand white paint, the kind you’d find in an elementary school. Cheap!
By selectively applying the paint to certain areas on the mask, I was able to get cracks to show up in some places but not others. The finish on the white mask was perfect.
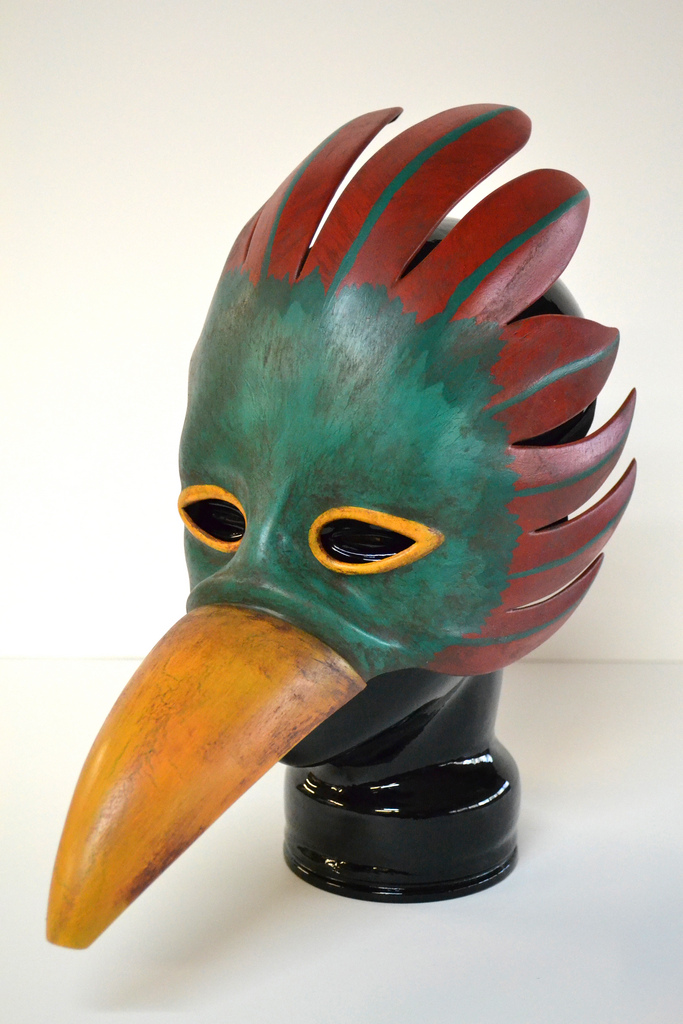
The second mask required a bit more prep. There are only four masks like this in BioShock, worn by the four Splicers that Sander Cohen sends you kill and photograph in the “Fort Frolic” section of the game. These have red feathers, green feathered paint around the eyes, a yellow beak, and yellow eye accents.
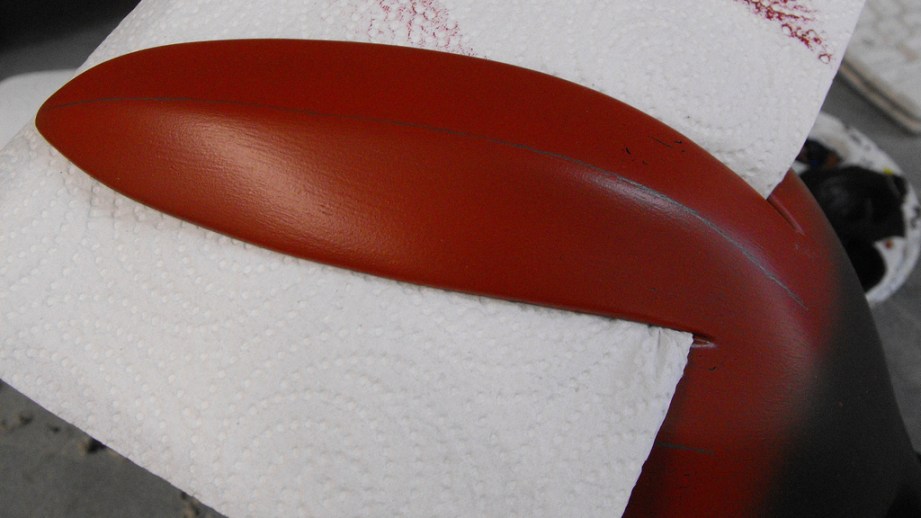
First, the feathers were airbrushed red and allowed to cure, then I used a drybrush technique to streak paint across these parts in a feather-like pattern.
The green areas were painted with a base of Elmers glue to get them to crack a bit, but I used a thin brush to get a small feather texture to the paint. Green was also used for the quills on the red feathers.
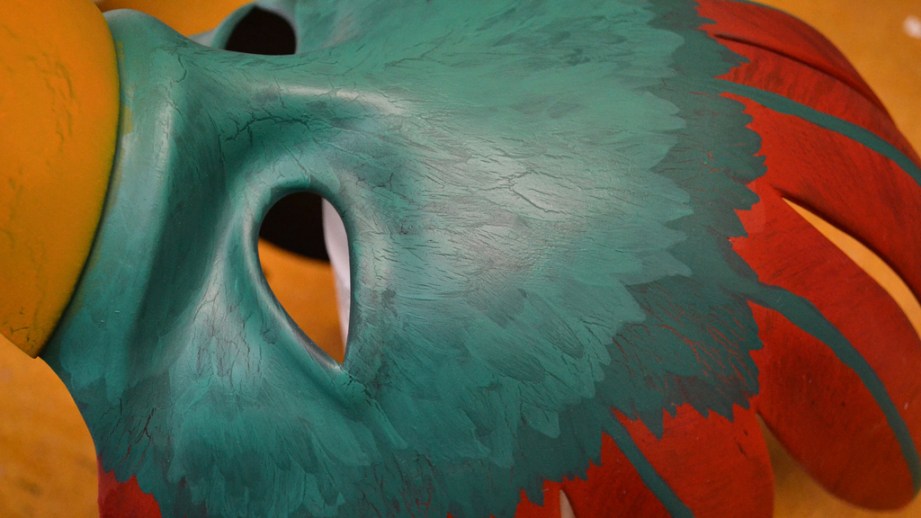
Lastly, the beak was airbrushed yellow and the areas around the eyes were accented with yellow rings. This was all done with acrylic paint.
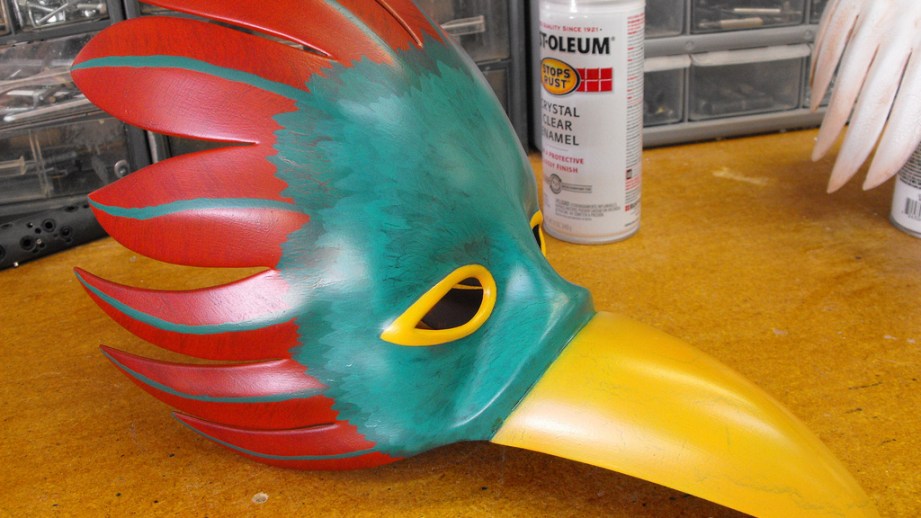
In order to protect these base layers, the acrylic paint was sealed with clearcoat at this stage before weathering. I wanted to make sure that rubbing the grime coats into the cracks and crevices of the masks didn’t disturb all the work I’d done already.
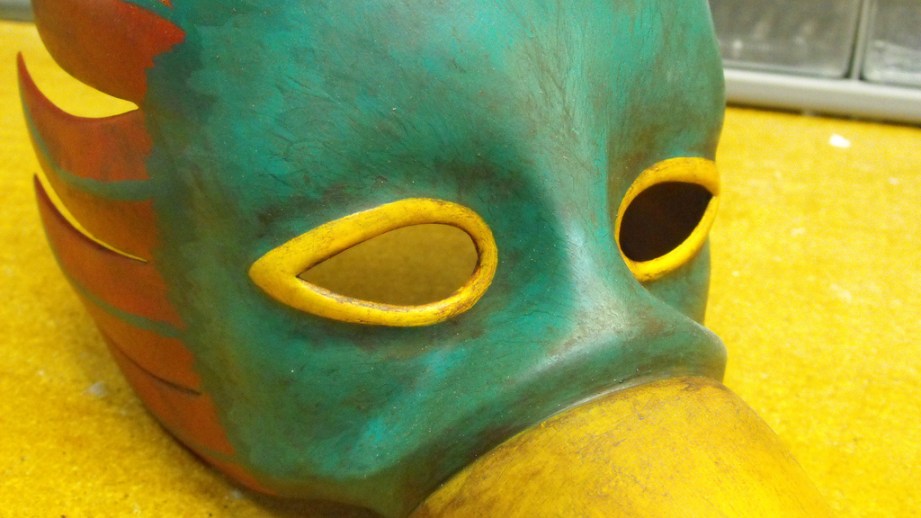
The finishing touch for the Fort Frolic mask was a few passes of dirt and grime, once again done in acrylic paint. I used a damp paper towel to streak the paint across and remove dirt in raised areas while depositing it into recesses.
The white mask got a similar coat of grime before the really fun part…
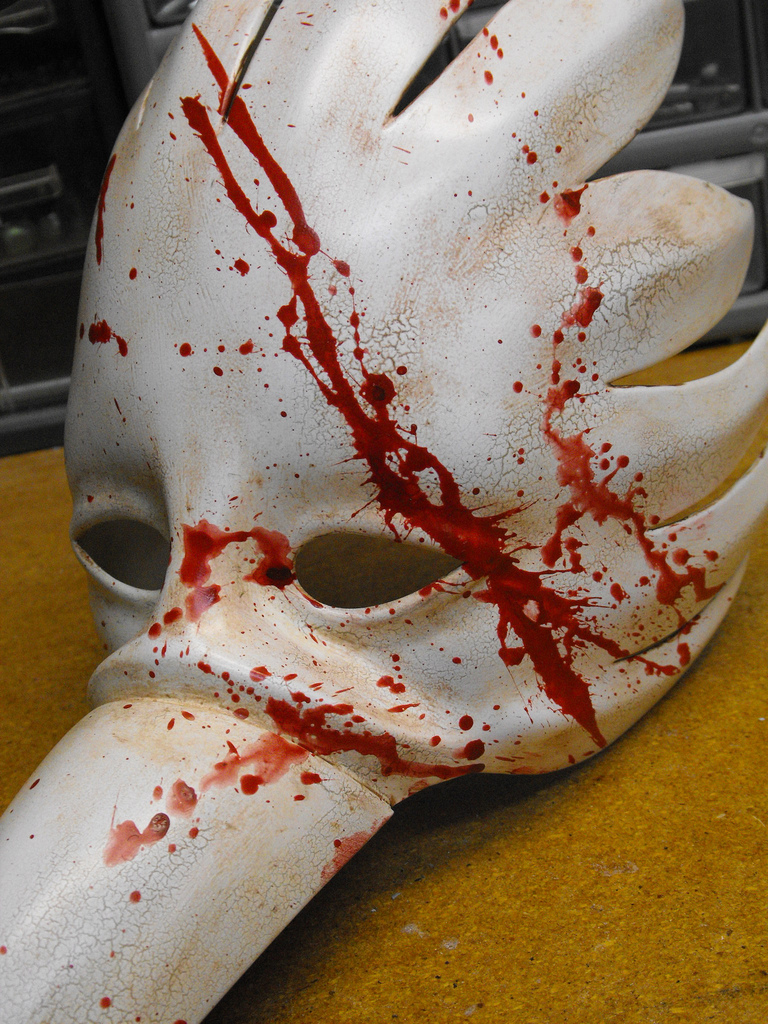
…blood splatters! It’s been a while since I got to do a really fun splat of blood, and this one turned out wonderfully. After the acrylic weathering cured, both masks got another pass of clearcoat and an elastic strap was added so they could be worn.
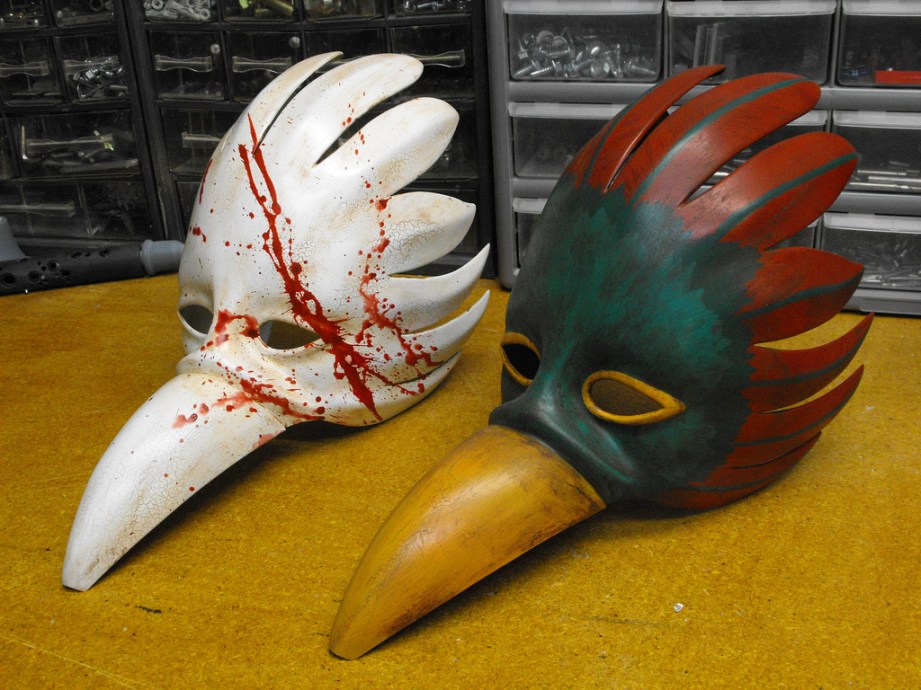
Here are some shots of the finished pieces – if you want to see more photos of them in higher resolution, check them out in my gallery.
Thanks for reading! I’ll be back in two weeks to resume the Halo Needler project!
The Volpin Project, Part 1: Introductions
The Volpin Project, Part 2: References and Blueprinting
The Volpin Project, Part 3: Selecting Materials
The Volpin Project, Part 4: Taking Shapes
The Volpin Project, Part 5: Bondo Strikes Back
The Volpin Project, Part 6: Details, Accents, Refinements, and Mockups