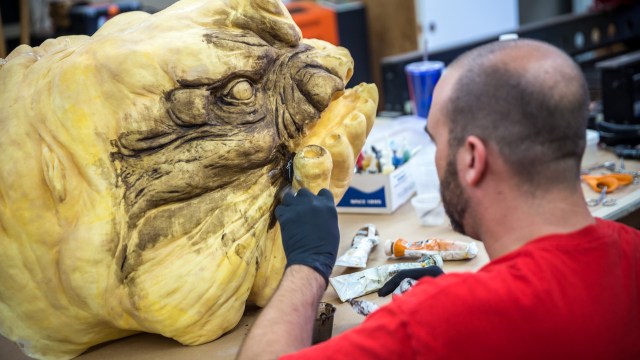
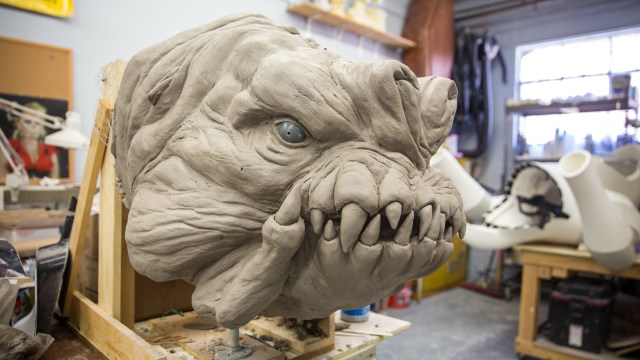
In the fourth part of our Rancor costume build, Frank Ippolito walks us through the mold and casting process of the large Rancor head sculpt. We discuss ways to add texture and “skin” to the foam suit, and start painting the creature just one week before Comic-Con! Thanks for following along with the build–we’ll be back next time with a debriefing of how the Rancor suit turned out. (Thanks to Model-Space.com for sponsoring this project!)
This week, Will, Norm, and Jeremy discuss the Windows 10 adoption rate, the latest iPhone 6S rumors, the Galaxy Note 5’s pen problem, YouTube Gaming’s launch, Pixar in a Box, Comcast’s plans for gigabit, in-flight Wi-Fi pricing, the McWhopper, and a whole lot more. Enjoy!
This is the second in a series of articles that examine the real-life systems aboard the International Space Station (ISS) which inspired the fictional equipment found in Andy Weir’s novel (and soon-to-be-released movie) The Martian. In the first installment, we looked at the many ways in which water is conserved and recycled. This time around, we will investigate the components that process air to make the ISS both habitable and comfortable for the humans inside.
The Basics
Before getting into too much detail about the air systems on the ISS, a brief overview of the general layout is probably warranted. As with the water systems, many of the US-made air management components on the ISS have foreign counterparts. For the sake of simplicity, this article will focus only on the US equipment.
The habitable areas of the ISS are pressurized modules that are typically cylindrical in shape. Three node sections (named Unity, Harmony, and Tranquility) serve as the crossroads for all of the modules No matter which direction you choose to exit a node, your path will soon reach a dead end in some module.
On Earth we have the luxury of myriad natural processes that create air currents on a local and global scale. This helps to ensure that the same patch of air never lingers over any location for very long. In the manmade ecosystem of the ISS, however, such air flow does not occur naturally. The Intermodule Ventilation system (IMV) compensates by using fans to force airflow between the modules. Without it, the air would stagnate in those dead ends. Well, everywhere, actually.
The inter-module airflow is extremely important because the life support systems that manage the composition of the air are not present in every module. In fact, most of the US-managed life support systems are located in Tranquility. IMV mixes and moves the atmosphere to ensure that the air quality in every module is homogeneous–or nearly so.
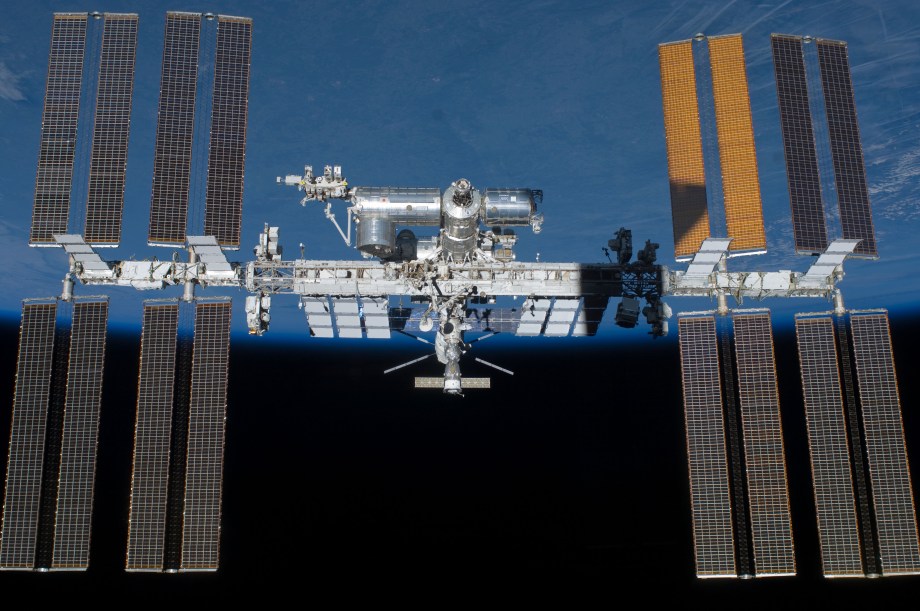
Although the ISS has the outer dimensions of a football field, only the collection of cylindrical modules is inhabited by astronauts. Getting proper airflow between the modules is vital.
The powerful fans that comprise the IMV are a large contributor to the cacophony that is an accepted aspect of living on the ISS. ETHOS (Environmental and Thermal Operating Systems) flight controller, Tom Horn, explained to me that specific noise levels in the fans are closely monitored and often provide clues to pinpoint trouble spots in the IMV system.
“The fans typically get louder as they need to push harder to overcome whatever clog is in the flow path. So we take regular sound level measurements every couple of weeks. Sometimes they’ll come back and we’ll say ‘Aha! You spiked by 10 decibels in this module.’ You probably have a dirty fan there.”
Horn explained the “dirt” fouling the system could be hair, skin, dirt, or even discarded trash (space litter…who knew?). It all floats around the cabin in zero-G and could get sucked into the air ducts. In fact, the ventilation filter is one of the first places that astronauts check for missing items.
Keeping Cool and Dry
With so many heat-producing people, machines, and electronics crammed into a relatively small volume, things would get warm very quickly if not for the ISS’s beefy air conditioning system. NASA calls it the Common Cabin Air Assembly (CCAA). The CCAA allows temperatures inside the ISS to hover between 70-75 degrees (F) at about 40-45% humidity. The astronauts can even configure specific temperatures for each module to fine tune their comfort level.
The CCAA is essentially a heat exchanger. Fans pull warm air from the cabin and pass it over an array of pipes. The water within those pipes is a chilly 40 degrees (F), causing the passing air to cool. The cooling process also forces water vapor in the air to condense back to a liquid state. As we know from the previous article, this water is collected and routed to the Water Processor Assembly, where it becomes potable water for the crew…again.
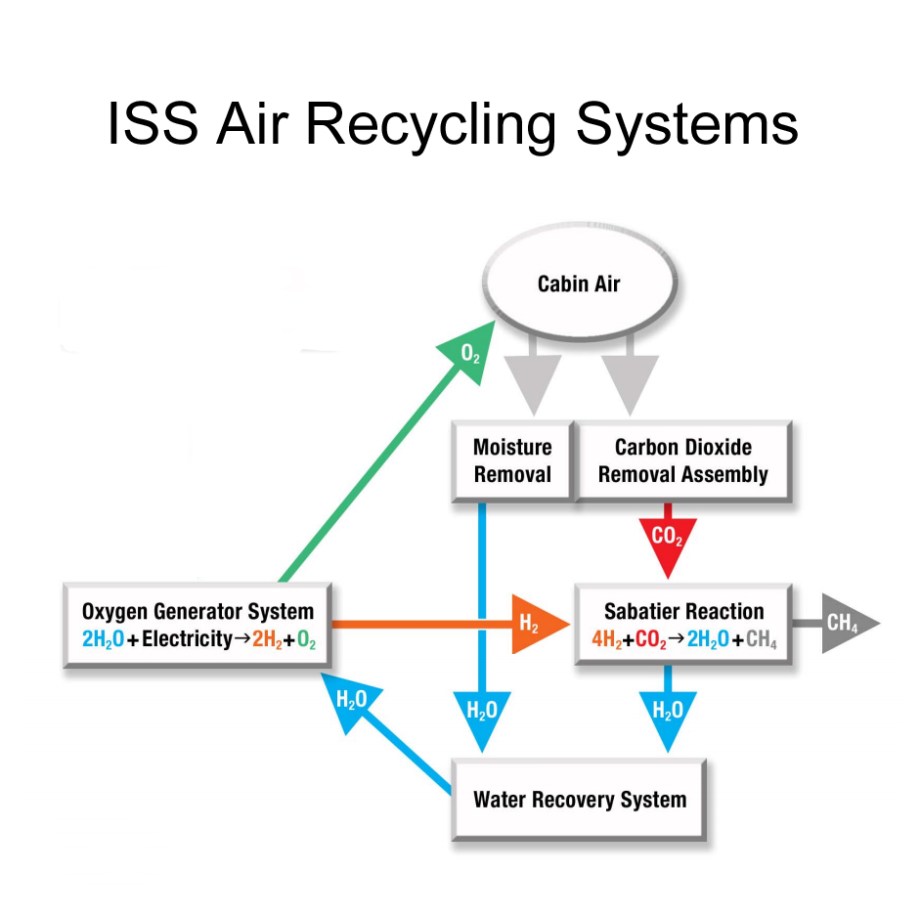
This simple chart illustrates how the air and water recycling systems on the ISS work in unison to squeeze the most out of every resource. Very little is thrown away.
The largest source of humidity in the ISS’s air supply is the crew of astronauts and cosmonauts. Every bead of sweat and exhaled breath adds water vapor to the air that will eventually be reclaimed.
The largest source of humidity in the ISS’s air supply is the crew of astronauts and cosmonauts. Every bead of sweat and exhaled breath adds water vapor to the air that will eventually be reclaimed. I was surprised to learn that the second largest source of humidity is the collection of water storage bags that are stashed throughout the spaceship. Even though the bags are considered to be sealed, the barrier is not perfect. Each container leaks a trace amount of water. When all of those tiny leaks are added up, the total can’t be ignored.
Although crew comfort and water reclamation benefits are factors, the primary driver for controlling humidity within the ISS is to ensure that condensation does not occur anywhere outside of the CCAA. If the air in any module was allowed to reach dew point, water would collect on all sorts of sensitive machinery, electronics, and soft goods. This creates a risk for microbial growth as well as unintended operational conditions for the hardware. The orbital environment in space is extremely harsh on equipment as it is. There’s no sense in adding a rain forest element to make things even worse.
The Right Mixture
Air pressure within the ISS is maintained at a familiar 14.7 psi. The mixture of gases that comprises the air is also very Earth-like. Horn and his ETHOS teammates strive to keep the air’s oxygen content at 20-24%, with the remainder being nitrogen….well, most of the remainder. Obviously, other gases are present. Methane, carbon dioxide, and hydrogen are among the notable bit players. Even though their content is measured in fractions of a percent, these other gases must be closely monitored and managed.
The Atmosphere Revitalization System is a collection of three subsystems used by ETHOS flight controllers to keep a short leash on the air composition inside the ISS. It contains the Major Constituent Analyzer (MCA), Trace Contaminant Control Subassembly (TCCS) and the Carbon Dioxide Removal Assembly (CDRA).
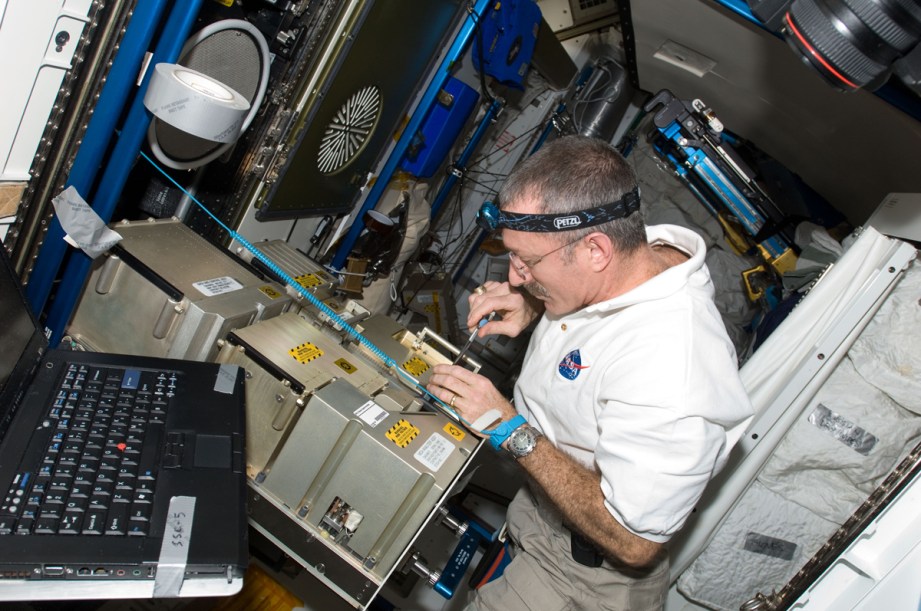
Astronaut Dan Burbank works on the mass spectrometer portion of the Major Constituent Analyzer, a tool that identifies the gasses that are present in the ISS’s atmosphere.
MCA is essentially an air analysis system that pulls samples from each of the ISS modules. It uses mass spectrometry to detect nitrogen, oxygen, methane, carbon dioxide, and hydrogen while also indicating the partial pressure of each gas.
Technologically-speaking, the capability of the fictional gas analysis system in The Martian is not a far stretch.
Readers of The Martian may recall that Weir’s habitation module on Mars sported a system similar to MCA. This fictional gas analysis system can also automatically release stored gas into the air to correct for any deficiencies. Technologically-speaking, that capability is not a far stretch. The MCA actually has the ability to automatically add oxygen when it is required. It’s just that flight controllers have always chosen to manage the ISS’s oxygen content manually. I am reminded of the space shuttle commanders who routinely landed their ship with the auto pilot disabled, because “Why not?”
TCCS is used to pull unwanted stuff out of the air. To start, a fan blows air over an activated charcoal bed. This removes ammonia and high molecular weight contaminants. Next, low molecular weight gases (hydrogen, methane, carbon monoxide) are evicted in a subassembly called the High Temperature Catalytic Oxidizer (HTTCO). The HTCO oxidizes the unloved gases by heating the air through various means. The final subcomponent of the TCCS is the Lithium Hydroxide Bed. It contains granular Lithium Hydroxide which pulls acidic oxidation products from the air.
In a process that most of us are familiar with, the breathing astronauts pull oxygen from the air and replace it with carbon dioxide. On Earth, plants and trees perform the reciprocal part of the cycle during photosynthesis. There are indeed plants aboard the ISS, but not nearly enough to make a dent in the carbon dioxide content. So the role of plants in the oxygen-carbon dioxide cycle must be performed artificially.
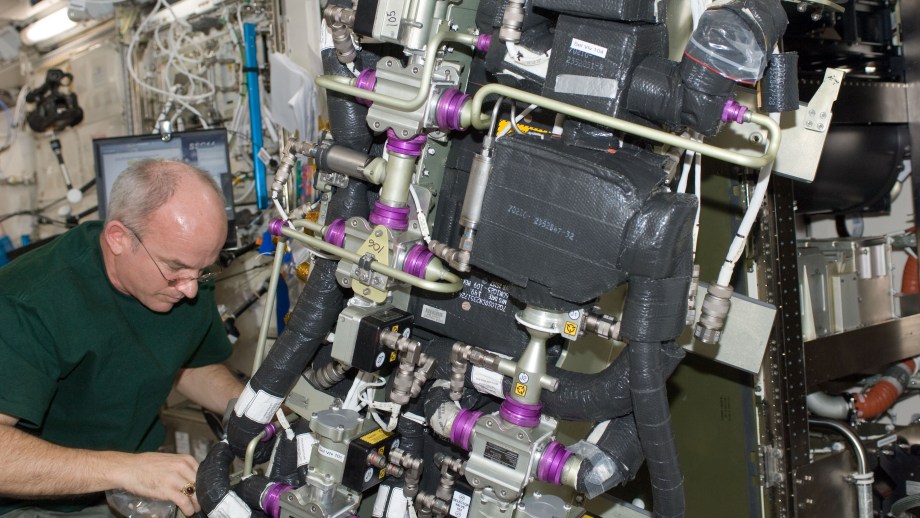
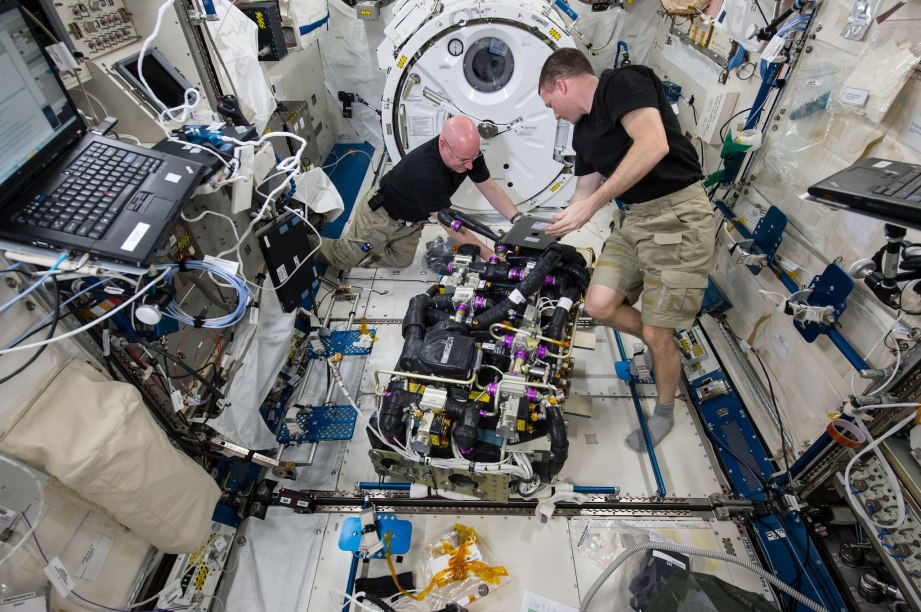
Astronauts Scott Kelly and Terry Virts are seen replacing a faulty fan on one of the space station’s two Carbon Dioxide Removal Assemblies.
The job of removing carbon dioxide falls on the aptly-named Carbon Dioxide Removal Assembly (CDRA). Carbon dioxide-rich air coming into the CRDA is first dried by being passed over a bed of silica gel desiccant. The air is then forced through a bed containing a porous, crystalline aluminosilicate called Zeolite. Air emerging from the Zeolite bed is pumped back into the cabin, free of carbon dioxide.
Each CRDA (there are two) contains two Zeolite beds. While one bed is filtering air, the other is exposed to the vacuum of space. This purges the trapped carbon dioxide from the Zeolite and cleans the bed for future use. The exiting carbon dioxide is sometime captured for use in another system that I will explain further down.
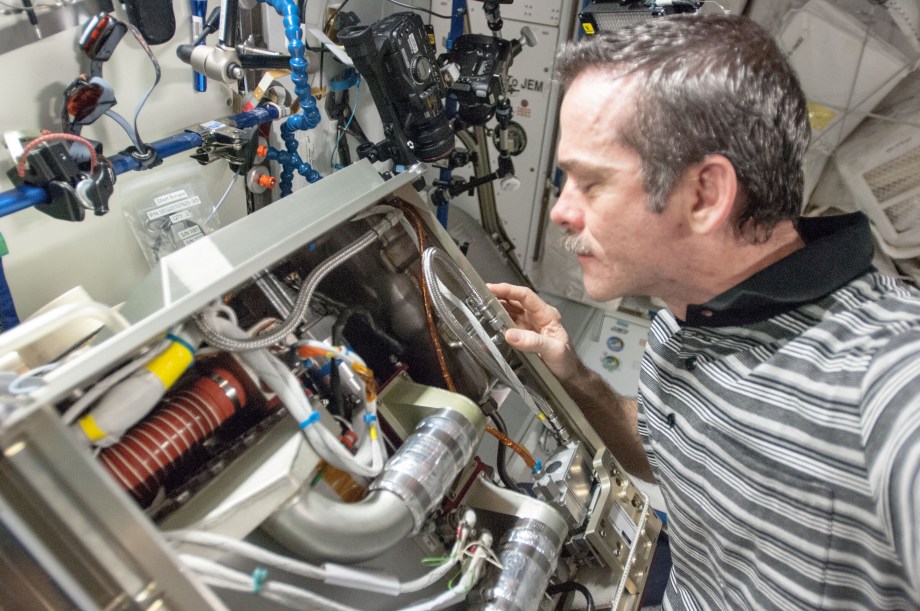
Astronaut (and friend of Tested) Chris Hadfield investigates the Amine Swingbed, an experimental carbon dioxide removal device that now serves in a backup capacity on the ISS.
There is another US-managed carbon dioxide removal device on ISS. The Amine Swingbed was developed as a compact carbon dioxide scrubber for the future Orion spacecraft. A prototype unit was delivered to the ISS for testing during 2013 and 2014. The device worked adequately and it is expected to be implemented on Orion. The test unit remains on the ISS and is treated as a backup to the CDRA.
In addition to removing carbon dioxide, it is also necessary to replenish the supply of oxygen in the air. The Oxygen Generator Assembly (OGA) performs this vital task. The OGA creates oxygen through electrolysis of water. By passing an electrical current through water (the same potable water that the astronauts drink), it is split into its constituent parts; hydrogen and oxygen. The oxygen is pumped back into the cabin. The hydrogen can be vented overboard, but it is frequently used for an additional regenerative process.
Closing the Loop
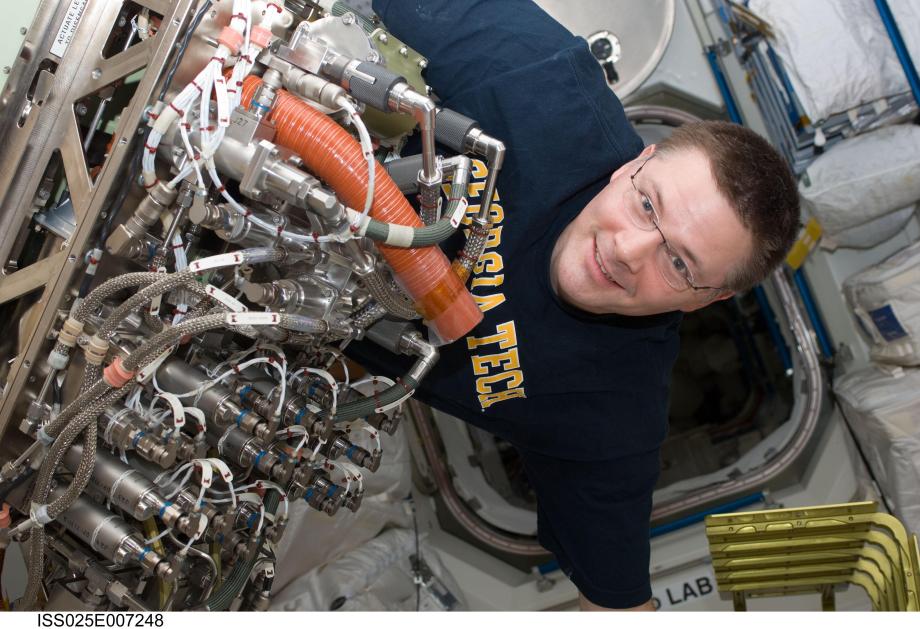
The Sabatier reactor (flight controllers just call the device “Sabatier”) is another source of potable water on the ISS. It takes hydrogen output from the OGA as well as carbon dioxide collected in the CDRA to produce water and methane. The water is added to the potable water supply while the methane is vented overboard. Sabatier is a prime example of how every resource on ISS is used to its full capacity in order to minimize resupply burdens.
The Sabatier reactor on the ISS, seen here with Doug Wheelock, combines two unwanted gases (hydrogen and carbon dioxide) to produce water for the crew.
Venturing Further
The air regeneration systems on the ISS provide a nearly limitless source of breathable air for the humans living on board. Yet, there are still challenges to be faced before we will be ready for missions that resemble anything like Weir’s Martian expedition. The biggest obstacle will be carbon dioxide management.
The air regeneration systems on the ISS provide a nearly limitless source of breathable air for the humans living on board. For a Mars mission, the biggest obstacle will be carbon dioxide management.
Although the carbon dioxide on the ISS is only about .4% of the air content, this is roughly ten times greater than average levels on Earth. Some astronauts are not impacted by the higher concentration. Others show acute side effects (headaches, general grumpiness) that could be detrimental to their day-to-day performance. Perhaps analysis of Scott Kelly’s year in space will help us to better understand the long term effects of breathing air with elevated carbon dioxide levels.
Horn points out that there are options for reducing the carbon dioxide content on the ISS and/or future spacecraft.
“For a longer duration vehicle, like a two or three year mission to Mars, you would probably want to get CO2 down lower than what it is on ISS right now. Either that, or you want to screen your crews to make sure that they’re CO2-resistant. But that, of course, is a hardware cost that doesn’t come free. If you want to scrub CO2 lower, you’re going to have to have a beefier, heavier, more power-hungry carbon dioxide removal system. You have to strike a balance. What will allow your crew to function, and what can you actually fit on the vehicle.”
Which do you think will end up on Mars, a super-duty carbon dioxide remover, or a super-human carbon dioxide tolerator?
Author’s Note – Once again, I’d like to express my sincere thanks to Tom Horn for taking the time to explain the many air systems found on the ISS.
All images appear courtesy of NASA.
Terry spent 15 years as an engineer at the Johnson Space Center. He is now a freelance writer living in Lubbock, Texas. Visit his website atTerryDunn.organd follow Terry on Twitter:@weirdflight
We’ve seen beautiful pieces of original movie props, costumes, and production materials at conventions like Comic-Con and Star Wars Celebration, but we finally get to visit Prop Store’s LA warehouse where it stores much of its collection. Brandon Alinger gives us a tour and tells us the story of several of his favorite pieces, including the Nostromo model, a Batmobile, and Back to the Future II shoes. Place a comment below with your favorite item from the upcoming live auction for a chance to win one of five auction catalogs!
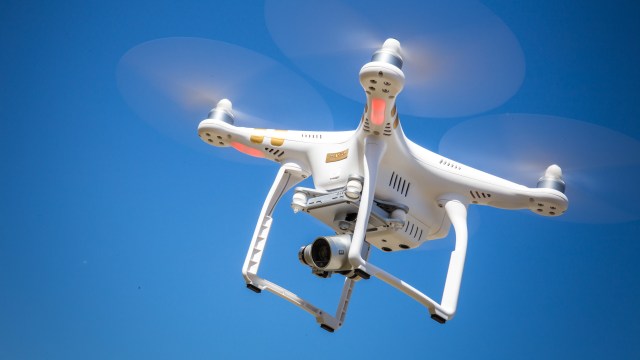
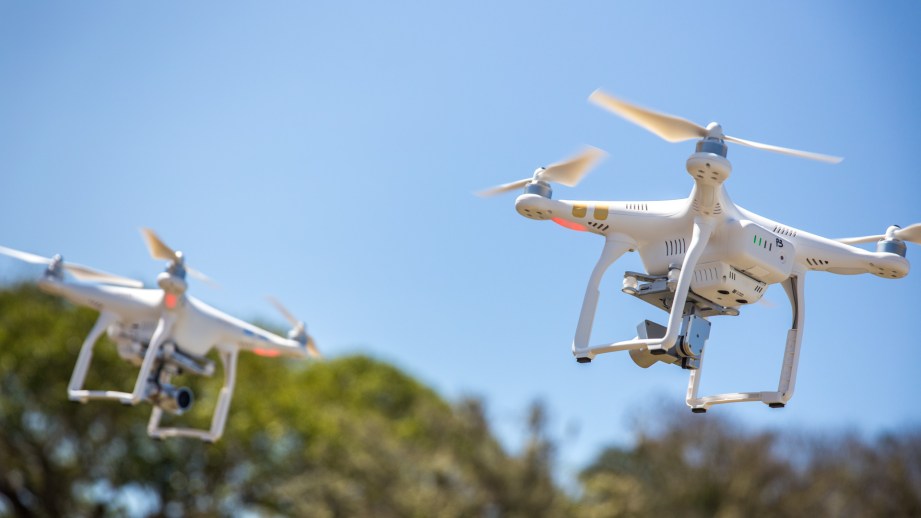
Earlier this year, DJI released its third-generation Phantom quadcopter. The Phantom line is perhaps the most well-known ready-to-fly quads you can buy, and the Phantom 3 Advanced and Phantom 3 Professional models are significant upgrades to the last generation. These quadcopters are amazing devices; they combine aerial, sensor, and imaging technologies to make a user-friendly remote-controlled flying camera that would not have been possible a decade ago. That ease-of-use is partly what makes these ready-to-fly quadcopters so compelling. While hobbyists have been building RC multi-rotors for fun and sport, the low barrier to entry offered by RTF quads has exploded the market for new products–not unlike the first years of the modern smartphone. And the rapid pace of DJI’s product iterations, along with the proliferation of quadcopter-produced photos and videos–further bootstraps a fast growing community of new flyers.
So to answer one frequently-asked question: yes, the Phantom 3 line is a significant and worthwhile upgrade to the Phantom 2. Our first Phantom was last year’s Vision+, which amazed us by being easy to fly, incorporating a built-in stabilized gimballed HD camera system, and tying flight and sight together with an integrated FPV video feed. All three of these features are markedly improved in the Phantom 3. Let’s go over the changes in depth.
First, the new flight system. The Phantom 3 looks a lot like the Phantom 2, with only a slightly bigger airframe (it will fit in many existing Phantom 2 cases). But the brushless motors, DJI speed controllers, and 4S battery system that power it under the hood are new, and grant the quad more power. It’s not that the Phantom 3 flies a lot faster than the Phantom 2 (16m/s max speed vs 15m/s max) or can ascend and descend quicker; that power manifests itself as improved stability and control during flight. Unlike DJI’s Inspire 1, the Phantom 3 doesn’t fly like a hovering tank–it feels nimble and responsive, even when taken to heights where the motors are fighting winds. And that’s power you can take for granted–it wasn’t until I switched back to the Phantom 2 for a day that I realized how rock solid the new quad is by comparison.
Key to the Phantom’s flight system is GPS-stabilization. In the Phantom 2, this allowed the quadcopter to calculate where it should be in positional space, automatically adjusting its motor power in real-time to compensate for external forces. We’ve demoed this before by dragging a flying Phantom by its landing struts to simulate wind and feeling the motors “fight back”. Phantom 3 taps into both GPS and Russian GLONASS satellites for a wider range of coverage, though that accounts for faster satellite acquisition moreso than increased positional accuracy. More notable is the Phantom 3 Advanced and Professional’s (I’ve been testing the latter) use of an ultrasonic and visual positioning system for low-altitude stabilization. This is the same system that was introduced in the Inspire 1–a combination of sonar and downward-facing camera to stabilize the quad when it’s lower than 10 feet above ground. This is tech that other RTF quads simply don’t have.
Another feature unique to DJI that has made its way from higher-end models to the Phantom 3 is Lightbridge video streaming. In the previous Vision+, FPV video from the onboard camera was streamed to a receiver over Wi-Fi–hence the use of a Wi-Fi extender for an effective range of about 300m. The Wi-Fi system worked, but required a clumsy setup process before each flight and operated over an unprotected signal. Lightbridge is DJI’s proprietary wireless data system for 720p/30 HD video transmission. Still 2.4GHz, but with an effective range of a 1KM and works through some obstacles. The digital video quality is simply fantastic over Lightbridge and while latency of about a quarter of a second isn’t as immediate as an analog video broadcast, is still responsive enough for aerial filming. As with all camera-enabled quads, flying by direct sight of the vehicle is always recommended, and a spotter to keep an eye on the quad is a must.
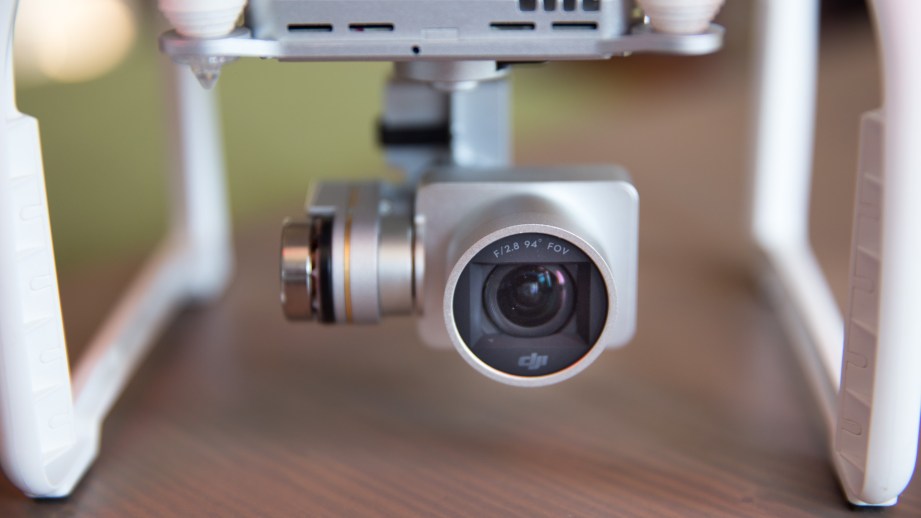
Finally, the integrated camera is dramatically improved in the Phantom 3 over the Vision+. Still mounted on a motorized three-axis gimbal, the camera now records via a 12.4MP 1/2.3″ Sony EXMOR sensor like the one on the Inspire 1 (similar to what you’d find in a high-end smartphone). GoPro doesn’t say who makes the sensor in its Hero 4 camera, but teardowns of previous models have revealed Sony sensors; it’s very likely that the camera here is the same as the one in a new GoPro. But sensor doesn’t tell the whole tale, and the optics in the Phantom 3 are new a well. The lens here is a 20mm full-frame equivalent, so it shoots photos and video with a 94-degree field of view. That’s still technically wide-angle, but it’s not like the ultra-wide 140-degree FOV found in the Vision+. By comparison, GoPro 4’s cropped “narrow” FOV setting is 90-degrees.
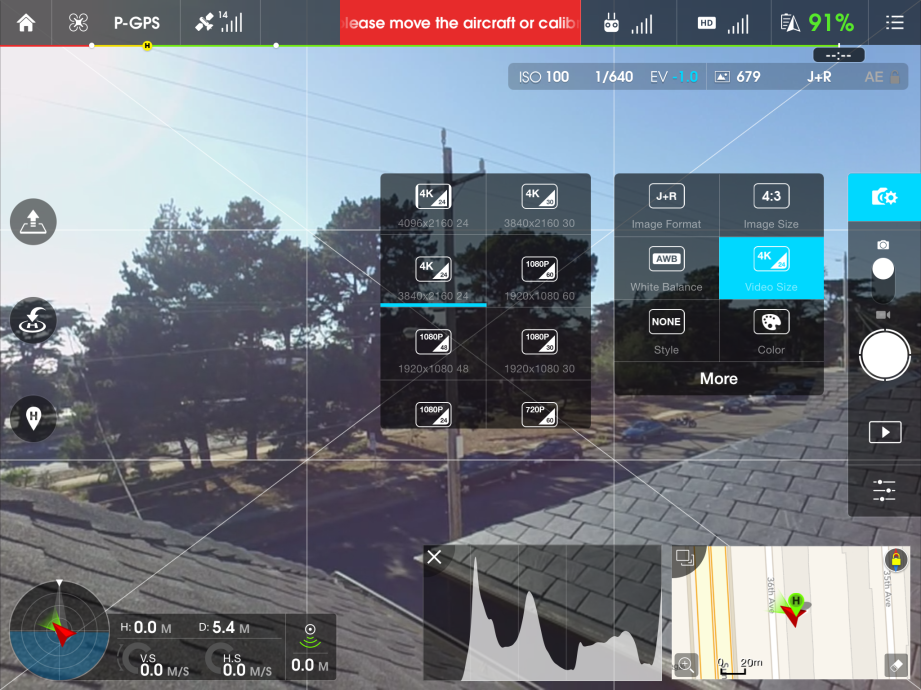
The camera system is actually what differentiates the Advanced and Professional models of the Phantom 3. While both use the same sensor and can take 4000×3000 RAW photos, the $1250 Professional model has enough video processing power to shoot 4K video (4096×2160 25fps max), while the $1000 Advanced is limited to 1800p 60fps max. The camera design looks identical on both models, so unless the video encoder chips are different, this is likely an artificial limitation to segment the models. The same 1080p settings on both models should produce the same footage–I would recommend the Advanced model if you can’t benefit from editing 4K video. DJI also just announced an $800 Phantom 3 Standard model with no Optical Flow stabilization or Lightbridge video, but strangely with a camera that can record 2.7K video.
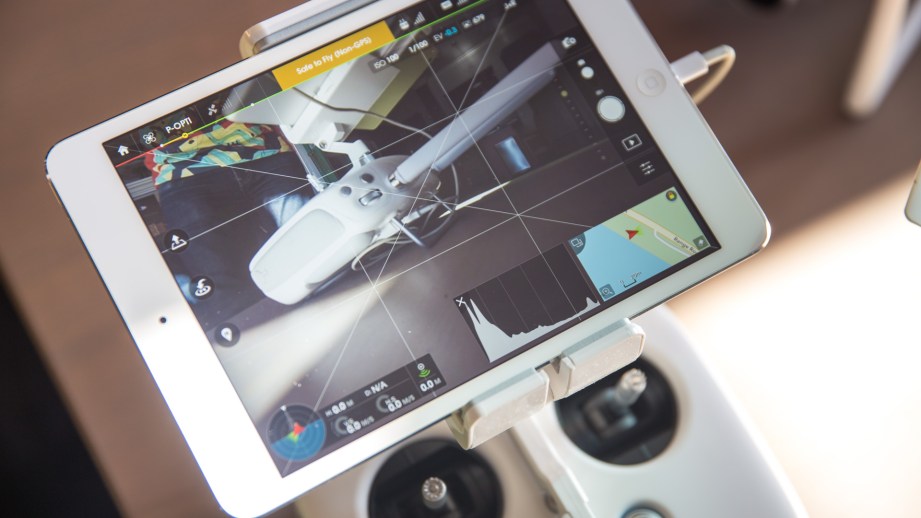
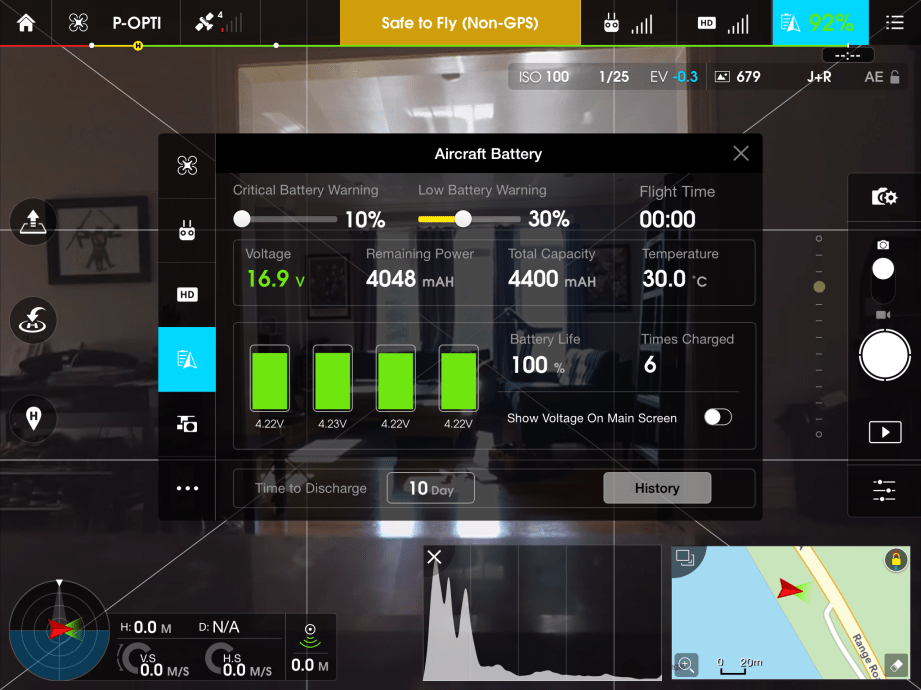
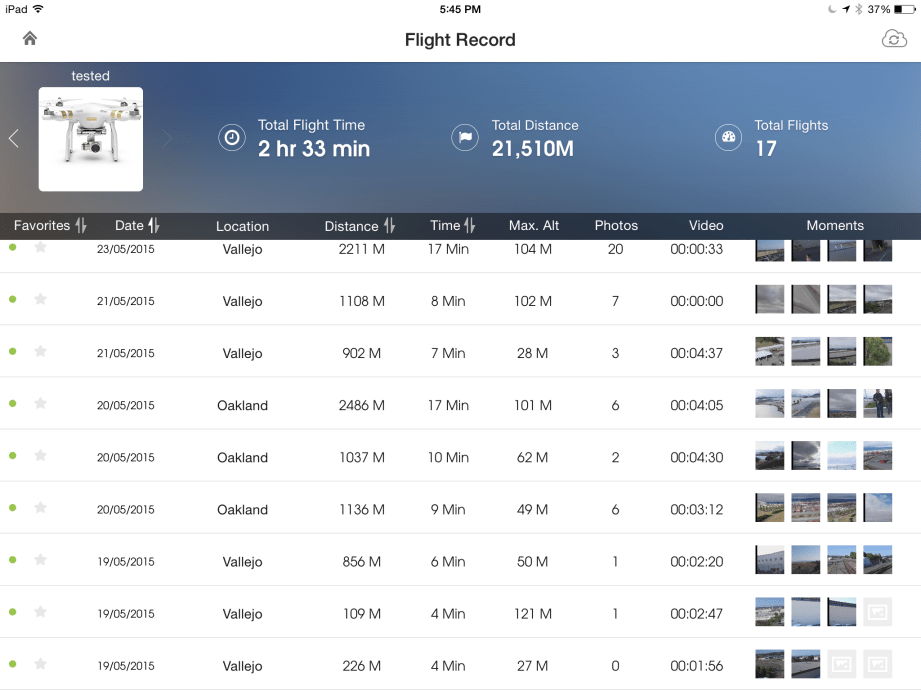
The new Phantoms also get access to the awesome DJI Pilot app, which we first saw in use with the Inspire 1. Like on the Inspire, the app runs on a tablet that gets data from the transmitter over a physical USB cable, not Wi-Fi. It’s so much better than the phone app we used on the Vision+: higher resolution interface with detailed on-screen telemetry, camera controls, setting adjustments, map overlays, flight logs, and the ability to stream video directly to YouTube. The two higher-end Phantom 3 models also come bundled with a new transmitter that has buttons and dials for manual camera control, like exposure comp., vertical panning, and shutter trigger. No more having to touch the tablet screen mid-flight to work the camera–you can keep both hands on the flight sticks and still be a capable photographer.
As the lineup stands, the Phantom 3 Standard is only a minor step-up from the Vision+, the Advanced and Professional models leap ahead in capability, and the Inspire 1 still at the high-end with a beefier flight system, transforming formfactor, two-axis camera control, and two-transmitter piloting. That $2900 quad is really the only one that deserves the Professional moniker.
My experience of flying the Phantom 3 Professional shows that its spec improvements aren’t paper-thin. It’s simply a joy to fly, and rewards you for practice. Getting it up in the air and back on the ground is simple with automated on-screen controls, and even new flyers will be able to perform simple pans and glides within their first flight. Training your fingers to execute maneuvers like circles and stable figure eights requires more practice, but the experience is always satisfying because the quad behaves predictably. I was never frustrated by the quad not doing my thumbs told it to do–a testament to the speed controllers’ responsiveness and power delivered by the 4S battery. Lightbridge video worked from several hundred meters away, rarely breaking up as long as the quad was in my visual line of sight. The transmitter range is even longer, so I still had control of flight even when the Lightbridge connection started weakening due to distance.
After a dozen flights, that worry in the back of my head that the Phantom could fall out of the sky at any moment was all but gone–I had no fear of flying it over trees or lakes on a recent trip through the Canadian Rockies. That doesn’t mean you can’t be careless with the Phantom, or any other quadcopter. As we’ve discussed on Still Untitled and in pastarticles, the low barrier to entry of RTF quads can give a false sense of security. These are powerful pieces of technology that shouldn’t be treated like toys. Owning one, even before you fly it, automatically shoulders the responsibility of learning the regulations and best practices for flying both legally and safely. We’ve covered some of those best practices in this guide.
Indoor flight is another story, and I’m still wary of flying the Phantom 3 in an enclosed space. The Optical Flow system works and will keep it relatively stable when the Phantom can’t detect satellite signals, but it’s a backup measure best used for low flight outdoors and automated landing assistance. It’s not that I don’t trust the Phantom to keep stabilized indoors–I’m more worried about the unpredictability of obstructions and other moving objects (like people) in an enclosed environment. Different situations yield different risks; I’d be comfortable hovering the Phantom 3 in a large warehouse to film an aerial shot, but not flying it at home, for example.
Flying is fun in its own right, but the Phantom 3 is really an aerial photography and videography tool–a smartphone camera you can fly through the sky. The quality of its video is constrained by the payload capabilities of the quad–multi-rotor builders who’ve built Octos that can hold full-frame cameras are going to be able to shoot higher quality and more versatile shots. Video here is very comparable to a GoPro 4–compressed h.264 footage that maxes out at 60mpbs at 4K. That’s not bad at all, and definitely higher quality than what YouTube will compress 1080p and 4K videos at. But looking closely at 4K footage, I did notice compression blocking, especially in scenes with lots of foliage and trees. Low-light quality on the camera is much improved from the Vision+, with shots that look less grainy and discolored. I don’t recommend flying the Phantom 3 at night, but exposure control means that you can shoot some really nice golden hour video.
(A note: you’ll need a fast microSD card for local recording, but the Phantom 3 Professional includes a very good class 10 16GB Lexar card. 16GB should be good enough for 30 minutes of 4K footage, which is more than you’ll be able to record on a single flight. But media management is a must, as the data adds up pretty quickly).
A built-in camera has a lot of innate benefits, like a wholly integrated video streaming system and direct camera control mid-flight. But a third-party camera like a GoPro–despite using very similar sensors–gives videographers slightly more post-processing options. GoPro can record flatter video that can then be tweaked in its Protune software, and can output cleaner 4:2:2 video over HDMI to an external recorder (if you can mount one on a quad). That gives video editors more space to color grade in post. With the video encoded by the Phantom 3’s camera system, there’s only so much you can do in Premiere to grade and fix exposure.
Another limitation of this kind of built-in camera is what kind of motion you can film. The settings let you control framerate (eg. 24fps vs 30fps) and shutter speed, but matching that shutter to an ISO setting to get cinematic motion (eg. 1/50s for 24fps) is tricky since the camera doesn’t have any built-in ND filters. You can of course buy an ND filter accessory to mount over the lens before flight. Photos, however, are another story since the Phantom 3 can save RAW images. You can shoot directly at a sunset and tweak the picture in Lightroom to turn out a beautiful shot. Despite the 4K capability, I’ve honestly had more fun with photography on Phantom 3 than videography.
Imaging quality aside, the Phantom 3 and other camera-equipped quads force videographers to consider the potential and limitations of this kind of aerial platform. Flying a Phantom 3 may be orders of magnitude easier than flying a helicopter, but aerial cinematography is complicated. You have to think about how the camera moves and what kind of perspective is captured holding a camera up 250 feet in the area. Unlike a Steadicam operator, controlling a camera on a flying quadcopter only gives you so much control over the physical positioning of the camera platform. Of the six axes of movement, you only have direct access to four (no roll or pitch, though pitch is simulated with gimbal vertical panning). Adding to the challenge, those four axes of control respond to commands with various degrees of sensitivity and latency. In practice, that means it’s difficult to get a graceful up/right/yaw combination to spiral the camera around a subject, at least without lots of trial and error.
Another hard limitation is the focal length of the camera, which sets its field of view. Think about your typical iPhone, which has a 35mm equivalent lens. You can buy lens attachments like the Olloclip to simulate a wider or narrower focal length–that’s how filmmakers use iPhones to shoot telephoto-like shots. No such lens attachments are available for the Phantom 3’s camera. Combined with a focus set to infinity, this explains why so many quadcopter videos all look so similar. You need variation in camera hardware to expand on the language of aerial films.
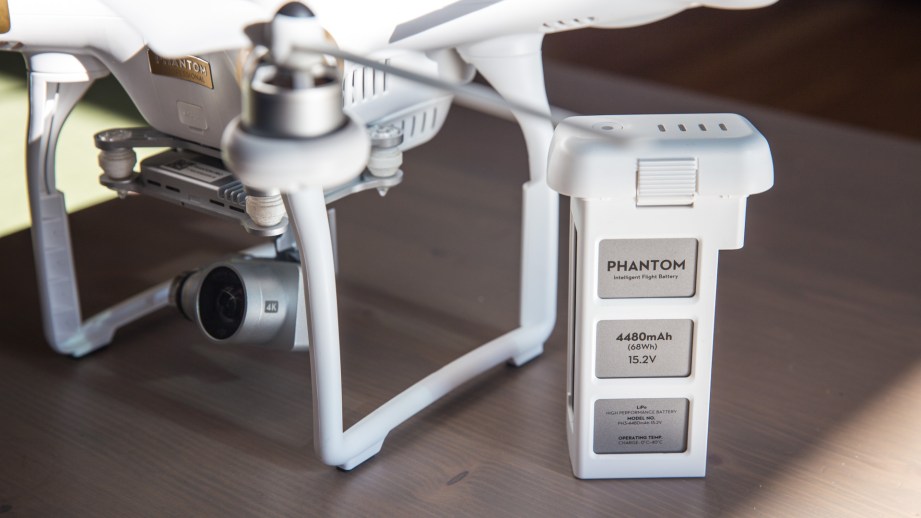
DJI claims 20 minutes of flight time for the Phantom 3’s battery, which is in line with my testing. And while 20 minutes is a long time for flying, it’s actually not that long for video production. You really only get 16 to 18 minutes of airtime before needing to bring the quad back home, which may be enough time for one or two good shots. Getting the “camera” in position takes more time than the actual filming. The new battery also isn’t compatible with the Phantom 2’s 3S smart batteries, so they’ve been in high demand since launch.
As a video camera platform, the Phantom 3 is really best suited for a few types of shots. The stationary aerial shot. Panning. Long tracking shots. Pulling Back. Pirouettes. The cinematic lexicon of multi-rotor mounted cameras is still somewhat limited, especially when you’re constrained to one axis of camera panning. So as a camera tool, the Phantom 3’s footage is best used to complement more traditional video, as opposed to standing alone. You also quickly learn that even the slightest of movements can ruin tracking shots. Slow drifts from the flight or nudges to transmitter sticks can break up the kind of smooth movement viewers expect from aerial videos. (An advanced yaw-lock setting helps.) It may be more practical to take on aerial cinematography as an experienced videographer learning to fly, rather than a RC pilot who wants to make films.
Soon after the release of the Phantom 3, DJI also released a new SDK for app developers. The SDK allows for the creation of apps that control both camera and flight, such as the Autopilot app. From developer reports, it’s much more functionality than was previously granted in the Phantom 2 SDK, which is a good thing, since features like the ground station waypoint system didn’t make it into the new models. DJI seems to be letting the developer community build in those features in third-party apps. With 3D Robotics touting many automated and assistive video-centric flight tools in its Solo quadcopter, Phantom users have to wait for apps to fill those holes.
We’ve said it numerous times, but it bears repeating: the Phantom 3 and other ready-to-fly quadcopters aren’t toys. If you think you’re in the market for a quadcopter and have never flown one before, buy a smaller one to fly first for fun and learn the mechanics of two-stick multi-rotor control. The same is the case if you’re a photographer or videographer who’s never flown a quadcopter–learn on a micro quad first, and then consider what type of photos and videos you want to get from a $1000 investment. If you’re an RC hobbyist who wants a quad purely for flying and performing aerial tricks, you should probably learn to build your own quad and tune it. But if you have experience in both RC and photography/videography and are ready for this class of product, DJI’s Phantom 3 is an incredible piece of technology at a really great price, and worth the upgrade from previous models.
Adam shares his latest acquisition from Prop Store’s collection of original movie props: a costume piece from Hellboy II: The Golden Army. These horns and wig were part of King Balor’s makeup–the one-armed king of Elfland from the beginning of the film. It’s a beautiful piece that now finds its home in the cave!
For the third part of our Rancor suit walkthrough, Frank shows us how he sculpted the incredibly detailed Rancor head. This clay sculpture weighed 300 pounds, and was based on Phil Tippett’s original puppet sculpture for Return of the Jedi. Plus, we talk about the electronics solution that allows Frank to look around while wearing the suit! (Thanks to Model-Space.com for sponsoring this project!)
While researching topics for her books, author Mary Roach puts the obscure and fascinating stories of science under a spotlight. Her books cover a diverse range of topics, including sex, colonizing Mars, death, and the human alimentary canal. Please welcome Mary Roach to The Talking Room!
This week, Will, Norm, and Jeremy discuss Disney’s D23 convention, the news from the Intel Developer Forum, Google’s new router, candy that starts with the letter ‘M’, Amazon, and Hawaiian shirts. Enjoy!