


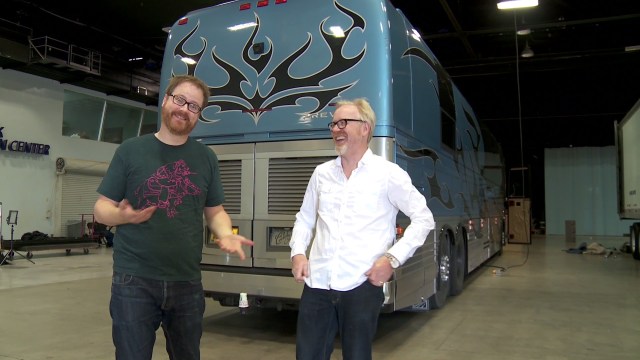
Adam gives Will a walkthrough of his tour bus, which, yes, appears to have a lower back tattoo on it. Adam explains how he’s spending his time on the road, and the number one rule of the bus.
Episode 195 – So Long, 2013! – 12/19/2013
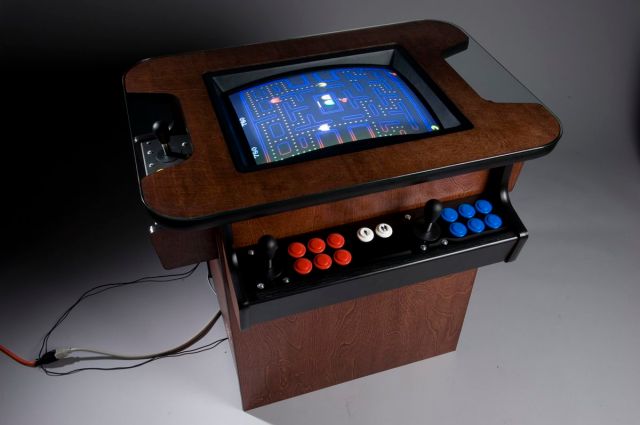
How did the year pass so quickly? For potentially the last podcast of 2013, Norm is joined by Wes and Jeremy to talk about robot telemarketers, Google’s robotics ambitions, virtual reality, and China’s historic landing on the Moon. We also discuss products we’re testing, reveal a MAME machine project, and give a little preview of what to expect on Tested in 2014. Plus, predictions!
The Talking Room: Adam Savage Interviews Damon Lindelof
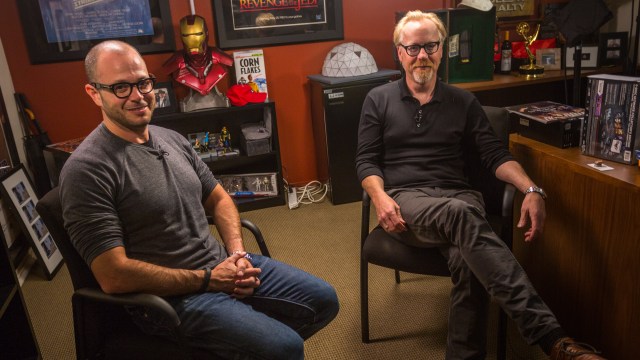
Damon Lindelof is a writer, producer, and television showrunner. He was a co-creator of Lost, and has worked on the screenplays for movies like Star Trek Into Darkness, Prometheus, Cowboys & Aliens, and the upcoming Tomorrowland. Join Adam for a conversation with Damon Lindelof about screenwriting, collaborating with other writers, and his next television project.
Inside Jamie Hyneman’s Behind the Myths Tour Bus
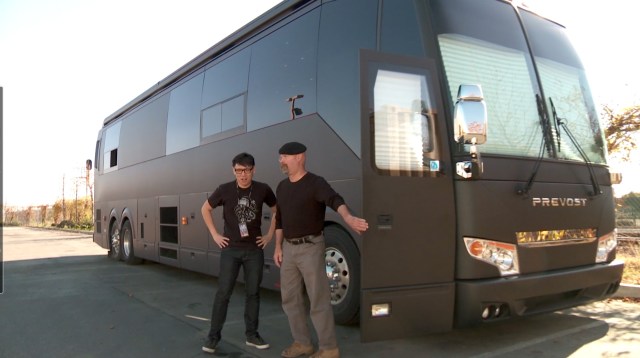
For the Behind the Myths tour, Jamie and Adam each have their own tour busses as they drive across the US and Canada. Jamie lets us inside his “stealth” bus to see how he spends his downtime when they’re on the road.
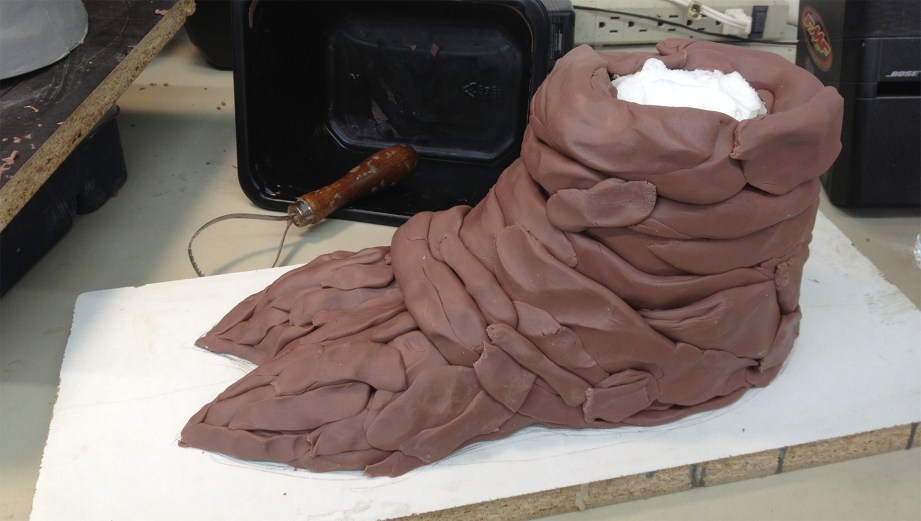
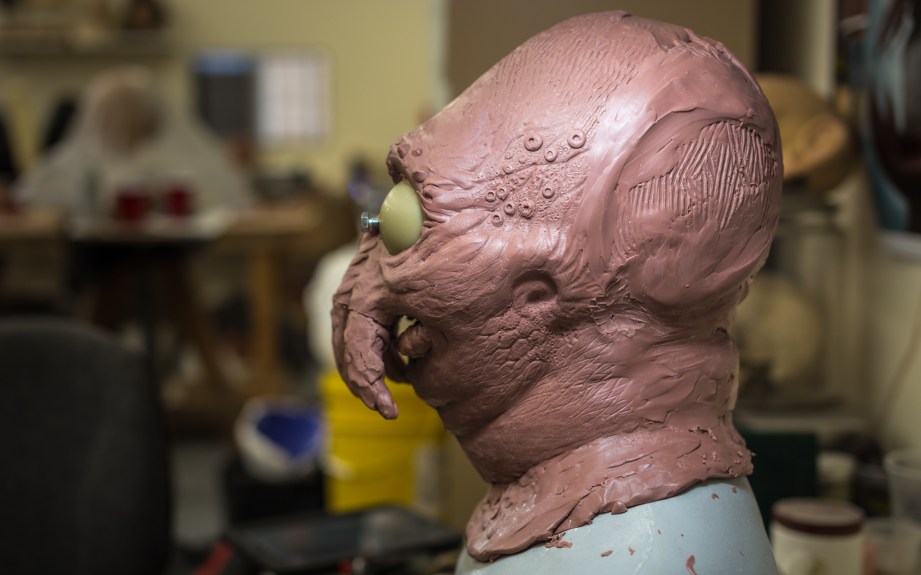
The Zoidberg Project, Part 5: Clawing Away
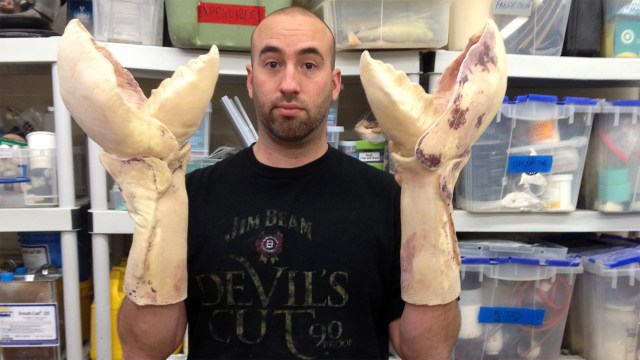
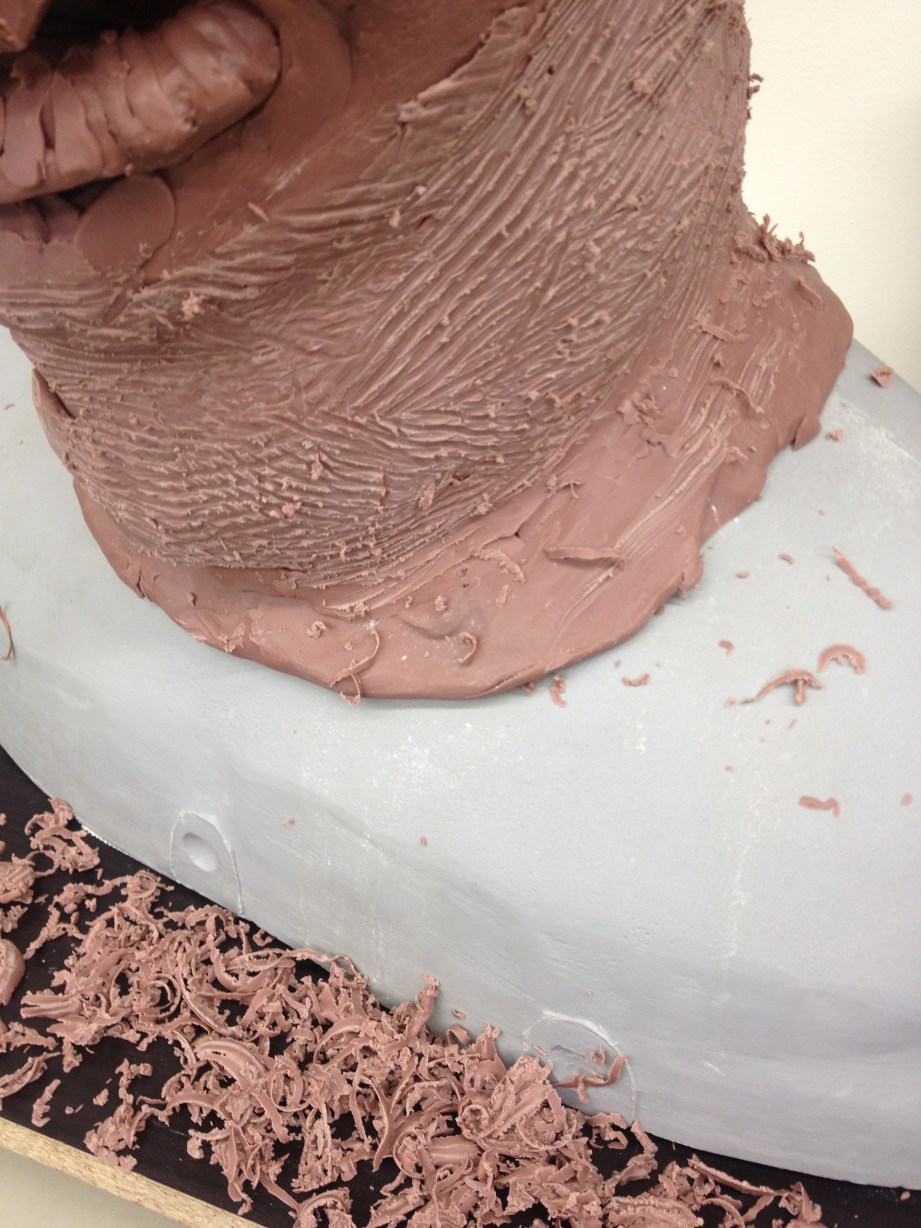
A confession: this isn’t the first time I have gone down the path of trying to make a Zoidberg makeup. I started a version in 2011, got sidetracked by some jobs, and had to shelve it. I then pulled it out again last year to start over again, but for some reason, I started with the claws first before blocking out a head. Those claws, along with Zoidberg’s “feet,” are what we’re going to be talking about today.

For the claws, I created sculpts using WED (EM-217) clay. WED clay is a water based clay developed by Laguna Clay for Disney (WED = Walter Elias Disney). WED clay has some components which seem to slow the drying down a bit because water based clays tend to dry out fast, and that makes it hard to sculpt with. For the head i am using Monster Clay, and that’s an oil based clay, which never dries out (its a oil/wax based clay). There are a lot of differences in these two types of clays, but one of the big advantages of WED clay is the speed at which you can crank stuff out. These claws don’t really have a lot of nuance, so i want to be able to move quickly and get to the next step.
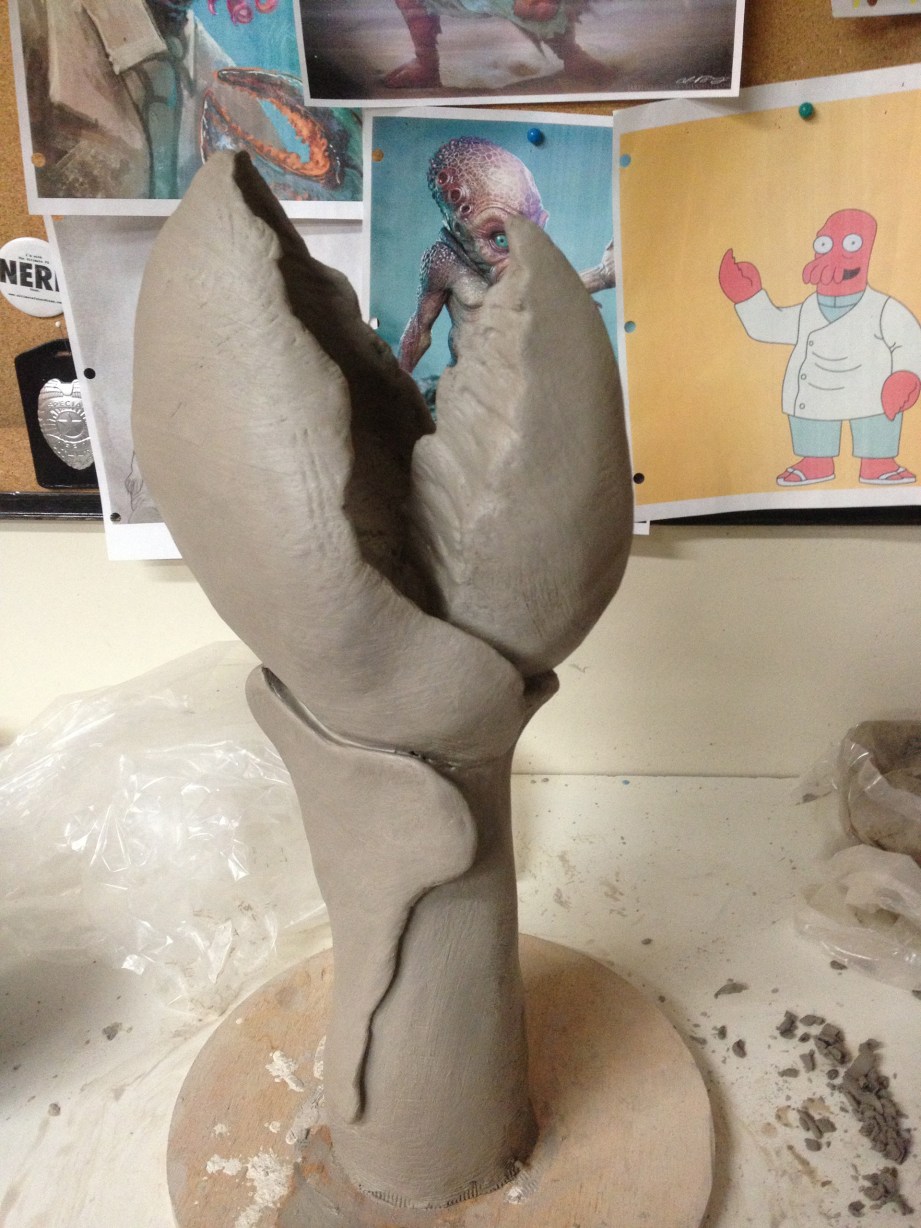
In approaching the design of Zoidberg’s claws, I had to make a design decision: do I make the claws more like a decapod claw (kind of like a pair of scissors or pliers) or more like how the cartoon is drawn. I noticed in some episodes that his larger claw seems to have cupping on the inside, like the palm of a hand. So, even though the animal anatomy is technically the more accurate way to do it, I went for the cartoon version of his claw shapes because it would suit the wearer being able to comfortably use them as gloves.
The sculpture process with WED is pretty much the same as with the Monster Clay in the head sculpt. To start, I just add blobs of clay onto an armature that I built and block out the rough forms and shapes, then spend some time refining the anatomy and then finally the texturing (I’ll cover refining and texturing much more when I get back to the head).
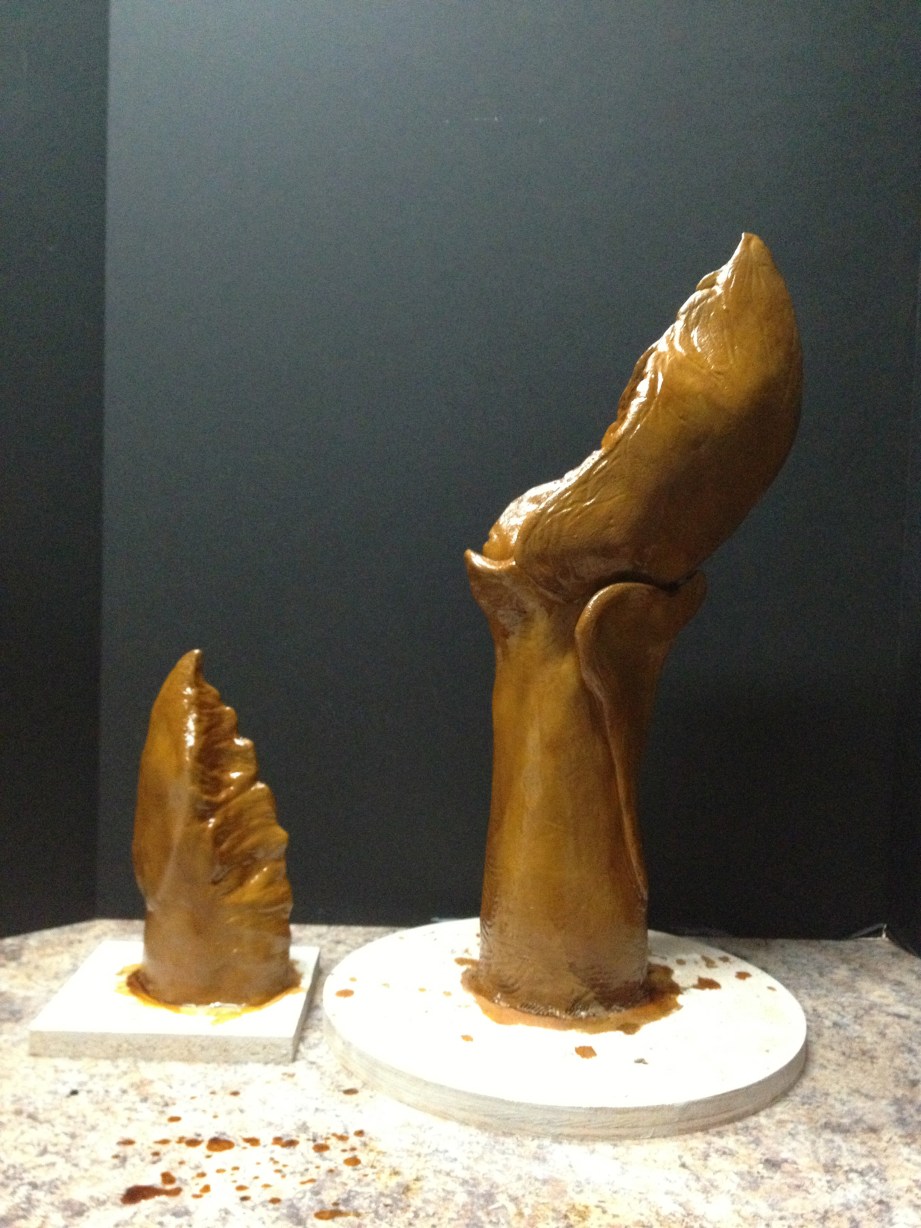
I sculpted the whole thing together, then separated the smaller claw to make molding easier. At this point I was thinking that I’d brush in a latex skin, back it with a soft polyfoam, then just carve out the inside until my arm fit in. The latex will act as a layer of “skin” which I can paint, and the polyfoam will take up the extra space between where my hand goes and the latex. That way it will fit snug!
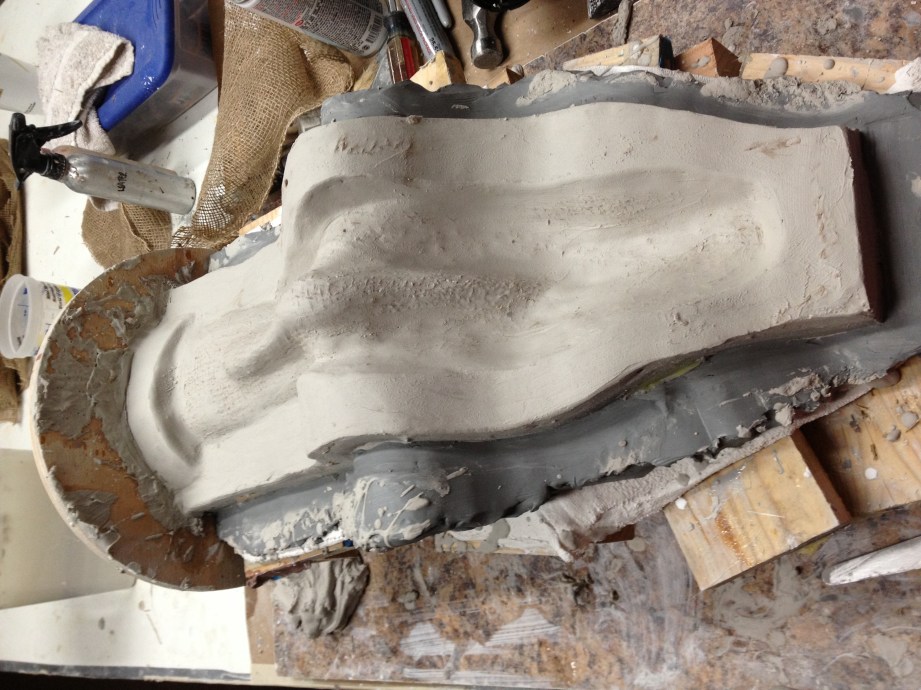
If you remember back to the Admiral Akbar build, I originally thought about making the gloves out of slush cast latex, but the latex would not dry correctly in the epoxy molds. I had to create an arm core for that mold and fill it with foam latex between the core and mold. Well, because I wanted to make Zoidberg’s claws out of slush cast latex this time around, I opted to make the molds out of something that wasn’t epoxy. I ended up choosing Ultracal 30. Ultracal is a hard Gypsum cement, and has a 30 minute working time. For the small claw, it was an easy two-part mold, split right up the center. I coated the sculptures with a few coats of shellac (as a sealer), built a clay dividing wall with white clay (EM-210) and went at it.
Whether the mold is going to be for a latex slush cast, a jacket mold, or for running foam latex, I make most of my Ultracal molds pretty much the same way. I first brush on a splash coat of Ultracal to capture the details of the sculpt, and build that up to about ¼-inch thick. When mixing Ultracal (or any plasters), you add the powder to the water. As a rule of thumb, the volume of your initial water will be about doubled once all the plaster is sifted in. I slowly and evenly sift in the plaster to water, to avoid clumping and make sure all the little plaster particles are getting wet out. Once the surface of the water looks like a dried riverbed, this means all the plaster is hydrated and I mix it with my hand or a whisk. You don’t want the plaster too thick, or it will trap air bubbles on the surface of the sculpture, and you don’t want it too watery or you will just be chasing it with a brush forever. If you stick your hand in the plaster, it should give a nice opaque coating. It sometimes takes a bit of trial and error to get the ratios and the “feel” for mixing plaster down.
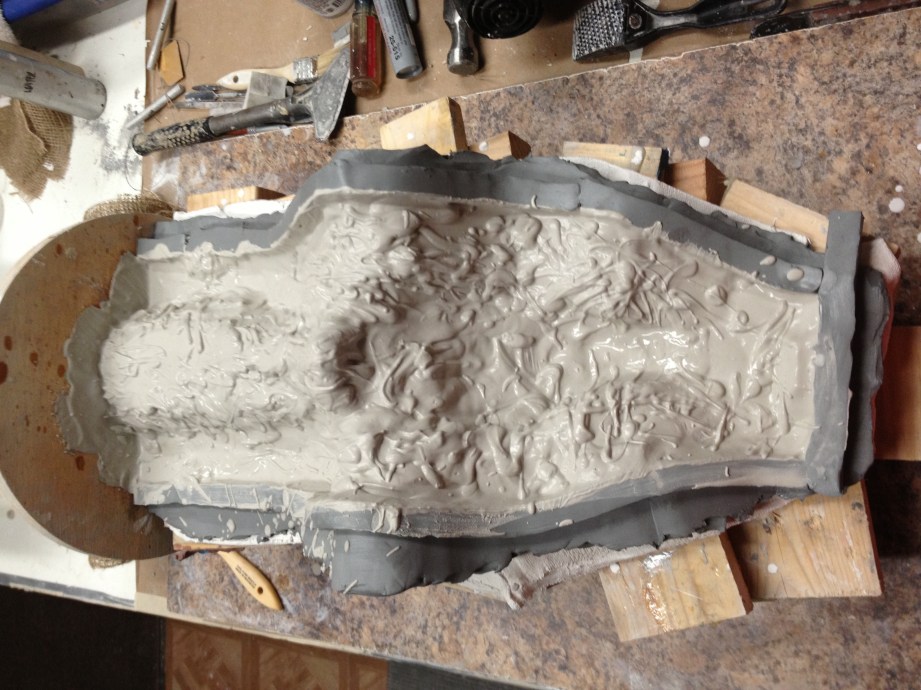
Once you have that surface coat on your sculpt, you need to wait a little bit. This is another place where the “feel” and experience comes in. You want the plaster to just lose its shine and start to develop a matte finish before moving on. If you wait too long, the plaster starts steaming and curing up, and if you go too early the plaster is soft, and you could damage the surface coat. When it’s just right, you can start adding your reinforcement layers of the mold. I usually do four or five layers of open weave burlap that are dipped in the plaster, and then use the leftover plaster to do a “beauty coat” and make the mold look pretty and clean.
When this is all set up (which takes about an hour) you can pull the clay wall off, seal the plaster with a couple coats of Crystal Clear acrylic spray and do the other side of the sculpt the same way.
For the big forearm section, I will make a three-piece mold. This will make demolding the casting easier in the end. This is the same process as before for the plaster; you just have to plan how the three mold pieces are going to come apart. Visualizing multi-piece molds can be tricky, but if you’re a fan of Tetris, it might be right up your alley. An easy way for this is to treat two of the pieces as one (in your mind) and as long as the third will open up easily, all you have to do is separate the other two. That will help keep your mold from locking together and being stuck.
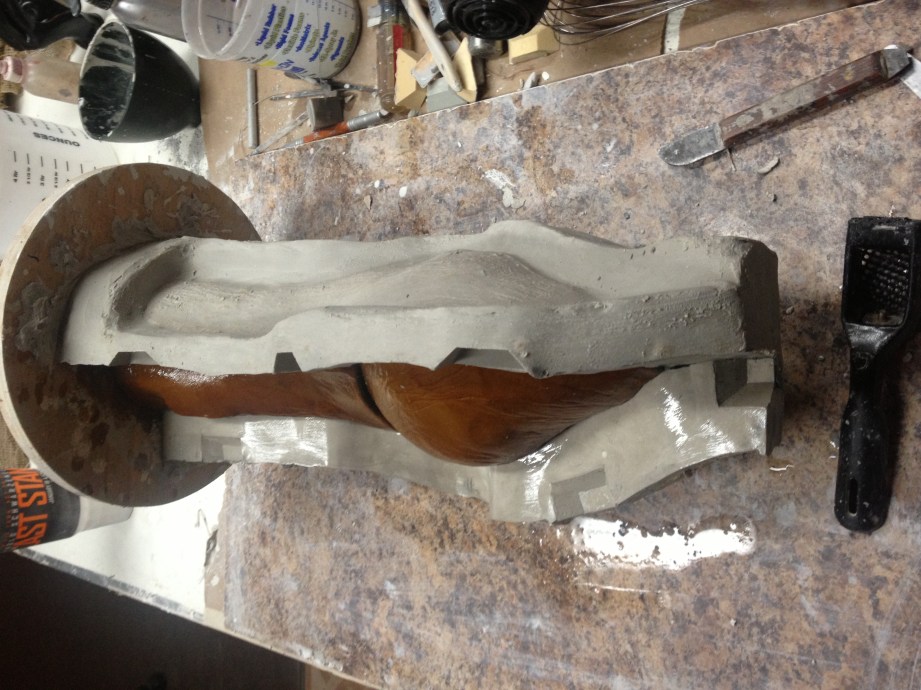
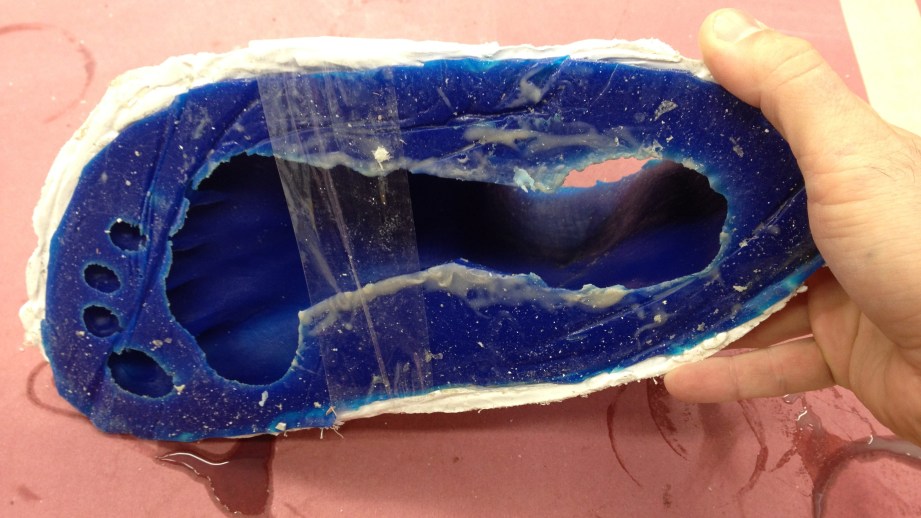
Once the molds are cleaned out and strapped back together all you have to do is fill it with latex for about 30 minutes, and then dump it back out. That’s the “slush” part of the Slush Cast Latex. This will allow a thickness of latex to collect on the inside surface of your mold. You can it sit longer if you want a thicker glove wall, or shorter if you want it thinner. Keep in mind that this only works in plaster molds–which is why we ran into the problem back on Adam’s Ackbar hands, and had to make a core and inject foam latex instead.
For casting latex objects like this I prefer RD-407 latex. Different latexes have different amounts of filler and viscosities and shrink rates. From my experience, this one seems to have a good blend of all the properties. I’ll then prop the mold up on some boards and let the excess drip out for about an hour, then sit the molds on their sides and point a fan into them. This will help it dry a little faster.
Pretty much the next day, I’ll do the next step, which is filling the rest of the mold with soft polyfoam. If you’re keeping track, the outer layer of the glove will be made of latex, and in the inner material where the wearer’s hands will be touching will be polyfoam. To help give the foam a little extra bite and stick to the latex, I mist in a coat of 3M Super 77 spray adhesive, then mix up a batch of Flex Foam-it 3. I can’t remember how big of a batch I did back then, maybe 500 total grams of material if I had to estimate. I always use an electric drill and mixer when I mix up any kind of polyfoam. Since I began using this trick, I haven’t run into inconsistent or collapsing foam runs. Sometimes when I cast polyfoam, I like to give it a little back pressure to fill all the voids, too. For these claws I won’t, so I’ll just pour it in and let it rise (and probably overflow). After about two hours, I can pop open the mold and trim up the excess. Because I filled the whole arm with polyfoam, I’ll want to hog out the inside to fit my arm and fingers. I can do this a little quicker with the aid of an electric turkey carver!
But, here is the problem then I ran into–the polyfoam can get too warm, since it’s akin to wrapping your arm in snug insulation. And it didn’t have the freedom of movement that I was hoping for. When you’re wearing a costume at a convention, or on a movie set, the performer has to be at least a little bit comfortable….so I really need to rethink this.
So now here I am. I still think the sculpture is fine, it just needs to be built a different way. The mold is a rigid stone mold, but I could take a chance waxing it and casting thick fiberglass/epoxy pieces, or do a quick silicone or alginate mold on the polyfoam/latex parts and make plaster copies that could be vacuformed over. I don’t know right now, but I’ll be working on that in the upcoming weeks. This is the kind of problem solving that I have to go through with my builds: finding the most appropriate materials and processes for the right purpose.
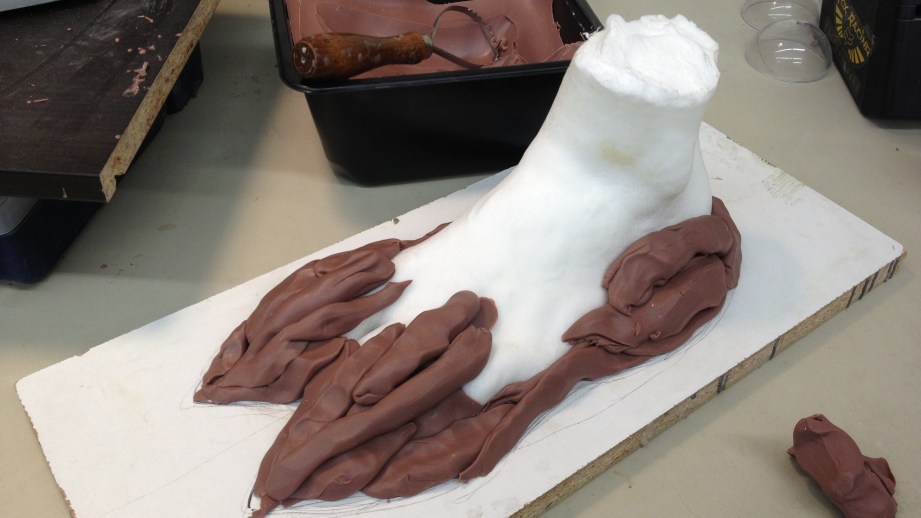
That’s just the claws, too. Then there’s the feet. I borrowed a mold of a human foot from my pal (and the guy that I split my shop space with) Mike Hill, strapped it to a board and filled it with some 8 lb rigid polyfoam. This is just for a simple form, and so that I don’t have to make a solid clay foot sculpture. From what I can tell in the pictures of Zoidberg, his left and right feet are the same. And even if they aren’t, I’m going to take some creative license and make them the same. I need to figure out what I want to make the sandals out of and how that will interact with the sculpture, but for now, I’ll just start getting the forms blocked out and thinking about how I want to cast this up (and again, out of what material).
While working on the claws and feet, I’ve continued to plug away at refining the head sculpt too, and it’s coming along. I’ll get more into the refinement of shapes and anatomy, and all the awesome people that I’m collaborating with on this project in the next article!
Thanks to Iwata-Medea and Smooth-On for providing materials and sponsoring this project.
Adam Savage Explores a Military Surplus Store

Will and Norm meet up with Adam during one of the Behind the Myths tour stops, and the three visit a local military surplus store in Bakersfield, CA. Adam browses for finds that are best bought in person, and we all marvel at the store’s collection of vintage vehicles.
Jacket Aficionado Magazine – 12/10/2013
Adam is still on tour, but that can’t stop the ‘cast. This week, the gang discusses dining with friends, the best kind of New York days, the perils of crappy okra, Thomas Edison’s last breath, and the right way to buy a jacket. Apologies in advance, there are a couple of places this show gets weird because of bad hotel Internet and Skype lag. Enjoy!
Totally Unauthorized Commentary – A.I. Artificial Intelligence

Adam, Will, and Norm deliver an exclusive commentary track for Stephen Spielberg’s AI in our first piece of member-exclusive content. It’s two hours and thirty minutes of commentary track goodness, so if you haven’t already signed up for a membership, what are you waiting for?
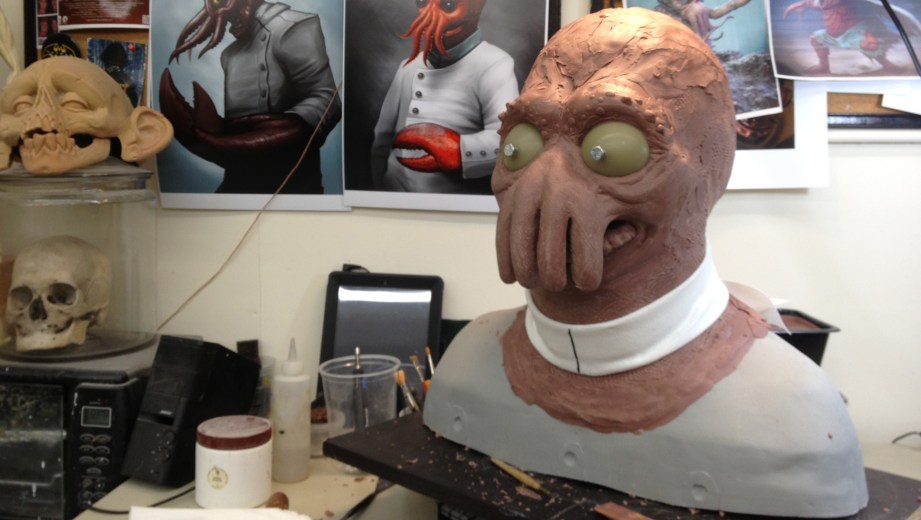
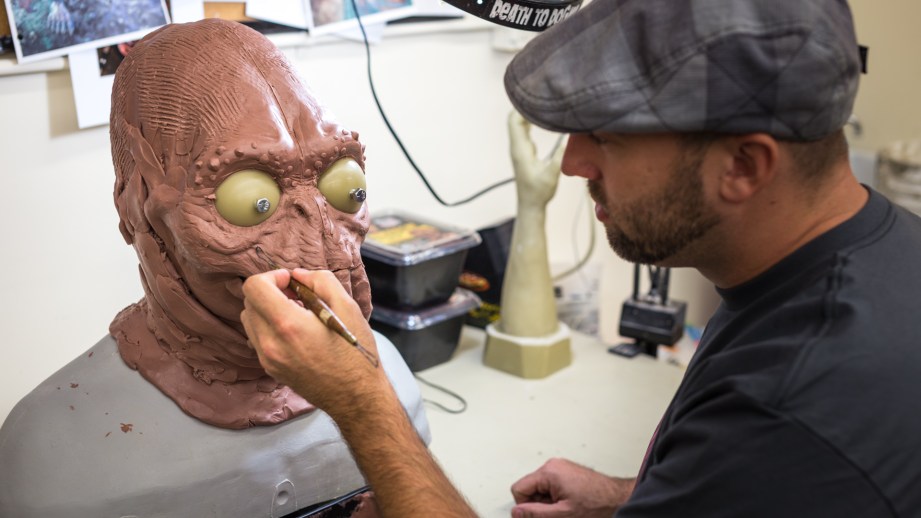
The Zoidberg Project, Part 4: Let’s Start Sculpting!
Ok, after building out our core lifecast and having a life-sized figure to work on, we are finally on to the sculpting stage. This is the part where I take some clay, and start making the character that will eventually become the one and only Zoidberg.
There are a million sculpting techniques and a million ways to approach a new sculpture, so don’t take my methods as gospel–it’s just what seems to work for me. But to start, the thing I think about is really wanting to try and get the scale right. Shape placement and general forms and anatomy are what I’m focusing on right now. Anatomy is something that I picked up from general observation and a bit of research (on the internet or in books). Human, animal, insect, or in this case decapod–really anything that you can look at and apply will make it more realistic and believable.
Sometimes I can get lucky and attack a sculpture and go right to the character that I am trying to find, other times it takes a lot of pushing and pulling on the clay to get there. Forms are always more important than the details.
We’re going to be sculpting on the lifecast that I have of our model, because we want it to fit on top of his head and line up with his mouth and eyes (so he will be able to eventually see and speak and breathe in this thing).
For clay choices, there are two main categories: water-based and oil-based. With water based clays (such as Laguna EM-217, otherwise known as WED) you have to stay aware of how wet or dry the clay is getting. If the water clay gets too dry, it will start to crack and crumble. If it’s too wet, it’s like sculpting with soup. Oil-based clays offer more versatility. Out of necessity, I stay away from clays with sulfur in them because sulfur will inhibit platinum-based silicones when you are making your mask molds.
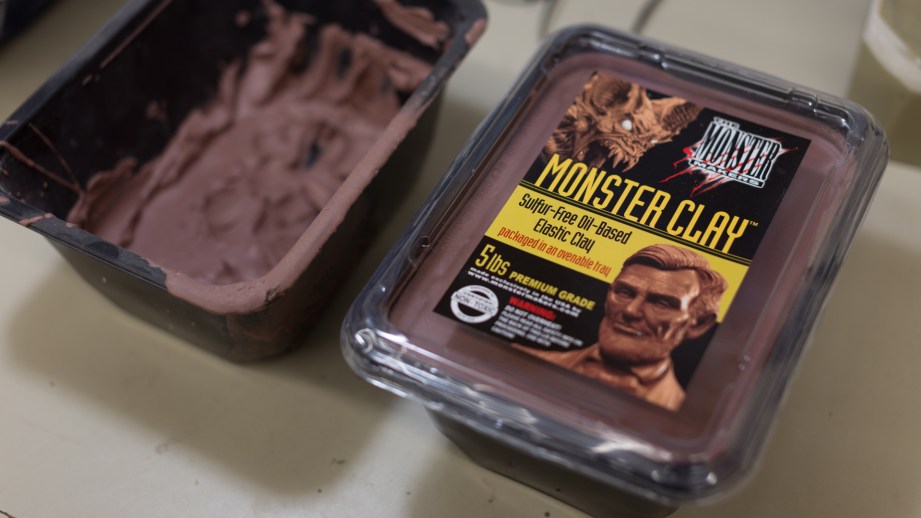
My two main choices in oil clay are Chavant Medium and Monster Clay. Both of these clays have their quirks and which one I pick sometimes just depends on what mood I’m in. In general, I love Chavant for prosthetics, and love Monster Clay for everything else. For Zoidberg, I’ll be using Monster Clay. Its high wax content is really nice for both crisp details and smooth shapes.
I like medium hardness clays because at room temperature they will hold high detail, but when warmed a bit, they become more malleable and easily shaped. An easy way to warm the clay is to buy a small convection oven and put it on the lowest setting, 140F or below. If you don’t want to spend money on an oven, get a cardboard box, line it with aluminum foil and put a lamp through a hole. It’s less controlled, but still works!
I cringe a little bit when I see people’s sculpting tools and they are just a tiny box of dental pickers, so I’ll walk you through the ones I’ll be using on these first steps.
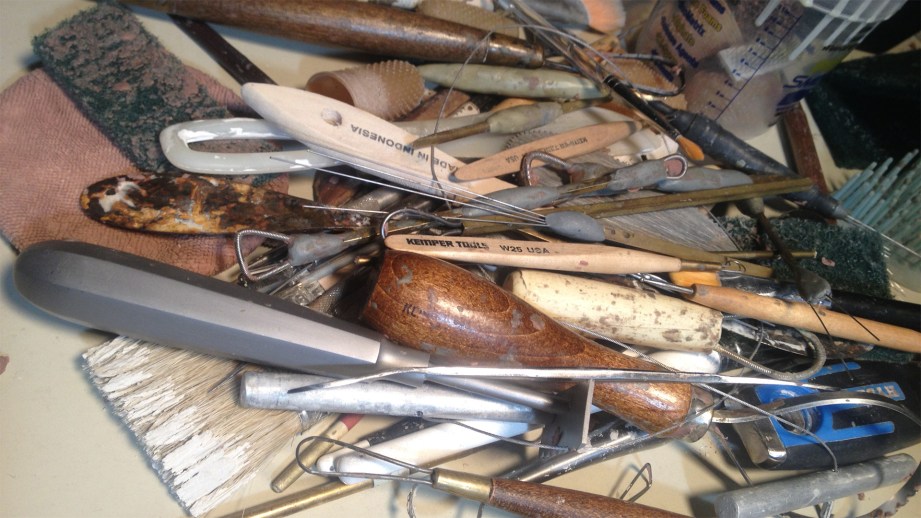
Your hands are the first set of tools you should think about. Take some warm clay and mush it around. Make worm shapes, or pancakes, or a big chunk to build up mass. Think about the silhouette that the shapes would make, only focusing on really rough forms and shapes. I rarely bother smoothing clay out at this point; it’s a waste of time. For Zoidberg, I’m still kind of shooting in the dark as to what I want this to be. Even with the maquette and designs…it’s going to take a bit of fiddling.
When you start getting some shapes put together, you might want to refine them farther, and that’s where rakes come in. I have a bunch of tools that are basically ribbons of metal with one side notched incrementally.
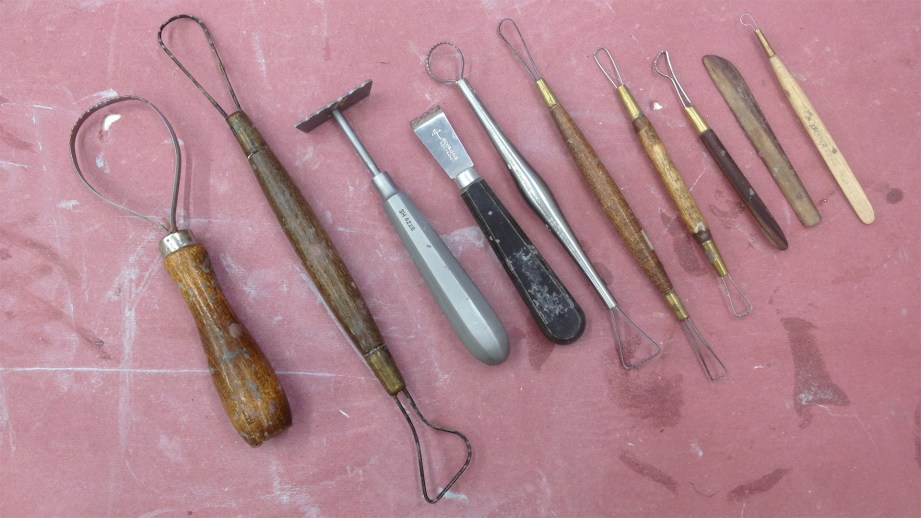
I prefer these blunt teeth to the sharp teeth of a section of saw blade. The shallow rake is much more functional, in that it doesn’t gouge a deep crevice into the clay, it just rakes the surface. I rake in a criss-cross kind of motion, so that (again) I’m not just gouging out a crevice or ravine. The X pattern will evenly take down the surface. I have two or three tools that I use more than others, and my largest rake is one of them.
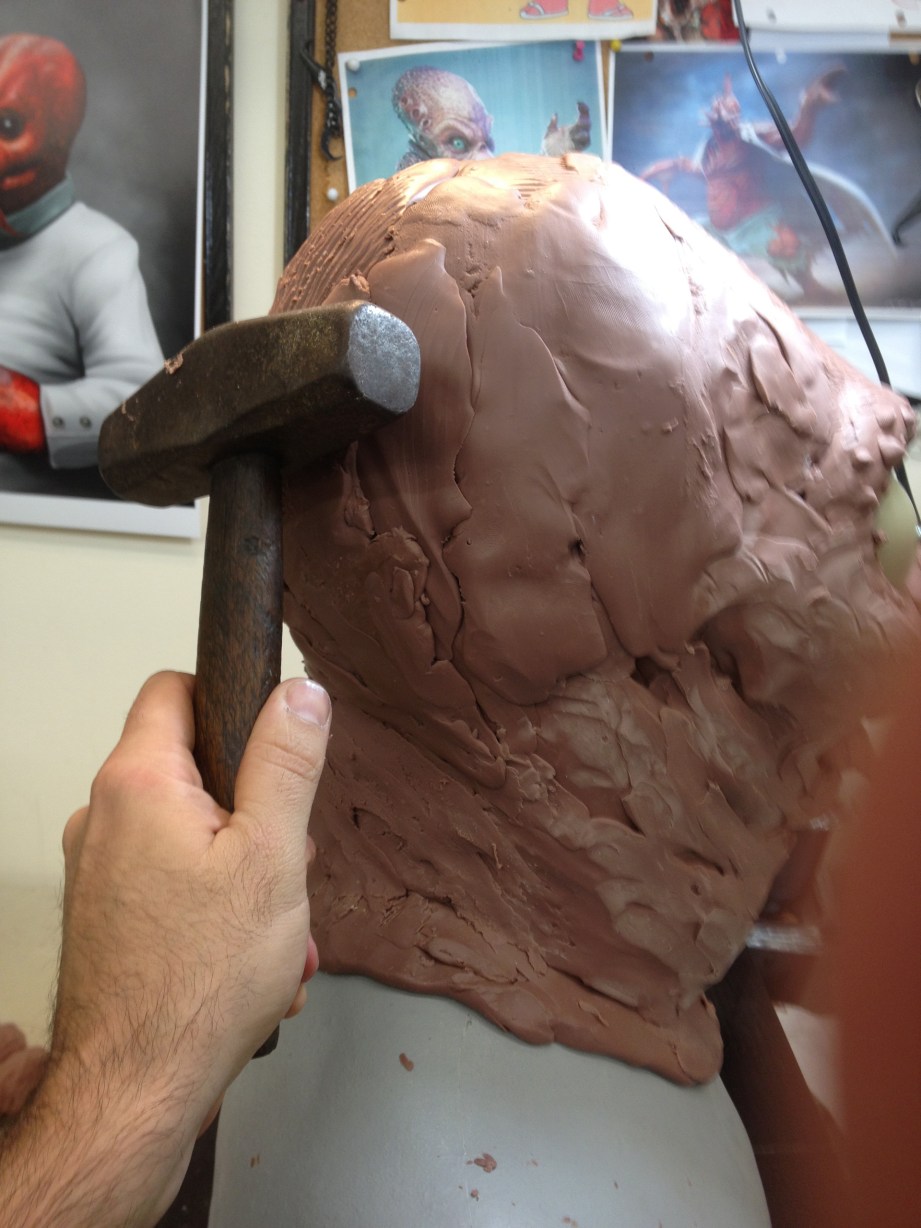
It helps me concentrate on the broad strokes of the form, and not worry about the small details. Even when I get far into a sculpture, I’ll pull out the big rake or a hammer and start changing the silhouette.
I shot this time-lapse video to give you a sense of how the first pass came together. Trust me–it’s not really this fast!
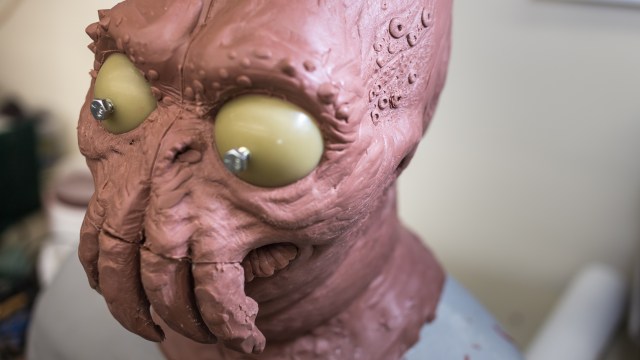
This first pass I make feels too Cthulhu to me, but I’m just working out forms, so it’s OK.
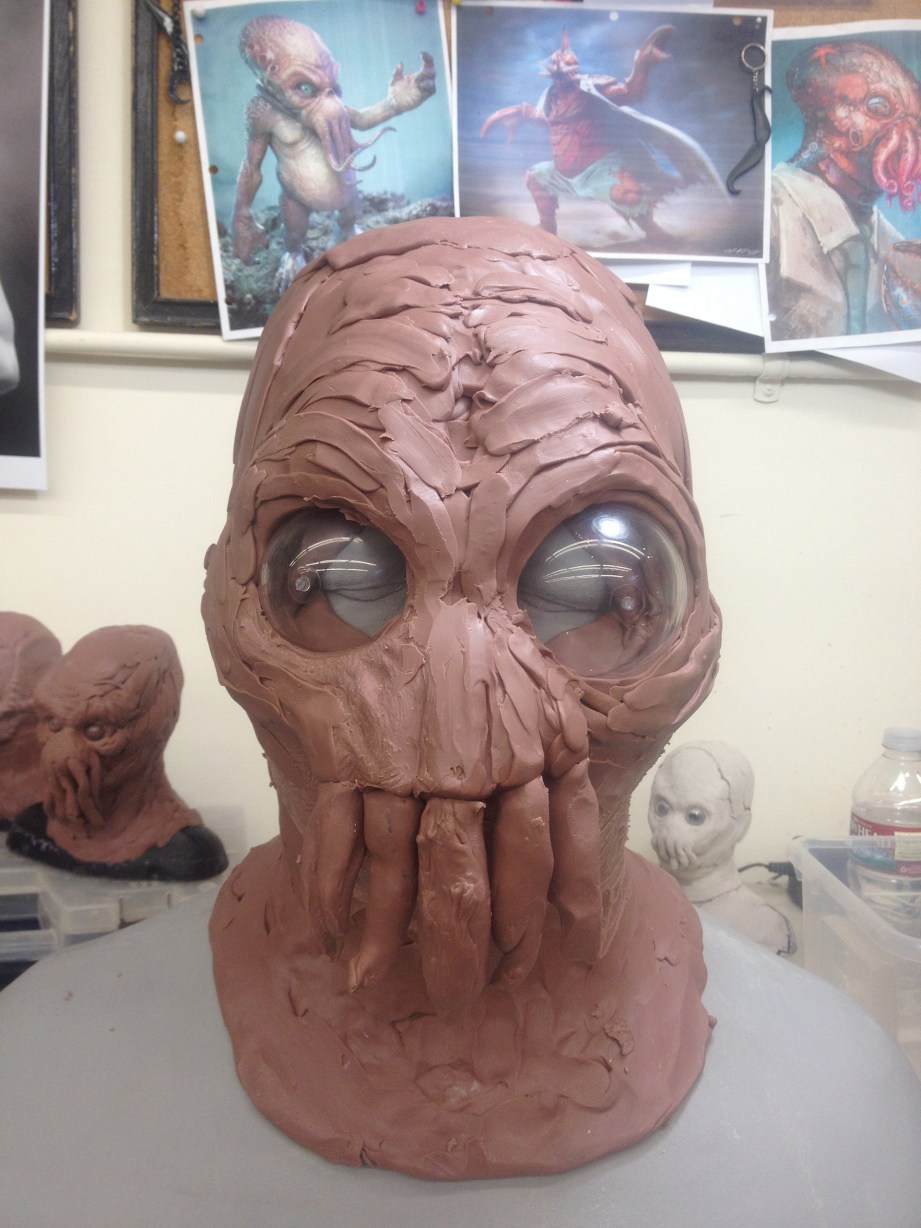
I need to make the tentacles feel more mustache-like and get the head into proportion. I’m using the raw clear plastic eye forms at first to see which size I like better. Once I decide what I like, I’ll just dig it out and replace it with the urethane ones that I made with the bolt in the center. For eye placement, I want to make sure I keep in mind the vision of the performer.
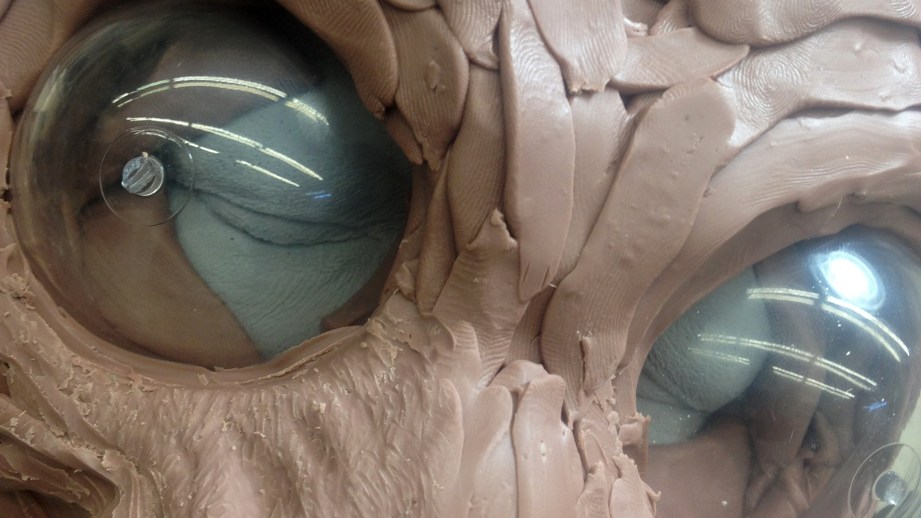
For Adam’s Admiral Ackbar, any wearer was able to see through the nose holes, but I don’t think I have that luxury in this case. I want to keep the eyes in a relatively similar position as to the cartoon. I’ll have to figure out how to make the final eyes able to see through or some other placement for an eyehole…but I’ll sort that out as I figure out the shapes and proportion.
Refining shapes and anatomy, texture, solvents and finishing will come later. Next up is getting the arms and feet going, and refining forms on the head. Here’s a teaser of how far it’s come along since that first pass!
Thanks to Iwata-Medea and Smooth-On for providing materials and sponsoring this project.
