
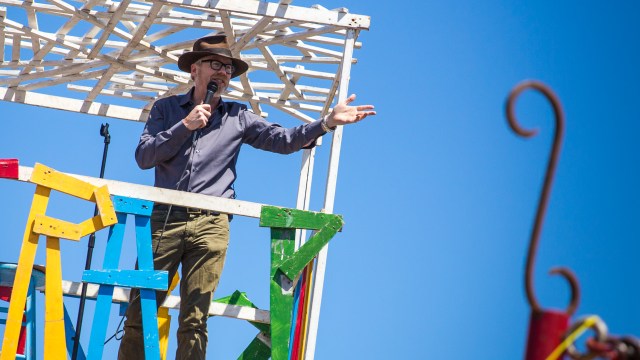
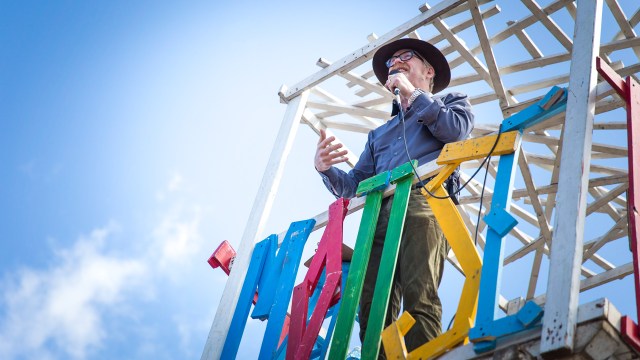
This week, Will and Norm catch up on big MakerFaire news, Gary’s big news, Apple’s big news, Dre’s big news, Google’s big news, and Microsoft’s big news. Enjoy!
Bits to Atoms: 3D Printing Buckaroo Banzai’s Jetcar
Scientist, neurosurgeon, gunslinger and leader of the rock group the Hong Kong Cavaliers–Buckaroo Banzai, a true Renaissance man, and one of my all-time favorite characters played by the awesome Peter Weller in The Adventures of Buckaroo Banzai Across the 8th Dimension. This remains one of my top sci-fi films and while by no means a perfect movie, the cast consists of Peter Weller, John Lithgow (in one of his finest performances), Ellen Barkin, Christopher Lloyd, and Jeff Goldblum–so you know there’s going to be some good stuff in there.
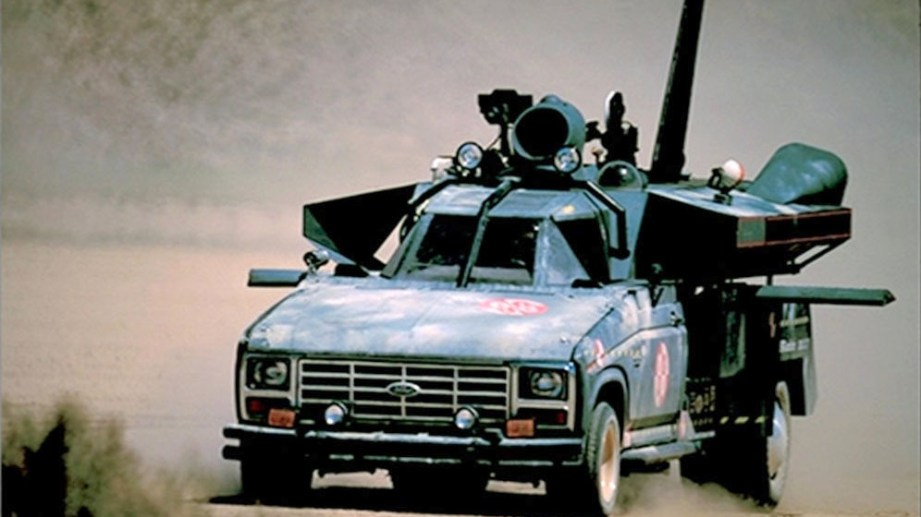
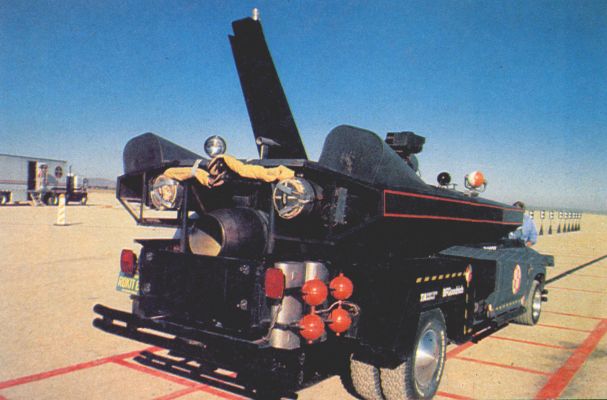
I’m not going to delve into the plot, just watch it, but the film has a great opening with Dr. Banzai testing his oscillation overthruster, a device that he theorizes will allow him to travel through solid matter. In order to do so he outfits the overthruster to a Jetcar which he intends to drive straight through a mountain. When I was a kid I wanted that Jetcar so bad, but Buckaroo Banzai toys were never meant to be. Flash forward a few decades and I’m in a 3D printing class and need something to build and print and I know exactly what that should be.
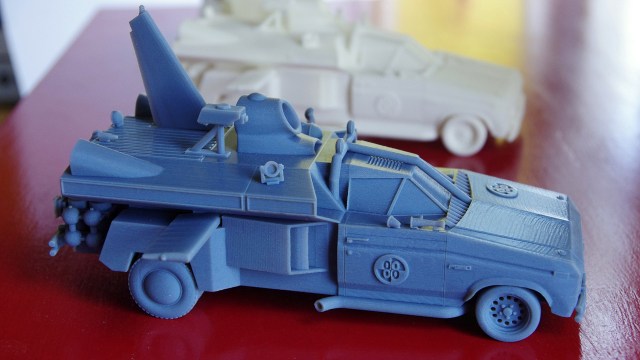
This was actually my very first 3D print and the most complicated thing I had modeled up to that point. Hence my advice to those getting started with 3D printing–start with something simpler! In the end it turned out great but there was a steep learning curve for both the modeling and 3D print preparation, and I think I may have been better off doing something simpler. But let’s walk through that process so you can learn from my early ambitions!
As always, good reference material is a must and you can never have too much. When I made the TARDIS, I was lucky enough to find detailed blueprints which made replicating the pieces much easier. With other props you may be stuck with screengrabs from the movie and if you’re lucky, production art books and maybe random finds on the internet. As Adam is fond of mentioning, the Replica Prop Forum is an excellent place to find source material for props and costumes since chances are someone has already done the research and saved you a lot of time.

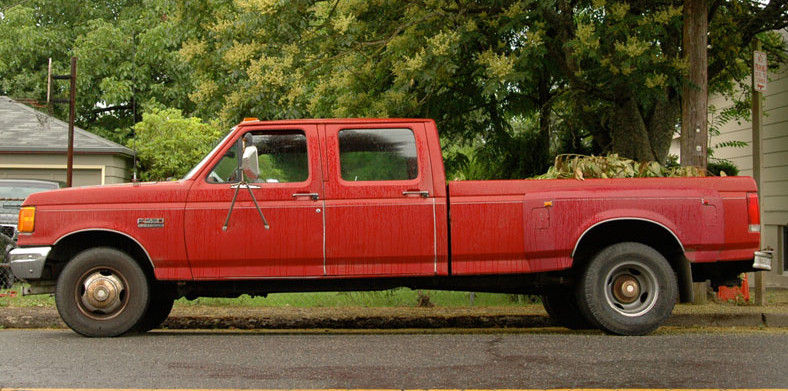
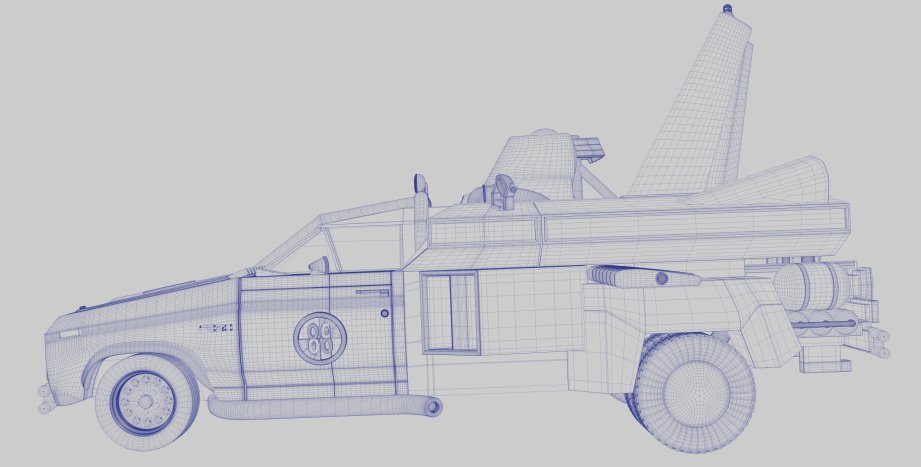
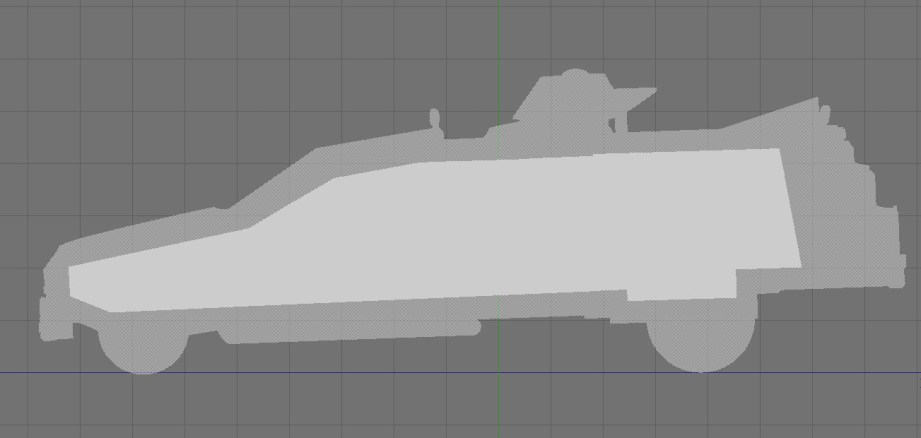
In the case of the Jetcar, there wasn’t a lot of info, especially since it’s classified by the Banzai Institute, so I had to scan through the DVD and save a ton of screengrabs. In the DVD extras, I was able to find side, front and top production drawings that would be useful. Via the RPF, I was also able to discover that the Jetcar was a modified 1984 Ford F-350 truck, so I found pictures and data such as wheelbase, etc so I had actual measurements to base the model on.
I set up image planes in the modeling program so I could build the model right on top of the blueprints. This didn’t work out due to the fact that the production sketches were drastically different from the finished Jetcar. I used the F-350 measurements as a starting point and ended up eyeballing everything else, which is fine since this was more sculpture and less a mechanically functioning model.
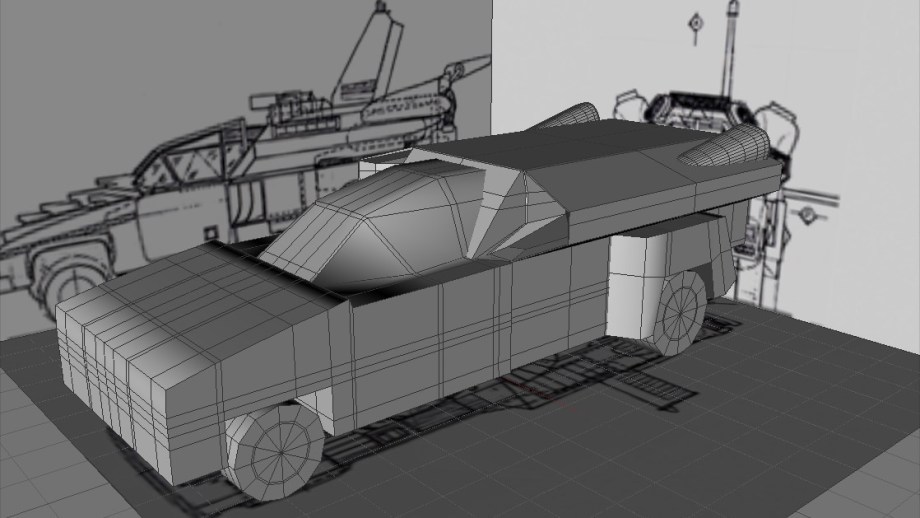
When I started the Jetcar I had not yet done a lot of modeling and I quickly felt overwhelmed and discouraged by the project. My professor sat me down and told me to break the model down into simple shapes as a way to visualize how to build the car. Tires started as simple tube shapes, doors as cubes, tanks as cylinders, etc and each was modified and smoothed until it started to resemble the real thing.
Let’s also remember something I have mentioned before: don’t be afraid to rebuild parts. I think I modeled the fenders at least three times. The first time was bungling around trying to figure out how it should be done. The end result looked good, but the geometry of all the polygons was a mess. Based on what I learned the first time, I built a second, cleaner version which took half the time as the first. As I discovered more modeling techniques, I figured out how to further improve version two, thus version three was built in half the time.
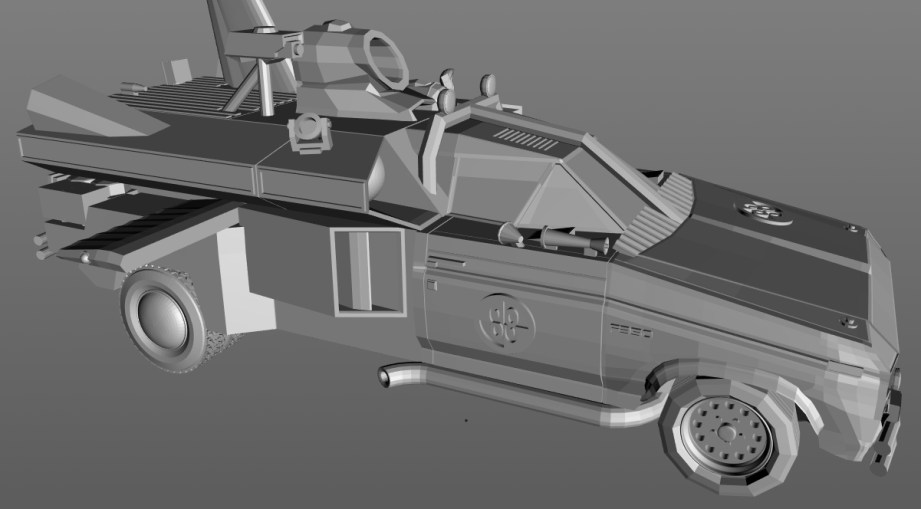
It was a rocky road, but I finished the Jetcar and was feeling pretty good about it until it was pointed out to me that I had forgot to turn off the viewport smoothing function. We’ve talked about how 3D printers only print pure geometry, so you have to subdivide your models so they’re nice and smooth (see ‘Subdivide and Conquer‘) and how you have to make sure to turn off the 3D program’s smoothing feature which makes models look smooth for visual rendering purposes. So, yeah, I left the smoothing function on so my model looked great on the screen–until the smoothing was turned off, making it a blocky, faceted mess which resulted in even more hours of tweaks to fix it. Still better than spending a lot of money on a print that would have turned out terrible.
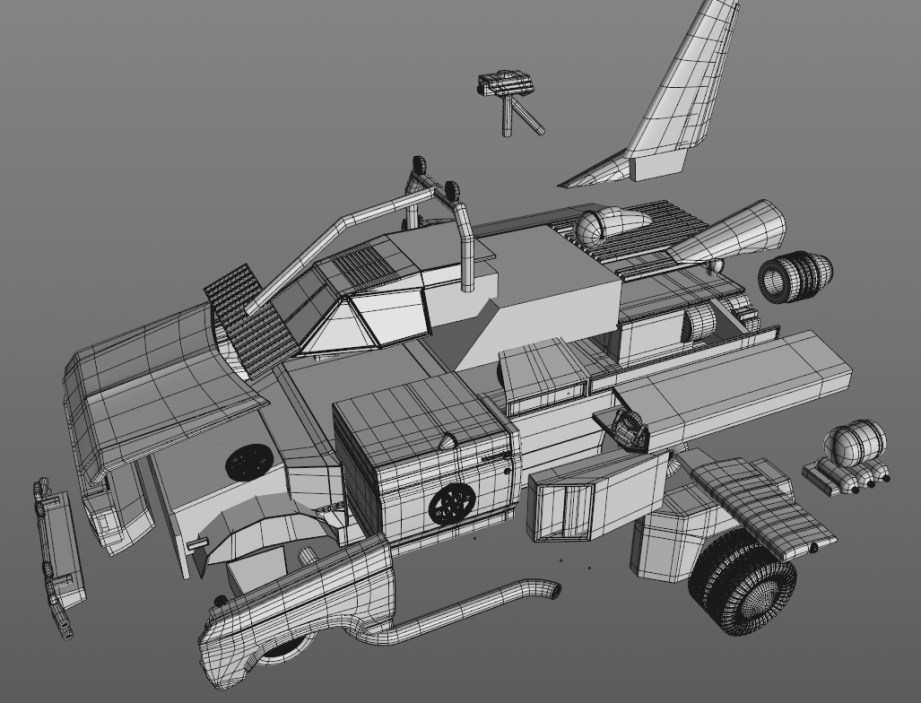
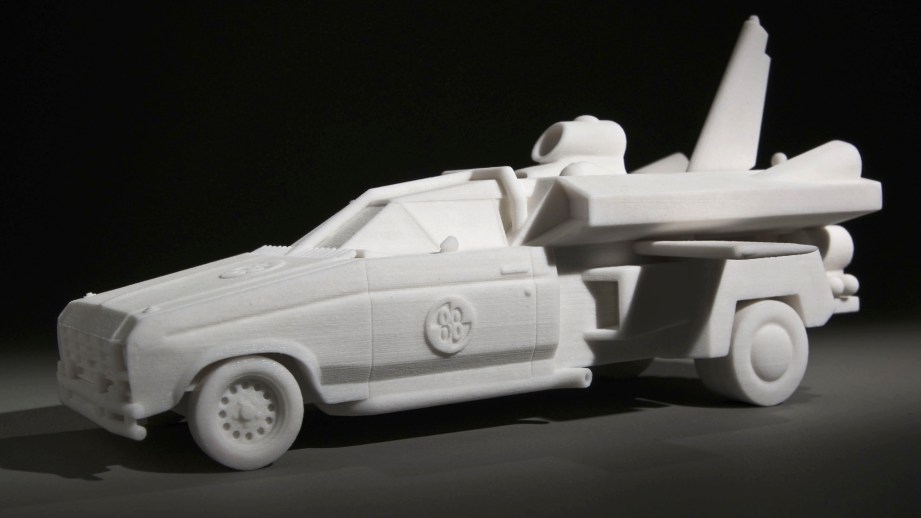
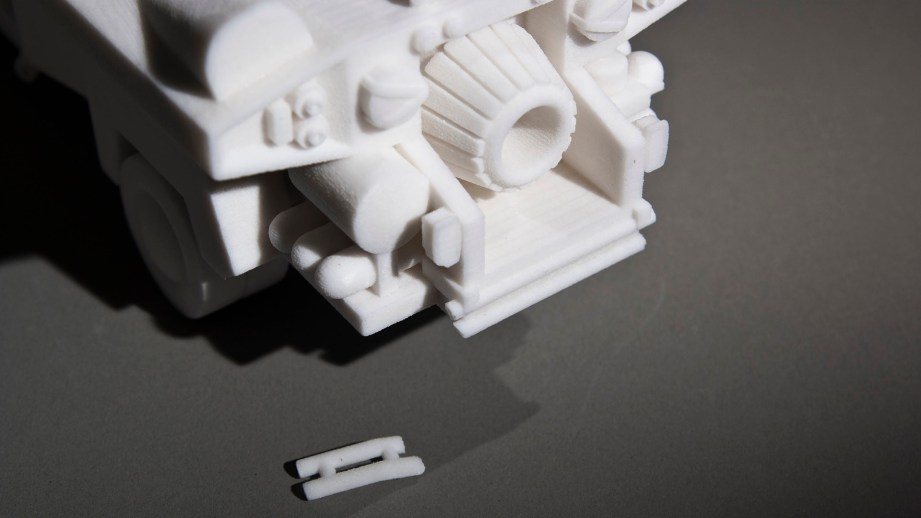
At this point the model was a lot of tires, tanks, doors, jets and other pieces all jammed together which I thought was fine for printing–nope! All the pieces had to be combined into one continous mesh or shell. There are programs out now that will do that for you but just a few years ago you had to do it by hand which took a few hours and a lot of boole functions. Booling assured that there was no stray geometry on the inside of the model and the outside was the unified shell needed for printing. The top tail and the wings were a printing concern, since they are thin and stick out. There was a good chance they would get broken off and the height of the tail could drive the price up, since print bed volume occupied can factor into the cost. To remedy this I removed and keyed the tail and wings to print separately. This also allowed me to have backups if one ever snaps off.
Again, I foolishly thought I was finished, only to discover that I needed to hollow out the model unless I wanted to pay three times more than I should on the print, since it’s calculated by material and mass. Another few hours later, and I finally had a hollow built inside the Jetcar with escape holes in the bottom so loose print material could be removed from the hollow. There is software such as netfabb that will hollow models for you, but it doesn’t always work correctly and you have to buy the software. I haven’t found a good free way to hollow out models other than doing it by hand. In the case of the Jetcar, I simply started with a cube positioned inside the model and extruded it outward until it filled the space inside the car. The model had to have a wall thickness of at least 2 mm to maintain structural integrity so I had to make sure the space I hollowed out met that criteria. Hollowing out the model brought the print price down to about a third of what it would have cost to print it solid. Another good reason to do this is weight–the Jetcar is about 10″ long and weighs a few pounds, a solid print would be ridiculously heavy.
Finally! the model was ready to print. Every printer has parameters such as resolution, how thin walls and details can be and still print, tolerances for mating parts and overall size of the model. I knew I wanted to print the Jetcar at about 10″ so I paid attention to how small the detail parts were and I eliminated or beef up some parts in order to print the model successfully. With all of the booling and hollowing done to the Jetcar it was especially important to run it through mesh repair software to ensure there were no geometry problems.
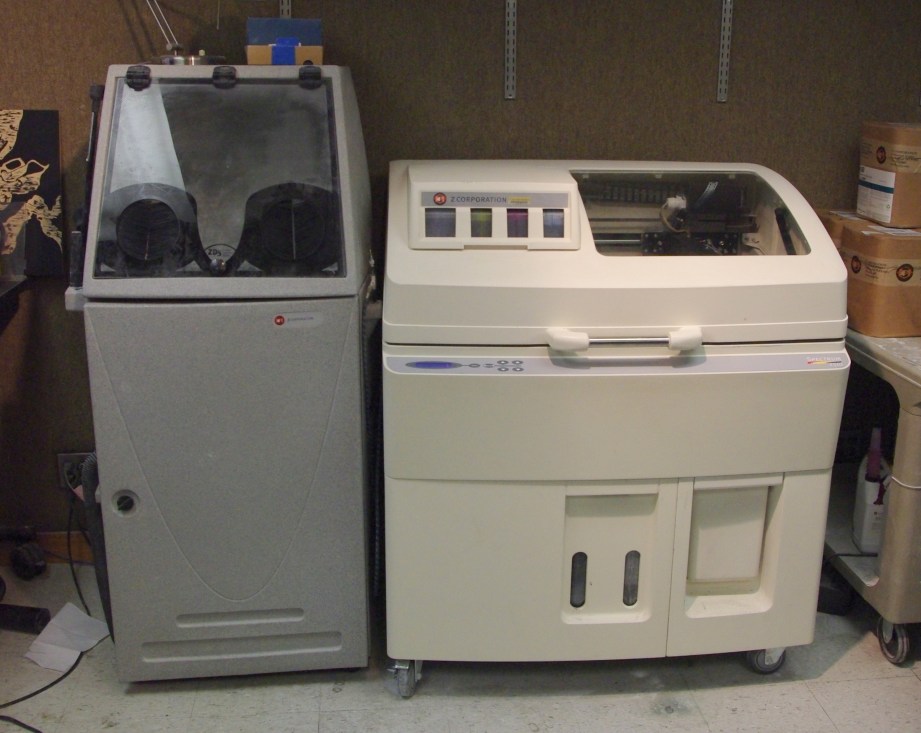
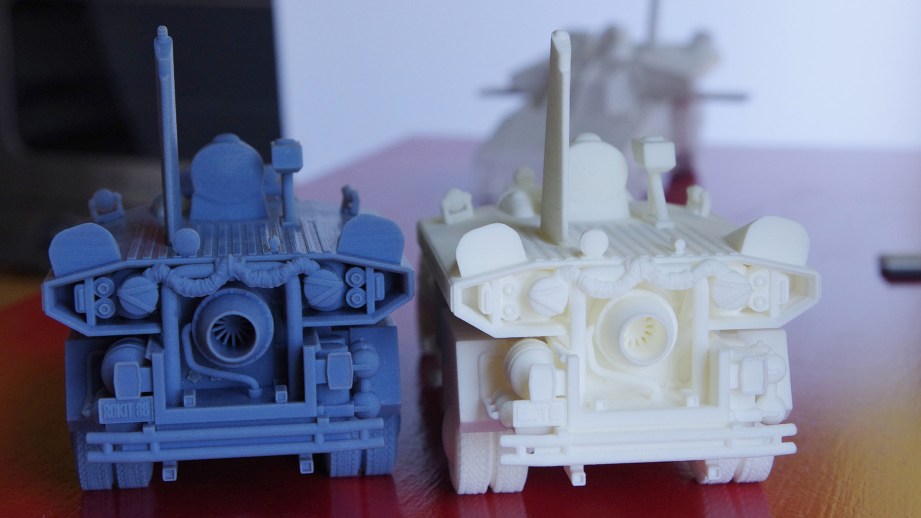
I printed the first version of the Jetcar on a ZCorp (now 3D Systems) Color Jet Printing (CJP) machine that uses a plaster-like powder and can even print in full color. These prints are often referred to as ‘sandstone’ and have a slightly rough finish which reminds me of a sugar cube.
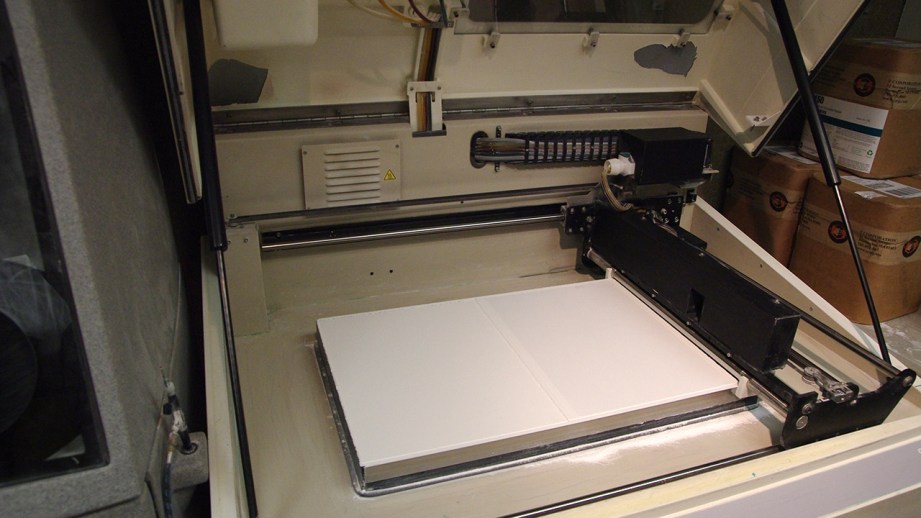
The ZCorp has two bins inside with movable platforms: the left side starts with the platform down and the bin full of powder for printing, the right starts in the up position and empty. The print arm pushes a thin layer of powder from the left bin across the right side print platform and the print head ‘draws’ the model on the powder with a binding liquid. The liquid glues the powder together while any powder surrounding it stays loose and acts as a support material to hold up the rest of the model. The print platform then moves down, ready for the next layer and the supply side moves up to distribute more powder.
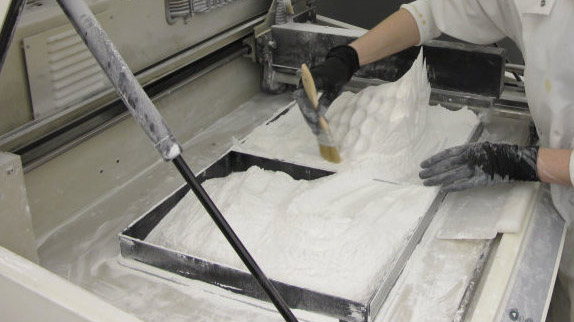
When the machine is done printing the bins look almost identical to how they started – blank white surfaces – the model is buried inside the powder in the print side bin. Now it’s like excavating a fossil, as the surrounding powder is brushed and vacuumed away and saved for another print. The model is very fragile at this point and is left to firm up before being cleaned in a booth that uses air guns to get all the extra powder off and suck it up for reuse.
Finally, the print is covered in what amounts to fancy super glue which binds and seals the model, making it very strong–this is called infiltrating. This can be done by hand with a squeeze bottle or dipped in a vat. The advantages of this machine are the material costs are lower than most others, support material can be reclaimed and reused, and it is one of the few machines to print in full color. Disadvantages are that the resolution isn’t as high as other machines, models aren’t as durable, models require additional treatment after printing, and they’re messy.
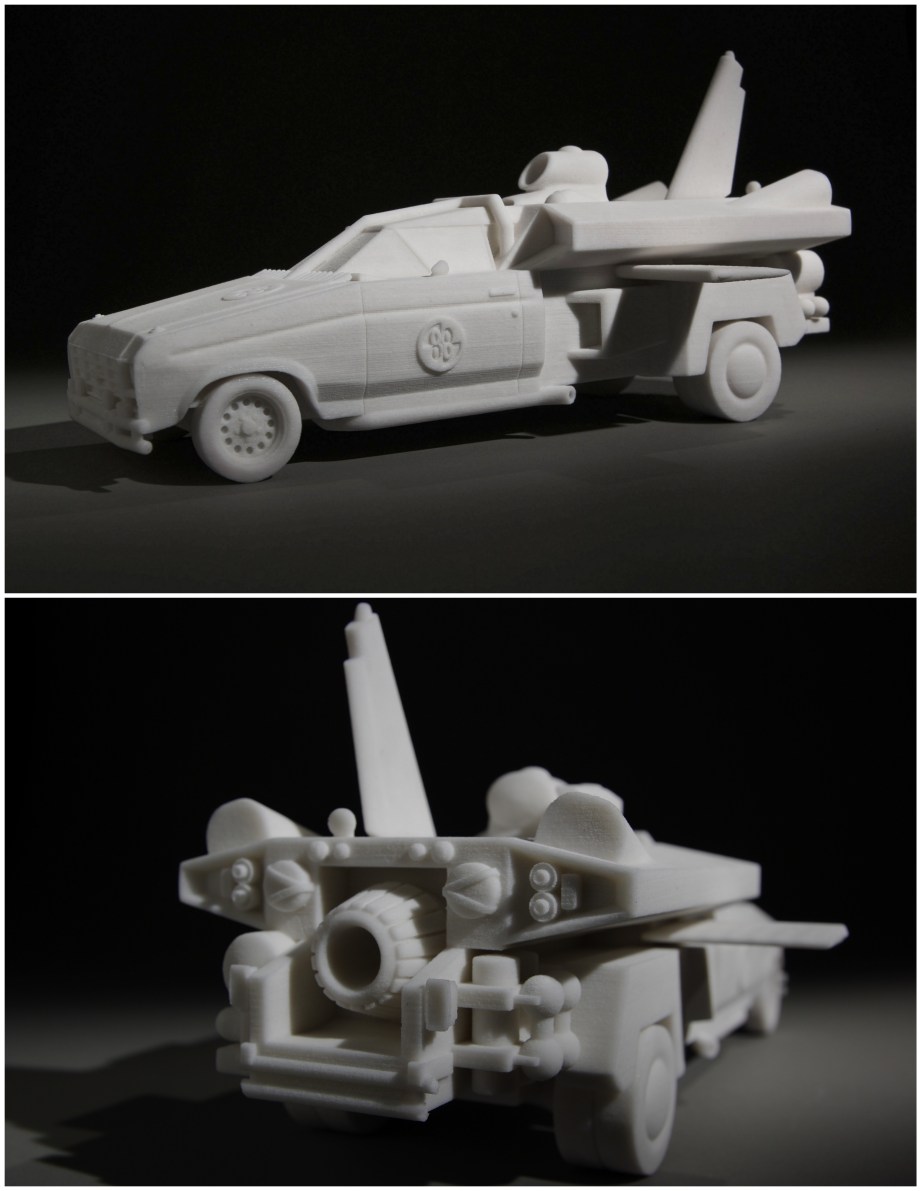
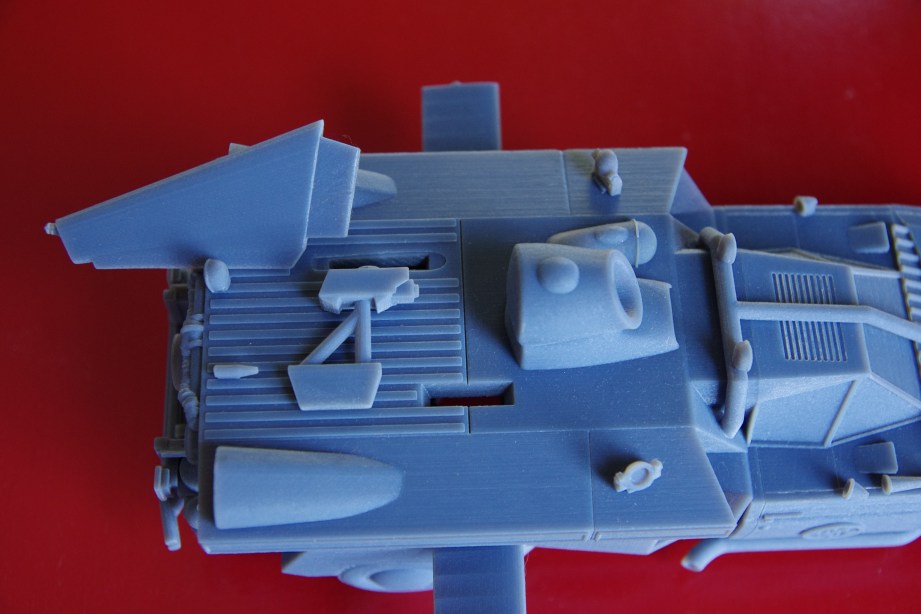
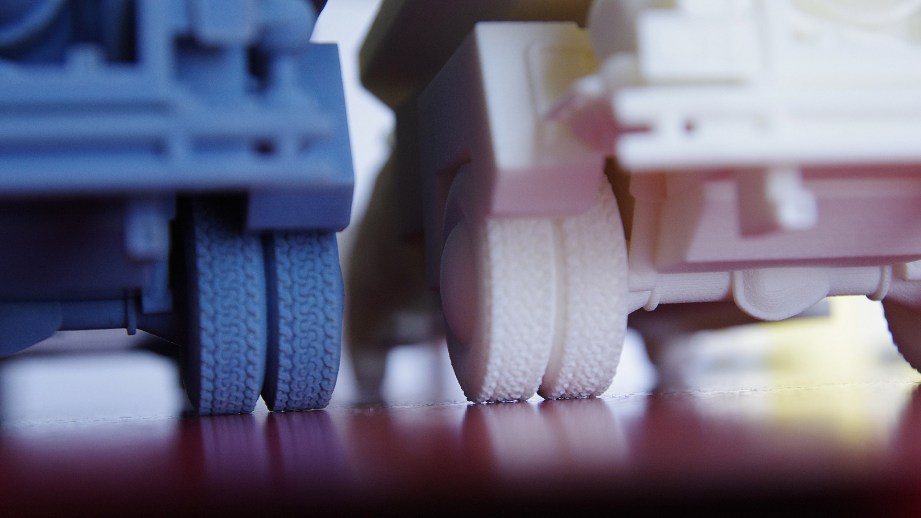
In the end my first 3D print turned out great with only a few problem areas. The rollbar headlights and parts of the bumper weren’t supported well enough, and broke off during excavation from the printer. You can see the ‘grain’ that happens with the prints, mainly on each layer transition and on sloping parts. The resolution and durability of CJP printing have improved a lot since I did the Jetcar and you can successfully print most objects in full color.
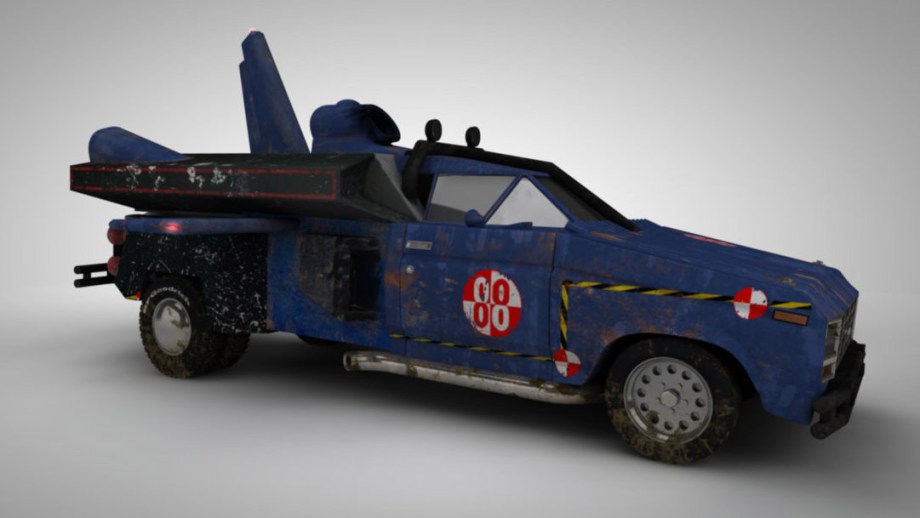
The Jetcar has been an ongoing project and is currently on version 3, I even textured the whole thing although I haven’t attempted a full color print yet. The newest versions have incorporated more detail in an effort to be more movie-accurate.
I have done an SLS print which is laser sintered nylon and has a surface finish similar to the powder print although with higher resolution, better strength and it’s ready to go out of the printer–no infiltrating necessary. The printer can reuse the support material like the CJP but it can not do full-color prints, but single color prints are available. This is Shapeways most popular method of printing due to it’s low cost and durability.
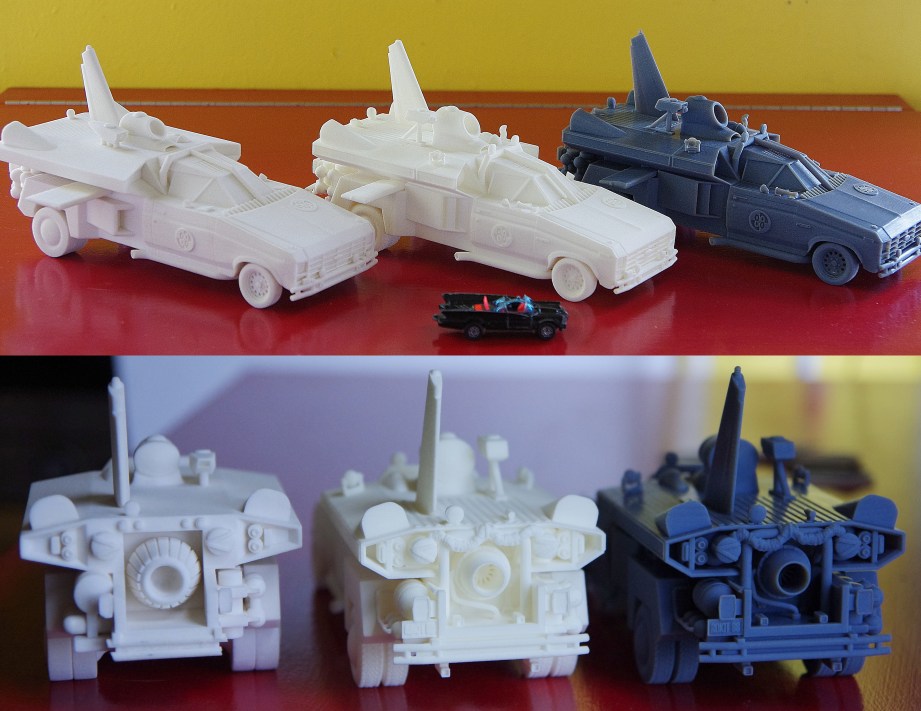
In 2012, the Jetcar was invited to be displayed at the So Far, the Future Gallery as part of Vienna Design Week. I was flattered and put in an order with Shapeways, but it got delayed, and I was forced to get another print done on the Objet at the NYU AMS lab. They saved my butt and the Jetcar made it to Vienna; Dr. Bonzai was proud.
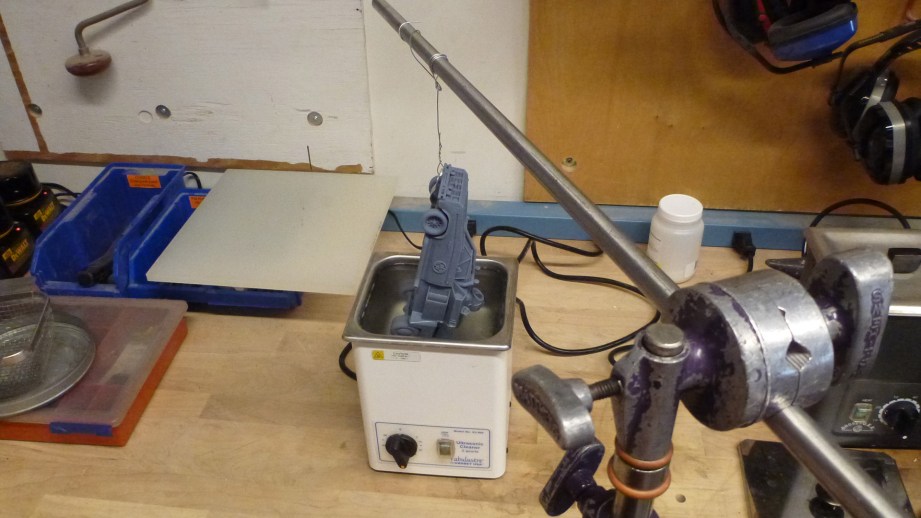
The Objet is a polyjet printer and uses a UV cured liquid resin on a print platform. The model turned out great and it’s nice to be able to compare between the printers. The Objet really shined on fine details such as the license plate and tires which turned out fuzzy on the SLS print. The Objet prints are more expensive and fragile than the SLS prints so care has to be taken. They are also a pain to clean since the support material is a clingy, wax-like material that has to be cleaned off with a water jet and/or a lye bath.
Hope you have enjoyed the journey of the Jetcar! I think there’s still more versions to come–maybe a finished cockpit–and let’s not forget the Oscillation Overthruster! Adam offered up his replica as a guide to model one, and I’m going to have to take him up on that. In the words of Buckaroo Banzai… “Hey – now. Don’t be mean; we don’t have to be mean, cuz, remember, no matter where you go, there you are.”
Every other week, 3D printing expert (and Inventern competition champion!) Sean Charlesworth will share some of his insight and experience of 3D design and printing. All photos and images courtesy Sean Charlesworth unless otherwise noted.
How To Make Your Own Giant Papercraft Head
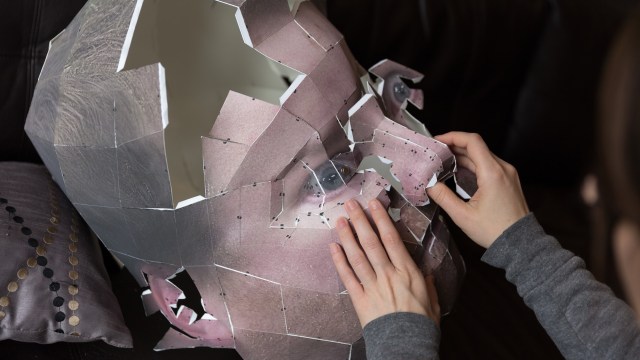
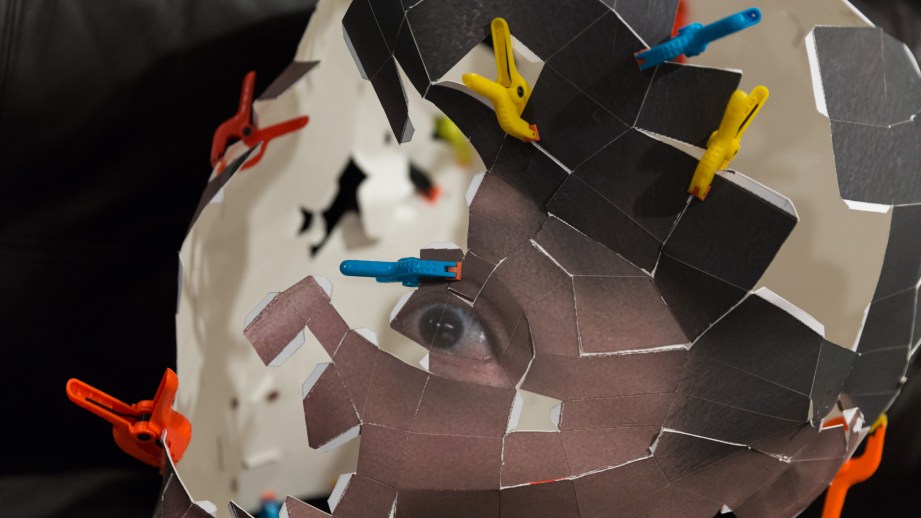
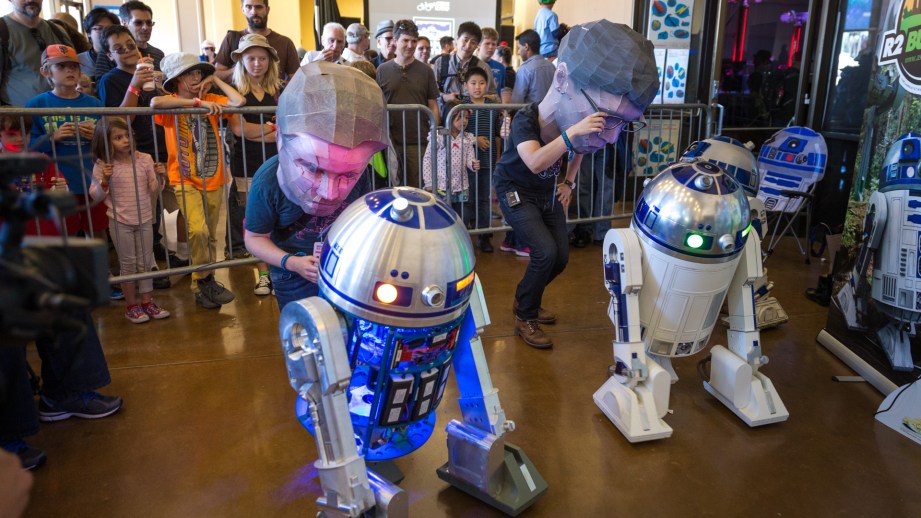
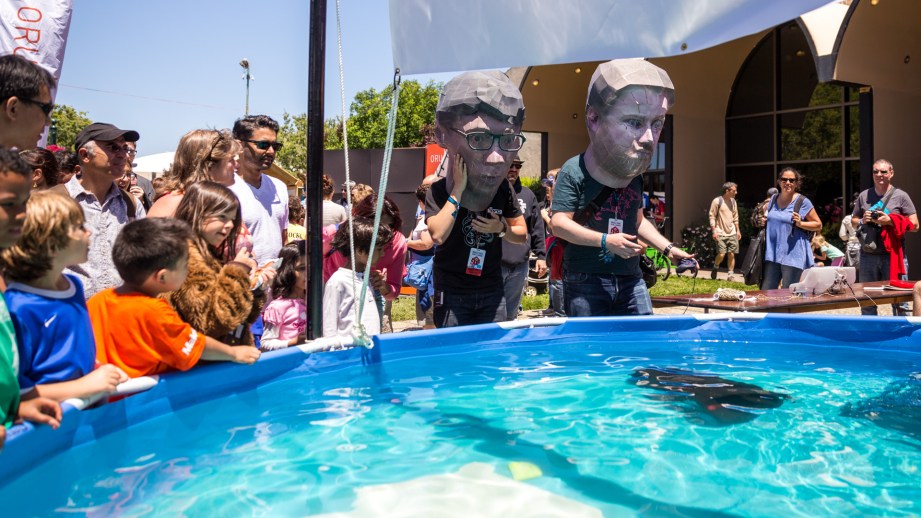
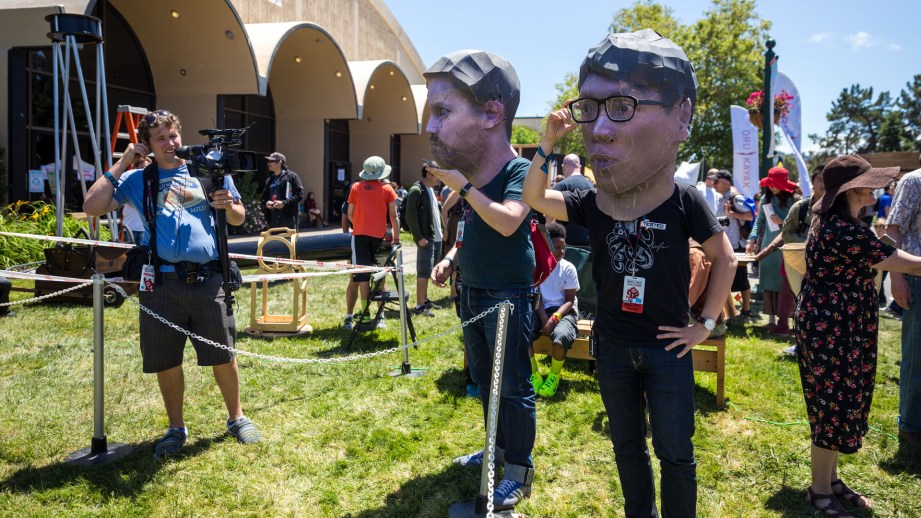
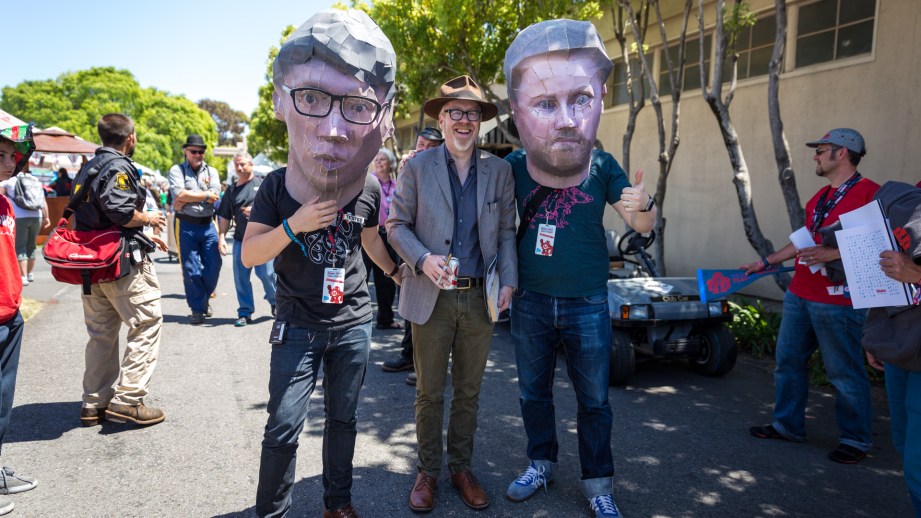
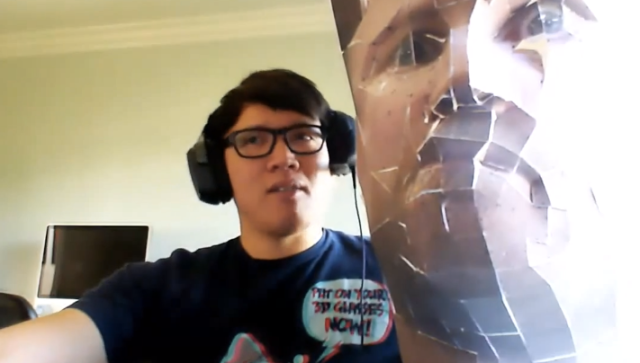
If you saw us at Maker Faire this year, you may have caught us bumbling about wearing big versions of our heads, giving high-fives and confusing children. A bunch of people we met asked what these masks were made of, and how we built them to look so much like our own heads. These paper heads were constructed using a combination of cool techniques and software: photogrammetry with PhotoScan, modeling in Maya, and papercrafting with Pepakura. The heads took about about two weeks to build from start to finish, including several long nights of paper cutting and gluing, right up until the morning of Maker Faire. They were laborious to make, but it’s technically a project that anyone can do without previous papercrafting experience. Of course, knowing what I know now about the process, I would’ve done several things differently to streamline the build. Having just a few more days of time for putting the heads together would’ve gone a long way to making them look so much better, but I think they still turned out great for the first attempt.

So for anyone who wants to build their own giant papercraft heads, I’m going recap the steps of the project from start to finish, guiding you with tips that I learned from time around. Photogrammetry expert Brandon Blizard, who did the modeling work on this project, also has some tips for how to image your visage for use in Pepakura. And for those with more experience with this kind of Pepakura papercrafting, please share your own tips in the comments below.
Step 1: Capture Your Head with Photogrammetry
The first thing we needed to do was get a digital copy of our heads. This could’ve been done a few different ways, ranging from a completely manual process to a fully-automated one. On one end, we could have sculpting a model from scratch in a CAD program like Maya or Sketchup, which requires 3D sculpting skills we didn’t have. This method also doesn’t give us an image texture for our faces. On the other end, we could have generated a computer model of our heads using a 3D imager, like a hand-held laser or optical scanner. 3D Systems makes one, but these tools are generally pretty expensive.
We went with a middle ground–somewhat automating the modeling with photogrammetry. That’s the process of generating a 3D model computed from the processing of numerous photographs, all taken around one subject from a multitude of angles. Photogrammetry apps like 123D Catch would’ve worked for our needs, but we invited Brandon to our office to take high-resolution photos using a DSLR rig to import into a piece of software called PhotoScan.
We’ve previously detailed the basics of Photogrammetry software and hardware along with some best practices for taking your photogrammetry pictures in these guides.
Step 2: Import Your Photos in PhotoScan
After taking the photos, Brandon imported them into PhotoScan software for processing into a 3D model. Some color correcting and RAW image processing may be needed before you can just dump the photos into PhotoScan, and once again we’ve detailed the step-by-step process in a previous project walkthrough.
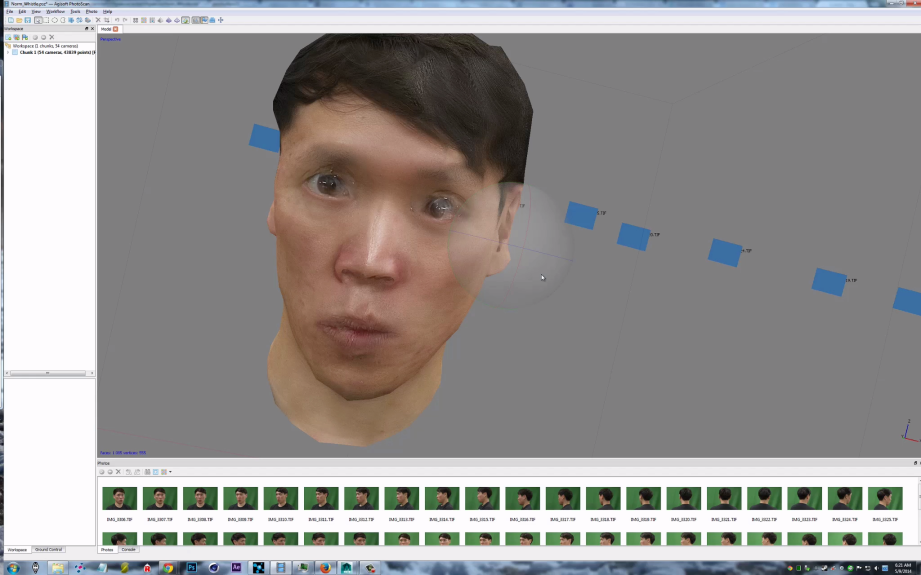
This is probably the most complicated part of the big heads project, though the model you create from PhotoScan doesn’t need to be as refined as something you would use for 3D printing or in animation. The PhotoScan model can be a little messy, since the next step is to basically rebuild that model with fewer polygons using a program like Maya. The model you want to give to Pepakura shouldn’t be more than few hundred polygons/meshes. The more “faces” of your model, the more complex the physical build is going to be. That’s not to say that you can’t put together a papercraft head with 2000 faces, but it’s going to be really difficult, with not much room for error. Fewer faces (~300) reduces the complexity of the papercrafting, and also produces a more authentic low-poly videogame look. Think PlayStation 1 game instead of PlayStation 4.
Step 3: Model Your Head in Maya
Says Brandon: “There are many ways to create a low polygon model that Pepakura Designer can read. I had I started off by taking a series of pictures of Norm and Will, and used a program called PhotoScan that can stitch the photos together into a 3D model. Since there were far to many faces in this mesh, I used Maya to create a low-polygon model, using the high-polygon model as a template. Simple reduce functions will work well, but I wanted a little more control over where the folds would be.”
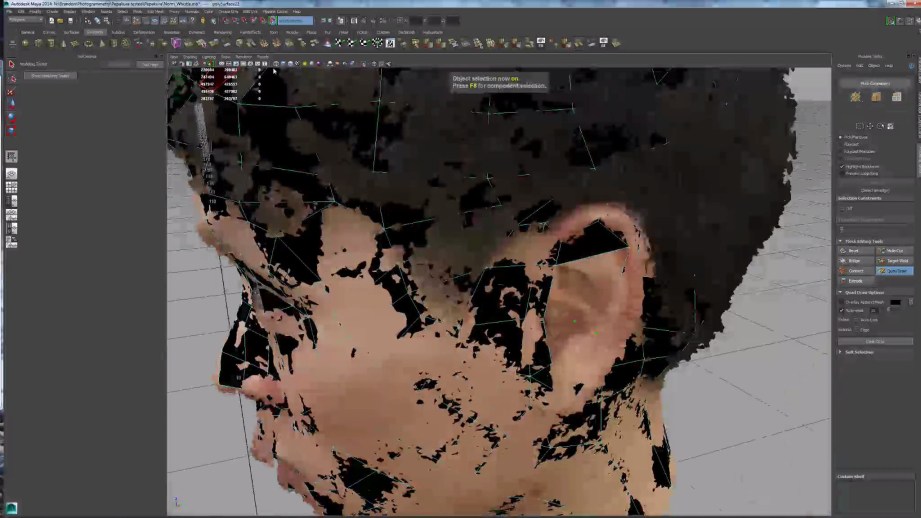
Basically, Brandon had to recreate our heads in Maya, one edge at a time. Some of this can be automated, but it does require 3D modeling experience. Blender can be used as a free alternative to Maya as well.
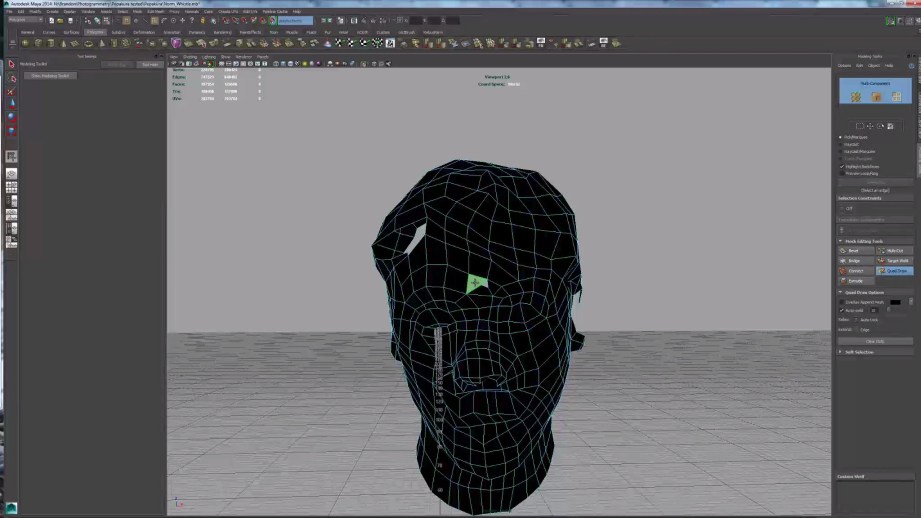
When modeling, keep in mind that every polygon you create is a separate piece that will have to be connected to the others around it when the papercraft is being assembled. The faces can be geometrically any shape–Brandon used three and four-sided faces for his modeling. In other examples I’ve seen, modeling only with triangles can give a better result to work with in Pepakura.
Also recognize that the most important features of your face are your eyes, nose, and mouth. Those are, unsurprisingly, the most complicated to model–every curve and bend you make will add to the complexity of the gluing later. Ears are also surprisingly complex, requiring many folds and bends. Next time, I would simplify the ears and keep their geometry simple, leaving the complexity only for the eyes, nose, and mouth.
Step 4: Tweak Your Skin in Photoshop
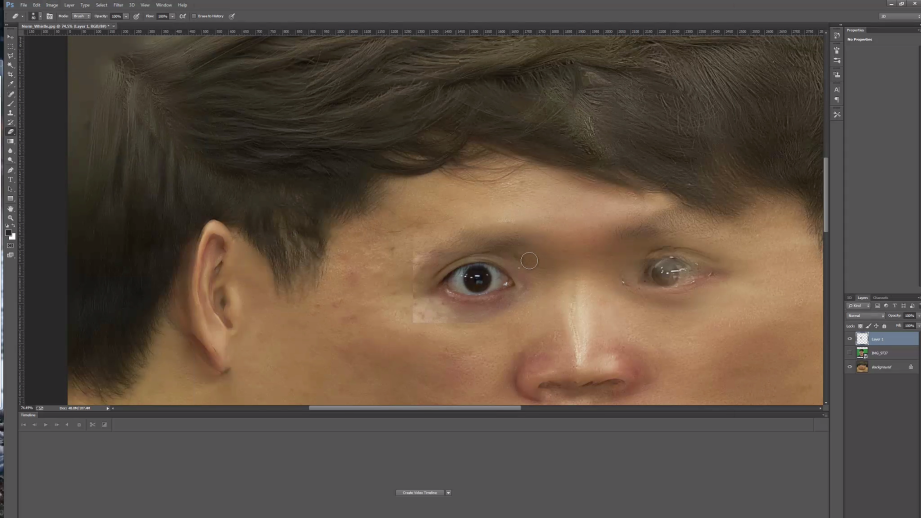
Brandon: “After I created the Low-polygon versions, I needed to apply the photographs to color the models. PhotoScan has a great feature that lets you import a model that you have made in another program, and run the “build texture” command. That takes all the photographs and uses them to automatically build a texture image. Since Will and Norm moved around a just little during the photography session in between photos, their eyes were a bit blurry. I used pieces of the original photographs in Photoshop to clean up blurry features like the eyes and mouth.”
Step 5: Import Your Model into Pepakura
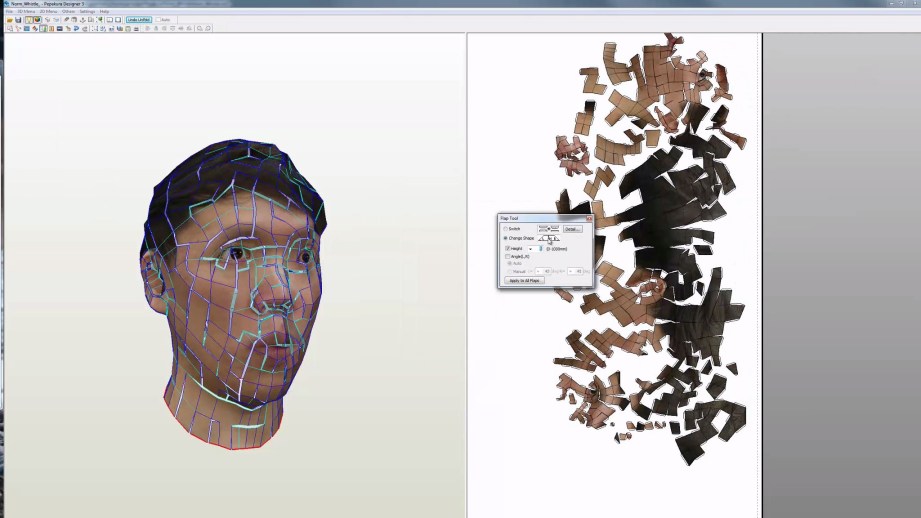
Brandon: “After creating both the model and texture, they were now ready to bring into Pepakura Designer. I scaled the heads in Maya so that they would be the desired size once in Pepakura. I then imported the model, oriented it right side up and brought in the texture file. The unfold procedure automatically splits up the model faces and lays them out on the 2D paper plane, as seen on the right side of the screen. Since Norm was using a really big printer, I could keep it almost all on one big piece.”
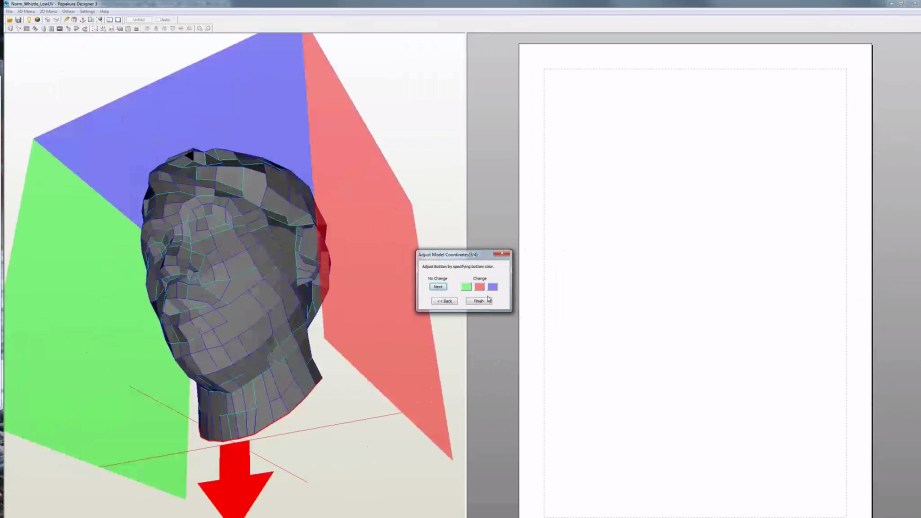
Pepakura will automatically create a small paper tab on one side of each seam, which is used for gluing the edges together. There are options in Pepakura to let you configure the size and shape of the tabs. You can also swap which edge of a seam a tab is on. This is handy when you need that extra few millimeters to fit a piece on a page.
Once your model is flattened on the 2D plane, you can manually cut edges to create new seams, weld them back together, move, and even rotate the pieces. Every piece you weld together is one fewer piece to cut and glue when you are putting the model together.
Brandon: “Try to preserve continuous strips, This will make for an easier time cutting and assembling. Will’s head had 419 faces, while Norm’s had a a bit more at 545 faces. Even though the difference in the numbers is small, each polygon is a bit of work, this can add up quickly to hours on a complex model.”
In the example of my model as seen above, the majority of the pieces were contained to one very large strip, which encompassed part of my face and most of my “hair”. For a future build, I would try to ensure that my hair and neck pieces were connected in one strip, and that the important details of my face–eyes, nose, and mouth–were each isolated in their own pieces. Even though that may mean a larger overall print surface, keeping details like the eyes all together will save a lot of headache later. It was a pain to try to connect half of an eye to one large strip and the other half connected to a strip of nose.
Essentially, break your head apart into logical pieces–neck and back of head, scalp and skullcap, ears, eyes, nose, and mouth. Building those pieces individually and then patching them together later is much easier than mixing them together arbitrarily.
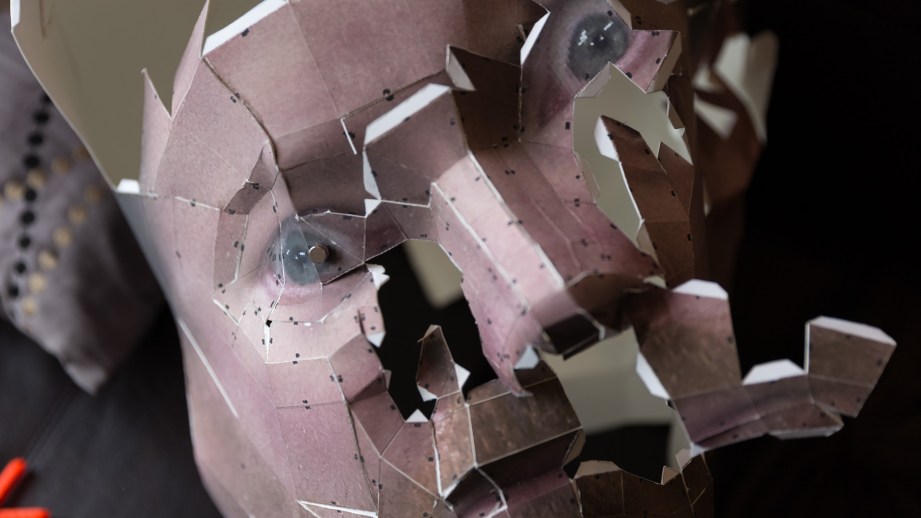
When you export your papercraft pieces, also remember to turn off the numerical matching annotations in Pepakura. These are tiny numbers set along the edge of each polygon, which show you how the edges match up in the construction. We forgot to do this with Will’s printout, which is why it looks like he has little black freckles scattered throughout his face.
Step 6: Print Your Papercraft Skin
As Brandon mentioned, he provided the Papercraft printout as one large sheet, in this case exported as a high-resolution Bitmap, 4000 pixels wide. The standard version of Pepakura doesn’t export high-resolution textures, but the detail in the standard version was just fine for our purposes.

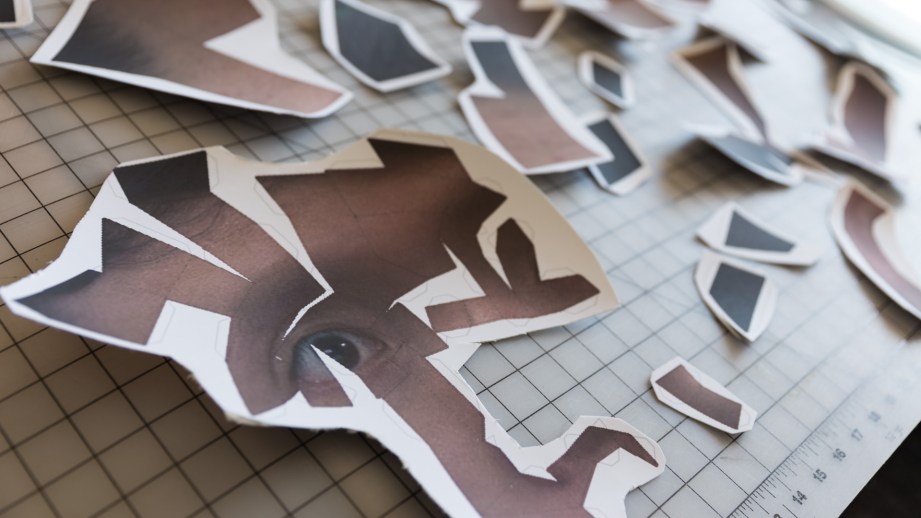
Using the size of my ear in the image as a guide, I manually scaled the image up in Photoshop, using the ruler tool to approximate a size so my ears would be about 7-inches tall. That produced a very large image with low DPI, but again, that resolution is fine for large-scale papercraft. People far away wouldn’t be able to notice the details anyway.
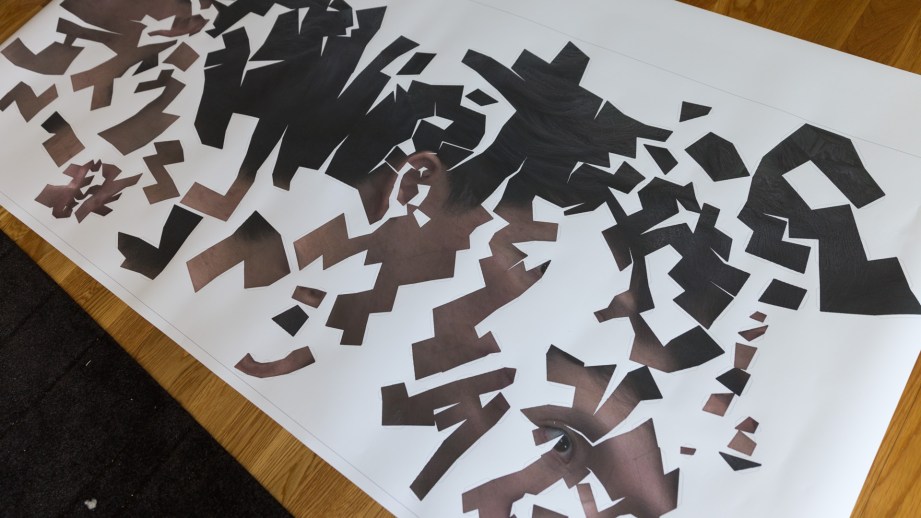
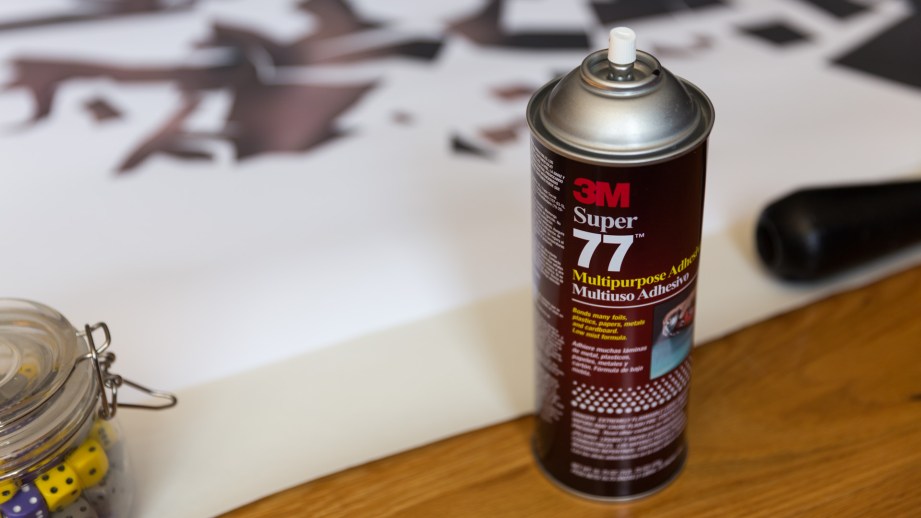
I sent the image to be printed on one giant sheet 36-inches by 80-inches. The printout was the most expensive part of the project, since we did it on short notice at a photo lab. Each sheet cost about $150 to print. The printed sheet looked great and was scaled properly, but the printer paper wasn’t firm enough to be crated into a sturdy head. So the next task was to mount it on a thick sheet of cardstock. I bought a roll of 300 gram/m2 (110 lb) cardstock from the local art store Flax and spray glued the printout on the roll.
Step 7: Cut and Prep Your Model Pieces
After the print was mounted onto the cardstock came the painstaking process of cutting out the pieces. This was done using an arsenal of scissors and cutting blades, on a large cutting mat.
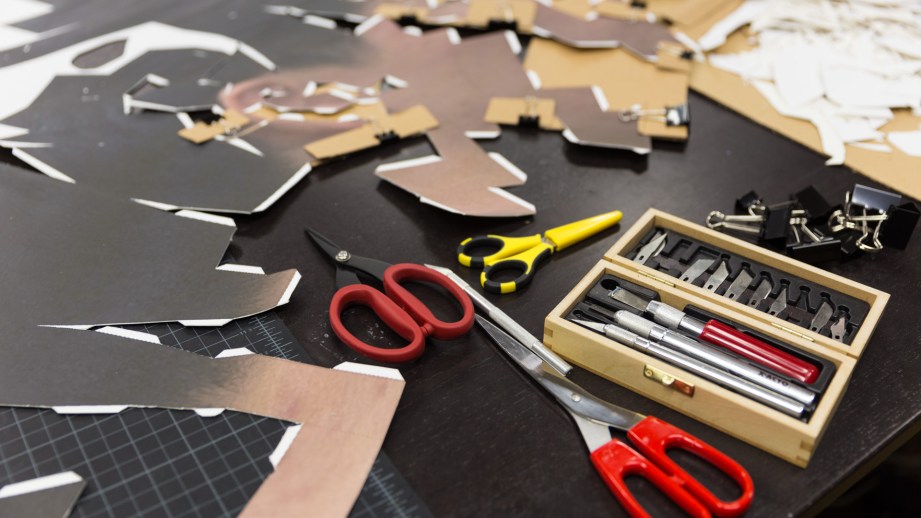
Cutting out the pieces was about a full week of work–there are ways to automate the cutting using equipment like the Silhouette Cameo or maybe even a laser cutter, but I opted to do it by hand.
Once all the pieces and strips were cut out–tabs intact–I needed to crease all of the edges before I could start folding and gluing. In our video, we talked about using a bone tool to crease the edges. This worked well but was pretty slow. In the end, given how thick the cardstock was, I ended up lightly scoring all of the edges using an X-Acto knife.
Pepakura isn’t perfect when it comes to its guides and instructions–there were many fold seams that didn’t show up in the print out. So as I scored the tabs and folds using the blade, I had a laptop in front of me with Pepakura open, as a reference to see which edges needed scoring.
Step 8: Assemble Your Head Model
While the cutting and the scoring were the most time-intensive parts of the build, the assembly was probably the most maddening. I didn’t build a jig or frame to hold the pieces into place, so all of the propping up and connecting was done manually by hand.
To affix the pieces together, I used just regular clear-drying paper glue, also bought at Flax. This is the same glue I used for my Terada Mokei papercraft architectural model kits, which is relatively fast drying and easy to apply with a small brush.
I also kept a small bottle of superglue nearby for gluing very small tabs. The superglue was risky to use because if any of it got on the front of the printout–eg by way of my fingers–it would stick to the printed texture side and tear out that detail. It was only used as a last resort.
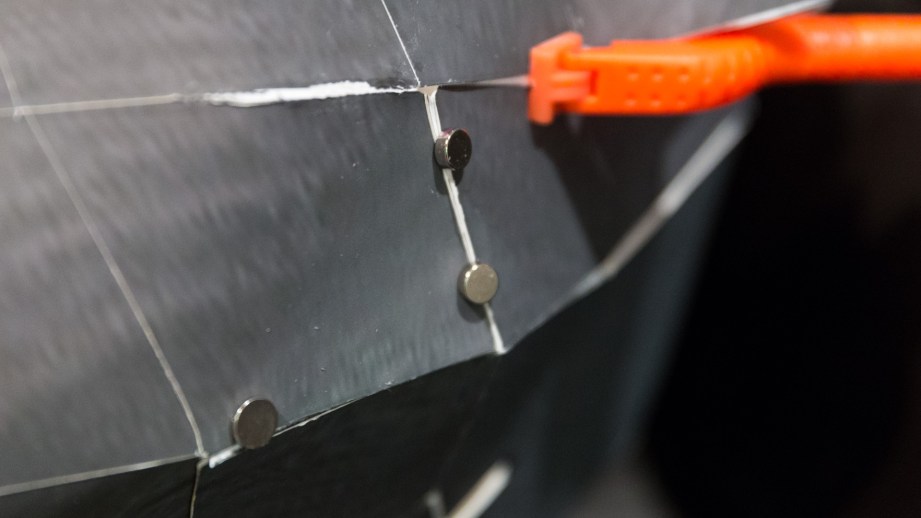
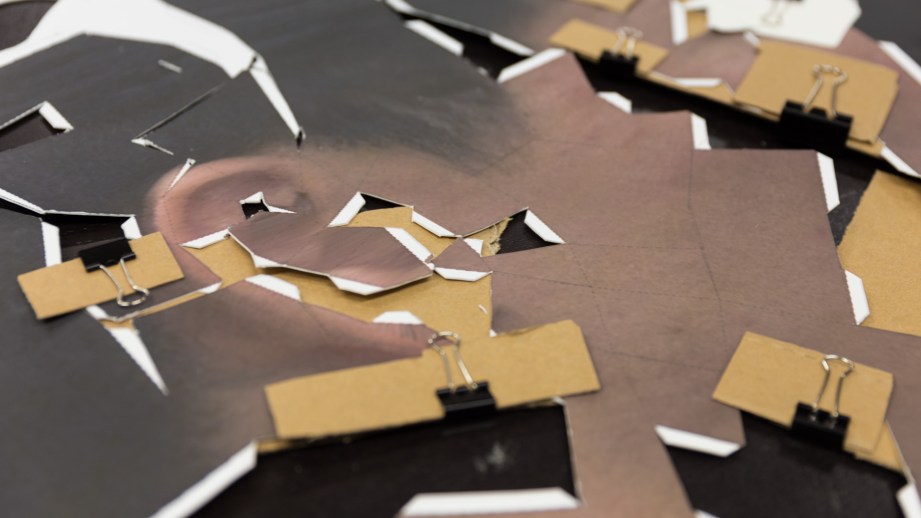
Much of the difficulty in piecing together the head was keeping the pieces affixed in place while the glue dried. To help, I used a combination of small plastic clamps and a batch of strong neodymium magnets to hold the seams together.
I found that the best way to start building the heads was to get the overarching structure figured out first–meaning the hair at the top of the head and the neck at the bottom. Getting that neck ring figured out and clamped together laid the foundation for the rest of the pieces, guiding the folds and showing me how tabs were supposed to fit together. Like with the scoring, I had Pepakura open on a laptop nearby to use as reference.
Not every tab is going to fit together perfectly, and not every fold will be exact. By the end, I had to cut some excess material out of my ear pieces to get them to fit.
I finished by fabricating my eyeglasses out of a sheet of black card stock, eyeballing its shape and size from my own glasses, sketched first on a sheet of printer paper.
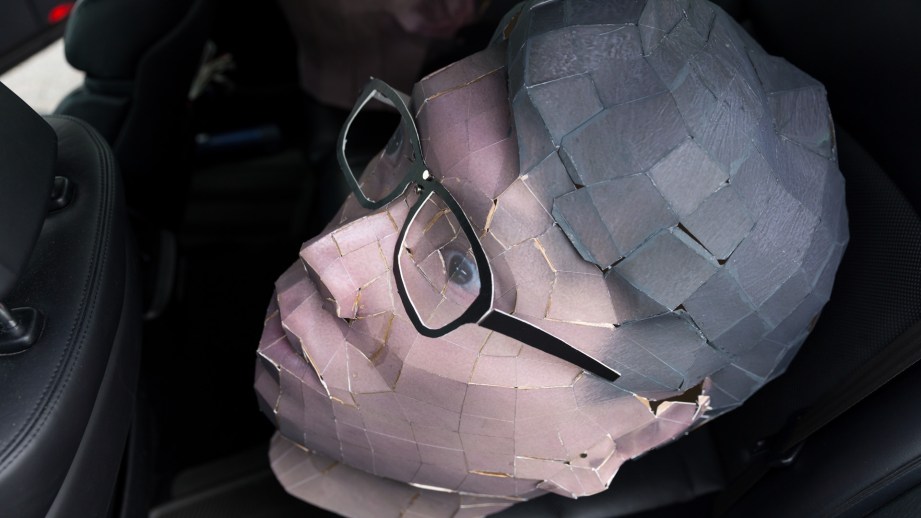
The finished papercraft head looks pretty good from a distance, but you can definitely see the cracks and holes up close. A golden sharpie was used to hide my crimes and fill in the seams on the face texture, while grey paint was applied to the seams in the hair pieces to make it look like one solid paper model.
Wearing Your Papercraft Head
Given the rush to the finish at the end of the project, I didn’t have time to properly make eye holes or structural padding inside the heads for wearing at Maker Faire. The lack of eye holes made walking around difficult, but I was able to see through some of the seams to lock onto nearby objects like Joey in front of me with his camera.
The paper heads also ended up fitting perfectly over our own heads, so that the back of the neck rested on the back of our heads. The card stock was also really light, and it wasn’t hot inside the heads at all–no fans required. The only scare we had was that the heads were still pretty fragile, and even light winds could blow them out of our hands.
But now that Maker Faire is over, I’m going to spend some more time on the heads, fixing up the ear pieces and finding a way to seal the paper with a coat to keep its structure intact. Overall, I think the project was a success, and it was fun rushing from concept to completion in just a few weeks before the event.
Thanks to Brandon Blizard and Danica Johnson who helped me with this project.
Adam Savage, Aisha Tyler, and Chuck Klosterman Talk Nerd Fest

“Adam Savage, Archer’s Aisha Tyler and author Chuck Klosterman talk about excited fans, why they think “nerd culture” has become so accepted, and why being weird means being human.” This is just one bit from the Connecticut Forum conversation that Adam participated in at the beginning of the month. We discussed it on a recent episode of Still Untitled, and the CT Forum have uploaded a few other clips to their YouTube page.
Hands-On with the Onewheel Electric Skateboard
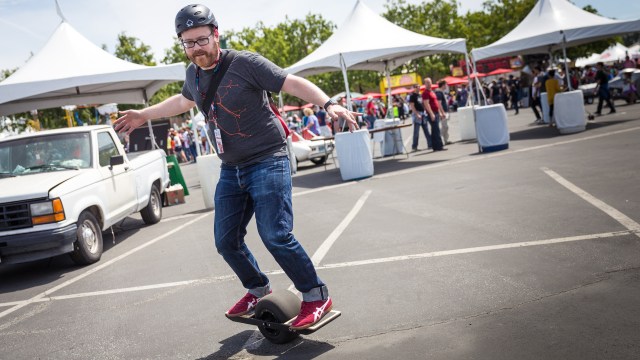
At Maker Faire, we got to try the Onewheel, a self-balancing electric skateboard that uses gyros to and a single motorized wheel to propel you forward or backward. The Onewheel uses a go-kart tire, and attempts to simulate the feeling of snowboarding, but on solid asphalt. Watch to see if we gracefully carve pavement or faceplant in our first test.
Still Untitled – MakerFaire 2014 Keynote – 5/20/2014

Maker Faire 2014: Adam Savage’s 10 Commandments of Making
Every year, Adam gives a speech at the Bay Area Maker Faire. He’s talked about intrinsic need for makers to build things, and how to work smart on projects. This year talk are his 10 tips for makers of all ages–the advice Adam would’ve given to himself when he was just starting out.
My 10 Commandments for Makers
[Editor’s note: Adam has given an address at every Bay Area Maker Faire. In past year, he’s talked about why makers have a need to make and how to work smart when making. This year’s talk was framed around Adam’s top tenets for makers–the commandments he lives by and the advice he would give to makers of any age. The full video is also below!]

1. Make something. Anything. Weld, carve, cook, sculpt, sew. Make something in the world that wasn’t there before. As humans, there are two things that make us truly unique: the ability to use tools and the need to tell stories. Making things is both. Everything made has a story embedded in it. When you make something, it becomes part of your story. Humans are natural storytellers, and when you make new things, you join in the most ancient and important story of all.
2. Make stuff that improves your life, either mechanically or aesthetically. It doesn’t matter which. Nothing cements a feeling of utility than using something you’ve made in the course of moving through life. Make useless stuff too, because that’s fun and fine, but you’ll cement your satisfaction by improving your surroundings.
3. Don’t wait. You can start now with what’s in front of you. As Goethe [may or may not have] said, “Begin it!”
4. Use a project to learn a skill. I don’t know about you but I need a goal to learn a skill. I can’t deconstruct and just learn welding for welding’s sake. I need to have something that only welding will bring me. Look around and find something you need to build. Something you can’t help but build.
5. ASK. Ask for help. People who make things love to share their ideas and knowledge. Makers love to talk about their work. Any husband or wife of a maker knows this is true. Learn how to work well with others and it will give back to you tenfold. Ask questions. Ask for advice. Ask for feedback.
6. Share your methods and knowledge and don’t make them a secret. Take lots of pictures and make notes. Make noise. You will forget key details unless you do. Recognize that no matter how esoteric the build or the process you’re working on, somebody somewhere is interested in the same thing and will benefit from your experience, no matter how young you are. Nobody has the monopoly on being you. No one can steal that. Don’t keep secrets!
7. Discouragement and failure are intrinsic to the process. Don’t hide from these. Talk about them. They’re not enemies to be avoided, they’re friends, designed to teach your humility. Go easy on yourself. Don’t compare yourself to others; go ahead and be envious of others’ skills, because frequently you can’t not. Use that.
8. Measure carefully. Have some tolerance. You know what tolerance is? If something fits tightly into something–that’s a close tolerance. If something fits loosely, that’s a loose tolerance. Knowing the difference between tight and loose tolerance is perhaps the most important measure of a craftsperson.
9. Make things for other people. Nothing feels better than expanding your making beyond yourself. Make no mistake: you make yourself vulnerable when you give something to someone that you made, but the rewards are incredible.
10. And if I could go back in time and tell my young self anything–any specific thing at all–it would be this: Use more cooling fluid!
Premium Member State of the Union + Q&A w/ Will & Norm
We’re here to answer your questions and tell you what we’ve got planned for Premium Memberships. If you’re a Premium Member, you’ll definitely want to check this out.