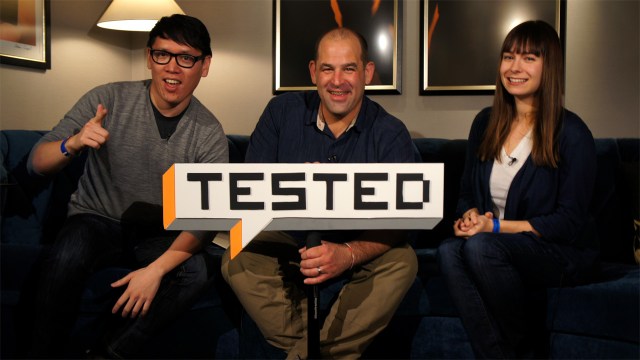
On the final day of CES, Norm is joined by Veronica Belmont and Patrick Norton of Tekzilla to talk about the best things they’ve seen at the show and the perils of shady Vegas hotels. Plus, ice skating! We close out CES with a whole lot of fun!
CES 2013 – Day 3 Recap Show – Now With Audio!

Norm recaps the third day of CES 2013 with special guest Nathan Edwards from the Wirecutter. Norm and Nathan talk about Lenovo’s new laptops, Razer’s Edge tablet, and the PC Build Race. Thanks to Tested user Lee Costigan for cleaning up the audio on these enough that we could post them!
Worklog: Tetris Shelves – Planning, Materials, and Tools
From the very first time I saw someone’s worklog on the Internet, I’ve always wanted a set of Tetris shelves. Tetris shelves are modular shelves, shaped like the standard Tetris pieces, that you can stack in configurations you’d find in the game. Unfortunately, pre-made shelves are expensive, so I’ve never been able to justify spending the money or taking the time to actually build a set. At least, I couldn’t until I had a nursery to decorate.
That’s right, I’m building Tetris shelves for my daughter’s nursery. Before you ask, yes, I know that they’re nerdy. Yes, I know they aren’t practical. Yes, those shapes are going to be pretty tricky to make. No, I don’t have much experience with woodworking. I’ve built some quick-and-dirty shelves before, but I’ve never done any kind of fine carpentry work.
I’m happy to share my plans, as well as the CAD files I created, and I’ve recorded video of much of the build process for a series of posts about the shelves. But, this isn’t a guide that explains the proper way to build a set of Tetris shelves. I’m absolutely positive that I made lots of mistakes as I was building–most were likely harmless, but I did a couple of things that were actually dangerous. I’m just learning the basics of cabinetry and furniture building as I go, so I’m not in a position to teach even the most basic stuff. I’d love feedback from people who have more experience, as well!
This is intended to show you my process as I went about learning a new skill, or set of skills in this case. I did a ton of research, drew diagrams, built CAD files, watched videos on the Internet, and talked to friends, experts, retailers, and even people on Twitter to get advice. Unless something goes horribly wrong as I assemble the last few shelves and finish them, this will likely be a three-part story: Planning, Assembly, and Finishing.
I started on this project without knowing anything. I didn’t know what type of wood to use–whether to use hardwood, a rough composite plywood, a finer plywood, or something weird that I didn’t even know existed. I didn’t know how big I could make them, how deep they could be, or anything about finishing them. Before I started on this, I knew how to work a handful of hand power tools–circular saws, reciprocal saws, and the like–but hadn’t ever really used stationary shop saws, like a table saw or miter saw.
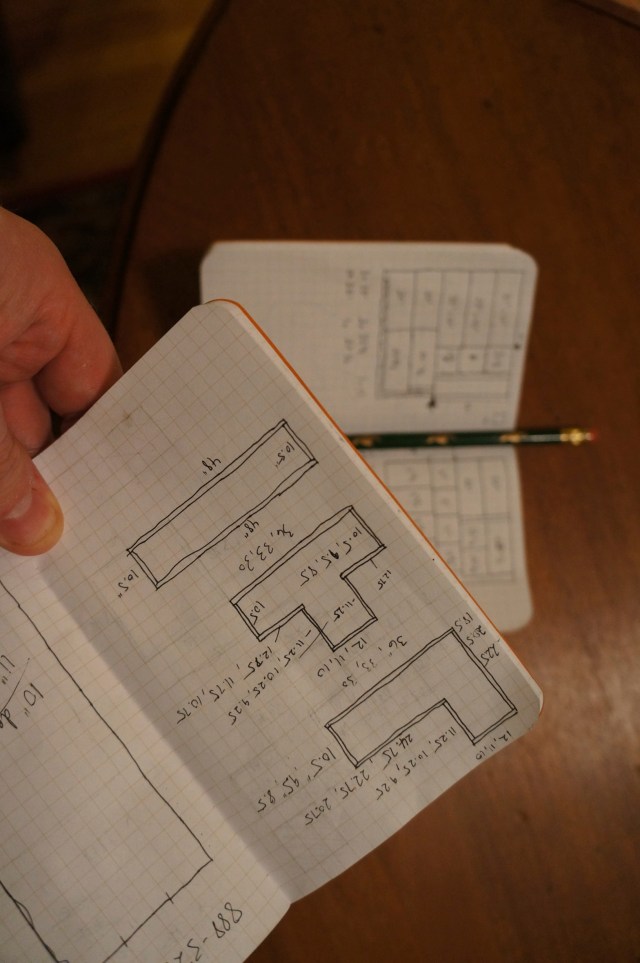
My first step was to figure out the design and pieces I’d need to assemble shelves that look good and can hold a reasonable amount of stuff. In the game, there are seven basic Tetris pieces, called Tetrominos. However, two of the pieces are mirror images of each other, so for the purposes of my design, I only had to figure out how to make five pieces. I sketched each piece, then calculated dimensions at a couple of different scales. After looking at the things we want to put on the shelves–kids’ books, toys, lamps and pictures–I chose an initial scale for the shelves of 12 inches per block.
Sketching this kind of project is why I love grid-lined notebooks like the Field Notes notebooks–they make it easy to make to-scale drawings. I drew multiple ways to connect each joint in the shelves, then selected the ones that seemed to apply stress most evenly in the configurations I thought I’d use.
After I worked out the measurements, I loaded up 123D Design to convert my sketches into 3D models. 123D Design is a stripped down, free CAD software from AutoDesk. 123D Design lets you start your work as a 2D sketch, then extrude it to make it three dimensional. While this wouldn’t work well for more complex models, it was perfect for a set of shelves.
After I built 3D models of each piece, I tried to assemble them in 123D Design, but the software isn’t really designed for that and I wasn’t able to get anything aligned properly. However, because we have access to a 3D printer, I was able to run off scale models of the pieces to see how the shelves would fit together in the real world. If you don’t have access to a 3D printer, you could do the same thing by assembling a model from foamcore, cardboard, or even just cutting paper sketches of your design out.
When I was using the scale models, I realized I’d made a mistake in a couple of the more complex pieces. It wasn’t something that showed up in the CAD assembly, but it was immediately obvious when I tried joining the S and Z pieces to a T. A couple of quick CAD file changes followed by an hour or so of printing, and I was back in business with a design that I was confident would work–if I could assemble it properly.
The scale models also let me physically see different possible configurations for the shelves. Since different Tetrominos require different size sides, once I started cutting my materials, I’d be locked into using those pieces. Once I found a configuration of pieces I liked, I made sure they’d fit in the baby’s room. Finally, I checked out other shelves pretty much everywhere I went to figure out the optimal depth of the shelves. I ended up building 10-inch deep shelves and made each cube of the Tetromino 11 inches.
Materials
Next up was figuring out the right kind of wood to use for the shelves. While I appreciate Jamie’s love of welded square-tube steel, it doesn’t seem appropriate for a kid’s room. Wooden shelves seemed like the smart choice, but I was worried about both warping and the expense if I used solid hardwood, but I was also worried that plywood wouldn’t be sturdy enough to join at the corners. Adam suggested I look at thin-ply plywood, which contains many more layers than typical plywood–13 layers instead of 7 or 8. This makes it both more rigid and less likely to warp for the type of project I’m working on.
Next, I visited the local hardwood store (MacBeath Hardwood in San Francisco, but you’ll likely have something similar in the lumber or cabinetry section of your local Yellow Pages) to see what was available. If you’ve never been to a shop that specializes in lumber for furniture and cabinetry, it’s dramatically different than the lumber aisle in your local Lowes or Home Depot. MacBeath stocks dozens of different species of wood, suitable for any project. At the shop, I asked about the thin-ply and we discussed my project, to make sure it was a good fit. After we looked at a few different types of wood, I ended up going with a 3/4-inch thick, formaldehyde-free, birch thin-ply that was made in the Pacific Northwest. The plywood comes in 4-foot by 8-foot sheets and costs about $110/sheet. By default, the sheets are too big to fit in my car, but the guys at MacBeath said they’d be happy to do a couple of quick cuts so my wood would fit in the car.
Before I was able to buy the plywood and cart it home, I had to figure out what size pieces I needed, and what the optimal way to carve those sizes out of two 4’x8′ sheets of plywood was. After a lot more sketching, I realized that simply cutting each sheet of the plywood into two 4’x4′ sheets would leave me plenty of room to work and minimize my waste. Your project may be different, so if you can’t haul an uncut sheet of plywood, make sure you know where your cuts should be before you go to buy materials. I later learned that I could have paid an outside contractor to pre-cut the sheets to my specifications, which would have been much easier, cost just a bit more than the tool rental, and saved me a day of fairly difficult work. Lessons learned.
The rest of the materials were simpler. After talking to several woodworkers and investigating my options for assembling the shelves on the Internet, I decided use biscuits instead of one of the more advanced joints. While I understand they aren’t the strongest possible option, they seemed like a good balance between joint strength and my rudimentary carpentry skills.
Biscuit joints require that you cut a slot in each piece of wood to be joined. The slots align with each other, and you fill them with wood glue and a wooden biscuit. The biscuit helps you line up the joint and also absorbs moisture from the glue, which causes the biscuit to swell and helps strengthen the connection. The good news is that both the biscuits and the glue are relatively inexpensive–a tub of 100 #20 biscuits (the large ones) cost about $5 and a gallon of Tightbond III wood glue was $30 from Amazon.
To finish the shelves, I am priming and painting them with water-based latex paints and primers. After I get the final coats of paint on (and sanded to my liking), I’ll either add a couple of coats of polyurethane or use furniture wax to seal and protect the shelves.
Now, I have a plan to build my shelves, I know what materials I need, and I just need to round up the tools.
Tools
Going in, I knew I needed a way to precisely make long cuts that split the plywood sheets into 10-inch boards and cut those resulting boards to a perfectly square 90 degrees at exactly the right point. My reading suggested that a table saw was the right tool to make the long rips, while a miter saw would be better to make the precise 90-degree cuts required for the ends. I shopped around to price out entry level tools, and quickly realized that I didn’t want to spend $500 to $1,000 just on tools.
Then I looked at renting shop space for a day to do the rips and cuts. Unfortunately, that wasn’t practical without a good way to haul the wood. After the plywood was cut, I had just under 90 board-feet of wood to tote around, which seemed like a bad idea.
After consulting the Yellow Pages and talking to some folks at equipment rental places, I found a place that rents power tools by the day: Action Rentals. For a single day, I was able to rent a 12-inch sliding, compound miter saw and a 10-inch table saw for about $60. While that meant I needed to get all of my cutting done in a single 24-hour period, it was doable, with good planning. While both saws were well maintained, neither saw’s blades were exactly right for what I wanted to do. I ended up visiting Lowes and bought a couple of new blades more in line with my project. I only ended up using one (I returned the other), but I didn’t want to ruin $200 worth of lumber because I didn’t have the right blade for a rental saw.
While I’m sure there are multiple other ways to cut the holes for biscuits, I was able to borrow a plate joiner to simplify the task. A plate joiner is a specialized saw with guides that make it difficult to mess up your cuts and a plunging saw blade that cuts a slot that’s the appropriate shape for standard sized biscuits. Typically they run $180-$200, so borrowing one saved me a ton of money.
As frequently gets you in this kind of project, the assorted other stuff adds up. Luckily, I already had an orbital sander and ShopVac, both of which will be massive time savers. I have a circular saw to do rough cuts when I’m breaking down the big pieces of plywood, and I have plenty of brushes and painting supplies. I already had a respirator to use while sanding and safety glasses, to wear pretty much all the time.
What I didn’t have, were clamps. At first, I thought I could make do with a handful of corner clamps and a C-clamp or two, enough to do two or three joints at a time. It quickly became clear that I needed to clamp both sides of every single joint on a piece simultaneously, and the pieces needed to be clamped in place for at least 12 hours each. That meant I needed 16 corner clamps, unless I wanted each piece to take multiple days. Even at $7 each for the cheap clamps, clamp costs added up quickly. I’m sure I’ll use them for something else in the future, but Spending $150 on clamps was kind of a bummer.
So there we are. At this point in the process, I have plans, materials, and tools. I’ve spent about $270 in materials, $150 on clamps, and $60 on tool rental, but more importantly, I’ve spent 30 hours sketching, making CAD models, and printing scale models and another 10 or so watching instructional videos and reading about techniques and materials. Now it’s time to put what I’ve learned to the test and start cutting, gluing, clamping, and sanding. Next week, we’ll talk about actually breaking down the plywood, cutting biscuit slots, gluing the shelves together, and figuring out the right way to clamp corners. In the meantime, I’d better get back to my sanding.
Part 2 of the Tetris Shelves Worklog is up. There’s video and even an animated GIF
CES 2013 – Day 2 Recap Show – Now With Audio!

Norm and special guests Roberto Baldwin and Christina Bonnington from Wired Gadget Lab discuss the new products and technologies they’ve seen from the show floor at CES 2013. Thanks to Tested user Lee Costigan for cleaning up the audio on these enough that we could post them!
Autodidacticism – 1/8/2013

My First Car and The Courage to Try

I found this photo a few weeks ago. It’s me in 1992, shortly after moving to San Francisco. I’m 25 and that is my first car, a 1978 Volvo 245DL. Great vehicle. I could fit a 4-by-8 sheet of plywood in the back. I painted those clouds on it because I thought it would look awesome — and also because I had bought a crap-ton of lacquer spray paint before a California ban went into effect, and it was going bad.
I was living pretty hand to mouth in those days, and Volvos can be expensive to maintain. So in addition to being a canvas, this car taught me about auto repair. More important, it taught me how to parse complex systems, a skill that’s been essential in every professional environment I’ve found myself in since.
In theory, cars are fairly simple. If they don’t start, it’s either the fuel system or the electrical system. Teach yourself about the path of each in your engine and tracing it is fairly straightforward. But at the beginning, mastering each new system seems like an unreachable shore. The car is effectively a black box.
I bought not only the simplified consumer repair manual for my Volvo but also the shop repair manual. I’d compare the two until the system in question made sense. That’s the method I used to learn how to replace the wiper blades (don’t laugh — it’s everyone’s first repair), spark plugs, and oil, and eventually how to fix things like the window motors and driveshaft. I was terrified of the brakes. But when the shoes wore down, I replaced them. I swore I’d never attempt to bleed the hydraulic system. But when I found out that a new master cylinder for the brakes was going to cost hundreds of dollars, I learned how to do it.
Every repair followed the same progression: (1) I don’t know how, (2) I can’t afford to pay someone else to do it, (3) I have to do it, (4) hey, that wasn’t so hard!
Whether it’s the experiments on MythBusters or my earlier work in special effects for movies, I’ve regularly had to do things that were never done before, from designing complex motion-control rigs to figuring out how to animate chocolate. That car was a vital step in developing the courage to tackle these sorts of projects. Knowing that even dauntingly complex challenges can be broken down — that there’s a huge difference between not understanding something and not understanding it yet — is powerful mojo.
Photo credit: Daniel Salo, Wired.com
(This post originally ran on Wired.com in November 2012)
CES 2013 – Day 1 Recap Show – Now With Audio!

Join Norm and the Tested crew as they recap the first day of CES 2013 with special guests Florence Ion and Casey Johnston from Ars Technica. Topics include press conference announcements, 4K televisions, and 1080p smartphones. Thank to Tested user Lee Costigan for cleaning up the audio on these so we could post them!
CES 2013 Day 0 Recap Show – Audio!

Maker Profile: Chris Barton’s Prop Restoration Work
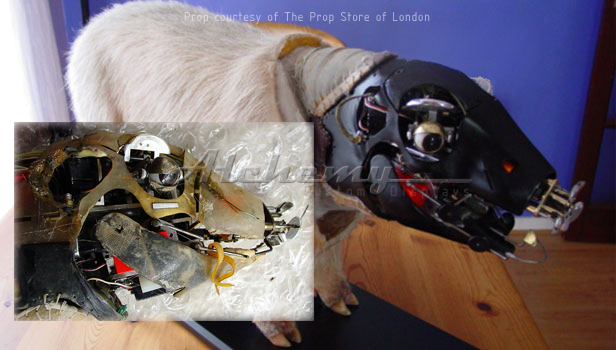
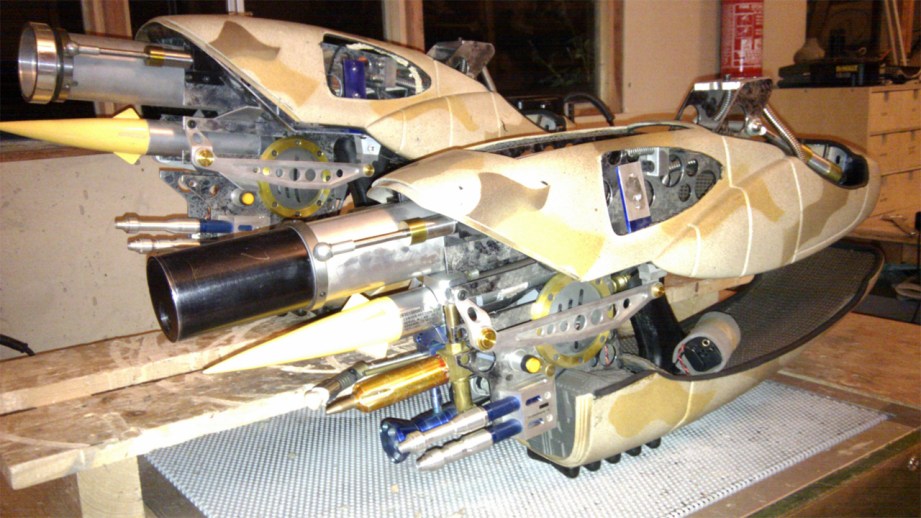
One of the things we’ve learned in the past year from our conversations with prop makers, collectors, and replicators is that props made for the silver screen don’t really hold up in person. For a variety of reasons–budget and time included–an imaginary science fiction rifle or robot built by the prop department for a movie just has to look good enough on screen to impress audiences or be enhanced with computer generated graphics later. And when these props are pulled from storage and acquired by collectors later on, they might be in even worse condition.
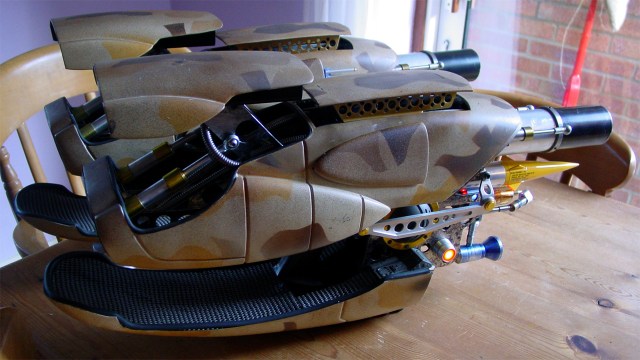
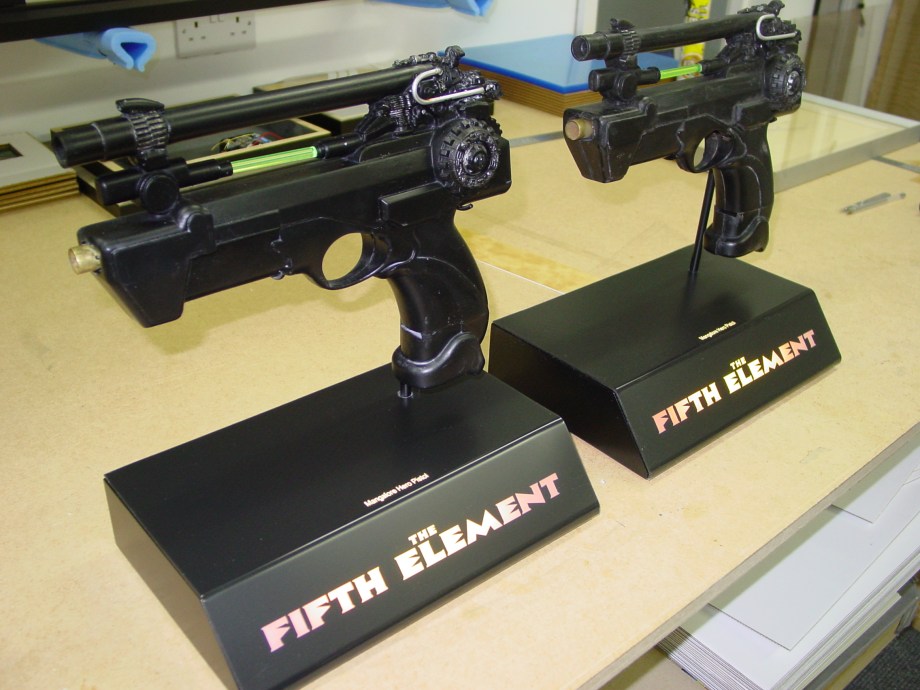
So who do prop collectors and resellers turn to when they want to bring back to life an animatronic Mangalore head recovered from the production of The Fifth Element? A professional prop restorer, it turns out. Chris Barton is one such restorer–he’s an ex-prop maker that runs Alchemy Custom Displays, a UK-based shop that restores props and creates custom display setups for collectors to show them off. When Prop Store of London came into possession of two Zorg ZF-1 rifle props, they went to Chris to refurbish them and replace components that had been lost ten years after the props were originally made.

I spoke with Chris about his career in prop-making and how he adapted his skills building animatronics into a job restoring old props for those who want a piece of movie history exactly how they remember and imagined it.
What’s your background in prop creation? How did you get started making props professionally?
In the late seventies and early eighties I became really interested in movie special effects, and the release of The Dark Crystal really opened my eyes to what could be achieved. Disillusioned with my job as an art director in advertising, I decided to try and get a job in the UK film industry, so in 1985 I wrote to Jim Henson’s Creature Shop in London, and was asked to go in for an interview. This was quite a heady time in the UK film industry as films like Aliens and Little Shop of Horrors and Legend were in production. To cut a long story short, two years later I got offered a trainee animatronics position on The Storyteller TV show.
At Henson’s I worked on Teenage Mutant Ninja Turtles, The Witches, The Flintstones and Babe amongst others. After Henson’s, The Fifth Element came next, followed by The Phantom Menace and the Harry Potter series – on all of these films I was involved in the mechanical design and construction of the various creatures. It was a fun time!

Where did you learn your skills? What materials do you typically work with, and what tools do you use in your shop?
As anyone who has worked in the FX industry will tell you, you learn something new on every job. Typically in animatronics every new creature is a first, and though things like eye mechanics and the like are broadly standardized or have a common approach, there is always that initial period of “How are we going to do that?!” As you gain more experience you get better at knowing what the best approach will be… at least that’s the hope!

The construction of a prop or creature can use just about every material going, though fibreglass is perhaps the most common component of a prop, though if it’s a creature then silicon rubber or foam latex is the major material. As such I have to be able to handle everything from steel through to gold leaf, MDF board to oak, rubber skins through to real hair – the list goes on and on. I don’t use any particularly specialist tools, though I do have access to a milling machine and lathe for when parts need machining.
You’ve worked on films such as the Fifth Element and Star Wars building props. What were some of the props you were responsible for and how did you go about building them?
Every film I worked on, I was employed to do animatronic mechanical design. In my time I have been lucky enough to have been involved with the building of, amongst others, Yoda, Kermit the Frog, Mondoshawans, Hagrid the Giant, Dino from The Flintstones, Mangalores, Aragog the giant Spider, Nimodians and Mad Eye Moody. For the build, the script is always the starting point naturally, then the contributions from the director and the various department heads involved. It’s then just a question of coming up with an approach that satisfies all those needs, then adapting and developing them–or starting from scratch again)–as the script and budget requirements change.
How did you end up specializing in creating display bases and stand-ups for prop collectors?
A few years ago I visited the Prop Store and met Stephen Lane, the founder of the company. As it happened a couple of weeks later they acquired one of the many animatronic pigs from Babe, which was in a pretty poor state, so Stephen gave me a call. I took the job on and refurbished the mechanisms, installed a servo controller card so that the head would operate at the touch of a button and mounted it all on a base – and that was the start of what has become a long relationship between myself and the Prop Store. To date I have handled hundreds of displays and refurbishments for them, and of course for many other prop collectors, as the years have passed by.
Your current job brings you in contact with some props that need restoration work. Let’s talk about that. What condition are props in when they come to you?
As you might expect it varies, some are absolutely mint, where as others look like they have been pulled through a hedge backwards. It’s not uncommon for an older prop to be reused for another production, which invariably means someone has slapped a load of paint all over it. Some props have just been sitting at the back of a workshop for years and consequently are filthy with grime and dust. The foam latex used for make-up and creature skins is often in a pretty poor condition, due to the rubber perishing from exposure to sunlight, and the more recent trend of using silicon skins also brings its own set of problems, where the silicon oil leeches out of skin, which in itself can also stretch and distort. On the whole though, most props are well cared for, and are usually in reasonable condition.
What’s your goal in restoring a prop–making it look like the original, like it appeared on screen, or as it was originally built? Where do you feel you’re allowed to take some creative license?
The client often has very firm views on how they want the piece restored. There is often ‘history’ in the condition of the prop, which while it may not be regarded as being as it was when filmed, nonetheless is deemed to add fidelity to the piece. By the same count another client may want the prop restored exactly to its original condition. Either way it can be quite a challenge, and ultimately my aim is to make any restoration work I do as unnoticeable as I can. In fact there is little or no creative license with prop restoration, but that is made up for by the creative freedom to come up with an imaginative display that hopefully enhances the piece.
Where do you go for information when researching a prop restoration? Do you ever contact the original prop builders for details?
The internet and DVDs! Often there is literature, such as a ‘coffee table’ book or magazine (I have most copies of Cinefex, which has been a very useful resource for older films). The Prop Store has a vast library of films and software for screen grabs makes the process very easy to get stills. It can be very hard to reach out to the original prop builders, simply because there is very often very little or no information as to who they were. Obviously a piece that has been built recently can make the original makers easier to find, but many older props can only be attributed to Department Heads at best.
Can you describe the process of the Fifth Element ZF-1 restoration?
The ZF-1s came to me from the Prop Store. They had acquired a pair of them, just two of the many made for the film, and the brief was to refurbish them to their original state. These particular guns were (very broadly) the flame thrower and the dart/net firing versions. They were in good condition but lacking in a few parts. As luck would have it, the total parts between two of them provided a complete gun, so it was just a case of molding/casting and fabricating the missing components. The entire ‘freezing’ nozzle assembly for example was missing on one of them, so it was just a case of machining the new pieces to match exactly.
I took silicon molds of a number of panels and laid up new ones in fibreglass. Again, having a given part absent on one gun and being present on the other, made it much easier, as there was little or no guesswork involved in making up replacement pieces. It’s quite a well known problem, to guess the size of something from reference with no scale to hand, as many model builders of replica props would no doubt agree.
The biggest challenge was the art finish on the new pieces–the new panels in particular had to blend in seamlessly with the original painted pieces, so trying to deconstruct the paint layering in the camouflage patterning was quite a task. Once the technique was solved, it was then down to matching the coloring. This sounds sort of easy, but it was a flipping headache. T
he final process involved spraying a base layer, then two (matched) patterned layers, with two ‘splatter’ layers between them–five different paint colors in all. The barrel was missing from one, so I cast another–this then had to be painted to match the black anodized scratched original.
In general I was pleased the way they turned out, and now looking at the photos of the pair, I find it hard to discern which parts are original, and which are facsimiles.
Getting access to rare props like the ZF-1 lets you cast molds that prop replicators would love to get their hands on? Is that allowed in the prop building community, or is that property of the prop owner/collector or even production company?
This is an interesting question, and a bit of a grey area. Pulling a mold off a prop takes time and money, so unless it’s part of the restoration process I don’t bother. Broadly speaking, while I always store the molds I make, to my mind, they remain to some degree the property of the respective client. I haven’t yet been approached about providing molded parts for replicas by anyone, but would, under that circumstance refer to the client, who may or may not be happy to let casts go. The production company aspect hasn’t affected me so far, not least for the fact that many production companies fold after the release of the film or show.
What are some recent restorations or custom display bases that you’ve worked on?
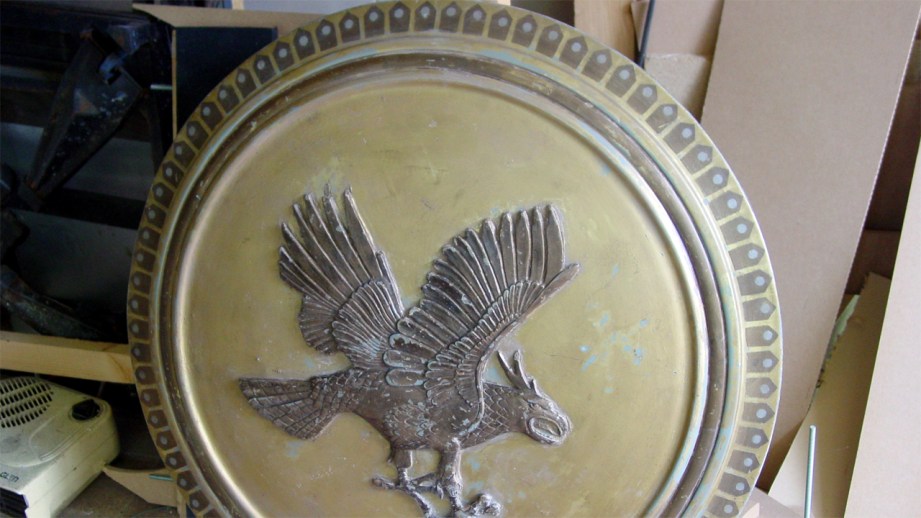
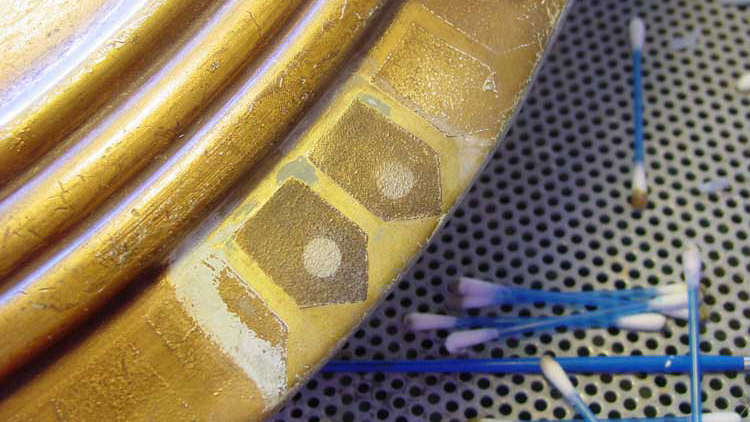
I mentioned old props being overpainted earlier, and that was just the case with Perseus’s shield from the original Harryhausen Clash of the Titans. By using different solvents and about 3,000 cotton buds I managed to strip a thick layer of gold paint off to reveal the original design underneath. It was fastidious work, and not the sort of thing I have the most patience for, but it was satisfying to gradually reveal the original finish.
A large part of my work is modifying mannequins to fit a respective costume, and then put it in a suitable pose. Building a mannequin up is easy, but making it smaller, particularly in volume, can be challenging. Recent work has included Star Trek’s ‘Seven of Nine’, The Chamberlain from Hellboy 2 and Robert Downey Jr’s Chaplin costume from the Chaplin.

What’s the favorite project you’ve worked on while running Alchemy?
The ZF-1 stands out, but doing a mannequin display and base for a complete Indiana Jones costume, whip included, was good fun. People often ask me if I try costumes on, and I don’t. However, I couldn’t resist trying on Indy’s jacket – who wouldn’t!
On balance, the art finishing probably ties with the general refurbishment of a prop. I recently cleaned up a SFX sword from Kingdom of Heaven and taking it from a rusty, broken down state, back to its on screen luster was great.
Are there any specific props you’d be interested in restoring to get hands-on?
Nothing springs to mind. Despite my career (or maybe because of it) I’m not a prop collector myself, but it’s always nice to see a older prop from the seventies or earlier. One of the great things about this job, is that I never know what is coming in next week – it could be a gremlin, a flux capacitor or James Bonds suit!
Images courtesy Chris Barton and Alchemy Custom Displays