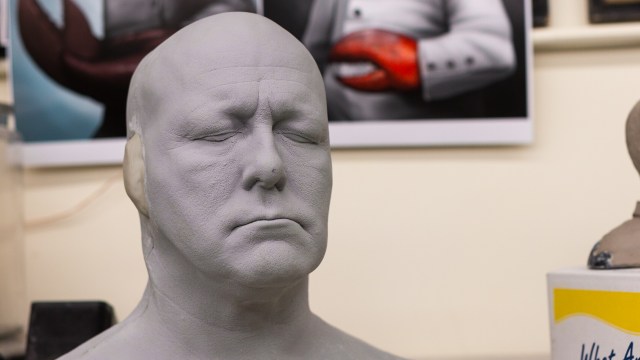
To make the full-size Zoidberg mask, we need a full-size head to sculpt on. And for that we’re going to use something called a life cast. A life cast is a three dimensional copy of a person’s face of head that I can sculpt the mask or prosthetic on top of, since I can’t expect a model to stay perfectly still for hours on end. Since the makeup has to be fitted for a specific actor’s head shape, the life cast has to be as close of a reproduction of that head as possible. That means putting the actor under molding materials like alginate or silicone to create a 1:1 mold of their head, and then casting it with a material like plaster or gypsum.
To make our life cast mold for the Zoidberg sculpt, we’re going to use Body Double from Smooth-On–a silicone specifically made for lifecasting. There are three kinds of Body Double, each with different work and set times (how long you have to apply it and how long it takes to cure). Standard Set which has an 5 minute work time and 20 minute set time, Fast Set which is 90 seconds work time and 7 min cure time, and a new “Body Double Silk” which has a 6 minute work time and 20 minute cure time. All three types have a durometer of 25a. Durometer (or shore hardness) is the scale that materials are rated on to assess how hard or soft they are. “A” scale is for materials that are flexible, “D” scale is for things that are rigid, and there is a “00” scale for gels. The three scales overlap a bit, as you can see on this chart (PDF).
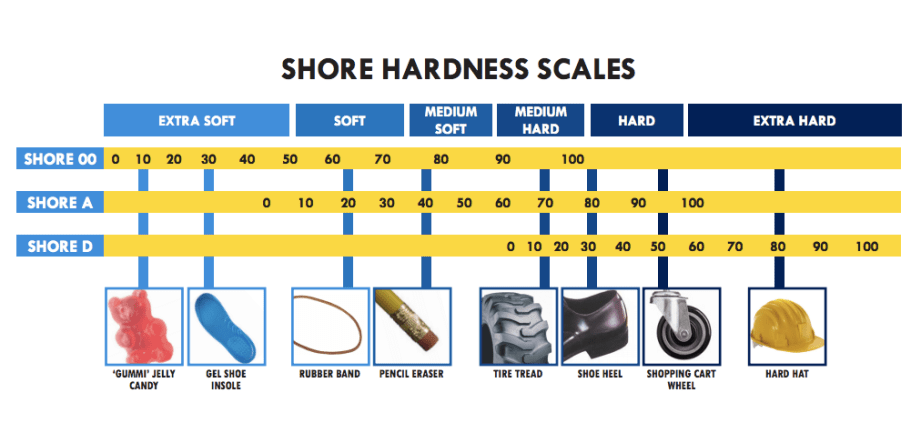 Image credit: Smooth-On
Body Double Silk has some really cool properties, in that is doesn’t stick to hair at all and has a viscosity similar to that of alginate. Alginate is the water-based material that people have been using to make life casts with for the past 40 years, but with the advent of silicone, it’s rarer these days. The last time I made an alginate life cast was in 2004 during the preparation for Pirates of the Caribbean 2, and the first time I made a silicone life cast was in 2003 while working for makeup artist Kevin Haney. It was during that overlap period that silicones were becoming more widely used and not until 2004 did I feel that my technique and the technology was ready to fully transition over. Now, it’s way more commonplace in the effects business to just use silicone.
Prepping My Lifecasting Materials
There are also additives that you can get for the various silicones to change their properties while making a life cast. You can add accelerators to make the silicone set faster, retarders to slow it down, thixotropic additives to make the silicone thick like peanut butter, and thinners to lower the viscosity. There is also an additive for life casting called hyperfolic that will help the Standard and Fast Set Body Double release from hair. All (as far as I know of) lifecasting silicones are platinum based. Silicones are broken down into two types: platinum (addition) cure and tin (condensation) cure.
Tin based silicones are usually cheaper and rarely inhibited (when a surface contaminate prevents the material from curing) by anything, platinum-based silicones are a bit more delicate and they can’t come in contact with latex (or anything else with sulfur in them), moisture, some urethanes, aloe, some baby powders, etc. Platinum-based silicones are much more stable when fully cured, will last longer in storage, and let you pull more parts out of them without breaking down. They are also much more accepting to modifiers (such as thinners or retarders) without sacrificing their strengths.
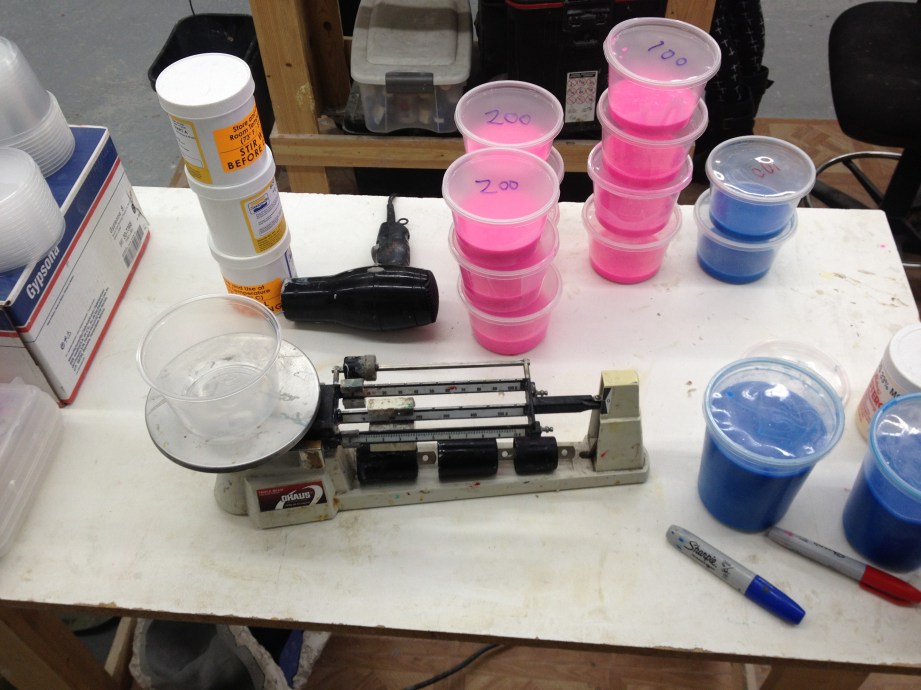
To start, I prep my materials out by organizing them on my work table. I weigh the silicone components out into two batches of 100g and four of 200g, and these are set aside.
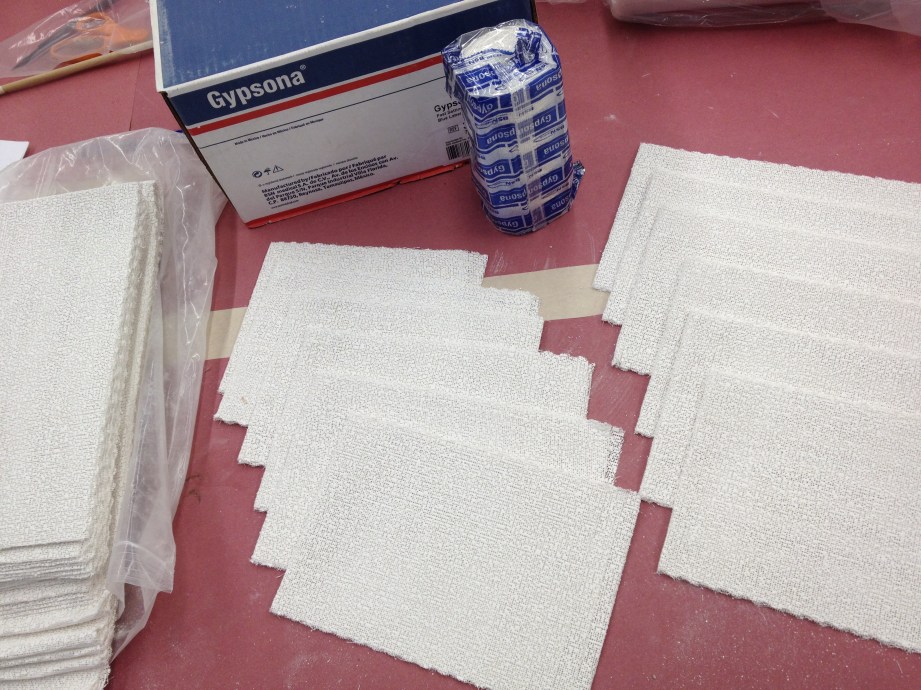
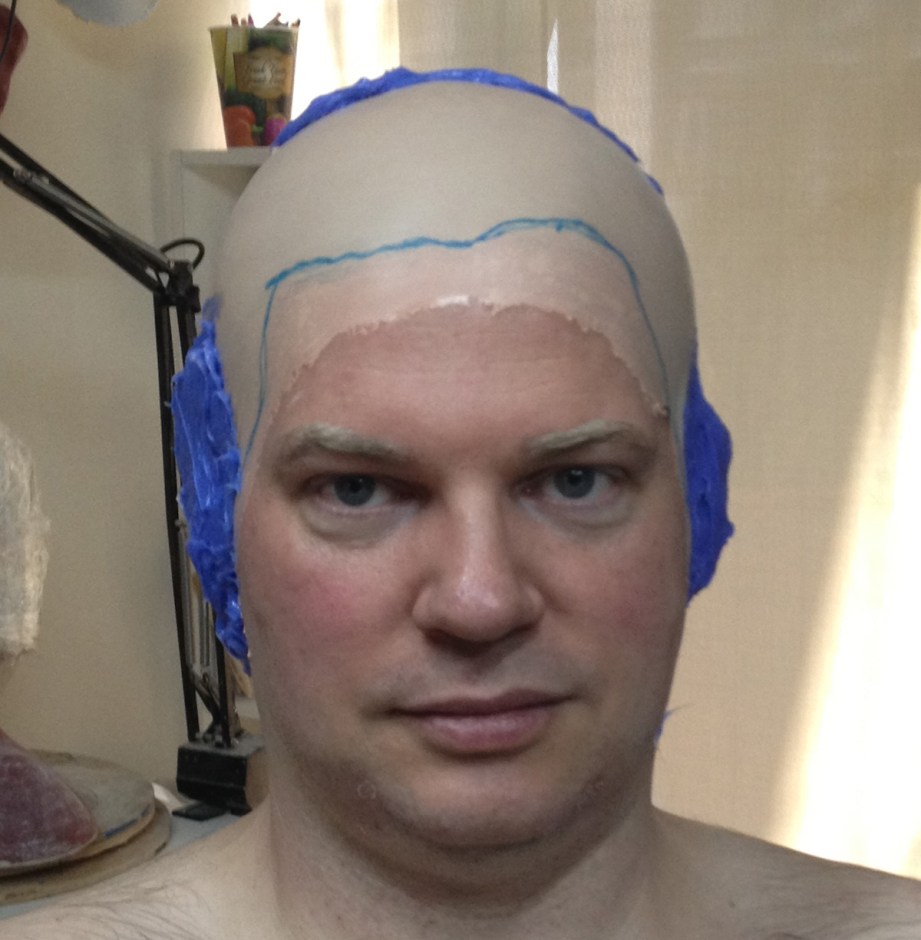
Then I prep the plaster bandages which will be used to create a rigid mold shell after the silicone layer is done. I usually prep a little more plaster than I need, just in case: 4 long strips (about 24 inches), 10-12 medium (10 inches), and 5-10 short (5 inches), and one that is just 1-inch wide. These prepped lengths are all four layers thick, and 6″ wide of bandage. I prefer the Gypsona brand because of the amount of plaster in the bandage; they just seem creamier. I’ll also set out all of the tools I will need: mixing sticks, gloves, small spatulas, hyperfolic, thivex (the thixotropic additive), a plastic bald cap, glue for the bald cap and a little bit of release cream. We use a plastic cap because latex will inhibit lifecasting silicone.
Next I’ll put the bald cap on the model using Telesis 7 glue. This allows me to work fast and it holds great, even under the silicone. I’ll dissolve the edges of the bald cap with the tiniest bit of acetone, being careful not to get it on the model’s skin. This is just to break down the edges of the cap so it’s smooth. I also use a couple trash bags instead of makeup capes to place over the body of the model. One trash bag with a hole cut in it taped down just past the shoulders and the other to be draped over their legs, to keep the model clean in case of any drips.
Using pencils that activate in water, I trace the model’s hairline, which hopefully will later transfer to the silicone. This helps me know where to stop if I’m making a prosthetic that just goes to the hairline. I have also used a different color silicone or a few other ways of transferring this hairline information, but the water-activated pencil seems to be easiest. Then I put a little bit of the release cream on the eyebrows and eyelashes to help the silicone slide off of hair. The release that I prefer is called “cholesterol” and is a leave-in hair conditioner that is available at many beauty supply shops.
Applying the Silicone Mold
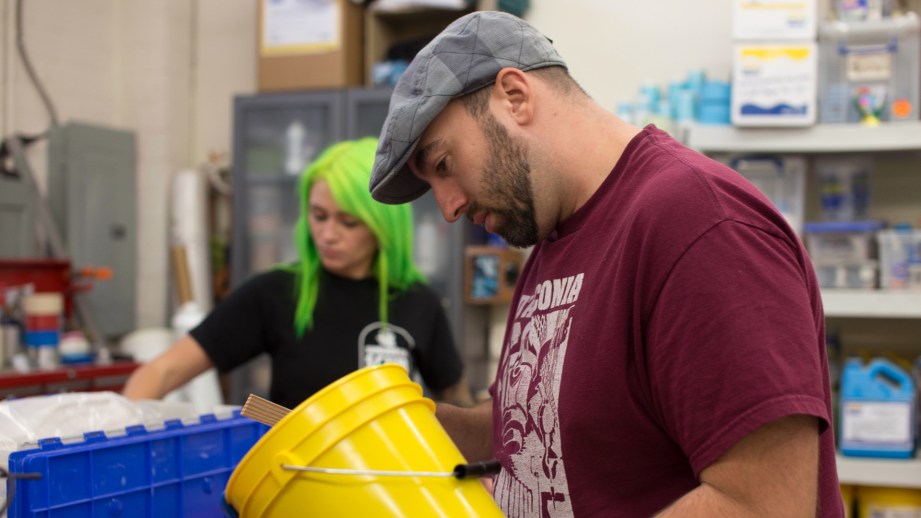
With all my materials laid out and the model prepped with a bald cap and trash bag covers, it’s time to start applying the silicone.
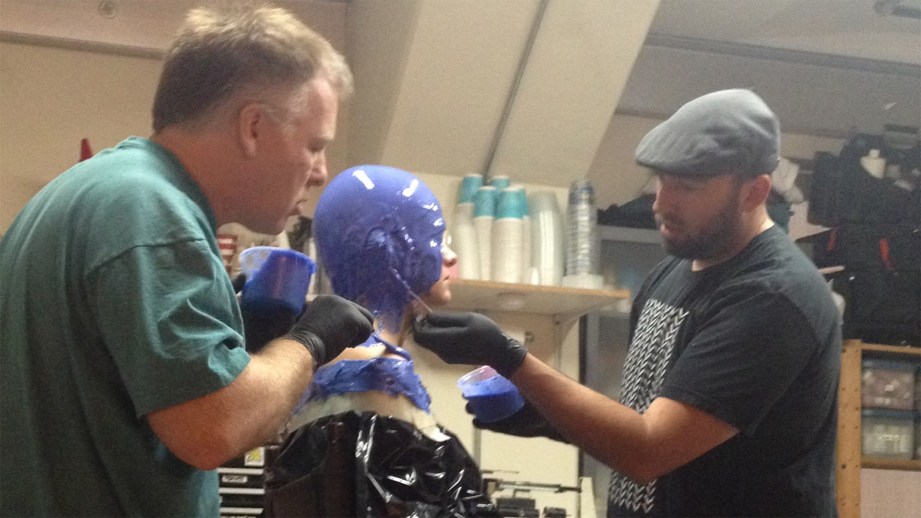
I like to start with ears first; this lets me pay greater attention and get a more accurate casting of their forms, while relieving me from worrying about them when I move on to the face. An added benefit is that it eases the model to the sensation of having silicone applied to their head. With an assistant, we each take the 100g batches and add a little thivex into the blue component, then scoop the pink into the blue. The pink part of the mix has a lower viscosity and is easier to scrape out of the cup. Once the two components are throttle mixed, they will be purple and you won’t see any streaks of blue or pink. Then we spatulate the mixed silicone onto the ears using one of the tongue depressor sticks. Any extra in the batch, we use along the base of the lifecast, to thicken up the edges.
In the past, lifecasting silicones were notorious for giving the models hickeys.
Next we each mix up a 200g batch with some hyperfolic additive to help release the skin and facial hair (eyebrows and eyelashes). In the past, lifecasting silicones were notorious for giving the models hickeys. The rubber was a much higher durometer (I think 50a) and that lack of softness would cause suction and it wasn’t uncommon to have bruise marks on the bridge of the nose, corners of the mouth or even ears. I have done life casts like this solo, but it is always quicker with one or two extra people to do other sections at the same time. Lately, I just have one assistant that will handle the back of the head while I pay attention to the face. The more you practice, the better your sense of timing gets, and this is partially timing and partially technique.
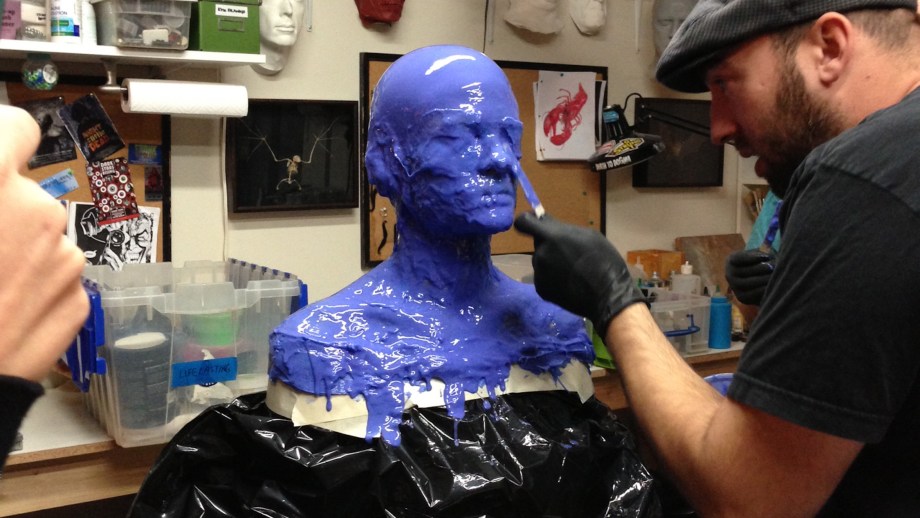
In terms of technique, I start with a blob of silicone on the top of the head, then spread the silicone down the sides of the he face, then I put a few more globs in the eye sockets and take care not to trap air bubbles in the corners of the eye, or under the eyelashes. I jump back to the side of the face and spread some more material down into the neck and chin. I try not to cover the model’s mouth or nose until the end, since it’s the areas that really make someone feel like they are being cut off from the world–some people are claustrophobic! I want them to get comfortable with having goo all over their head.
The mouth is next, once I have the rest of the face taken care of. I try to make sure not to get air bubbles in the corners of the mouth, and also make sure I’m not pushing the model’s lips into a crooked expression. It’s easy to push the top/bottom lip out of alignment, and you don’t want that–it’ll show up in the finished life cast and won’t be an accurate representation of the model. This whole time I’m constantly checking back to all the rest of the material, chasing drips and keeping a decent amount of coverage.
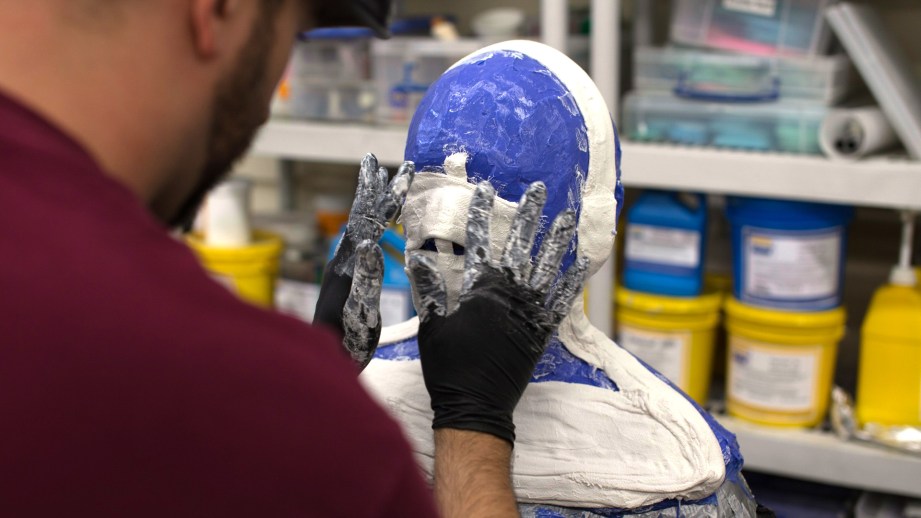
As the material gets closer to setting, I close into the nooks and crannies, including the nose. With a small dental spatula I can put material all the way around the nostrils, making sure not to ever cover this singular air passage. About now, the material is gelling to the point that it’s no longer dripping or moving, but still soft. My model will have to be patient the next few minutes because the silicone has to sit before you put the next layer on. The reason you wait a couple minutes is that the first layer is still soft, and can easily be displaced or messed up with more application.
While I am applying silicone to the face, my assistant would be covering the back of the head with a consistent layer–which is super simple and low stress compared to application on the front. One thing that can make the back of the head difficult to cover is the plastic cap. If the cap is too lose, the weight of the silicone can pull on the cap and warp it into a funny shape. I prefer the plastic caps from MEL (makeup fx lab, and available through Nigel’s) since they are a bit stiffer yet stretchier than the Alcone ones that I used to use.
The second silicone layer on the lifecast is way simpler and faster to apply. I add a little thivex thinner to the blue side just like on the ear batches, this time using the last set of 200g batches of silicone. Stir it up, and spatulate it onto the whole surface. Because this is about the consistency of peanut butter, you don’t have to worry about drips and can move quicker. You don’t need to build up a huge thickness in the silicone layer, just a consistent one. I always aim to have my final coat be as smooth as possible, and the person working on the back adds a bit extra material starting at the peak of the head and ending between the shoulder blades. This will help when I get to removing the mold from the model’s face.
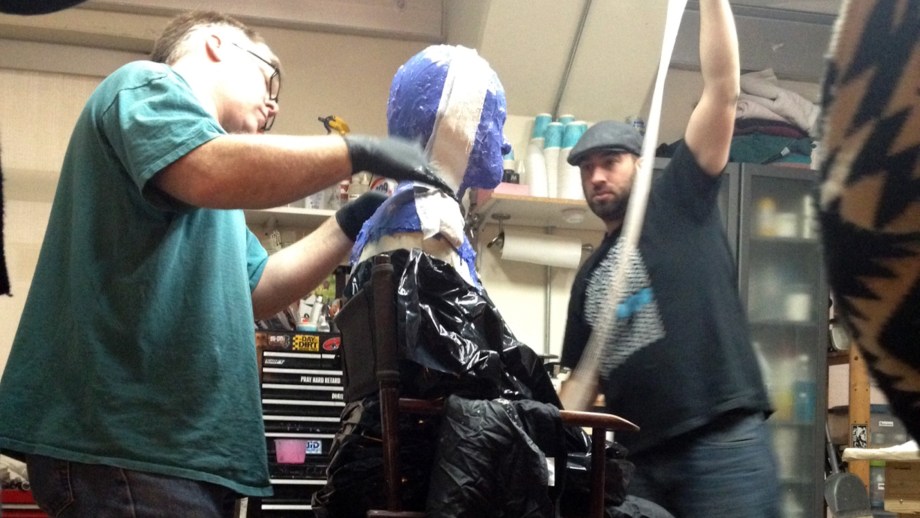
This second layer has to sit for a couple minutes again, which is a good time to reset your work area for the bandage layer. I used Gypsona’s extra fast bandages with warm water and sometimes a little salt in it. The salt makes the plaster in the bandages harden faster.
Applying the Plaster Bandages
To apply the plaster bandages, I start with the front half, and (one at a time) take two long bandages and fold each to make 8-ply long bandage sections to run across the head from shoulder to shoulder. I go right in front of the ear for this one and try and finish a little forward of the halfway mark at the top of the head. Here is where I jump around a bit…
I put the 1″ strip down the nose, and then a small bandage over the bridge of the. Nose, then another small one over the mouth- these lock down the thin nose bandage. My theory for this is that the nose is a easily deformed area and I want the bandages fully set there by the time I’m done with the rest. I also want the long edge set up as to not let the overall shape of the head deform. Once that nose section is laid down, I place a medium bandage over the forehead, a medium one down each side of the face, and a medium one under the chin. Then a couple med/small make up the neck and front chest, with an extra folded over one on the bottom ended of the cast. The back can be done at the same time as the front, you just have to wait for the divider bandage to be laid down. In the past I used to wait for the divider to set up and then Vaseline it up for release, but now, I just take thin cut lengths of paper towel, wet them, and lay them down to separate the halves. The paper towels act as a release!
For the back order, I lay down two long ones folded in half , and just barely overlapping the front. Then two or three medium ones placed vertically to cover the head down onto the neck. Then a couple medium or small ones, horizontally to cover the rest of the neck and back, with an extra folded over one on the bottom edge–just like on the front edge.
Remember which was the last bandage you laid down, because that will be the one you check for hardness, and determine when you can pull the cast off. Once it is set up sufficiently, remove the back and front half of the bandages and carefully set them aside. Now loosen up the silicone all along the bottom. I have a pair of EMT scissors for cutting up the back of the silicone, so that I won’t accidentally cut the model. Slip a couple fingers under the silicone and use your own hand to buffer between the scissors and the model for some extra precaution. Cut up the middle of the back, giving a “v” shape a couple times to help with alignment when you put it back together. Once you hit the top center of the head, stop…this should be far enough. Start to peel the silicone forward slowly and peel it off your model.
Boom, you’re done. Put the silicone back in the bandage jacket and tape it shut! I try to avoid standing it up on top of the head, as sometimes it will dent the top of the form.
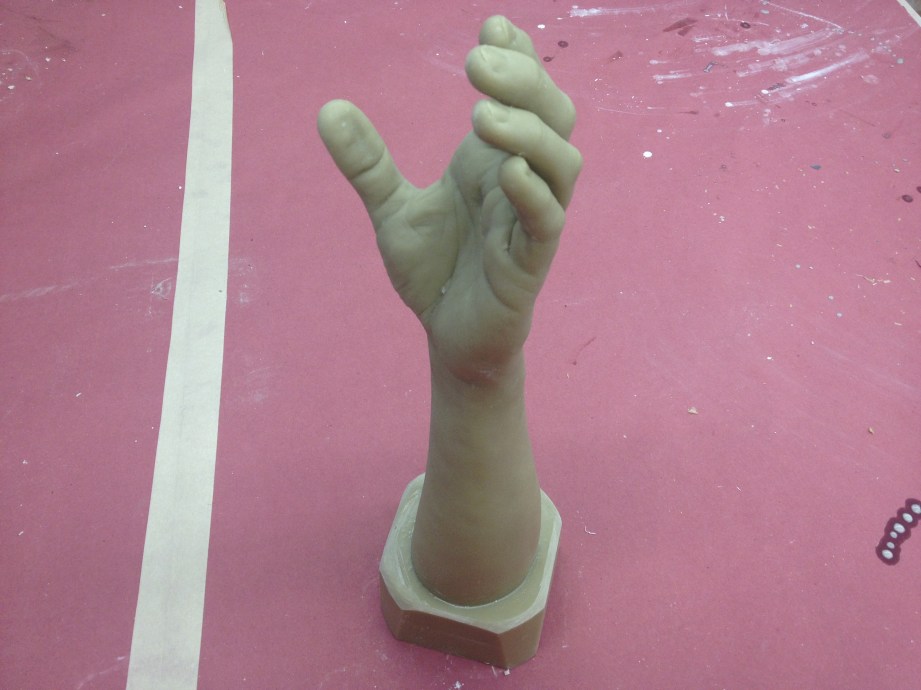
Lifecasting My Arm for Zoidberg’s Claws
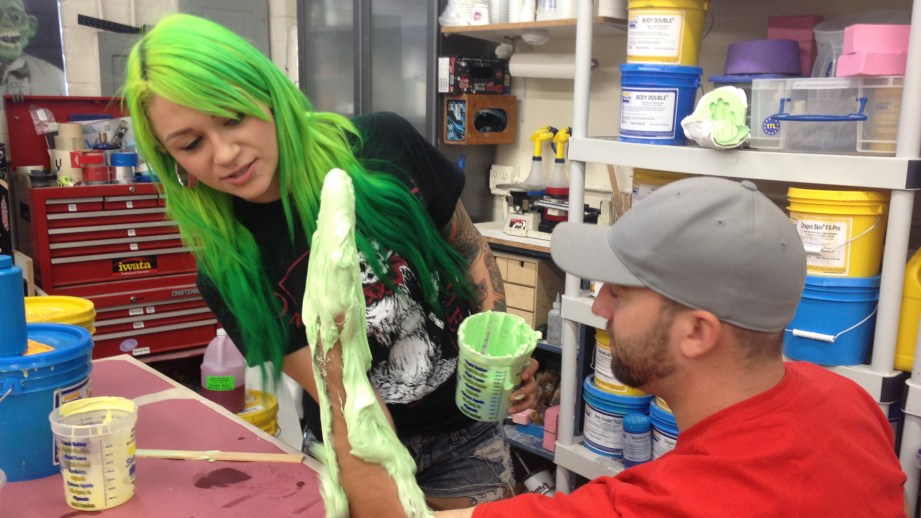
These same principles and techniques apply to any life casting or body casting, and once you have a feel for the timing and consistency of the materials, transitioning to more complicated forms isn’t so daunting. With that in mind, to make Zoidberg’s claws, I need an arm form. It’s pretty tricky to single-handedly mold your own arm, so I call my assistant Nora to come over and do the heavy lifting.
I want to have a cast of my arm past the elbow, and with my hand in a Kung-fu-grip kinda pose. This will facilitate the way the sculpture needs to be made and will most likely serve as an ambidextrous form with some simple modifications. Because my arm is hairy, we used the Body Double Silk for its awesome non-hair-pulling properties, and it can be applied in one big batch instead of two layers. This is because the small details are not as important as the overall forms, and we don’t need to make breathing holes for my arms.
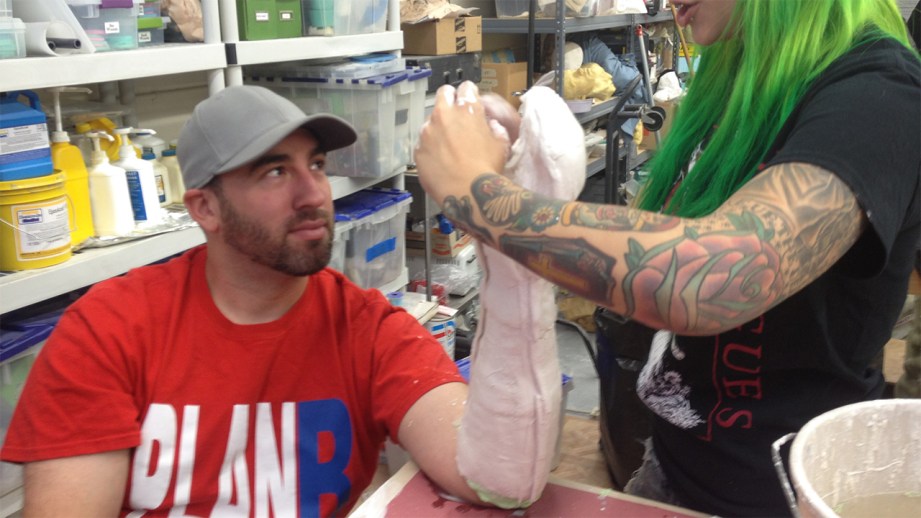
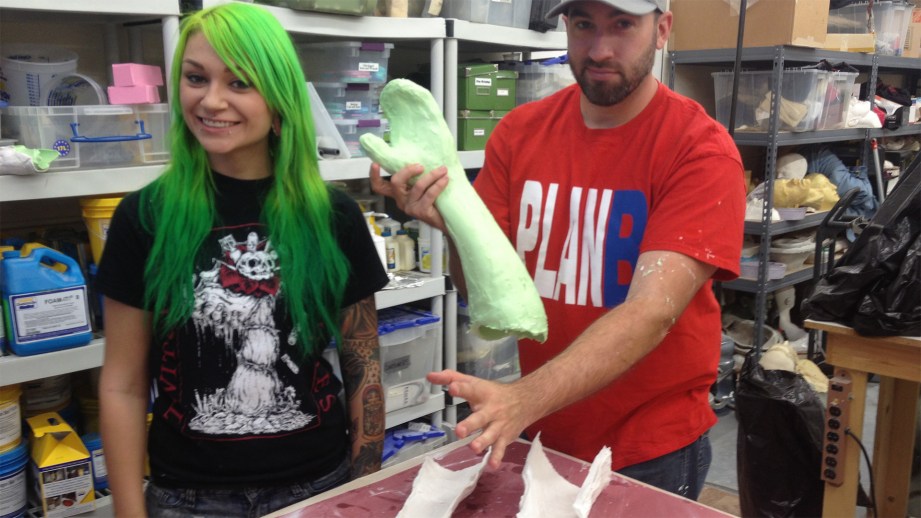
One big 400g batch of silicone is applied and a plaster bandage jacket split up my arm, over my thumb and across the tips of my fingers and back down the other side. When it’s all set, we open it up and I slide my arm out without ANY pulling on my hairs . Once that is all put back together, I fill it in one big pour of Smoothcast 380. First pouring a little in and rolling it around to make sure there aren’t any air bubbles trapped, then fill it up to the top.
I have a mold of a drafted base to use with arms that I stick the arm casting in and fill around it. Now it stands easily and has some registration for molding. Next up is making the life cast ready for sculpting and making the eye forms!
Thanks to Iwata-Medea and Smooth-On for providing materials and sponsoring this project.