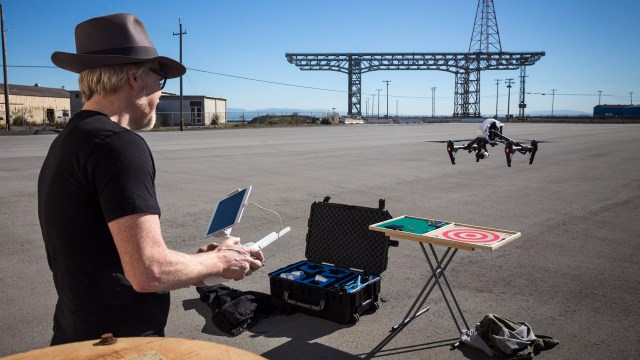
Since getting his DJI Inspire 1 quadcopter, Adam has been flying it regularly to learn its abilities as a videography platform. And as he becomes familiar with its operating procedures, Adam can’t help but built custom accessories and gear to optimize his flight setup. From flight log notebooks to battery charging racks, we check out some of Adam’s specialized flight equipment.
The Demise of Radio Shack – 3/10/2015
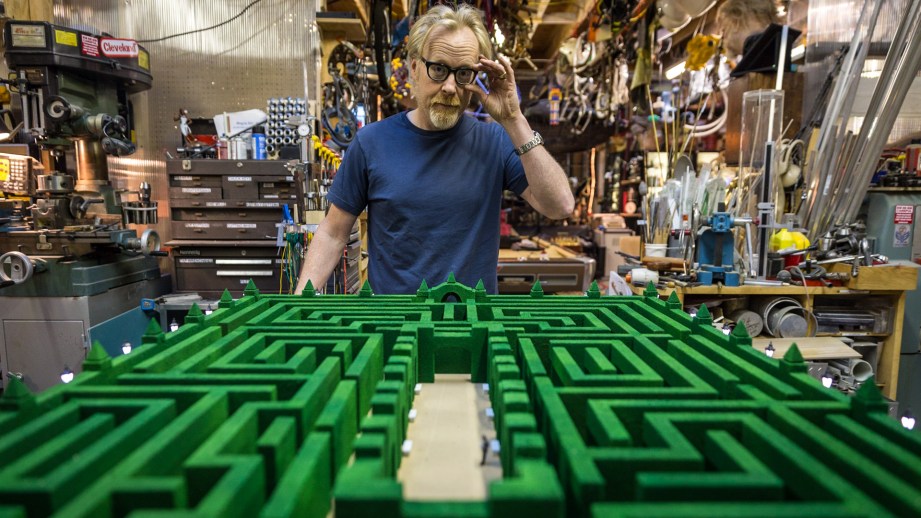
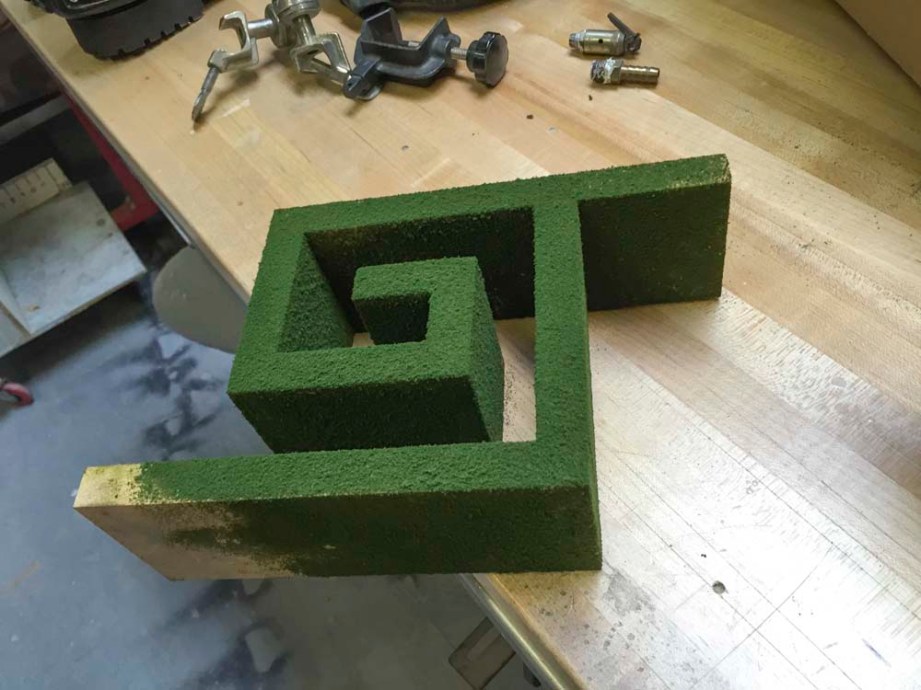
My Shining Maze Build Notes

I didn’t intend to make a replica of the architectural model of the hedge maze from The Shining.
Stanley Kubrick’s The Shining is one of my all-time favorite horror movies. There’s an exhibition from the Kubrick archives traveling around the world right now, and I’ve seen it three times in two cities so far. Twice at LACMA in Los Angeles and again at the TIFF in Toronto. There’s a whole section in the exhibit devoted to The Shining, and in that section, I started for some reason to get excited about the Overlook Hotel maze. It’s such an iconic character in the film, and one of the ways in which the film departs significantly from the book. I also took note that the maze they had in their exhibit didn’t meet my standards for accuracy. So I started to gather information, with the idea that I might make my own.
The film is based on Stephen King’s novel of the same name and follows a family: Jack, Wendy and Danny Torrance as they take on the task of being winter caretakers of the legendary (and fictional) Overlook Hotel. The Overlook is a hotel with a history. Jack is even told in his job interview that there is a history of caretakers getting “cabin fever” and murdering their families. The Overlook is a malevolent entity with designs of its own for Jack.
The Overlook was designed for the film by legendary art director Roy Walker, and is based in part on several different real hotels. The first flyover shot of the Overlook is in fact a shot of the Timberline Lodge on Mt. Hood in Oregon.
For the rest of the exteriors (with actors in front of the building), a facade of the Timberline was built on the Elstree lot in England.
The interiors were all sets built at Elstree. For research Kubrick sent his people to hotels all over the United States to find inspiration for the interiors. The main room Jack does his writing (called the Colorado Lounge in the film) was inspired (like a lot of other details about the Overlook) by the Great Lounge in the Ahwahnee Hotel in Yosemite, Calif.
The Red Bathroom in which Jack meets Grady (one of the former, ahem, caretakers) was modeled after the bathroom at the Frank Lloyd Wright-designed Biltmore Hotel in Arizona.
From theoverlookhotel.com: “Many Overlook Hotel design elements were lifted directly from the Awahnee, including the double red doors, the hotel lobby, the Colorado Lounge, and the pervasive Native American motifs. These photographs of the Awahnee illustrate just how strongly it influenced much of the Overlook’s interior design.”
A note about theoverlookhotel.com: It’s run by my new friend Lee Unkrich, Pixar director and fellow Kubrick obsessive. He provided me with some incredible research, archival material and information that allowed me to make this maze FAR more accurate than would have been possible otherwise. His help has been invaluable.
THE MAZE
The most memorable central architectural feature of the Overlook Hotel in The Shining is its outdoor hedge maze. Extremely large and elaborate, it makes several appearances in the film. We see it both full-sized and as an architectural model, as a fantasy and as a reality, and it is featured in the film’s climax, snow-covered in fog and darkness. There are multiple distinct mazes in the film. They all stand in for the one, of course, and while similar at a superficial level, they also are distinctly different in ways that aren’t immediately apparent upon a casual viewing of the film.
MAZE NUMBER ONE
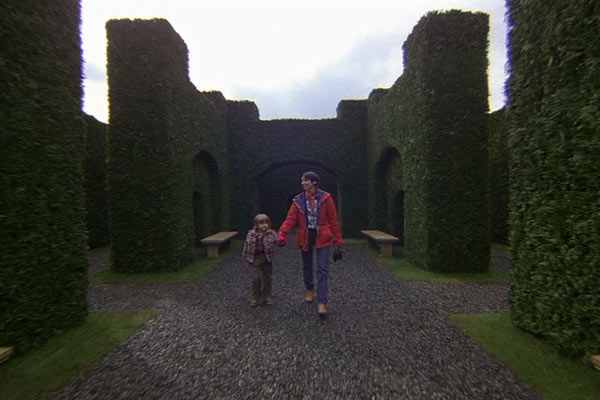
There’s the first maze we see early in the film in full scale in fair weather, which Danny, Wendy and Jack walk past during a tour of the grounds. This maze was made from plywood, chicken wire and dressing, and was filmed outdoors on the Elstree lot, next to the replica exterior of the Timberline Lodge. This is not, however, the same maze that we see Wendy and Danny walking through farther down this list. This maze is literally only the facade that is visible on film. The maze that Danny and Wendy walk through was a separate set built on an airfield near Elstree. So this is not a maze per se; it’s a maze fascia.
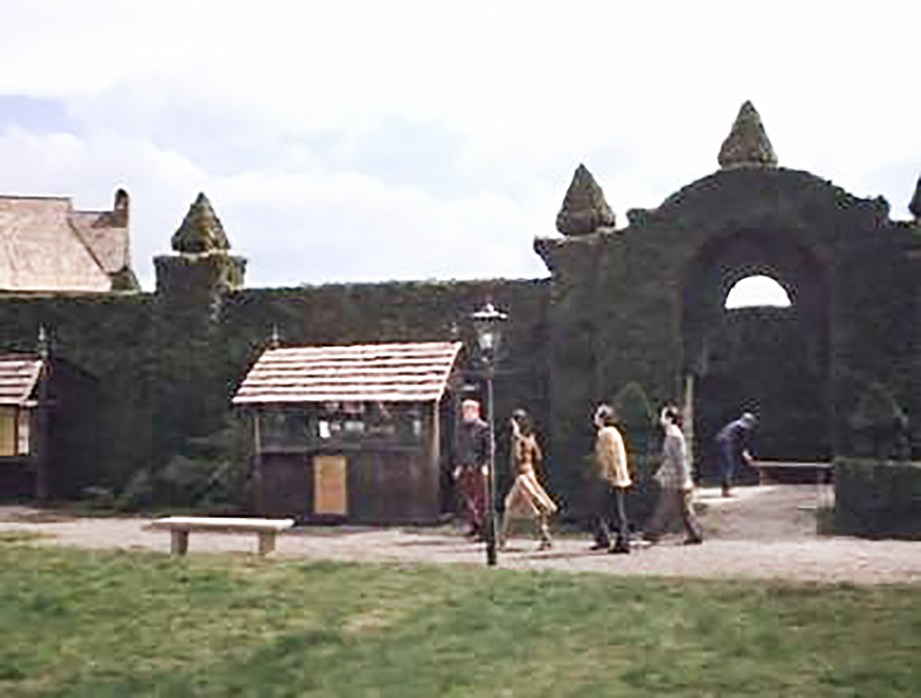
As Wendy and Danny walk past the full-sized mockup, they pass a kiosk. On the kiosk is a map of the hotel’s labyrinth.
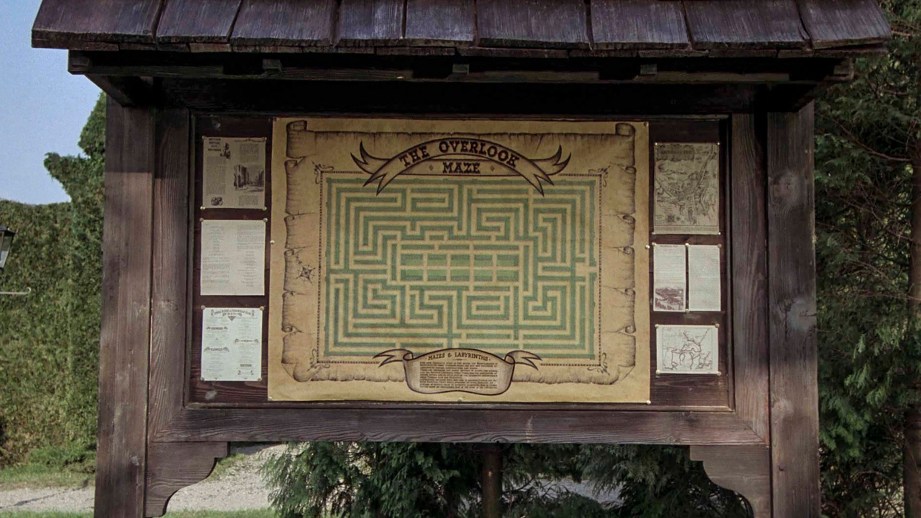
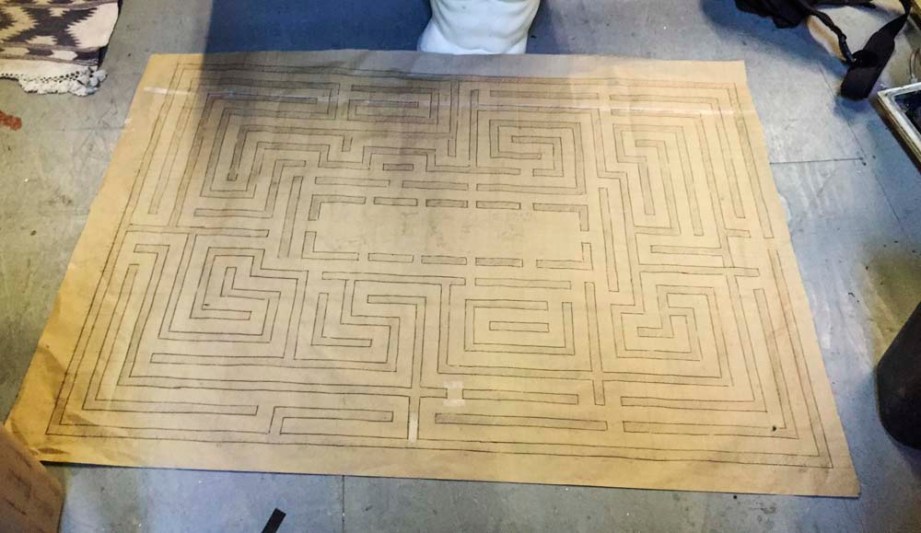
This kiosk map shows a layout that is identical to the layout of the architectural model you will see below in MAZE NUMBER FIVE. It is this layout that I will follow in my maze.
MAZE NUMBER TWO
Maze number two is the maze we see Wendy and Danny walking through in the daytime. They’ve been at the hotel for a while now, and seek the maze for diversion. From IMDB: “The maze was constructed on an airfield near Elstree Studios, by weaving branches to chicken wire mounted on empty plywood boxes. The maze was shot using an extremely short lens (a 9.8mm, which gives a horizontal viewing angle of 90 degrees) which was kept dead level at all times, to make the hedges seem much bigger and more imposing than they were in reality.”
This is apparently wrong. This maze was built on a nearby MGM studio lot.
Maze number two is the same maze as maze number four below. They reconstructed the same set indoors for the snow-covered finale.
MAZE NUMBER THREE
While Wendy and Danny walk through the maze in the daytime, Jack is at that moment looking over an architectural model of the same maze in the Colorado Room at the Overlook (maze number FIVE). It seems that Jack sees Wendy and Danny in the middle. The camera starts on a maze of giant proportions and slowly zooms in to allow us to see that Wendy and Danny are actually IN the maze.
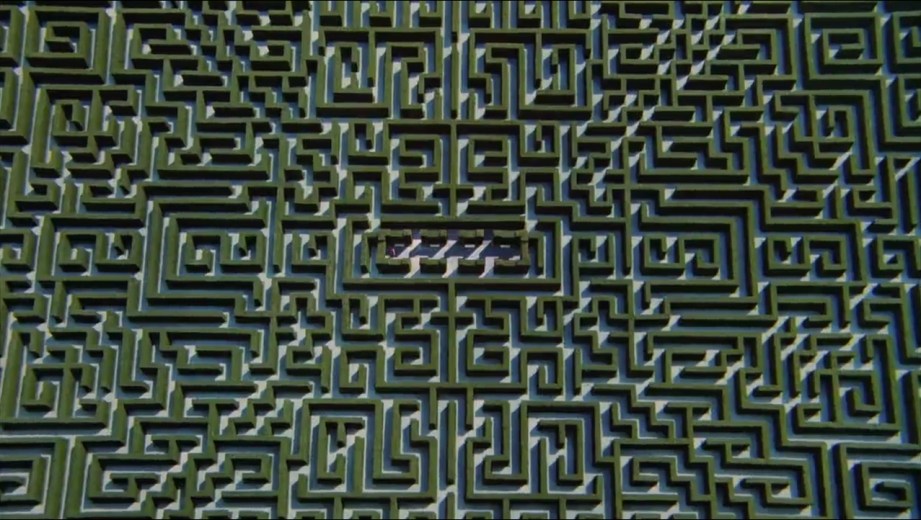
This was done using a full-sized master shot of Wendy and Danny that was composited onto a model of the maze. The most noteworthy aspect of this maze is that it’s symmetrical, both on the x and y axis. This sets it apart, as no other maze in the film has this exact layout or is remotely symmetrical. It’s interesting as to why Kubrick would have his scenic shop make two distinctly different mazes. Perhaps the idea was that a symmetrical maze is exactly the kind of thing someone would conjure in their mind, where the reality is, of course, more complex.

From Lee Unkrich: “The overhead shot of Wendy and Danny in the center of the maze was filed from a high apartment balcony, looking directly down into the parking lot. It was filmed at a building near Elstree Studio, and the apartment it was shot from was the same apartment used as Alex’s parents’ apartment in A Clockwork Orange.”
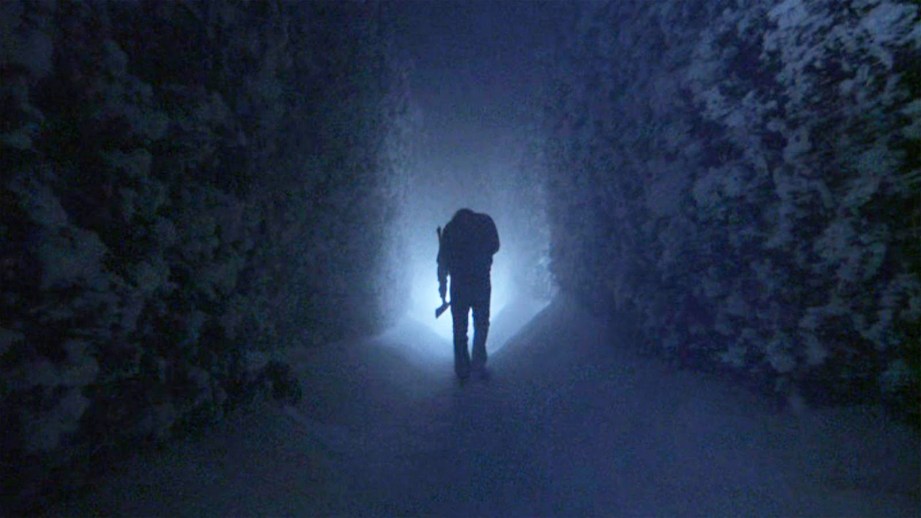
MAZE NUMBER FOUR
The fourth maze is the location for the climax of the film: an ax-wielding Jack chases Danny through the snow. Built indoors on an Elstree stage, this set was dressed with 9 tons of fake snow, made of salt and styrofoam. Smoke helped to hide the fact that you can’t see the actors’ breath. It wasn’t necessary for Kubrick to build the entire maze to get the shots he wanted. He effectively built just over one quarter of it. As the viewer can’t possibly know where the characters are in the maze, this was totally sufficient for shooting the climax.
This is a map of what was built for the film’s climax:
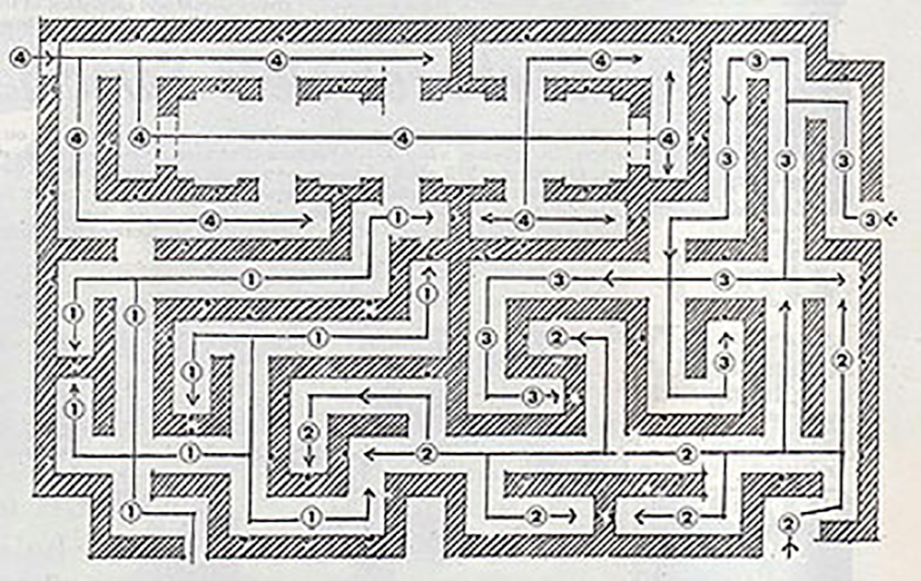
This maze is the same set used in maze number two. Its layout differs widely from maze number three, as well as maze number five below.
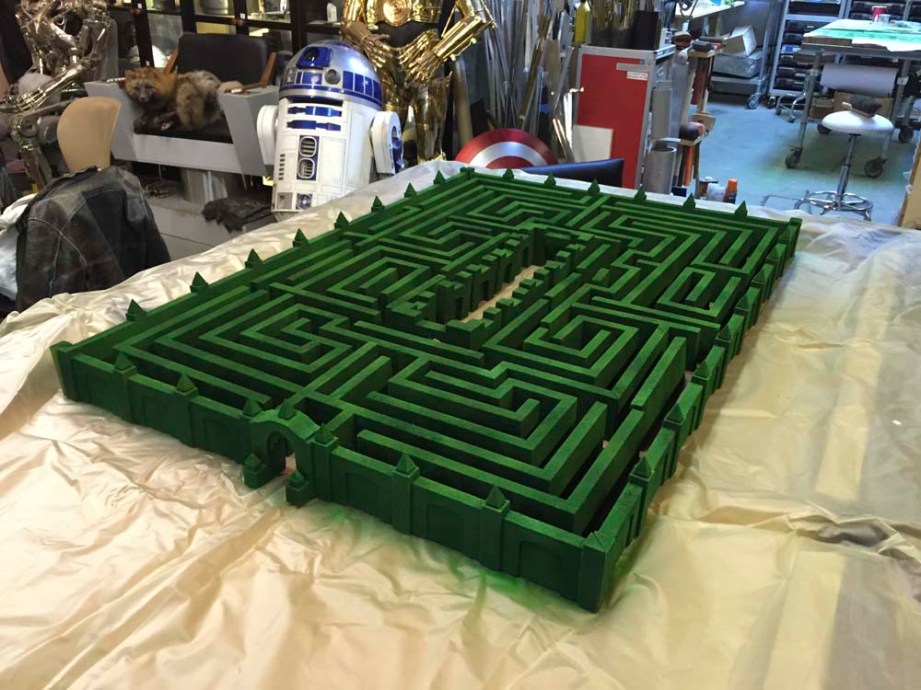
MAZE NUMBER FIVE
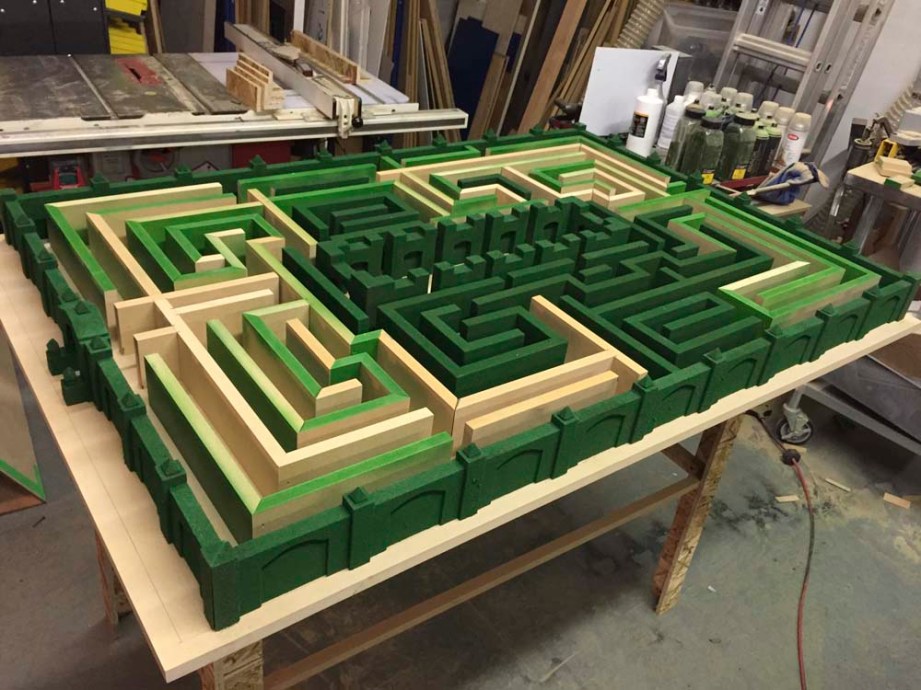
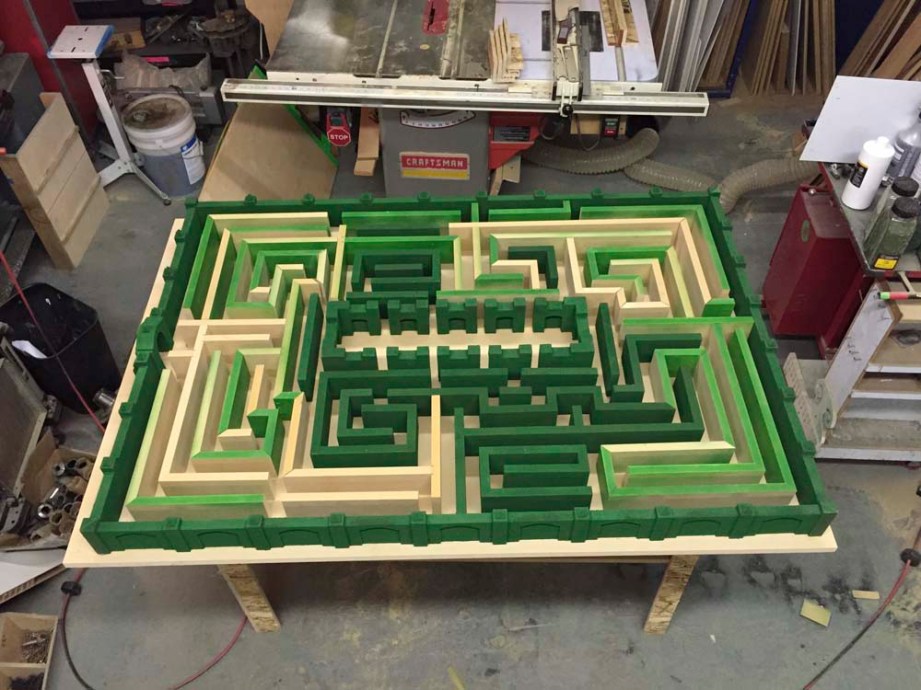
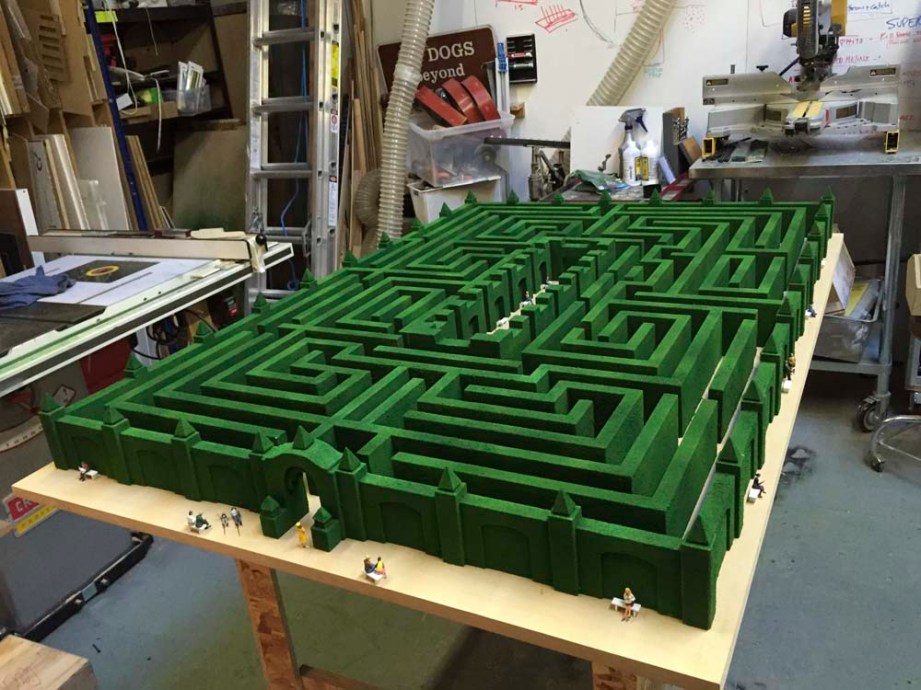
This is the maze that Jack Torrence looks over in the lobby (The Colorado Room) of the Overlook. It’s an architectural model, quite large, on a platform on a table. There are numerous scale details: streetlights, benches, kiosks, and even scale figures sprinkled throughout.
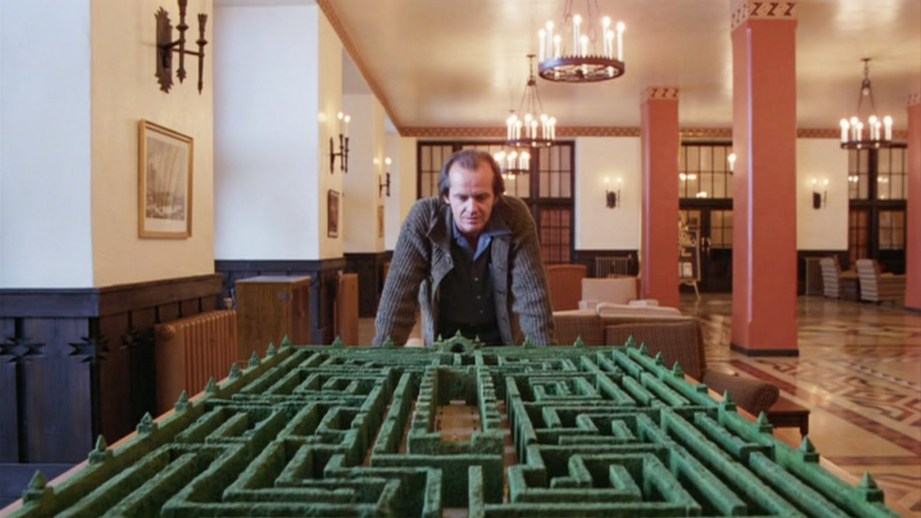
I decided to make an exact replica of the architectural model of the maze that Jack stands over in the photo above.
THE SCALE
After looking at many reference photos, re-watching the film, and poring over whatever documentation I could muster, I made some carefully extrapolated measurements and concluded that the maze scale hovered somewhere between 1:46 and 1:52 scale. This is good news because there’s a model-train scale called O-scale, that is 1:50 scale (sometimes it’s 1:48). The original builders would quite reasonably have used O-scale because of the common availability of figures, lamps and architectural details. I would make my model in O-scale.
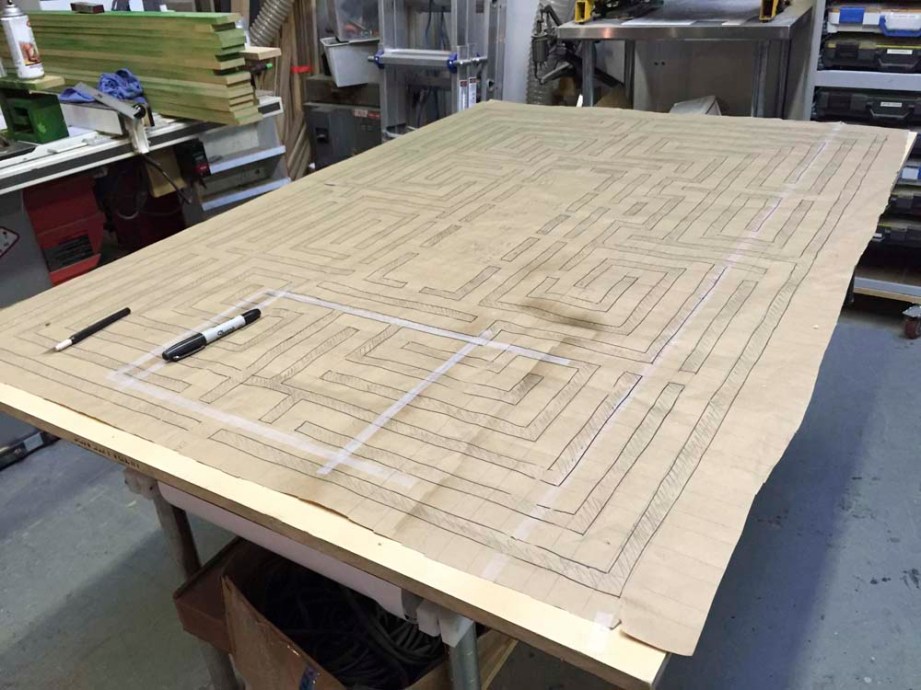
THE MAP
It’s quite clear that the hedges are narrower than the rows. I concluded that the hedges were 3/4″ wide and the rows were approximately 1-1/8″ wide. This means that the maze is drawn on a grid made up of alternating large and small squares. So I drew such a grid on butcher paper on my dining-room table. Then I laid out the maze on the paper.
Here’s my result. There’s some inconsistencies, but I was able to resolve them. With a couple mods, this was the layout I’d follow for my maze.
These are the measurements I figured out for the final maze.
TOTAL NUMBER OF LINEAR FEET OF HEDGE 85
HEIGHT OF HEDGES 3.25″
HEIGHT OF COLUMNS 4″
HEIGHT OF COLUMNS WITH CROWNS 4.875″
HEIGHT OF CENTRAL HEDGE RECTANGLE 4″
Hedge/row distribution:
Hedges: .75″ wide
Rows: approx 1.125″ wide
Outer dimensions of the MAZE 46.5″ wide 66″ long
HEDGE SPACING
Short side 5.25″
Long side 5.75″
TOTAL NUMBER OF HEDGE COLUMNS/CROWNS 33
TOTAL NUMBER OF STREETLIGHTS 30
TOTAL NUMBER OF BENCHES
15 outside
11 inside
1 Kisok (with map)
1 Kiosk house
DISTANCE BETWEEN STREETLIGHTS & MAZE
Short side front entrance 2.5″
Long sides 1″
Short side rear 1″
SOLVING THE BUILD PROCEDURES
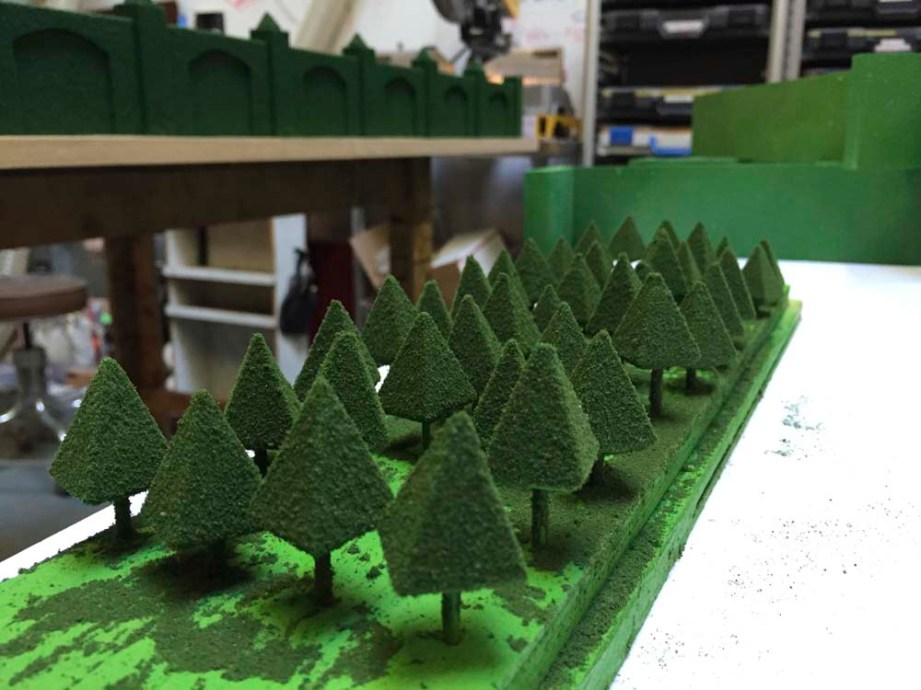
First I wanted to solve the flocking: how to apply the hedge texture. So I whipped up a sample hedge from 3/4 MDF and stapled it together. The MDF I use is called Trupan and it’s half the weight of standard MDF. Lovely stuff. I’m quite sure the original was made from either urethane foam or EPS, but I wanted more durability. I also glued all the joints.
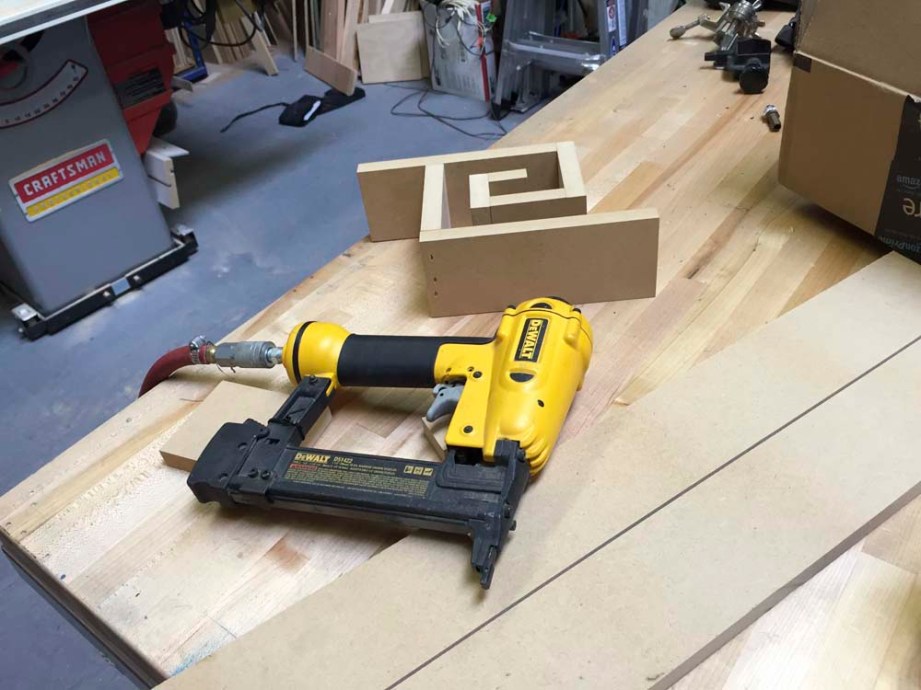
Looks legit.
I painted this with a base coat of white glue. The white glue I chose is archival (because I’m like that), but it also tended to bead on the surface of the MDF I was using, leaving a visible texture after flocking. This was not good.
In order to counteract the beading problem, I textured the MDF first with a spray glue.

After the spray treatment, the white glue wet out nice and evenly.
For the actual green I sprinkled each hedge with fine model-train grass, which you can buy in bags like this:
Here is the first test of flocking. Looks pretty good.
Knowing that I’d be manhandling the hedges to put the maze together, I wanted to make doubly sure that the coating would be robust.
The first test wasn’t.
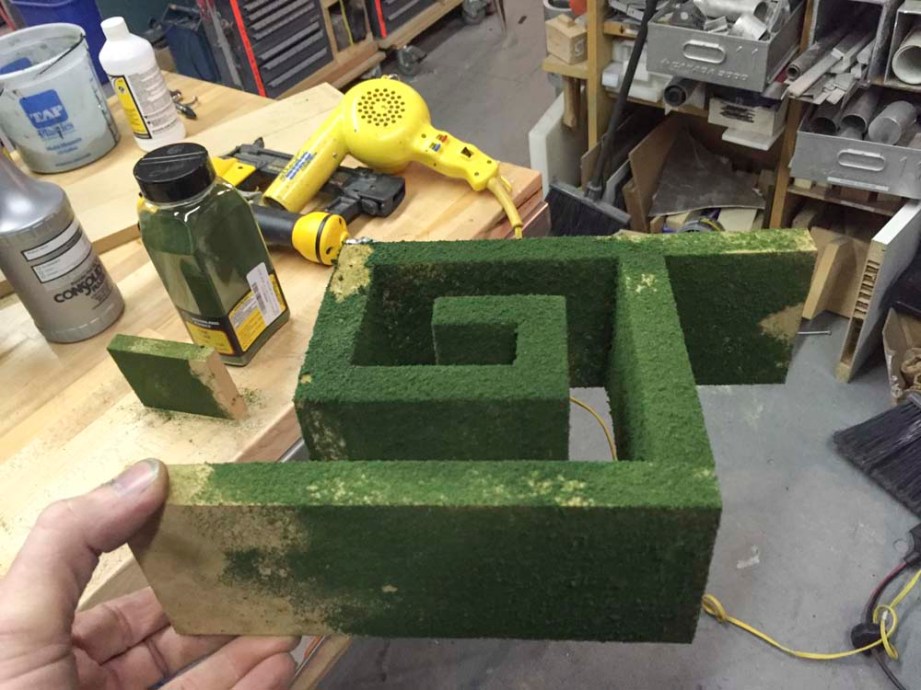
After several more runs, I developed a nice tough coating system in a six-step process:
1. Paint MDF hedges with base coat of green paint
2. Apply white glue
3. Flock the hedge
4. Let it dry
5. Apply clearcoat
6. Apply a last coat of green paint
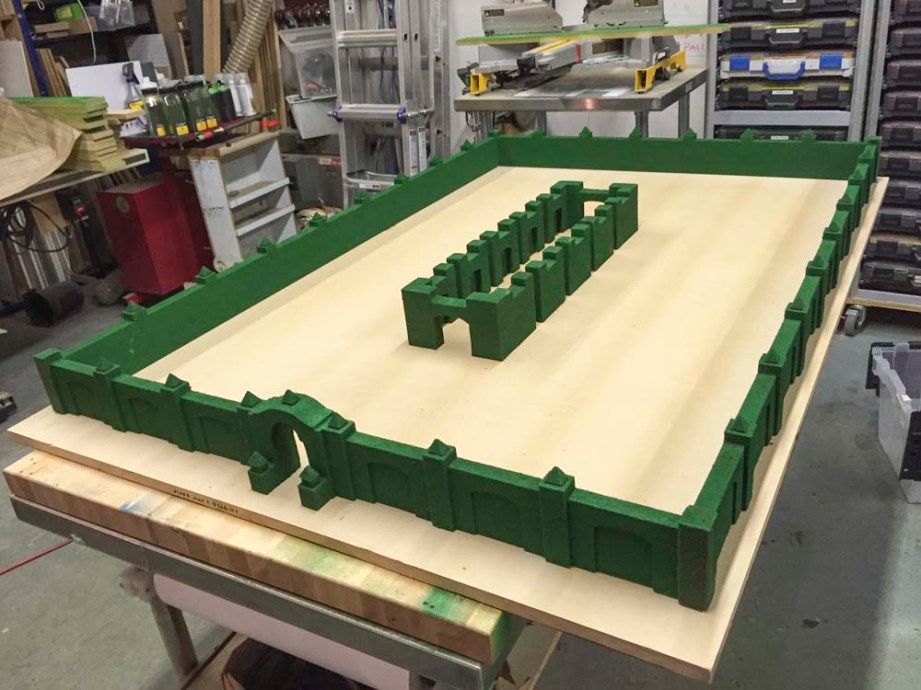
CONSTRUCTION
For the purposes of discussion, the maze has three distinct parts:
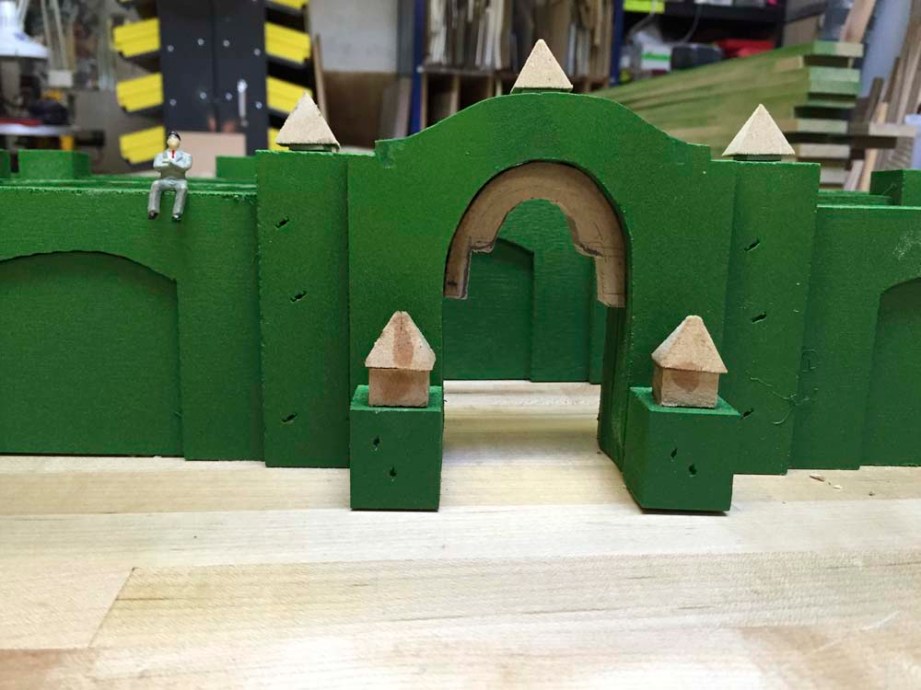
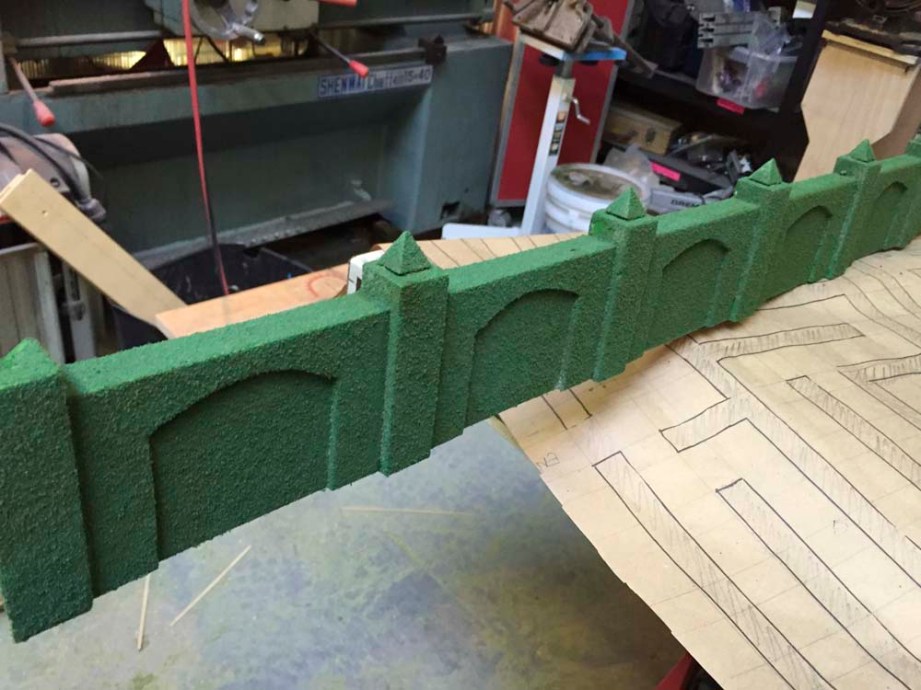
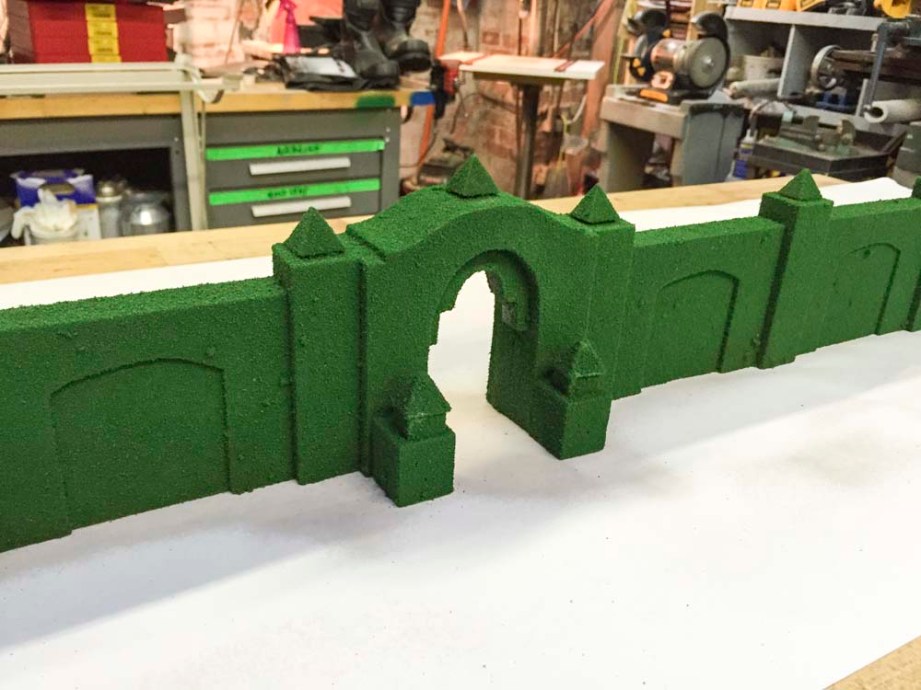
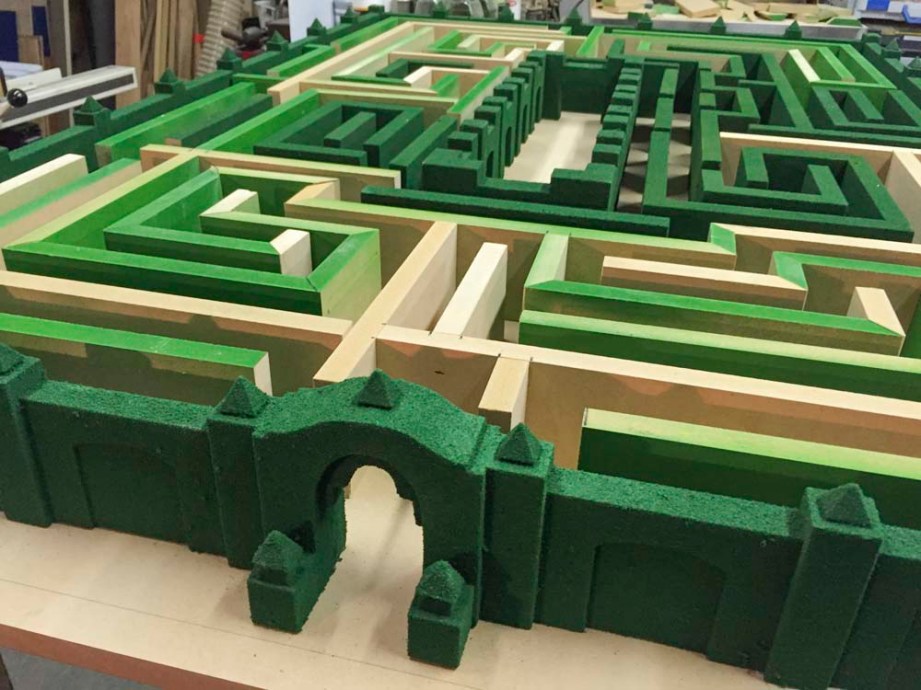
1. The outside. Rectangular with column and arch details around the perimeter. There are four sides, two long and two short. The two long sides are identical, but the two short sides have slight differences, the main one being that one short side is the entrance. These hedges are 3/4″ thick, save for the columns and entrance, which are thicker.
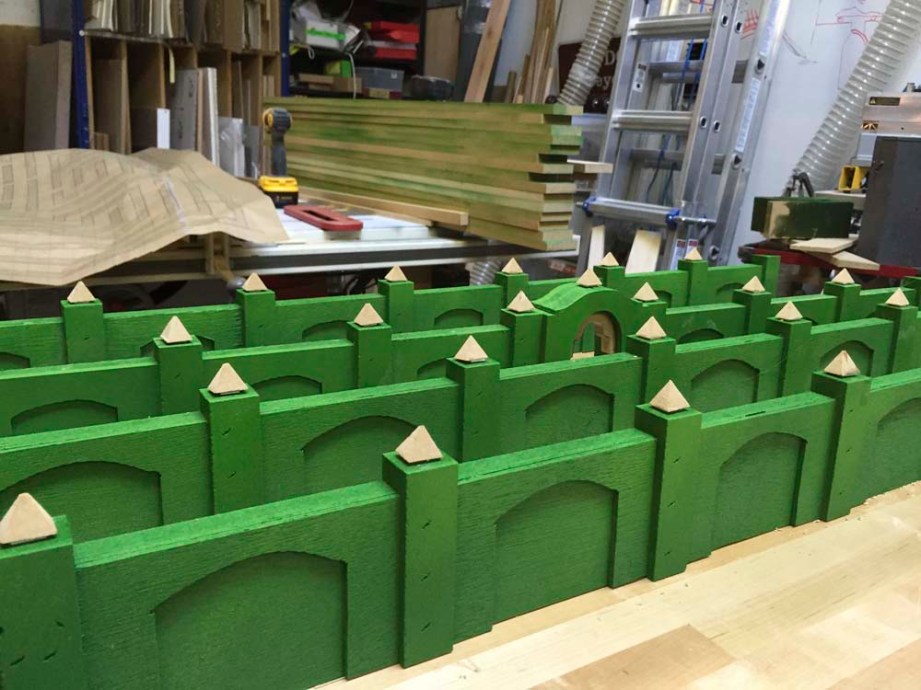
2. The “heart” center of the maze. These hedges are taller than the body hedges. They are as tall as the outside columns around the perimeter, and are crenelated. These hedges are 1″ thick.
3. The main body of the maze, with identical 3/4″ thick hedges. There are exactly 68 feet of this type. These hedges are 3/4″ thick.
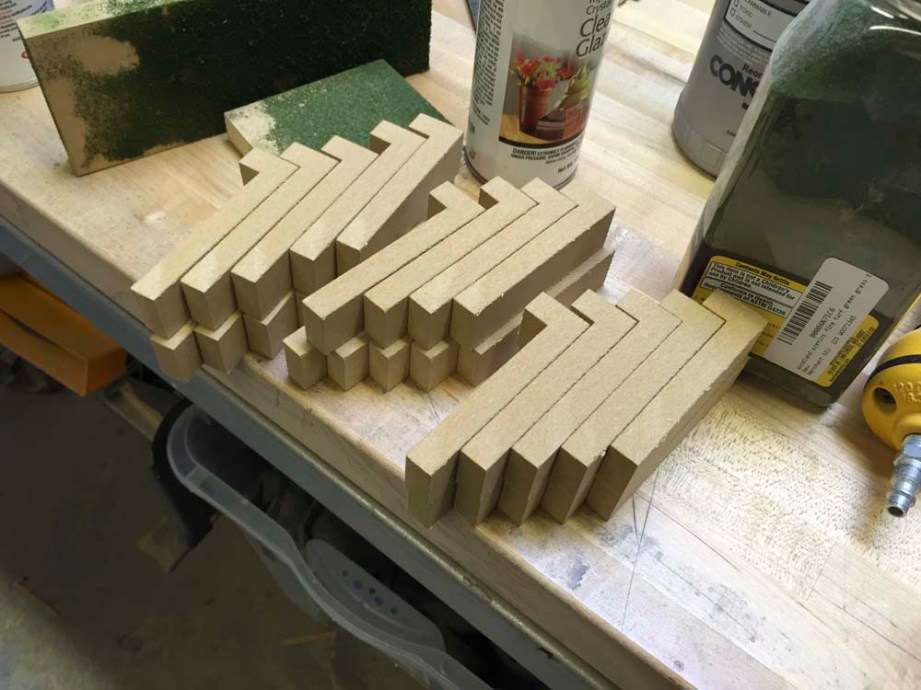
I started with the outside perimeter, because I like to tackle the hard stuff first. The perimeter has many details: columns, crowns, arches, and the entrance to the maze. Because the maze is rectangular, the spacing between the columns changes depending upon the location. I worked out this spacing and started to lay out the pieces.
THE COLUMNS
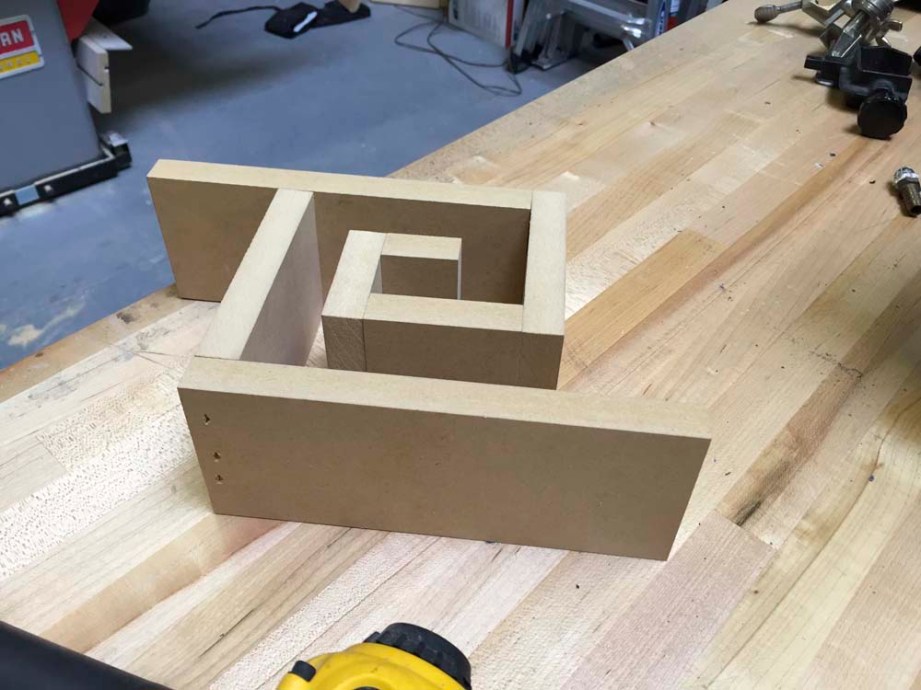
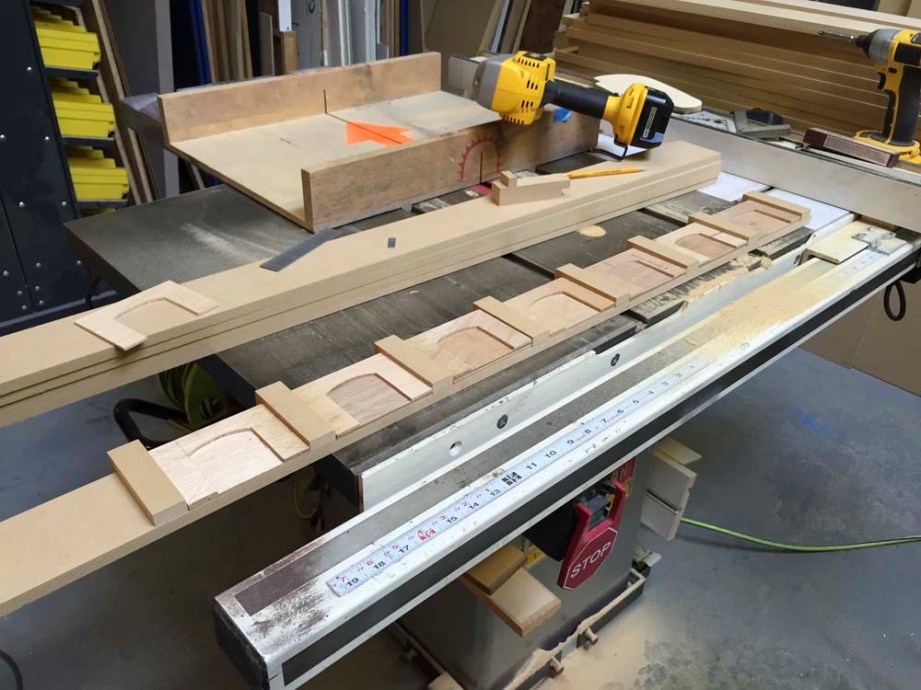
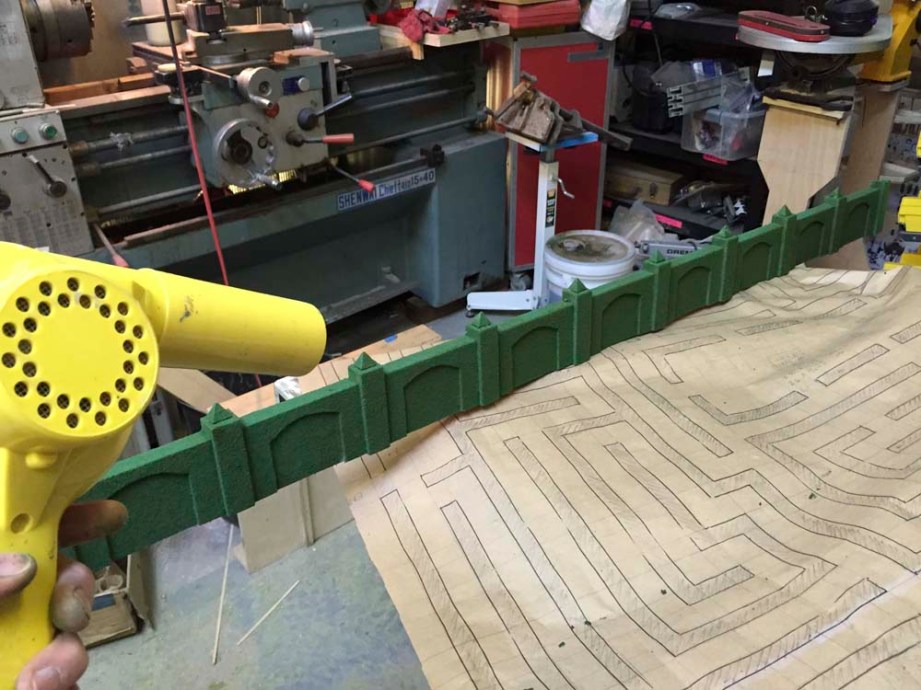
The outside perimeter is broken up with the columns. The hedge is 3/4″ thick and the columns are 1″ square. The arch details are 1/8″ deep in the hedges. Since the inside of the perimeter is smooth, the columns can be constructed in a couple of ways. One is as whole columns, with the hedges jumping between each freestanding column. The other is as L-shapes attached to the outside of the running hedges. As this makes construction considerably easier, I chose the latter. I needed to cut 33 of the columns. This was done on the table saw by making two cuts (one long and one short) into a piece of 1″ MDF and then slicing that L-shaped piece into 1″ thick strips.
THE ARCHES
The arches are on the outside and between the columns. There are 31 of them. Because the column spacing changes depending on which side of the maze we’re talking about, I noted that there were three different sizes of arch. For efficiency, I gang cut them in three different stacks on my bandsaw. Since I needed 3/4″ thick hedges, I made the hedges out of 1/2″ material, faced with 1/4″ arches, which were then “filled” with 1/8″ thick plywood arches. This gave me the 1/8″ detent detail I was looking for.
DRAWING OF ARCH AND COLUMN CONSTRUCTION
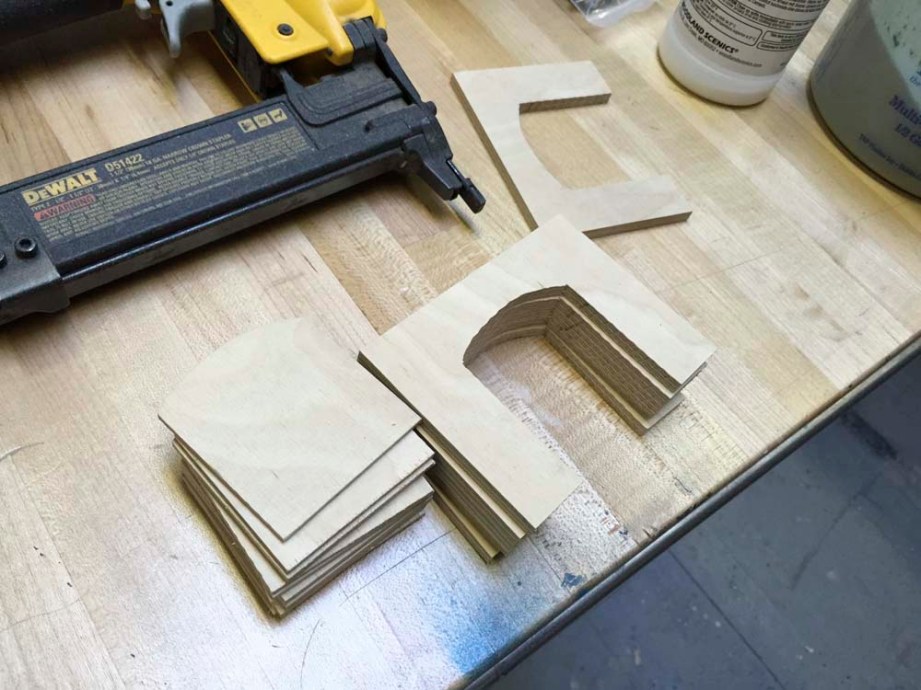
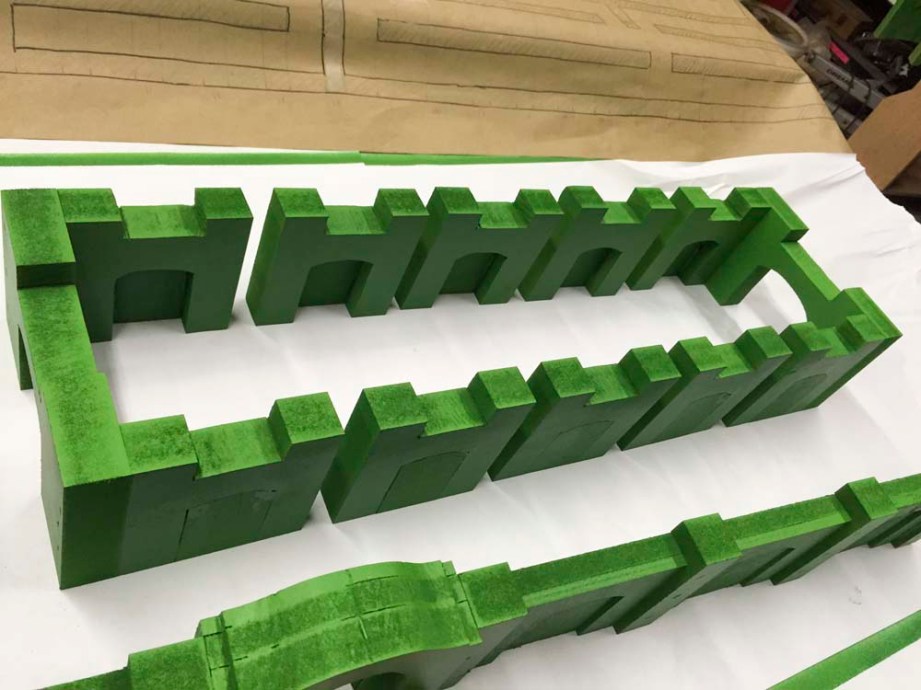
The first set of parts and pieces laid out on my bench.
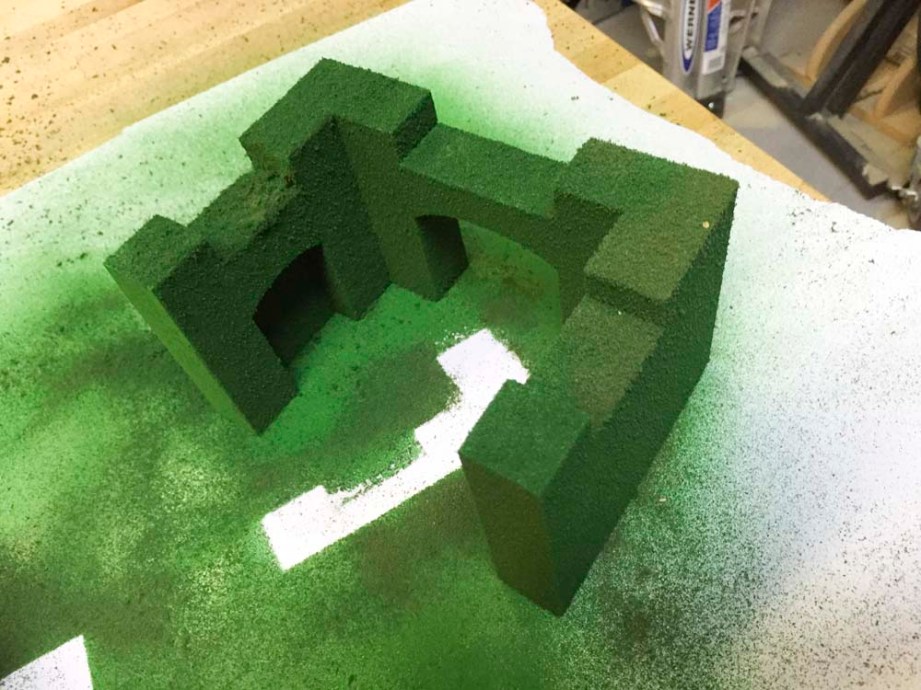
I began to assemble the long sides of the maze.
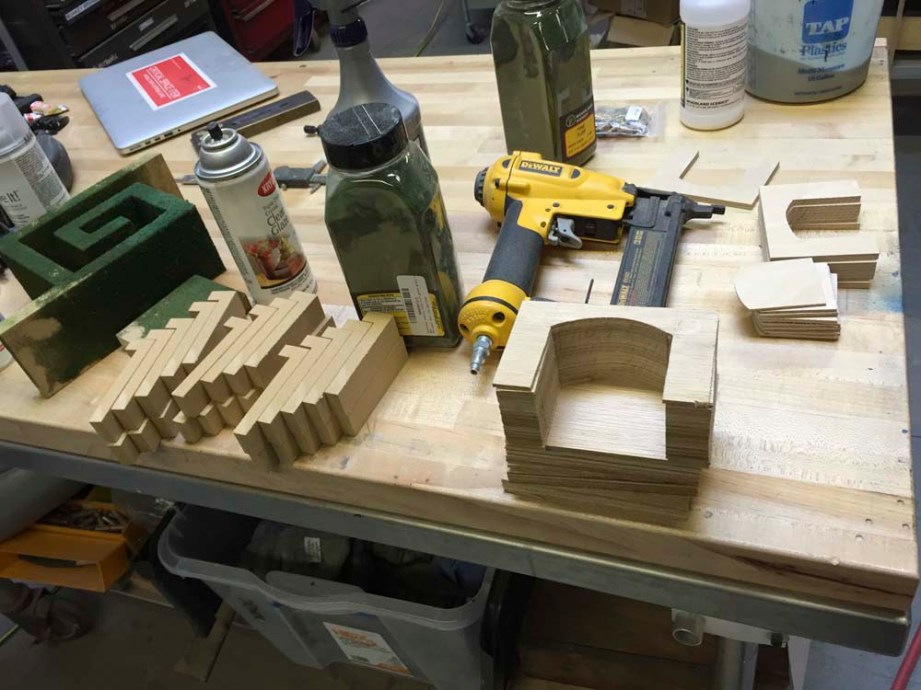
The front is coming along. Behind this you can see I’ve completed and base-coated the eight pieces that make up the “heart” of the maze.
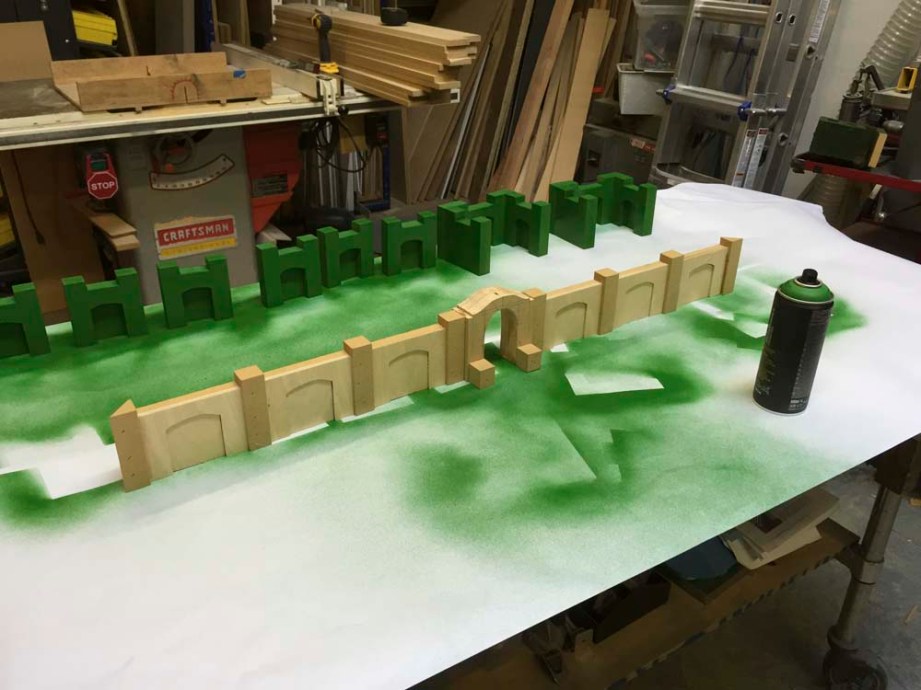
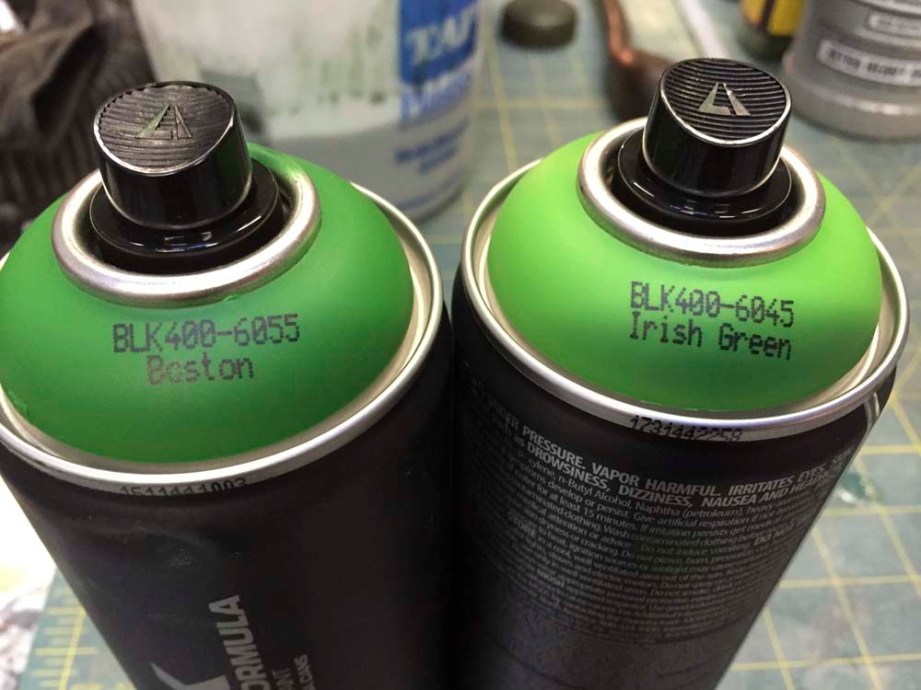
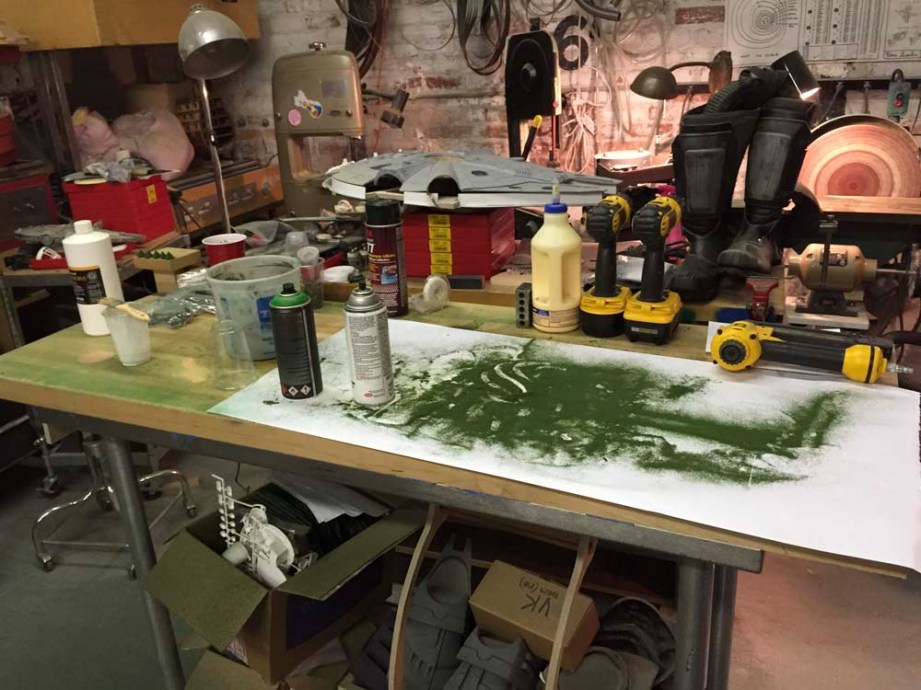
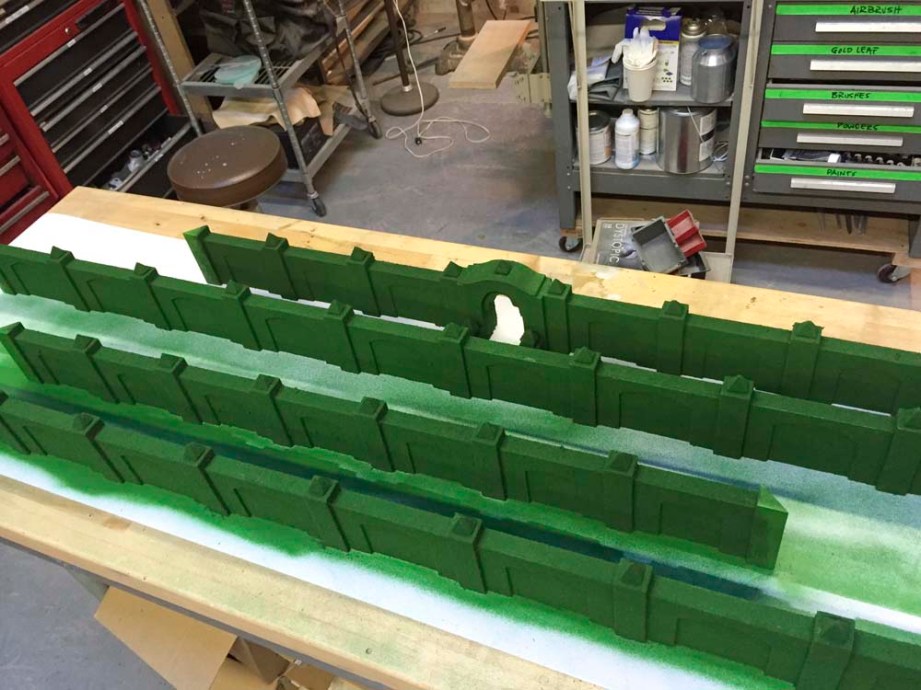
This is the spray paint that I used. Flax art supplies sells it, and it’s great stuff. It has a high color saturation, and lays down a nice rich coat.
Sixty feet of my hedges base-coated. This project stretched spacial management in my tiny shop to its limit.

Cut some of the hedges down and coated the stand-alone hedge rows.
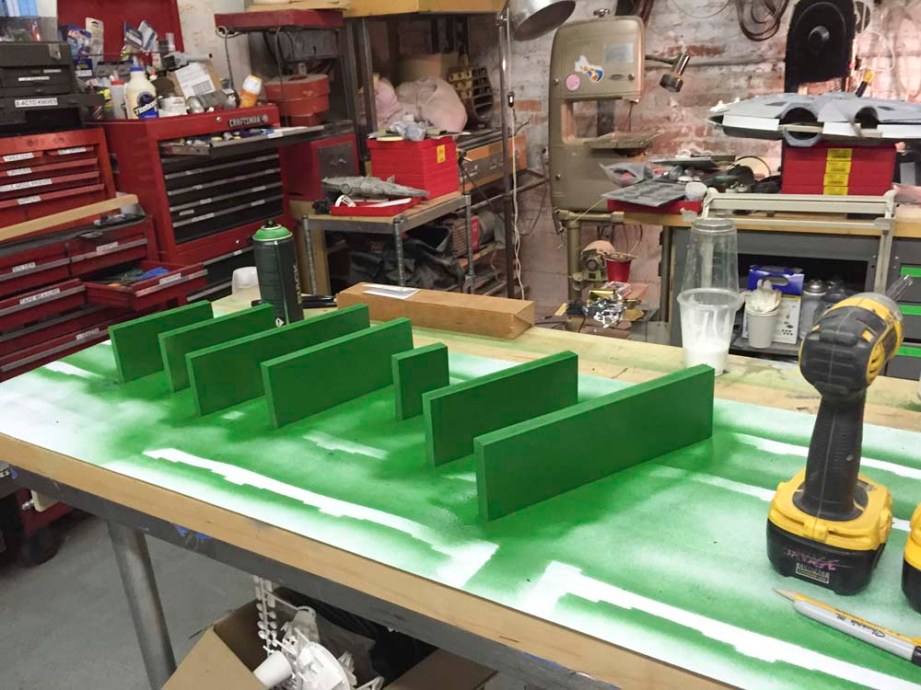
Here’s the mostly finished outer perimeter and heart base-coated sitting on my table saw.
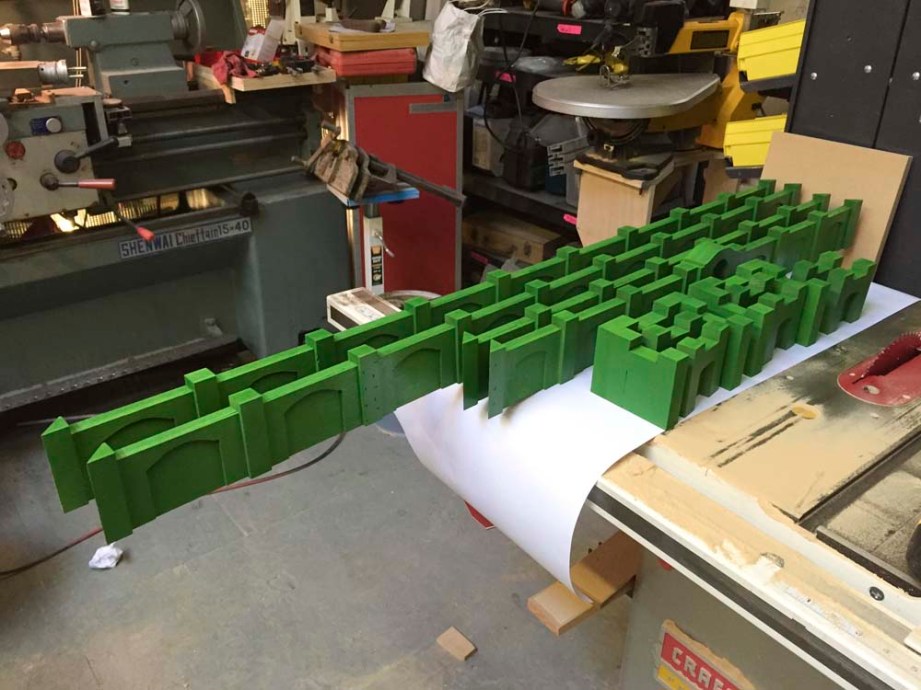
Neat!
This maze was starting to look like a TON of work.
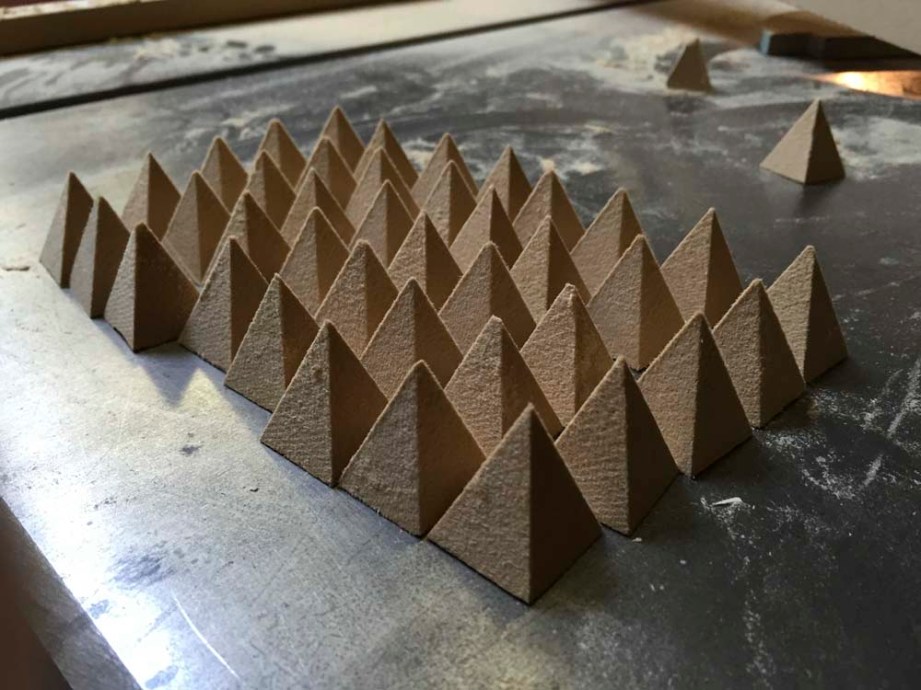
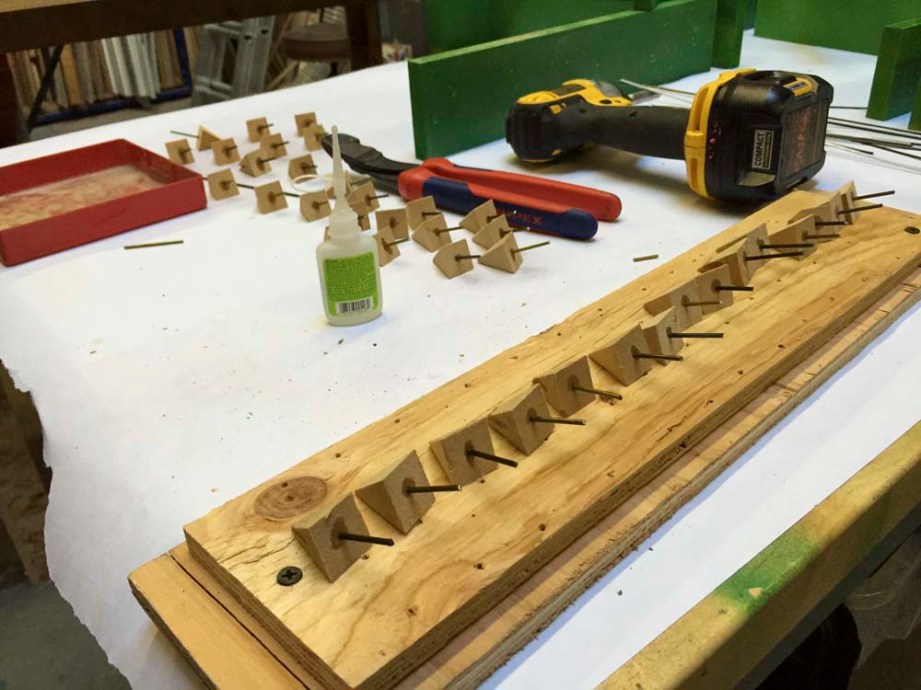
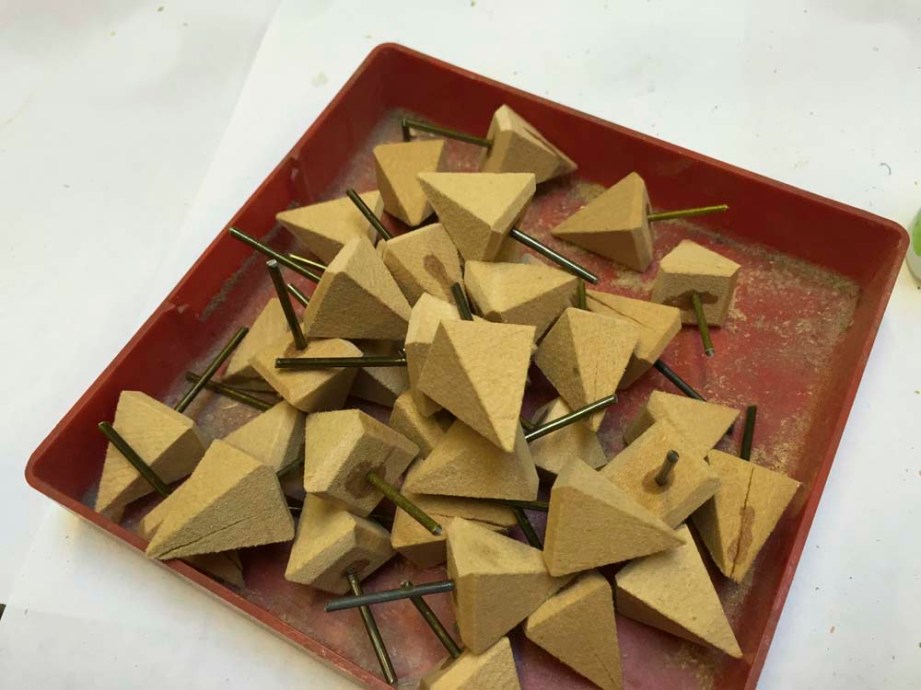
COLUMN CAPS OR “CROWNS”
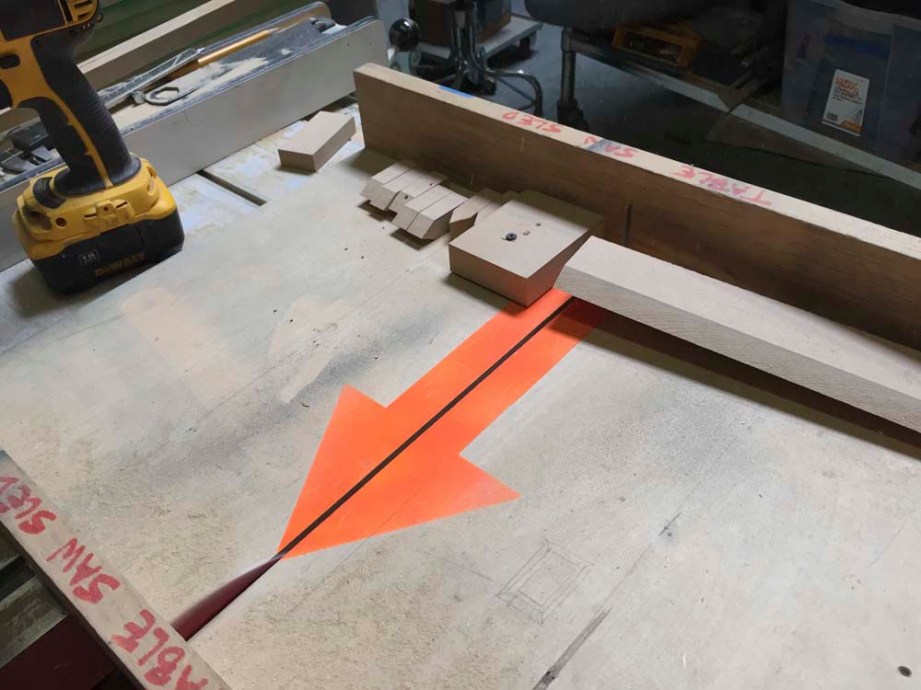
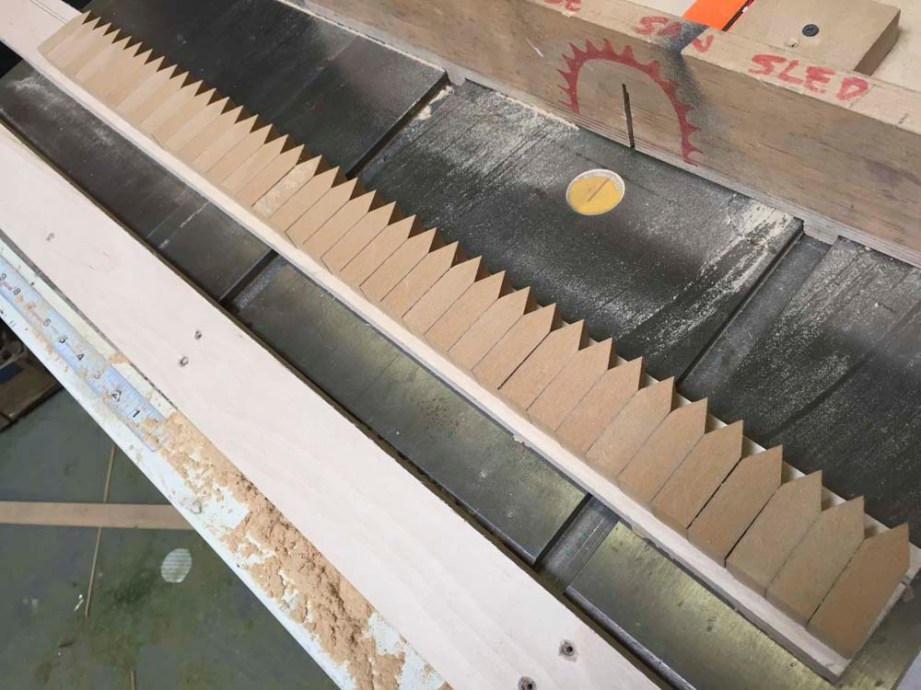
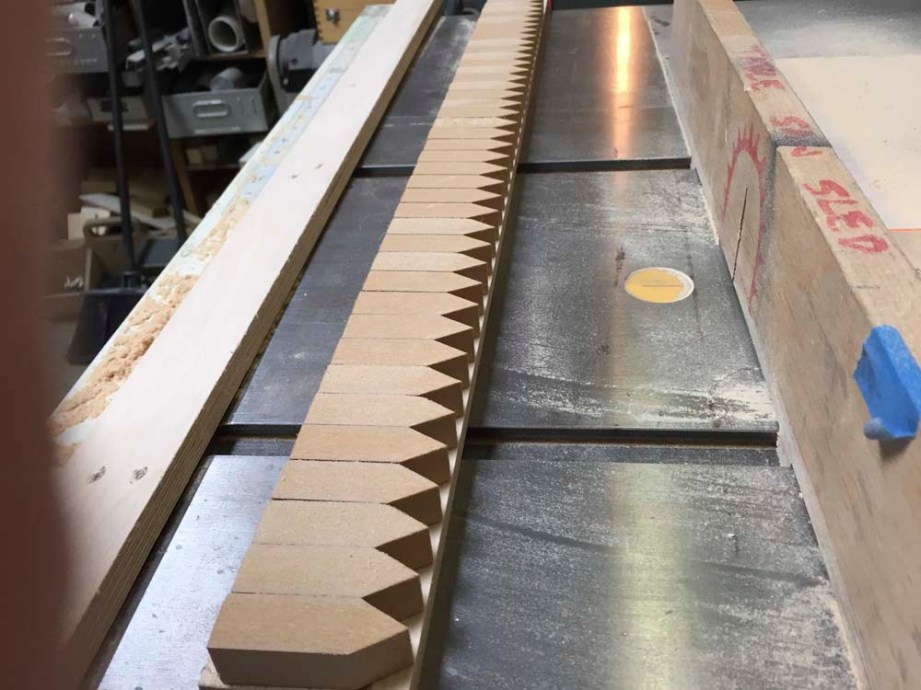
As I said earlier, each column in the outer perimeter of the maze is crowned with a small pyramid of hedge. I wanted to make these all at once. So I took a piece of 3/4″ MDF and used my table saw to cut an edge of two 26-degree angles, like a knife. This is a hard cut to make; I achieved it by sandwiching the MDF between two long strips of plywood so that the MDF was held at a constant height above the blade while I cut the knife edge.
Then I used my sled and a backstop to cut this piece into 33 individual pieces.
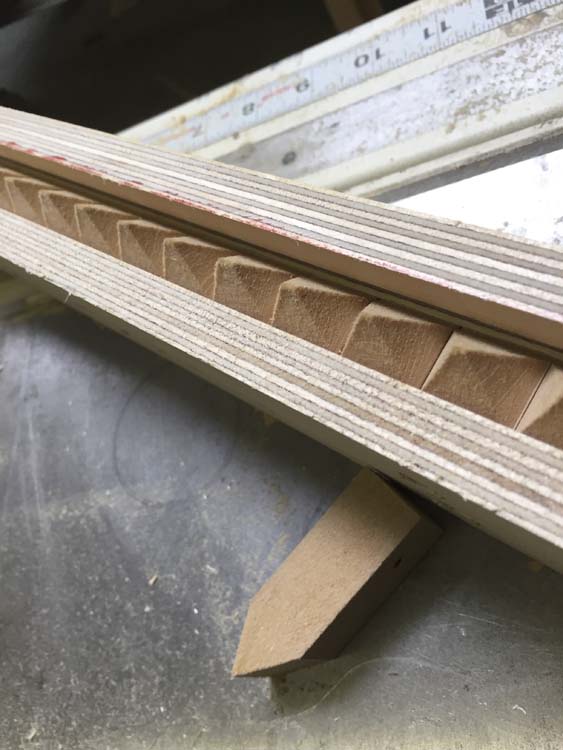
I lined them up on a board …
… and stapled them between two pieces of ply and fed this construction back through the table saw set at a 26-degree angle.
Voila!
Flipped it 90 degrees and used the blade to cut them down.
My completed pile.
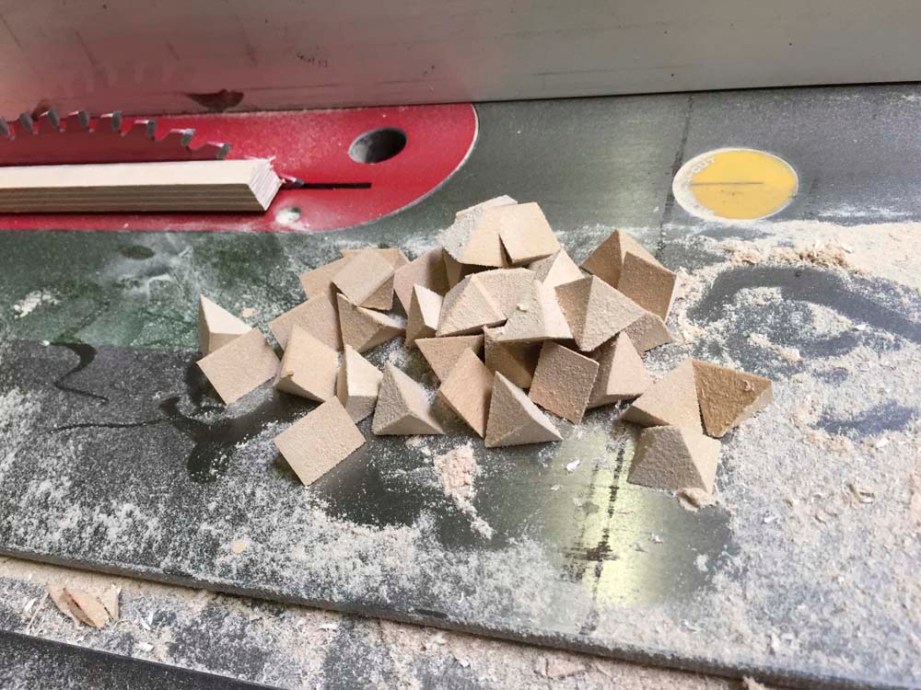
With some coat-hanger wire pins I used to attach them to my hedge columns.

NICE!
Tada!
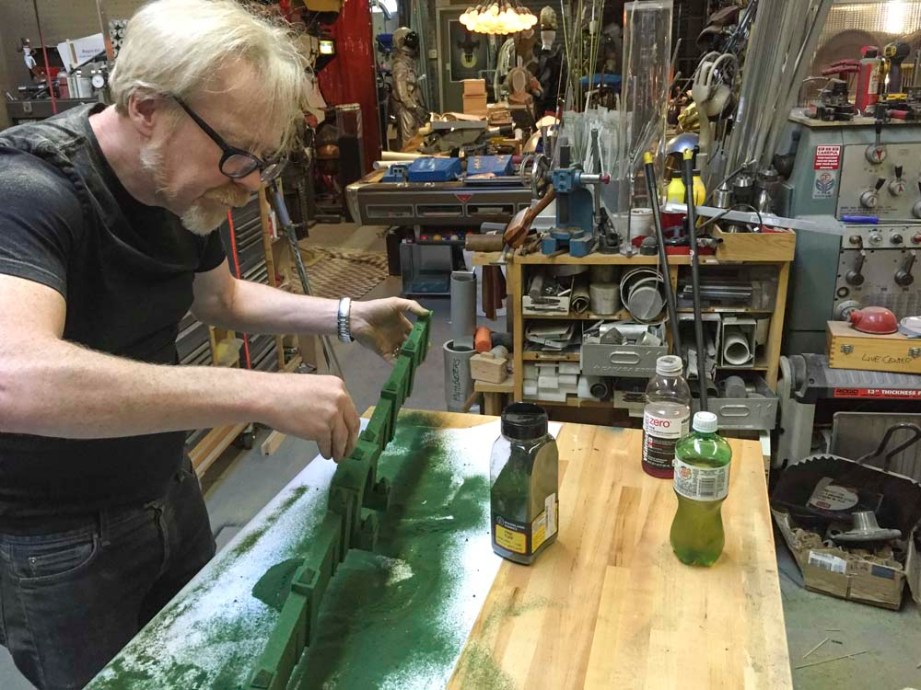
FLOCKING THE PARTS
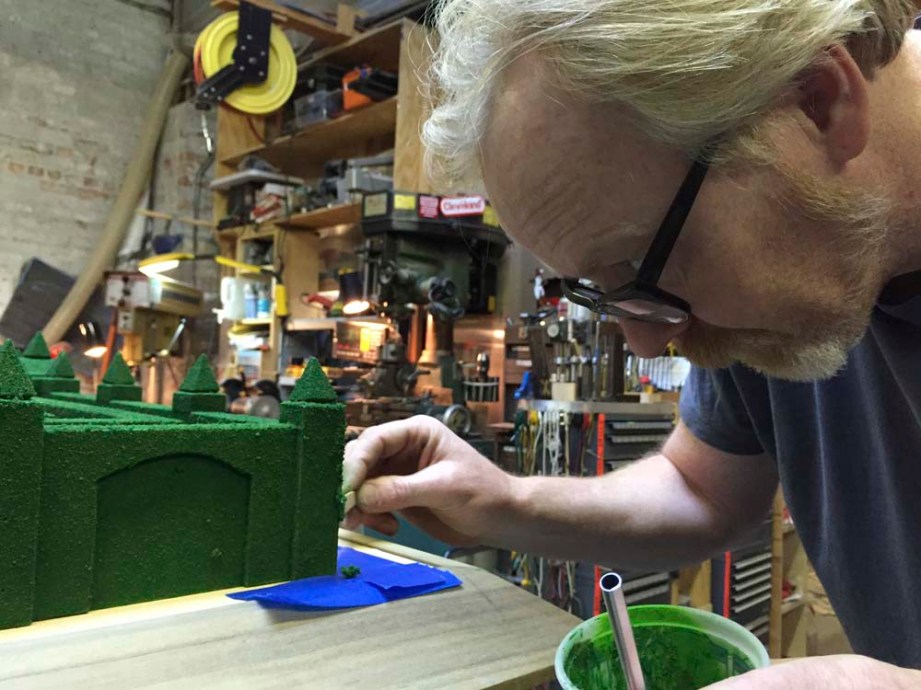
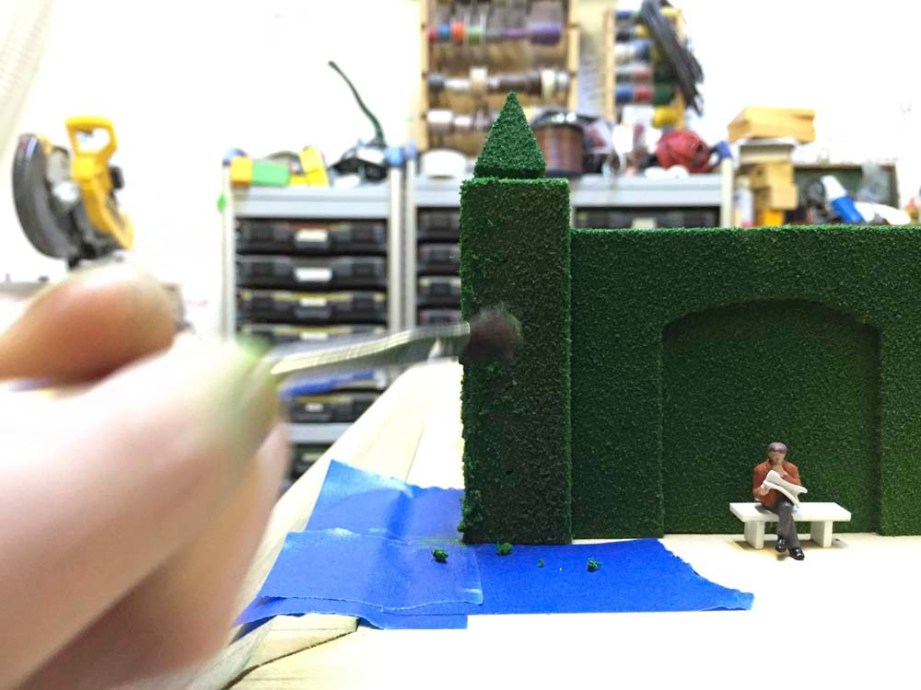
Here I’m finally applying the flocking to the entrance. As the most complex of all the parts I had to flock, I would normally do this one first, but I also had to balance the fact that this was also the most visible part; the piece that would get the most photographs. Therefore I flocked the other parts of the perimeter first, to make sure I had my process bulletproof before applying it to the part that would have the highest profile.
ON FLOCKING
I keep using that word, but it bears explanation. Flocking is usually used in model making to describe a fine, velvety texture. Often used in architectural and train modeling to simulate grass and landscapes, the process is pretty simple. The piece to be flocked is coated with a glue which stays wet for a reasonable period of time, and dries clear. Once coated, the flocked piece is left to dry. The glue grabs the flocking as it dries. I have better results by undercoating my pieces with a green paint, so that the color of my wood doesn’t show through. This allows me to “hide the crimes” as we used to say in SFX model making.
I look at his picture and think, “My posture is terrible!”
My son Thing2 took these photos. He’s a good photographer.
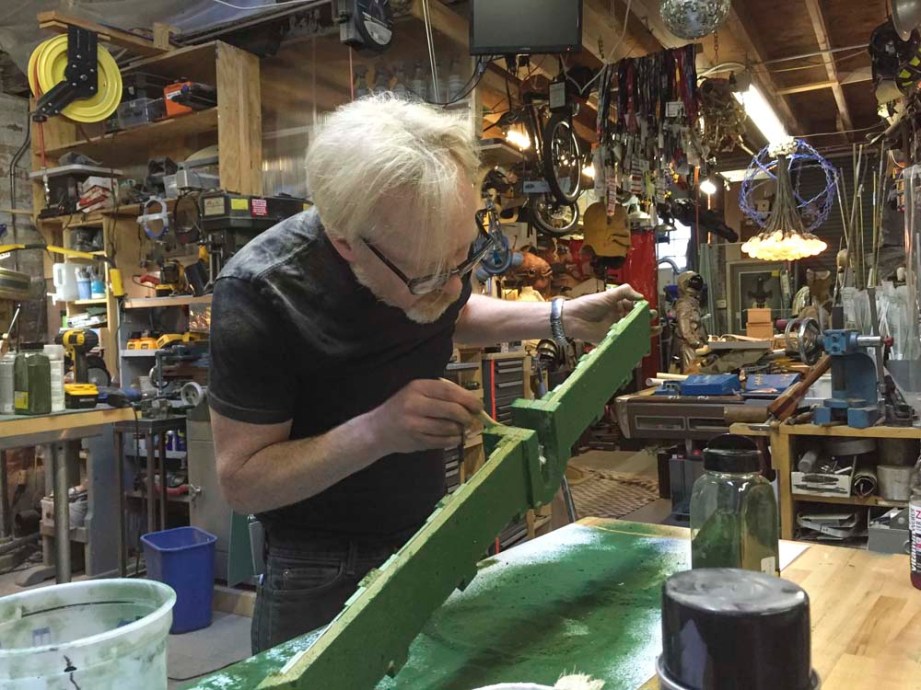
I had green dust EVERYWHERE. On the floor, in my hair. This was a dirty build.
My old blowdryer handily makes short work of the glue-drying process.
Now it’s starting to look like progress.
Ahhh.
Another coat of paint to even out the color and make it uniform across all the hedges.
Some more completed parts.
It’s worth noting at this point that it was dawning on me just how far I hadn’t gotten and how much work there was still left to do: the flocking of dozens of feet of wood, maze construction, figure placement, benches, kiosks, streetlights, wiring, etc.
I felt a bit overwhelmed by the size of it. But here’s the thing: I’d been in discussion with the organizers of the traveling Kubrick exhibition. I’d let them know that I was making this maze and that I was willing to send it to them and lend it to be part of their exhibition. Fantastically, they’d said yes.
This is unprecedented for me. But it also put a distinct timeline upon my maze; it had to be finished within a couple of weeks.
A BREAK
There was still a TON to do so I did the natural thing: I took a break and worked on something else.
Specifically I took a day and upholstered the black vinyl part of Captain Kirk’s Command Chair from the original series of Star Trek.
It was just the kind of palette cleanser I needed. Refreshed and energized after being able to actuallycomplete something, I entered the fray with my maze again.
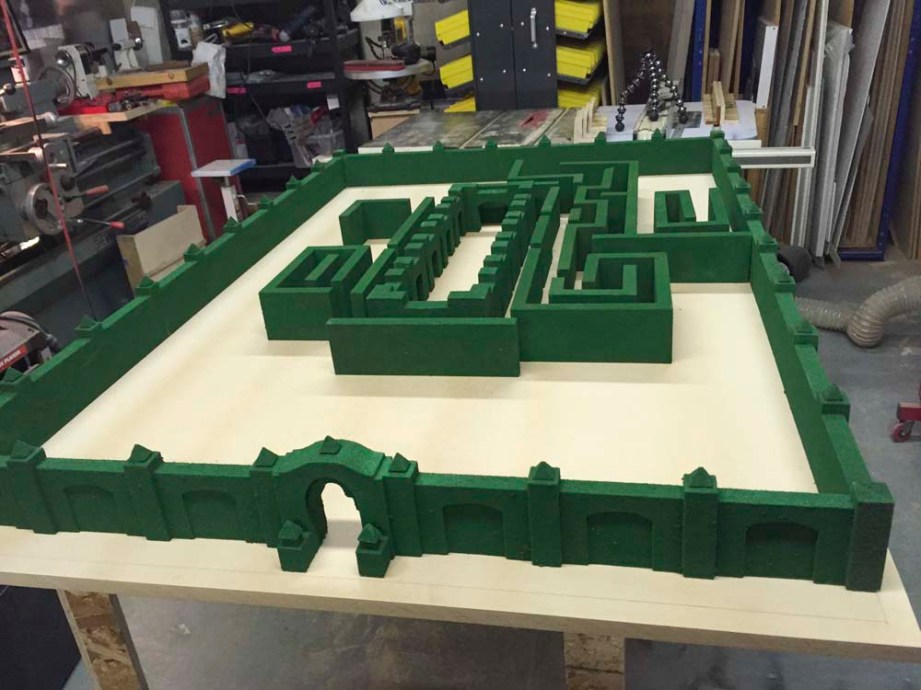
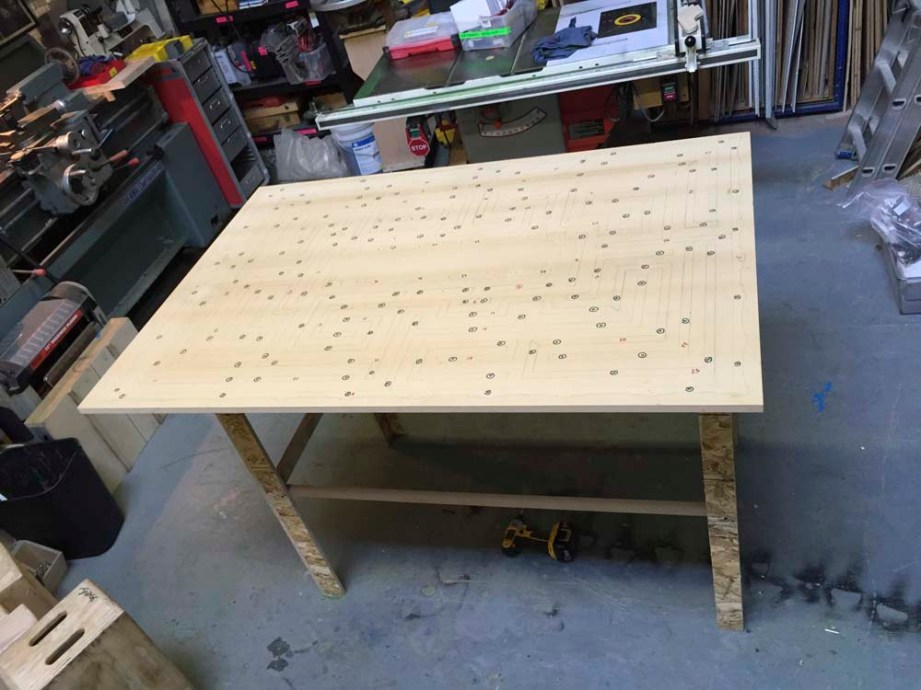
Now it was time to get ready to lay the maze on its baseboard. I laid out my paper map and pondered the proper order of things.
Since the perimeter and center were completed and ready, I decided to start with those and fill in the rest.
I’m feeling pretty good, even though I’ve not even started on the interior hedges yet. Lots of flocking ahead.
As I completed the interior hedges and flocked them, I started placing them on the base board to gauge my progress.
I found that seeing the parts of the maze come together was so inspiring, I decided to do it before flocking. I needed to SEE progress. This gives me energy that propels me through he tedious bits. And this final stretch WAS tedious. There were over 50 separate parts to flock. My sons Thing1 and Thing2 both chipped in to help, as did Frank Ippolito. Together they coated perhaps a dozen parts of the maze for me, and that was significant in helping me get over the hump.
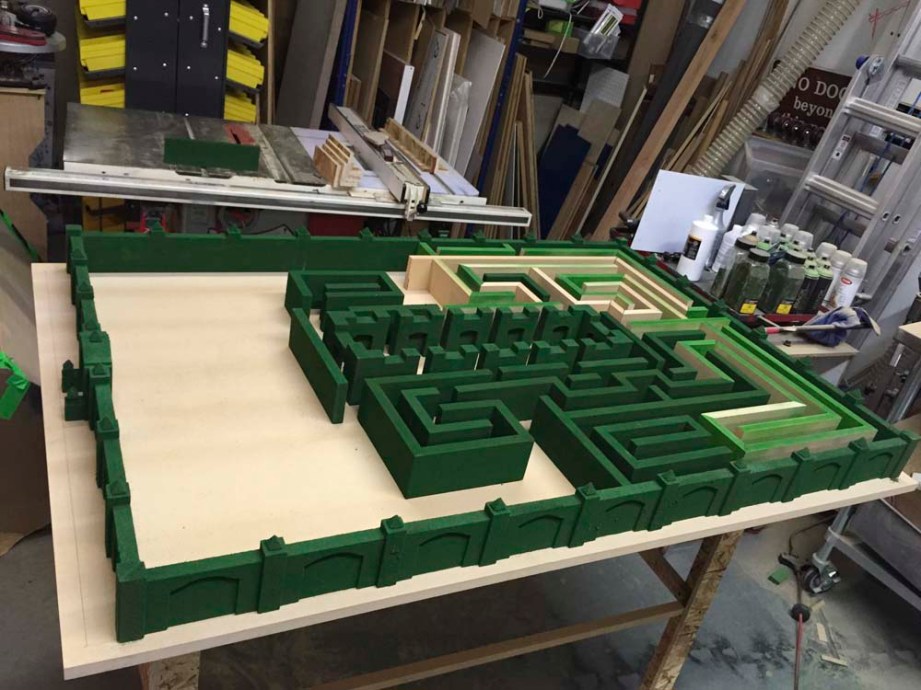
A few hours later I had it.
Once I had this it was time for final positioning: I spent over an hour tweaking the minute positioning of every single hedge. Small errors — a 16th of an inch here, an 8th of an inch there — can make a huge impact on surrounding hedges. Compounded error. Think of it this way: if my measurement was off by a 32nd of an inch per hedge, it’d be off by an inch off to one side. This was definitely not a job that could be simply laid out from one end to the other.
Much had to be tweaked to achieve the correct layout that felt balanced. There are reasons this was non trivial, but they’re boring so I won’t go into it. Suffice to say that I had to err on the side of it “feeling” right rather than “being” right.
Also: I’d decided early that I’d make all my corner joints bevel joints: cut at a 45-degree angle. My feeling was that I wouldn’t be able to hide every single one with flocking, and that if any one was visible, it’d be more attractive to see that bevel joint. I stand by that, but the cascading effect was that it was very difficult to maintain perfectly square assemblies. This also meant that as I laid stuff down, anything that wasn’t square showed up immediately by throwing everything around it out of square. This meant that I had to make many tiny adjustments to each hedge piece as I was laying it in place.
The end can’t be far away now.
WHUPS
I screwed up. After gluing all of my column crowns in, it was pointed out to me that they were too short. A review of the reference material proved I’d paid too little attention to the angle/height of the crowns in the original. This was undeniable. I had to do the whole thing over again. It took two more tries because I messed up another time, but I finally, FINALLY, ended up with this:
They look damned good.
New crowns pinned and glued with posts. The posts are made from coat-hanger wire. I save all my wire coat hangers. I keep a lot on hand in my shop for various quick fixes, kluges, and general use. I use nippers to cut the straight bits out and I keep them in my wire rack. There are few wires I find as useful as coat-hanger wire. The clue is cyanoacryate. CA glue is my bread-and-butter glue.
I like trays. Note that I chamfered the bottom edges of the crowns on my disc sander. They’re not perfectly consistent, but that’s fine; it’ll be close enough that it wouldn’t get noticed, and the inconsistency helps with the realism. Reality is messy.
Laid out for “the process.” Paint, then glue, then flocking, then paint again. THEN they get attached.
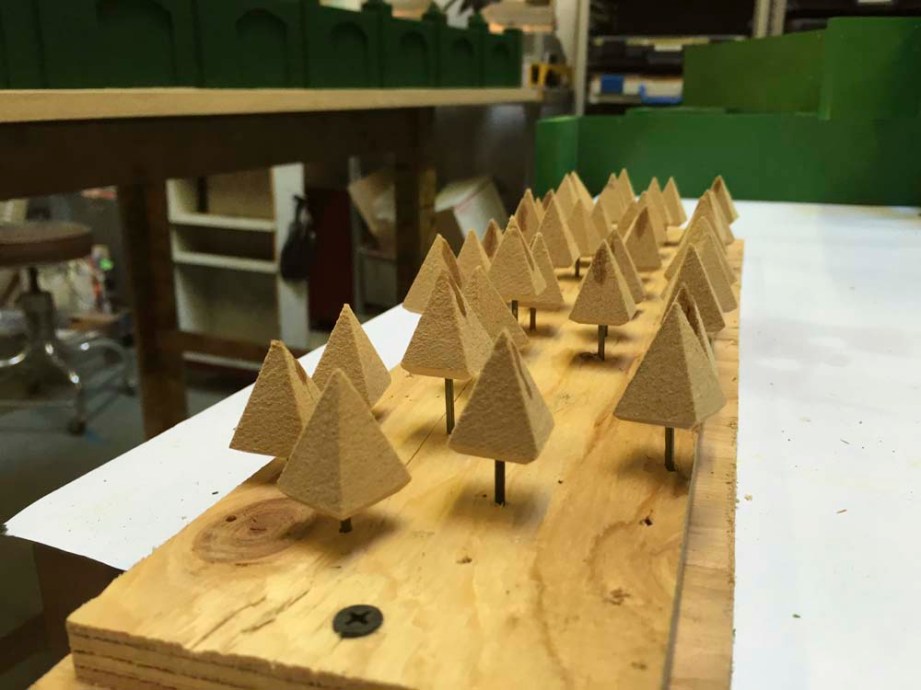
Painting.
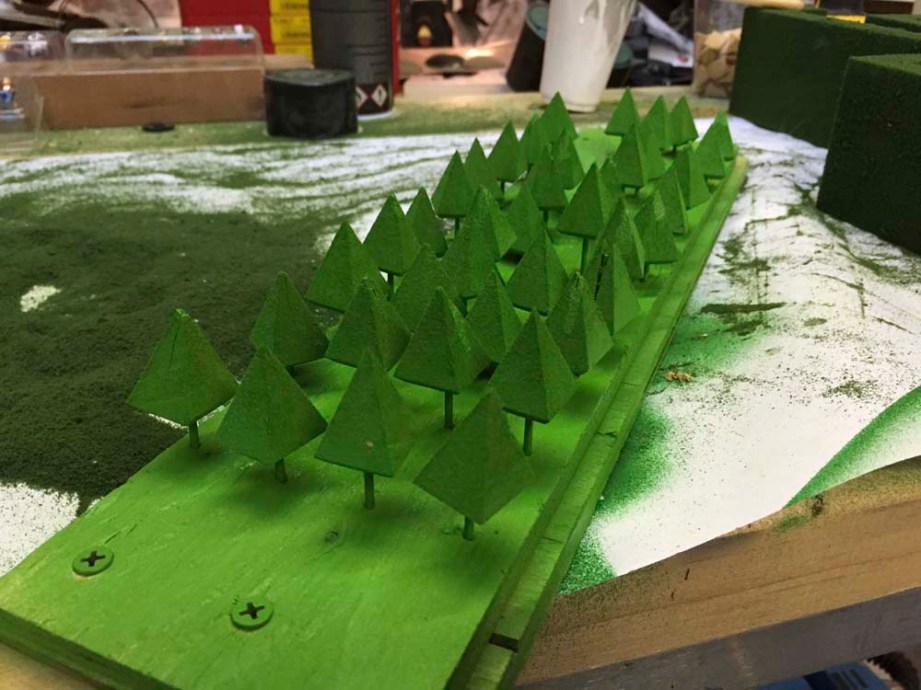
FLOCKED! I love how this looks like a little forest.
Pulling out the old crowns only took about 30 minutes. The task was a confirmation of my build methods, as they were tightly in there and hard to remove. This is great, as robustness is one of my goals. The new crowns are, if anything, even more secure, as well as being much more accurate. I have to admit that I find re-doing something I’ve gotten wrong more tedious than almost any other process, but it’s necessary, and so I force myself to bear it. Even though the removal, re-making, and re-installation of the crowns only took about two hours total (not much in the grand schema of this job), I still had to take several breaks during it to do other stuff. Maintaining my energy through the tedium is tough.
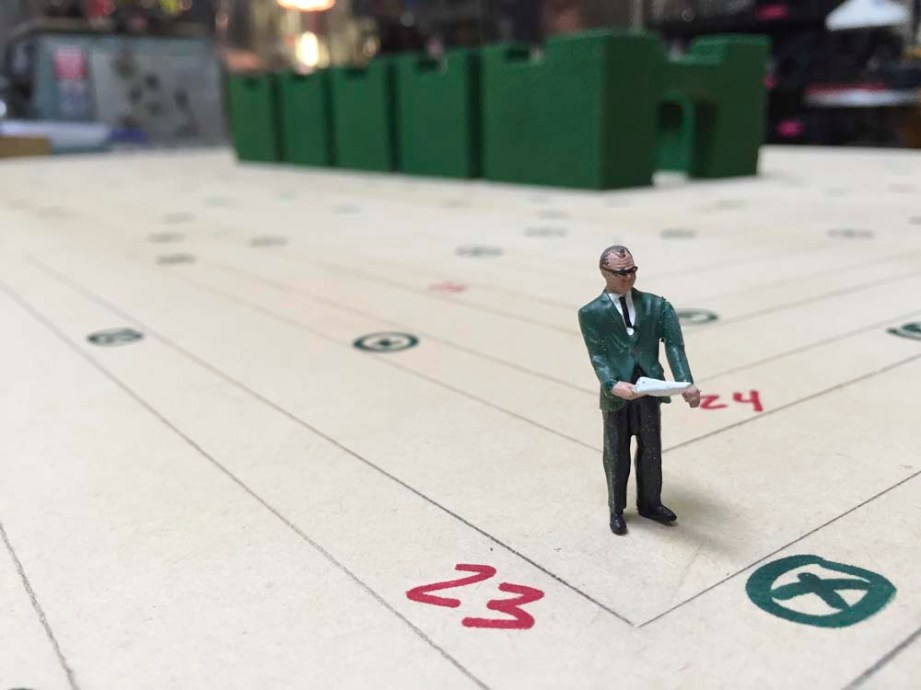
FINAL ASSEMBLY
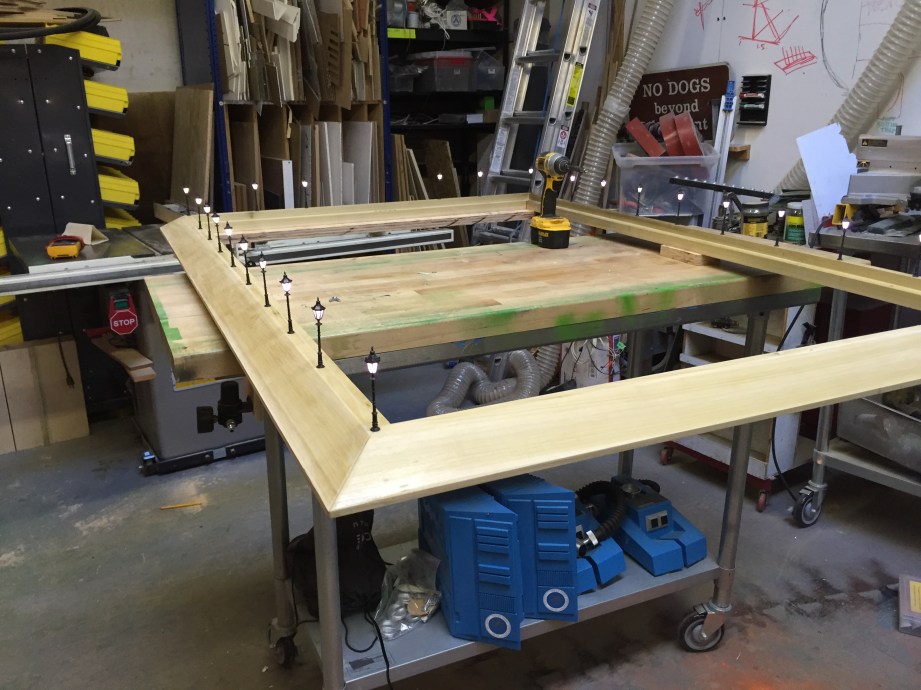
Here’s the baseboard after tracing and numbering every hedge position. The green circled X’s are screw holes. I didn’t want to glue the maze together; I wanted it bulletproof, so I went with pilot holes and 3″ screws for every hedge.

Yep, number 23 goes right here …
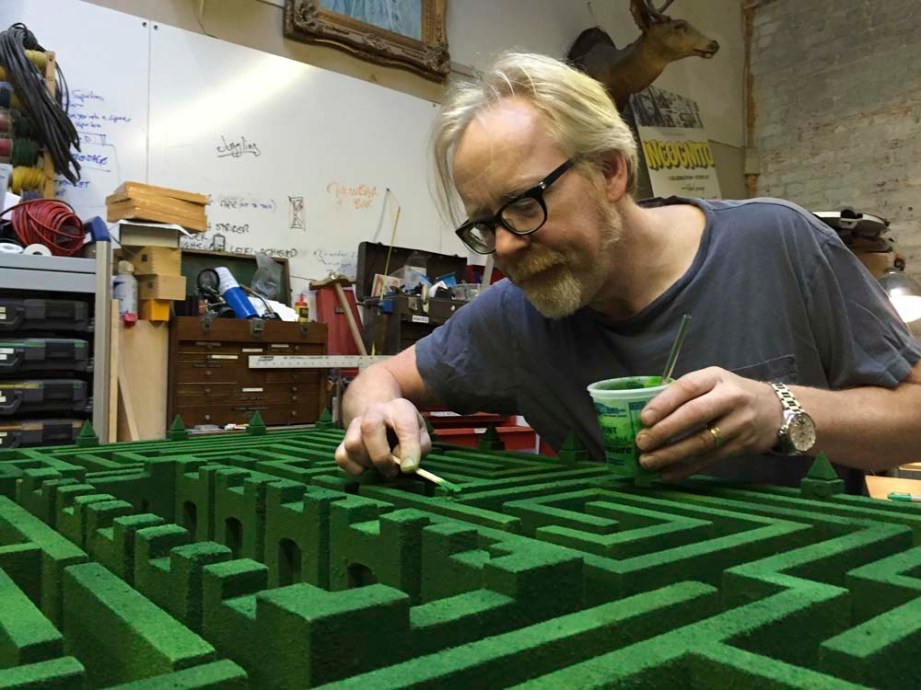
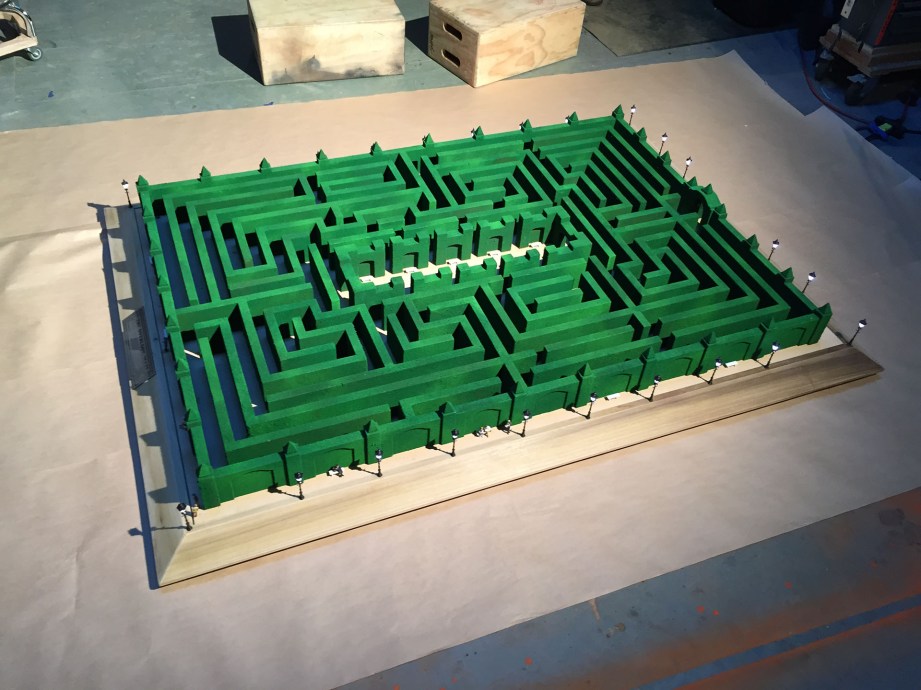
After another dozen hours or so and all the flocking was finished. As I’d been flocking, some pieces were painted a week apart. There was dust, and different people have different hands when laying down the texture. This meant that once everything was laid out, the colors looked inconsistent. I was always going to do a final paint coat to tie the whole thing together, but Lee Unkrich pointed out that the original model had a variegated paint job. Not a single color, but somewhat mottled.
To achieve this without spraying on my baseboard, I put down a tarp on my pool table, laid out the maze, and used two colors of spray paint to get the proper “mottled” texture I was looking for. Now I’m getting very excited. The end is much more clearly in sight.
The base board waits …
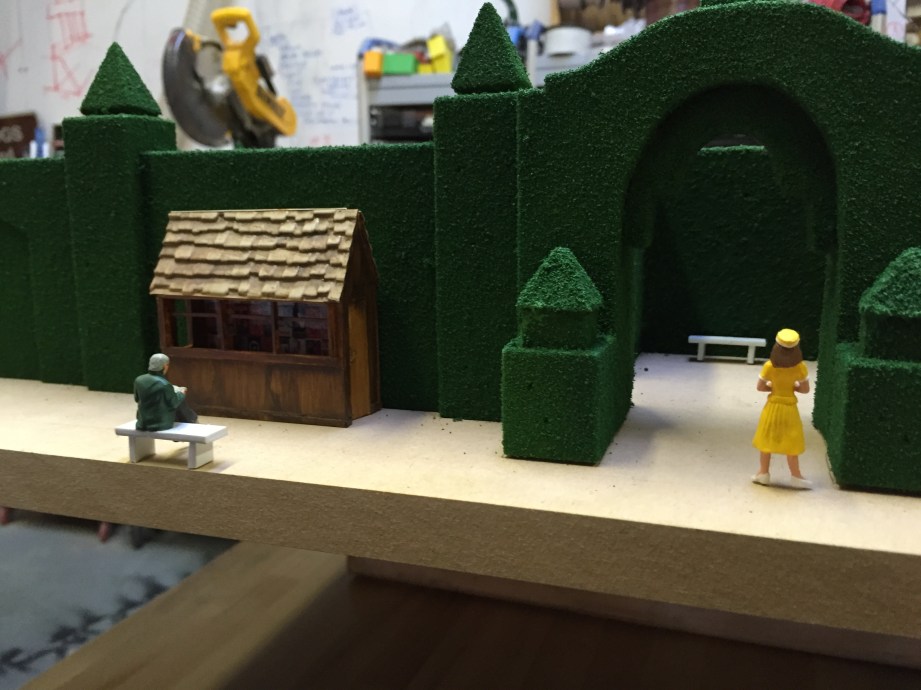
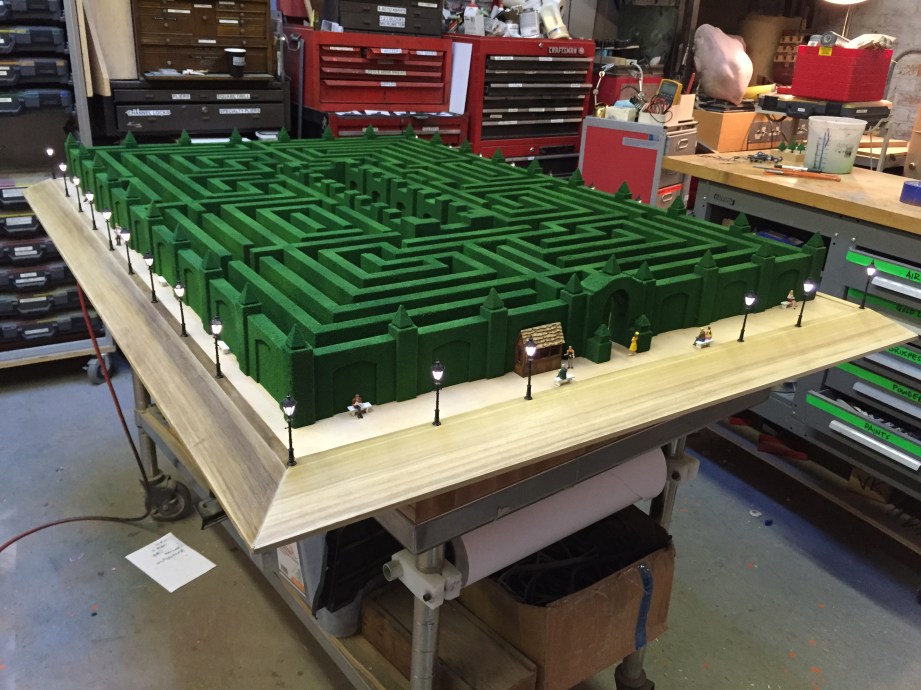
Aaaand here it is! All screwed down with figures pinned in place and everything. Each figure is held to the baseboard with a tiny piece of .030 spring steel wire and CA glue. The benches are made from styrene sheet that I cut into benches and legs and glued together with a weld-bond glue. The benches are also pinned down to the baseboard.
The next step is the frame. The original map in the film has a beveled frame surrounding it. Luckily for me, my next-door neighbor Bobby is a master carpenter with a full shop. He does high-end architectural work and cabinetry. He ripped the moulding to the exact profile I drew. He used poplar and it came out beautifully.
Here’s a profile of the moulding.
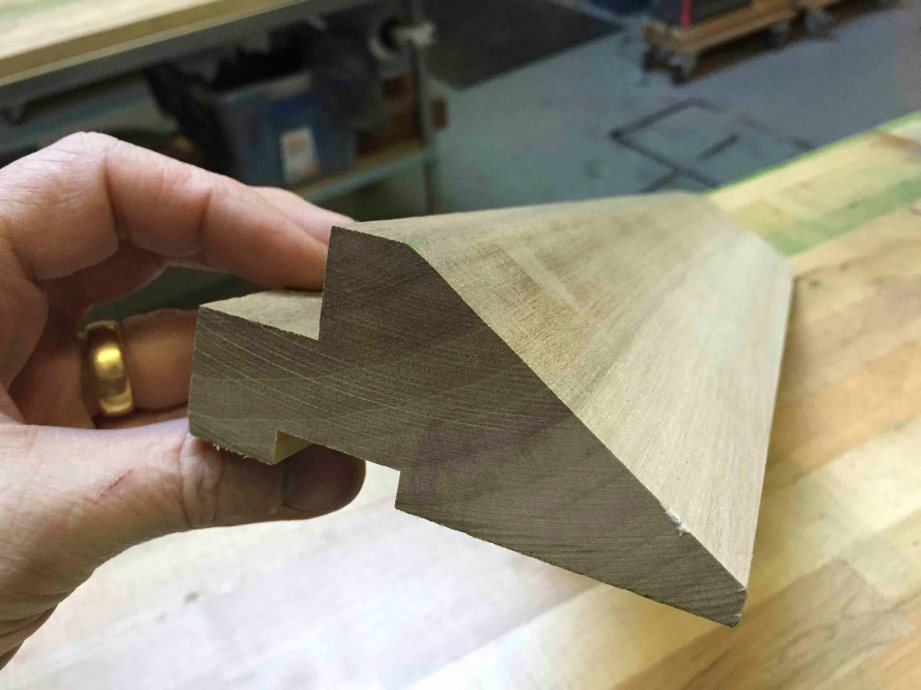
The wide lip is so I have some meat with which to attach the moulding to the baseboard.
The channel cut out of the bottom serves a specific purpose. That purpose is streetlights. The original map has old-time streetlights surrounding the perimeter of the maze. I found a very good facsimile of them. I didn’t want to attach the streetlights to the maze baseboard as it already weighed over 60 pounds and would be a bear to move around. Plus I’d be placing something delicate right at the edge. For something that will get shipped multiple times thousands of miles, this is bad form. So I decided early to attach the streetlights to the frame. Much easier to install, wire and attach. Also easier to crate.
These are the streetlights. They can tend to run expensive — over $5 apiece. This was a problem, as I needed at least a couple dozen. I found them on Alibaba.com for less than a buck apiece.

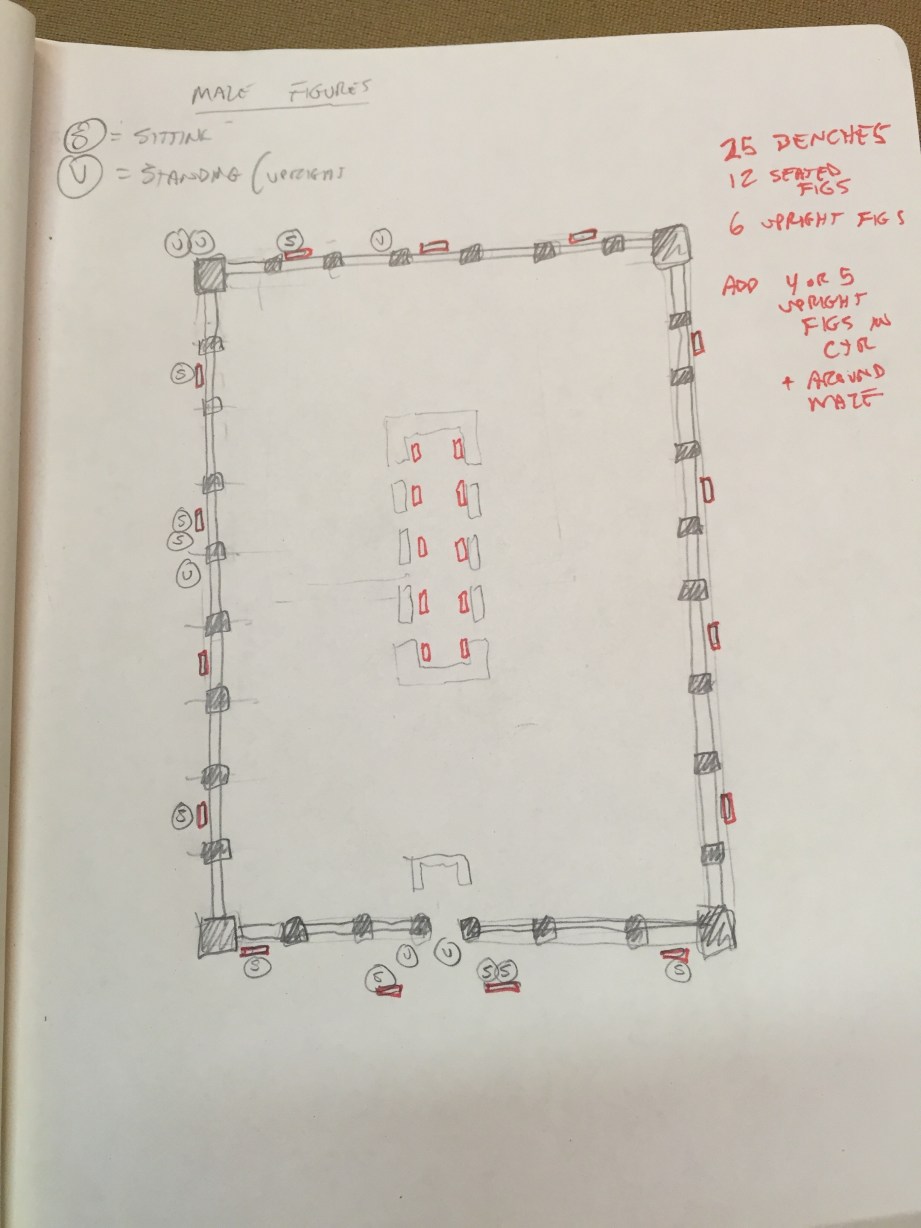
How to distribute all the parts? Here’s my map of all benches, people and streetlights.
Streetlights placed and glued in.

Each one wired in and soldered to copper tape underneath the frame.
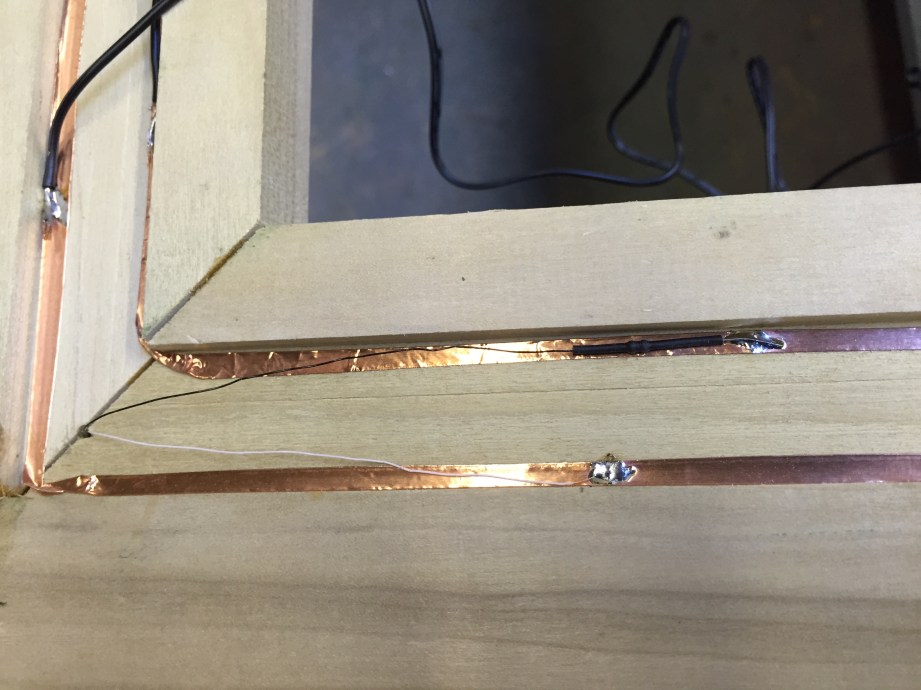
They all work!
Ahhhh. That’s satisfying.

Some details.
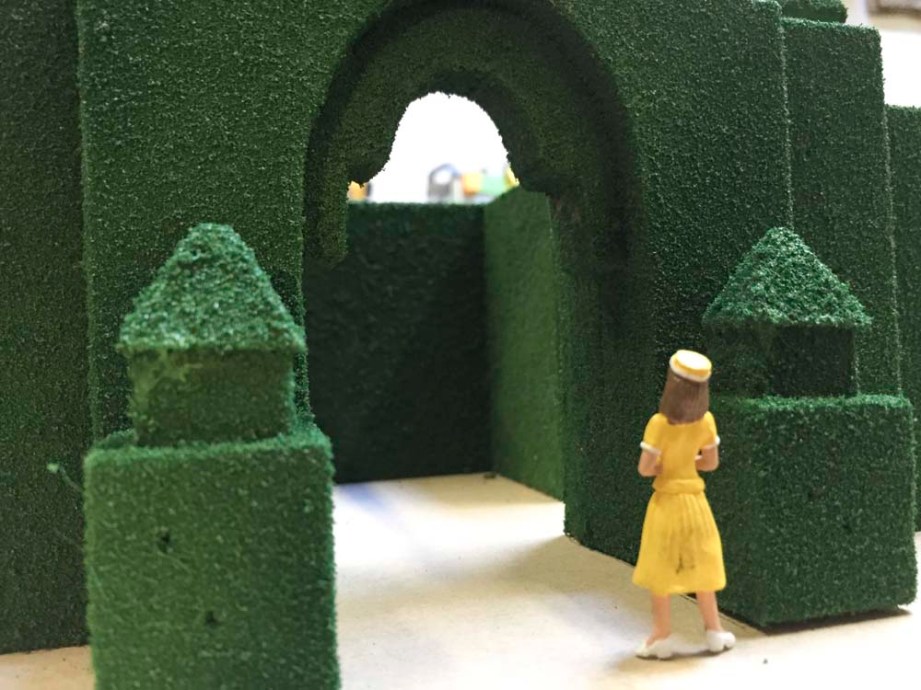
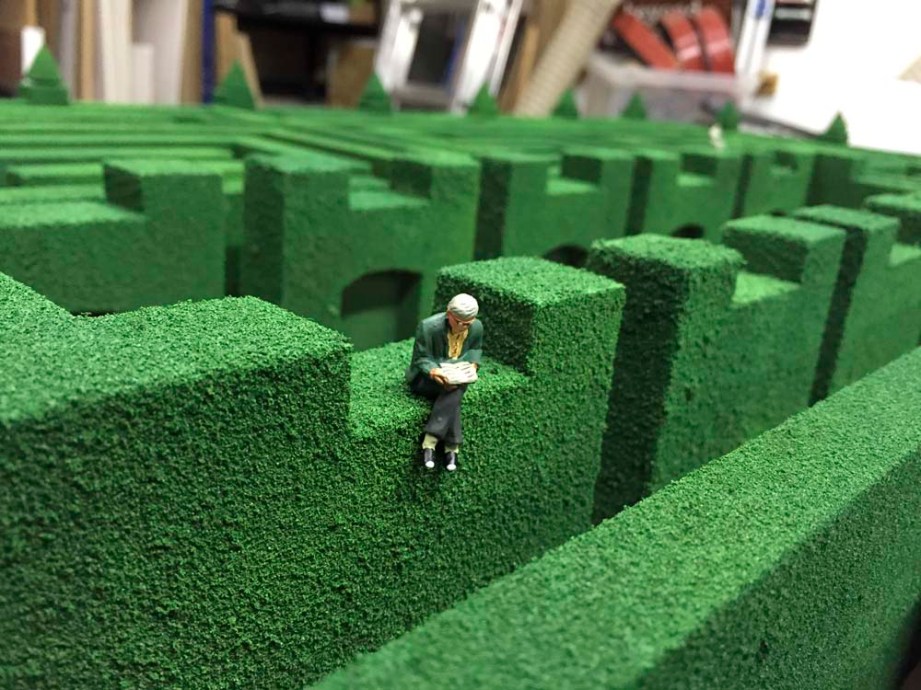
Don’t bother me I’m reading (instant New Yorker cover).
I was close now. I had to do some repair on some of the seams where hedges joined together. Occasionally small differences (and some large gaps) ruined the illusion of a continuous hedge. For these repairs, I sprayed some of my spray paint into a cup, and mixed in some of my powdered grass. Then I filled the seams with a two-step process: I spackled in the filler material into the crack, and dressed it with a small brush to blend the repair in.
A small tongue depressor applies the fix material.
The corners of the outside needed special attention.
And a stiff-bristled acid brush blends in the repair. The guy reading the newspaper didn’t seem to mind.
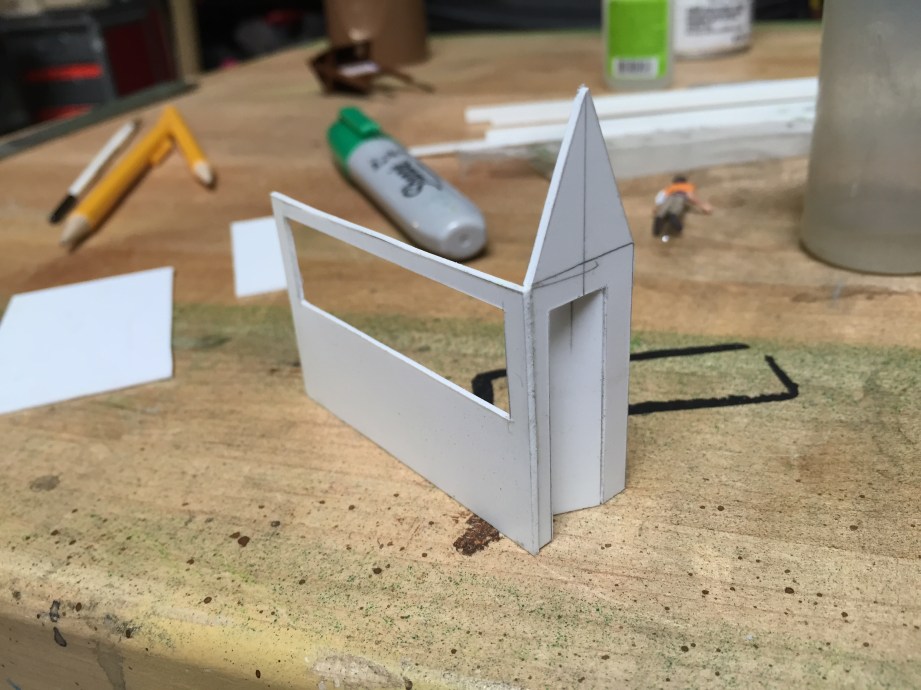
I also made progress on the news kiosk.
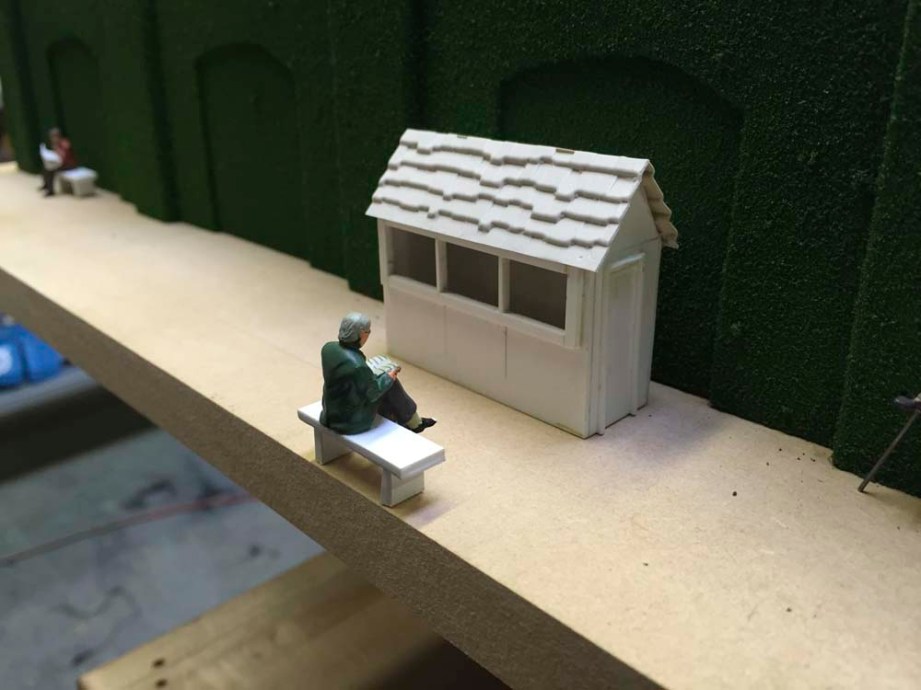
Looks great! But:
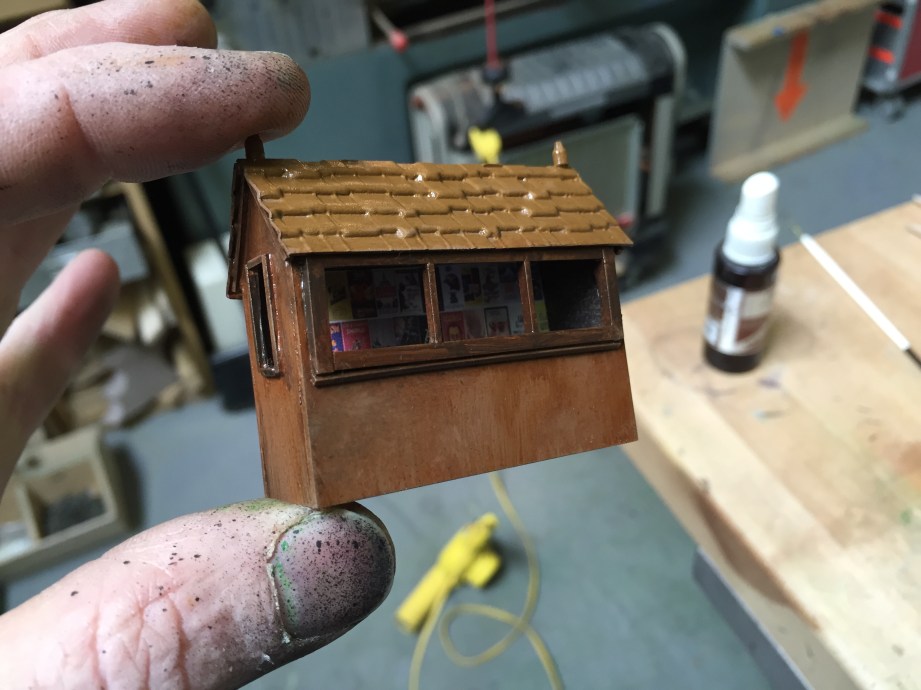
The problem was that I messed up my scaling and built the news cabin and the kiosk the wrong sizes. So I had to re-build the entire pair of structures from scratch.
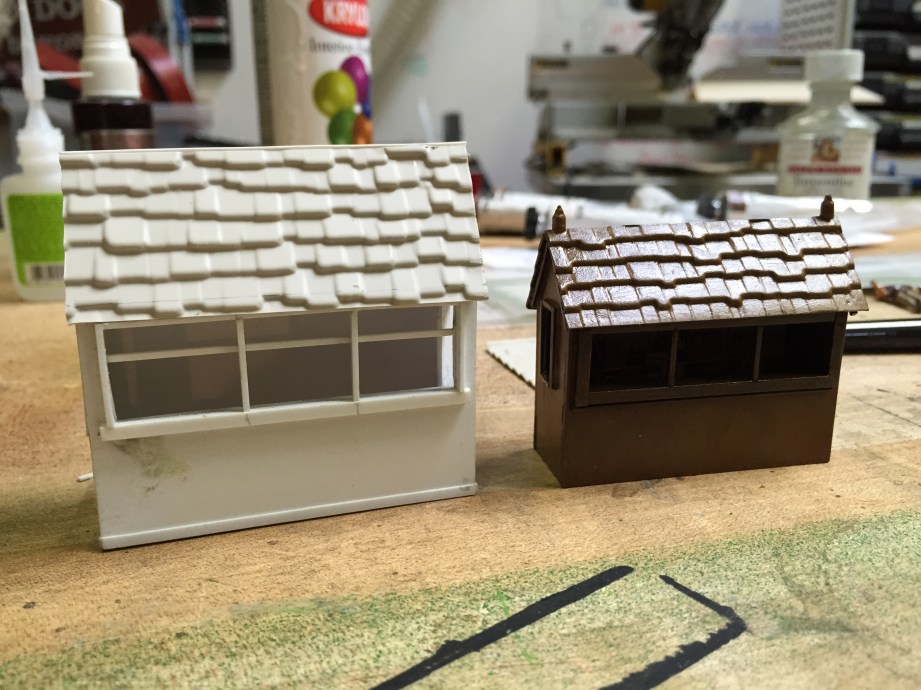
The new one next to the old one. Much better. More accurate. Sigh.
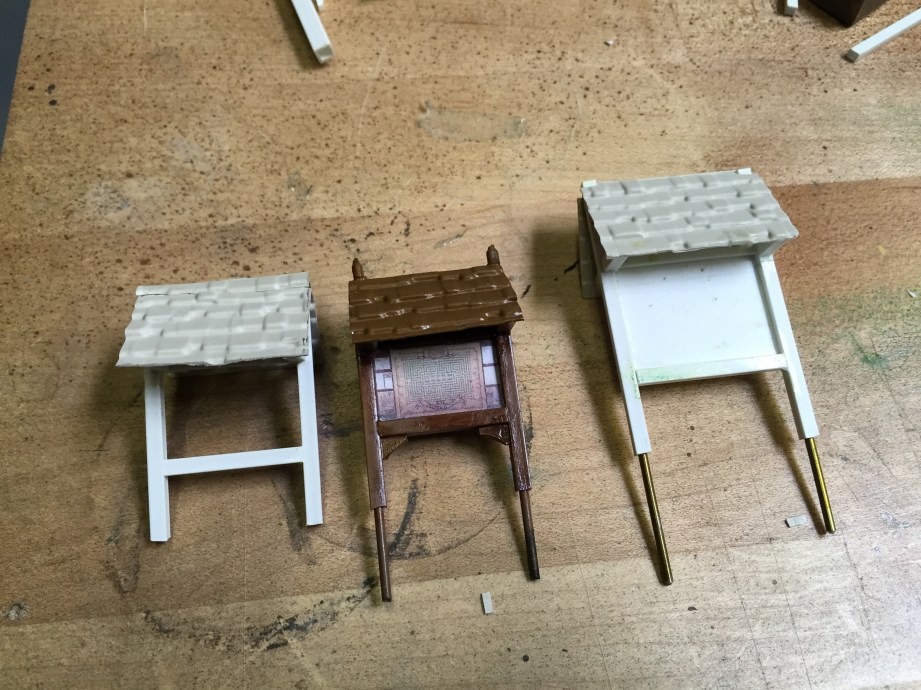
The two failed kiosks and the final correct one.
Even though it was a pain in the ass to redo, I think the final new kiosk and newsstand look far better than my first attempt.
Now it’s pretty much time to put it all together.
Streetlights all lit.
Here’s the plaque being laser etched into aluminized acrylic. This plaque (and much other incredible information about the maze) would not have been known about had I not gotten into contact with the great and generous Lee Unkrich. He’s not only an Oscar-winning director, he’s also a fellow Kubrick obsessive. He supplied me with some incredible behind-the-scenes photos of the maze both in construction and finished for me to gain information from. He’s also the one who spotted the incorrect crowns. Thanks, Lee!
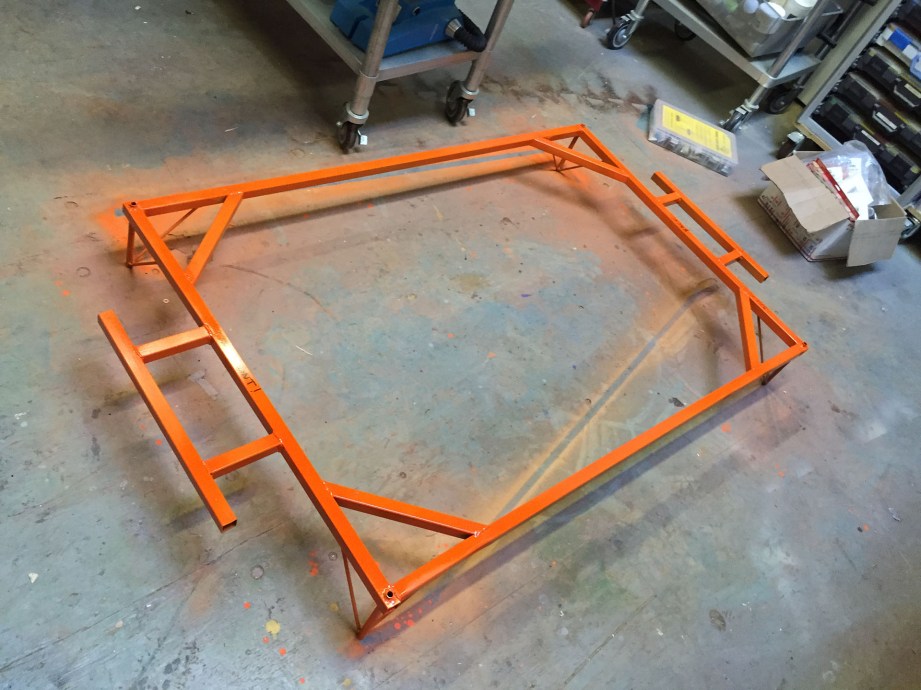
In order to ship it without injury, I welded a frame to bolt to the maze for travel.
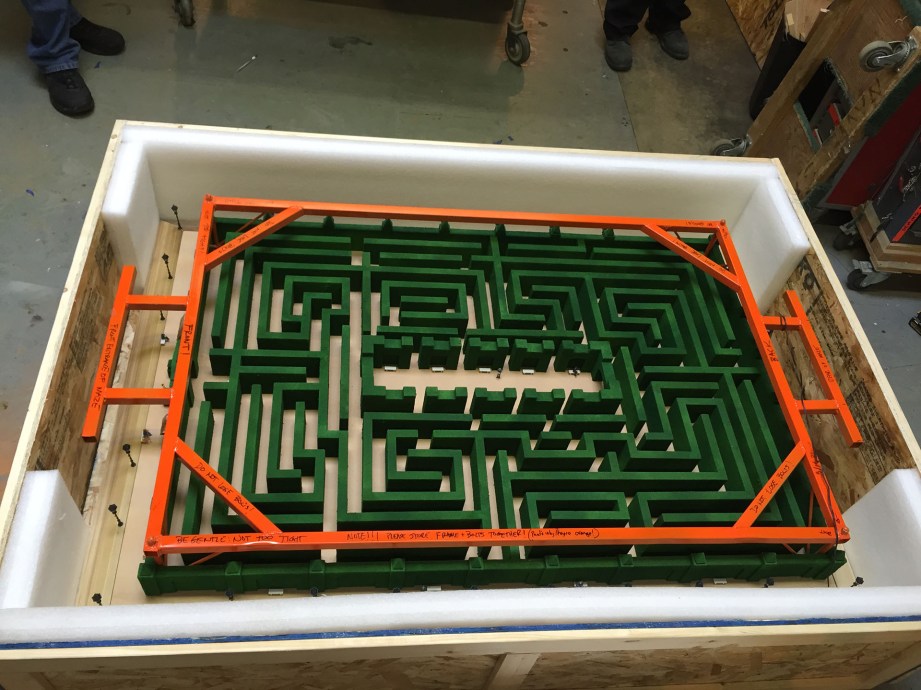
The maze in its crate and ready to go.
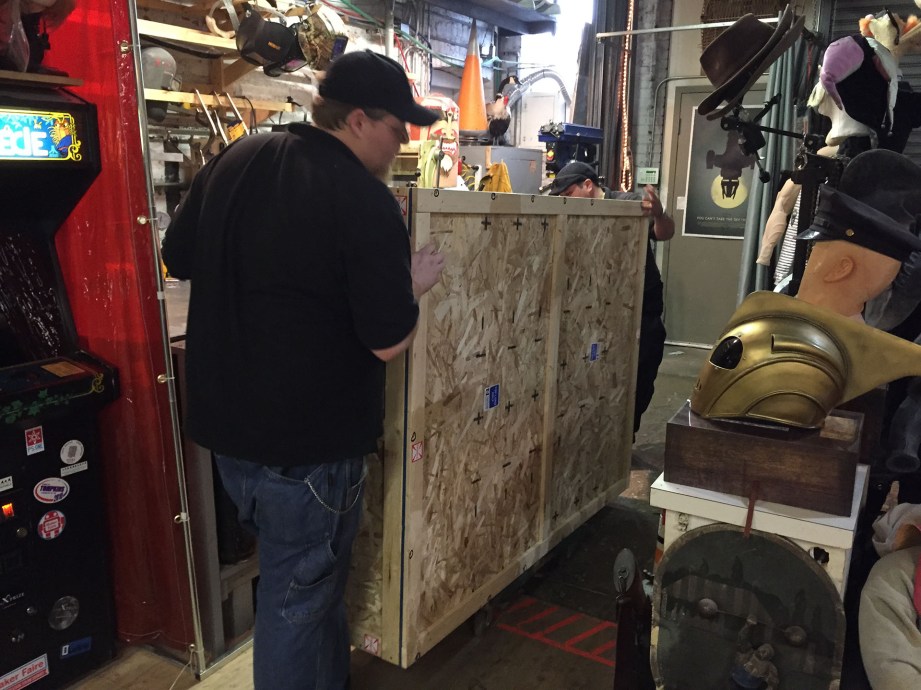
The maze leaves my shop. This is the only time the maze will ever be vertical. It’s meant to ship horizontally and now it’s off to MEXICO!
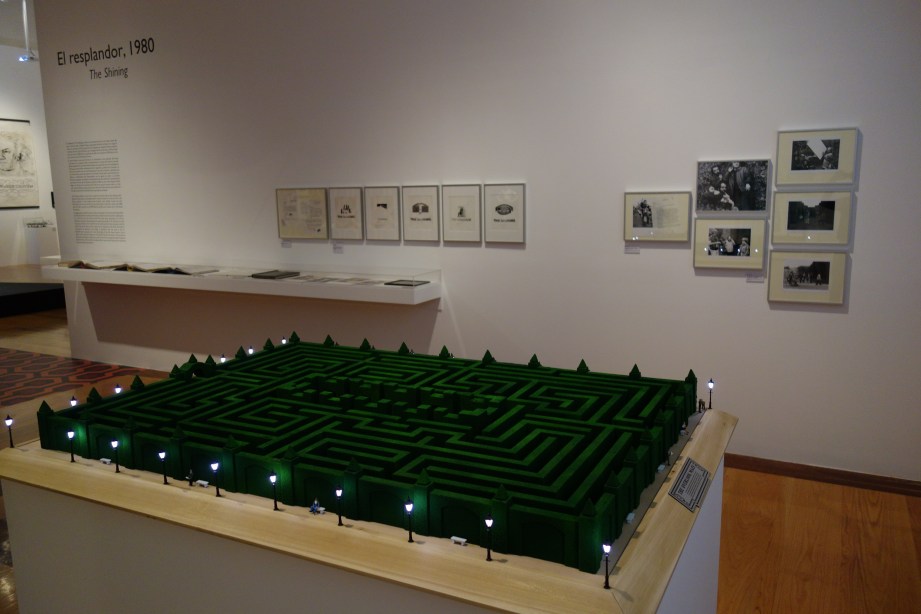
Here’s the maze, currently on display at the Kubrick exhibit, courtesy of Tim Heptner:
Testing: Smooth-On’s XTC-3D Print Coating

Here’s a behind-the-scenes video for an upcoming Show and Tell product review. Smooth-On, the makers of molding and casting materials we often use, sent us a new epoxy coating for 3D printed parts. We recruited the help of Jeremy Williams to print several things to test this on, from low-polygon figures to complex shapes. To watch along, support us and sign up for a membership here!
Episode 291a – A Podcast in Two Parts – 3/5/2015

This week, Will and Norm are joined by game developer Samantha Kalman to discuss GDC, virtual reality rumors, the news from Mobile World Congress, the Pebble Time Steel, the real purpose for Kickstarter, and a bit of behind the scenes on the Amazon Fire Phone. Audio listeners, be sure to stick around at the end for a post-GDC update from Will and Norm about GDC announcements and impressions of Valve and Sony’s latest VR demos.