Photo Gallery: Collectibles, Cosplay, and ‘Cinephile’ at Comic-Con 2015
Photo Gallery: Comic-Con 2015 Cosplay
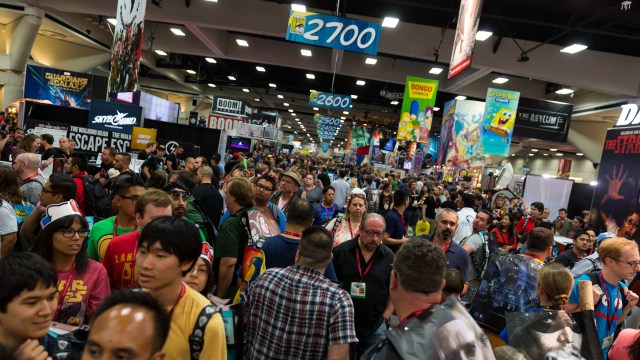
Phiew, that sure was a Comic-Con. First of all, my apologies to everyone who’s been waiting for a cosplay gallery this year. Between, hosting a party, three Adam Incognito walks, two new Tested projects (one of which we revealed today–The Rancor), and all of our other videos, I just didn’t have the time on the floor last week to shoot enough photos for a proper gallery. Promise to make it up to you at Dragon*Con. But that doesn’t mean I didn’t take any photos. So in lieu of a full cosplay gallery, here’s a selection of my photos showing you my SDCC 2015 experience. A mix of costumes, events, props, panels, and collectibles from Comic-Con, along with my commentary in the captions.
Let’s start with the cosplay that I managed to photograph at the show.
Photo Gallery: Collectibles, Cosplay, and ‘Cinephile’ at Comic-Con 2015
Photo Gallery: Comic-Con 2015 Cosplay
Of all the conventions I get to visit, Dragon*Con has the most inventive cosplay. But the sheer quantity and quality of costumes at Comic-Con dwarves other cons.
Photo Gallery: Collectibles, Cosplay, and ‘Cinephile’ at Comic-Con 2015
Photo Gallery: Comic-Con 2015 Cosplay
I love running into familiar faces of costumers I’ve either photographed before or met at previous conventions. Hendo cosplay is one of the best Spider-Gwens I’ve seen!
Photo Gallery: Collectibles, Cosplay, and ‘Cinephile’ at Comic-Con 2015
Photo Gallery: Comic-Con 2015 Cosplay
A cheerful Galactus in search of a herald.
Photo Gallery: Collectibles, Cosplay, and ‘Cinephile’ at Comic-Con 2015
Photo Gallery: Comic-Con 2015 Cosplay
Phiew, that sure was a Comic-Con. First of all, my apologies to everyone who’s been waiting for a cosplay gallery this year. Between, hosting a party, three Adam Incognito walks, two new Tested projects (one of which we revealed today–The Rancor), and all of our other videos, I just didn’t have the time on the floor last week to shoot enough photos for a proper gallery. Promise to make it up to you at Dragon*Con. But that doesn’t mean I didn’t take any photos. So in lieu of a full cosplay gallery, here’s a selection of my photos showing you my SDCC 2015 experience. A mix of costumes, events, props, panels, and collectibles from Comic-Con, along with my commentary in the captions.
Photo Gallery: Collectibles, Cosplay, and ‘Cinephile’ at Comic-Con 2015
Photo Gallery: Comic-Con 2015 Cosplay
Friend of Tested Bill Doran (aka Punished Props!) Bill was part of our special teams crew this year, assisting on the Rancor reveal. Here, he shows off the project he’s been working on: the alien assault rifle replica from District 9.
Photo Gallery: Collectibles, Cosplay, and ‘Cinephile’ at Comic-Con 2015
Photo Gallery: Comic-Con 2015 Cosplay
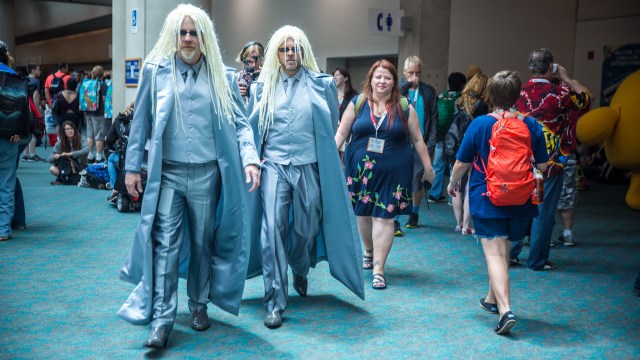
Mr. Freeze. Frank has talked about wanting to do his interpretation of Mr. Freeze for a while. I really dig the Batman: The Animated Series version…
Photo Gallery: Collectibles, Cosplay, and ‘Cinephile’ at Comic-Con 2015
Photo Gallery: Comic-Con 2015 Cosplay
These Ghostbuster cartoon cosplayers were awesome. That hair!
Photo Gallery: Collectibles, Cosplay, and ‘Cinephile’ at Comic-Con 2015
Photo Gallery: Comic-Con 2015 Cosplay
Couldn’t resist photography a real-life Thorgi.
Photo Gallery: Collectibles, Cosplay, and ‘Cinephile’ at Comic-Con 2015
Photo Gallery: Comic-Con 2015 Cosplay
These two are party of a troupe of Walking Dead cosplayers. Uncanny likenesses all around.
Photo Gallery: Collectibles, Cosplay, and ‘Cinephile’ at Comic-Con 2015
Photo Gallery: Comic-Con 2015 Cosplay
Phiew, that sure was a Comic-Con. First of all, my apologies to everyone who’s been waiting for a cosplay gallery this year. Between, hosting a party, three Adam Incognito walks, two new Tested projects (one of which we revealed today–The Rancor), and all of our other videos, I just didn’t have the time on the floor last week to shoot enough photos for a proper gallery. Promise to make it up to you at Dragon*Con. But that doesn’t mean I didn’t take any photos. So in lieu of a full cosplay gallery, here’s a selection of my photos showing you my SDCC 2015 experience. A mix of costumes, events, props, panels, and collectibles from Comic-Con, along with my commentary in the captions.
Photo Gallery: Collectibles, Cosplay, and ‘Cinephile’ at Comic-Con 2015
Photo Gallery: Comic-Con 2015 Cosplay
Bill strikes a pose in his Mass Effect armor in our hotel, right before our Rancor video shoot.
Photo Gallery: Collectibles, Cosplay, and ‘Cinephile’ at Comic-Con 2015
Photo Gallery: Comic-Con 2015 Cosplay
Phiew, that sure was a Comic-Con. First of all, my apologies to everyone who’s been waiting for a cosplay gallery this year. Between, hosting a party, three Adam Incognito walks, two new Tested projects (one of which we revealed today–The Rancor), and all of our other videos, I just didn’t have the time on the floor last week to shoot enough photos for a proper gallery. Promise to make it up to you at Dragon*Con. But that doesn’t mean I didn’t take any photos. So in lieu of a full cosplay gallery, here’s a selection of my photos showing you my SDCC 2015 experience. A mix of costumes, events, props, panels, and collectibles from Comic-Con, along with my commentary in the captions.
Photo Gallery: Collectibles, Cosplay, and ‘Cinephile’ at Comic-Con 2015
Photo Gallery: Comic-Con 2015 Cosplay
This Hitman was part of a large group of actors to promote the upcoming game and film.
Photo Gallery: Collectibles, Cosplay, and ‘Cinephile’ at Comic-Con 2015
Photo Gallery: Comic-Con 2015 Cosplay
Phiew, that sure was a Comic-Con. First of all, my apologies to everyone who’s been waiting for a cosplay gallery this year. Between, hosting a party, three Adam Incognito walks, two new Tested projects (one of which we revealed today–The Rancor), and all of our other videos, I just didn’t have the time on the floor last week to shoot enough photos for a proper gallery. Promise to make it up to you at Dragon*Con. But that doesn’t mean I didn’t take any photos. So in lieu of a full cosplay gallery, here’s a selection of my photos showing you my SDCC 2015 experience. A mix of costumes, events, props, panels, and collectibles from Comic-Con, along with my commentary in the captions.
Photo Gallery: Collectibles, Cosplay, and ‘Cinephile’ at Comic-Con 2015
Photo Gallery: Comic-Con 2015 Cosplay
A Mad Max, Immorten Joe, and war boys group! I was surprised that there weren’t as many Furiosas as I had anticipated and hoped. But these cosplayers were great!
Photo Gallery: Collectibles, Cosplay, and ‘Cinephile’ at Comic-Con 2015
Photo Gallery: Comic-Con 2015 Cosplay
Immorten Josephine?
Photo Gallery: Collectibles, Cosplay, and ‘Cinephile’ at Comic-Con 2015
Photo Gallery: Comic-Con 2015 Cosplay
Phiew, that sure was a Comic-Con. First of all, my apologies to everyone who’s been waiting for a cosplay gallery this year. Between, hosting a party, three Adam Incognito walks, two new Tested projects (one of which we revealed today–The Rancor), and all of our other videos, I just didn’t have the time on the floor last week to shoot enough photos for a proper gallery. Promise to make it up to you at Dragon*Con. But that doesn’t mean I didn’t take any photos. So in lieu of a full cosplay gallery, here’s a selection of my photos showing you my SDCC 2015 experience. A mix of costumes, events, props, panels, and collectibles from Comic-Con, along with my commentary in the captions.
Photo Gallery: Collectibles, Cosplay, and ‘Cinephile’ at Comic-Con 2015
Photo Gallery: Comic-Con 2015 Cosplay
Mash-up cosplay is one of my favorite things. Cosplayer Longstermash is a regular at events like these.
Photo Gallery: Collectibles, Cosplay, and ‘Cinephile’ at Comic-Con 2015
Photo Gallery: Comic-Con 2015 Cosplay
I believe that this cosplayer was also a Tested fan!
Photo Gallery: Collectibles, Cosplay, and ‘Cinephile’ at Comic-Con 2015
Photo Gallery: Comic-Con 2015 Cosplay
Phiew, that sure was a Comic-Con. First of all, my apologies to everyone who’s been waiting for a cosplay gallery this year. Between, hosting a party, three Adam Incognito walks, two new Tested projects (one of which we revealed today–The Rancor), and all of our other videos, I just didn’t have the time on the floor last week to shoot enough photos for a proper gallery. Promise to make it up to you at Dragon*Con. But that doesn’t mean I didn’t take any photos. So in lieu of a full cosplay gallery, here’s a selection of my photos showing you my SDCC 2015 experience. A mix of costumes, events, props, panels, and collectibles from Comic-Con, along with my commentary in the captions.
Photo Gallery: Collectibles, Cosplay, and ‘Cinephile’ at Comic-Con 2015
Photo Gallery: Comic-Con 2015 Cosplay
Anorak from Ready Player One. I just started reading the book at SDCC, so this was a nice find.
Photo Gallery: Collectibles, Cosplay, and ‘Cinephile’ at Comic-Con 2015
Photo Gallery: Comic-Con 2015 Cosplay
Phiew, that sure was a Comic-Con. First of all, my apologies to everyone who’s been waiting for a cosplay gallery this year. Between, hosting a party, three Adam Incognito walks, two new Tested projects (one of which we revealed today–The Rancor), and all of our other videos, I just didn’t have the time on the floor last week to shoot enough photos for a proper gallery. Promise to make it up to you at Dragon*Con. But that doesn’t mean I didn’t take any photos. So in lieu of a full cosplay gallery, here’s a selection of my photos showing you my SDCC 2015 experience. A mix of costumes, events, props, panels, and collectibles from Comic-Con, along with my commentary in the captions.
Photo Gallery: Collectibles, Cosplay, and ‘Cinephile’ at Comic-Con 2015
Photo Gallery: Comic-Con 2015 Cosplay
More pups in cosplay!
Photo Gallery: Collectibles, Cosplay, and ‘Cinephile’ at Comic-Con 2015
Photo Gallery: Comic-Con 2015 Cosplay
Phiew, that sure was a Comic-Con. First of all, my apologies to everyone who’s been waiting for a cosplay gallery this year. Between, hosting a party, three Adam Incognito walks, two new Tested projects (one of which we revealed today–The Rancor), and all of our other videos, I just didn’t have the time on the floor last week to shoot enough photos for a proper gallery. Promise to make it up to you at Dragon*Con. But that doesn’t mean I didn’t take any photos. So in lieu of a full cosplay gallery, here’s a selection of my photos showing you my SDCC 2015 experience. A mix of costumes, events, props, panels, and collectibles from Comic-Con, along with my commentary in the captions.
Photo Gallery: Collectibles, Cosplay, and ‘Cinephile’ at Comic-Con 2015
Photo Gallery: Comic-Con 2015 Cosplay
Frank grimaces in Adam’s Dredd helmet before an Incognito walk.
Photo Gallery: Collectibles, Cosplay, and ‘Cinephile’ at Comic-Con 2015
Photo Gallery: Comic-Con 2015 Cosplay
Riddle of Riddle’s Messy Wardrobe, also a friend of Tested!
Photo Gallery: Collectibles, Cosplay, and ‘Cinephile’ at Comic-Con 2015
Photo Gallery: Comic-Con 2015 Cosplay
You may have seen these guys in my video tour of Comic-Con. They’re members of The RPF, and Griff is actually Brad Fyfe, uber-Back to the Future fan who coordinated the recent RPF showcase party in Frank’s shop!
Photo Gallery: Collectibles, Cosplay, and ‘Cinephile’ at Comic-Con 2015
Photo Gallery: Comic-Con 2015 Cosplay
Phiew, that sure was a Comic-Con. First of all, my apologies to everyone who’s been waiting for a cosplay gallery this year. Between, hosting a party, three Adam Incognito walks, two new Tested projects (one of which we revealed today–The Rancor), and all of our other videos, I just didn’t have the time on the floor last week to shoot enough photos for a proper gallery. Promise to make it up to you at Dragon*Con. But that doesn’t mean I didn’t take any photos. So in lieu of a full cosplay gallery, here’s a selection of my photos showing you my SDCC 2015 experience. A mix of costumes, events, props, panels, and collectibles from Comic-Con, along with my commentary in the captions.
Photo Gallery: Collectibles, Cosplay, and ‘Cinephile’ at Comic-Con 2015
Photo Gallery: Comic-Con 2015 Cosplay
Phiew, that sure was a Comic-Con. First of all, my apologies to everyone who’s been waiting for a cosplay gallery this year. Between, hosting a party, three Adam Incognito walks, two new Tested projects (one of which we revealed today–The Rancor), and all of our other videos, I just didn’t have the time on the floor last week to shoot enough photos for a proper gallery. Promise to make it up to you at Dragon*Con. But that doesn’t mean I didn’t take any photos. So in lieu of a full cosplay gallery, here’s a selection of my photos showing you my SDCC 2015 experience. A mix of costumes, events, props, panels, and collectibles from Comic-Con, along with my commentary in the captions.
Photo Gallery: Collectibles, Cosplay, and ‘Cinephile’ at Comic-Con 2015
Photo Gallery: tv2c6943
That’s it for cosplay–stay tuned for Bill’s SDCC project video next week!
Photo Gallery: Collectibles, Cosplay, and ‘Cinephile’ at Comic-Con 2015
Photo Gallery: The Rancor Project
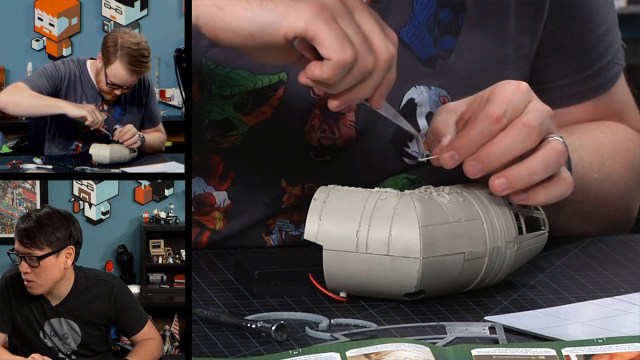
Frank and his Rancor, before our video shoot on Thursday. It took Frank less than a month to build the costume, though he had been planning it for a while. So glad we were able to make it happen!
Photo Gallery: Collectibles, Cosplay, and ‘Cinephile’ at Comic-Con 2015
Photo Gallery: The Rancor Project
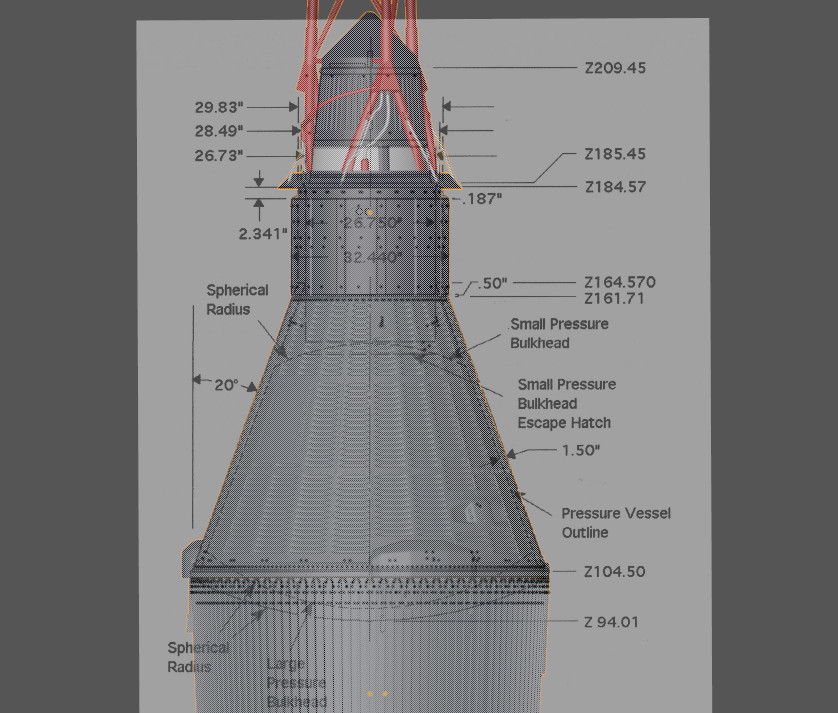
The Rancor holds a small 12-inch Kenner Luke from the ROTJ line. It was very appropriate that the Luke toy came with a small Rancor bone. The toy is actually sixth scale, but the Rancor costume is about 1/8th scale.
Photo Gallery: Collectibles, Cosplay, and ‘Cinephile’ at Comic-Con 2015
Photo Gallery: The Rancor Project
As you saw in the video, the foam arms were a little difficult to lift (hence the hand-holding). That’s something Frank is going to improve before the next time Rancor makes a convention appearance!
Frank was also able to look around using a small Lumenius FPV color camera and Fat Shark video goggles. They were connected with a direct line, so no messing with wireless signals. It worked perfectly.
Photo Gallery: Collectibles, Cosplay, and ‘Cinephile’ at Comic-Con 2015
Photo Gallery: The Rancor Project
Frank breathes in deep after the Rancor walk. He rigged up a fan system for the suit, but ran out of time to get it set up.
Photo Gallery: Collectibles, Cosplay, and ‘Cinephile’ at Comic-Con 2015
Photo Gallery: Adam Incognito
We’ll have this video up next week as well, but here’s Adam walking the floor as Judge Dredd, heading to a Dredd meetup!
Photo Gallery: Collectibles, Cosplay, and ‘Cinephile’ at Comic-Con 2015
Photo Gallery: Cinephile Party
On Friday, Will and the team from our LA office set up the Cinephile party. We filled the venue with props and costumes from Adam’s cave, and put up photos from previous Tested projects.
Photo Gallery: Collectibles, Cosplay, and ‘Cinephile’ at Comic-Con 2015
Photo Gallery: Cinephile Party
Adam makes an adjustment to the C-3PO display at the party, propping the head up on the main chassis.
Photo Gallery: Collectibles, Cosplay, and ‘Cinephile’ at Comic-Con 2015
Photo Gallery: Cinephile Party
Will made helmet stands for some of Adam’s helmet collection to be displayed.
Photo Gallery: Collectibles, Cosplay, and ‘Cinephile’ at Comic-Con 2015
Photo Gallery: Cinephile Party
Adam had display cases left over from a Wired event, and we used them to bring portions of his cave shelves to the party. For example, here are the contents of the Bourne Identity go-bag.
Photo Gallery: Collectibles, Cosplay, and ‘Cinephile’ at Comic-Con 2015
Photo Gallery: Cinephile Party
One of Adam’s Maltese Falcon replicas.
Photo Gallery: Collectibles, Cosplay, and ‘Cinephile’ at Comic-Con 2015
Photo Gallery: Cinephile Party
And the stones from the Fifth Element!
Photo Gallery: Collectibles, Cosplay, and ‘Cinephile’ at Comic-Con 2015
Photo Gallery: Cinephile Party
The Tarantino shelf, which we shot a video of last year.
Photo Gallery: Collectibles, Cosplay, and ‘Cinephile’ at Comic-Con 2015
Photo Gallery: Cinephile Party
The Rancor was also unveiled at the party, which made the venue kind of a hybrid Jabba’s Palace and Bespin Gas Chamber.
Photo Gallery: Collectibles, Cosplay, and ‘Cinephile’ at Comic-Con 2015
Photo Gallery: Cinephile Party
Tested members were granted early access, and Adam was able to meet many of them before doors opened to general admission.
Photo Gallery: Collectibles, Cosplay, and ‘Cinephile’ at Comic-Con 2015
Photo Gallery: Cinephile Party
And yep, we had a surprise DJ late in the evening: Deadmau5!
Photo Gallery: Collectibles, Cosplay, and ‘Cinephile’ at Comic-Con 2015
Photo Gallery: Hadfield Incognito
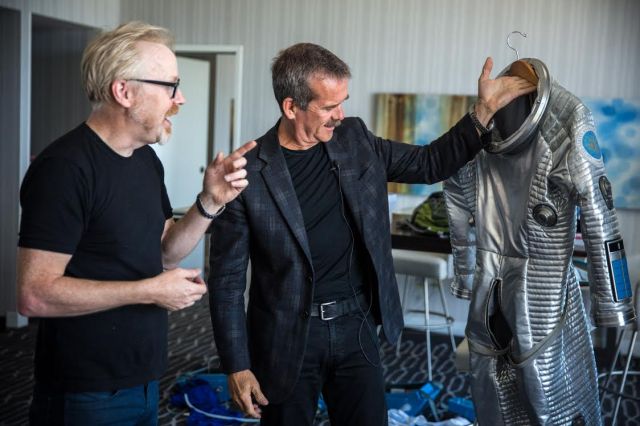
Saturday’s Incongito walk featured astronaut Chris Hadfield. You can find photos from that lovely experience here.
Photo Gallery: Collectibles, Cosplay, and ‘Cinephile’ at Comic-Con 2015
Photo Gallery: Adam’s Comic-Con panel
We’ll also have video of Adam’s full Comic-Con panel on the site next week. He was joined by Phil Plait, Andy Weir, Alton Brown, and Chris Hadfield. The packed room went nuts!
Photo Gallery: Collectibles, Cosplay, and ‘Cinephile’ at Comic-Con 2015
Photo Gallery: Adam’s panel guests
All smiles after a hugely successful Comic-Con panel. This was also basically the conclusion of Comic-Con production. The team packed up and flew out on Sunday, while I drove all the gear and cave props back to San Francisco on Monday. Sunday was the day I was able to actually walk the floor, hang out at booths, say hi to friends, and buy some toys.
Photo Gallery: Collectibles, Cosplay, and ‘Cinephile’ at Comic-Con 2015
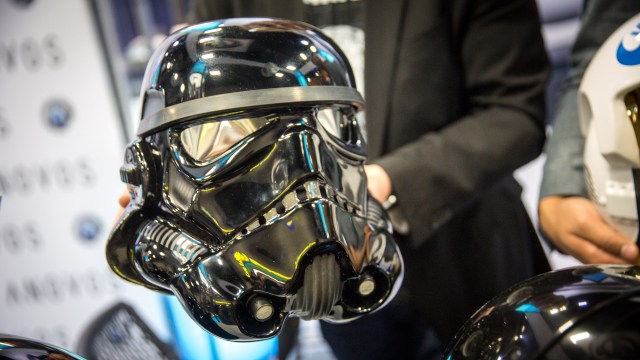
Photo Gallery: Anovos’ Darth Vader Helmet
Anovos really blew me away with what they showed at SDCC. Star Wars costumes, kits, and helmets that looked fantastic. On Sunday, I also saw that they are going to make Star Trek hand props, like tricoders and phaser rifles. I can’t wait!
Photo Gallery: Collectibles, Cosplay, and ‘Cinephile’ at Comic-Con 2015
Photo Gallery: The New Wonder Woman
DC/Warner Bros. had costumes from next year’s Batman v Superman on display. I actually prefer the shimmering gold tones of the Wonder Woman costume in the reveal photo over the muted red and blue.
Photo Gallery: Collectibles, Cosplay, and ‘Cinephile’ at Comic-Con 2015
Photo Gallery: Moon Rover
A rover miniature from Duncan Jones’ Moon, at the Prop Store booth.
Photo Gallery: Collectibles, Cosplay, and ‘Cinephile’ at Comic-Con 2015
Photo Gallery: Leeloo Dallas Multipass!
The actual multipass hand prop! Note that Leeloo’s personal info is actually just copied over from the Corban Dallas pass.
Photo Gallery: Collectibles, Cosplay, and ‘Cinephile’ at Comic-Con 2015
Photo Gallery: tv2c7098
Phiew, that sure was a Comic-Con. First of all, my apologies to everyone who’s been waiting for a cosplay gallery this year. Between, hosting a party, three Adam Incognito walks, two new Tested projects (one of which we revealed today–The Rancor), and all of our other videos, I just didn’t have the time on the floor last week to shoot enough photos for a proper gallery. Promise to make it up to you at Dragon*Con. But that doesn’t mean I didn’t take any photos. So in lieu of a full cosplay gallery, here’s a selection of my photos showing you my SDCC 2015 experience. A mix of costumes, events, props, panels, and collectibles from Comic-Con, along with my commentary in the captions.
Photo Gallery: Collectibles, Cosplay, and ‘Cinephile’ at Comic-Con 2015
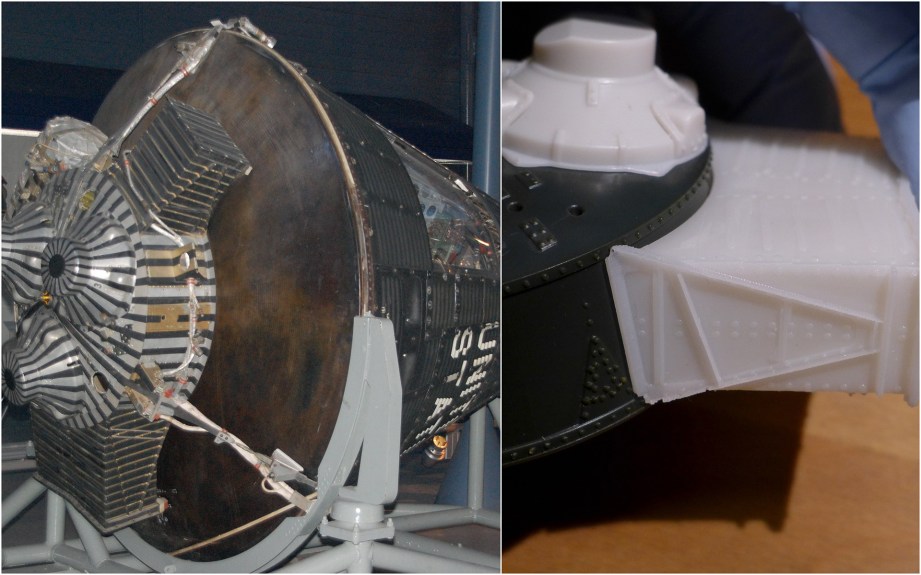
Photo Gallery: USS Reliant Battle-Damage Section
Photos and video really can’t do justice to the amount of detail in this filming miniature.
Photo Gallery: Collectibles, Cosplay, and ‘Cinephile’ at Comic-Con 2015
Photo Gallery: USS Enterprise 1701-C
Throughout the entire video, I was straining my brain trying to remember the starship class of the USS Enterprise 1701-C. Finally remembered it after we finished filming: Ambassador class.
Photo Gallery: Collectibles, Cosplay, and ‘Cinephile’ at Comic-Con 2015
Photo Gallery: Prop Store
Phiew, that sure was a Comic-Con. First of all, my apologies to everyone who’s been waiting for a cosplay gallery this year. Between, hosting a party, three Adam Incognito walks, two new Tested projects (one of which we revealed today–The Rancor), and all of our other videos, I just didn’t have the time on the floor last week to shoot enough photos for a proper gallery. Promise to make it up to you at Dragon*Con. But that doesn’t mean I didn’t take any photos. So in lieu of a full cosplay gallery, here’s a selection of my photos showing you my SDCC 2015 experience. A mix of costumes, events, props, panels, and collectibles from Comic-Con, along with my commentary in the captions.
Photo Gallery: Collectibles, Cosplay, and ‘Cinephile’ at Comic-Con 2015
Photo Gallery: Sideshow Collectibles
Phiew, that sure was a Comic-Con. First of all, my apologies to everyone who’s been waiting for a cosplay gallery this year. Between, hosting a party, three Adam Incognito walks, two new Tested projects (one of which we revealed today–The Rancor), and all of our other videos, I just didn’t have the time on the floor last week to shoot enough photos for a proper gallery. Promise to make it up to you at Dragon*Con. But that doesn’t mean I didn’t take any photos. So in lieu of a full cosplay gallery, here’s a selection of my photos showing you my SDCC 2015 experience. A mix of costumes, events, props, panels, and collectibles from Comic-Con, along with my commentary in the captions.
Photo Gallery: Collectibles, Cosplay, and ‘Cinephile’ at Comic-Con 2015
Photo Gallery: Sideshow Collectibles/Hot Toys
With this sixth scale Millennium Falcon cockpit for Hot Toys figures, they’re officially dolls in playsets. I still want them all.
Photo Gallery: Collectibles, Cosplay, and ‘Cinephile’ at Comic-Con 2015
Photo Gallery: Sideshow Collectibles/Hot Toys
Phiew, that sure was a Comic-Con. First of all, my apologies to everyone who’s been waiting for a cosplay gallery this year. Between, hosting a party, three Adam Incognito walks, two new Tested projects (one of which we revealed today–The Rancor), and all of our other videos, I just didn’t have the time on the floor last week to shoot enough photos for a proper gallery. Promise to make it up to you at Dragon*Con. But that doesn’t mean I didn’t take any photos. So in lieu of a full cosplay gallery, here’s a selection of my photos showing you my SDCC 2015 experience. A mix of costumes, events, props, panels, and collectibles from Comic-Con, along with my commentary in the captions.
Photo Gallery: Collectibles, Cosplay, and ‘Cinephile’ at Comic-Con 2015
Photo Gallery: Sideshow Collectibles/Hot Toys
Unbelievable sixth-scale TIE Fighter, with pilot inside. Any guesses as to how much it would cost? For reference, their sixth-scale vehicles (ie. Batmobile) retail between $600 and $800. So maybe under $2000?
Photo Gallery: Collectibles, Cosplay, and ‘Cinephile’ at Comic-Con 2015
Photo Gallery: Sideshow Collectibles/Hot Toys
Red Son Batman was a new statue at the Sideshow booth. Highly recommended graphic novel!
Photo Gallery: Collectibles, Cosplay, and ‘Cinephile’ at Comic-Con 2015
Photo Gallery: Sideshow Collectibles/Hot Toys
Superman: Red Son
Photo Gallery: Collectibles, Cosplay, and ‘Cinephile’ at Comic-Con 2015
Photo Gallery: Sideshow Collectibles/Hot Toys
Phiew, that sure was a Comic-Con. First of all, my apologies to everyone who’s been waiting for a cosplay gallery this year. Between, hosting a party, three Adam Incognito walks, two new Tested projects (one of which we revealed today–The Rancor), and all of our other videos, I just didn’t have the time on the floor last week to shoot enough photos for a proper gallery. Promise to make it up to you at Dragon*Con. But that doesn’t mean I didn’t take any photos. So in lieu of a full cosplay gallery, here’s a selection of my photos showing you my SDCC 2015 experience. A mix of costumes, events, props, panels, and collectibles from Comic-Con, along with my commentary in the captions.
Photo Gallery: Collectibles, Cosplay, and ‘Cinephile’ at Comic-Con 2015
Photo Gallery: Sideshow Collectibles/Hot Toys
Hot Toys’ Hulkbuster vs Hulk…
Photo Gallery: Collectibles, Cosplay, and ‘Cinephile’ at Comic-Con 2015
Photo Gallery: LEGO
…and the LEGO version.
Photo Gallery: Collectibles, Cosplay, and ‘Cinephile’ at Comic-Con 2015
Photo Gallery: Sideshow Collectibles/Hot Toys
Never afraid to milk a license, Hot Toys also had a prototype Marty and Delorean from BTTF II. The Marty from the first film just shipped.
Photo Gallery: Collectibles, Cosplay, and ‘Cinephile’ at Comic-Con 2015
Photo Gallery: Chronicle Collectibles
Anyone recognize this gun? You’ll see it in a future video…
Photo Gallery: Collectibles, Cosplay, and ‘Cinephile’ at Comic-Con 2015
Photo Gallery: 3A
Love love love this Stormtrooper design from 3A. Maybe worth turning an Anovos kit into this version?
Photo Gallery: Collectibles, Cosplay, and ‘Cinephile’ at Comic-Con 2015
Photo Gallery: Quantum Mechanix
QmX’s USS Enterprise. I’ll never own one of these, so they’re wonderful to examine up close in person. Fun fact: the name of the pattern on the hull is “Aztecing”, since the panel designs resemble Aztec wall art.
Photo Gallery: Collectibles, Cosplay, and ‘Cinephile’ at Comic-Con 2015
Photo Gallery: QmX’s Enterprise
Phiew, that sure was a Comic-Con. First of all, my apologies to everyone who’s been waiting for a cosplay gallery this year. Between, hosting a party, three Adam Incognito walks, two new Tested projects (one of which we revealed today–The Rancor), and all of our other videos, I just didn’t have the time on the floor last week to shoot enough photos for a proper gallery. Promise to make it up to you at Dragon*Con. But that doesn’t mean I didn’t take any photos. So in lieu of a full cosplay gallery, here’s a selection of my photos showing you my SDCC 2015 experience. A mix of costumes, events, props, panels, and collectibles from Comic-Con, along with my commentary in the captions.
Photo Gallery: Collectibles, Cosplay, and ‘Cinephile’ at Comic-Con 2015
Photo Gallery: Sculptures
Wish I had interviewed the Shiflett brothers at the show. Their sculpture work is crazy good, and they sell resin kits!
Photo Gallery: Collectibles, Cosplay, and ‘Cinephile’ at Comic-Con 2015
Photo Gallery: Shiflett Brothers
Phiew, that sure was a Comic-Con. First of all, my apologies to everyone who’s been waiting for a cosplay gallery this year. Between, hosting a party, three Adam Incognito walks, two new Tested projects (one of which we revealed today–The Rancor), and all of our other videos, I just didn’t have the time on the floor last week to shoot enough photos for a proper gallery. Promise to make it up to you at Dragon*Con. But that doesn’t mean I didn’t take any photos. So in lieu of a full cosplay gallery, here’s a selection of my photos showing you my SDCC 2015 experience. A mix of costumes, events, props, panels, and collectibles from Comic-Con, along with my commentary in the captions.
Photo Gallery: Collectibles, Cosplay, and ‘Cinephile’ at Comic-Con 2015
Photo Gallery: Hasbro’s Star Wars Toys
Hasbro had a great display set up with their Black series TFA Stormtroopers as well as a TFA TIE Fighter. Really fun taking photos of this diorama, which I believe recreates a scene from the TFA trailer.
Photo Gallery: Collectibles, Cosplay, and ‘Cinephile’ at Comic-Con 2015
Photo Gallery: Hasbro’s Star Wars Toys
Phiew, that sure was a Comic-Con. First of all, my apologies to everyone who’s been waiting for a cosplay gallery this year. Between, hosting a party, three Adam Incognito walks, two new Tested projects (one of which we revealed today–The Rancor), and all of our other videos, I just didn’t have the time on the floor last week to shoot enough photos for a proper gallery. Promise to make it up to you at Dragon*Con. But that doesn’t mean I didn’t take any photos. So in lieu of a full cosplay gallery, here’s a selection of my photos showing you my SDCC 2015 experience. A mix of costumes, events, props, panels, and collectibles from Comic-Con, along with my commentary in the captions.
Photo Gallery: Collectibles, Cosplay, and ‘Cinephile’ at Comic-Con 2015
Photo Gallery: Hasbro’s Star Wars Toys
Phiew, that sure was a Comic-Con. First of all, my apologies to everyone who’s been waiting for a cosplay gallery this year. Between, hosting a party, three Adam Incognito walks, two new Tested projects (one of which we revealed today–The Rancor), and all of our other videos, I just didn’t have the time on the floor last week to shoot enough photos for a proper gallery. Promise to make it up to you at Dragon*Con. But that doesn’t mean I didn’t take any photos. So in lieu of a full cosplay gallery, here’s a selection of my photos showing you my SDCC 2015 experience. A mix of costumes, events, props, panels, and collectibles from Comic-Con, along with my commentary in the captions.
Photo Gallery: Collectibles, Cosplay, and ‘Cinephile’ at Comic-Con 2015
Photo Gallery: Acid Rain World
Fantastic toy design from Acid Rain World, found at the Toynami booth.
Photo Gallery: Collectibles, Cosplay, and ‘Cinephile’ at Comic-Con 2015
Photo Gallery: Profile in History
Was able to visit the Profiles in History booth on the last day of the show. They actually had some original filming miniatures from Star Wars, X-Men, and even Spaceballs.
Photo Gallery: Collectibles, Cosplay, and ‘Cinephile’ at Comic-Con 2015
Photo Gallery: Profile in History
Phiew, that sure was a Comic-Con. First of all, my apologies to everyone who’s been waiting for a cosplay gallery this year. Between, hosting a party, three Adam Incognito walks, two new Tested projects (one of which we revealed today–The Rancor), and all of our other videos, I just didn’t have the time on the floor last week to shoot enough photos for a proper gallery. Promise to make it up to you at Dragon*Con. But that doesn’t mean I didn’t take any photos. So in lieu of a full cosplay gallery, here’s a selection of my photos showing you my SDCC 2015 experience. A mix of costumes, events, props, panels, and collectibles from Comic-Con, along with my commentary in the captions.
Photo Gallery: Collectibles, Cosplay, and ‘Cinephile’ at Comic-Con 2015
Photo Gallery: Insight Editions Book
Another section of SDCC I always make a point to visit: book publishers. Insight Editions had their Alien: The Weyland-Yutani Report book to check out, as well as a preview of their upcoming art of Ghostbusters book. Must-buys.
Photo Gallery: Collectibles, Cosplay, and ‘Cinephile’ at Comic-Con 2015
Photo Gallery: Kidrobot
And finally, was very tempted to buy this Kid Robot vinyl toy, though ended up showing uncharacteristic restraint. Maybe next year!