


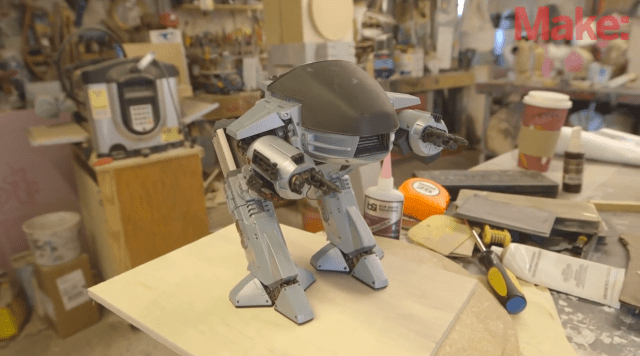
Replica prop and armor maker Shawn Thorsson, who we’ve previously interviewed about his amazing Warhammer costumes, is building a life-size ED-209 replica for this year’s Maker Faire. Make Magazine is following his build progress with regular build logs, along with weekly video updates. Shawn is currently in the prototyping and moldmaking phase, prepping his MDF sculpt into something that can be reproduced into fiberglass resin parts. We can’t wait to see it in person this May!
We Went to SXSW – 3/18/2014

Adam Savage’s SXSW 2014 Keynote: Art and Science

Adam Savage talks about the importance of the relationship between art and science for his keynote at this year’s SXSW Interactive Conference. What can scientists learn from artists (and vice versa)? How can technologists be better storytellers? Adam discusses these topics and more and then sits down for a Q&A with Norm!
Hearing Loss – 3/11/2014
Premium: Weathering the T-800 Endoskeleton
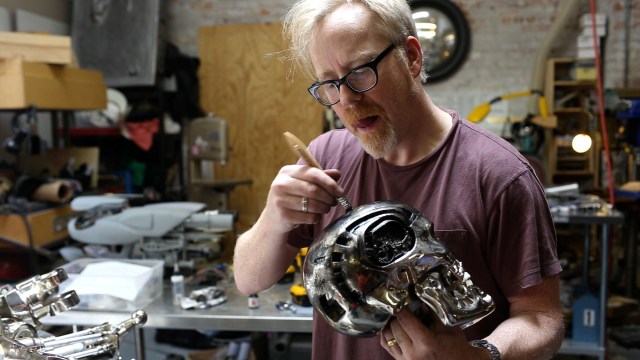
We stopped by Adam’s Cave last year to catch him applying weathering effects to his new T-800 Terminator replica. While we shot video coverage of Adam working on this project, Adam explains this particular weathering process and how he makes the shiny endoskeleton look like it’s been through a gritty and grimy battlefield.
Inside Adam Savage’s Cave: Terminator T-800 Endoskeleton
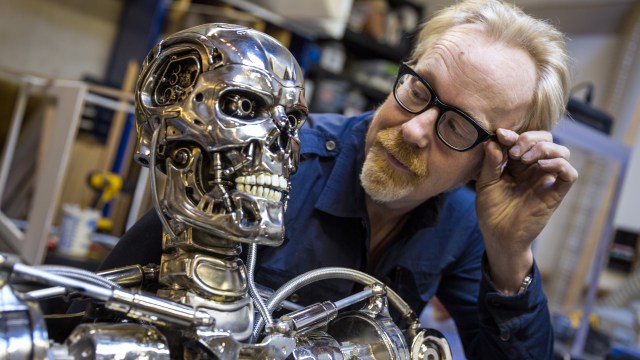
The newest addition to Adam’s Cave is a replica of the Terminator T-800 Endoskeleton. Adam acquired raw castings, had them chromed, and then applied weathering effects himself to make it look like a realistic human-hunting machine. Watch Adam paint and add weathering effects to his T-800 in this member video.
Bits to Atoms: 3D Printing an Accurate Replica TARDIS
One of the things that excited me the most about about getting into 3D printing was the ability to make prop replicas. I’m sure Tested readers can relate! Lightsaber hilt, fertility idol, communicator badge, blaster, you name it and it can probably be printed. This technique is turning up more and more on The Replica Prop Forum (RPF) and is here to stay. Not that 3D printing is a replacement for traditional modeling and sculpting methods; it’s just another tool to get the job done and you pick what works best for the project. You may not have room for a workshop at home, but with some software, a bit of time and access to a printer, you can put a phaser in your hand–even custom fit for your hand!
The Community Center
I am not a prolific prop builder but I have done my share and will breakdown some of these projects over the next few months. I wanted to start with something relatively simple, so if you’re a Whovian, this project is for you. But even if you’re not of the Gallifreyan fan base, these design and printing tips may help your future projects.
I like Doctor Who and found a nice TARDIS model by Gossamer on Thingiverse, MakerBot’s online repository for sharing 3D models. This was a great starting point, but I wanted to add an LED at the top and this is where Thingiverse gets fun. Since most everything is shared via a Creative Commons license it can be downloaded, modded and re-uploaded as long as the original creator is credited.
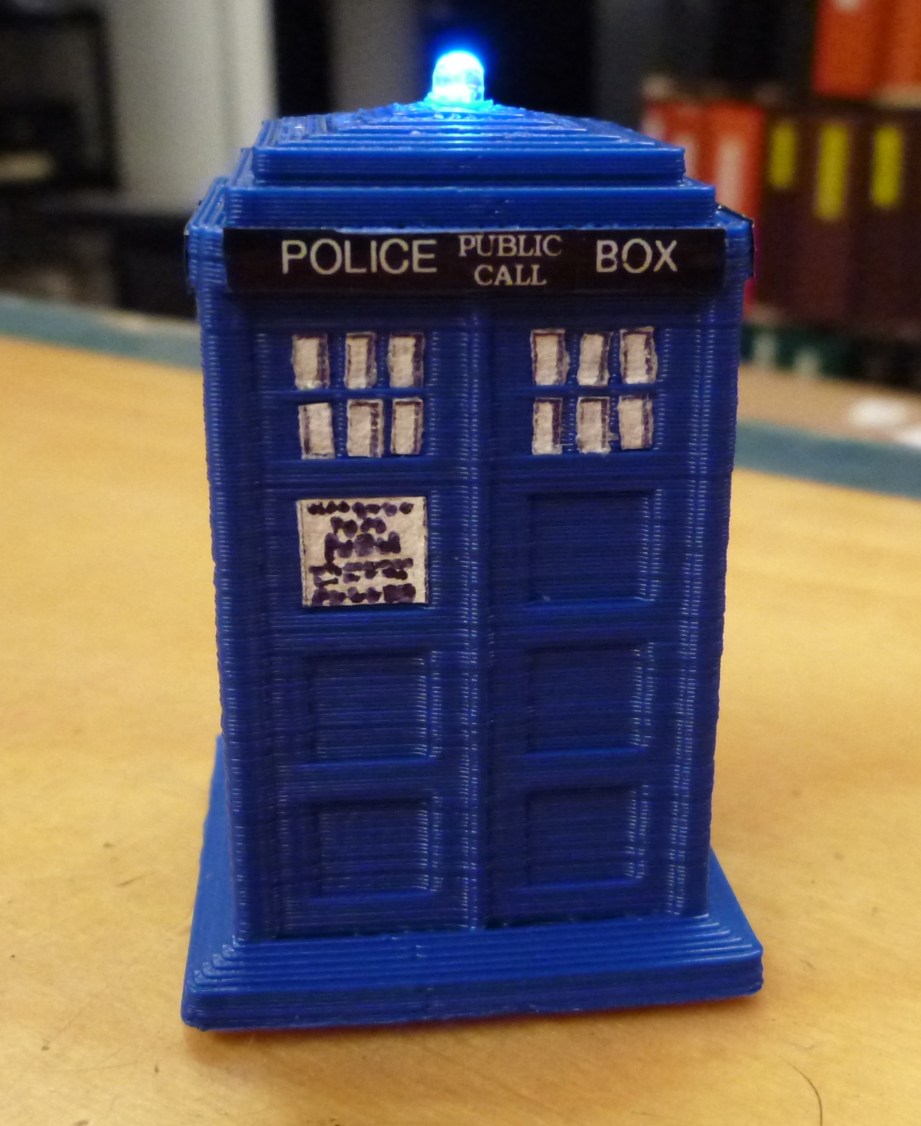
Another user, nopoe, had already modded Gossamer’s model to have an LED hole! Perfect! It printed ok, but not great, on my old Thing-o-matic, and a friend put some rough stickers on it. I thought it would be cool to have the windows light up so I modded nopoe’s version to have open windows. Check out the video to see how it was done:
This is one of my favorite aspects of 3D printing. The community and collaborative spirit is a lot of fun and even advances the technology. You can download mods for your printer, that you make with your own printer. One of the driving forces behind the RepRap project was to make self-replicating machines so they could print most of their own parts. Pretty cool. There is a large collection of mods to download and make for your printer and they are constantly improved via community conversation and remixes of the original. Whether it’s a mod or a model, it’s a huge time saver to be able to download an object and simply mod it to fit your purposes. Depending on the project, the model, file format, etc., it may be an easy fix.
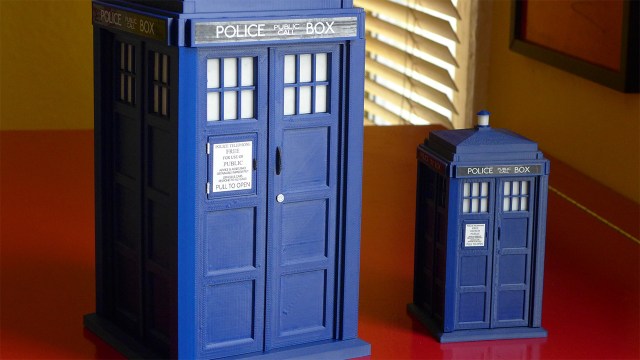
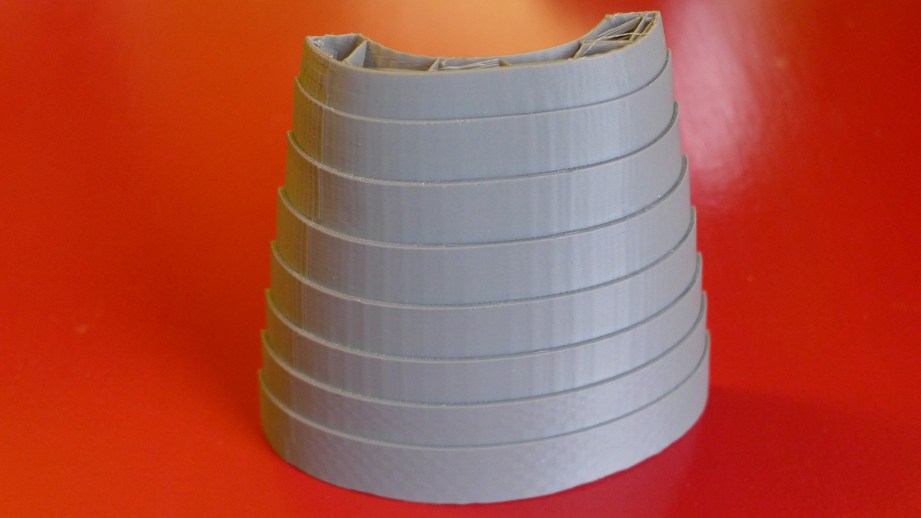
So the modded, window TARDIS turned out pretty well at about 5-inches high, but as you can see, I was having some print problems. I was printing with ABS which can be thermally tricky to print with and no matter what I did, the corners would start cracking and separating. . ABS typically needs a heated print bed to keep the bottom and top from cooling at drastically different rates which can cause warping and splitting. The ideal setup for ABS is a heated and enclosed print chamber which keeps a more constant temperature around the print. My Thing-o-matic had a heated print bed but only a partially enclosed chamber. Splitting can also occur by not printing the walls thick enough. I was having some problems getting a good print and I also didn’t have much room to install the wiring and LEDs. I eventually came up with a design idea that I felt would print better, faster and allow for more customization options, so I set to work.
The Best Laid Plans
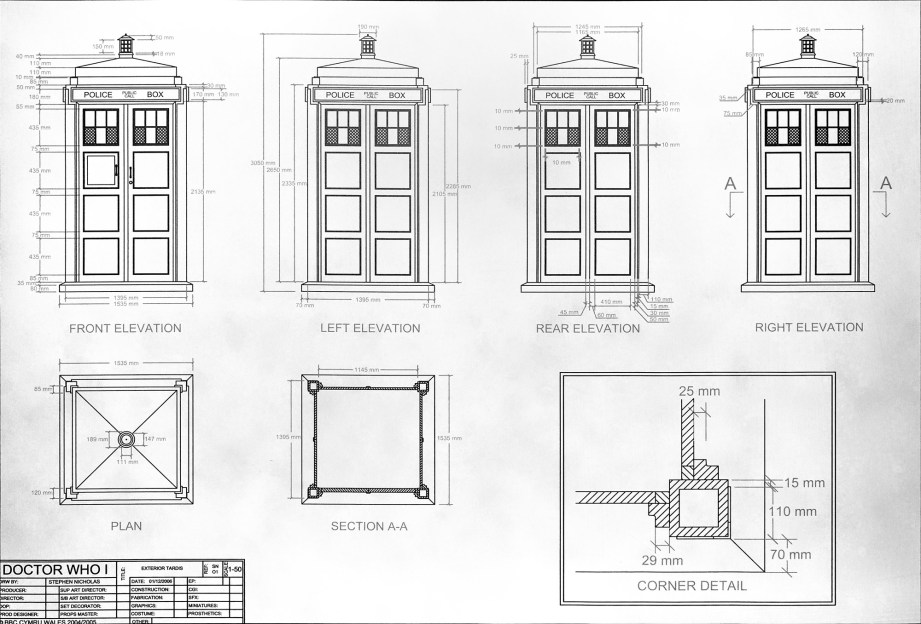
As a giant nerd, I wanted my TARDIS to be as accurate as possible so the first order of business was to get good reference material. Photos and screengrabs are great but it can be hard to get clear pictures of every detail and figuring out the proper scale can be tricky. Blueprints are gold (“Gold, Jerry! Gold!”) when you can get them, especially if they have measurements and even if they don’t you can sometimes use them as a backdrop to build over. I was lucky enough to find BBC blueprints of the early David Tennant TARDIS on the TARDIS Builders website courtesy of Marinedalek who had snapped a picture at the Doctor Who Experience in England. Since the TARDIS is a lot of simple shapes I went with the measurements rather than using the blueprints as a backdrop to build on.
I wanted a higher print success rate for my TARDIS so I decided to print it out in smaller, flatter pieces. Printers are coming with bigger print volumes and are more reliable but the inescapable fact is that there are many things that can go wrong with a print and the longer it takes to print something, the more time there is for something to go wrong. I have had many prints fail for various reasons such as: ran out of filament, filament got tangled, the print broke loose from the print bed, the apartment is too drafty, the apartment is too hot, jammed print nozzle, and even losing power (and I won’t rule out the presence of cat hair).
Some Assembly Required
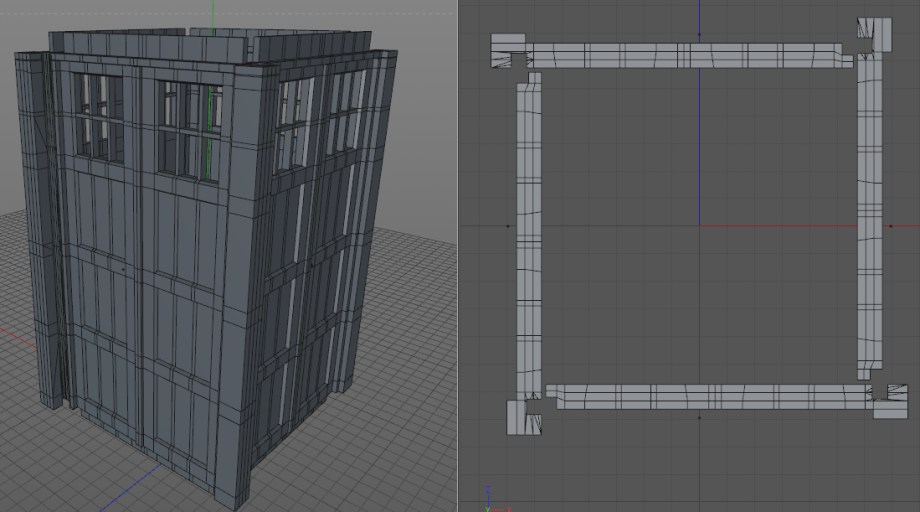
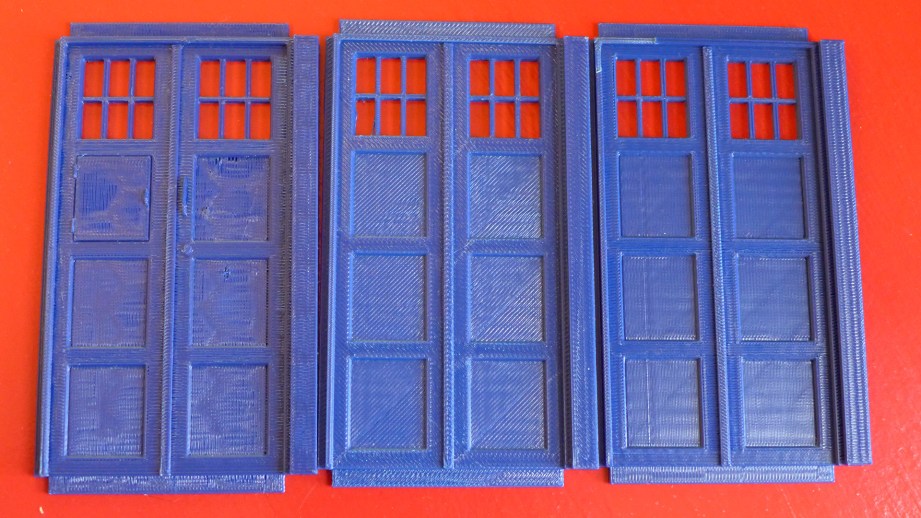
While I have no problem and like using hardware when needed, in this case I wanted this model to slot together without screws, nails, or any other hardware. I decided to make the main body out of identical panels that interlock with each other. This would allow them to print flat, without support and be interchangeable except for the front door panel. This simple idea still went through a few iterations to get it right. When you need parts to fit together, build tolerances have to be considered. Simply put, if you want a 2mm peg to fit in a hole, you have to add maybe .2mm to the size of the hole. It will vary from printer to printer and even print to print so some experimentation may be needed. For the panels I made sure that the slots were slightly larger than the keys to ensure proper fit.
Check out the video to see how the panels were built:
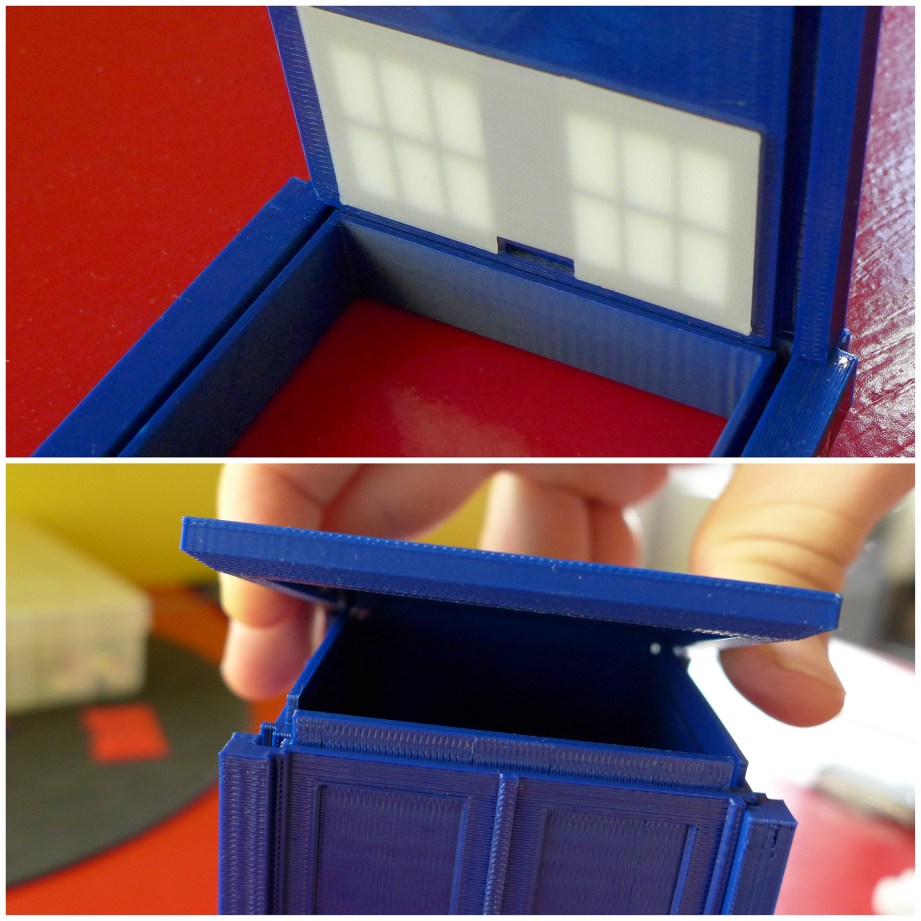
The top portion went through a few revisions to figure out the best assembly. The first version was all one piece which printed fine but I decided I wanted to have a removable top so the TARDIS could be used as a pencil holder (a request from my wife who wanted one for her desk at work). This led to revision two, where the roof slotted onto the bottom portion. Since I wanted to install lights, this caused a problem with light leaking around the edges of the roof. Unacceptable! Revision three, had an inset for the roof to sit down in– a simple solution.
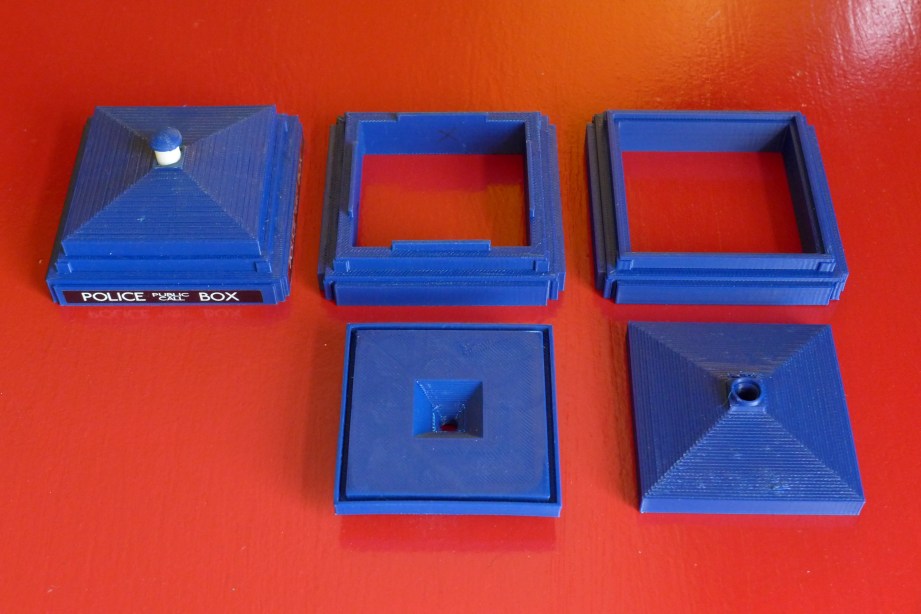
Notice how the center of the top is recessed to allow room for the LED to be inserted. When printing with ABS plastic, you can get away with about a 45 degree unsupported slope. If the unsupported slope is too great, you’ll get a messy print or need to use support material. With PLA you can push it a bit more to about 60 degrees unsupported.
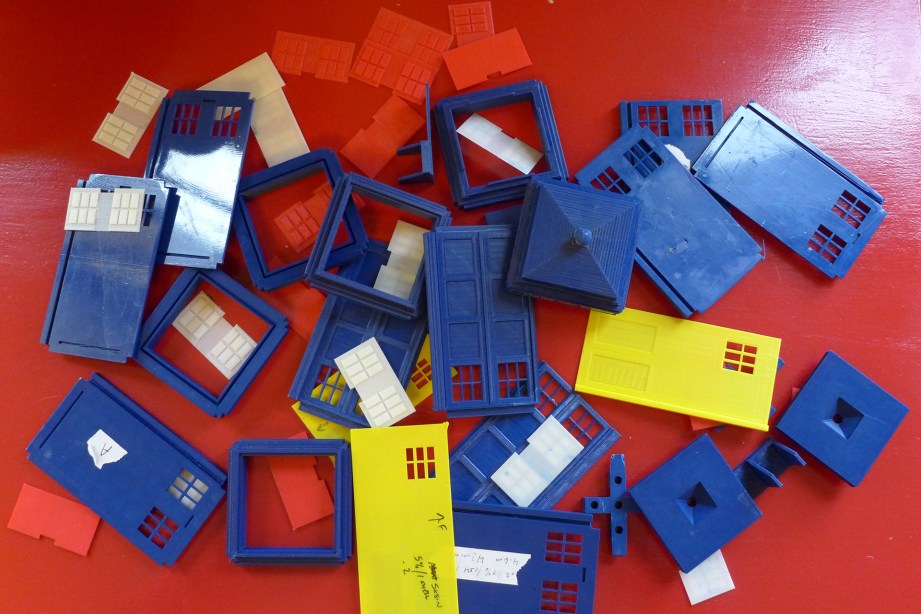
The window panels were designed to be very thin to allow light through and just snap in place due to tight tolerances. The bottom keys on the side panels just friction fit into the base. All of the parts went through various revisions until everything was right. This generated a lot of test prints which maybe cost $15 in plastic– which isn’t bad for development costs!
An Aside on Support
I tend to design my models to not use support material whenever possible. In the past it was due to the fact that it added to the print time, was generally a mess to remove and would blemish the surface of the print. However, support generation has improved greatly and these are not as much of a concern. Still, a bonus to designing this way is a cost reduction when using professional printers, since you may have to pay for the support material and it can be even more difficult to clean off than a home printer. Sometimes you have to use support, but if a little extra design work will eliminate the need for it, that’s your best bet. For a refresher on supports, see my earlier overview of 3D printing technologies.
Prints Bigger on the Inside
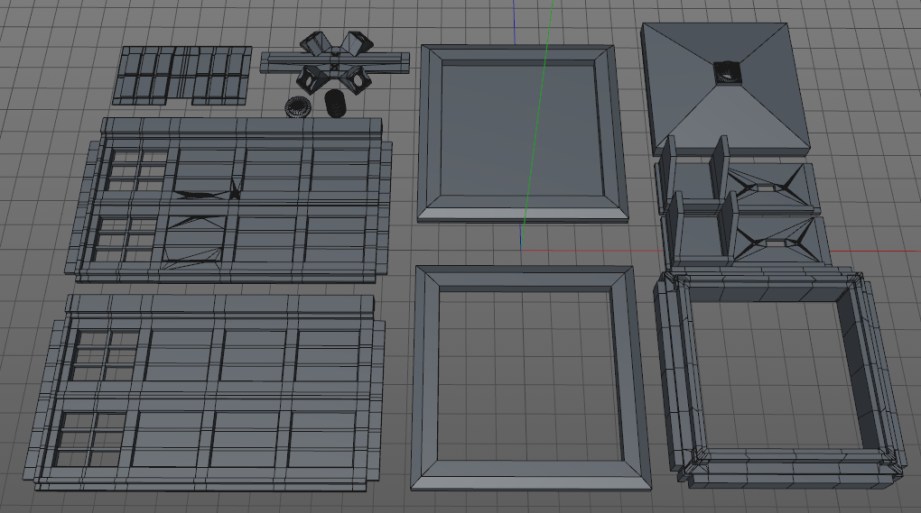
Once the design was nailed down, all the parts were oriented for printing. As you can see, everything is nice and flat on the bottom, no overhangs greater than 45 degrees, so no support is needed, and areas which don’t directly touch the print bed, such as the slots on the side panels, are small enough to be bridged when printing.
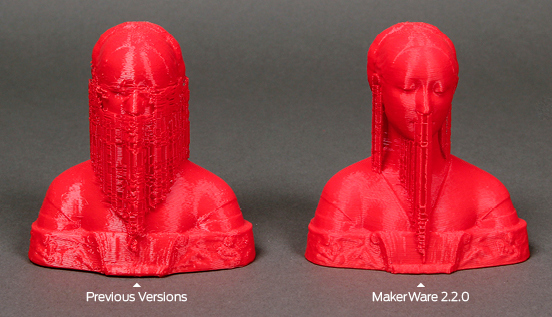
While the printed parts didn’t need to be super-strong, they did need to have enough fill to get a nice surface finish. While I could have done a 5% fill for the panels, there would not be enough internal structure for the top layer to print well on, so I upped it to 10% and ultimately used a different slicing engine (and yes, I’ll explain slicing options in a future article) to get the surface finish I wanted.
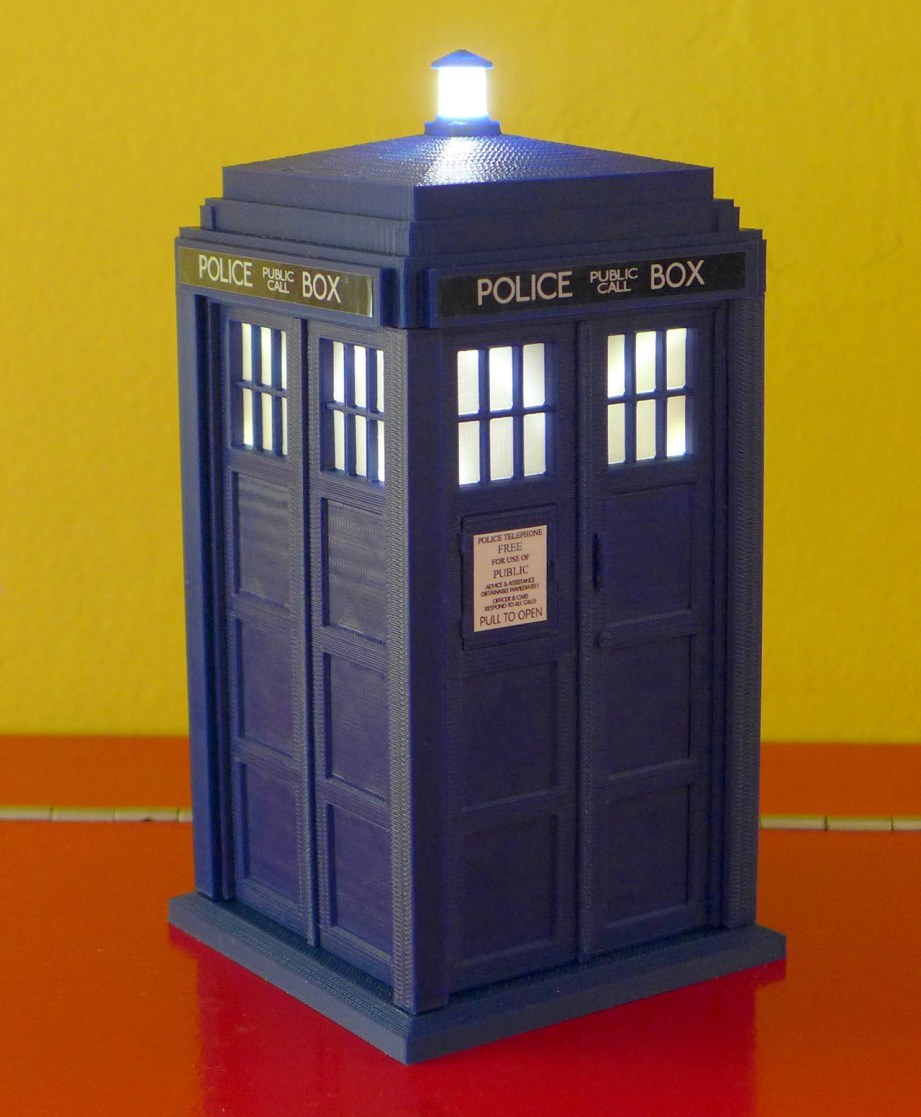
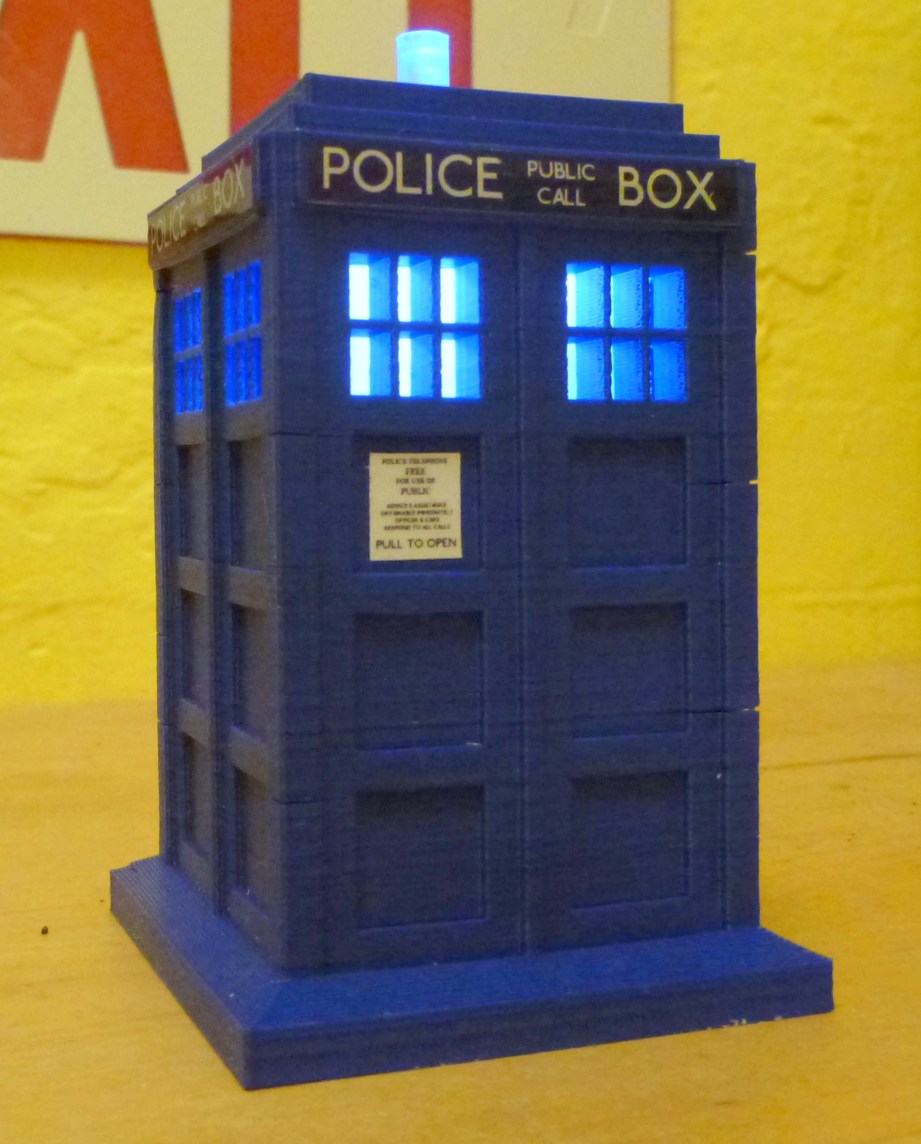
While this still takes a few hours to print, it’s turns out clean and reliably and if I do run into a problem the whole model isn’t ruined. The finished print can simply be slotted together or glued for a sturdier model. Due to the modular design, it can also be used in different ways, such as a container or pencil holder. Another nice advantage of 3D design and printing is the ability to simply scale a model up or down to print an infinite array of sizes. I ended up with a really nice one foot tall TARDIS by printing it as big as I could fit on the print bed.
Let There Be Light!
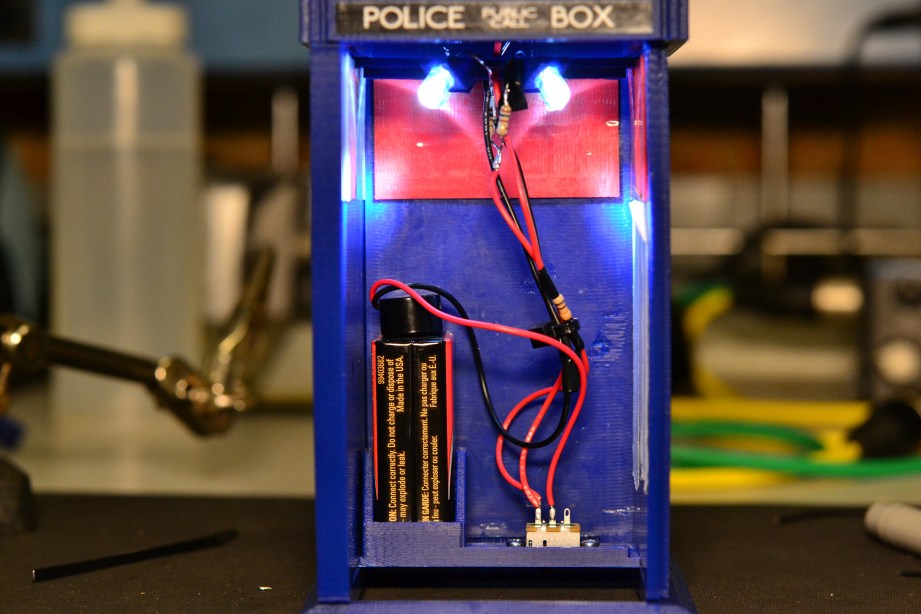
Adding LEDs was the finishing touch. I built simple stands-ins for the LEDs and 9V battery to build the holders around. I was stumped on how to install them without glue and finally settled on using slots in the back of the side panels which would hold everything in place once assembled. My favorite electronics place, Adafruit, once again supplied the needed components and I used an online LED array wizard to figure out the wiring. I modded the TARDIS base so it was open, to allow access to the battery and switch.
Mad Man with a Box
I hope this walkthrough has given you some ideas, I’m sure there’s a million things I left out, so ask away in the comments. If you have access to a printer, I have posted the TARDIS files on my Thingiverse page, make sure to post a picture of your print. Fully-illustrated instructions and wiring info are available at Charlesworth Dynamics. Or buy a TARDIS kit and build your own from my Etsy store.
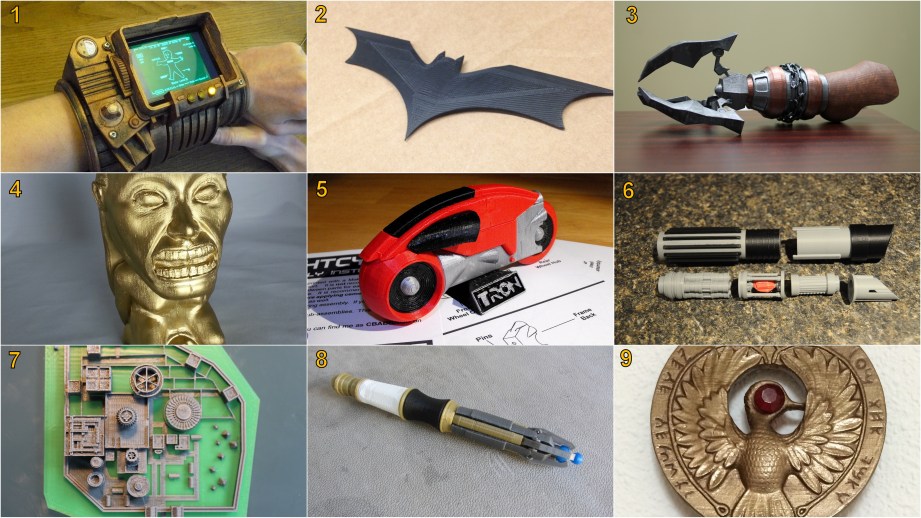
Prop collage credits:
- 1 – Fallout Pip-Boy 3000 by dragonator
- 2 – Batarang by ThatTTUGuy
- 3 – Zelda Clawshot by The Kretchfoop
- 4 – Fertility Idol by wgss
- 5 – TRON Lightcycle by cbabbage
- 6 – Lightsaber by sirmakesalot
- 7 – Winterfell by damm301
- 8 – Sonic Screwdriver by Ellindsey
- 9 – Staff of Ra Headpiece by youngs66
Every other week, 3D printing expert (and Inventern competition champion!) Sean Charlesworth will share some of his insight and experience of 3D design and printing. All photos and images courtesy Sean Charlesworth unless otherwise noted.
Premium: Testing Camera Gear in Norm’s Garage
I’m working from home today, so thought it’d be cool to share with you some new camera gear I just received for testing. Having just spent a day with it, here are my very early impressions and some thoughts on how I plan on testing it while at the South by Southwest conference next week. I also want to get you input about testing this camera, and would like to know what you want to see!
