


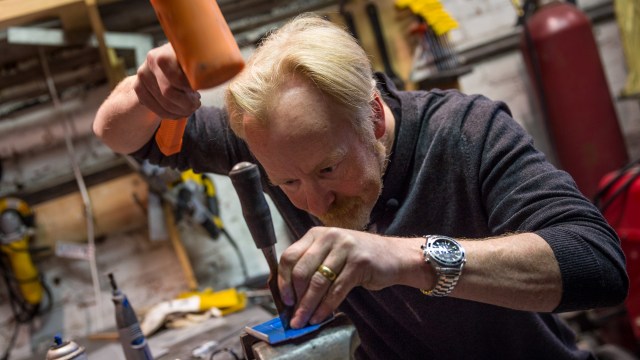
One of Adam Savage’s everyday carries is his favorite multi-tool, the Leatherman Wave. But the leather sheath that comes with the tool is too slow and cumbersome for Adam’s needs, so today he makes a custom metal holster based on his own design. In the process, Adam shares several tips for metalworking and introduces a few favorite tools in the Cave’s new metal shop.
Potpourri – 5/12/2014

Episode 256 – The Ethics of Flight – 05/08/2014

The Zoidberg Project Completed and Revealed!
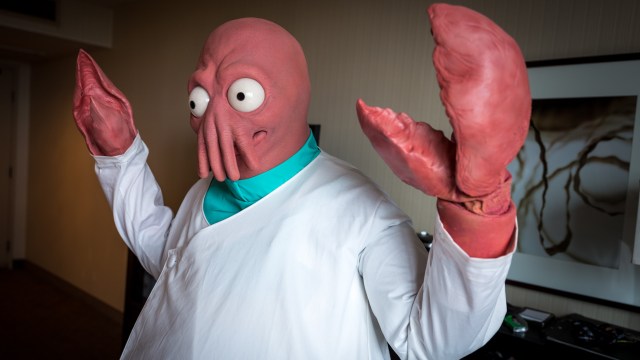
The Zoidberg Project is finished! Effects artist Frank Ippolito guides us through the entire fabrication process, including design, sculpting, molding, and even some animatronics to bring Zoidberg to life. Suited up in the costume, we walk the convention floor of WonderCon 2014 to greet some attendees and take photos with other cosplayers. Woop woop!
Behind the Scenes at Weta Workshop

Minor spoilers within. Weta Workshop released this behind-the-scenes video showing its fabricators and artists working on props, costumes, and makeups for Sony’s Amazing Spider-Man 2 film. The brief montage shows bits of the modeling, CNC milling, finishing, and painting processes for some of the villain props. I can’t get enough of their large CNC router, which is also spotlighted in this making-of video for the fabrication of two Great Eagles for the Wellington airport.
Star Wars Casting – Captain America SPOILERCAST – 5/6/2014
The Zoidberg Project, Part 11: Animatronics
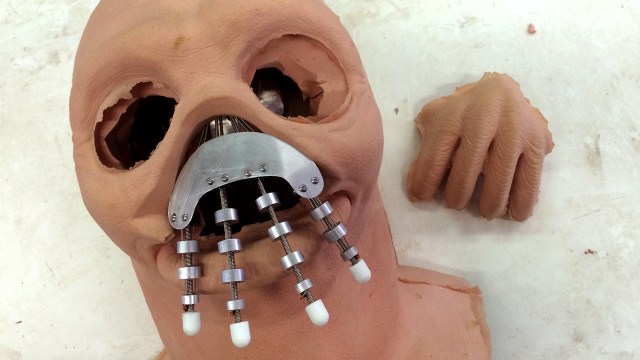
A lot has changed in the past few weeks leading up to the completion of The Zoidberg Project, and part of coordinating a project of this scope is being able to roll with unexpected changes. My pal Terry Sandin started out designing the animatronics for Zoidberg’s tentacles, but then got called away to another long term project and had to shift his commitments. This happens all the time in the film industry, especially when it comes to favors. People that are freelance employees need to go where the longer term and better paying jobs are. But Terry did do a bunch of the legwork to get the animatronics under way.
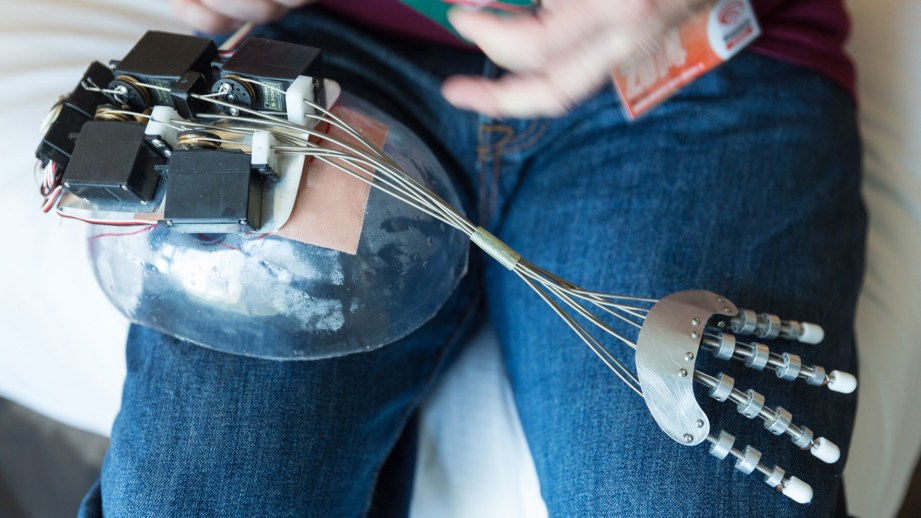
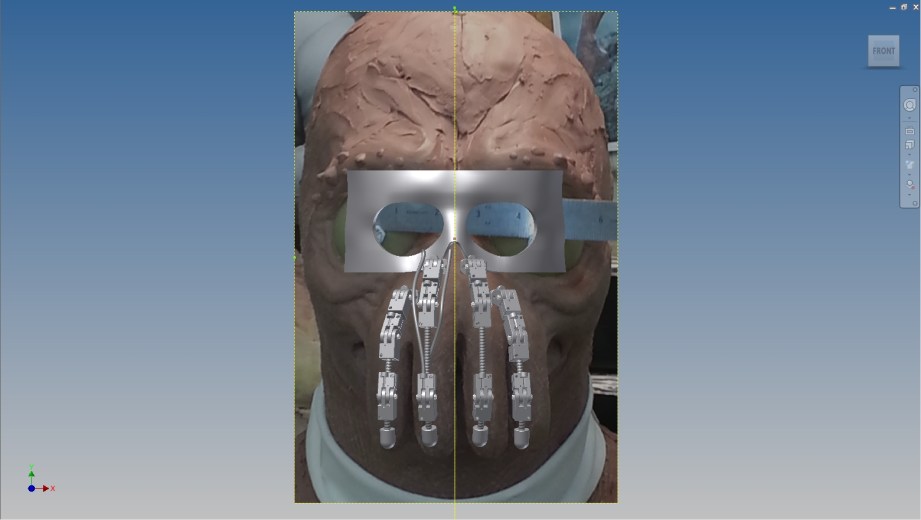
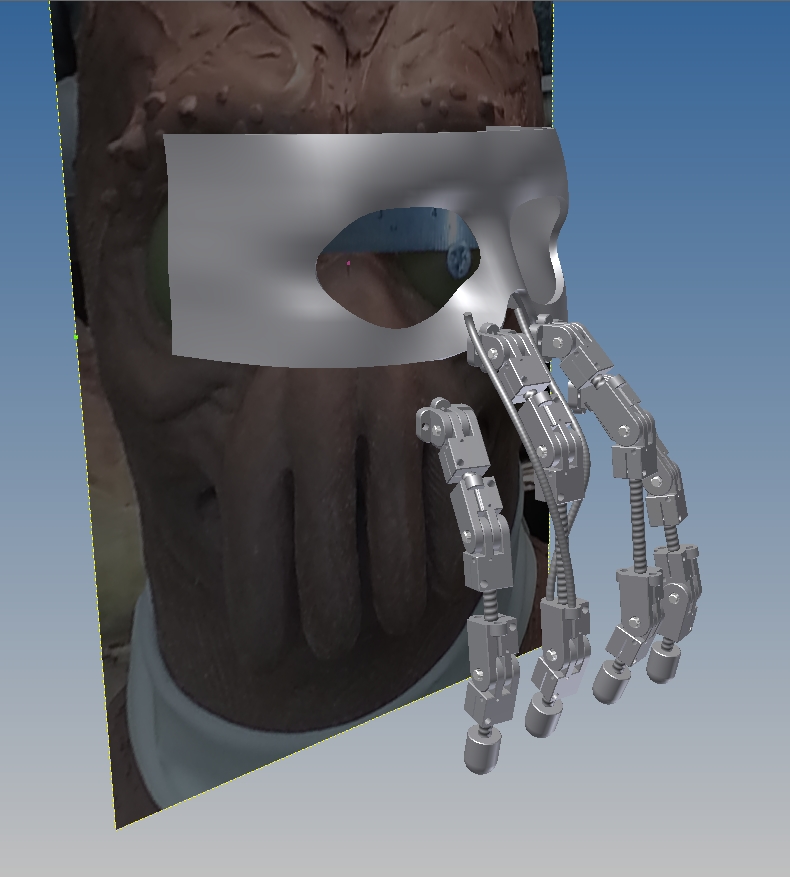
The first thing Terry did was come by my shop to take some photos of the sculpture (because it was destroyed in the molding process) from front and profile to get a better idea how much room he would have for the animatronics mechanism. With that information, he then started 3D modeling the mechanical parts and superimposed his design to fit inside the sculpture. When you have been doing this kind of stuff for as long as Terry, you instinctually know how much room to leave for foam latex thickness and where/how the skin will crease. Basically, too thick of a skin and the mask wont want to move (you would need bigger servos and beefier mechanisms) or too thin of a skin and the mask will crease and wrinkle in an unnatural way.
These parts that Terry designed got sent off to Shapeways to be 3D printed. It was about that time that Terry had to jump off onto another project, and we enlisted another friend of ours Pete Chevako to wrap up the animatronics work. Pete got the parts, and they looked very promising for the mech, but with a new crunched schedule due to the hand-off for WonderCon, we decided to simplify the whole mechanical design.
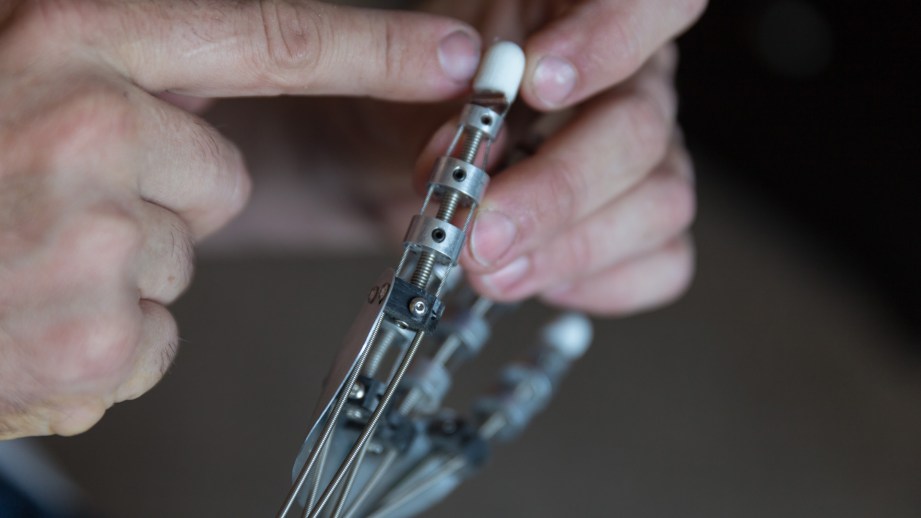
The original design by Terry called for 12 servos (three on each tendril) for some really great and precise controllable movement. Unfortunately, I don’t have 12 servos sitting around like Terry did in his shop, and was able to scrounge up four to use. Pete took some leftover machined aluminum disks with pre-drilled cable holes and set-screwed them onto some flexible cable housing. Its basically a super simple way to make organic bendy movements for tentacles, snakes, or whatever.
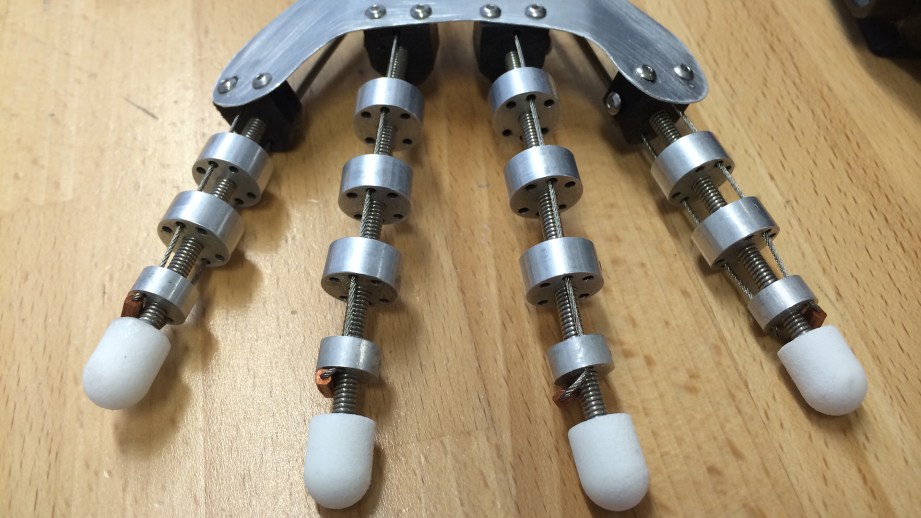
If you take a flexible rod, attach a cable to the end, then pull on it, the rod will just flop over. But once you start adding ribs that the cable is threaded through, the whole unit moves in a singular direction. The more ribs you add, the more fluid and controllable the bending motion will be. If you wanted this to more in more than just one direction (like a finger) and wanted the tentacle to coil and go in different directions (like a snake), you can just add more cables pulling evenly around the rib to add directional movement. Look closely at the machined ribs that Pete used and you can see other holes (six total, for multiple options) in there for that exact reason–these ribs can be “stock” parts and used for many different projects.
A good explanation of the cable-control system is below, courtesy Stan Winston School:
Pete mounted the new tendril mechs onto a thin aluminum plate with a bend in it and fed the cables up to where the core-insert would be. If you remember from my mold finishing article, I made an insert to accommodate space for the servos and receiver at the top of the mask, kind of like a skullcap. While the cables and ribs will be hidden in Zoidberg’s tentacles, the servos and other electronics will actually run up to the top of his head. Not quite how muscles work, but it’ll do for special effects!
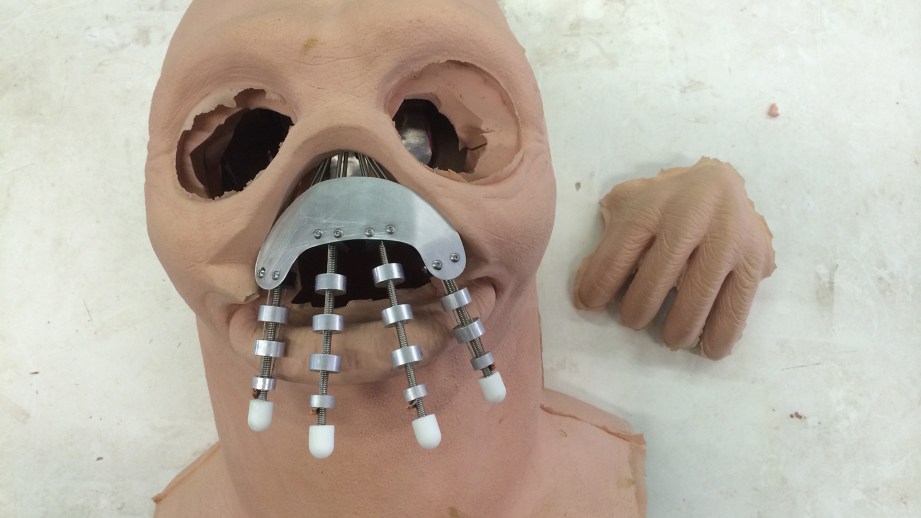
I also had my foam runner Roland cast a test skin for us to beat up and test the animatronics. Pete used this test skin for estimating placement of the mech and cables and servos. One of the reasons I made the core insert removable is to generate a shell for the top of the head and for the mechanics to be mounted to. I simply stuck the insert into my neighbor’s vacuform machine and pulled a .09 polycarbonate shell of the outside and inside. With this shell made, I could easily trim and match the parts up and Pete would know exactly how much space he has to work with.
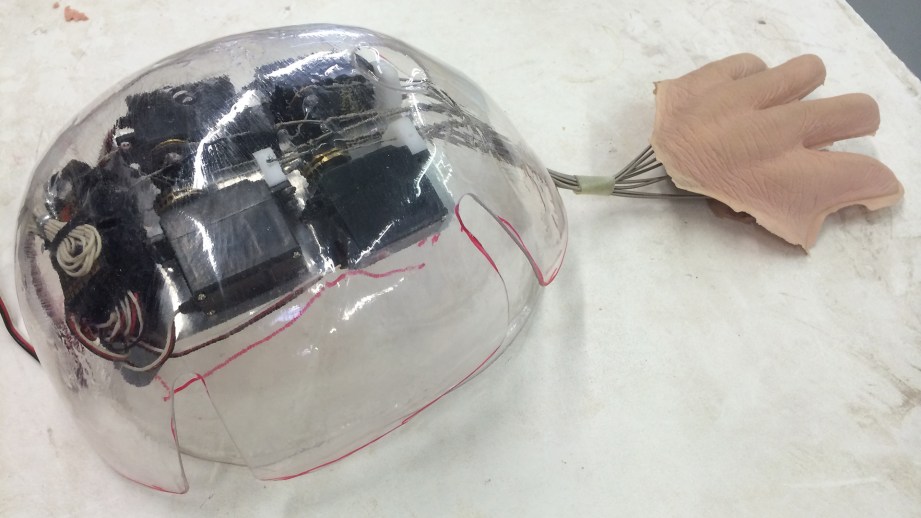
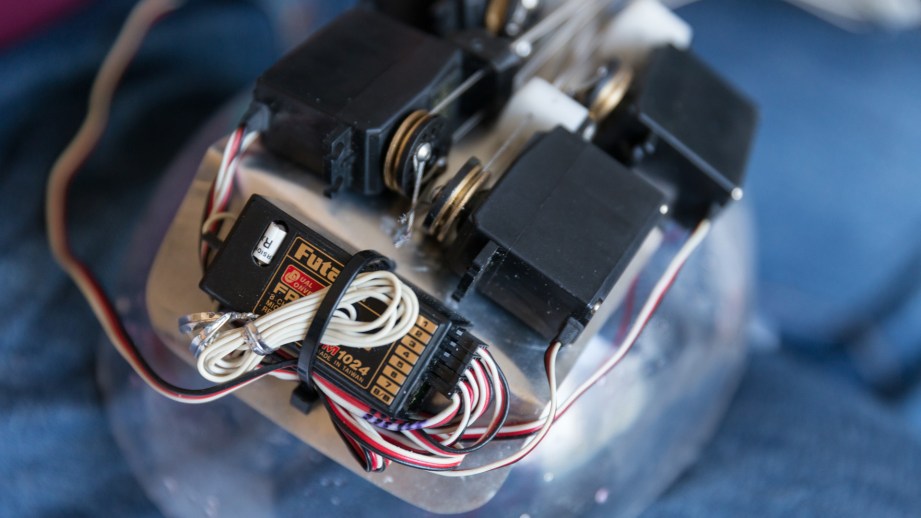
The servos we used are the ones that come with a basic radio-receiver kit–it’s one of the more expensive kits, and cheaper ones are available. These servos and small receiver unit were mounted to a thin aluminum plate with some machined delrin blocks that the cables ran through. To make the push/pull movement, Pete also had some small machined brass pulleys that the cables were wound around. Once the tension is set and the slack removed, this would give some good control of the tendrils.
Originally, I wanted to make the animatronics voice controlled, so Zoidberg’s tentacles would move when the actor wearing the mask spoke, based on the volume and pitch of the performer’s voice. My plan is still to eventually make that work. But after putting the whole thing on for a test run, we realized that you can barely hear the performer through the mask, so we opted for a traditional remote control. All we need is four channels of control on this mechanism. The remote that we’re using has more than four channels, but we’re just going to use the two control sticks, each with two channels assigned (up/down and left/right). That way, moving the sticks diagonally in and down will bend all of the tendrils together, and moving the sticks diagonally up and out will make the tendrils splay open in true Zoidberg fashion.
Now that we have the servo plate mounted to the inner vacuform with some double sided foam tape (it doesn’t need to be more than that for this project, this tape actually holds pretty well!), and the outer vacuform shoved inside the head, I can carefully thread the tendrils into the skin as not to rip anything, and stick the inner core up into the head to test the mech out.
Mounting the animatronics this way makes for easy removal and tweaking. The tendrils seem to move great, but if I were to ever run another set, I’d shave down the core to give a little more thickness to the skin on the tendrils. That way, it’ll will move with a little less creasing, and look more lifelike as a result. All that is left is the battery, which I’ll leave the wire hanging low down the back of the neck for easy changing. that way only the collar of the wardrobe needs to be pulled up to swap out the battery.
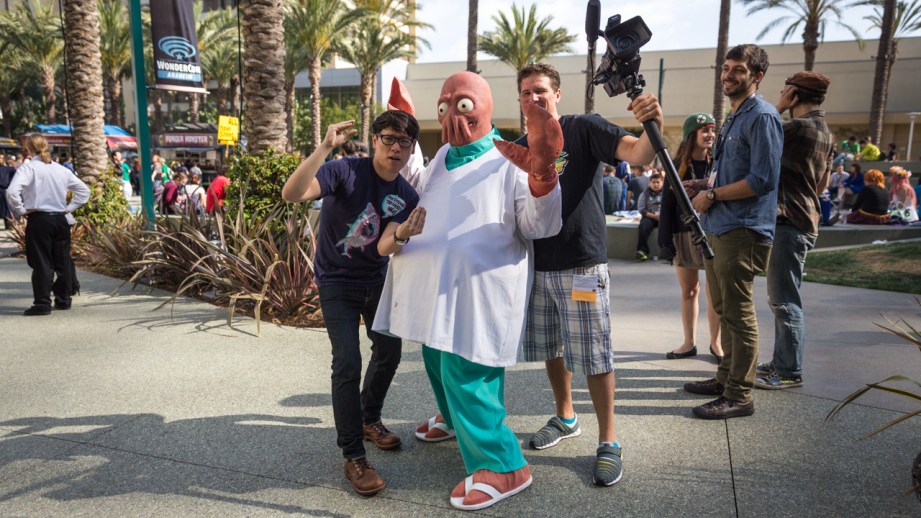
Of course, as you’re reading this, WonderCon has actually come and passed, and I’m glad to report that Zoidberg performed admirably in his convention debut. The animatronics worked wonderfully with my friend Carson controlling them remotely, even though the batteries lasted just one session on the WonderCon floor. The final chapter of Zoidberg is coming up real soon, along with our unveiling video. Thanks for following along with the project so far!
Thanks to Iwata-Medea and Smooth-On for providing materials and sponsoring this project.
Episode 255 – Where’s Lando? – 5/1/2014
This week, Norm is once again joined by Jeremy to talk about the Atari ET game cartridge excavation, researching laser cutters, the future of human-computer interaction, and the casting for the new Star Wars film. We also take some listener questions and geek out about flying quadcopters.